Haier L1911W-A User manual


Connection Instructions
Ensure that you connect the grounding / earth wire to prevent possible
electric shock. If grounding methods are not possible, have a qualified
electrician install a separate circuit breaker. Do not try to ground the
unit by connectingit to telephone wires, lighteningrods, or gaspipes.
Grounding
External Equipment Connections
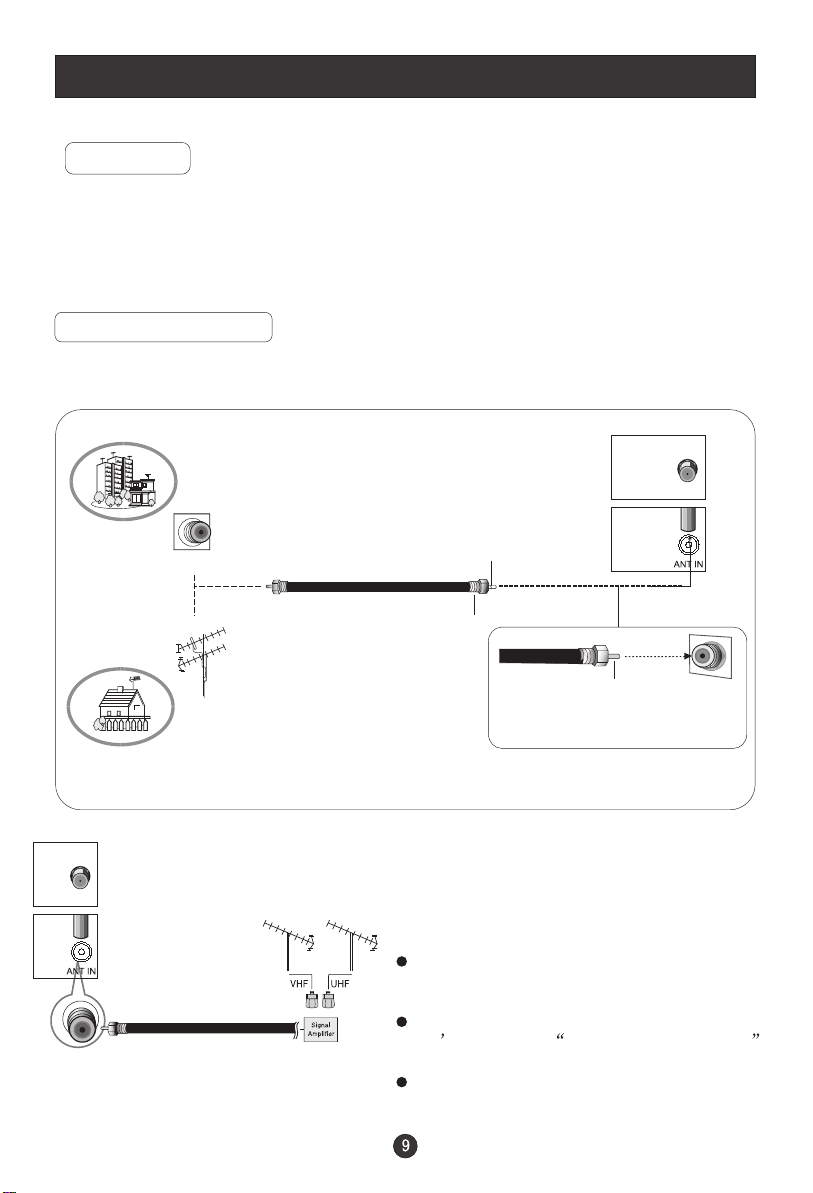
Antenna Connection
- Antenna or Cable Service with a Cable Box Connections
- For optimum picture quality, adjust antenna direction if needed.
Multi-family Dwellings/Apartments
(Connect to wallantenna socket)
wall antenna
socket
VHF antenna
UHF antenna
outdoor
antenna
Single-family Dwellings /Houses
(Connect to walljack for outdoorantenna)
Bronze Wire
Be careful notto bend the bronze
wire when connectingthe antenna.
Bronze Wire
Turn clockwise to tighten.
RF coaxial wire(75 ohm)
To improve picture quality in a poor
signal area, purchase and install a
signal amplifier.
If the antenna needs to be split for two
TV s, install a 2-Way Signal Splitter
in the connections.
If the antenna is not installed properly,
contact your dealer for assistance.
NOTE: Cables shownare not includedwith the TV
Note:The connection instructions just take modelL1510A-A for example, there maybe some
difference from othermodels .

Connection Instructions
You can use your LCD-TV as a monitor for your personal computer using a VGA
cable (not supplied).
PC Setup
Connection and use steps:
1.Read the userguide supplied with
your computer and ensure that it has
a VGAconnector;
2.Make sure that the power of the LCD
-TV and thePC are off;
3.Connect a Dtype 15-pin VGAinterface
cable ( not supplied ) to the VGAvideo
interface connector on the PC. Then
connect the other end to the VGA video
interface connector on the back of the
LCD-TV.Tighten the screwson the VGA
connectors once they are firmly
connected;
4.Turn on the power of the LCD-TV first ,
and then turn on the power of the PC;
5.Press the TV/AV button to set the video
input mode ofthe LCD-TV toPC-RGB;
6.Check the image on your TV. There may be noise associated with the resolution,
vertical pattern, contrast or brightness in PC mode. If noise is present, change
the PC mode to another resolution, change the refresh rate to another rate or
adjust the brightness and contrast on the menu until the picture is clear. If the
refresh rate of the PC graphic card can not be changed,change the PC graphic
card or consult the manufacturer of the PC graphic card.

V
IN
Connection Instructions
VCR Setup
Connection and use steps:
1.Read the user guide supplied with your AV devices and ensure that it has
Composite or S-Video connectors;
2.Make sure that the power of the LCD-TV and the AV device are off;
.Turn on the power of the LCD-TV first ;
and then turn on the power of the AV
device;
4.Press the TV/AV button to set the video
input mode of the LCD-TV to S-VIDEO
mode or AV mode.
Connection Option 1
Set VCR output switch to 3 or 4 and then
tune TV to the same channel number.
Connection Option 2
1. Connect the audio and video cables from
the VCR's output jacks to the TV input jacks,
as shown in the figure.
When connecting the TV to VCR, match
the jack colors (Video = yellow, Audio
Left = white,and Audio Right = red).
If you connect an S-VIDEO output from
VCR to the S-VIDEO input, the picture
quality is improved; compared to conne-
cting a regular VCR to the Video input.
2. Insert a video tape into the VCR and press
PLAY on the VCR. (Refer to the VCR owner s
manual.)
3
- To avoid picture noise (interference), leave an adequate distance between the
VCR and TV
.
VCR
1
2

V
IN
V
IN
Connection Instructions
Cable TV Setup
- After subscribing to a cable TV service from a local provider you can watch cable
TV programming. The TVcannot display TV programming unless a TV tuner
device or cableTV converter box is connectedto the TV.
- For furtherinformation regarding cableTV service, contact your localcable TV
service provider(s).
Connection Option 1
1. Select 3or 4 withchannel switch on cable
box.
2. Tunethe TV channel to the same selected
output channel on cable box.
3. Select channelsat the cablebox or with
the cable box remote control.
Connection Option 2
1. Connect theaudio and videocables from
the Cable Box'soutput jacks tothe TV
input jacks, asshown in thefigure.When
connecting the TV to a Cable Box, match
the jack colors
(Video = yellow, Audio Left = white, and
Audio Right= red).
2. Select theinput source byusing the TV/AV
button on theremote control.
3. Select yourdesired channel withthe
remote control forcable box.
External AV Source Setup
How to connect
Connect the audioand video cablesfrom
the external equipment'soutput jacks to the
TV input jacks,as shown inthe figure.
When connecting theTV to external equip-
ment, match thejack colors (Video = yellow,
Audio Left =white, andAudio Right = red).
How to use
1. Select theinput source byusing the TV/AV
button on theremote control.
2. Operate thecorresponding external equi-
pment. Refer toexternal equipment ope-
rating guide.

Basic Operating Instructions
Turn on the LCD-TV
When the POWER button is pressed and the LCD-TV
is turned on, the indicator light on the front of the LCD-TV
changes from red to green. When the LCD-TV is turned off
using the power button, the LCD-TV will go into standby
mode and the indicator light turns red.
Note:
The display of the input mode
will disappear in3 seconds. PC
COMPONENT
AV
SV
Switch AmongDifferent Inputs: TV / PC / COMPONENT / AV / SV
Each time youpress the TV/AV button, TV, PC, COMPONENT, AV, SV,
will appear on the screen in order.
Audio Control
1.Press the VOL+ button to increase the volume. Anumber will appear
on screen indicating the volume level.
2.Press the VOL- button to decrease the volume. A number will appear
on screen indicating the volume level.
Mute
1.Press the MUTE button to mute the sound temporarily. A mute icon
appears on the screen.
2.Press the MUTE button or VOL+/VOL- again to restore the sound.
The mute icon disappears.
TV
MUTE
RECALL DISPLAY EXIT
123
456
789
MTS/SAP P.STD
MENU TV/AV
CH+
CH-
VOL
-
VOL
+
CCD SLEEP SCAN
0
30

Basic Operating Instructions
Select the TV Channel You Want
You can use the number keys on the remote control to directly select TV
channels.
The LCD-TV can store up to channels , and you can press the keys on the
remote control or on the panel to make a selection.
181
Program Scan
Press SCAN button to scan through all the memorized TV channels. The scan
will pause for about 2 seconds on each channel .
If you want to stop the function during auto scanning, simply press the SCAN
button again .
Picture Mode
Press P.STD button on the remote control for menu display . For desired mode as
follows:
PERSONAL STANDARD MILD FRESH
Sleep
Press SLEEP button to set the time : SLEEP 240-SLEEP 180-SLEEP 120
-SLEEP 90-SLEEP 60-SLEEP 45-SLEEP 30-SLEEP 15-SlEEP OFF
This feature allows you to turn off the television after a pre-selected
minutesnumber of

Menu Operations
Picture Menu Options
1. Press MENU button to display the main menu, and VOL+/VOL-to select the
main menu .
2. Press CH+/CH- to scroll through the parameters
3. Press VOL+/VOL- buttons to make changes to the parameters
4. Press the EXIT button to exit the menu
* In thismanual, the OSD(On Screen Display)may be differentfrom your TV s
because it isjust an exampleto
Press TV/AV to selectthe input source,and the menu is
different .
illustrate the TVoperation.
for each source
Picture quality can be adjusted for any input separately .
The picture qualityon the screencan be adjustedas follows:
1. Press MENU button and VOL+/VOL- until the following menu appears
on the screen.
PC/COMPONENT MENU
TV/AV/SV MENU
PICTURE
BRIGHTNESS
CONTRAST
SHARPNESS
COLOR
HUE
PICTURE
BRIGHTNESS
CONTRAST
SHARPNESS
COLOR TEMP
COLOR
30
Note: Symbols on top of the menu in thismanual may bedifferent from the actual set
30
30
2
COOL
50
50
2
50
50 Only available inNTSC system
No available incomponent
0No available inPC

Menu Operations
2. Press CH+/CH- button to enter the picture menu and to go up and down to
select the desired option .
3.Press VOL+/VOL- button to increase and decrease the level to adjust the
selected option toyour preference .
4. Repeat step 2 and step 3 until desired picture quality has been achieved .
Function:
BRIGHTNESS :Adjust the brightness ofthe picture . By increasing the level, it
will add more light to dark parts of the picture and by decreasing the level ,it will
add more dark to light parts of the picture.
CONTRAST : Adjust the contrast of the picture . The higher as
the number increase.
SHARPNESS : Adjust the amount of the detail enhancement , the image
sharpness rises as the number increases (By increasing the level, it will show
cleaner and clearerimages and bydecreasing the level, it will make picture
smoother).
COLOR : Press VOL+/VOL- to adjust the color
HUE :Adjust the toneof the picture. Appear and be adjusted only under NTSC
mode
COLOR TEMP : Press to select the color temperature from
contrast becomes
WARM/NEUTRAL/
COOL .
Picture Menu Options continued
Sound Menu Options
Sound can beadjusted for anyinput as follows:
1. Press MENU and VOL+/VOL- button until the following menu appears on
the screen
VOLUME
BALANCE
BASS
TREBLE
AUDIO MODE
AVL
SOUND
50
50
30
70
VOICE
OFF

Menu Operations
Sound Menu Options continued
You can adjust sound options to the levels you prefer.
2. Press CH+/CH- button to enter the audio menu and to go up and down to
select the desired option .
3.Press VOL+/VOL- button to increase and decrease the level to adjust the
selected option toyour preference .
4. Repeat step2 and step3 until desiredsound quality hasbeen achieved ..
Function :
VOLUME :Adjust the volumeof your TV
BALANCE : Adjust the balance of the audio output from left to right . When
indication value of balance increases toward +50 , sound of the left speaker
becomes weaker . When indication value of balance decreases toward -50 ,
sound of the right speaker become weaker .
BASS : Adjust the bass of the sound . Can only be adjust under PERSONAL mode .
TREBLE : Adjust thetreble of thesound . Canonly be adjustunder PERSONAL
mode .
AUDIO MODE : Press VOL+/VOL- to select amongPERSONAL, VOICE, MUSIC
and THEATRE .
AVL:
Automatic Volume Limit Control reduces the effect of high volumes by
the limiting the same volume to all channels .

Menu Operations
Function Menu Options
Menu Language Selection:
The menus canbe shown onthe screen inthe selected language. First select
your language.
1. Press MENU button and VOL+/VOL- until the following menu appears
on the screen.
2. Press CH+/CH- button to enter the function menu and to go up and down to
select the desired option .
3.Press VOL+/VOL- button to increase and decrease the level to adjust the
selected option toyour preference .
4.
Functions:
1. INPUT SOURCE : Display current mode . There are PC, COMPONENT ,
AV , SV ,TV to display .
2. LANGUAGE :Press VOL+/VOL- to select the OSD language.
3. CC MODE:Press VOL+/VOL-buttons to selectthe Closed Caption options.
Closed Captioning helpsthe hearing impaired with the broadcast program,
as well as helping children learn how to read. A built in decoder displays the
audio portion of a program as text on the screen when this option is selected.
OFF: When OFFis displayed on CC MODE isturned off.
CC1: When CC1 on TV means CC MODE is turned on.
CC2 to CC4: For other modes of video related broadcast information.
TT1: For program guide andother information displayed by broadcasters.
(This blocks alarge portion ofthe picture onyour screen).
TT2 to TT4 :For other modes ofinformation displayed by broadcasters.
(This blocks a large portionof the picture on your screen).
Repeat step 2 and step 3 until desired settings have been achieved .
TV, it means
is displayed
IMPORTANT: Closed captioningavailability entirely depends on broadcasters
supplying the signal. Therefore, closed captioning might not always be
available and languageavailability will differ by broadcast.
INPUT SOURCE TV
LANGUAGE ENGLISH
CC MODE OFF
BLUE SCREEN ON
RESET
FUNCTION

Menu Operations
Function Menu Options Continued
Note: Select CC1for full translationof the primary language such as English in
your area. SelectCC2 for secondarylanguage translation such as French or
any other languagethat may bebroadcast in your area.
4.BLUE SCREEN: Press VOL+/VOL- to select ON or OFF.
5. RESET : Press VOL+ to reset some settings to the factory default .
To set On, the screen
will be in blue screen after 3 seconds if there is no signal.
Adjust Menu Options
1. Press MENU and VOL+/VOL- button until the following menu appears on the
screen
ADJUST
AUTO CONFIG
PHASE
CLOCK
H POSITION
V POSITION
Note: This menu is only appears in PC mode .
2. Press CH+/CH- button to enter the adjust menu and to go up and down to
select the desired option .
3.Press VOL+/VOL- button to increase and decrease the level to adjust the
selected option toyour preference .
4. Repeat step2 and step 3 until desired quality has been achieved ..
Functions:
AUTO CONFIG : Is opted for adjustmentof picture locationfrequency and phase
parameters .
PHASE : Removes any horizontal distortion and clears or sharpness the displayed
characters .
CLOCK :Adjust the TFT-LCD tomatch the PCinput source
H-POSITION : Picture horizontal position adjust
V-POSITION : Picture verticalposition adjust .
0
50
50
50
Table of contents
Other Haier TV manuals

Haier
Haier MX-TM7414Mpeg4 User manual

Haier
Haier HTN13R12 User manual

Haier
Haier NS-LCD19W-09 User manual

Haier
Haier HTF20-A User manual

Haier
Haier HL15T User manual

Haier
Haier HTAF2918 User manual

Haier
Haier HL40K2AFA User manual

Haier
Haier 55e3500 User manual

Haier
Haier HTN13R12 User manual

Haier
Haier HLC19R - 19" LCD TV User manual

Haier
Haier TV-8888-34 User manual

Haier
Haier 21FA11-AM User manual

Haier
Haier L26V6-A8 User manual

Haier
Haier L26F6 User manual

Haier
Haier HP-2999 User manual

Haier
Haier BH1304D User manual

Haier
Haier 21FA12-AM User manual

Haier
Haier HT-3718 User manual

Haier
Haier MSD318 User manual

Haier
Haier DTA21F81 User manual