Hamilton/Buhl CAMERA-DC2 User manual

CAMERA-DC2
Digital Camera Instruction Manual
Read manual carefully before using the product and keep for future reference.
80 Little Falls Road, Fairfield, NJ 07004 — 800.631.0868 — www.HamiltonBuhl.com
80 Little Falls Road, Fairfield, NJ 07004
800.631.0868
www.HamiltonBuhl.com

18
Product Registration Instructions
Visit: www.HamiltonBuhl.com
Since our founding in 1993, HamiltonBuhl continues to evolve as a leader in technology products for education and industry.
Our products are embraced by educators, corporate trainers, presenters, government agencies and hospitals for their daily
presentation, from classrooms to the boardroom.
Our Mission:
Click on Customer Support
Click on Product Registration Form
Please ll out all eld marked with * to register your product
1.
3.
2.
80 Little Falls Road, Faireld, NJ 07004

Image Sensor 5 Megapixel CMOS
Still picture resolution 4000X3000 (12M), 3264x2448 (8M), 2592x1944 (5M), 2240x2240 (5M 1:1), 2048x1536 (3M), 1760x1760 (3M 1:1),
1920x1080 (2M HD), 1600x1200 (2M),1536x1536 (2M 1:1), 1280x1024 (1.3M), 1280x720 (HD), 992x992 (1M 1:1) 640x480
(VGA), 576x576 (VGA 1:1)
Video resolution 720P (30fps), 640X480 (30fps)
File Format JPEG (picture)/MJPEG(video)
External storage SD/SDHC Card (Maximum support 32GB) the speed requirements of Class 4 or above
LCD 2.7 inch TFT
Focal distance Fixed Focus, 8X digital zoom
Exposure -3.0EV ~ +3.0EV
White balance Auto, Daylight, Cloudy, Incandescent, Fluorescent
ISO Auto/100/200/400
Scene Auto, Night Portrait, Night Scenery, Portrait, Scenery, Beach, High Sensitivity
Flash On/ Auto/ Off
Self-timer 2, 5 or 10 seconds option
Anti-shake Support
Print Support
Face detect Support
Interface USB 2.0
System Windows2000/XP/VISTA/WIN7
Battery 600 mAh lithium battery
Working temperature 0~40oC
Introduction
Thank you for purchasing the HamiltonBuhl 12 Megapixel Camera. Please read the manual carefully before
using the product in order to use and understand the maximum benefits and features of this camera.
Primary Features
• 5 Megapixel CMOS Sensor, interpolated 12 megapixel photo resolution, multiple 1:1 photo
resolution options
• Video resolution: 1280x720 / 30 fps, 640x480 / 30 fps
• 2.7 inch TFT LCD screen
• 8 digital zoom
• Multi-snapshot (6 continuous shooting)
• Self-timer
• Built-in flash
Included:
Digital camera, USB cable, instruction manual, quick reference guide, camera strap, lithium battery
217

3 16
Product Features 1. Flash
2. Self-Timer / Charge Indicator
3. Lens
4. Speaker
5. LCD Display Screen
6. Status Indicator LED
7. W Button
8. T Button
9. Up / Flash Button
10. Right / Delete Button
11. Menu / OK Button
12. Down / Self-Timer Button
13. Playback Button
14. Left / Scene Button
15. Mode Button
16. Tripod
17. USB Port
18. Battery Cover
19. Shutter Button
20. Power Button
21. Microphone
22. Wrist Strap Hole
Download images to your computer
Connect the camera to your computer with the USB cable. Power on camera. The prompt information
will appear on the LCD “removable disk” information will appear on your computer. Double-click the
disk to enter into the lower menu. You can copy and review the files in the DCIM file.
System
• Operating System: Microsoft Windows 2000/XP /VISTA/WIN7
• Available USB interface
• CPU: Intel Pentium III processing 667MHz or above process

Installing the Battery
The battery lock must be in the pushed-in position before inserting battery.
Install the battery before using, and make sure battery cover is closed
1. Load the lithium battery into the battery compartment according to the markings of polarity markings.
2. Close the battery cover.
3. Power on the camera. A symbol of the battery capacity in the lower right corner of the LCD screen.
Note:
1. When the battery is low, “low battery” information will displayed on the LCD screen.
The camera will power off automatically, after a few seconds.
2. Remove the battery from compartment if the camera is not in use for an extended period of time.
3. When the battery level is low, charge the battery fully.
Battery Lock
The battery lock must be in the pushed-in
position before inserting battery.
415
- PrintBridge : Print the picture directly via a printer which supports PrintBridge format.
- Press menu to confirm the information. “Please connect to device” will appear in the LCD.
- Connect your camera to printer with USB cable to start printing.
Rotate , this function allows you to rotate the stored picture and save. There are three rotation
degrees in this mode: 90, 180 and 270 degrees. The LCD will display this information.
Note: you cannot rotate a protected file; if you try to rotate the protected file “file is locked” information
will appear on the screen.
- Protect
- Delete
- Crop image
To protect your stored picture and video, avoid accidental deletions.
To delete the current file or delete all images/videos.
To crop your stored picture and system will automatically save the cropped image.
Select a picture after choosing this menu. A blue frame will appear over image to be cropped.
Press “Up/down/left/right/W/T” button to adjust the blue crop frame. Press menu button to save the
cropped picture. The system automatically returns back to playback mode.
Note:
1. This operation can be completed according to the LCD prompted.
2. The saved picture will appear in the LCD, the cropped picture will be a new picture stored on SD card.

5 14
Charging the Lithium Battery
1. Make sure the battery is fully charged before use.
2. To charge the battery, connect it to your PC with the USB cable.
3. While charging, the LED (green) indicator light will be illuminated. When fully charged, the LED
light will turn off.
Load SD card
Load the SD card into the card slot next to the battery compartment. To install:
1. Open the battery cover and locate the SD card slot.
2. Load the SD card correctly as shown in the picture.
3. When you hear a “click” it means the memory card is installed correctly.
An icon of the SD card will appear on the LCD screen.
4. Before installation, make sure that the SD card is not locked.
If the SD card is locked, the pictures will not be saved.
5. Supports up to 32GB.
Note:
1. Formatting will erase all data including protected data in the SD card.
2. Please do not remove the SD card while the card is being formatted to avoid any file damages.
1. Video les played
Press left/right button to choose any video file or Press the W button to enter the thumbnail mode.
Press the arrow buttons to select a video file.
Press the SHUTTER button to play the video files.
Press the SHUTTER button to pause the video files.
Press the UP button to completely exit out of the video file that is being played.
2. Thumbnail
This function enables you to display stored videos and photos in 3 x 3 thumbnails.
Press the W button and then press arrow button to choose the photos or videos, press menu button to
display full-screen of the video or photo.
3. Zoom in or zoom out photos (8X)
Select any stored photos in the memory card. Press the T or W button to zoom in and out of the
selected photo. When the T or W button is pressed, the zoom icon will appear on the LCD screen.
4. Different functions in the playback mode
Different menus can be accessed by selecting the following functions:
1. Press menu button to enter into menu interface
2. Press arrow buttons to choose the icon that you would like to select
3. Press to confirm, save and exit

Power on the camera
Press the power button at the top of the camera to turn on the power. The LCD screen will be turned on
and the camera is ready to be used.
Power off the camera
If the camera is on, press the power button to turn off the camera.
When the power is low, the red battery icon and the “low battery” message will appear on LCD.
Within a few seconds, the camera will power off automatically. Be sure to charge the battery.
Note: If you turn off the Auto Power Off mode, the camera will not turn off until the battery is completely
drained, or you manually turn off the camera.
• Sound Effect: ON/OFF, set the option, you can turn ON/OFF the key sound.
• Languages: English, Spanish, Portuguese, French, German, Italian, Russian, Traditional Chinese and
Simplified Chinese.
• Frequency: There are 50Hz/60Hz options.The default setting is 50Hz.
• Format: The function will format the SD memory card, and will remove all the files in memory,
including the protected file.
• Default setting: Set the option, you can restore the factory settings on the camera.
Video Mode
Power on the camera, press the mode button to video mode, press shutter button to record the video, The
status led Flash in the recording video, press the shutter button again to stop recording the video.
Note: For recording videos, a Class 4 or higher speed card is needed.
Video size: the camera supports 2 video sizes - 1280x720 (720P) and 640x480 (VGA).
Playback Mode
Power on the camera. Press the playback button to activate playback mode.
Photos can be rotated, protected, deleted, and cropped.
Note: If there are no photo and/or video files, the LCD will display “No File Exist” message.
Press the playback button to return to the Photo mode or Video mode.
613

7 12
Modes
The camera supports three modes - photo mode, video mode and playback mode
Photo mode: Shooting still photos
Video mode: Record video files
Playback mode: Review photos and videos, delete, rotate, protect, crop and print.
Selecting Different Modes
1. Press the power button to turn on the camera. Press the Mode Button to change and select the different
modes of the camera. The camera mode will change, when pressing the Mode button each time.
2. Press playback button to enter into the playback mode, despite the camera is in photo or video mode.
Photo Mode
When the power is on initially, it will default to the photo mode. Press the ode button to change the working
mode of the camera.
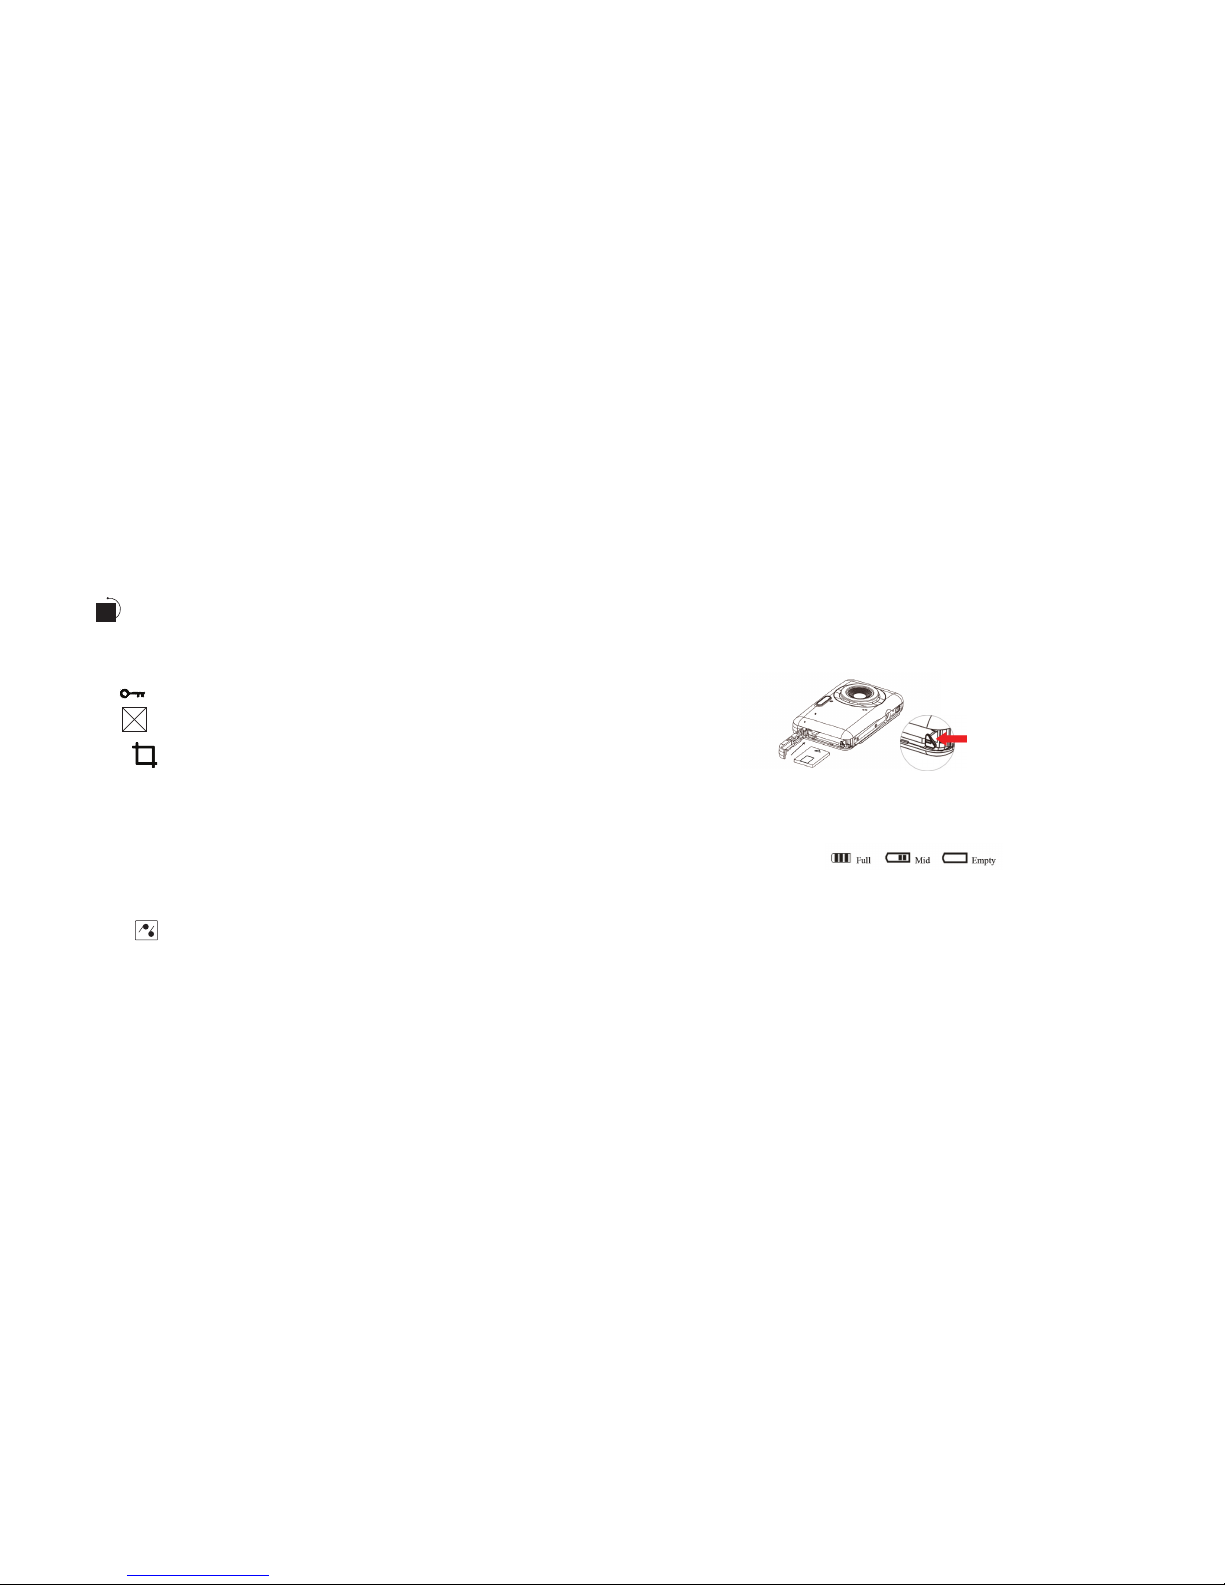
Taking Photos: Power on the camera, point to the image which will display on the LCD screen, press the
Shutter button to take photos.The camera will save the photo to the memory card. The number of available
shots will be shown on the LCD screen and it will decrease as you take photos. If the memory of SD card is
full, the LCD screen will read “insufficient space”. Download the photos and videos to your computer or delete
data in the memory card to free up the memory space or insert a new memory card to take more photos.
8. Set Up
There are thirteen parameters set options in the setup menu. Choose any one, an icon appears at the
bottom of the LCD.
• Exposure: There are 7 kinds of exposures values (-3, -2, -1, 0, 1, 2, 3) in the menu.
• ISO Value: ISO Auto, ISO 100, ISO 200, ISO 400.
• White Balance: Auto, Daylight, Cloudy, Incandescent, Fluorescent.
• Sharpness: Sharp, Normal, Soft.
• Image Quality: Super Fine, Fine, Normal. The default setting is Super Fine.
• Effect: There are many effects in the DC, total 20 options: Normal, B&W, Sepia, Red, Green, Blue,
Binary, Sunset, Warm, Cool, Over Exposure, IR, Vivid, Undertone, Dog Eye, Aibao, Gothic, Japan Style,
LOMO, Negative.
• Date: On, Off, Set Date.
• Auto Power Off: Off, 1 minute, 2 minutes, 3 minutes, 4 minutes, 5 minutes, 10 minutes.

Note:
Insert a SD card before using the camera — there is no internal memory.
Digital Zoom
The digital zoom allows up to an 8 times magnification. Press the W/T button to reduce/ enlarge the
zoom. The LCD screen will appear the corresponding icon.
8X
1X
Flash
In a dark environment, it is best to use the built-in flash. You can use flash in the backlight conditions too.
Press UP button to change the flash setting. There are three working modes; flash on, auto, flash off.
Press the button and each time the mode will be changed once. While flash is charging, the status
indicator LED will flash. When fully charged, the LED stops flashing.
3. Anti-Shake
The anti-shake function helps avoid shooting photos that are blurred due to movement.
4. Face Detect
There is a face detect function which have on/off options in the camera.
5. Smile Capture
After the function is on the camera can capture the smiling face and take pictures automatically and
save it.
6. Multi-Snapshot
After the function is on, press shutter button once and the camera can take 6 pictures.
7. Self-Timer
There are three options for the self-timer; 2 seconds, 5 seconds and 10 seconds. The self-timer LED
flash corresponding times.
811

9 10
A
Flash on Auto Flash off
Note:
1. The camera will show “Turn on Flash” in dark environments.
2. When the camera is low on power, “low battery” information will be displayed on the LCD
screen. The flash cannot be turned on when the battery is low.
Self-timer mode
Press the DOWN button. Each time the camera will change the working of mode once. There are four
self-timer modes; 2 seconds, 5 seconds, 10 seconds and self-timer off. Select any self-timer modes and
the LCD will show the corresponding icon.
Delete (shortcut key)
Press the RIGHT button to delete the last file.
Different functions in the photo mode
Different menus can be accessed by selecting the following functions:
1. Power on the camera, press the menu button to enter menu interface.
2. Press left, right, up, down to choose what you want to set.
3. Press the menu to confirm the option, now save and exit.
4. The corresponding icon for mode chosen will be displayed in LCD screen.
5. Setting the parameters are as follows:
Portrait
1. Scene
The camera supports many different scenery conditions, which include: auto, night portrait,
night scenery, portrait, scenery, beach, high sensitivity according to the current light conditions
and environment to select desired shooting conditions.
The corresponding icon as shown below:
Auto Night Portrait Night Scenery
Scene Beach High Sensitivity
2. Image Size
Photo size depends on the pixels and quality. The more pixels, the better the quality. Detailed photo
resolution as below:
4000x3000 (12M), 3264x2448 (8M), 2592x1944 (5M), 2240x2240 (5M 1:1), 2048x1536 (3M),
1760x1760 (3M 1:1), 1920x1080 (2M HD), 1600x1200 (2M), 536x1536 (2M 1:1), 1280x1024
(1.3M), 1280x720 (HD), 992x992 (1M 1:1), 640x480 (VGA), 576x576 (VGA 1:1)
Note: If you choose 3M or higher pixel pictures, make sure to use higher capacity SD card
(Maximum up to 32GB).
Other manuals for CAMERA-DC2
1
This manual suits for next models
1
Table of contents
Other Hamilton/Buhl Digital Camera manuals

Hamilton/Buhl
Hamilton/Buhl Kids-Flix CAM18-KID User manual

Hamilton/Buhl
Hamilton/Buhl ActionPro HDV17BK User manual

Hamilton/Buhl
Hamilton/Buhl CAMERA-DC2 User manual

Hamilton/Buhl
Hamilton/Buhl CAM17SV User manual

Hamilton/Buhl
Hamilton/Buhl VividPro CAM17SV User manual

Hamilton/Buhl
Hamilton/Buhl SpectraVR 360 User manual