Hamilton HTK Owner's manual

HTK & CTK
PROGRAMMING MANUAL
Document #101-0243
1
02/01/18

Contents
Introduction ..................................................................................................................................................4
HTK (Hamilton Transaction Kiosk).............................................................................................................4
CTK (Cashless Transaction Kiosk)..............................................................................................................5
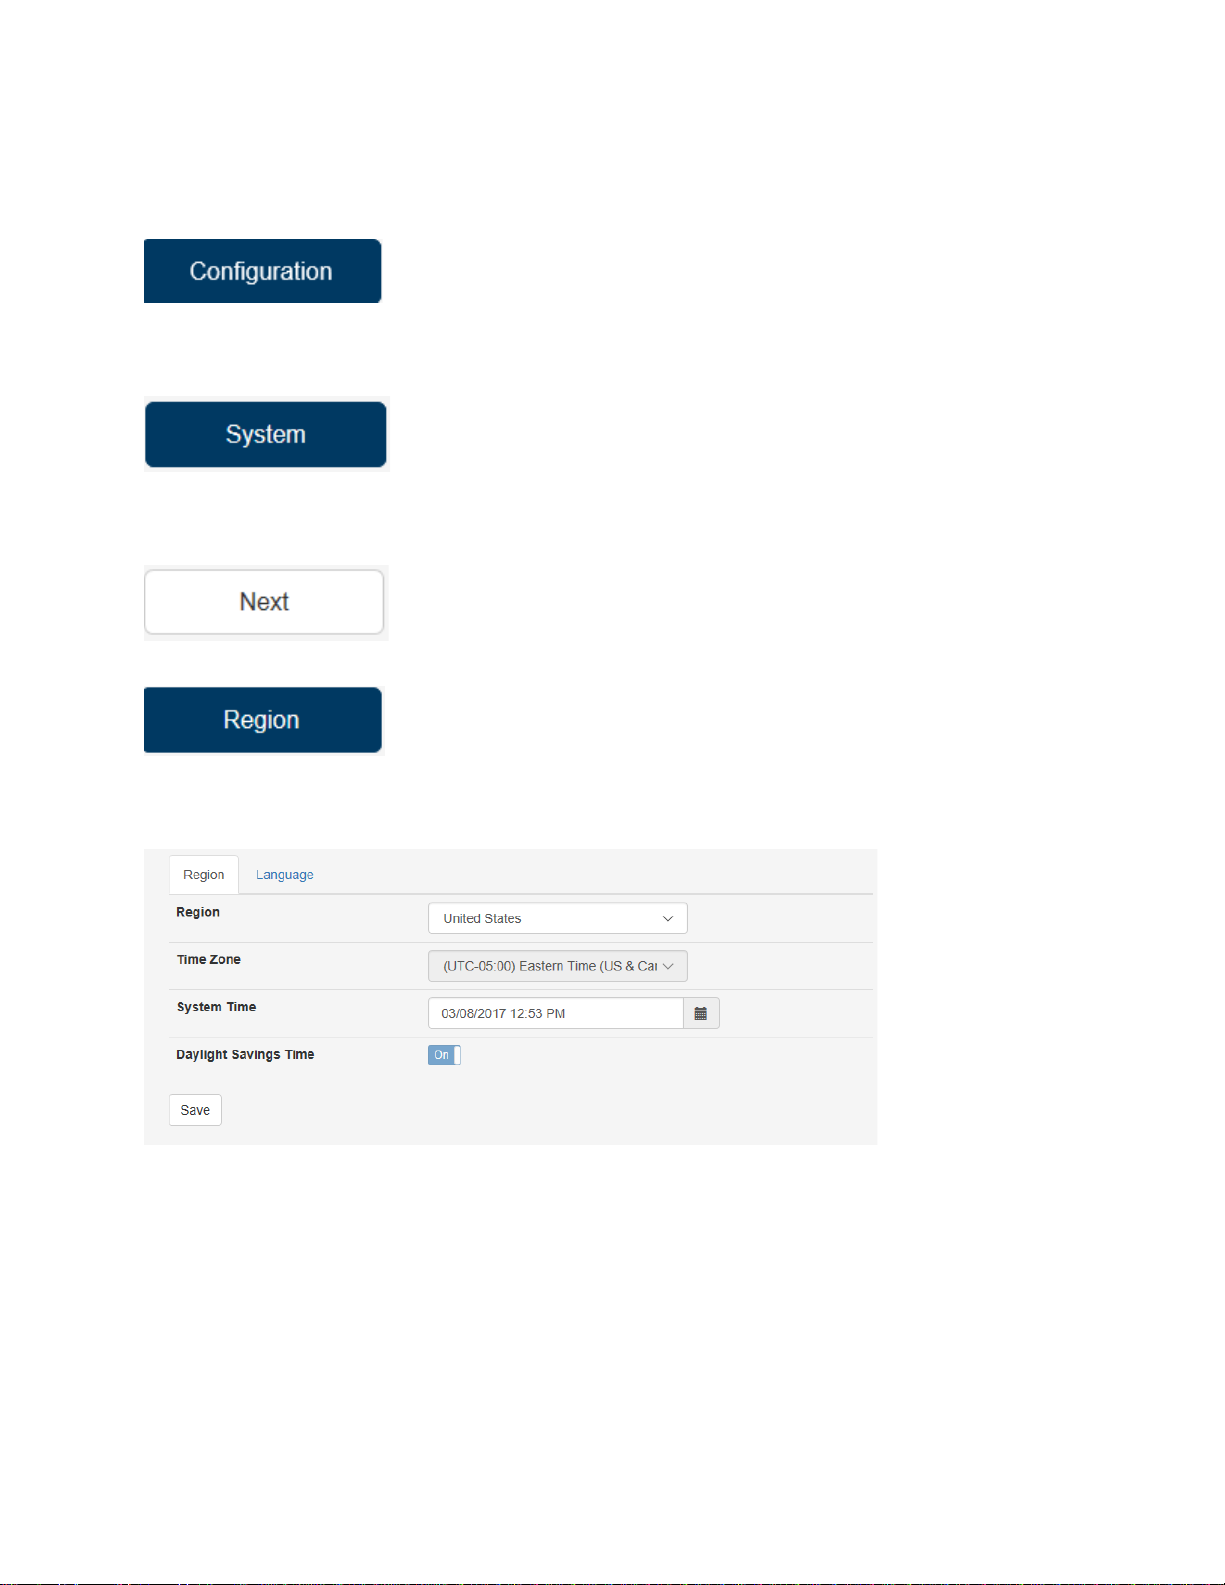
Region Settings ...........................................................................................................................................10
LAN Settings................................................................................................................................................12
Create a User...............................................................................................................................................21
Item Prices ..................................................................................................................................................23
Item Details.................................................................................................................................................25
Item Buy Ups...............................................................................................................................................28
Buy Up Items...............................................................................................................................................31
Configure Buttons.......................................................................................................................................33
Events..........................................................................................................................................................37
Welcome Messages ....................................................................................................................................40
Proceed Prompts.........................................................................................................................................42
Tokenotes®..................................................................................................................................................45
Token Coins.................................................................................................................................................48
Code Coupons.............................................................................................................................................50
Code Coupon Receipts................................................................................................................................54
RFID Basic Settings......................................................................................................................................56
Change Rule ................................................................................................................................................57
Queue Mode...............................................................................................................................................59
Vend............................................................................................................................................................61
Matrix......................................................................................................................................................63
Custom Single Relay................................................................................................................................64
Ethernet Vending....................................................................................................................................66
Checkout Screen .........................................................................................................................................67
Misc Messages............................................................................................................................................69
Barcode.......................................................................................................................................................71
HTK..............................................................................................................................................................73
DAN/AUX.....................................................................................................................................................75
SMTP ...........................................................................................................................................................77
FTP Updates ................................................................................................................................................79
Document #101-0243
2
02/01/18

Card Settings...............................................................................................................................................80
Payment Express.....................................................................................................................................83
E-Xact ......................................................................................................................................................83
P2P (Points to Partners)..............................................................................................................................85
Wash Card...................................................................................................................................................87
World Gift....................................................................................................................................................88
Auto Pilot Cards ..........................................................................................................................................89
UI Settings...................................................................................................................................................91
Alerts...........................................................................................................................................................95
Security .......................................................................................................................................................96
Tax...............................................................................................................................................................97
Gate.............................................................................................................................................................99
Validator....................................................................................................................................................101
Hoppers.....................................................................................................................................................103
Receipt Printer ..........................................................................................................................................105
Coin Mechanism .......................................................................................................................................113
Programming IDX Coin Mech................................................................................................................115
Canadian Coin Programming ................................................................................................................116
Australia Coin Mech Programming.......................................................................................................117
Bill Dispenser.............................................................................................................................................118
POS............................................................................................................................................................122
Card Reader ..............................................................................................................................................123
Hamilton ExpressPass RFID System ..........................................................................................................125
Cash Management....................................................................................................................................127
LIMITED WARRANTY AGREEMENT OF HAMILTON MANUFACTURING CORP...........................................133
Document #101-0243
3
02/01/18

Introduction
HTK (Hamilton Transaction Kiosk)
What you will need:
Computer or laptop connected to the same network the HTK will connect to. A USB Keyboard, USB
mouse, the keys and lock crank to the HTK.
You can plug the keyboard and mouse into any open USB port inside the HTK.
How to log into the HTK:
When logging into your HTK for the first time, unlocking the door will trigger the log in screen to appear.
This screen will prompt you for a user ID and Passcode, using the numeric keypad on the door, type in
the default user ID and Passcode. User ID: 00 Passcode: 12345 then hit enter
HTK’s with a touch screen: When you are at the log in screen, a small keypad will appear under the
Passcode box. If you touch the keypad, it will become larger so you can enter the user ID and Passcode.
User ID: 00 Passcode: 12345
Then hit the enter button. The HTK will immediately prompt you to change the Passcode. The local
admin Passcode will be all numeric and should be five digits long. This Passcode will expire every 90
days. Admin login should only be used as last resort. Each person should have their own log in
credentials (see set up user section).
Document #101-0243
4
02/01/18

CTK (Cashless Transaction Kiosk)
When you open the door to the CTK, a silver toggle switch will be located in the back right corner of the
machine. Putting the switch in the opposite direction will prompt the CTK to go to the log in screen.
Once the programming is complete, put the toggle switch back to the original position to put back into
operational mode.
All other programming will be the same between the HTK and the CTK
NOTE: The CTK is a cashless transaction kiosk, so the following options will need to be turned OFF in
the CTK.
At the HTK, using the USB mouse, click in any white box, a small keyboard will appear in the bottom left
corner of the screen. You can use your mouse to click on the keyboard buttons to type in the required
fields, or you can use the USB keyboard to type the information in.
This is what the main menu screen will look like. Each usable selection button on the front of the HTK
will light up, indicating it may be selected. Once you push the lighted button, it will take you into the
category labeled next to it.
Document #101-0243
5
02/01/18

∗ Each button on the left is selectable category.
• The white status box in the middle of the screen will tell you the status of the HTK. If the machine
goes into an error, the status box will tell you what the error is.
• The white Version box displays the name and version of the payment application for credit card
acceptance, along with the credit version. The application version is the current version on the
HTK software.
• The blue Clear Error button will allow you to clear an error that may have occurred and reset the
HTK.
• The blue Operational Mode button will take you back to the operational screen viewed by
customers.
• The white banner at the top of the screen will let you know where you are at in the programming.
It will add categories and page numbers as you enter into them.
Once you enter into a category, you will notice a red Back button .This button will take you back to the
previous page. If you keep selecting the back button, you will eventually end up back at the main menu
screen where you would be able to choose the blue Operational Mode button
Document #101-0243
6
02/01/18

Setting up the HTK:
Once you are logged in, it is recommended that the first 4 steps are done in order.
*NOTE: It would be suggested to leave the CAT5 cable unplugged from the HTK for the first four steps.
Step 1: Set up Region (this should have been set at the factory)
Step 2: Set up network LAN
Step3: Create a user and rights
Step 4: Enable remote access
After these four steps are complete, you can now go inside and remote into the HTK from your
computer or laptop to complete the setup.
*NOTE: You cannot log in remotely using the admin credentials.
Document #101-0243
7
02/01/18

Each Blue button on the left is selectable category.
• The white status box in the middle of the screen will tell you the status of the HTK. If the machine
goes into an error, the status box will tell you what the error is.
• The white Version box displays the name and version of the payment application for credit card
acceptance, along with the credit version. The application version is the current version on the
HTK software.
• The orange Clear Error button will allow you to clear an error that may have occurred and reset
the HTK.
• The white logoff button will take you back to the operational screen viewed by customers.
Document #101-0243
8
02/01/18

• The white banner at the top of the screen will let you know where you are at in the programming.
It will add categories and page numbers as you enter
into them.
Once you enter into a category, you will notice an orange Back button . This button will
take you back to the previous page. If you keep selecting the back button, you will eventually end up
back at the main menu screen where you would be able to choose the blue Operational Mode button.
Document #101-0243
9
02/01/18

Region Settings
• Select
• Select
• Select
• Select
The screen should look like this:
Region: This menu allows you to view your HTK’s settings match the region that the equipment is
installed. Changing the region can change or alter what coin types and bill types are selectable options
when setting up the rest of the equipment. Due to this, after changing the region, you will be required
to reconfigure your Hoppers, Validator and Bill Dispenser. These settings cannot be changed from this
screen. see Lan Settings section of this manual.
*NOTE: This is normally set at the factory, if the location of the machine is known. If the correct region
is already set DO NOT CHANGE THE SETTINGS. If a new controller or a new hard drive is received this
will need to be set first.
Document #101-0243
10
02/01/18

*Wash package names and other custom menus may also need to be changed to reflect other language
selections.
Time Zone: this will display the settings from the computer side of the controller. this cannot be
changed from this screen.
System Time: After making your time zone selection, set the correct time in this area.
Daylight Savings Time: If your time zone is applicable, it is recommended to turn this setting ON to help
the HTK keep proper time for events and other features of the equipment.
Click the Language tab
Languages: Clicking the ON/OFF button next to the languages available will make that language a
selectable alternative on the operational menu of the HTK display.
Voice: Selecting Male or Female for the voice option will change how the HTK speaks the menu
prompts.
Default Language: The language you select for this box will be the primary language, visually and vocally
when a customer pulls up to the HTK. Choosing one of the alternate languages from the above section
will allow that language to be offered as an alternative on the main wash screen. So a customer may
select that language and complete their transaction. The HTK will then revert back to the default
language after the transaction is complete.
Once you have completed these settings, click activate changes to save the settings. Then click the back
button to the previous page. Continue to click Back until you are at the page you need.
Document #101-0243
11
02/01/18

LAN Settings
Turn the top lock so the login screen comes up:
Enter in user ID 00, password is 12345.
At this screen, hit the Service Mode button.
At this screen, hit the Service Mode Reboot button.
Document #101-0243
12
02/01/18

Hit Yes to allow the program to make changes.
Then this screen will come up:
On this screen the customer will have to swipe up on the screen, if it’s a touchscreen, or just click on it if
they have a mouse hooked up.
Document #101-0243
13
02/01/18

The Admin screen will come up. Enter in the password 51You92Up.
That will put you on the Windows desktop screen.
Once you are connected to the HTK, change the time and date first! Set the time zone correctly if not
already set.
Setting IP addresses statically:
Click on the folder in the lower left hand corner.
Where it says this pc at the top, type in cmd, then hit enter.
In the command prompt box, type ipconfig.
Write down the ip address, subnet mask, and the default gateway.
Document #101-0243
14
02/01/18

Ping the ip address you want to put the HTK on before setting the addresses. Just type in the cmd
prompt ping 192.168.1.50, or whatever ip you want to check. If there is a response in ms, that address
is being used, try another.
Once you know what ip to use, right click on the computer in the lower right hand corner,
This will come up:
Left click on Open Network and Sharing Center.
That will bring up this screen:
Document #101-0243
15
02/01/18

Click on Ethernet:
Then click on properties:
Document #101-0243
16
02/01/18

Scroll down to Internet Protocol Version 4 (TCP/IPv4)
Double click it.
Now put in your IP address, subnet mask and gateway. Also put in the DNS addresses.
Then hit OK, OK, close, then close the networking window.
Once you are back at the desktop, make sure there are no errors on the network properties by looking
at the computer in the lower right hand corner. It should look like this:
Document #101-0243
17
02/01/18

If you have a red X or yellow! there, something is not right. Re-check your settings.
Once the IP addresses are set right, click on the icon that says Exit Service Mode.
Then hit yes on this screen:
Then type in a Y for yes here:
Document #101-0243
18
02/01/18

Then hit enter.
The HTK will reboot and load the wash program.
You will see the initialization screen next:
Then it will go to the wash selection screen:
Document #101-0243
19
02/01/18

If you want to get into the programming mode, you can hit CTRL-O.
*NOTE: If you are needing assistance from Hamilton
Look for the Logmein Icon: It is in the upper left hand corner under the Recycle Bin. Double click it.
If they don’t have the Logmein Icon, you can start a session by opening Internet Explorer. The type in
www.logmein123.com in the address bar.
This will allow the Hamilton technician to gain control of the HTK to better assist.
Document #101-0243
20
02/01/18
Other manuals for HTK
1
This manual suits for next models
1
Table of contents
Other Hamilton Digital Signage manuals