manuals.online logo
Brands
  1. Home
  2. •
  3. Brands
  4. •
  5. HAMPTON BAY
  6. •
  7. Outdoor Light
  8. •
  9. HAMPTON BAY 29156 User manual

HAMPTON BAY 29156 User manual

1
HAMPTONBAY.COM
Please contact 1-855-HD-HAMPTON for further assistance.
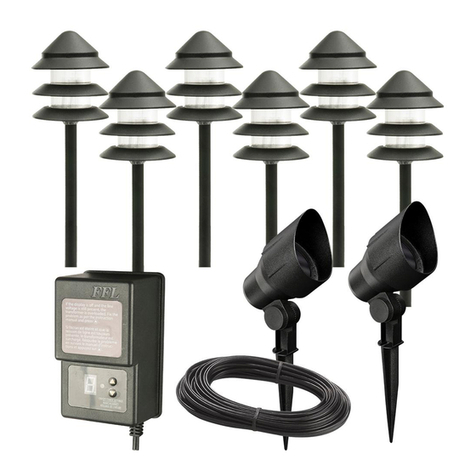
LED LOW VOLTAGE PATH LIGHT
Use and Care Guide
NOTE: Do not use a hammer. If the ground is
hard, use water to soften or a trowel to loosen
the soil.
Attaching and installing the
light
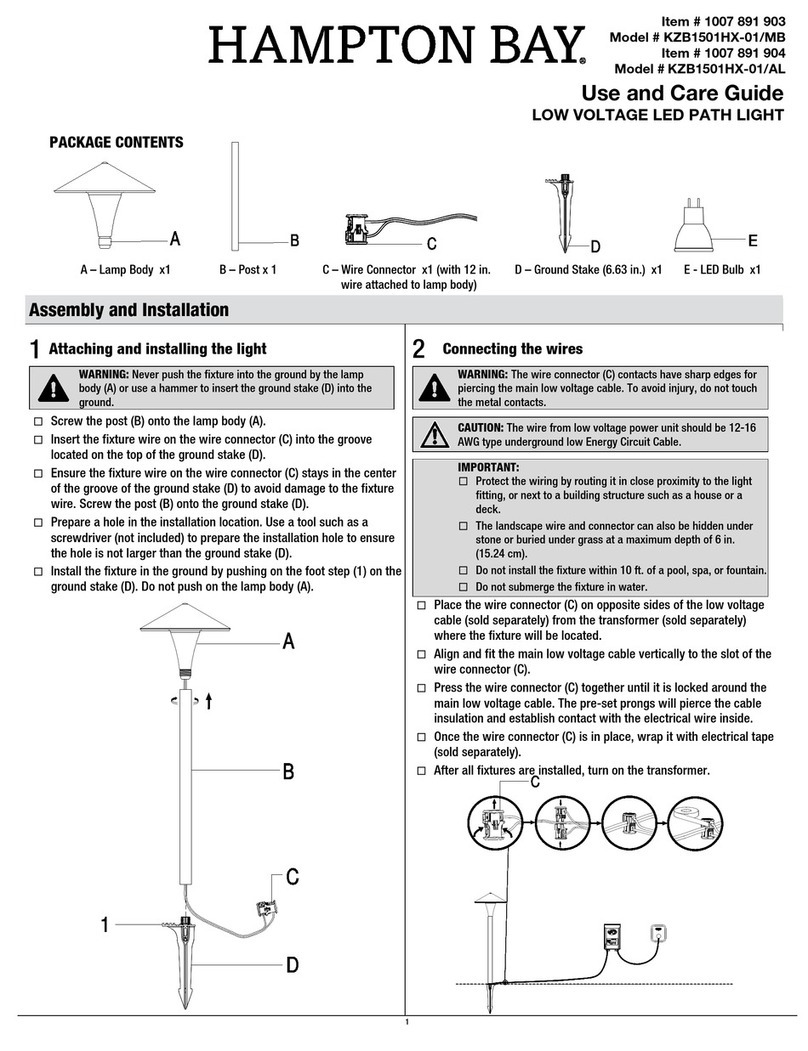
□Attach the xture head (A) to the post (B) by inserting
the xture head (A) into the upper end of the post (B)
and then twisting clockwise.
□Insert the xture wire (2) into the groove located on
the top of the ground stake (C).
□Attach the post (B) to the stake (C) by placing the
bottom of the post (B) onto the top of the stake (C)
and twisting clockwise.
□Prepare a hole in the installation location. Use a
screwdriver to prepare the installation hole to ensure
that the hole is not larger than the stake (C).
□Install the xture in the ground by pushing on the foot
step (1) on the stake (C). Do not push on the xture
head (A).
1
WARNING:
Do not install the light within 10 ft.
(3 m) of a pool, spa, or fountain.
A
B
D
2
1
C
D
Assembly and Installation
Item #1001 513 111
Model #29156
Connecting the wires
2
IMPORTANT:
• Protect the wiring by routing it in close proximity to the light, tting,
or next to a building structure such as a house or a deck.
• Do not bury the wiring by more than 6 in. (15.24 cm) in order to
connect to the main secondary wire.
• Do not submerge xtures in water.
CAUTION: The wire from the low voltage power unit shall be 12-16 AWG
type underground Low Energy Circuit Cable.
□Detach and place the wire connector (D) on opposite sides of the low voltage cable (not
included) from the transformer (not included) where the xture will be located.
□Align and t the main low voltage cable vertically in the slot of the wire connector as shown.
□Press the wire connector (D) together until fully seated and locked around the cable. Pre-set
prongs will pierce the cable insulation and establish contact. Turn on the power unit. If the
light xture does not turn on, repeat operations 2 and 3.
□Once the clip-on connector is in place, we recommend to wrap it with electrical tape (not
included) for additional protection.
WARNING: The connector contacts (D) have sharp edges for piercing the
main low voltage cable. To avoid injury, do not touch the metal contacts.
PACKAGE CONTENTS
A - Fixture head x 12 B - Post x 12 C - Stake with foot step x 12 D - Connector with 12 in. wire length (attached to fixture) x 12
ABCD
2
Care & Cleaning
Troubleshooting
Warranty
□Before attempting to clean the xture, disconnect the power to the xture by turning the breaker off or removing the fuse from the fuse box.
□To clean the xture, use a dry or slightly dampened clean cloth.
□Do not use cleaners with chemicals, solvents, or harsh abrasives, as damage to the xture may occur.
Problem Possible Cause Solution
Lights do not turn on. □There is no power.
□There is a disconnection or
break in the wire.
□The transformer setting is
incorrect.
□Check the outlet and ensure that a breaker or GFCI circuit has not been tripped.
□Follow the wires from the xture and ensure a continuous connected path back to the
transformer.
□Check the settings on the transformer.
Lights icker. □There is a loose wire con-
nector to the xture.
□Tighten the wire connector and ensure the metal contacts pierce the insulation on the low
voltage cable from the transformer.
Lights icker (all xtures). □There is a loose
connection at the
transformer.
□Unplug the transformer from the outlet and visually inspect the positive and negative
connecting posts. Each wire should be securely screwed in and not in contact with any
other.
Cable Selection
WHAT IS COVERED
The manufacturer warrants this lighting xture to be free from defects in materials and workmanship for a period of ve (5) years from date of
purchase. This warranty applies only to the original consumer and only to products used in normal use and service. If this product is found to
be defective, the manufacturer’s only obligation, and your exclusive remedy, is the repair or replacement of the product at the manufacturer’s
discretion, provided that the product has not been damaged through misuse, abuse, accident, modications, alterations, neglect, or mishandling.
WHAT IS NOT COVERED
This warranty shall not apply to any product that is found to have been improperly installed, set-up, or used in any way not in accordance with
the instructions supplied with the product. This warranty shall not apply to a failure of the product as a result of an accident. misuse, abuse,
negligence, alteration or faulty installation, or any failure not relating to faulty material or workmanship. The warranty shall not apply to the nish on
any portion of the product, such as surface and/or weathering, as this is considered normal wear and tear.
The manufacturer does not warrant and specially disclaims any warranty, whether express or implied, of tness for a particular purpose, other than
the warranty contained herein. The manufacturer specically disclaims any liability and shall not be liable for any consequential or incidental loss
or damage, including but not limited to any labor / expense cost involved in the replacement or repair of said product.
Contact the Customer service team at 1-855-HD-HAMPTON or visit www.HamptonBay.com
12 VOLT TAP Cable Length
Total Fixture Wattage 0-50 feet 51-100 feet 101-150 feet
0-60 Watts 16 AWG 16 AWG 14 AWG
61-120 Watts 16 AWG 14 AWG 12 AWG
121-180 Watts 14 AWG 12 AWG NOT RECOMMENDED
181-240 Watts 14 AWG 12 AWG NOT RECOMMENDED
241-300 Watts 12 AWG NOT RECOMMENDED NOT RECOMMENDED
600W Transformer = (2x300 Watts) 12 AWG NOT RECOMMENDED NOT RECOMMENDED
900W Transformer = (3x300 Watts) 12 AWG NOT RECOMMENDED NOT RECOMMENDED
15 VOLT TAP Cable Length
Total Fixture Wattage 0-50 feet 51-100 feet 101-150 feet
0-60 Watts 16 AWG* 16 AWG 16 AWG
61-120 Watts 16 AWG* 16 AWG 12 AWG
121-180 Watts 14 AWG* 14 AWG 12 AWG
181-240 Watts 14 AWG* 14 AWG 12 AWG
241-300 Watts 12 AWG* 12 AWG NOT RECOMMENDED
600W Transformer = (2x300 Watts) 12 AWG* 12 AWG NOT RECOMMENDED
900W Transformer = (3x300 Watts) 12 AWG* 12 AWG NOT RECOMMENDED
* NOT RECOMMENDED FOR HALOGEN LANDSCAPE LIGHTS
NOTE: Most LED landscape xtures can operate with full illumination from 9V all the way to as little as 6V. It is possible to have extended length runs
with LED xtures that go beyond the specications shown on the charts above.

Other HAMPTON BAY Outdoor Light manuals

HAMPTON BAY WELLINGWAY HDP06597BR User manual

HAMPTON BAY

HAMPTON BAY WELLINGWAY HDP06597BR User manual

HAMPTON BAY IMS1691L User manual

HAMPTON BAY

HAMPTON BAY IMS1691L User manual

HAMPTON BAY 155-194 User manual

HAMPTON BAY

HAMPTON BAY 155-194 User manual

HAMPTON BAY HB7027-05 User manual

HAMPTON BAY

HAMPTON BAY HB7027-05 User manual

HAMPTON BAY 719-694 User manual

HAMPTON BAY

HAMPTON BAY 719-694 User manual

HAMPTON BAY IWH1501LL-5 User manual

HAMPTON BAY

HAMPTON BAY IWH1501LL-5 User manual

HAMPTON BAY ELKTON HDP15138 User manual

HAMPTON BAY

HAMPTON BAY ELKTON HDP15138 User manual

HAMPTON BAY KZB1501HX-01/MB User manual

HAMPTON BAY

HAMPTON BAY KZB1501HX-01/MB User manual

HAMPTON BAY CHARLOTTE LDR1603AX-01 User manual

HAMPTON BAY

HAMPTON BAY CHARLOTTE LDR1603AX-01 User manual

HAMPTON BAY HB7094-43 User manual

HAMPTON BAY

HAMPTON BAY HB7094-43 User manual

HAMPTON BAY QTP22a-R4-AC-2 User manual

HAMPTON BAY

HAMPTON BAY QTP22a-R4-AC-2 User manual

HAMPTON BAY HDP06605BL User manual

HAMPTON BAY

HAMPTON BAY HDP06605BL User manual

HAMPTON BAY JBO1691A-5/ORB User manual

HAMPTON BAY

HAMPTON BAY JBO1691A-5/ORB User manual

HAMPTON BAY NXT-3149B User manual

HAMPTON BAY

HAMPTON BAY NXT-3149B User manual

HAMPTON BAY HD29234 User manual

HAMPTON BAY

HAMPTON BAY HD29234 User manual

HAMPTON BAY KJC2601LX-04 User manual

HAMPTON BAY

HAMPTON BAY KJC2601LX-04 User manual

HAMPTON BAY WARWICK LDN1603AX-01/BR User manual

HAMPTON BAY

HAMPTON BAY WARWICK LDN1603AX-01/BR User manual

HAMPTON BAY HBP609-35 User manual

HAMPTON BAY

HAMPTON BAY HBP609-35 User manual

HAMPTON BAY 10318 User manual

HAMPTON BAY

HAMPTON BAY 10318 User manual

HAMPTON BAY Y38017A-279 User manual

HAMPTON BAY

HAMPTON BAY Y38017A-279 User manual

HAMPTON BAY 72003/HD User manual

HAMPTON BAY

HAMPTON BAY 72003/HD User manual

HAMPTON BAY 752-396 User manual

HAMPTON BAY

HAMPTON BAY 752-396 User manual

HAMPTON BAY 62113 User manual

HAMPTON BAY

HAMPTON BAY 62113 User manual

HAMPTON BAY HD28905 User manual

HAMPTON BAY

HAMPTON BAY HD28905 User manual

Popular Outdoor Light manuals by other brands

Kichler Lighting HELEN 37536 instructions

Kichler Lighting

Kichler Lighting HELEN 37536 instructions

Thorn OXANE L installation instructions

Thorn

Thorn OXANE L installation instructions

esotec Solar Globe Light multicolor 20 operating instructions

esotec

esotec Solar Globe Light multicolor 20 operating instructions

mitzi HL200201 ELLIS Assembly and mounting instructions

mitzi

mitzi HL200201 ELLIS Assembly and mounting instructions

HEPER TILA S AFX 3 Module Installation & maintenance instructions

HEPER

HEPER TILA S AFX 3 Module Installation & maintenance instructions

Designplan TRON 180 installation instructions

Designplan

Designplan TRON 180 installation instructions

Sealey LED37 instructions

Sealey

Sealey LED37 instructions

nordlux VEJERS Mounting instruction

nordlux

nordlux VEJERS Mounting instruction

SImx ELITE LED LHTC637 installation instructions

SImx

SImx ELITE LED LHTC637 installation instructions

GEV CAROLINE 10833 manual

GEV

GEV CAROLINE 10833 manual

WE-EF PFL540 LED Installation and maintenance instructions

WE-EF

WE-EF PFL540 LED Installation and maintenance instructions

HEPER DOGO Side LW6048.585-US Installation & maintenance instructions

HEPER

HEPER DOGO Side LW6048.585-US Installation & maintenance instructions

BEGA 84 253 Installation and technical information

BEGA

BEGA 84 253 Installation and technical information

HEPER LW8034.003-US Installation & maintenance instructions

HEPER

HEPER LW8034.003-US Installation & maintenance instructions

HEPER MINIMO Installation & maintenance instructions

HEPER

HEPER MINIMO Installation & maintenance instructions

LIGMAN BAMBOO 3 installation manual

LIGMAN

LIGMAN BAMBOO 3 installation manual

Maretti TUBE CUBE WALL 14.4998.04 quick start guide

Maretti

Maretti TUBE CUBE WALL 14.4998.04 quick start guide

Maxim Lighting Carriage House VX 40428WGOB installation instructions

Maxim Lighting

Maxim Lighting Carriage House VX 40428WGOB installation instructions

manuals.online logo
manuals.online logoBrands
  • About & Mission
  • Contact us
  • Privacy Policy
  • Terms and Conditions

Copyright 2025 Manuals.Online. All Rights Reserved.