H&H CPS-Q5 User manual

User Set-up and
Operating
Manual
Q-5 System: Handset &
2-way Communicator


CPS-Q5 User Manual
1
Contents
Important Safety Information .................................................................................................2
Limited Liability Statement......................................................................................................3
About the CPS-Q5....................................................................................................................4
Package Contents ....................................................................................................................5
Handset Features and Controls ...............................................................................................6
General Information .............................................................................................................8
Backup Battery During a Power Failure................................................................................8
SOS Triggering ......................................................................................................................9
Alarm Distress (SOS) Button the Communicator ..................................................................9
Handset: Features While Handset is in Use........................................................................10
Handset Menu Choice 1: PHONEBOOK ..............................................................................10
Handset Menu Choice 2: CALL LISTS...................................................................................12
Handset Menu Choice 3: ORGANIZER ................................................................................14
Handset Menu Choice 4: SETTINGS ....................................................................................15
Room Monitor (ECI)............................................................................................................21
Communicator Features and Controls...................................................................................24
General Information ...........................................................................................................25
SOS Triggering ....................................................................................................................26
Alarm Distress (SOS) Button on the Communicator...........................................................26
Communicator Battery Information ...................................................................................27
Turning On or Off the Communicator ................................................................................28
Troubleshooting ....................................................................................................................28
Replacement Parts/Optional Accessories..............................................................................28

CPS-Q5 User Manual
2
Important Safety Information
Please make sure to review the information in this manual and keep it for future reference.
Please be aware of the following important details when installing and using the CPS-Q5
System:
•Do not submerge any of the products in water. The communicator is water resistant
and can be worn in the shower, but should never be immersed in water.
•Ensure the bases are plugged into an outlet that cannot be turned on or off by a
switch. Otherwise the switch could inadvertently be turned off, leaving the system
without AC power and placing the CPS-Q5 in an emergency no power mode.
•Do not place bases or components (handset or communicator) near a heat source.
In order for the CPS-Q5 system to work correctly it must be:
•Programmed by an experienced dealer,
•Used in combination with a professionally monitored call
center, and
•Installed/used in the manner described in this manual.

CPS-Q5 User Manual
3
Limited Liability Statement
The purchaser agrees to read and follow all instructions and warnings within this user set-
up and operating manual.
The purchaser also agrees, by using the CPS-Q5 System, to the following terms and
conditions.
It will be the sole responsibility of the purchaser to assure that the CPS-Q5 System is
programmed, connected, and set-up properly and safely; and that the unit is utilized and
maintained correctly. This includes, but is not limited to: periodic use to assure that the
system, including batteries, are in proper working order; that the unit is located in an
appropriate location in the home; that the electrical outlet is supplying power; and that the
user has been educated as to the operation and functionality of the product as a whole.
The CPS-Q5 System’s equipment is not designed or guaranteed to prevent any loss or
injury. This Limited Warranty constitutes the terms of sale and use of the system (and
accessories) equipment, and if, notwithstanding these terms of sale and use of the product,
there should arise any liability on the part of HH-IMG as a result of any cause whatsoever,
regardless of whether or not such loss, damage, or personal injury was caused by or
contributed to by HH-IMG’s negligence to any degree or failure to perform any obligation
or strict products liability, such liability will be limited to an amount paid by the Purchaser
for the product.
Further, HH-IMG has no obligation to assure that calls are made, received or responded to,
nor is HH-IMG responsible for acts, or consequences of the acts, of those responding to
activation of emergency communication.
HH-IMG does not provide monitoring services. It is the responsibility of the individuals
whose numbers are called at the time of an emergency to respond in an appropriate
manner.

CPS-Q5 User Manual
4
About the CPS-Q5
The CPS-Q5 system is a DECT cordless phone and Personal Emergency Response (PERS)
communicator for your emergency needs all in one system.
The CPS-Q5 system unique handset features:
•Digital cordless handset DECT 6.0, 1.9GHz technology for enhanced voice quality and
exceptional range from the base up to 1300 feet
•SOS button on the back of the handset
•Large keypad buttons, numbers and characters
•HAC (Hearing Impaired Compatible)
•Volume Booster +40dB amplifier
•5 programmable emergency alert phone numbers
The CPS-Q5 system unique communicator features:
•Two-way voice communication
•Digital DECT 6.0, 1.9GHz technology for enhanced voice quality and exceptional
range from the base up to 1300 feet
•One push button alert capability
•IP56; dust protection level 5, water resistant level 6 ( can be worn in the shower)
•Low battery voice prompt
•Communicator charger (no need to replace batteries)
•Illuminated SOS button and vibration alert
•Adjustable lanyard cord with safety breakaway feature
CPS-Q5 User Manual
5
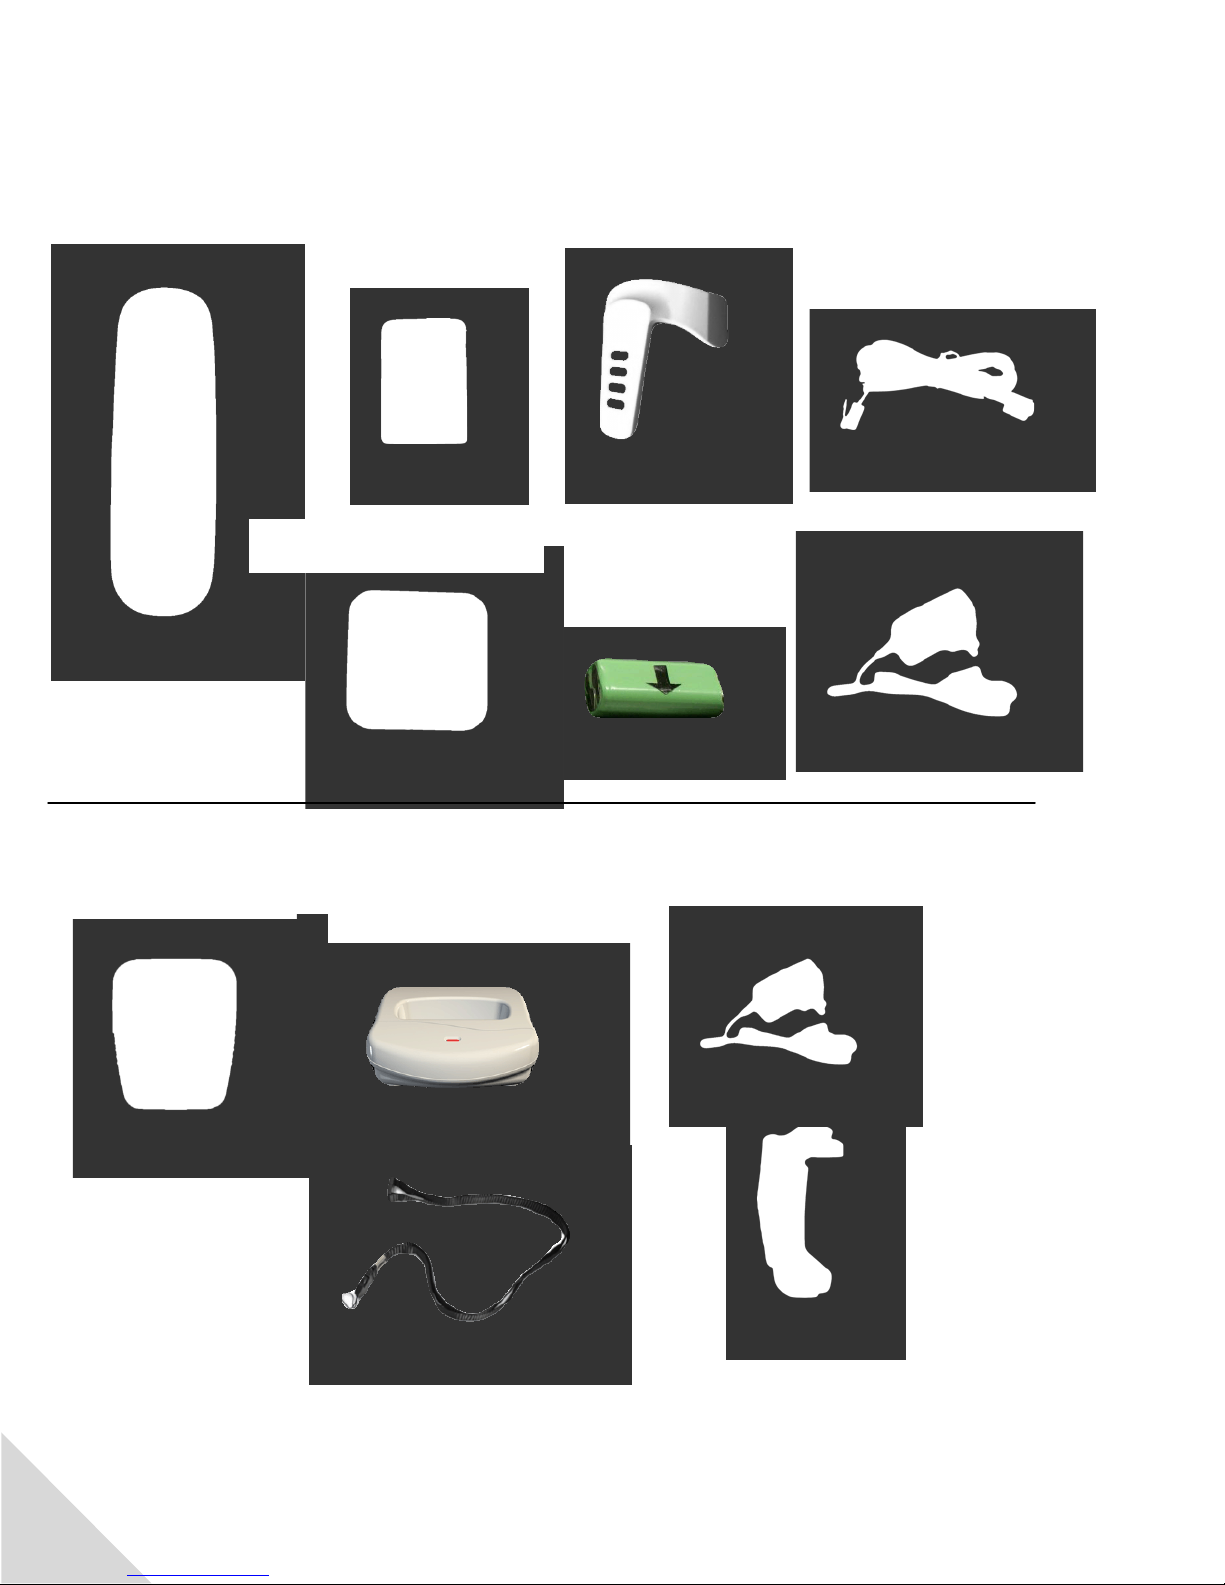
Package Contents
Handset Items and Accessories
Handset
Handset Battery
3.7V 800 mAh lithium
Belt Clip
Phone Cord
Base Battery
3.7V 850 mAh lithium
Base AC Adapter
Communicator Items and Accessories
Communicator
AC Adapter
Adjustable Lanyard
Belt Clip
Handset Base/Charger
Communicator Charger

CPS-Q5 User Manual
6
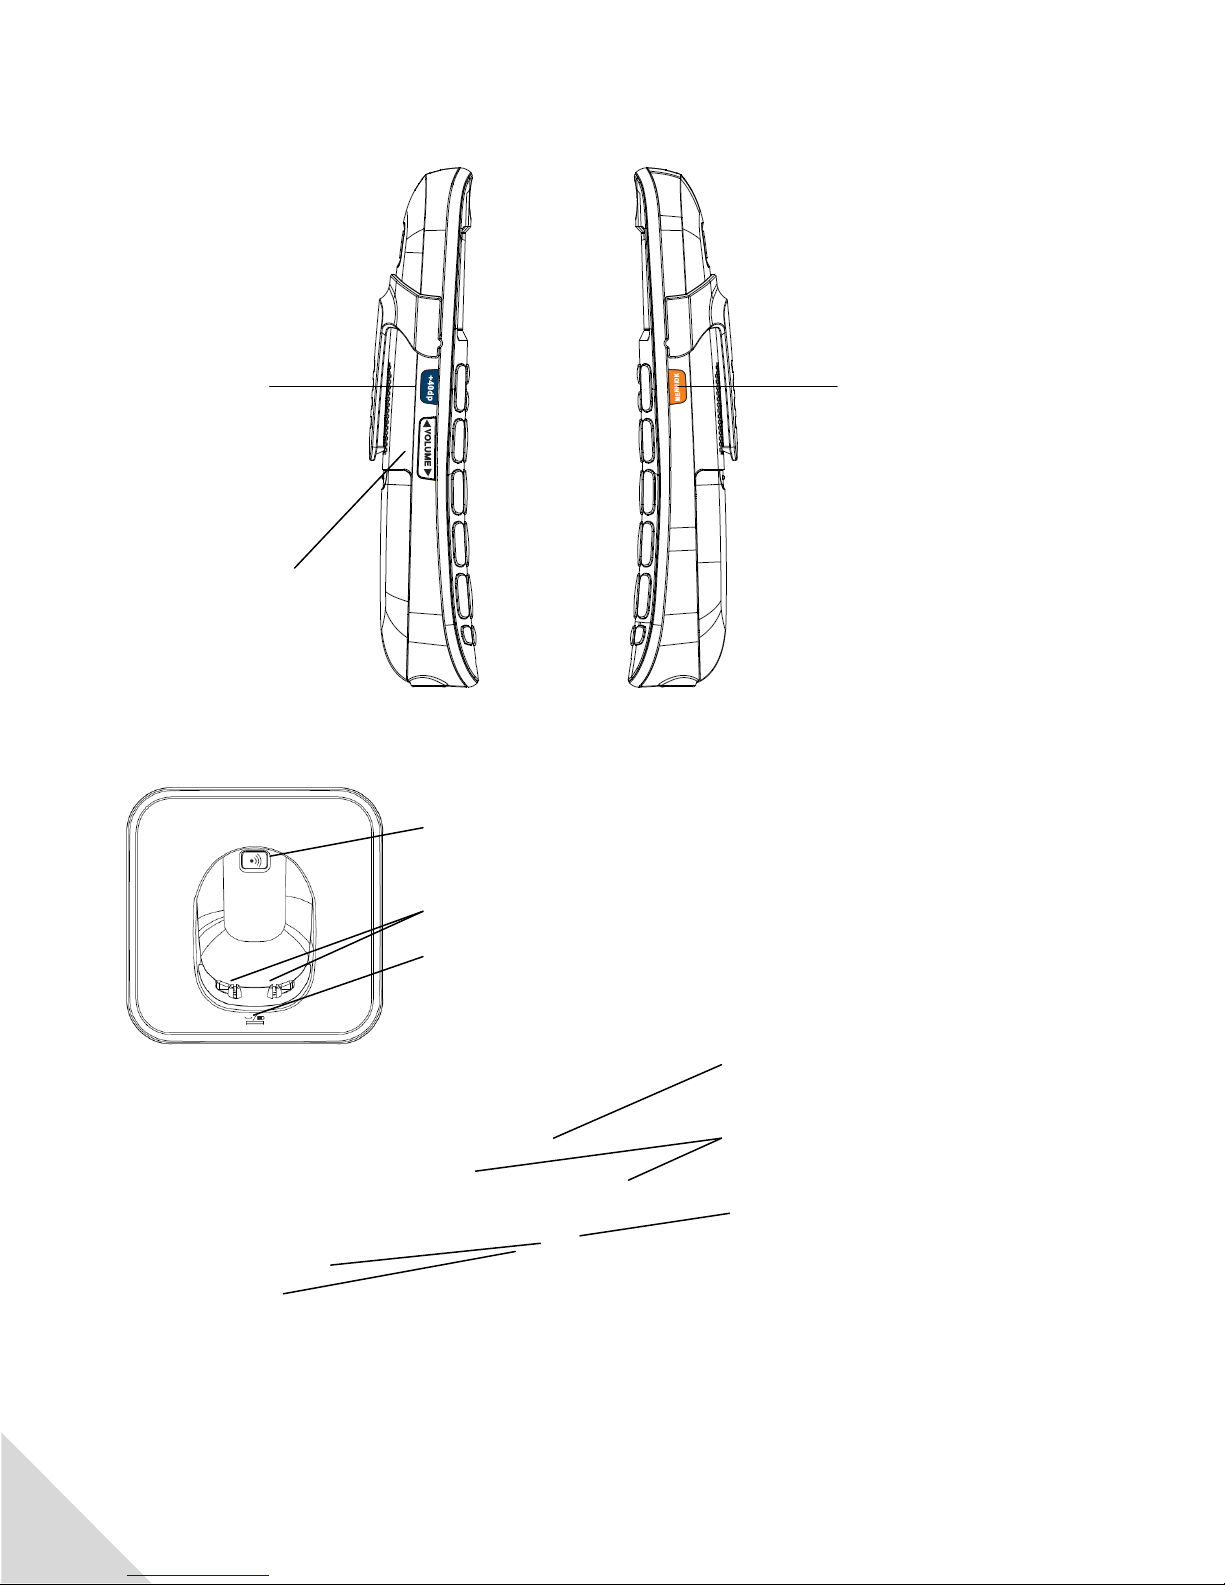
Handset Features and Controls
1. Receiver
2. TFT display
3. Disconnect, OFF
button, and to back
out of menu choices
4. Up and Down
5. Main buttons
6. Press and hold for
silent mode
7. Redial button
8. Flash and intercom
button
9. Answer a call button
10. Press and hold to
turn on or off the key
lock
11. Speaker button-
Speaker is on back of
phone
12. Microphone
1. Lanyard cord
(optional)
2. SOS button
3. Belt Clip
4. Speaker
5. Battery house/cover
SOS
Handset Front View
Handset Back View
REDIAL
P/I
CPS-Q5 User Manual
7
1. +40dB for extra
amplification
during a call
and to view
missed calls
when in
standby mode
2. Volume up or
down
3. Menu/OK
Base Top View
1. Page button to find
misplaced handset
2. Charging contacts
3. Charging and in call
LED indication
Handset Side
Base Back View
3. Backup batteries
house/cover
4. Channels for line cord
and power supply cord
5. Power supply socket
1. Line cord socket
2. Extra socket for future
dry contact support –
available in late 2013.

CPS-Q5 User Manual
8
General Information
1. The handset range is up to 1300 feet from its base. The range also depends on the
area and general environment.
2. The handset equipped with a special HAC (Hearing Aid Compatible) for users with
hearing aid devices. The HAC feature allows users to hear louder and clearer through
their hearing aid devices.
3. The LED light on top of the base will turn RED.
4. When the system arrives the handset is already registered to the base station.
In case the is handset not registered or you want to register additional handsets to
the same base, please follow the instructions below:
•Press the Page button on the handset base (7 seconds) until the red light
starts flashing.
•Select the button on the handset; go to the “Registration” mode. Press
the button, select base number to register, press the button,
input pin 0000, press the button, Registration?” will display on the screen,
then press the button to complete registration.
5. When a handset is misplaced:
•Press once on the Page button on the base. The handset that is registered
to the base will automatically ring.
•To cancel, press the Page button again on the base.
•To answer on the handset only press the Onbutton, to cancel press the Off
button.
Backup Battery During a Power Failure
The CPS-Q5 base supports an option for a rechargeable back-up battery. When a backup
battery is installed, during a power failure, the system operates normally for at least 12 -24
hours standby time and 4 hours talk time on either the communicator or handset.

CPS-Q5 User Manual
9
SOS Triggering
Note: the CPS-Q5 system will detect when the Communicator is in alarm status!
During a telephone conversation if an alarm is triggered by another handset and or
communicator (that are registered to the base), the telephone conversation will be
immediately and automatically terminated, allowing the SOS alarm to be sent.
If more than one communicator is registered to the base and an SOS alarm is trigger from
both communicators, the second alarm will be put into memory, after the first alarm is
completed, the second alarm will then dial the pre-registered SOS numbers.
Please note: when an SOS alarm is triggered from the communicator, the handset buttons
will flash and it will indicate on the handset TFT display which terminal triggered the SOS
alarm “T2 SOS” for example (TERMINAL 2 SOS)
Alarm Distress (SOS) Button the Communicator
The SOS button on the back of the handset or on the communicator will activate and send a
SOS distress call to the call center.
Note:
1. All SOS telephone numbers must first be entered in the SOS PHONEBOOK by your
service provider.
2. When an alarm is triggered, the TFT display on the handset will indicate which
terminal number triggered the alarm, for example; “T1 SOS” indicates TERMINAL 1
triggered the SOS alert. All buttons on the handset will lock.
3. To cancel the alarm on the communicator, press the On/Off button on the side of the
communicator which triggers the SOS.
4. To cancel the SOS alarm on the handset press and hold the SOS button on the back
of the handset for about 7 seconds until the SOS alarm is canceled. You may also
place the handset on the base; this will also cancel the SOS alarm.

CPS-Q5 User Manual
10
Please Note: When an SOS alarm is triggered from the communicator the TFT display on
the handset will indicate which terminal triggered the SOS alarm, for example; “T1 SOS”
(TERMINAL 1) triggered the SOS alarm. All buttons on the handset will lock.
Handset: Features While Handset is in Use
Speaker
Use the Speaker button on the phone to turn On or Off the speaker function.
Transfer
During conversation, you may transfer the call to another handset (when minimum 2
terminals are registered to the same base) by pressing during the conversation and
chose “Divert”, then select the terminal you want to transfer the call to.
Mute
During conversation, you can mute the call (the caller will not hear you, but you still hear
the caller).
1. Press during conversation.
2. Use Arrow buttons to scroll to “mute”.
3. Press for On.
4. To turn mute Off , press the button (you can see below the MUTE on the
right side if it is in On or Off mode)
Handset Menu Choice 1: PHONEBOOK
1. While phone and alarm system is not in use, press on the side of the
handset. On the handset screen, you will see Phonebook highlighted.
2. Press again to select the feature.
You can also access the Phonebook by selecting the Down Arrow while in standby
mode.

CPS-Q5 User Manual
11
Quick Search
1. If there are contacts in the Quick search phonebook, Use Arrow buttons on the
front of handset to highlight search. You may also press on the letters for direct
search for names (using the character buttons).
2. Press to view it, edit it or delete.
3. To place the call, press the On button.
Add New Contact
1. Use Arrow buttons on front of handset to highlight “Add new contact”.
2. Press .
3. “Name” is highlighted, press again.
4. Type the name by using the character buttons 2-9 (For example, #2 button
represents A, B, and C. To get A, press 2 once; to get B, press 2 twice; to get C, press
2 three times.).
5. When finished press to confirm the name.
6. If you need to go back and make any changes, select the Off button.
7. Once you confirm the name – you will see a highlighted word that says “Done”.
8. Highlight “Number” and enter the number that coincides with the name you just
entered.
9. When finished press to save and confirm.
Note: 2 numbers can be entered for the same name.
To enter additional names and numbers, please follow instructions above.
To enter a number from standby mode, type the number first and then press you
will then have the option to save it to phonebook.

CPS-Q5 User Manual
12
Delete All
If you wish to delete all of the contacts in the phonebook:
1. Use Arrow buttons on front of the handset to highlight “Delete all”.
2. Press .
3. Input the password (0000).
4. Press .
Memory Status
This category will display the current memory capacity. The phonebook memory can
contain up to 200 contacts. For example, if there are 10 contacts in the phonebook, when
you view memory status you would see 10/200.
1. Use Arrow buttons on front of handset to highlight “Memory status”.
2. Press .
Handset Menu Choice 2: CALL LISTS
1. While the phone and alarm system is not in use, press on the side of the
handset.
2. Use the arrow buttons to highlight “Call Lists”.
3. Press again to select the feature.
4. Use arrows buttons to scroll and then press .
Missed Calls
In this category you can view missed calls.
1. With “Missed calls” highlighted, press . The missed numbers will be shown
on the display.

CPS-Q5 User Manual
13
To view more information about the call:
1. Highlight number and press .The information about the number will be
displayed: Call date, time, name of caller, their phone number and number of
attempts.
2. Press on to have the choice to delete this Call, Save the number to the
Phonebook, make a Direct call, or Edit it.
Dialed Calls
In this category you can view dialed calls.
1. With “Dialed calls” highlighted, press . Dialed numbers will be shown on
the display.
To view more information about the call:
1. Highlight number and press . The information about the number will be
displayed: Call date, time, phone number, and how many times.
2. If you press again, you may Delete this call, Save to Phonebook, Call or
Edit.
Received Calls
In this category you can view received calls. The number of entries (calls) are indicated in
the small blue window.
1. With “Received calls” highlighted, press . The received numbers will be
shown on the display.
2. Press for a received call number and you may now view the received call
date, time, name of caller, phone number, number of calls and conversation time.
3. If you press again, you may Edit, Save to Phonebook, Delete or Call.

CPS-Q5 User Manual
14
You can also access received calls by selecting the Up button once while on standby
mode.
Delete Call Logs
In this category you can delete all the call logs from each separate category or delete the
entire call log list.
Call Timers
In this category you can view all the conversation times as indicated in the small blue
window. You may also reset it.
Handset Menu Choice 3: ORGANIZER
1. While phone and alarm system is not in use, press on the side of the
handset.
2. Use the arrow buttons to highlight “Organizer”.
3. Press again to select the feature.
Alarm
Alarm will display highlighted. Repeat the following process for each alarm set-up.
1. Press , there are 3 alarm clock set-ups.
2. The first one will be highlighted, press .
3. Select “On or Off “using the side button.
4. Using the arrow buttons, move the highlight down to “Clock” and key in the
desired time in a 24 hour clock mode.
5. When finished, move the highlight down to “Repeat” and select the necessary alarm
use by using the left side volume button (once, custom or everyday).
CPS-Q5 User Manual
15
6. To confirm and save, press the Off button, “Saved?” will display on the screen
and then press the button to confirm.
Calculator
1. To operate the calculator, select in calculator main menu.
2. Use the number buttons to enter the numbers.
3. Use the up and down buttons to choose the plus (+) or minus (-) function and
the button to choose the division (÷) or the multiplication (X) function.
4. Press for the solution.
Handset Menu Choice 4: SETTINGS
1. In standby mode, press and then highlight “Settings”.
2. Enter the access code (0000) press and you are in settings main menu.
Intercom
You must have at least 2 handsets or 1 communicator and 1 handset registered to the same
base in order to use the intercom feature.
1. At the home screen, press the button for three seconds.
2. Select the terminal you want to intercom to Press .
3. To disconnect the intercom, press the Off button.
BS Setting (Base Setting)
1. In standby mode, press and then highlight “Settings”.
2. Enter the access code (0000) press and you are in Settings main menu.
Delete Terminal
In this category you can delete terminals (communicator and/or handsets) that have been
registered to the base. You may select the terminal you want to delete and press
,”Logout?” will display on the screen, press to confirm “Deregistration”.

CPS-Q5 User Manual
16
Flash time
You can choose different flash time between 100ms to 1000ms. The handset default is set
at 100ms.
Dial mode
There are 2 dialing mode types: tone and pulse. The handset default is tone dialing.
Change PIN
The PIN code the default setting is 0000; to change this pin code, do the following:
1. Press and input the old PIN (0000) and press again
2. Input the new pin code and press
3. Input the new pin code once again and press
Base Default
By using this selection and confirming it to reset to the base default, you will remove all the
settings you created in the system.
1. To reset the base, please press and input the PIN code (0000), press
Pendant/Communicator Setting
The communicator is equipped with a voice prompt that will automatically announce that
the communicator battery is low and needs to be placed on the charger.
When the communicator voltage drops to 20%, the low battery voice announcement will
be activated and announce one time that the battery is low and needs to be placed on the
charger. If the communicator is not charged during the next 30 minutes a designated low
battery alert call will be made to up to 3 pre-registered telephone numbers announcing the
communicator is in low battery state and the communicator needs to be charged
immediately.
Low Battery Alert, press , you will have two options:

CPS-Q5 User Manual
17
1. Status, press , (default setting is On). If you choose to change this setting
highlight either On or Off and press .
2. Number, Scroll down to number and press , press again and enter
the numbers (up to three) that you want the unit to dial with a voice
announcement when the Communicator’s battery is low and press again.
3. Pendant/Communicator Voice Language, press , (English is set as the
default language).
1. To change the language, select the language of your choice, press .
HS Setting (Handset Setting)
1. In standby mode, press and then highlight “Settings”.
2. Enter the access code (0000) press and you are in Settings main menu.
3. Press , select HS Settings and press ,
Select Base
1. You can register the handset to different bases. The handset is already registered to
the base (base #1). It is recommended that the handset stay registered to base #1.
2. When you want to register the handset or additional handsets to other bases, you
may need to purchase additional bases first.
HS Name (Handset Name)
1. You may name the handset or leave it empty.
2. Press and by using the characters on the keypad, input the desired name. You
may use up to 10 characters in the handset name for example: “Kitchen”. When
finished press to save and confirm.

CPS-Q5 User Manual
18
PABX Code
1. When the phone works with a PABX system (this where you need to dial a number to
get an outside line before you can get a dial tone to dial the number you will be
calling), please input the necessary PABX number such as an 8 or a 9. You may use up
to 5 numbers. Then press , to confirm.
2. When dialing a number, the PABX number will dial before the number.
Time and Date
Press , scroll to Time and Date, press .
1. Set Format, press , select either the 12 or 24 hour clock by using the
button. Then scroll down using the button to MM DD YYY, scroll to
Date separator and use button to select “-“, press .
2. Set time/date, press . Using the keypad enter the correct time in a 24 hour
format. Scroll down using the button and enter the year, month and day, press
to complete setup.
Tone Setting
Define different rings and Volumes in the Handset
Tone Setup, press .
1. Incoming Call, press and select a ring tone using the button, then press
.
2. Keypad, scroll down using the button, press . Choose either silent or tone
and press .
Volume, press .Ring tone will display press . Using the button
set your desired volume then press .
Table of contents


