GE 2-9191 User manual

1
2-9191
12-Number Memory
Call Waiting Caller ID
Telephone
User's Guide
We bring good things to life.

PB
IMPORTANT INFORMATION
NOTICE: The Industry Canada label identifies certified
equipment.This certification means that the equipment
meets certain telecommunications network protective,
operational and safety requirements.The Industry Canada
does not guarantee the equipment will operate to the
user’s satisfaction.
Before installing this equipment, users should ensure that
it is permissible to be connected to the facilities of the
local telecommunications company.The equipment must
also be installed using an acceptable method of
connection.The customer should be aware that compli-
ance with the above conditions may not prevent
degradation of service in some situations.
Repairs to certified equipment should be made by an
authorized Canadian maintenance facility designated by
the supplier. Any repairs or alterations made by the user
to this equipment, or equipment malfunctions, may give
the telecommunications company cause to request the
user to disconnect the equipment.
Users should ensure for their own protection that the
electrical ground connections of the power utility,
telephone lines and internal metallic water pipe systems, if
present, are connected together.This precaution may be
particularly important in rural areas.
CAUTION: Users should not attempt to make such
connections themselves, but should contact the appropri-
ate electric inspection authority, or electrician, as
appropriate.
NOTES: This equipment may not be used on coin service
provided by the telephone company.
Party lines are subject to telephone company tariffs and,
therefore, you may not be able to use your own telephone
equipment if you are on a party line. Check with your local
telephone company.
INDUSTRY CANADA NUMBER IS LOCATED ON THE
CABINET BOTTOM
REN NUMBER IS LOCATED ON THE CABINET BOTTOM

3
WARNING:
TO PREVENT FIRE
OR ELECTRICAL SHOCK HAZARD,
DO NOT EXPOSE THIS PRODUCT
TO RAIN OR MOISTURE.
SEE MARKING ON BOTTOM / BACK OF PRODUCT
CAUTION
RISKOFELECTRICSHOCK
DONOTOPEN
THE EXCLAMATION
POINT WITHIN THE
TRIANGLE IS A
WARNING SIGN
ALERTING YOU OF
IMPORTANT
INSTRUCTIONS
ACCOMPANYING
THE PRODUCT.
THE LIGHTNING
FLASH AND ARROW-
HEAD WITHIN THE
TRIANGLE IS A
WARNING SIGN
ALERTING YOU OF
"DANGEROUS
VOLTAGE" INSIDE
THE PRODUCT.
CAUTION: TO REDUCE THE
RISK OF ELECTRIC SHOCK,
DO NOT REMOVE COVER
(OR BACK). NO USER-
SERVICEABLE PARTS IN-
SIDE. REFER SERVICING
TO QUALIFIED SERVICE
PERSONNEL.
INTERFERENCE INFORMATION
This equipment generates and uses radio frequency
energy which may interfere with residential radio and
television reception if not properly installed and used in
accordance with instructions contained in this manual.
Reasonable protection against such interference is
ensured, although there is no guarantee this will not occur
in a given installation. If interference is suspected and
verified by switching this equipment on and off, the user is
encouraged to try to correct the interference by one or
more of the following measures: Reorient the radio/
television receiver’s antenna, relocate the equipment with
respect to the receiver, plug the equipment and receiver
into separate circuit outlets.The user may also wish to
consult a qualified radio/television technician for additional
suggestions.This equipment has been fully tested and
complies with all limits for Class B computing devices
pursuant to part 15 FCC Rules and Regulations.This
apparatus does not exceed the class B limits for RF noise
emissions specified in the RFI regulations of the Industry
Canada.
HEARING AID COMPATIBILITY
This telephone system meets FCC/Industry Canada
standards for Hearing Aid Compatibility.

PB
TABLE OF CONTENTS
IMPORTANT INFORMATION ............................................................ 2
INTERFERENCE INFORMATION ........................................................ 3
HEARING AID COMPATIBILITY ....................................................... 3
INTRODUCTION .......................................................................... 5
CALLER ID WITH CALL WAITING ................................................. 5
BEFORE YOU BEGIN ................................................................... 6
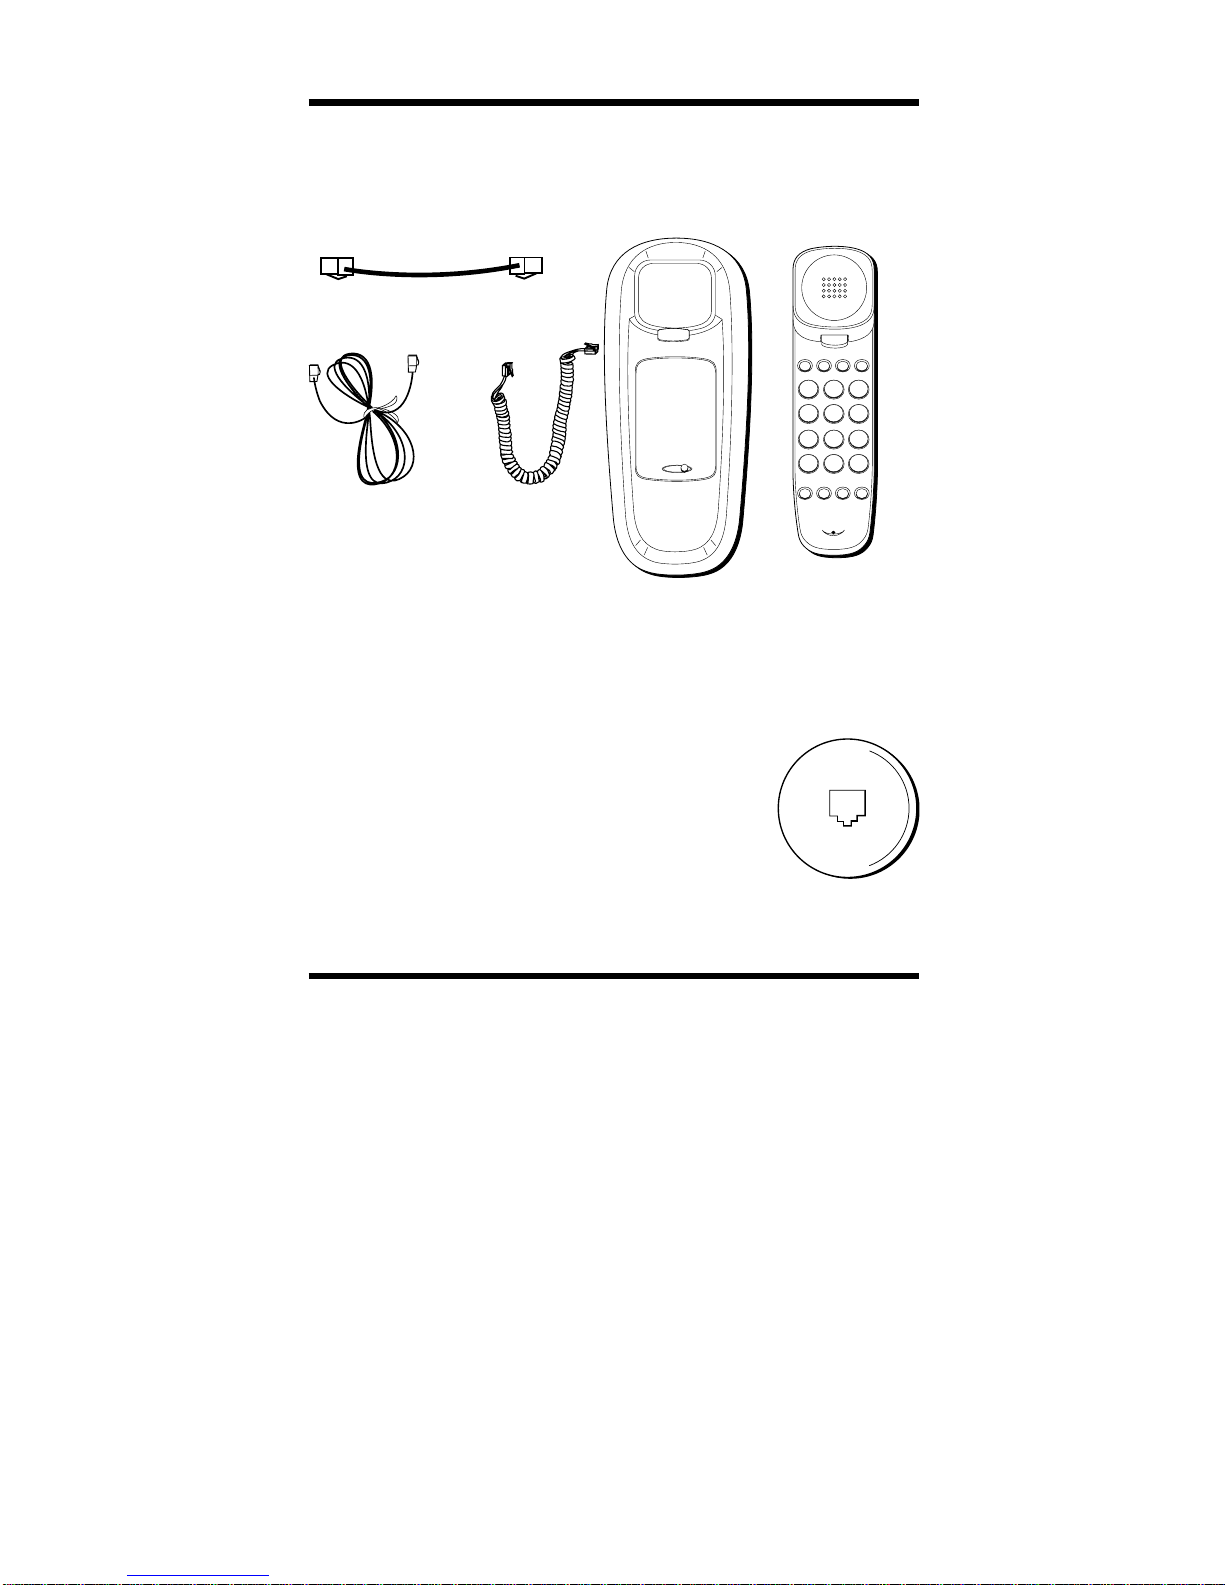
PARTS CHECKLIST ................................................................. 6
MODULAR JACK REQUIREMENTS ............................................. 6
INSTALLATION & SETUP .............................................................. 6
IMPORTANT INSTALLATION INFORMATION .................................... 6
INSTALLING THE BATTERIES ..................................................... 6
SETTING UPTHE CALLER ID MENU ......................................... 8
TOSET YOUR LOCAL AREA CODE ...................................... 9
TOSET THE CID DISPLAY LANGUAGE ................................. 9
TOSET THE LCD CONTRAST ........................................... 10
TOSET THE DIAL MODE ................................................. 10
TOEXIT SETUP ............................................................. 11
INSTALLING THE PHONE ............................................................ 12
TOINSTALL ON ADESKTOP .............................................. 12
TOMOUNT ON AWALL ...................................................... 13
CALLER ID FEATURES ............................................................... 14
SUMMARY SCREEN ............................................................. 14
RECEIVING AND STORING CALLS ............................................ 14
USING THE CALLER ID BUTTON ............................................ 14
REVIEWING CALL RECORDS ................................................... 15
DELETING CALL RECORDS .................................................... 15
DIALING BACK .................................................................... 15
IFYOU PROGRAMMED YOUR LOCAL AREA
CODE IN THE SETUP MENU ........................................... 16
IFYOU DID NOT PROGRAM YOUR LOCAL
AREA CODE IN THE SETUP MENU .................................... 16
CALLER ID WITH CALL WAITING ............................................ 17
MESSAGE INDICATORS .............................................................. 18
TELEPHONE BASICS .................................................................. 19
CHANGING THE VOLUME ...................................................... 19
REDIALING ANUMBER ......................................................... 19
USING ONE TOUCH REDIAL .................................................. 19
USING MEMORY FEATURES .................................................. 20
TOSTORE EMERGENCY/QUICK DIAL NUMBERS ................... 20
TOSTORE FREQUENTLY CALLED NUMBERS ........................ 20
TOCHANGE ASTORED NUMBER ...................................... 21
TOERASE ASTORED NUMBER ......................................... 21
TODIAL AQUICK DIAL NUMBER ...................................... 21
TODIAL FREQUENTLY CALLED NUMBERS ........................... 21
TOUSE PAUSE (REDIAL) ................................................ 21
FLASH ............................................................................... 22
TOUSE TEMPORARY TONE DIALING ................................. 22
TROUBLESHOOTING TIPS ........................................................... 22
TELEPHONE NETWORK INFORMATION ........................................... 24
REN NUMBER ........................................................................ 25
INDEX .................................................................................... 26
SERVICE ................................................................................. 28

5
INTRODUCTION
Your Caller ID phone stores and displays specific
information, provided by your local telephone company, to
subscribers of Caller ID or similar caller identification
services.You must subscribe to one of these services in
order to use this unit.
Your Caller ID phone enables you to:
• Identify callers before you answer the phone.
• View the time and date of each incoming call.
• Record up to 60 Caller ID messages sequentially.
• Know who called while you were away.
CALLER ID WITH CALL WAITING
Also known as Type II Caller ID, this feature allows you to
see the name and number of a call that beep in while you
are talking on the phone with someone else.
IMPORTANT: In order to use this unit, you must
subscribe to either the standard Name/Number
Caller ID Service or Caller ID with Call Waiting
Service. To know who is calling while you are on
the phone, you must subscribe to Caller ID with
Call Waiting Service.

PB
MODULAR JACK
REQUIREMENTS
You need an RJ11(CA11A) type modular
jack, which is the most common type of
phone jack and might look like the one
pictured here. If you don’t have a modular
jack, call your local phone company to find
out how to get one installed.
INSTALLATION & SETUP
IMPORTANT INSTALLATION
INFORMATION
• Never install telephone wiring during a lightning storm.
• Never touch uninsulated telephone wires or terminals,
unless the telephone line has been disconnected at the
network interface.
• Use caution when installing or modifying telephone lines.
INSTALLING THE BATTERIES
Your Caller ID phone uses 4 “AA” size alkaline batteries
(not included) for receiving and storing Caller ID records
and for the numbers you use for memory dialing.
Base
Telephone line
cord
RINGER VOLUME
OFF LO HI
ABC
2
DEF
31
JKL
5
MNO
6
GHI
4
TUV
8
WXYZ
9
PQRS
7
OPER
0
#
Store Quick Dial Caller ID
Volume Memory Redial Flash
AB
*
Handset
Short cord
BEFORE YOU BEGIN
PARTS CHECKLIST
Make sure your package includes the following items:
Coiled
cord

7
IMPORTANT: You will have approximately 60
seconds to replace the batteries before the
memories stored in the handset are lost. Please
read the instructions before replacing the
batteries and have the batteries ready to be
inserted beforehand.
1. If both the straight and coiled line cords are already
connected, disconnect them from the base unit. Place
the handset off to the side.
2. Use a screwdriver to loosen the two screws on the
battery doors located on the bottom of the base. Once
the screws are fully loosened, (they will not come all
the way out), slide the doors in the direction of the
arrows.
3. Insert 4 “AA” size alkaline batteries (not included) as
shown on the diagram in the battery compartments.
Two batteries will be inserted for each compartment.
4. Replace the battery compartment doors securely and
tighten the screws, being careful not to strip the
threads.
5. If the cords were previously connected, re-attach the
line cords to the unit and check your memory locations.
NOTE: If the low battery icon appears in
the display, you need to replace the batteries. It is
important that you replace the batteries as soon as
possible in order to maintain Caller ID operation.
During the replacing of batteries, a backup circuit
in the unit will retain your stored information for
up to 60 seconds. Write down any stored
information you do not want erased.
IMPORTANT: If you’re not going to use the
telephone for more than 30 days, remove the
batteries because they can leak and damage the
unit.

PB
SETTING UPTHE CALLER ID MENU
You should not plug the telephone into the wall line jack
while setting up the Caller ID menu. An incoming call may
invalidate the change if it was not yet saved.The phone
must display
xx CALLS
before you can enter the setup
menu.
1. Press and hold the REVIEW up button then press and
hold the REVIEW down button. Continue to hold both
buttons for 3 seconds.
SETUP MENU ^ v
appears.
2. At this point you can press either REVIEW up or down
button to scroll among the 6 menu screens, which are:
•SETUP MENU ^ v
•LOCAL AREA CODE (default - - -)
•CID LANGUAGE (default English)
•LCD CONTRAST (default 3)
•T/P DIAL MODE (default tone)
•EXIT SETUP
3. You have 10 seconds following any key press before the
phone will automatically return to the
CALLS
summary
screen.
CALLER ID PHONE
SETUP MENU
delete dial
review

9
TOSET YOUR LOCAL AREA CODE
The telephone uses the programmed area code to
determine the number format to display when a valid
Caller ID signal is received and is also used for the
Dialback feature.
1. Press and hold the REVIEW up button then press and
hold the REVIEW down button. Continue to hold both
buttons for 3 seconds.
SETUP MENU ^ v
appears.
2. Press the REVIEW up button until
LOCAL AREA
CODE
appears.
3. To enter or change the area code, press the DELETE
button.The display shows the present area code
stored.The left-most digit or a minus sign (-) flashes,
indicating it is ready to accept the area code entry.
4. Press REVIEW down to choose 9-0 for the first digit.
5. When the desired digit is flashing, press REVIEW up to
advance to the next digit.
6. Repeat steps 4 and 5 until all the digits for your area
code are correct.
If you make a mistake, you can simply retrace the
previous steps until your area code is set.
7. Press DIAL to store the area code and return to the
LOCAL AREA CODE
display.
TOSET THE CID DISPLAY LANGUAGE
This adjustment changes the Caller ID prompts to be
displayed in English, French or Spanish.
1. Press and hold the REVIEW up button then press and
hold the REVIEW down button. Continue to hold both
buttons for 3 seconds.
SETUP MENU ^ v
appears.
2. Press the REVIEW up button until
CID LANGUAGE
appears.

PB
3. Press the DELETE button to show the current language
setting.The default is English.
4. Press REVIEW up or down to change the language.
5. Press DIAL to store the language and return to the
CID
LANGUAGE
display.
TOSET THE LCD CONTRAST
This adjustment allows optimization of the contrast and
viewing angle of the display.
1. Press and hold the REVIEW up button then press and
hold the REVIEW down button. Continue to hold both
buttons for 3 seconds.
SETUP MENU ^ v
appears.
2. Press the REVIEW up button until
LCD CONTRAST
appears.
3. Press the DELETE button to show the current contrast
setting.There are 5 levels of contrast, with the default
set to 3.
4. To decrease the contrast, press REVIEW down.To
increase, press REVIEW up.
5. Press DIAL to store the contrast setting and return to
the
LCD CONTRAST
display.
TOSET THE DIAL MODE
This adjustment allows you to select tone (touch-tone) or
pulse (rotary) mode dialing.
1. Press and hold the REVIEW up button then press and
hold the REVIEW down button. Continue to hold both
buttons for 3 seconds.
SETUP MENU ^ v
appears.
2. Press the REVIEW up button until
T/P DIAL MODE
appears.
3. Press the DELETE button to show the current dial
mode.The default is set to tone.

11
4. To change the dial mode, press REVIEW up or down.
The display will alternate between the two modes.
5. Press DIAL to store the dial mode and return to the
T/P DIAL MODE
display.
TOEXIT SETUP
To exit the setup mode after your changes have been
made, you can immediately exit by selecting the
EXIT
SETUP
menu and pressing the DIAL button.
NOTE: The phone will exit setup after 10 seconds
if no buttons are pressed.
REMINDER: The time and date are programmed
automatically when the first Caller ID information is
successfully received after setup.

PB
INSTALLING THE PHONE
TOINSTALL ON ADESKTOP
1. Plug the coiled cord into the handset. Plug the other
end into the jack on the bottom end of the base.
2. Plug the long straight line cord into jack on the bottom
of the base. Plug the other end into a wall jack.
3. Set the RINGER switch on the base to HI.
•LO = Sound will be lower.
•OFF = Telephone will not ring.
RINGER VOLUME
OFF LO HI
3
2
1

13
TOMOUNT ON AWALL
1. Plug the short line cord into the jack on the bottom of
the base and connect the other end to a wall phone
jack.
2. Feed the short line cord through the grooves provided
so that the base area is flat and ready to mount on the
wall.
3. Slip the mounting holes of the base (on bottom of unit)
over the wall plate posts and slide the base down until
the phone is firmly in place.
4. Plug the coiled cord into the handset. Plug the other
end into the jack on the lower end of the base.
5. Set the RINGER switch on the base to HI.
•LO = Sound will be lower.
•OFF = Telephone will not ring.
6. Place the handset in the base.
RINGER VOLUME
OFF LO HI
5
3
4
1
2

PB
CALLER ID FEATURES
SUMMARY SCREEN
The Summary Screen
shows the current time,
current date and number
of new calls to be
reviewed. It is displayed
until any button is
pressed. Within 10
seconds of receiving a new call, the Summary Screen will
be displayed and the New Call LED will flash.
NOTE: The number of new calls is displayed until
any new calls have been reviewed.
RECEIVING AND STORING CALLS
This unit receives and displays information transmitted by
your local phone company.This information can include
the phone number, date, and time; or the name, phone
number, date, and time.The unit can store up to 60 calls
for later review.When the memory is full, a new call
automatically replaces the oldest call in memory.
NEW
will
appear in the display for calls received that have not been
reviewed.
USING THE CALLER ID
BUTTON
When you take the handset off the hook, the unit locks the
Caller ID function buttons on the back of the handset to
prevent buttons being pushed accidentally.To unlock the
Caller ID function buttons, press the CALLER ID button.
The REVIEW up and down buttons and DELETE buttons
are now unlocked.
NOTE: If no CID function buttons are pressed
within 5 seconds of pressing the CALLER ID
button, the phone will return to the locked state.
AM
PM

15
REVIEWING CALL RECORDS
•Press either the REVIEW up or REVIEW down button
to view the newest call record.
•Press the REVIEW down button to scroll through the
call records from the most recent to the oldest.
•Press the REVIEW up button to scroll through the call
records from the oldest to the newest.
•When all of the messages have been viewed,
START/
END
appears in the display.
DELETING CALL RECORDS
•To delete the record shown in the display, press the
DELETE button once.
•To delete all records while reviewing, press and hold
the DELETE button for about 3 seconds. “
DELETE
ALL?
”appears in the display. Press DELETE again to
complete.
DIALING BACK
When reviewing Caller ID records, you can dialback the
numbers shown on the display by pressing the DIAL button.
NOTE: This feature DOES NOT work when the
handset is picked up.

PB
IFYOU PROGRAMMED YOUR LOCAL AREA
CODE IN THE SETUP MENU
1. Use the REVIEW up and down buttons to display the
number you want to dial.
•If you see a number with 7 digits (i.e. 555-1234), then
the call was received from within your area code.
However, this does not guarantee the call is a local call.
•If you see a number with 11 digits (i.e. 1-234-555-
1234), then the call received was not from your area
code.
2. Press the DIAL button and the display shows
PICKUP
or ADJ
. A 15 second timer will also start at this point on
the upper right side of the display, letting you know the
time until the unit will return to the Caller ID record. If
you adjust the number to be dialed, the timer will reset
after each adjustment.
3. To adjust the phone number, press the DIAL button. For
instance, a 7-digit local number sometimes cannot be
dialed because it requires a 10-digit or 11-digit format.
Press the DIAL button repeatedly to scroll through the
7, 10, and 11-digit numbers.
7-digits:
7-digit telephone number
(i.e. 555-5555)
10-digits:
3-digit area code + 7-digit telephone number
(i.e. 425-555-5555)
11-digits:
long distance code 1 + 3-digit area code + 7-digit
telephone number
(i.e. 1-425-555-5555)
4. To dial the displayed number, pick up the handset
before the timer reaches 0.
NOW DIALING
shows in
the display and the number is dialed.
IFYOU DID NOT PROGRAM YOUR LOCAL
AREA CODE IN THE SETUP MENU
1. Use the REVIEW up and down buttons to display the
number you want to dial.You will only see 11-digit
numbers (i.e. 1-234-555-1234).

17
2. See steps 2 through 4 in the above section to complete
the dialback sequence.
NOTE: If only PICKUP PHONE shows on the
display, no other changes to the number can be
made. The information sent from the telephone
company is known to be a valid number for
dialing back (available only in limited areas).
Once you pickup the phone, the number will be
automatically dialed.
CALLER ID WITH CALL WAITING
Provided your telephone
company is able to integrate
Caller ID and Call Waiting
services, you will see who is
calling you when you hear the call
waiting beep.The caller
identification information appears
in the display after you hear the
tone.
•Press the FLASH button to put
the person to whom you're
talking on hold and answer the
incoming call.
IMPORTANT: In order to use this unit, you must
subscribe to either the standard Name/Number
Caller ID Service or Caller ID with Call Waiting
Service. To know who is calling while you are on
the phone, you must subscribe to Caller ID with
Call Waiting Service.
CALLER ID PHONE
10/1912:30
1 - 315 - 555 - 1324
SMITH JOHN
delete dial
review

PB
MESSAGE INDICATORS
The following special messages indicate the status of a
message or the unit:
NO CALLS The caller memory is empty.
UNKNOWN CALL The incoming call does not have
Caller ID service or their service
area is not linked to yours. If
UNKNOWN CALL
appears along
with a calling number, the name
information for that number was not
available.
Battery power level is low.
BLOCKED CALL The caller of the incoming call is
registered as “Private Number”and their
Caller ID information is withheld.
ERROR Caller information has been
interrupted during transmission.
NO DATA No Caller ID signal has been
detected, or Caller ID service has
not been activated.
START/END You are at the beginning or the end
of the Caller ID memory log.
LOW

19
TELEPHONE BASICS
CHANGING THE VOLUME
You are able to control the listening level with the
VOLUME button, which has 3 levels. At the lowest level,
the phone beeps once.
It remains at the last level set until you change it.
REDIALING ANUMBER
If you want to call the last number you dialed again (up to
32 digits), use REDIAL.
1. Pick up the handset.
2. Press REDIAL.
3. The last number called is automatically redialed.
USING ONE TOUCH REDIAL
If the last call you dialed was busy, you can redial it
immediately by just pressing the REDIAL button without
hanging up the handset.
ABC
2
DEF
31
JKL
5
MNO
6
GHI
4
TUV
8
WXYZ
9
PQRS
7
OPER
0
#
Store Quick Dial Caller ID
Volume Memory Redial Flash
AB
*
Volume
button
Redial
button
Memory
button
Flash
button
Store
button
Quick Dial
buttons Caller ID
button

PB
USING MEMORY FEATURES
Before you store any telephone number into memory,
make sure the dial mode is correct for the type of
telephone you’re using.The default dial mode is tone
(touch-tone), so if you have pulse (rotary) service, you
must first change the dial mode. See “To Set the Dial
Mode.”
TOSTORE EMERGENCY/QUICK DIAL
NUMBERS
1. Pick up the handset.
2. Push STORE.
3. Enter the telephone number (up to 20 digits). If you
make a mistake, hang up and repeat the procedure for
storing from the beginning.
NOTE: It will not actually call the number in this
mode.
4. Push STORE.
5. Push selected Emergency Quick Dial location–A or B.
6. Hang up the handset.
7. Write the name or number of party stored in the
memory location on the directory card.
TOSTORE FREQUENTLY CALLED
NUMBERS
1. Pick up the handset.
2. Push STORE.
3. Enter the telephone number (it will not actually call the
number in this mode). If you make a mistake, hang up
and repeat the procedure for storing from the
beginning.
4. Push STORE.
5. Push 0-9 for the memory location.
6. Hang up the handset.
7. Write the name or number of party stored in the
memory location on the directory card.
Other manuals for 2-9191
1
This manual suits for next models
1
Table of contents
Languages:
Other GE Cordless Telephone manuals