Hannlomax HX-1081BT User manual
CD MICRO WITH FM RADIO AND BLUETOOTH
Model : HX- 1081BT
(Bluetooth pairing code: HX-1081BT HANNLOMAX)
INSTRUCTION MANUAL
Note: Please read and follow these nstruct ons before us ng your un t.
1. Read these nstruct ons. Keep these nstruct ons. Heed all warn ngs. Follow all nstruct ons.
2. Do not use th s apparatus near water.
3. Clean only w th dry cloth.
4. Do not block any vent lat on open ngs. Install n accordance w th the manufacturer’s nstruct ons.
5. Do not nstall near any heat sources such as rad ators, heat reg sters, stoves, or other apparatus ( nclud ng ampl f ers) that produce heat.
6. Do not defeat the safety purpose of the polar zed or ground ng-type plug. A polar zed plug has two blades w th one w der than the other. A
ground ng type plug has two blades and a th rd ground ng prong. The w de blade or the th rd prong are prov ded for your safety. If the
prov ded plug does not f t nto your outlet, consult an electr c an for replacement of the obsolete outlet.
7. Protect the power cord from be ng walked on or p nched part cularly at plugs, conven ence receptacles, and the po nt where they ex t from
the apparatus.
8. Only use attachments/accessor es spec f ed by the manufacturer.
9. Use only w th the cart, stand, tr pod, bracket, or table spec f ed by the manufacturer, or sold w th the apparatus.
When a cart s used, use caut on when mov ng the cart/apparatus comb nat on to avo d njury from t p-over.
10. Unplug th s apparatus dur ng l ghtn ng storms or when unused for long per ods of t me.
11. Refer all serv c ng to qual f ed serv ce personnel. Serv c ng s requ red when the apparatus has been damaged n
any way, such as power-supply cord or plug s damaged, l qu d has been sp lled or objects have fallen nto the
apparatus, the apparatus has been exposed to ra n or mo sture, does not operate normally, or has been dropped.
12. Ground ng or Polar zat on – Th s product may be equ pped w th a polar zed alternat ng-current l ne plug (a plug hav ng one blade w der
than the other). Th s plug w ll f t nto the power outlet only one way. Th s s a safety feature. If you are unable to nsert the plug fully nto the
outlet, try revers ng the plug. If the plug should st ll fa l to f t, contact your electr c an to replace your obsolete outlet. Do not defeat the
safety purpose of the polar zed plug.
13. Alternate Warn ngs – Th s product s equ pped w th a three-w re ground-type plug, a plug hav ng a th rd (ground ng) p n. Th s plug w ll only
nto a ground ng-type power outlet. Th s s a safety feature. If you are unable to nsert the plug nto the outlet, contact your electr c an to
replace your obsolete outlet. Do not defeat the safety purpose of the ground ng-type plug.
14. Vent lat on – Slots and open ngs n the cab net are prov ded for vent lat on and to ensure rel able operat on of the product and to protect t
from overheat ng, and these open ngs must not be blocked or covered. The open ngs should never be blocked by plac ng the product on
a bed, sofa, rug, or other s m lar surface. Th s product should not be placed n a bu lt- n nstallat on such as a bookcase or rack unless
proper vent lat on s prov ded or the manufacturer’s nstruct ons have been adhered to.
15. The MAINS plug or an appl ance coupler s used as the d sconnect dev ce, the d sconnect dev ce shall rema n read ly operable.
16. 回: CLASS II apparatus w th double nsulat on, and no protect ve earth prov ded.
17. Caut on Mark ng and rat ng plate was located at bottom enclosure of the apparatus.
18. To reduce the r sk of f re or electr c shock, do not expose th s apparatus to ra n or mo sture.
19. The apparatus shall not be exposed to dr pp ng or splash ng and that no objects f lled w th l qu ds, such as vases, shall be placed on
apparatus.
20. The ma ns plug s used as d sconnect dev ce. The ma ns plug of apparatus should not be obstructed OR should be eas ly accessed
dur ng ntended use. To be completely d sconnect the power nput, the ma ns plug or apparatus shall be d sconnected from the ma ns.
21. Battery shall not be exposed to excess ve heat such as sunsh ne, f re or the l ke.
22. Excess ve sound pressure from earphones and headphone can cause hear ng loss.
CC NOTICE
Th s equ pment has been tested and found to comply w th the l m ts for a Class B d g tal dev ce, pursuant to Part 15 of the FCC Rules. These
l m ts are des gned to prov de reasonable protect on aga nst harmful nterference n a res dent al nstallat on. Th s equ pment generates, uses
and can rad ate rad o frequency energy and, f not nstalled and used n accordance w th the nstruct ons, may cause harmful nterference to
rad o commun cat ons.
However, there s no guarantee that nterference w ll not occur n a part cular nstallat on. If th s equ pment does cause harmful nterference to
rad o or telev s on recept on, wh ch can be determ ned by turn ng the equ pment off and on, the user s encouraged to try to correct the
nterference by one or more of the follow ng measures:
– Reor ent or relocate the rece v ng antenna.
– Increase the separat on between the equ pment and rece ver.
– Connect the equ pment nto an outlet on a c rcu t d fferent from that to wh ch the rece ver s needed.
– Consult the dealer or an exper enced rad o/TV techn c an for help.
-1-
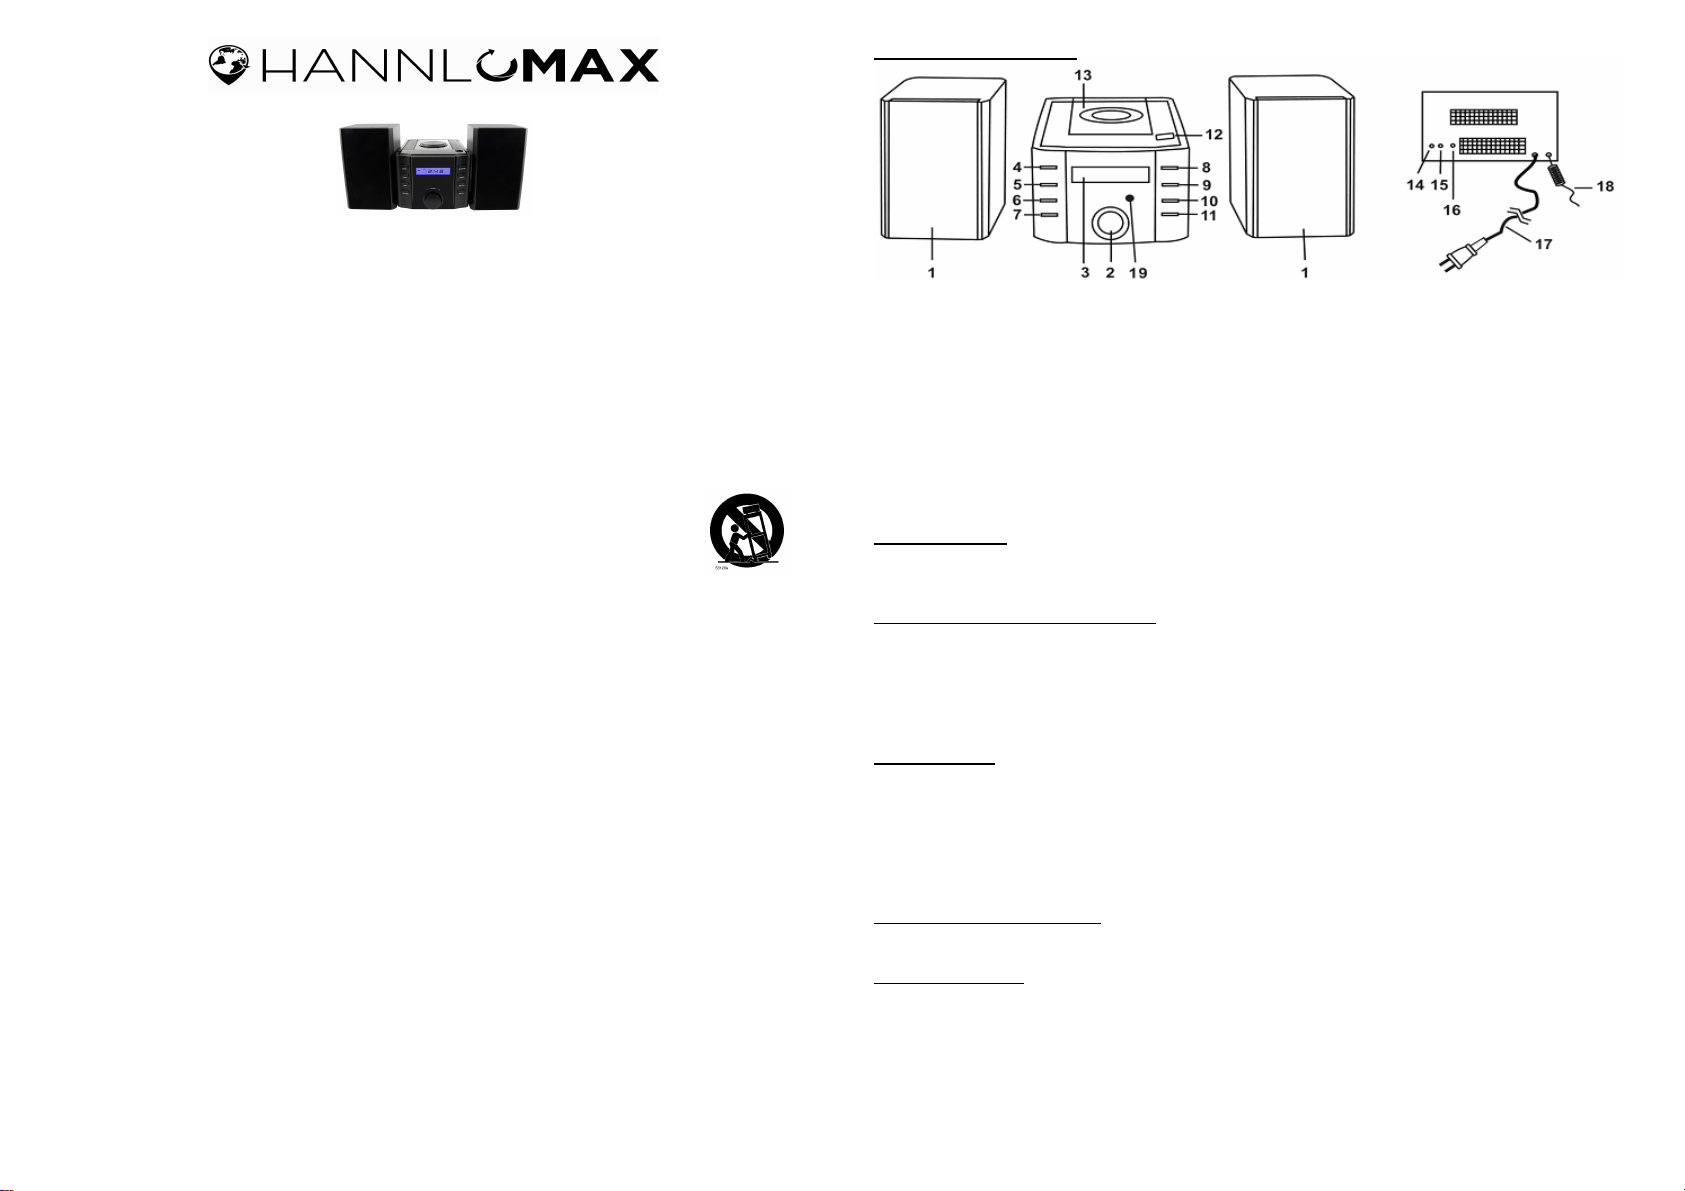
LOCATION O CONTROLS
1 Speaker 11 SKIP−/TU− button
2 VOLUME knob 12 CD door OPEN button
3 LCD display 13 CD compartment
4 ON/O button 14 Speaker jack R
5 SOURCE button 15 Speaker jack L
6 MODE button 16 Aux-in jack
7 PROG/MEM button 17 AC power cord
8 PLAY/PAUSE button 18 M wire antenna
9 STOP/M+ button 19 Remote Sensor
10 SKIP+/TU+ button
SPECI ICATIONS
Power supply: AC 120V ~ 60Hz
Frequency range: FM 87.5 – 108 MHz AM 520 – 1720 KHz
CONNECTING THE LOUDSPEAKERS
Connect the cables of the two loudspeakers to the nput of for the speakers. Two Speakers are dent cal.
Warning:
Connect the loudspeakers before power ng the un t:
The un t may not work properly or get damaged f you use speakers d fferent than the ones suppl ed
w th the un t.
AC OPERATION
Connect the power cable plug to the wall outlet.
ATTENTION
1. Do not plug or unplug the power cable wh le you have wet hands;
2. When plann ng not to use th s un t for a long t me, d sconnect the power cable from the wall outlet;
3. When d sconnect ng the power cord from the wall outlet, do not pull on the cord n order to avo d shock
r sks caused by damaged cable.
TURN ON AND O THE UNIT
Press the ON/O button to turn the un t ON or OFF.
RADIO OPERATION
1. Press SOURCE button to select AM or M rad o mode.
2. Press the SKIP+/TU+ button or SKIP−/TU− button step by step to tune to the des red rad o stat ons.
3. Press and hold the SKIP+/TU+ button or SKIP−/TU− button to search the next rad o stat on n the
d rect on of the search. The search operat on s mply f nds stat ons w th strong s gnals, Stat ons w th
weak s gnal can only tuned n step by step
4. Use the VOLUME knob to adjust the volume to the des red l sten ng level.
-2-
SAVING RADIO STATIONS IN THE MEMORY
Note : If you use th s un t n the f rst t me, or after plug off the power cord from a wall outlet, the un t memory
number w ll be start ng from P01.
1. Tune to the des red stat ons.
2. Press the PROG/MEM button, the d splay w ll show the next memory stat on number and ‘PROG’ flash
cont nuously.
3. Press the SKIP+/TU+ or SKIP−/TU− button to select memory number, then press PROG/MEM button
aga n to store the stat on nto the memory.
4. Repeat step 1 to 3 to store more rad o stat ons n the memory.
5. Up to 20 AM and 20 FM rad o stat ons can be stored n the memory.
TO SELECT A STORED RADIO STATION IN THE MEMORY
Press the STOP/M+ button to sk p to the next stored rad o stat on.
CD OPERATION
1. Press the SOURCE button to select CD mode.
2. Insert an aud o CD d sc n the CD compartment and close the CD door, the un t w ll start read ng the
d sc, t w ll show the total number of tracks of the ent re d sc after read ng.
3. Press the PLAY/PAUSE button to start play ng the f rst track of the ent re d sc.
4. Dur ng play ng, press the PLAY/PAUSE button to temporar ly pause play ng. To resume, press the
PLAY/PAUSE button aga n.
5. To stop play ng the d sc, s mply press the STOP/M+ button
Skip Mode
1. In PLAY or PAUSE mode, press the SKIP+/TU+ button to go to the next track.
2. In PLAY or PAUSE mode, press the SKIP−/TU− button to go back to the prev ous track.
3. In PLAY mode, press the SKIP−/TU− button to go back to the beg nn ng of the track.
4. In PLAY mode, press the SKIP−/TU− button tw ce to go back to the prev ous track.
Different Play Mode
In CD mode, press the MODE button to select d fferent k nds of play mode w th the follow ng sequence.
Repeat 1 Repeat ALL Normal
Repeat 1 – repeat the track be ng played.
Repeat ALL – repeat all the tracks n the ent re d sc.
Normal – play the tracks n sequence.
Programming
The programm ng can only be done n STOP mode
1. Press the PROG/MEM button, the LCD d splay w ll show P01 w th ‘PROG’ flash ng..
2. Use the SKIP+/TU+ button or SKIP−/TU− button to select the des red track.
3. Press the PROG/MEM button aga n to store the selected track n the memory, the LCD d splay w ll
show P02.
4. Repeat steps 2 to 3 to store more tracks n the memory. You can store up to 20 tracks n the memory.
5. Press the PLAY/PAUSE button to start play ng the d sc n the programmed order.
6. To stop play ng, press the STOP button.
7. To cancel the programm ng l st, press the STOP button aga n.
AUX-IN CONNECTION
1. Press the SOURCE button to select the AUX mode.
2. Insert one s de of the aud o cable (not ncluded) nto the L ne-Out or Phone Jack on your MP3 Player
or aud o dev ce and the other s de nto the AUX-IN jack of the un t.
3. Turn on your MP3 player or aud o dev ce and follow ts playback nstruct ons.
-3-
BLUETOOTH OPERATION
Connecting BLUETOOTH
1. Press the SOURCE button to select BLUETOOTH mode, ‘ bt ‘ w ll show n the LCD d splay.
2. Turn on the Bluetooth of your dev ce and search the un t for connect on. Your Bluetooth dev ce should
f nd “HX-1081BT HANNLOMAX”. If password s needed for connect on, please enter “0000”.
3. If connect on s successful, your Bluetooth dev ce may show Bluetooth s connected.
4. Select and play the aud o f le though your Bluetooth dev ce.
5. You can use the SKIP+/TU+ button to go to the next track or press the SKIP−/TU− button to go back to
the prev ous track.
6. Press the PLAY/PAUSE button to pause play ng. To resume, press the PLAY/PAUSE button aga n.
Turn Off the Bluetooth Operation
To turn off the Bluetooth operat on, press SOURCE button to select other mode.
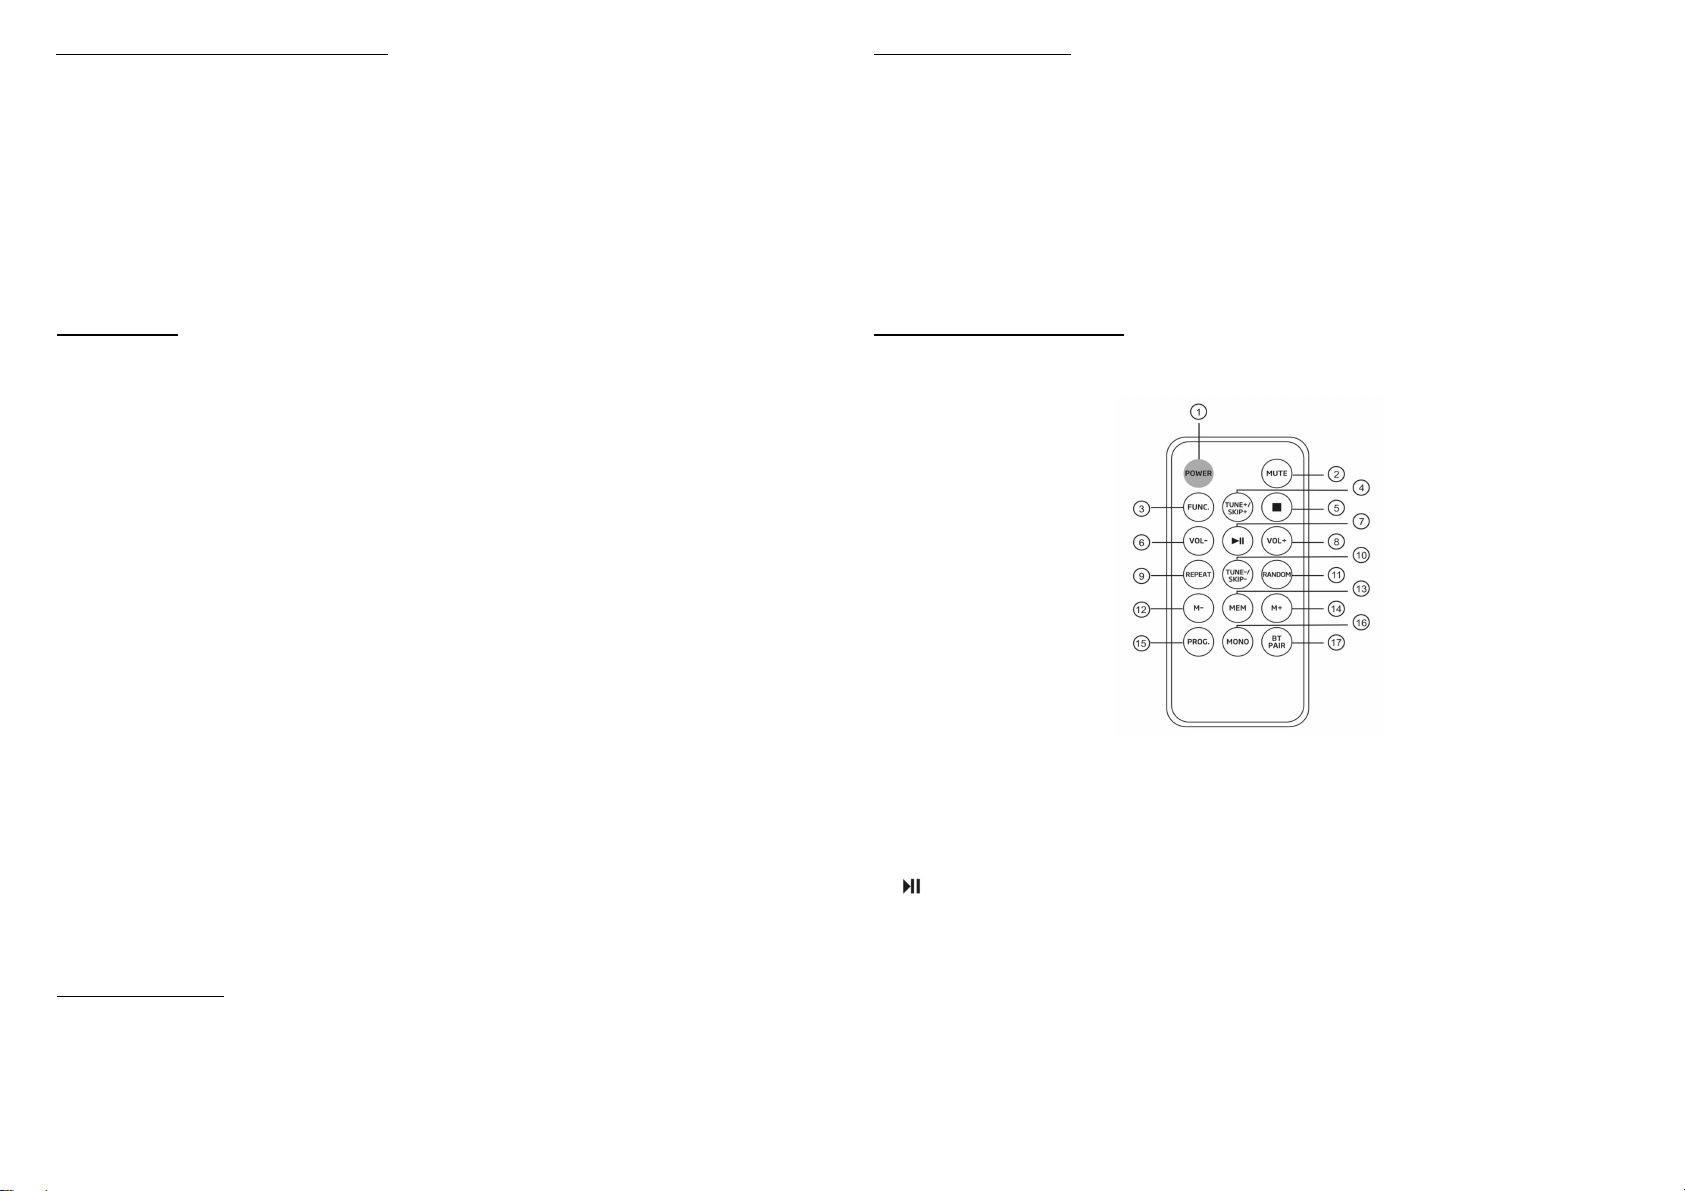
REMOTE CONTROL OPERATION
Reminder: Take off the plast c sheet located at the battery compartment tray to act vate the remote control.
Po nt the remote control at the remote sensor. The funct ons of the buttons on the remote control are same
as the correspond ng controls on the ma n un t.
1. POWER use th s button to turn the un t ON/OFF.
2. MUTE use th s button to turn off the sound.
3. UNC. use th s button to select the funct on
4. TUNE+/SKIP+ n CD mode or BLUETOOTH mode, use th s button to sk p to the next track. In FM
rad o mode, use th s button to search the next ava lable stat on n forward d rect on.
5. (STOP) n CD mode or BLUETOOTH mode, use th s button to stop play ng.
6. VOL− use th s button to decrease the volume.
7. (PLAY/PAUSE) n CD or BLUETOOTH mode, use th s button to start or pause play ng.
8. VOL+ use th s button to ncrease the volume.
9. REPEAT n CD mode, use th s button to select the REPEAT funct on.
10. TUNE−/SKIP− n CD mode or BLUETOOTH mode, use th s button to sk p back to the prev ous track.
In FM mode, use th s button search the next ava lable stat on n backward d rect on.
11. RANDOM n CD mode, use th s button to select the RANDOM funct on.
12. M− In FM rad o mode, use th s button to sk p to the next stored rad o stat on n backward order..
13. MEM n FM rad o mode, use th s button to store the select rad o stat on n the memory.
14. M+ In FM rad o mode, use th s button to sk p to the next stored rad o stat on n forward order.
15. PROG. n CD mode, use th s button to program the playback order.
16. MONO n FM rad o, use th s button to select Mono or Stereo broadcast.
17. BT PAIR Press and hold th s button to d sconnect the BT and go nto pa r ng mode.
-4-
Other Hannlomax Stereo System manuals


