Sony HCD-461 User manual

1
3-810-527-12(1)
HCD-461
Operating Instructions
f
© 1996 by Sony Corporation
Compact Disc
Deck Receiver

2
WARNING
CAUTION: TO REDUCE THE RISK OF ELECTRIC SHOCK,
DO NOT REMOVE COVER (OR BACK).
NOUSER-SERVICEABLEPARTSINSIDE.
REFERSERVICINGTOQUALIFIEDSERVICEPERSONNEL.
CAUTION
RISKOF ELECTRIC SHOCK
DO NOT OPEN
To prevent fire or shock hazard, do
not expose the unit to rain or
moisture.
This symbol is intended to alert the user to
the presence of uninsulated “dangerous
voltage” within the product’s enclosure that
may be of sufficient magnitude to constitute
a risk of electric shock to persons.
This symbol is intended to alert the user to
the presence of important operating and
maintenance (servicing) instructions in the
literature accompanying the appliance.
Note to CATV system installer
This reminder is provided to call the CATV system
installer's attention to Article 820-40 of the NEC that
provides guidelines for proper grounding and, in
particular, specifies that the cable ground shall be
connected to the grounding system of the building, as
close to the point of cable entry as practical.
Owner's Record
The model and serial number is located at the rear. Record
this serial number in the space provided below. Refer to
these numbers whenever you call upon your Sony dealer
regarding this product.
HCD-461 Serial No.
INFORMATION
This equipment has been tested and found to comply with
the limits for a Class B digital device, pursuant to Part 15 of
the FCC Rules. These limits are designed to provide
reasonable protection against harmful interference in a
residential installation. This equipment generates, uses, and
can radiate radio frequency energy and, if not installed and
used in accordance with the instructions, may cause harmful
interference to radio communications. However, there is no
guarantee that interference will not occur in a particular
installation. If this equipment does cause harmful
interference to radio or television reception, which can be
determined by turning the equipment off and on, the user is
encouraged to try to correct the interference by one or more
of the following measures:
— Reorient or relocate the receiving antenna.
— Increase the separation between the equipment and
receiver.
— Connect the equipment into an outlet on a circuit
different from that to which the receiver is connected.
— Consult the dealer or an experienced radio/TV
technician for help.
CAUTION
You are cautioned that any changes or modifications not
expressly approved in this manual could void your authority
to operate this equipment.
CAUTION
The use of optical instruments with this product will
increase eye hazard.

3
This unit is a compact disc deck receiver which consists of an
amplifier, tuner, stereo cassette deck and 5-compact disc
player.
Before operating this unit, please check the following.
On safety
• Operate the unit only on 120 V AC, 60 Hz.
• Should any solid object or liquid fall into the unit, unplug
it and have it checked by qualified personnel before
operating it any further.
• Unplug the unit from the wall outlet if it is not to be used
for an extended period of time. To disconnect the cord,
pull it out by grasping the plug. Never pull the cord itself.
Caution
The use of optical instruments with this product will
increase eye hazard.
On installation
• Place the unit on a level surface.
• Do not install the unit in a location near heat sources such
as radiators or air ducts, or in a place subject to direct
sunlight, excessive dust, mechanical vibration or shock.
• Good air circulation is essential to prevent internal heat
buildup in the unit. Place the unit in a location with
adequate air circulation. Do not place the unit on a soft
surface, such as a rug that would block the ventilation
holes on the bottom.
• Do not place anything on top of the cabinet. The top
ventilation holes must be unobstructed for the proper
operation of the unit and to prolong the life of its
components.
On cleaning the cabinet
Clean the cabinet, panel and controls with a soft cloth lightly
moistened with mild detergent solution. Do not use any type
of abrasive pad, scouring powder or solvent such as alcohol
or benzine.
On repacking
Do not throw away the carton and the packing material. It
makes an ideal container to transport the unit in.
On moisture condensation
If the unit is brought directly from a cold to a warm location,
or is placed in a very damp room, moisture may condense on
the lens inside the CD section. Should this occur, the CD
section will not operate. In this case, remove the disc and
leave the unit turned on for about an hour until the moisture
evaporates.
If you have any question or problem concerning your unit,
please consult your nearest Sony dealer.
For detailed precautions, see the leaflet "IMPORTANT
SAFEGUARDS".
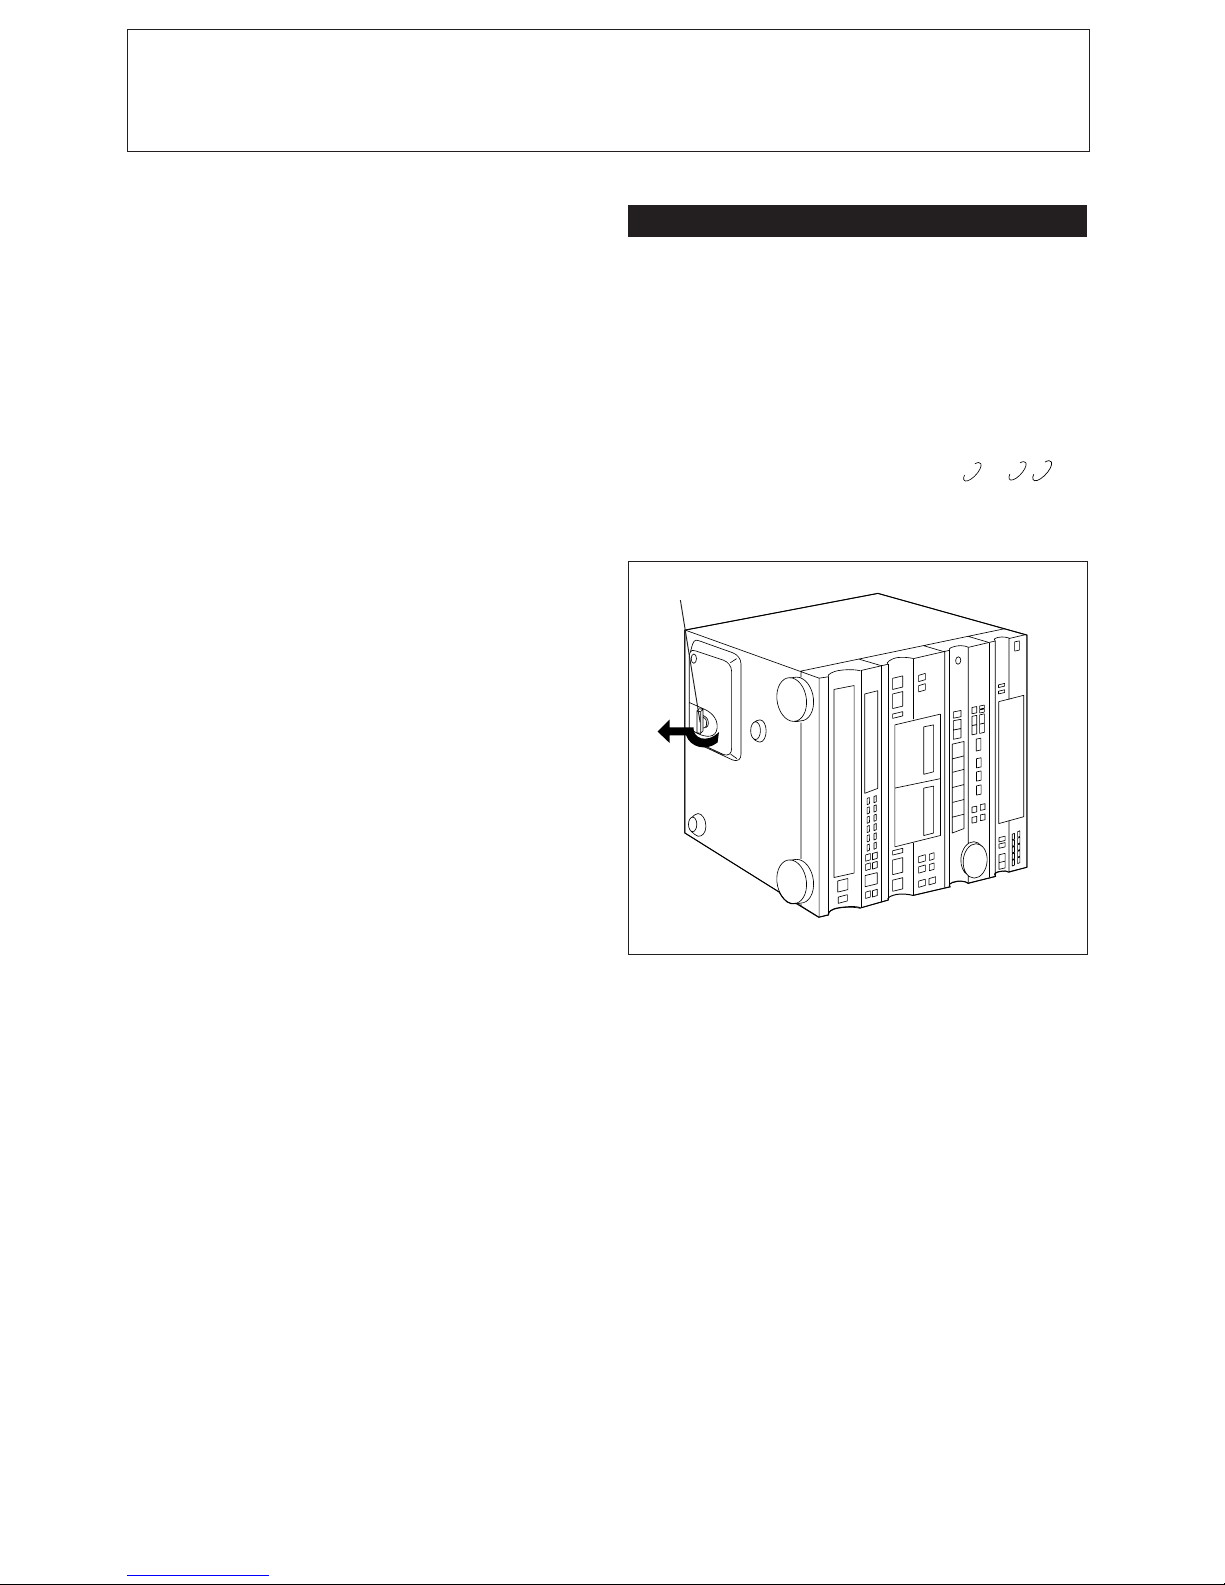
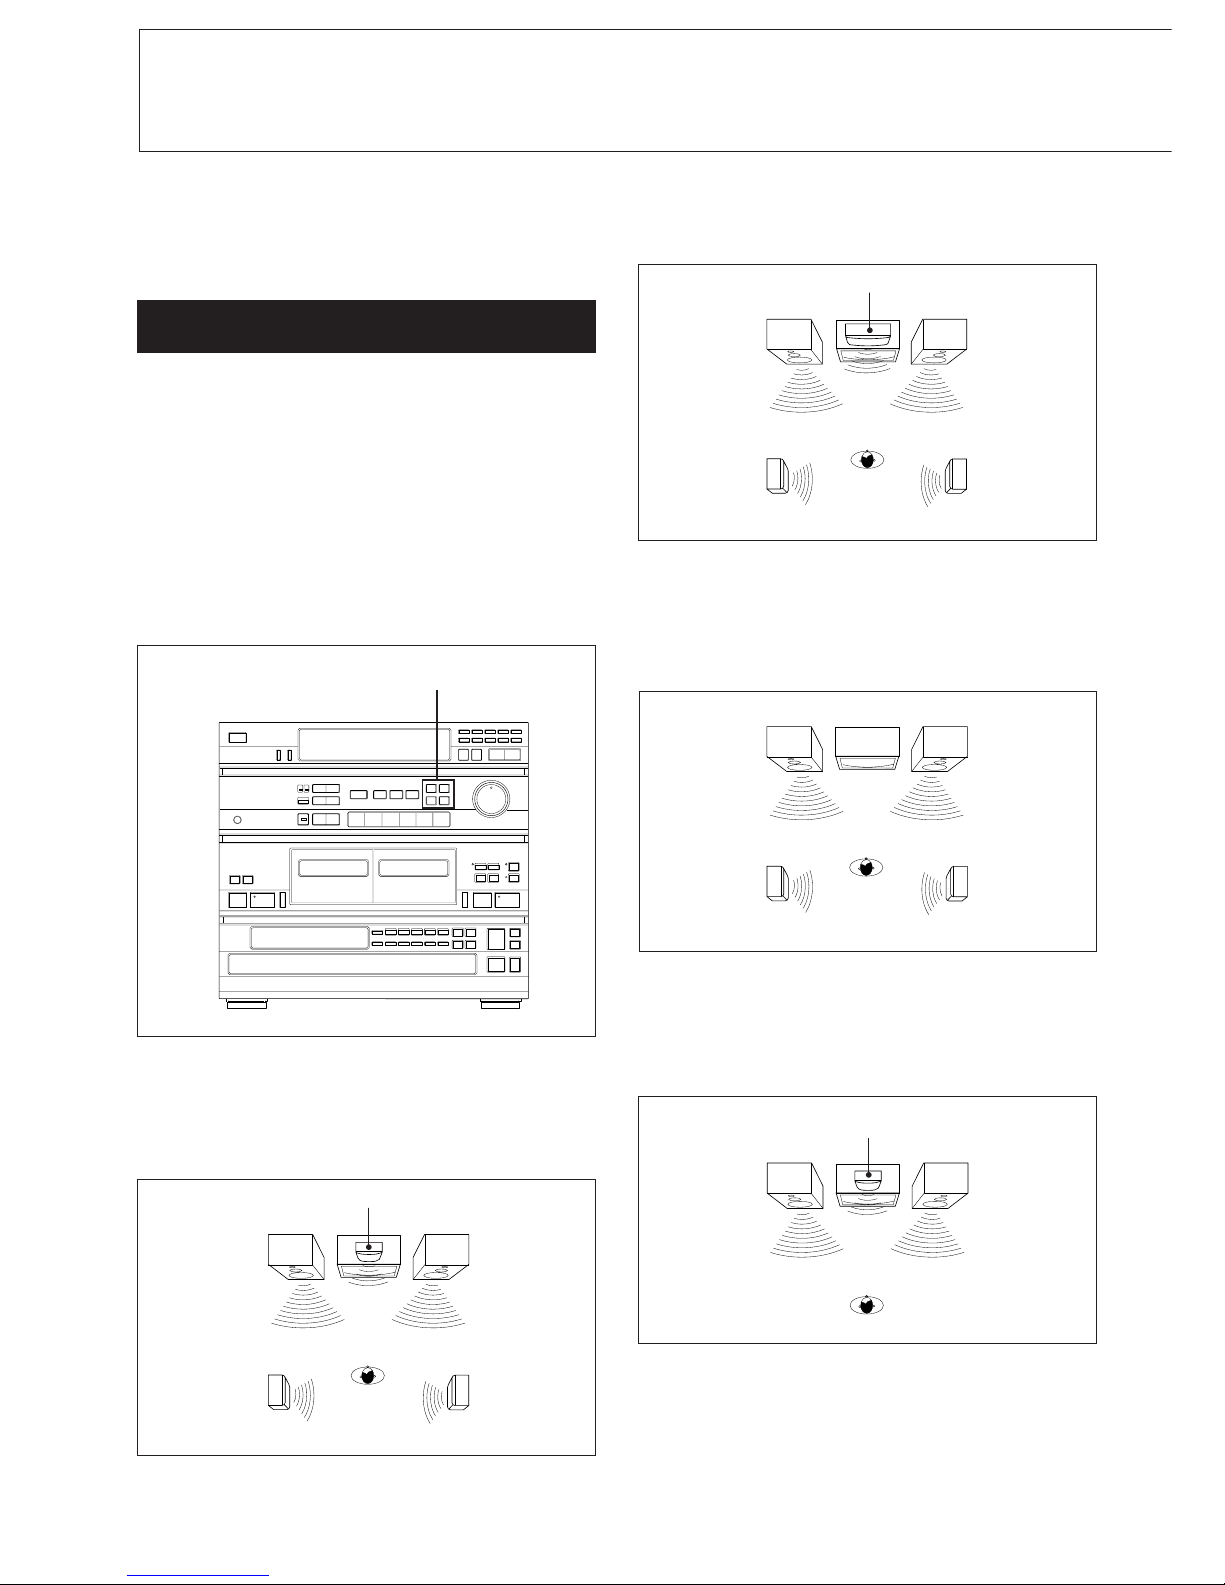
Note on the Transit Key
The transit key on the bottom exterior of the HCD-461
protects the optical system against shock during
transportation. Before operating the unit, be sure to remove
the key by following the instruction on the label, and store it
in a safe place.
When transporting the unit, re-install the key by following
the instruction below.
1Remove all discs from the CD section.
2Press §to close the disc tray and wait for " (or , ...)"
to disappear in the display.
3Turn the power off.
4Insert the key into its original hole and lock it in place.
3
2
1
HCD-461
Transit key
Precautions

4
Introduction
Precautions .................................................................................. 3
Note on the transit key ............................................................ 3
Getting Started
Remote control ............................................................................. 4
Hooking up the system .............................................................. 5
Using Your Stereo
Adjusting the audio .................................................................... 7
Adjusting the super woofer level .......................................... 7
Volume adjustment ................................................................. 7
Adjusting the bass and the treble sound .............................. 7
Getting ready for dolby surround sound ................................. 8
Placement of speakers and selecting the PRO LOGIC
MODE...................................................................................... 8
Adjusting the speaker volume ............................................... 9
Adjusting the delay time of the rear speakers ................... 10
Selecting a program source ...................................................... 10
Listening with the surround effect.......................................... 11
Receiving broadcasts ................................................................ 12
Storing station frequencies into memory ........................... 13
Tuning in a stored station ..................................................... 13
Scanning the stored station .................................................. 14
Playing back tapes (on either deck A or B) ............................ 15
Recording on tapes (Deck B) .................................................... 16
Dubbing tapes (from deck A to B) .......................................... 17
Playing the discs - Continuous play ....................................... 18
Information display ............................................................... 19
Selecting a desired disc ......................................................... 20
Locating a particular track.................................................... 20
Locating a particular point in a track .................................. 20
Playing in a random order-Shuffle play ................................. 21
Playing in a desired order - Program play............................. 22
Designating the total playing time - Time edit ..................... 23
Playing repeatedly - Repeat play ............................................ 25
General
Maintenance ............................................................................... 25
Specifications .............................................................................. 26
Troubleshooting ......................................................................... 27
Table of Contents Remote Control
The remote supplied with this unit can control the HCD-461
from a distance.
Battery life
About half a year of normal operation can be expected when
using the Sony SUM-3 (NS) batteries. When the batteries are
exhausted, the remote can no longer operate the unit. If this
happens, replace both batteries with new ones.
To avoid battery leakage
If the remote is not going to be used for a long time, remove
the batteries to avoid damage caused by battery leakage and
corrosion.
Inserting batteries into the remote
1Open the cover. 2Insert two size-AA (R6)
batteries with correct
polarity.

5
ANTENNA
SUPER WOOFER
CENTER SPEAKER
REAR SPEAKERS
FRONT SPEAKERS
This section describes the antenna and speaker connections. It also shows how to make
connections with other audio equipment.
• Connect the AC power cord last. Make sure the power is off.
• Cord plugs and jacks are color coded. Red plugs and jacks are for the right channel (R)
and white ones are for the left channel (L).
• There are also red and white jacks for the FRONT, REAR, CENTER, and SUPER
WOOFER.
• The cable connectors should be fully inserted into the jacks. A loose connection may
cause hum and noise.
• Keep speaker cords, connecting cords and power cords away from the␣ AM loop antenna
and the tuner's antenna lead-in to avoid possible noise pickup.
Hooking Up the System
AM
300
FM
75
For better FM reception
Outdoor FM antenna
(75-ohm coaxial cable)
1FM wire antenna (supplied)
AM
75
300
FM
12
3
}]
Rear Right
speaker
}]
Rear Left
speaker
}]
Center speaker
}]
Super Woofer
}]
}]
Front Right
speaker
Front Left
speaker
to a
wall
outlet
HCD-461
The numbers correspond to the
detailed illustrations following below.

6
PHONO
IN
VIDEO 1/MD
OUT
VIDEO 1/MD
IN
VIDEO 2
IN
AM
300
FM
75
Hooking Up the System
For better AM reception
2AM loop antenna (supplied)
Extend a 6 to 15-meter
insulated wire out of door(s).
It is also necessary to connect
the supplied AM loop antenna.
AM
300
FM
75
To attach to a wall
Adding other audio equipment to your system
VCR (for playback only)MD or VCR
to AUDIO IN to AUDIO OUT
Turntable system
HCD-461
R
–
+
L
–+
FRONT SPEAKER
IMPEDANCE USE 8–16
REAR SPEAKER
IMPEDANCE USE 8–16
R
–
+
L
–+
]}
]}
For left speaker
For right speaker
3Speaker cords
to AUDIO OUT

7
Adjusting the Audio
The following operations apply only to reproduced sound.
Volume Adjustment B
To increase the sound level, turn the VOLUME control
clockwise.
To decrease it, turn the control counterclockwise.
Adjusting the Bass and the Treble Sound C
Before adjusting the tone level, press TONE/LEVEL so that
the TONE indicator lights.
Press BASS/REAR + to enhance the BASS sound.
Press BASS/REAR – to attenuate the BASS sound.
The adjusted level is indicated on the display.
Press TREBLE/CENTER + to enhance the TREBLE
sound.
Press TREBLE/CENTER – to attenuate the TREBLE
sound.
The adjusted level is indicated on the display.
TREBLE/CENTER
–+
BASS/REAR
–+
B
C
TONE/LEVEL
indicators
TONE/LEVEL
AHEADPHONES C
A
B
For personal listening
Connect headphones to the HEADPHONES jack. No sound
is heard from the speakers.
Adjusting the Super Woofer Level A
–+
SUPERWOOFER LEVEL
Press SUPER WOOFER so that the indicator lights.
Press LEVEL – or + to adjust the super woofer level.
The super woofer level is indicated on the display.
Notes
• The super woofer is automatically turned off in the
PHONO mode and can not be controlled.
• Place the super woofer directly on the floor.
If your floor is made of wood, to obtain high-quality bass
sound, we recommend that you attach the supplied feet to
the bottom corners of the super woofer for greater
stability.

8
WIDE mode
Select this mode if you use a medium to big center speaker.
PHANTOM mode
Select this mode when you playback a Dolby surround
program source without using a center speaker. The sound
of the center channel is output from the front (L and R)
speakers.
3CH. (Channel) LOGIC mode
Select this mode when you playback a Dolby surround
program source only with the front and center speakers. The
sound of the rear channel is output from the front (L and R)
speakers.
Even for video software which does not carry the
qmark
Some commercially available software may have Dolby
surround processed sound tracks even though it is not
indicated on the package.
Getting Ready for Dolby Surround Sound
This section describes selecting a speaker configuration,
adjusting the speaker volume, and setting the delay time of
the rear speakers so you can enjoy Dolby surround sound.
Placement of Speakers and Selecting the PRO
LOGIC MODE
The Dolby Pro Logic Surround Decoder naturally
reproduces the audio sound field and creates a theater-like
experience in your listening room.
The HCD-461 incorporates a decoder which reproduces
specially encoded surround sound from Dolby surround
video programs.
To use Dolby surround effectively, select the speaker
operation mode according to your speaker configuration by
pressing DOLBY PRO LOGIC MODE: NORMAL, WIDE,
PHANTOM or 3CH.
With this unit, we recommended using the NORMAL mode.
NORMAL mode
Select this mode if you use a small center speaker. The bass
sound of the center channel is output from the front
speakers, since a small speaker cannot produce enough bass.
DOLBY PRO LOGIC MODE
Front speaker (R)
Front speaker (L)
Front speaker (L) Front speaker (R)
Front speaker (R)
Front speaker (L)
Rear speaker (R)
Rear speaker (L)
Rear speaker (R)Rear speaker (L)
Center speaker
Rear speaker (L) Rear speaker (R)
Center speaker
Center speaker
Front speaker (L) Front speaker (R)

9
4Press T.TONE to set to on.
"TEST TONE" appears on the display and the test
tone will be heard from each speaker in the
following order.
In NORMAL or WIDE mode:
LEFT(front) (CENTER (RIGHT(front)
REAR(L+R) 9
In PHANTOM mode:
FRONT(L+R)
REAR(L+R) 9
In 3CH mode:
LEFT(front) (CENTER (RIGHT(front)
5Adjust the volume level so that the sound
from each speaker is the same level at the
listening position.
A To adjust the level of center speaker(s)
(except for PHANTOM mode).
Press CENTER VOL/TV VOL +/–.
The adjusted center level is indicated on the display.
B To adjust the level of rear speakers
(except for 3CH. mode).
Press REAR VOL/TV CH +/–.
The adjusted rear level is indicated on the display.
(Turning the MASTER VOLUME control on the
unit, adjusts all speakers simultaneously.)
• To adjust the center level or rear level,
TREBLE/CENTER –/+ or BASS/REAR –/+ on
the main unit can also be used.
6After adjusting, press T.TONE to turn off the
test tone.
"TEST TONE" disappears.
Adjusting the Speaker Volume
For maximum enjoyment of surround sound when playing
any program source, adjust the front, rear, and center (if
connected) speakers to the same volume level. The
adjustment must be done with a test tone in the DOLBY
SURROUND mode, but once the level is adjusted it can be
used for all surround modes.
You can adjust the volume level from your listening
position by using the remote.
BASS/REAR –/+
MASTER
VOLUME
1Press SURROUND ON/OFF to ON.
"SURROUND ON" appears in the display.
2Press SURROUND MODE so that "DOLBY
SUR" appears on the display.
3Select the Dolby pro logic mode with the
DOLBY PRO LOGIC MODE buttons on the
main unit according to your speaker system.
The selected mode is displayed.
(
1
2
3
TREBLE/CENTER –/+
(
(
1
2
4, 6
5-B
MASTER
VOLUME +/–
5-A

10
Adjusting the Delay Time of the Rear
Speakers
The delay time is the time between the surround sound from
the front and rear speakers. The delay time can be set for
either 15 ms, 20 ms, or 30 ms.
The delay time can be set in each surround mode (DOLBY,
HALL, SIMULATED). (see page 11.)
1Press SURROUND ON/OFF to ON.
"SURROUND ON" appears on the display.
2Press the desired SURROUND MODE.
3Press DELAY on the remote commander to
adjust the delay time.
"DELAY TIME" and the selected delay time appear
on the display.
To turn off the surround effect
Press SURROUND ON/OFF to OFF.
SYSTEM POWER
nON 12
1
2
3
Getting Ready for
Dolby Surround Sound
Selecting a Program
Source
SYSTEM POWER
nON 1
1Select the program source.
The corresponding function name appears on the
display. (Only VIDEO 1 appears on the display
when VIDEO 1/MD is selected.)
Phono record
Radio Broadcast
Compact disc
Taped program
Video program
/Mini Disc
PHONO
TUNER
CD
TAPE
VIDEO1/MDorVIDEO2
Function selector to be
pressed
VIDEO 1/MD VIDEO 2 PHONOTUNERCD
TAPE
2Start the selected program.

11
SYSTEM POWER
nON
1Select the program source.
The corresponding function name appears on
the display.
2Start the selected program.
3Press SURROUND ON/OFF to ON.
"SURROUND ON" appears on the display
4Select the surround mode with the
SURROUND MODE* buttons
The corresponding surround mode name
appears on the display.
3 14
VIDEO 1/MD VIDEO 2 PHONOTUNERCD
TAPE
* You can select the appropriate surround mode
from among the following modes:
DOLBY** (Dolby Surround): Expands sound to create
theater-like sound effects.
HALL (Hall surround): Provides reverberation effects
similar to those produced in a concert hall.
SIMULATED (Simulated surround): Provides a simulated
surround sound for non-Dolby sources.
** Manufactured under license from Dolby Laboratories Licensing
Corporation. Additionally licensed under Canadian patent
number 1,037,877. "Dolby", the double-D symbol aand "Pro
Logic" are trademarks of Dolby Laboratories Licensing
Corporation.
Note
No sound will be heard from the rear speakers, unless the
SURROUND ON/OFF button is set to ON.
Listening with the Surround Effect

12
This section describes various ways to tune in AM and FM broadcasts.
Before tuning, be sure to connect the supplied AM and FM antennas.
1Press TUNER.
2Press BAND to select FM or AM.
BAND
FM
"TUNER" appears on the display.
(The CD section is automatically turned off in the
TUNER mode.)
3Press DUAL MODE TUNING – or +.
For a higher
frequency
For a lower
frequency +
–
• Tuning in automatically
Keep pressing DUAL MODE TUNING – or + for
about 1 second.
When a station is received, the automatic tuning
stops.
To stop automatic tuning
Press DUAL MODE TUNING – or +.
• Tuning in manually
Press DUAL MODE TUNING – or + to select the
station.
4Repeat step 3 until the desired station is
received.
Indicators in the display
• "TUNED" appears when a station is tuned in.
• "STEREO" appears when an FM stereo program of
sufficient signal strength is received.
To change the AM tuning interval
The AM tuning interval is preset at the factory to 10 kHz (for
U.S.A., Canada and Mexico) or 9 kHz (for other countries) to
match the frequency allocation system of your country. To
change the interval, proceed as follows.
1Press SYSTEM POWER to turn on the unit.
2Press TUNER.
3Set the BAND selector to AM.
4Press SYSTEM POWER to turn the unit off.
5While pressing DUAL MODE TUNING +, press SYSTEM
POWER to turn the unit on.
To reset the interval, follow the same procedure.
Note
When the interval is changed, all stored stations, the settings
for SUPER WOOFER ON/OFF, SURROUND ON/OFF, and
BASS/TREBLE will be erased from the memory. After
changing the interval, be sure to perform these settings
again.
23
SYSTEM POWER
nON 1
VIDEO 1/MD VIDEO 2 PHONOTUNERCDTAPE
Receiving Broadcasts

13
Storing Station Frequencies into Memory
Up to 10 stations can be stored in any order for each memory
page (A, B, C), so you can store up to 30 stations.
1Tune in the desired station. (See page 12.)
2Press MEMORY.
4While "MEMORY" is displayed, press the
desired number.
MEMORY
12345
80
67
3While "MEMORY" is displayed, press SHIFT
to select the memory page (A, B or C).
The memorized pages and numbers are displayed
as: A – 1, B – 1, C – 1.
9
MEMORY
You can store a station only while "MEMORY"
appears on the display
If "MEMORY" goes off, press MEMORY again.
To cancel the storing operation after pressing SHIFT
Press MEMORY.
If you store a new station
Storing a new station will erase the previously stored one.
Tuning in a Stored Station
1Press TUNER.
(The CD section is automatically turned off in the TUNER
mode.)
2Select the memory page with SHIFT.
3Designate the number with the numeric buttons.
4
SYSTEM
POWER
nON
SHIFT
Each time SHIFT is pressed, A, B or C is indicated
cyclically.
The last memorized number on the selected page
appears.
2TUNER 3

14
Scanning the Stored Station
1Press MEMORY SCAN.
2Press DUAL MODE TUNING – or +.
MEMORY
SCAN
SYSTEM
POWER
nON
3Press MEMORY SCAN again as soon as the
station you desire is tuned in.
MEMORY
SCAN
If a stored station cannot be tuned in by scanning
A stored station with a weak signal may be skipped.
Tune in the station manually.
DUAL MODE TUNING
The stored stations are scanned in the following
order:
Each station received will be heard for about 4
seconds.
2
A – 1 9 ( A – 2 ..... A – 0 9 ( B – 1 ..... B – 0
C – 0 9 ( C – 9 ..... C – 1
9
9
(
9
+
–
1, 3
Receiving Broadcasts

15
Playing Back Tapes (on either Deck A or B)
This section describes basic playback from either deck A or B.
1Press TAPE.
3
4
2p
SYSTEM POWER
nON
3Press DOLBY NR to select the DOLBY NR
setting.
4Press ·to start playback.
ØON øOFF
DOLBY NR
When the tape ends, playback stops automatically.
·
To stop playback, rewinding or fast forwarding,
press p.
To pause, press P.
To resume playback, press Pagain or ·.
To rewind the tape, press 0.
To fast-forward the tape, press ).
Notes
• During playback or recording on one deck, do not operate
the other deck. (When both decks A and B are in playback
mode, only playback from deck A will be audible.)
• Before turning the power off, be sure to stop playback or
recording by pressing p.
What is the Dolby NR* system?
Dolby NR (noise reduction) system reduces tape hiss noise in
low-level, high-frequency signals. The system boosts these
signals in recording and lowers them in playback.
When listening to a tape recorded with Dolby NR, set
DOLBY NR to ON.
* Dolby noise reduction manufactured under license from Dolby
Laboratories Licensing Corporation.
"DOLBY" and the double-D symbol aare trademarks of Dolby
Laboratories Licensing Corporation.
VIDEO 1/MD VIDEO 2 PHONOTUNERCDTAPE
"TAPE" appears on the display.
2Press §to open the cassette compartment,
insert the tape with the side to be played
facing you and close the cassette
compartment.
DECK A
§
EJECT
42
10 )
P

16
Recording on Tapes (Deck B)
This section describes how to record with deck B.
2Press DOLBY NR to select the DOLBY NR
setting.
ØON øOFF
DOLBY NR
§
EJECT
DECK B
1 2 5
SYSTEM POWER
nON
Tab for side A
Tab for side B
To protect side A
Break off the tab of side A.
To record onto side A
Cover the opening with
plastic tape.
Side A
To stop recording, press p.
Notes
• The recording level is automatically adjusted during
recording.
• Do not operate deck A while recording with deck B.
• It is not recommended recording with Metal tapes.
To prevent accidental erasure
®
REC
3Press rr
rr
rto enter recording pause mode.
The rand Pindicators light.
5Press ·or Pto start recording.
The recording pause mode will be canceled and the
recording starts.
The Pindicator goes off.
4Play the program source to be recorded.
·P
or
PAUSE
1Press §to open the cassette compartment,
insert the tape with the side to be
recorded facing you and close the cassette
compartment.
4 3

17
This section describes recording from deck A to B.
Dubbing Tapes (from Deck A to B)
1Press §§
§§
§to open the cassette compartments,
insert the tapes with the sides to be played
or recorded facing you and close the
cassette compartments.
2Press HIGH SPEED DUBBING.
The unit enters recording pause mode for high speed
dubbing, the Pand rindicators light.
(Dubbing can not be carried out by pressing the
HIGH SPEED DUBBING button.)
Recorded tape Blank tape
DECK A DECK B
HIGHSPEED
DUBBING
1 1
2
3
SYSTEM POWER
nON
3Press Pto start dubbing.
The recording pause mode will be canceled and
dubbing starts.
The Pindicator goes off.
P
PAUSE
To stop dubbing, press pon deck A or B.
Notes
• The tape in deck B is automatically recorded with the same
recording system as the original tape in deck A. So it is
unnecessary to set DOLBY NR.
• If the sound is affected by a television set during dubbing,
turn off the set or move it away from the unit.
p

18
12345
12345
678910
11 12 13 14 15
16 17 18 19 20
ALL
DISCS
1 DISC
12345
1
DISCS
MIN SEC
2345
678910
ALL
Playing the Discs – Continuous Play
This section describes continuous play with the CD section. You can choose to play just
one, or up to five discs.
Before playing a disc, turn on the SYSTEM POWER and set the function selector to the
CD mode.
1Press §§
§§
§to open the disc table.
§
OPEN/CLOSE
2Place a disc with the label side up.
To play more than one disc, press DISC SKIP to turn
the disc tray and place up to 5 discs.
After placing discs, press §to close the disc table.
Disc tray
/
DISC
SKIP
Disc No.
3Press CONTINUE to choose whether to play
one disc or all discs.
Each time CONTINUE is pressed, "1 DISC" or "ALL
DISCS" appears alternately.
CONTINUE
4Press DISC SELECT or ·to start playback.
Track numbers on the
selected disc.
When playback of a
track is finished, that
track number goes
out.
To stop play, press p.
To stop play and open the tray, press §.
To stop for a moment during play, press P.
Press ·or Pto resume playback.
Caution on adjusting volume
Do not turn up the volume while listening to a portion
with a very low level or no audio signals. The speakers
may be damaged when a peak level portion is played.
Notes
• The CD section is automatically turned off in the TUNER
mode. The OPEN/CLOSE and DISC SKIP buttons,
however, can be operated in any mode (including
TUNER). This is useful when recording on tape from CDs.
• The disc number of an empty tray will be displayed until
the empty tray is set to play. Once it is recognized as
empty, it will disappear.
To play an 8 cm (3-inch) CD
If the disc is provided with an adaptor, first remove it, then
place the disc on the inner circle of the tray. Do not put a
normal CD (12 cm/5-inch) on top of an 8 cm CD.
When there are no disc at all on the tray
"no d1SC" appears on the display.
The (indicator lights up.
Elapsed time in the
track being played
Track number
being played
12345
DISCSELECT or ·
1, 2
4
SYSTEM POWER
nON CD
p
P
23

19
12345
1
DISCS
MIN SEC
2345
678910
ALL
12345
1
DISCS
MIN SEC
2345
678910
ALL
12345
1
DISCS
MIN SEC
2345
678910
ALL
ALL
12345
1
DISCS
MIN SEC
2345
678910
TIME
TIME
TIME
a)
b)
c)
Each time you press TIME during playback, the display
changes as follows:
/
.
.
.
>
.
a) Time elapsed on the track (automatically displayed when
playback starts.)
b) Time remaining on the track.
"--.--" indicator will appear in the display instead of
the actual time, if selection number 24 or higher is
selected.
c) Time remaining on the disc.
Note
Time remaining on the disc is only available in the
continuous mode. It connot be displayed by pressing TIME
during the program or shuffle mode.
Information Display
Total playing time
Total number of the
tracks on the disc
Shows the disc
number to be
played back or
being played back.
(Current disc)
The circle shows that a disc is
loaded which has not been
played back completely.
When all tracks on a disc have
been played back, the circle on
the disc number goes off.
When the disc tray is closed by pressing §, the total number
of selections and the total playing time of the disc to be
played are displayed for a few seconds.
If you press TIME in stop mode, the total number of
selections and the total playing time of the disc to be played
can be displayed.
Disc number
TIME
Track numbers

20
Selecting a Desired Disc
By using the DISC SELECT 1 to 5 buttons or the DISC SKIP
button during playback, you can locate the beginning of any
disc.
To select a particular disc
Press the corresponding DISC SELECT 1 to 5.
To move to the next disc on the tray
Press DISC SKIP.
Locating a Particular Track
Locating a track in sequence
You can locate the beginning of a track on the disc being
played.
To locate the beginning of the track being played
Press ≠.
To locate the beginning of the next track
Press ±.
Press ≠or ±until the desired track is located.
Locating a Particular Point in a Track
Locating a point in sequence (Manual Search)
You can locate a particular point during playback by
monitoring the sound at high speed.
To go back at high speed
Keep 0pressed.
To go ahead at high speed
Keep )pressed.
Release the button when you reach the desired point.
To locate at higher speed
Press 0or )in the pause mode. Search speed will
increase by three times, but there will be no sound. Find the
desired point by watching the time number on the display.
" " appears in the display
If you continuously press )during play at the end of the
disc, " " appears in the display. Press 0or ≠to
return to the normal display.
DISC SKIP
DISC SELECT 1-5
0/)
Playing the Discs – Continuous Play
Table of contents
Other Sony Stereo System manuals

Sony
Sony HTC-W555 User manual

Sony
Sony LBT-D560 User manual

Sony
Sony MHC-DX80 User manual

Sony
Sony MEX-M71BT User manual

Sony
Sony HCD-LV80 User manual

Sony
Sony MHC-EC68USB User manual

Sony
Sony CMT-HX7BT User manual

Sony
Sony MHC-GX8000 - Mini Stereo System User manual

Sony
Sony SS-DP1000D User manual

Sony
Sony SHAKE-X70D User manual

Sony
Sony HCD-BX3 User manual

Sony
Sony HCD-GR8000 User manual

Sony
Sony HCD-GP6V User manual

Sony
Sony CMT-C7NT User manual

Sony
Sony MHC-M20D Quick start guide

Sony
Sony HCD-HPR90 - Receiver Component For Mini Hi-fi... User manual

Sony
Sony FST-GTK11iP User manual

Sony
Sony HCD-GV10AV User manual

Sony
Sony HCD-V8900 User manual

Sony
Sony ZS-D55 User manual