HANSCRAFT IN.K1000 User manual

USER MANUAL
IN.K1000 – HC EASY POOL

Contents
1 Hottubperformancespecications . . . . . . . . . . . . . . . . . . . . . . . . . 3
2 Preparation for the installation of the hot tub . . . . . . . . . . . . . . . . . . 4
2.1 Preparation of the place for installation and connection to electricity . . . . . . 4
2.2 Preparation for the interior hot tub installation . . . . . . . . . . . . . . . . . . . . 5
2.3 Preparation for the exterior hot tub installation . . . . . . . . . . . . . . . . . . . . 5
3 Installation of the hot tub . . . . . . . . . . . . . . . . . . . . . . . . . . . . . . . 5
3.1 General information. . . . . . . . . . . . . . . . . . . . . . . . . . . . . . . . . . . . . . 5
3.2 Filling the hot tub with water . . . . . . . . . . . . . . . . . . . . . . . . . . . . . . . . 6
3.3 Running the power supply of the hot tub . . . . . . . . . . . . . . . . . . . . . . . . 6
3.4 Programming of the hot tub control unit using the control panel . . . . . . . . . 6
4 Aquatic AV audio system . . . . . . . . . . . . . . . . . . . . . . . . . . . . . . . . 6
5 Control panel . . . . . . . . . . . . . . . . . . . . . . . . . . . . . . . . . . . . . . . 7
5.1 Touch screen . . . . . . . . . . . . . . . . . . . . . . . . . . . . . . . . . . . . . . . . . . 7
5.2 Functions of the Hot tub . . . . . . . . . . . . . . . . . . . . . . . . . . . . . . . . . . . 8
5.3 Whirlpool Mode . . . . . . . . . . . . . . . . . . . . . . . . . . . . . . . . . . . . . . . . 8
5.4 Settings . . . . . . . . . . . . . . . . . . . . . . . . . . . . . . . . . . . . . . . . . . . . . 10
5.5 Water care . . . . . . . . . . . . . . . . . . . . . . . . . . . . . . . . . . . . . . . . . . . . 11
5.6 Adjustment of water care plans . . . . . . . . . . . . . . . . . . . . . . . . . . . . . . 11
5.7 Protocol of maintenance and errors . . . . . . . . . . . . . . . . . . . . . . . . . . . . 13
5.8 Date and time. . . . . . . . . . . . . . . . . . . . . . . . . . . . . . . . . . . . . . . . . . 14
5.9 Screen setting . . . . . . . . . . . . . . . . . . . . . . . . . . . . . . . . . . . . . . . . . 15
5.10 Keypad Lock. . . . . . . . . . . . . . . . . . . . . . . . . . . . . . . . . . . . . . . . . . . 16
5.11 ElectricalConguration . . . . . . . . . . . . . . . . . . . . . . . . . . . . . . . . . . . 17
5.12 WiFi . . . . . . . . . . . . . . . . . . . . . . . . . . . . . . . . . . . . . . . . . . . . . . . . 17
5.13 Miscellaneous. . . . . . . . . . . . . . . . . . . . . . . . . . . . . . . . . . . . . . . . . . 18
5.14 About . . . . . . . . . . . . . . . . . . . . . . . . . . . . . . . . . . . . . . . . . . . . . . . 19
5.15 Excess water on the display . . . . . . . . . . . . . . . . . . . . . . . . . . . . . . . . . 19
5.16 Error messages about installation . . . . . . . . . . . . . . . . . . . . . . . . . . . . . 20
6 Upkeep of the hot tub . . . . . . . . . . . . . . . . . . . . . . . . . . . . . . . . . . 20
6.1 General information. . . . . . . . . . . . . . . . . . . . . . . . . . . . . . . . . . . . . . 20
6.2 Removalandcleaningoftheltercartridge. . . . . . . . . . . . . . . . . . . . . . . 20
6.3 Maintaining the quality of the water in the hot tub . . . . . . . . . . . . . . . . . . 21
6.4 Replacing the water . . . . . . . . . . . . . . . . . . . . . . . . . . . . . . . . . . . . . . 22
6.5 Cleaning the outer shell of the hot tub . . . . . . . . . . . . . . . . . . . . . . . . . . 22
6.6 Hot tub hygiene and disinfection. . . . . . . . . . . . . . . . . . . . . . . . . . . . . . 22
6.7 Thermo cover . . . . . . . . . . . . . . . . . . . . . . . . . . . . . . . . . . . . . . . . . . 23
6.8 Upkeep of the thermo cover and upkeep instructions. . . . . . . . . . . . . . . . . 23
7 Winter and summer time . . . . . . . . . . . . . . . . . . . . . . . . . . . . . . . . 24
7.1 Winter time – using the hot tub, all year operation (SLP) . . . . . . . . . . . . . . . 24
7.2 Summer time . . . . . . . . . . . . . . . . . . . . . . . . . . . . . . . . . . . . . . . . . . 24
8 Final establishments . . . . . . . . . . . . . . . . . . . . . . . . . . . . . . . . . . . 25
8.1 Guarantee conditions . . . . . . . . . . . . . . . . . . . . . . . . . . . . . . . . . . . . . 25
8.2 Safe disposal of the product after the service life . . . . . . . . . . . . . . . . . . . 25
8.3 Warranty claims and repair services . . . . . . . . . . . . . . . . . . . . . . . . . . . . 25
9 Repair services chart. . . . . . . . . . . . . . . . . . . . . . . . . . . . . . . . . . . 25
10 Supplements . . . . . . . . . . . . . . . . . . . . . . . . . . . . . . . . . . . . . . . . 26
11 Notes . . . . . . . . . . . . . . . . . . . . . . . . . . . . . . . . . . . . . . . . . . . . . 26

3
Hot tub performance specifications
1 Hot tub performance specifications
Performance specifications
nominal voltage:
three-phase connect. 230/400 V 50 Hz*
maximum work current: 3× 16 A
current surge: up to 3× 25 A
voltage resistance: 1 250 V/min. without puncturing
insulation resistance: >=1MΩ
water resistance: IPX5
electrical shock protection: rstlevel
*The product does not use the 400 V phase to phase voltage. It is possible to adjust
it to 1× 230 V, however, this is not recommended due to limitations of the functions.
(For more information on this connection, please refer to the Supplements, p. 26)
Stress load
heating: 1× 230 V/3 kW/13.6 A
ozone: 1× 230 V/50 Hz /80 mA
blower: 1× 230 V/0.66 kW/ 2.9 A
pump 1/1 + 1/1 + 1/1 + 0.4: 3× 2.2 kW + 0.4 kW
overall wattage (depends on the hot tub type)
: 10.66 kW/ h
protection class: I.
lighting: LED 12 V/10 W
maximum output: 20 W
humidity resistant speakers: yes
Preparation and electrical connection options – AC three-phase
current 3× 230/400 V/16 A/20 A
Ensure that the Hot tub is connected to a circuit protected by a Residual Current
protective Device with a rated tripping current of 0.03 A, at all times. It is necessary
For your own safety and the safety of your product, please observe the
following instructions. Read the following information carefully and follow
the user manual exactly when using the hot tub to avoid damaging the product
or the risk of injury. This appliance is intended for use by children 8 years of
age or older with reduced physical, sensory or mental capabilities, or lack of
experience and knowledge, provided they are under supervision or have been
instructed on the use of the product and understand the risks. Children must
not play with the product. Cleaning and maintenance must not be performed by
children without supervision.

4
Specifications/Preparation for the installation
to use a Type C or Type D circuit breaker with a rated current of 16 A (motor circuit
breaker) downstream of the Residual Current protective Device.
Recommended Type C or D circuit breaker (motor circuit breaker)
Hot tubs with two massage motors: 3× 16 A/C or D
Hot tubs with three massage motors: 3× 20 A/C or D
!!! THE HOT TUB MUST BE INSTALLED BY AN ELECTRICIAN WITH THE
APPROPRIATE QUALIFICATION ONLY !!!
2 Preparation for the installation of the
hot tub
Check the hot tub first before the installation. Immediately contact the
seller in case any of the parts are broken or missing. Make sure that all the
components correspond to your order
. Check the hot tub before every use.
In
case of any damage, do not use the hot tub.
2.1 Preparation of the place for installation and connection to
electricity
The hot tub must be installed on a at and rm enough base plate with regard to
the maximum load of the construction. For exterior installations we recommend a
construction of a monolithic concrete base plate of minimum thickness of 10 cm. It is
always necessary to pick the maximum load of the base plate with regard to the size
and weight of the hot tub. Consult with your construction supervisor. The weight is
adduced in the technical description of the hot tub.
The baths are prepared by us for an electrical wiring of 3× 230 V/400 V~ alternating
current. Therefore, use a circuit breaker 3× 16 A/C or D, alternatively 3× 20 A/C or D
and a Residual Current protective Device corresponding to this wiring. Furthermore, it
is necessary to have a cable with parameters corresponding to the rightful regulations
for this type of wiring. The cable must also have 4 usable meters at the location
of the Hot tub, so that it can be pulled through and connected to the control unit
without complications. Do not route the cable under the Hot tub!
NOYES

5
Preparation/Installation of the hot tubSpecifications/Preparation for the installation
2.2 Preparation for the interior hot tub installation
If the hot tub is installed in an interior space, it is necessary to comply with safety
instructions. The basic safety requirements are mainly non-skid oors and drainage in
the place of the installation in case of a water overow. It is also crucial to keep in mind
that the humidity around the hot tub will rise and can damage surrounding electric ap-
pliances. Therefore we recommend customizing the place of the installation according
to these conditions. The hot tub should be accessible from all sides for future repair
services. If it is not suciently accessible during the guarantee period, the owner has
a duty to ensure the access.
2.3 Preparation for the exterior hot tub installation
If the hot tub is installed in an exterior space, it is necessary to comply with safety
instructions. The basic safety requirements are mainly non-skid oors and water drain-
age in case of a rainfall or water overow from the hot tub. Therefore we recommend
customizing the place of the installation according to these conditions.
3 Installation of the hot tub
Warning: connection to electricity must be done according to norms valid in
CzechRepublicČSN332000-7-701
3.1 General information
We strongly recommend you to hire professionally trained and qualied technicians
for the process of installation. If you decide to install the hot tub by yourself, please
abide by the following instructions.
a) Carefully remove all the packaging material from the hot tub and position the hot
tub on a beforehand selected place of installation.
b) Demount the front panel on the side of the hot tub control panel. Demount the
upper cover of an electrical wiring under which you can nd a residual current de-
vice, a ground fault circuit interruptor (if it is part of the hot tub equipment) and
a ground staple. The connection itself must be done by a person with an expert
qualication.
c) Every hot tub is tested in real life conditions during the production process,
therefore there is a possibility some technical parts of the hot tub have remained
slightly dirty. We recommend you to clean the surface of the hot tub using a
suitable method; lukewarm water works best for this purpose. Clean the surface
using a soft cloth only. Don't use any rough abrasive means and cloths which could
permanently damage the surface of the hot tub. If you decide to use a generic
cleaning detergent, it cannot be aggressive towards the hot tub surface.

6
Installation of the hot tub/Audio system Aquatic
3.2 Filling the hot tub with water
Fill the hot tub with a sucient amount of water. The level of water in the hot tub
cannot ever fall under the skimmer level. If you notice a water leak, stop the water
until the defect is xed. Hot tubs do not possess the technology for water-softening
and hard water can be damaging to them. The damages caused by poor handling and
upkeep are not covered by the guarantee.
a) Fill the hot tub through a skimmer to prevent an over aeration of the circulation
pumps.
b) Do not ll the hot tub with water of temperature over 104 °F.
c) Once the water reaches the desired level, put the cartridge lter inside the
skimmer. Tilt the lter during the installation to prevent air bubbles. Only after
removing the air from the lter, install the lter into place.
3.3 Running the power supply of the hot tub
If the hot tub is connected by a moving supply cable, this cable cannot come in con-
tact with sharp objects or be exposed to external forces. Therefore we recommend
putting the supply cable inside a protective case. Turn on a residual current device
intended for a hot tub.
3.4 Programming of the hot tub control unit using the control
panel
Now you can start the programming of the hot tub. The process is described in the
chapter “Control panel”. After you are nish the programming, cover the hot tub with
a thermo cover and let the water temperature to stabilize. Check the water level
inside the hot tub regularly.
4 Aquatic AV audio system
Aquatic AV audio system AQUATIC/MY MUSIC (relevant only for hot tubs equipped
with the system)
If you want to play music from an external device, it is necessary to pair the device
with the hot tub rst (phone, tablet, computer). Turn on the bluetooth system on your
external device and search for the AQUATIC device. The connection is not restricted by
a code and only one connection can be active at a time. You can play music immediately
after the devices are successfully paired. You can control all the functions of the audio
system on your connected external device.

7
Control panelInstallation of the hot tub/Audio system Aquatic
5 Control panel (IN.K1000)
Notification icons
Icons on the top right of the screen display the status of the accessory providing
additional functions.
5.1 Touch screen
No mechanical buttons, keys or switches! Digital mode and function selection
circle, one-touch activation of last used settings, interactive icons and on-screen
notications – these are the elements of the Smart Touch user interface, designed
so that the user can intuitively communicate with his Hot tub and thus easily use its
features.
Aquasoul Pro
The audio
system is ON
Aquasoul Pro
The audio
system is OFF*
in.mix
Is installed
WiFi
The system
is connected
to WiFi
WiFi
The system is
disconnected
from WiFi
ALL- ON/ALL- OFF
BUTTON (one-touch
activation of last
used settings)
Mode selection
circle (settings and
accessories)
On-screen system
notications and
reminders
On-screen interactive icons
(main functions of Hot tub)
Function
selection circle
(settings and
other)
*The audio system is installed beyond the interface of the control panel, and thus
the icon in the interface is non-functional.

8
Control panel
Switch on the control panel
If no contact is made, the screen will switch
o 3 minutes after the last pump shutdown.
Touch the screen to switch it on. Then, follow
the instructions on the screen to access the
main page.
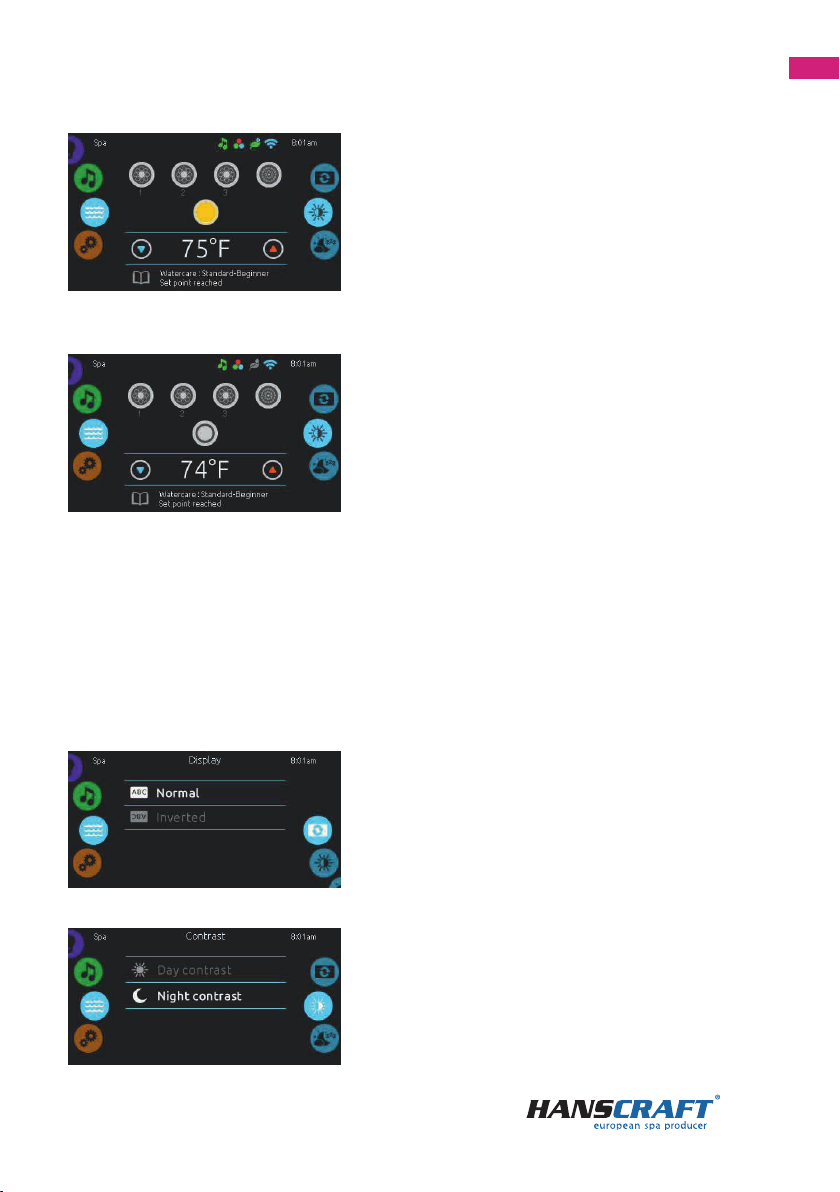
Whirlpool mode
To select the whirlpool mode, slide the selection
circle to the left or down until the whirlpool
icon is highlighted in the centre. The home page
of the ON/OFF button, arrows pointing up and
down, water temperature, notications and
selection of display options will show up:
– display orientation
– contrast of the display
To select an option, slide the selection circle up
or down until the desired icon is highlighted in
the centre.
ALL-ON/ALL-OFF button
Smart touch is equipped with a memory of
the last setting used, which can be activated
by one touch of a button. When selected, it
will either switch on or switch o all work
activities and accessories at once.
5.3 Whirlpool Mode
5.2 Functions of the Hot tub
Quick and easy step-by-step setup for controlling the main functions and
conguration of the system settings on your Hot tub using the Smart Touch screen.
On the main page you can select the following modes:
– color (with an installed in.mix)
– audio (with an Aquasoul Pro connection)
– spa
– settings
To select a mode, slide the left selection circle up or down until the desired icon is
highlighted in the centre.
9
Control panel
Switching accessories on and on
To start or stop an accessory (pump, air
blower, light), touch the corresponding icon.
If the accessory is on, the icons are animated.
When o, the animation stops. The icons on
the screen will reect the speed or status of
the running mechanisms in your Hot tub. If an
accessory has more than two speeds, press the
button until the desired speed is reached.
Water temperature
The temperature displayed on the bottom of the
screen represents the current temperature of the
water. Use the icon Up or down to regulate the
desired temperature. The selected temperature
will appear in blue. One step is set to 0.5. Unless
you make a change within 3 seconds, the current
temperature of the water will appear again. If
the set temperature is lower than the current
temperature, a notication will appear displaying
Cooling to xx.x. If the set temperature is higher
than the current temperature, a notication will
appear displaying Heating to xx.x. Under normal
circumstances, there will be a short delay before
the heating begins during which a notication
will be displayed under the temperature value
stating Heating suspended.
Display orientation
To adjust the display orientation settings,
slide the right selection circle until the display
orientation icon is highlighted in the centre.
Select the preferred orientation by tapping
on it.
Display contrast
To adjust the display’s contrast, slide the
right selection circle until the display contrast
icon is highlighted in the centre. Select the
preferred contrast by tapping on it.

10
Control panel
Sleep
If you want to put the display to hibernation
mode without waiting, select the SLEEP icon.
It is not possible to unintentionally run/stop
the pump in this mode.
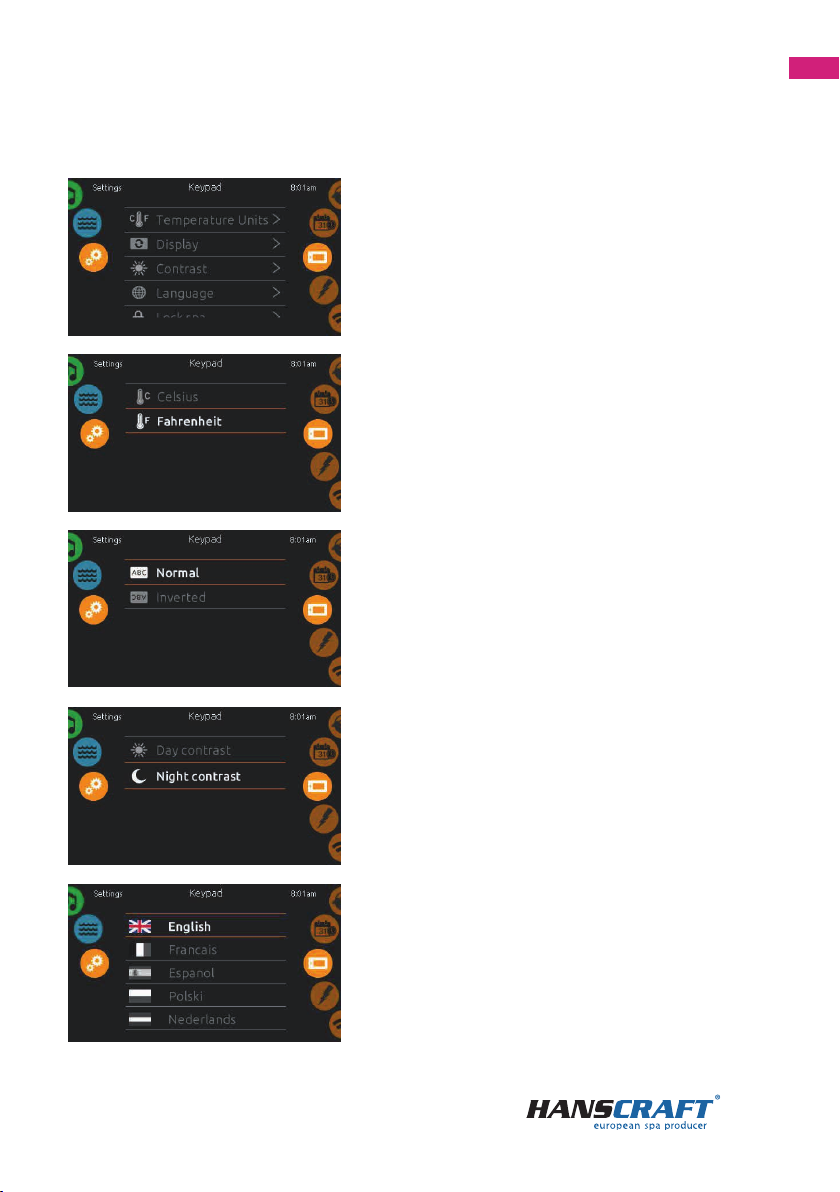
5.4 Settings
You can use the settings mode to manage the settings of your appliance.
List of
displayed
items
Mode
selection
circle:
settings icon
Function selection circle:
– water care
– maintenance
– date & time
– keypad
– electrical config
– WiFi
–
about
To select the mode of settings, move the left selection circle up or down until the
Settings icon is highlighted in the centre.
Under Settings you can access the following:
– water care
– maintenance
– date & time
– keypad
– electrical conguration
– WiFi
– about
To select an item, scroll the right selection circle until the desired icon appears in the
centre or by pressing on the item in the selection list.

11
Control panel
5.5 Water care
The Water Care page allows you to set up the ideal ltration and heating setting.
Select, set or change any of the 5 available modes depending on your needs
at the given.
AWAY FROM HOME
In this mode, the Hot tub will always be in saving mode (economy);
the set value will decrease to 11 °C.
STANDARD – BEGINNER
The Hot tub will never be in power saving mode (economy) and
filtering will take place depending on the configuration of the
system.
ENERGY SAVINGS
The Hot tub will be in power saving mode (economy) during the
peak of the day throughout the day and will return to the normal
mode during the weekend.
SUPER ENERGY
The Hot tub will be in power saving mode (economy) at all times
during the peak, every day of the week.
WEEKENDER
The Hot tub will be in power saving mode from Monday to Friday,
and it will run in normal mode during the weekend.
Water Care
You can change the category of water care by
tapping the pen icon on the right-end of the
desired water care, which will open the Water
Care menu.
5.6 Adjustment of water care plans

12
Control panel
Economy
Select the Economy folder to change the
operation plan. You can add another plan
by tapping on “Add Economy”. If you wish to
remove a plan, tap on the trashcan symbol on
the right end of the requested row.
In Economy mode the set temperature value will be decreased by 11 °C, meaning that the
heating system will not be in service until the temperature falls below 11 °C of the set value.
The Filter plan that will show up on the screen will concern the main lter pump, most
likely pump 1. If your Hot tub uses a circulation pump congured to run for 24 hours, the
screen will show the Purge setting instead of Filter setting. The Purge duration is set to
a xed number of minutes; thus, the duration will be set to N/A, and you may only adjust
the starting time.
Filter cycles
Select the Filter Cycle folder to change the
lter plans. You can add another lter plan
by tapping “Add lter cycle”. If you wish to
remove a plan tap the trashcan symbol on the
right end of the requested row.
You can adjust the programmed plans.
A number of timetable options are available
(Mo-Fri, weekend, every day, single days). This
plan will repeat itself every week. The cycle
duration can be set in 30-minute intervals.
Once you have chosen your plan, press
“Conrm”. If you do not wish to save the plan,
tap “Cancel” or use the calendar icon to return
back.

13
Control panel
Purge Time
Tap the Purge Time folder to change the
setting of the process. You can add purge
time by choosing “Add purge time”. If you wish
to remove a plan tap the trashcan symbol on
the right end of the requested row.
You can adjust the programmed purge time.
A number of timetable options are available
(Mo-Fri, weekend, every day, single days). This
plan will repeat itself every week. The duration
is set to 30 minutes. You can adjust the starting
time. Once you have adjusted the plan, tap
“Conrm”. If you do not wish to save the plan, tap
“Cancel” or use the calendar icon to return back.
Maintenance
To change the maintenance settings, slide the
right selection circle until the maintenance icon
is highlighted in the centre. On the Maintenance
page you can access the following:
– Reminders
– Standby
Just select the row with the item you wish to
change.
Reminders
Smart Touch will send reminders for necessary
maintenance of the Hot tub, as well as cleaning
of the lter. Every task has its own duration
based on its regular usage. The menu of
reminders allows you to check the remaining
time until necessary maintenance, as well as
resetting of the time as soon as the task has
been complete. To resume the task, select it
by tapping the curved arrow and then conrm
when prompted to. After you have conrmed
it, the task will reset.
5.7 Protocol of maintenance and errors

14
Control panel
Standby
This mode allows you to perform maintenance
of the Hot tub. The pumps are switched o for
30 minutes, after which they will automatically
switch on. The display returns to normal once
the pump is put into operation again.
Date and time
To adjust the date and time, slide the right
selection circle until the calendar icon is
highlighted in the centre. Just select the row
with the item that you wish to change.
5.8 Date and time
Date setting
Here it is possible to set up the year, month
and day. Simply slide your nger up or down
along the column that you wish to change, and
select your desired value. If you do not wish to
do so, you can return by tapping the calendar
icon on the right-hand side of the screen.
Time setting
You can set up the time display here. Simply
slide your nger up or down along the column
that you wish to change, and select the
desired value. If you do not wish to do so, you
can return by tapping the calendar icon on the
right-hand side of the screen.
15
Control panel
Temperature unit
On this page you can adjust or change the
display of the temperature in °F or °C.
Display orientation
On this page you can set up or adjust a normal
or inverted orientation of the display.
Display contrast
On this page you can set up or change the day
or night contrast of the display.
Display language
On this page you can set up or change the
language of the display.
Keypad setting
To adjust the keypad setting, slide the right
selection circle until the keypad icon is
highlighted in the centre. Simply select the
row of the item that you wish to change.
5.9 Screen setting
16
Control panel
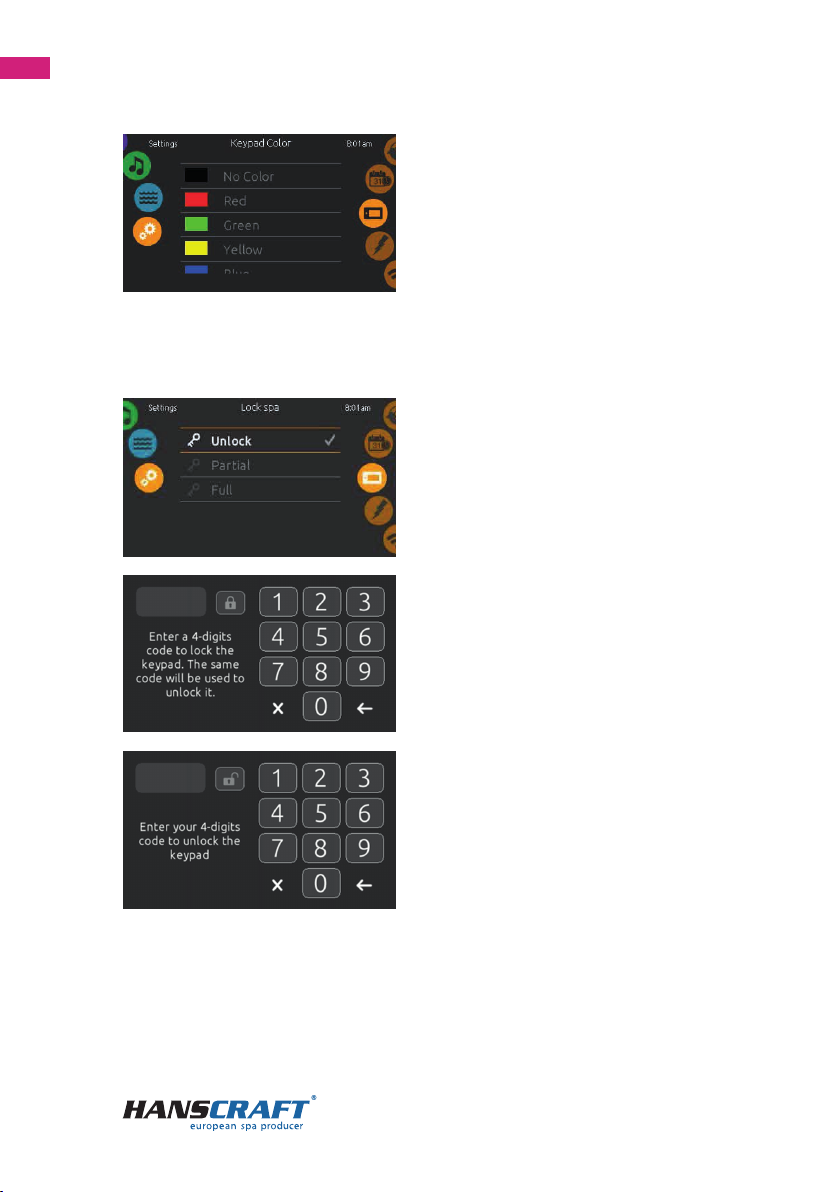
Keypad Colour
(optional) If this function is available, the user
can change the colour of the framing around
the keypad.
Lock spa (keypad lock)
(optional) If this function is available, the user
can partially or completely lock the keypad. If
the full lock is selected, the adjustment of all
functions is locked. During partial locking it is
only possible to activate accessories. Settings
are not possible.
5.10 Keypad Lock
If the user intends to use the lock, he/she is
prompted by the system to ll in a 4-digit
code. The same code will be required to
unlock the keypad.
With the next use, the system will again
request a 4-digit code (it does not have to be
identical). It is possible to unlock the keypad
with a universal code (3732), or through an
overall reset of the keypad.
17
Control panel
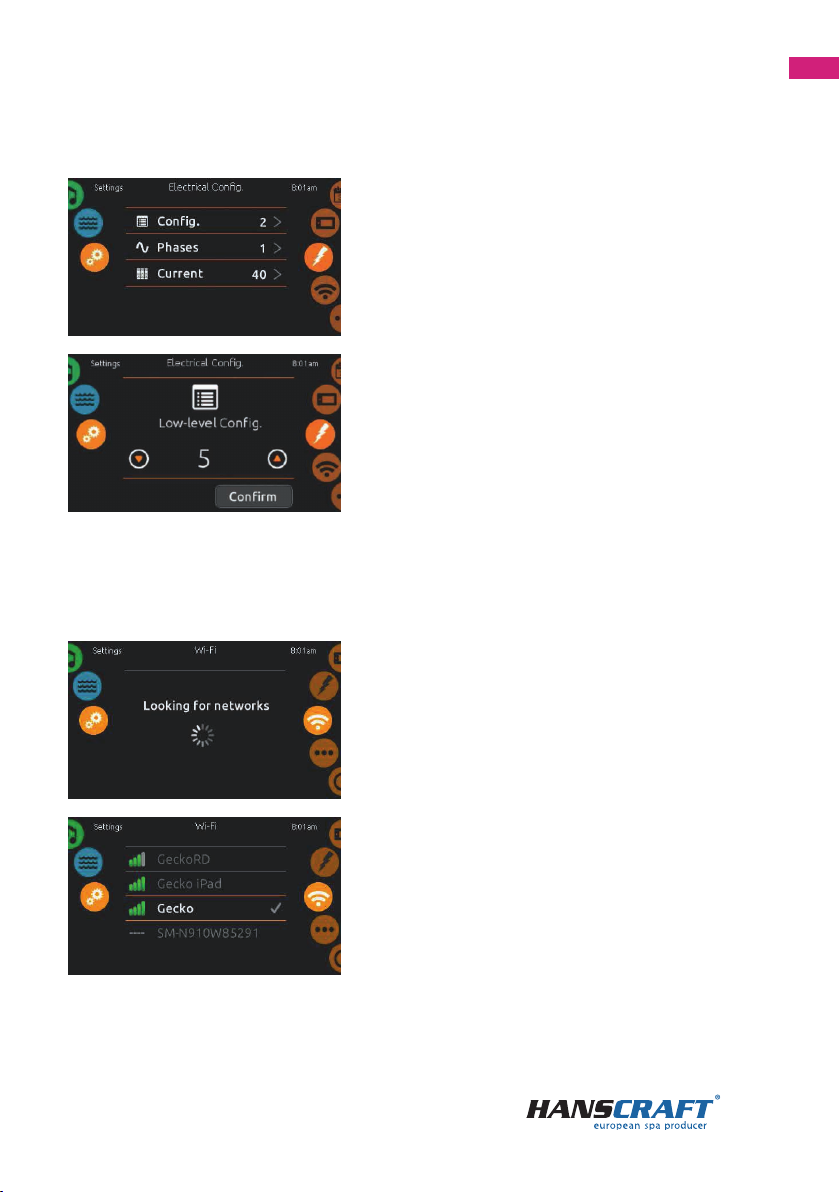
Important: Do not make any changes in this
areaunlessyouareaqualiedelectrician!
A password will be required. Please contact
the representative of the manufacturer to
obtain this password.
If you want to change the conguration, the
number of phases and input current of the Hot
tub system, slide the right selection circle until
the icon Electrical conguration is highlighted
in the centre.
5.11 Electrical Configuration
WiFi networks
The available networks will show up on the
screen after some time as well as their signal
strength. Scroll up or down on the list and
choose a network. The chosen network will be
marked with a green tick.
WiFi settings
To change the WiFi settings, slide the
right selection circle until the WiFi icon is
highlighted in the centre.
This function is only available if the in.touch Module is connected to the system.
5.12 WiFi

18
Control panel
WiFi password
If the WiFi network is protected with a
password, ll it in when prompted by the
keypad. Use the Enter key to conrm the
password. If no password is necessary,
in.touch will automatically connect.
In.touch module is connected
If the network in.touch 2 is found, it will
appear on the display.
In.touch module is not connected
This message will appear if the In.touch
module is not connected in your Hot tub.
Miscellaneous
This option allows access to the adjustment
of Warm Weather and Info messages in the
centre of messages.
5.13 Miscellaneous

19
Control panel
Info messages
By pressing the Display/Hide button, it is
possible to adjust the display of messages:
If Hide is selected, the display will only show
the message Smart Winter Mode and SWM
purge time. In the opposite case, the message
will always appear when SWM conditions are
met. If the Hide option is chosen, messages
concerning the discharge of heating and
resuming of ltration will not be displayed.
Warm weather
When a pump is running, it generates heat that
may increase the water temperature. When
enabled, the option “Warm Weather” allows
to avoid the built-in overheating function of
the ltration. If Warm Weather is set to “OFF”,
the overheating function of the ltration
is inoperative and your Hot tub’s ltration
system will operate continuously even when
the water temperature is higher.
About
To see information about the appliance, slide
the right selection circle until the “i” symbol is
highlighted in the centre. Information about
various parts of the system, software, and
revision numbers of individual components of
the system will be displayed.
Wipe the screen
This message will appear in case of too much
water detected on the display. Simply wipe
away the excess water.
5.14 About
5.15 Excess water on the display

20
Control panel/Upkeep of the hot tub
5.16 Error messages about installation
After switching on Smart Touch on your bath you may see one of the two error
messages. Please follow the directions of the message or reach out to your retailer
for more information.
A list and denition of error messages: http://geckokeypads.com/k1000errormessages
6 Upkeep of the hot tub
6.1 General information
Do not expose the hot tub to sun without water inside or a cover on top. The direct
sunlight can cause fading and deformation of the surface material. When you are not
using the hot tub, cover it with the thermo cover, regardless of whether it is empty
or full. Protect the hot tub from rain and snow. Place the hot tub under a gazebo or a
roof if possible.
a) Do not open the control unit. There are no user-xable parts inside.
b) Drain, clean and ll the hot tub with clean water on regular schedule.
c) Clean the lter cartridge at least once a week.
d) The hot tub user should have a proper shower before and after the use of the
hot tub.
6.2 Removal and cleaning of the filter cartridge
The hot tub lter cartridge can get clogged by calcareous and mineral particles from
a hard water, which can lead to a restricted water ow inside the ltration system.
We recommend to clean the filter cartridge at least once a week.
Remove the cartridge and the skimmer insertion. Using a garden hose, clean the
cartridge so that no settled dirt remains in the corners of the lter. Once clean, put
the insertion back to the skimmer. Put the cartridge inside the skimmer tank next
Table of contents


 owner's manual")


