Hanwha Techwin WISENET TRM-810S-1TB User manual

MOBILE VIDEO RECORDER
User Manual

Copyright
©2019 Hanwha Techwin Co., Ltd. All rights reserved.
Trademark
Each of trademarks herein is registered. The name of this product and other trademarks mentioned in this manual are the registered trademark of
their respective company.
Restriction
Copyright of this document is reserved. Under no circumstances, this document shall be reproduced, distributed or changed, partially or wholly,
without formal authorization.
Disclaimer
Hanwha Techwin makes the best to verify the integrity and correctness of the contents in this document, but no formal guarantee shall be
provided. Use of this document and the subsequent results shall be entirely on the user’s own responsibility. Hanwha Techwin reserves the right
to change the contents of this document without prior notice.
Design and specications are subject to change without prior notice.
You can download the latest version from the Hanwha Techwin web site. (www.hanwha-security.com)
The initial administrator ID is “admin” and the password should be set when logging in for the rst time.
Please change your password every three months to safely protect personal information and to prevent the damage of the
information theft.
Please, take note that it’s a user’s responsibility for the security and any other problems caused by mismanaging a password.
Mobile Video Recorder
User Manual

English _3
● OVERVIEW
IMPORTANT SAFETY INSTRUCTIONS
Read these operating instructions carefully before using the unit.
Follow all the safety instructions listed below.
Keep these operating instructions handy for future reference.
1) Read these instructions.
2) Keep these instructions.
3) Heed all warnings.
4) Follow all instructions.
5) Do not use this apparatus near water.
6) Clean the contaminated area on the product surface with a soft, dry cloth or a damp cloth.
(Do not use a detergent or cosmetic products that contain alcohol, solvents or surfactants or oil
constituents as they may deform or cause damage to the product.)
7) Do not block any ventilation openings, Install in accordance with the manufacturer's instructions.
8) Do not install near any heat sources such as radiators, heat registers, stoves, or other apparatus (including
amplifiers) that produce heat.
9) Do not defeat the safety purpose of the polarized or grounding- type plug. A polarized plug has two blades
with one wider than the other. A grounding type plug has two blades and a third grounding prong. The
wide blade or the third prong are provided for your safety. if the provided plug does not fit into your outlet,
consult an electrician for replacement of the obsolete outlet.
10) Protect the power cord from being walked on or pinched particularly at plugs, convenience receptacles,
and the point where they exit from the apparatus.
11) Only use attachments/accessories specified by the manufacturer.
12) Use only with the cart, stand, tripod, bracket, or table specified by the manufacturer,
or sold with the apparatus. When a cart is used, use caution when moving the cart/
apparatus combination to avoid injury from tip-over.
13) Unplug this apparatus during lightning storms or when unused for long periods of
time.
14) Refer all servicing to qualified service personnel. Servicing is required when the
apparatus has been damaged in any way, such as power-supply cord or plug is
damaged, liquid has been spilled or objects have fallen into the apparatus, the apparatus has been
exposed to rain or moisture, does not operate normally, or has been dropped.
Standards Approvals
J `Any changes or modifications in construction of this device which are not expressly approved by the party responsible for
compliance could void the user's authority to operate the equipment.
M
`
This device complies with part 15 of the FCC Rules. Operation is subject to the following two conditions: (1) This device may
not cause harmful interference, and (2) this device must accept any interference received, including interference that may
cause undesired operation.
`
This equipment has been tested and found to comply with the limits for a Class A digital device, pursuant to part 15 of the
FCC Rules. These limits are designed to provide reasonable protection against harmful interference when the equipment is
operated in a commercial environment.
This equipment generates, uses, and can radiate radio frequency energy and, if not installed and used in accordance with the
instruction manual, may cause harmful interference to radio communications. Operation of this equipment in a residential area
is likely to cause harmful interference in which case the user will be required to correct the interference at his own expense.
overview
PRODUCT USER MANUAL DESCRIPTION
This document is a product user manual for mobile NVR. Before using this product, please read this document
carefully in order to use it properly.
•This user manual explains how to use the product based on the defaults and default screens of this product.
•The content of this manual is subject to change depending on the product software updates and the company
policies. It is subject to partial changes without prior notification to users.
TARGET AUDIENCE
This user manual contains contents for mobile NVR users.
HOW TO USE THE PRODUCT
Users of this product can perform the following:
•How to monitor the camera on the mobile NVR in real time
•How to search for or play back video recording on the mobile NVR
•How to monitor real time events or search logs from the mobile NVR, its sensor and camera
Before using this product, check if the latest version of this software is installed. Go to Hanwha Techwin's website
(http://www.hanwha-security.com) to check the software version and download necessary files.

4_ overview
overview
CONTENTS
OVERVIEW
3
3Important Safety Instructions
3Product User Manual Description
3Target Audience
3How to Use the Product
4Contents
LIVE
5
5Getting Started
7Live Screen Configuration
11 Live Screen Mode
12 Status
14 Zoom
15 Layout
15 Audio ON/OFF
15 Freeze
16 Event Monitoring
16 Capture
17 Maintain the Screen Ratio
17 PTZ control
19 Backup
MENU SETUP
20
20 System Setup
26 Setting the Device
37 Setting the Recording
39 Setting the Event
42 Network Configuration
SEARCH & PLAY
51
51 Search
52 Playback
STARTING WEB VIEWER
54
54 What is Web Viewer?
54 Connecting Web Viewer
LIVE VIEWER
56
56 Live Viewer
58 Live Screen Configuration
62 Controlling a Connected Network Camera
SEARCH VIEWER
64
64 Search Viewer
SETUP VIEWER
67
67 Setup Viewer
BACKUP VIEWER
77
77 SEC Backup Viewer
APPENDIX
79
79 Using Virtual Keyboard
79 Troubleshooting
English _5
● LIVE
live
GETTING STARTED
Starting the system
1. Connect the power cable of the NVR to the wall outlet.
2. You will see the initialization screen.
The initialization process will last about 2 minute.
If a new HDD is installed, the initialization process may take
longer.
The following symptoms might be observed when starting
the system.
M
`If the HDD number is displayed at the bottom of the screen along
with <
> while the product is booting up, it indicates that the
HDD is in recovery, and for this reason booting up may take longer.
`If the progress stalls while in <
> state, it indicates that the HDD
has problems. Visit your nearest customer service center to check
the HDD.
3. The live screen appears with a beep.
Install Wizard
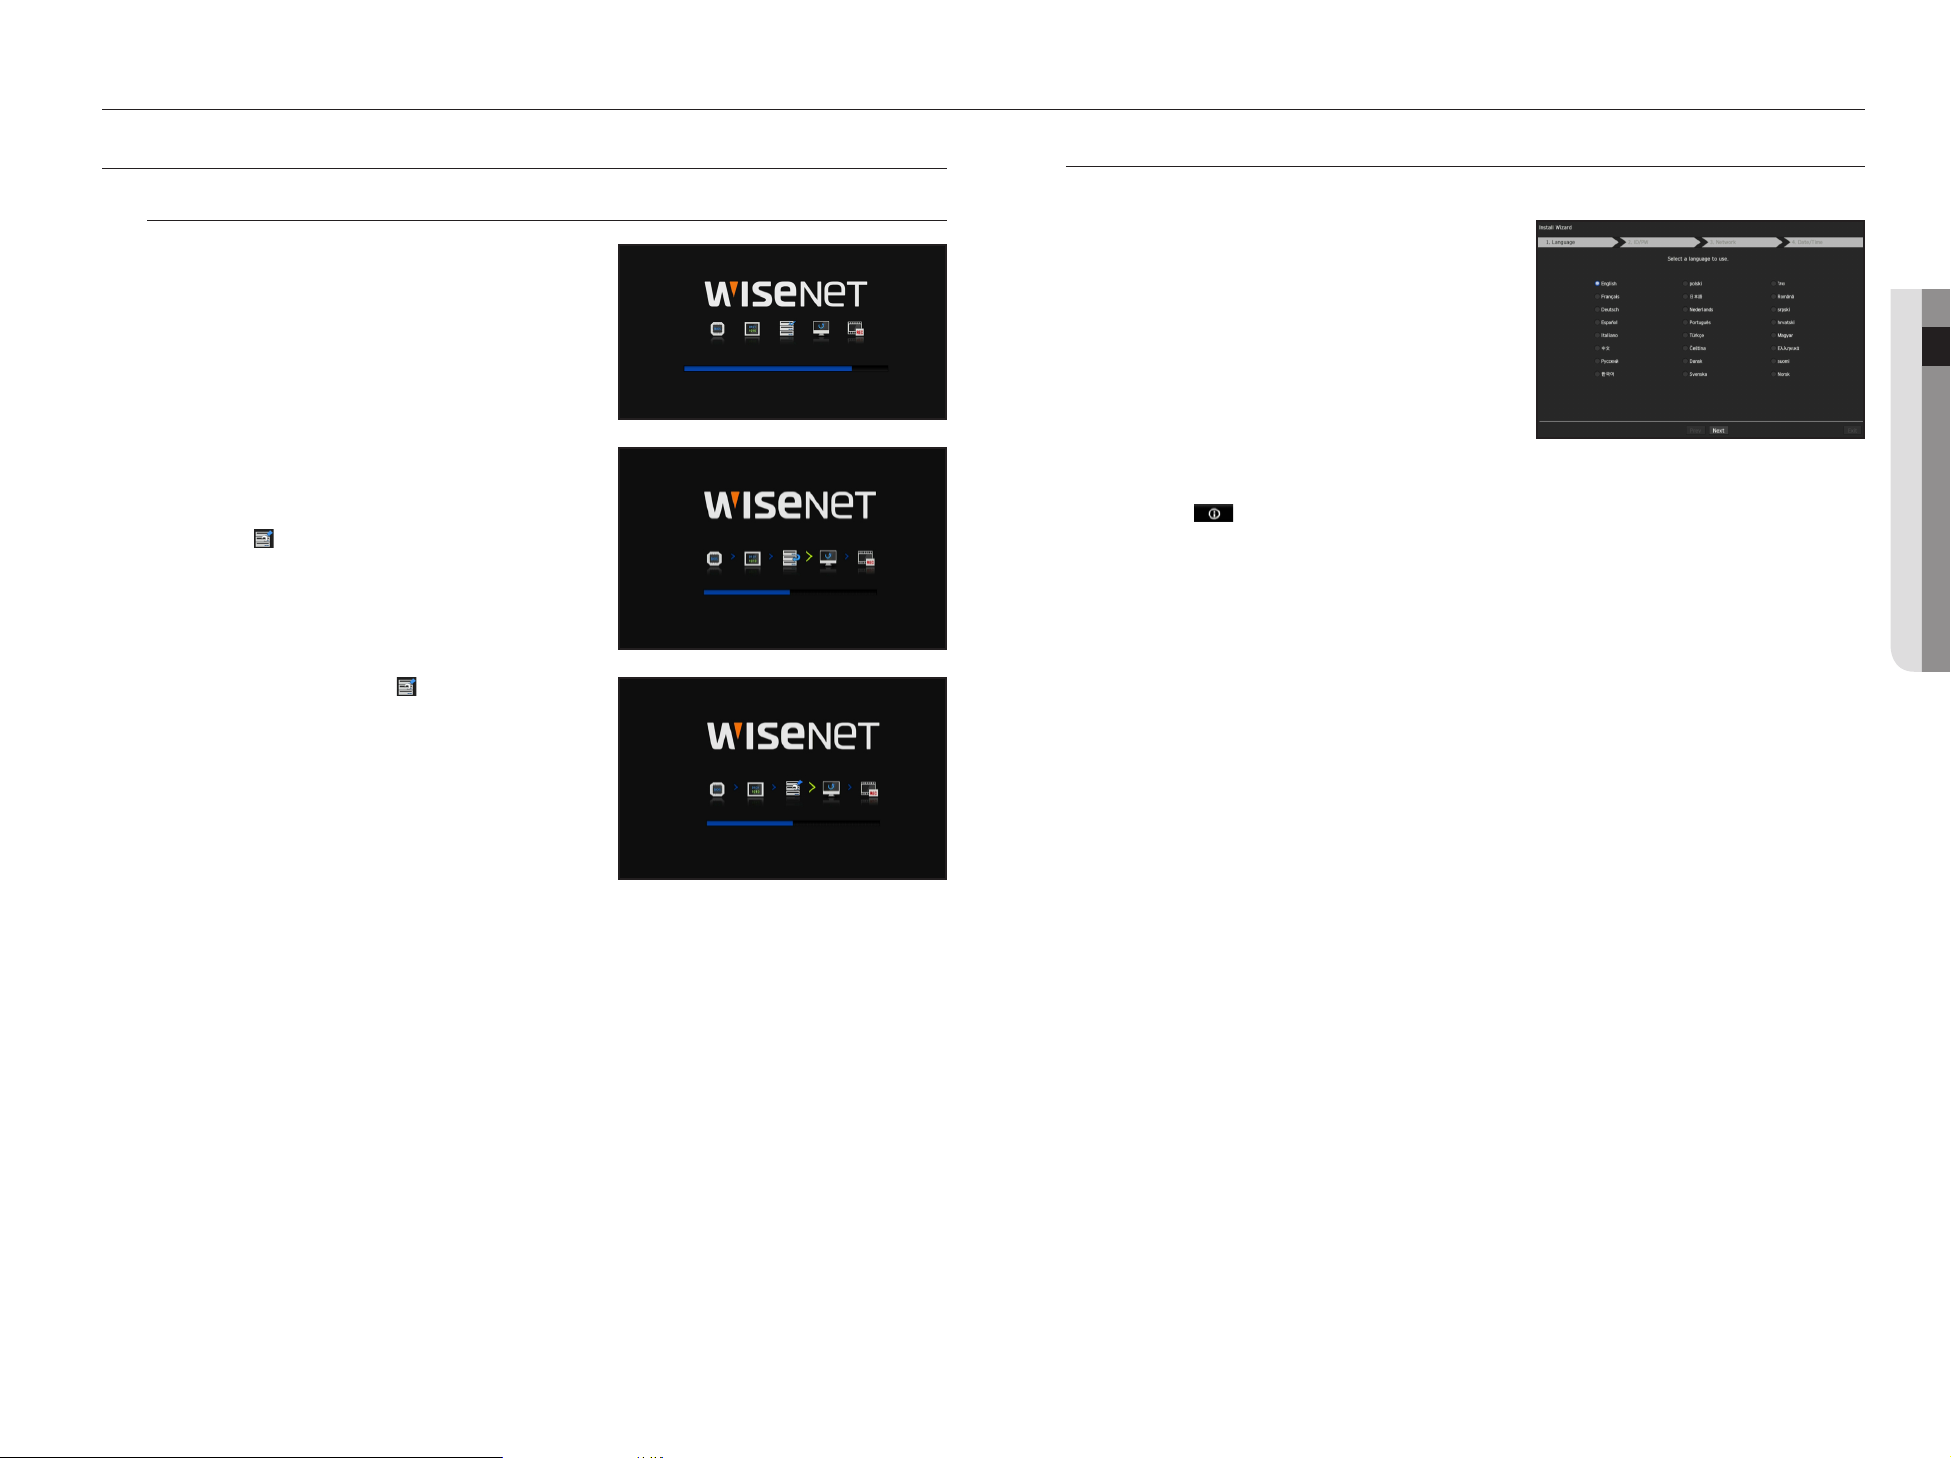
As shown below, proceed through each step of the <Install Wizard>.
1. In the <Language> screen, select the language and press
the <Next> button.
2. In the <ID/PW> screen, set the password and press
<Next>.
Setting up the admin password
When you click < >, a basic guide for setting a password is displayed.
Check the password setting rules.
Setting Camera Password
You can change the password of the camera en bloc if the camera password is in a factory reset state.
If the camera password is not in a factory reset state, please enter the password of the current camera to
register the camera.
M
`You cannot change password of a camera registered using ONVIF or RTSP.
3. In the <Network> screen, set the network access method and the access environment. To use a simple
intranet, click <Next>.
Setting up the DHCP server
If you set up the DHCP server, the IP address is automatically assigned to your camera.
For more details, see the "DHCP server" page under "Menu Setup > Network Configuration" in the Table of
Contents.
J
`Depending on the camera's state, no IP may be automatically assigned to the camera. After exiting the installation wizard, go
to the menu to assign an IP to DHCP, or set the IP manually.
HDD 1, 2, 3, 4, 5
HDD 5

6_ live
live
4. After setting the date/time settings in the <Date/Time>
screen, click on the <Finish> button to launch the setting
completion window.
5. In the setting completion window, click on the <OK> button
to finish camera setting and launch the camera registration
screen.
6. Cameras connected to the PoE port are automatically
registered and displayed in the camera registration list.
Select the cameras to be registered from the list of cameras,
and click the <Register> button.
`The camera may not be shown in the list if there is no response from
the camera. You can re-import the list by pressing the < >
button.
7. When camera registration is finished, the frame rate of the
set recording profile is displayed. After you click the
<Manual Setup> button, you can modify the frame rate
value.
M
`The recording settings are only applied to initialized cameras.
Setting up the network
Each NVR product supports a different number of network ports. If a product supports two or more, then each
network port will provide the following features.
•Camera: Can be used as a port for connecting a camera. If you connect a camera, then the camera video will
be transmitted.
M
`If a UTP cable is used for connection, (UTP) is displayed; if a fiber optic cable, (Optic).
•Viewer: Can be used as a port transmitting video to the web viewer. If you access the network information on
your browser, then you can remotely monitor video in your web viewer.
•All: Can be used as a shared port for the camera and web viewer connection.
•Wi-Fi : Port to connect to external Wi-Fi. Wi-Fi port is used for backup.
- IP type: Allows you to select the type of network access.
- IP address, subnet mask, gateway, DNS
`Static: IP address, subnet mask, gateway, and DNS can be directly entered.
`DHCP: IP address, subnet mask, gateway, and DNS can be automatically set.
`PPPoE: IP address, subnet mask, gateway, and DNS can be automatically set.
- User ID, password: To set the access mode to PPPoE, enter the "User ID" and "Password" registered to
PPPoE.
M
`If the LAN cable is not connected to the port, the setting button will not be activated for use. Check the LAN cable
connection. (But in case of a PoE product, Network 1 is activated.)
`The built-in DHCP Server in NVR will turn on automatically at stage 3. At this stage, using the existing DHCP server in the
same network may cause a problem, as two DHCP servers would be simultaneously operating.
`A product with multiple network ports cannot use a single bandwidth for all of them.
Example)
- Port 1: 192.168.100.199 / Port 2: 192.168.100.198 (X)
- Port 1: 192.168.100.199 / Port 2: 192.168.101.198 (O)
Setting the Switch Mode
Set the camera registration method. This function is only available for products with PoE support.
For products with PoE support, see “NVR products supporting each feature”. (Page 4)
•PnP Mode : Camera connected to the PoE port of the product will be registered automatically on each
channel in the order of the port number.
This works only when camera is in factory reset state.
•Manual Setup Mode : Automatically scans and registers camera connected to the product’s PoE and camera
with separate switch.

English _7
● LIVE
Shutting Down the System
1. In the live screen menu, select <Shutdown>.
2. The “Shutdown” confirmation pop-up window will appear.
3. Click on <OK>.
The system will shut down.
M
`Only the user with the "shutdown" permission can shut down
the system.
`To manage Permission Setup, see the "User" page under "Menu
Setup > System Setup" in the Table of Contents.
Login
To use the NVR menu, you are required to login as a user that is authorized to access the applicable menu.
1. Right click with your mouse button on the live mode screen.
You will see the context menu on the screen as shown.
2. Select <Login>.
The login dialog appears.
J `The initial administrator ID is set to "admin" and you will need to
configure the password in the installation wizard.
`Please change your password every three months to safely protect
personal information and to prevent the damage of the information
theft.
Please, take note that it’s a user’s responsibility for the security and any other problems caused by mismanaging a password.
M
`For more information about limited-access permission, see the "User" page under “Menu Setup > System Setup” in the
Table of Contents.
LIVE SCREEN CONFIGURATION
Icons on the Live Screen
You can check the status or operation of the NVR with the icons on the live screen.
Name Description
a
Current Date, Time
Displays the current time and date.
b
Login Information
When you are logged in, the "LOG ON" icon will be displayed.
c
Screen Mode
FULL NO RAIDRAID
SCSI
It is displayed when there is ongoing backup in the live condition.
FULL NO RAIDRAID
SCSI
Displayed when manually recording a video while the access restriction for stop recording
is enabled.
Only a user with the permission to stop recording is allowed to stop recording.
FULL NO RAIDRAID
SCSI
It is displayed when all the channels are switched at the set time interval.
FULL NO RAIDRAID
SCSI
This icon is displayed when you press the Freeze button.
FULL NO RAIDRAID
SCSI
It is displayed when the magnifying function is in operation.
d
System
Operation
FULL NO RAIDRAID
SCSI
It is displayed when there is a problem with the fan.
`Only provided for products that support fans. (See page 4 of the Product Specification
Manual)
FULL NO RAIDRAID
SCSI
Displayed when recording data is not properly saved.
FULL NO RAIDRAID
SCSI
Appears when input data rate per channel exceeds the specified data rate limit.
CAM 01
2016-01-01 00:00:01
FULL NO RAIDRAID
FULL NO RAIDRAID
FULL NO RAIDRAID
8_ live
live
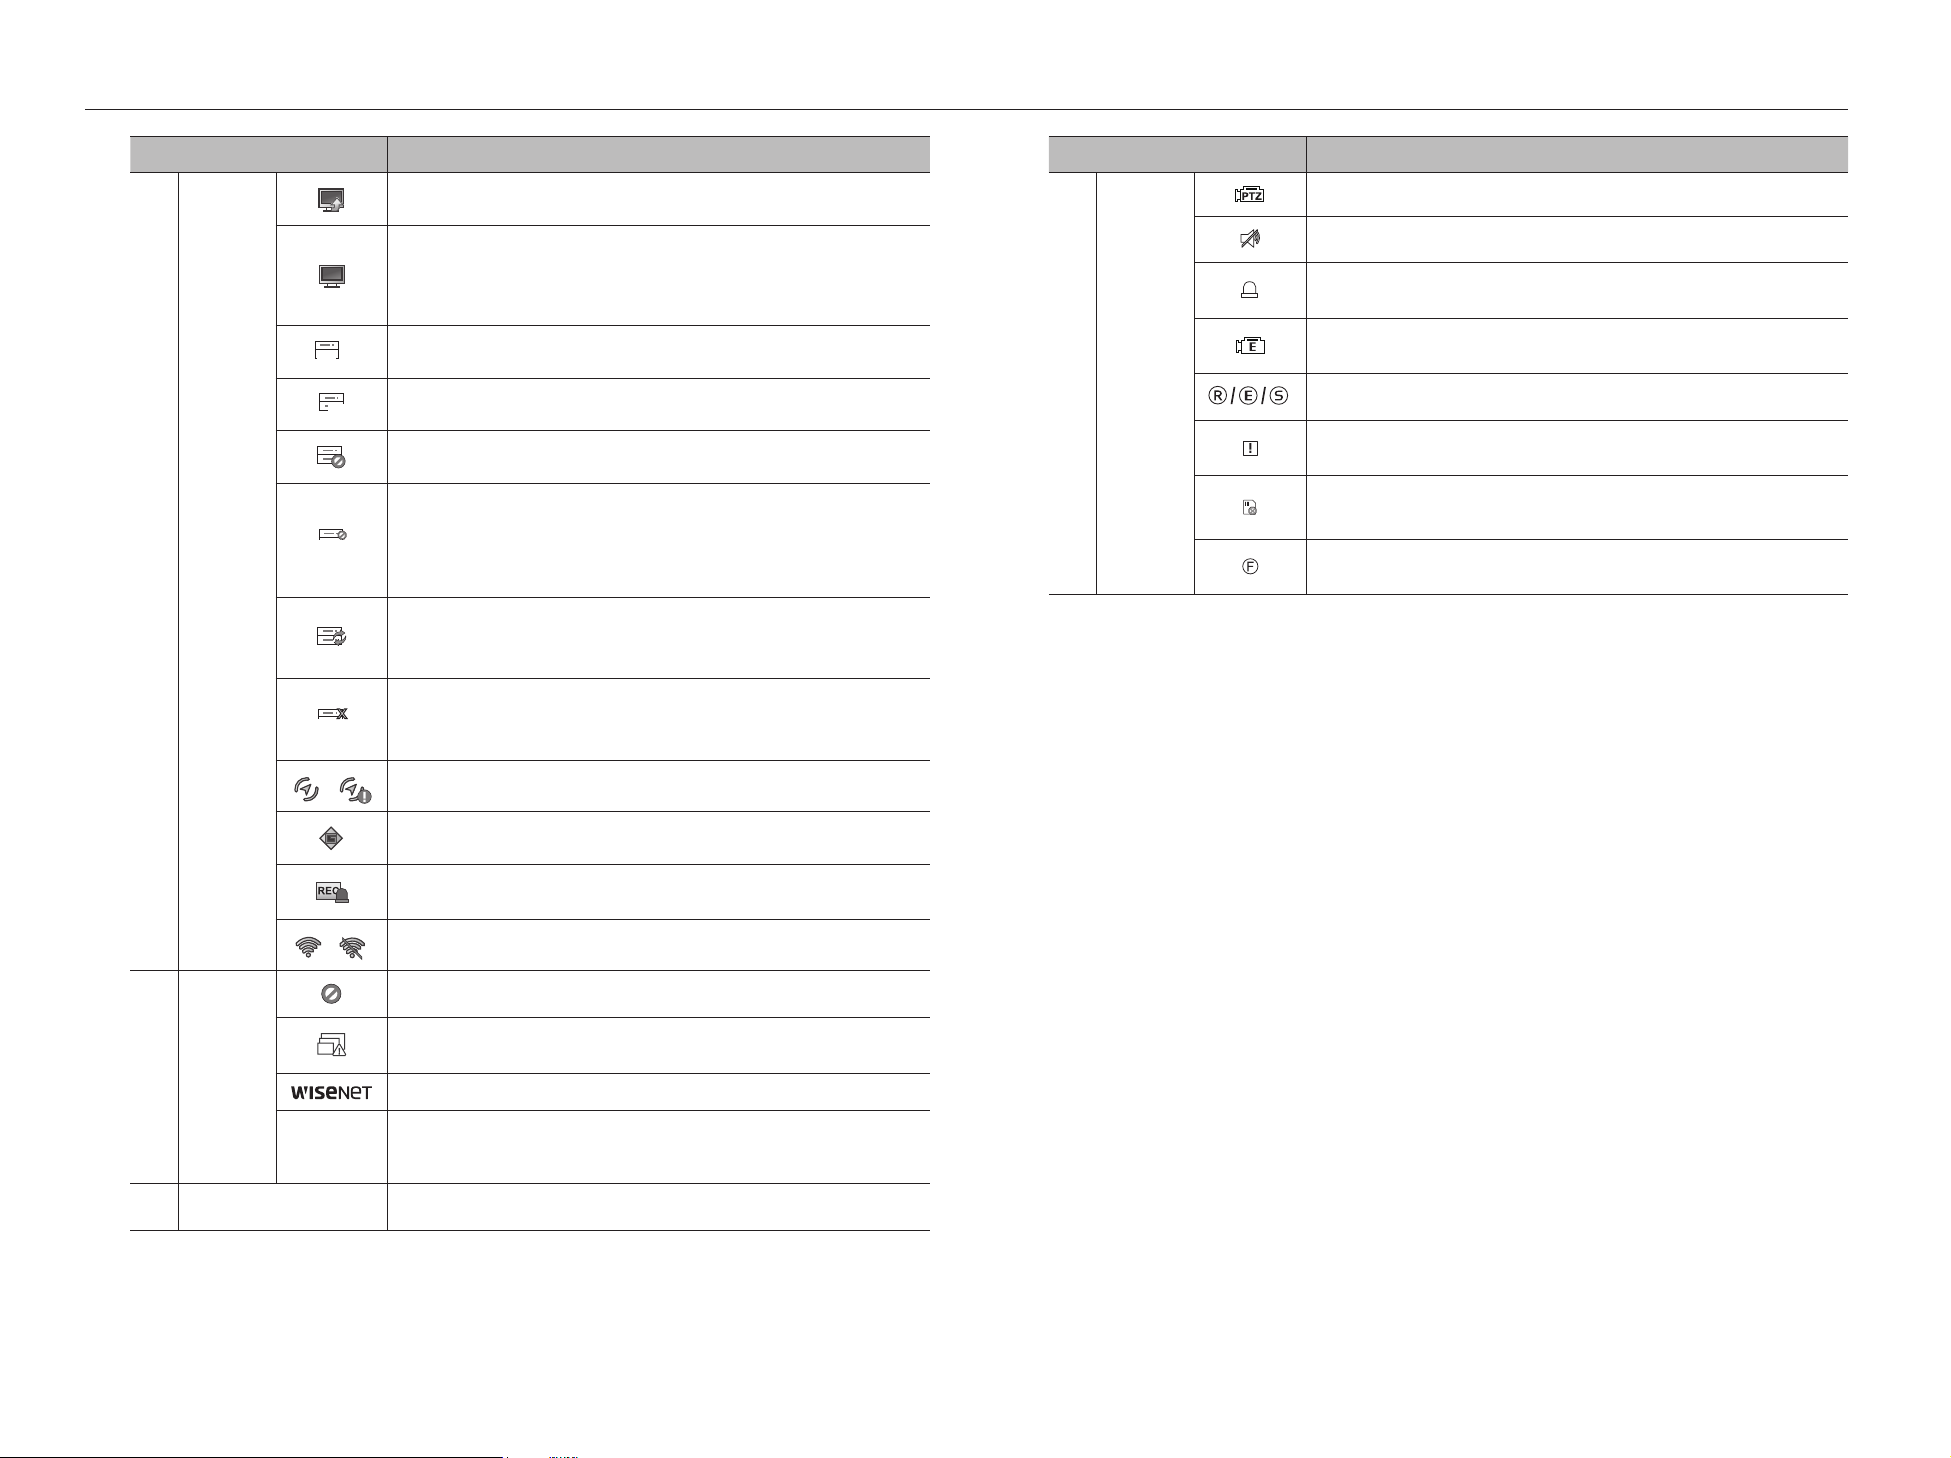
Name Description
g
Camera
Operation
FULL NO RAIDRAID
SCSI
This icon is displayed for a channel that a PTZ-featuring camera is connected to.
FULL NO RAIDRAID
SCSI
Displays AUDIO ON/MUTE. Not displayed in video mode if deactivated.
FULL NO RAIDRAID
SCSI
If the sensor is set to <ON>, the input signal will be displayed on the screen of the
connected channel.
FULL NO RAIDRAID
SCSI
This icon is displayed when Motion Detection is set to <ON> and a camera motion or
camera event occurs.
It displays the status of general/event/scheduled recording.
FULL NO RAIDRAID
SCSI
It is displayed when it fails to decode all the frames due to limited decoding performance
and in this case only the I-Frame is decoded.
FULL NO RAIDRAID
SCSI
RED - Displayed when there is any abnormality in the RED-SD card.
YELLOW - Displayed when there is no storage space in the SD card.
FULL NO RAIDRAID
SCSI
Flickers when a defocus event occurs. When you click the icon, a simple focus command
is sent to the camera.
Name Description
d
System
Operation
FULL NO RAIDRAID
SCSI
It is displayed when there is firmware to update the server.
FULL NO RAIDRAID
SCSI
It is displayed when the network is overloaded.
`It occurs when the max receiving allowance is exceeded, causing an overload to the
CPU. It will disappear if you modify the camera settings or delete a camera to reduce
the performance burden.
FULL
NO RAIDRAID
SCSI
Displayed if the HDD is full and the NVR has an insufficient space to record.
FULL
NO
RAIDRAID
SCSI
Displayed when there is no HDD or HDD is not detected.
FULL NO RAIDRAID
SCSI
Displayed if the HDD needs a technical examination.
FULL NO RAID
RAID
SCSI
It is displayed when there is a malfunctioning HDD in the RAID.
`There are one or two HDD malfunctions but you can still read or write to it.
`Only provided for products that support RAID. (See page 4 of the Product Specification
Manual)
FULL NO RAIDRAID
SCSI
It is displayed when recovering a RAID Error.
`Only provided for products that support RAID. (See page 4 of the Product Specification
Manual)
FULL NO
RAID
RAID
SCSI
It is displayed when you cannot write RAID due to a malfunction of HDD.
`Only provided for products that support RAID. (See page 4 of the Product Specification
Manual)
FULL NO RAIDRAID
/
FULL NO RAIDRAID
Shows GPS reception/no reception.
FULL NO RAIDRAID
Shows the vehicle shake state.
FULL NO RAIDRAID
Appears when emergency recording is in progress.
/
FULL NO RAIDRAID
Displays the Wi-Fi connection status when <Wi-Fi Enable> is set.
e
Video Input
Status
Displayed if no input is entered in the condition that the camera is set to <ON>.
FULL NO RAIDRAID
SCSI
Displayed when the live image with the camera turned <ON> exceeds the supported
resolution.
Displayed if no permission to live view is granted.
If the camera channel is <OFF>, the camera is not registered, or it is set to <Covert2>,
the live screen will display nothing. For <Covert1>, the screen will display nothing but
OSD.
f
Camera Title / Channel Display the camera title and channel number.

English _9
● LIVE
Error Information
•If the built-in HDD is not connected, the “NO HDD” icon ( ) will be displayed in the top left corner. In this
case, make sure you contact the service center for assistance as this may cause a failure of recording,
playback or backup.
•
If you do not format a purchased HDD in a format supporting NVR, a "NO HDD" icon( ) will be displayed on
the top left side of the screen. If the "NO HDD" icon is displayed, go to "Menu > Storage Device" to check
the HDD connection status, and format your HDD.
•
If a product with a fan does not work or has a problem with the fan, <Fan Information Window> appears and
the fan malfunction icon ( ) is displayed at the top left. In this case, check the fan inside the product. If the
fan is defective, it can shorten the product life cycle, so please make sure to contract service center nearby.
M
`If an abnormal Fan icon ( ) or NO HDD ( ) icon, HDD FAIL (
FULL NO RAIDRAID
SCSI
) icon is displayed, contact our customer service.
`For products that support fan, see “NVR products supporting each feature”. (Page 4)
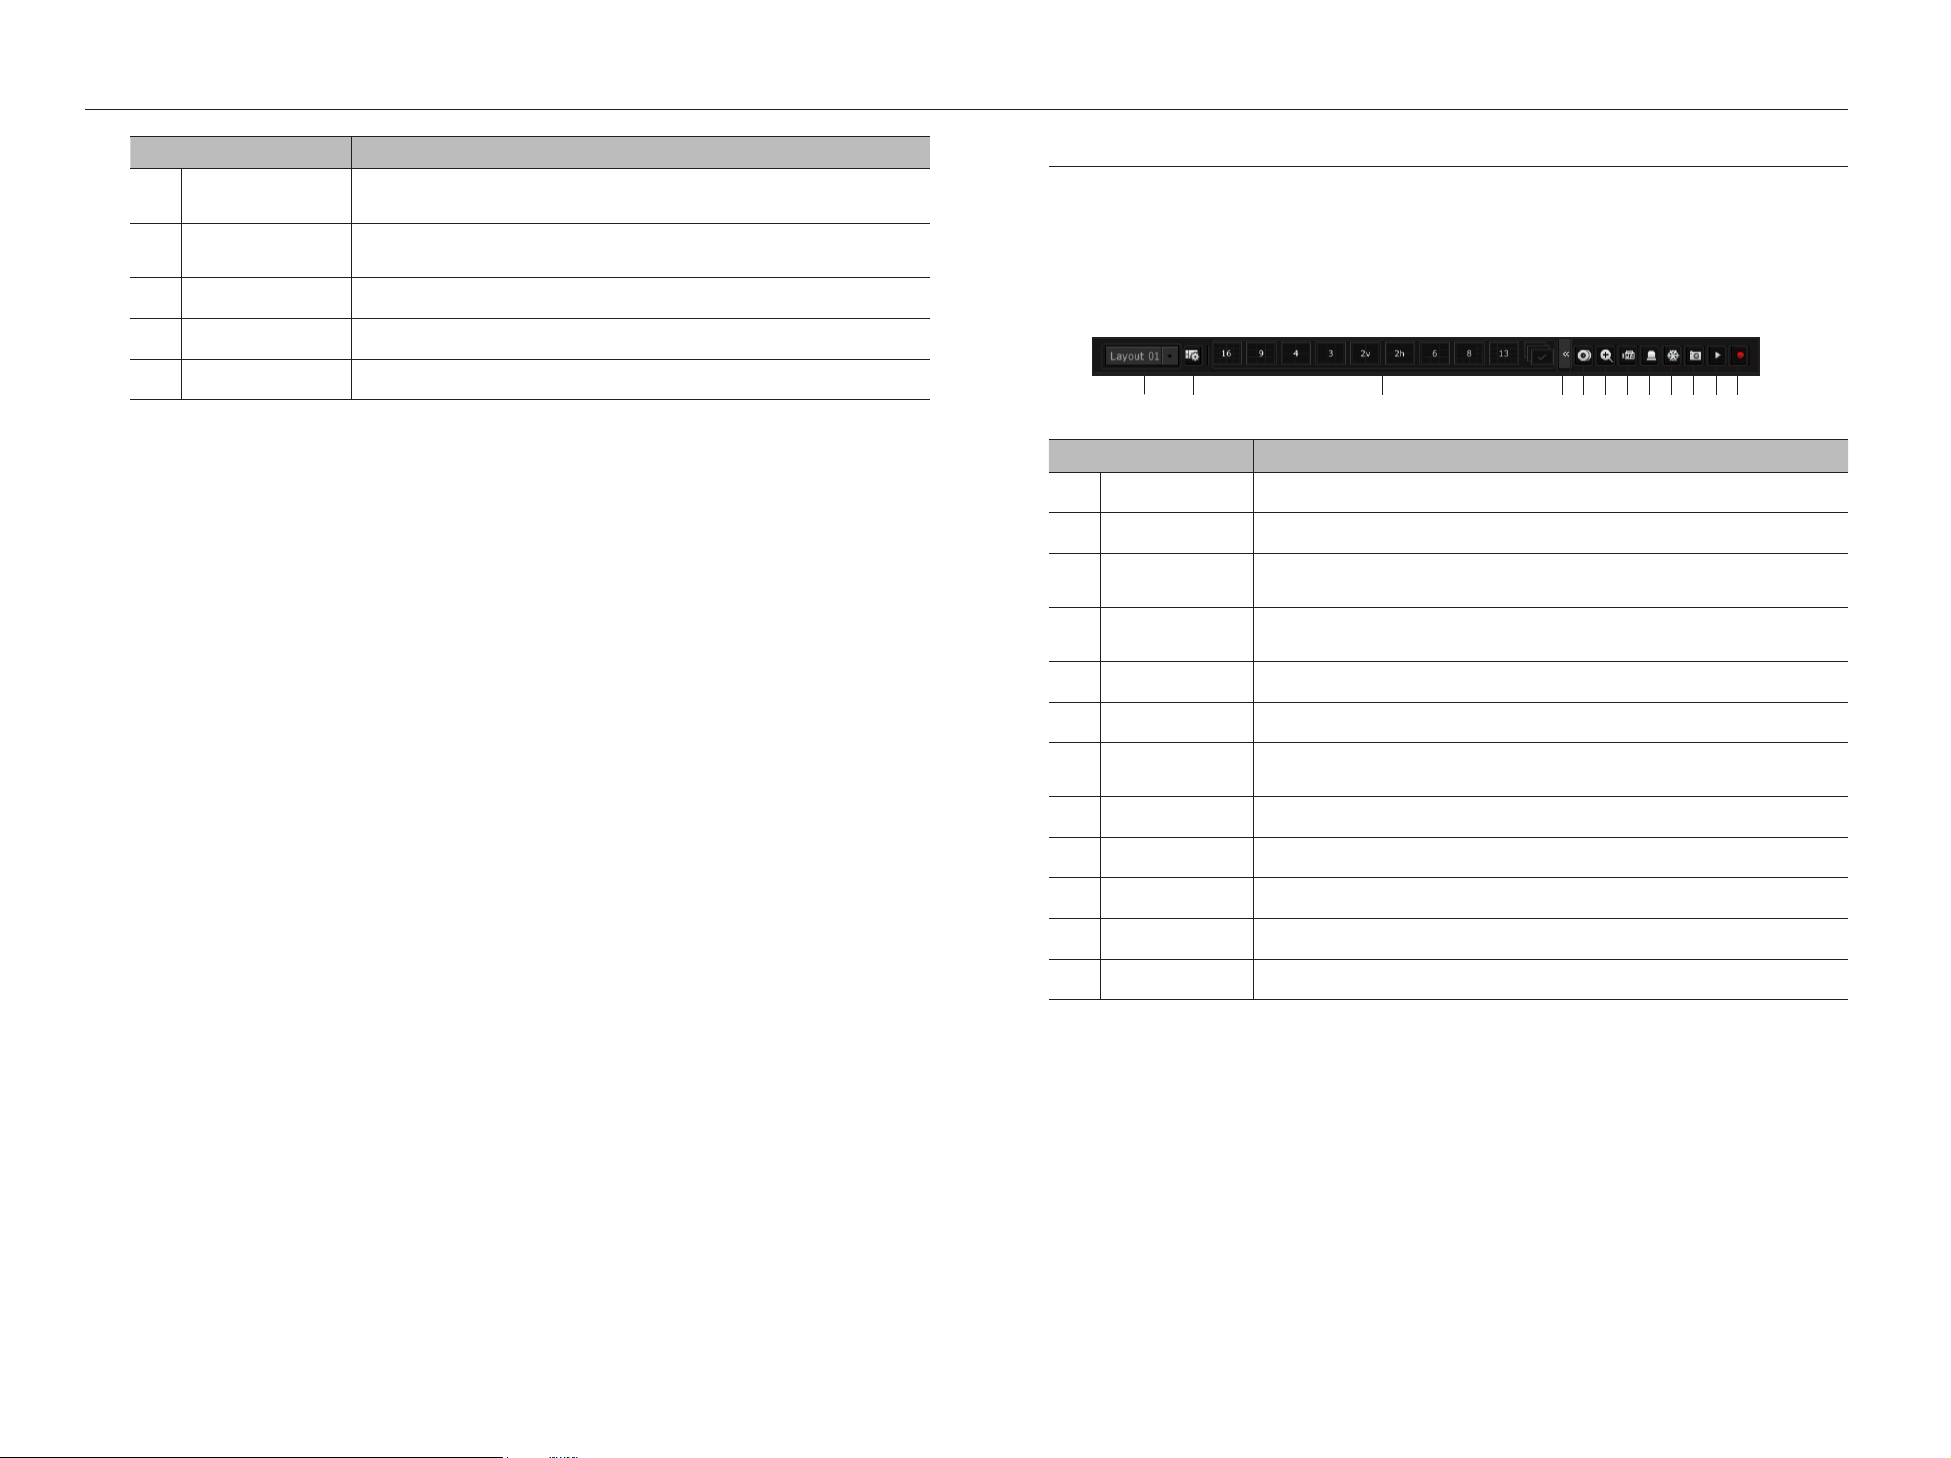
Live Screen Menu
If you right click with your mouse button in live screen mode, it will launch the live screen menu where you can
access each menu.
The context menu differs depending on the state of Log in/out, split mode, and NVR operation status.
M
`Depending on the user permissions, you may have limited access to menu items of Live View, Backup, Stop Recording,
Search, PTZ, Remote Alarm Output, and Exit.
Single Mode Menu
The single mode menu is available only in Single Mode.
Menu Description
a
PTZ
Accesses the PTZ Control menu. The PTZ menu will be active on the Live screen after you
select a single channel.
For more details, see the "Live > PTZ Control" page in the Table of Contents.
b
ZOOM You can enlarge the selected screen.
See the "Live > Zoom" page in the Table of Contents.
c
Capture Captures the screen of the selected channel.
See the "Live > Capture" page in the Table of Contents.
Split Mode Menu
In Live split mode, right-click to display this context menu as shown.
The look of the split mode menu is different for each NVR product and it also depends on the login/logout status.
Menu Description
a
Layout Select the split mode to display on the live screen.
See the "Live > Live screen mode"page in the Table of Contents.
b
Layout Setup Set the layout of each channel.
See the "Live > Layout"page in the Table of Contents.
c
Keep full scr ratio/
Keep ch. scr ratio
Channel screen ratio is changed.
See the "Live > Maintain the Screen Ratio" page in the Table of Contents.
d
Status
Shows the connection information of camera connected to each channel as well as live and
recording status.
See the "Live > Status" page in the Table of Contents.
`For product supporting PoE, you can check the PoE status under “PoE Status”.
`Only provided for products that support PoE. (See page 4 of the Product Specification
Manual)
e
Audio On/Off Turns ON/MUTE the sound of the selected channel.
See the "Live > Audio ON/OFF"page in the Table of Contents.
f
Freeze Stop playing the video temporarily.
See the "Live > Freeze"page in the Table of Contents.
g
Stop Alarm Stop the alarm output, deactivate the event icon and release the auto sequencing.
See the "Live > Event Monitoring" page in the Table of Contents.
h
Record/Stop Starts or stops manual recording.
i
Play See the "Search & Play > Play" page in the Table of Contents.
j
Search See the "Search & Play > Search" page in the Table of Contents.
Layout ►
Layout Setup ►
Keep ch. scr ratio
Status ►
PTZ
ZOOM
Audio ►
Freeze
Stop Alarm
Capture
Record
Play
Search
Backup
Menu
Shutdown
Logout
Hide Launcher
a
b
c
Layout ►
Layout Setup ►
Keep full scr ratio
Status ►
Audio Off
Freeze
Stop Alarm
Record
Play
Search
Backup
Menu
Shutdown
Logout
Hide Launcher
cba
d
m
n
o
lkjihgfe
10_ live
live
Menu Description
k
Backup Searches for a backup device and back up each channel at your desired time.
See the "Live > Backup"page in the Table of Contents.
l
Menu Enter the main menu.
See the "Menu Setup"page in the Table of Contents.
m
Shutdown
The system shutdown dialog will appear.
n
Login/Logout You can log in or out.
o
Show/Hide Launcher
Shows or hides the launcher. Refer to "View the Launcher Menu".
View the Launcher Menu
The Launcher menu appears on the bottom of the live screen.
1. Select <Show Launcher> in the context menu of the Live screen.
2. Move the cursor to the bottom and click a desired item in the Launcher menu.
M
`
If no input is entered for 10 seconds, the menu will disappear.
Menu Description
a
Layout Select the layout to be displayed on the screen.
b
Layout Setup You can set, change or delete the new layout of each channel.
c
Screen Mode Displays a list of split modes available in a bar type.
The current screen mode will be displayed grey.
d
Menu Expansion
Button Click to display the hidden menu to the right.
e
Backup Searches for a backup device and back up each channel at your desired time.
f
Zoom Enlarges the selected area. This is available only in Single Live mode.
g
PTZ If the network camera connected to the selected channel supports the PTZ operations, this will run
the PTZ control launcher.
h
Alarm Stops the alarm if it's activated.
i
Freeze Freezes the Live screen temporarily.
j
Capture Captures the screen of the selected channel.
k
Play Enters Play mode if a file to play exist, and if not, enters Search mode.
l
Record Start/End recording the Live screen.
ac db efghijkl

English _11
● LIVE
LIVE SCREEN MODE
You can display your camera's live video in various split modes.
M
`The ‘Live4NVR’ profile is added automatically with camera auto registration, and settings can be changed according to user
environment.
-Live4NVR Profile Basic Settings H.264 (codec), 800 x 600 (resolution), 30fps (frame rate)
`Depending on camera specification, you may not be able to add a profile or if you have the PLUGINFREE profile, you will not
be able to add the Live4NVR profile.
`If performance is lowered due to system overload, only the key frame (I-frame) can be played.
`To set profiles, see the "Camera Setting" page under "Menu Setup > Setting the Device".
Method for displaying screen mode
If you want to change the split mode, select a screen mode suggested in the launcher menu or right click with
the mouse button and select a split mode in the screen mode menu.
M
`Each product may support different split view modes.
CH1
CH1
CH2 CH1 CH2 CH1 CH2 CH3
Single mode Horizontal 2-split screen Vertical 2-split screen 3-split mode
CH1 CH2
CH3 CH4
CH2
CH1 CH3
CH4 CH5 CH6
CH2
CH3
CH1 CH4
CH5 CH6 CH7 CH8
CH1 CH2 CH3
CH4 CH5 CH6
CH7 CH8 CH9
4-split mode 6-split mode 8-split mode 9-split mode
CH2 CH3 CH4 CH5
CH6 CH7
CH8 CH1 CH9
CH10 CH11 CH12 CH13
CH1 CH2 CH3 CH4
CH5 CH6 CH7 CH8
CH9 CH10 CH11 CH12
CH13 CH14 CH15 CH16 CH1
13-split mode 16-split mode Auto Sequence
Switching the split mode
You can split the live video from cameras to Single, 4-split, 9-Split, or 16-split mode and watch them one by one.
M
`Each product supports different split modes. For more information, see "Method for displaying screen mode".
Press the button in the launcher or use the right menu to
automatically switch the screen.
Mouse right button menu ;Layout ;Auto switching mode
Auto Sequence
You can monitor the split mode of your own choice by switching one after another at a certain interval.
M
`For segmented screen switching, set <Sequence switching time> on the "Monitor" page under "Menu Setup > Setting
the Device" in the Table of Contents to automatically switch to the next sequence according to the preset time.
`When you switch the channel, the video may be delayed depending on the network condition.
Example) TRM-1610S
Layout
Layout Setup ►
Keep full scr ratio
Status ►
Audio Off
Freeze
Stop Alarm
Record
Play
Search
Backup
Menu
Shutdown
Logout
Hide Launcher
1-split
2 horizontal division
2-split
3-split
4-split
1+5
1+7
9-split
1+12
16-split
Auto Sequence
16
CH1
CH1
CH1
CH1
CH2
CH1
CH2
CH6
CH8
CH10 CH11 CH12 CH13
CH3 CH4 CH5
CH7
CH9
CH1
CH5 CH6 CH7 CH8
CH2
CH3
CH4
CH2
CH3
CH2
CH3 CH4
CH2 CH3
CH4 CH5 CH6
CH4 CH5 CH6
CH7 CH8 CH9
CH1 CH2 CH3 CH4
CH5 CH6 CH7 CH8
CH9 CH10 CH11 CH12
CH13 CH14 CH15 CH16
CH1
CH1
CH1
CH1 CH2
CH3 CH4
CH2 CH3
CH4 CH5 CH6
CH7 CH8 CH9
CH5 CH6
CH7 CH8
CH9 CH10
CH11 CH12
CH13 CH14
CH15 CH16
CH10 CH11 CH12
CH13 CH14 CH15
CH16
CH7 CH2 CH3 CH4
CH5 CH6 CH1 CH8
CH9 CH10 CH11 CH12
CH13 CH14 CH15 CH16 CH3 CH1
CH1 CH2
CH1 CH2
CH3 CH4
CH1
CH1
CH7 CH8
CH4
CH3
CH2
CH5
CH1
CH6 CH12
CH1
CH13
CH19
CH4
CH7
CH5
CH10
CH8
CH11
CH6
CH2 CH3
CH4 CH5
CH2
CH6
CH1 CH3
CH7 CH8 CH9
CH1 CH2
CH3 CH4
CH5 CH6
CH7 CH8
CH9 CH10
CH11 CH12
CH13 CH14
CH15 CH16
CH1
CH4 CH5
CH2
CH6
CH1 CH3
CH7 CH8 CH9
CH13 CH14
CH11
CH15
CH10 CH12
CH16
CH1 CH3
CH2
CH4 CH5 CH6
CH1
CH2
CH1 CH2
CH3 CH1CH15
CH11
CH16
CH12
CH7
CH3
CH8
CH4
CH13
CH9
CH14
CH10
CH5
CH1
CH6
CH2
CH15
CH11
CH16
CH12
CH7
CH3
CH8
CH4
CH13
CH9
CH14
CH10
CH5
CH1
CH6
CH2
CH15
CH11
CH16
CH12
CH1
CH3
CH8
CH4
CH13
CH9
CH14
CH10
CH5
CH7
CH6
CH2
1
Single mode
CH1
CH1
CH1
CH1
CH2
CH1
CH2
CH6
CH8
CH10 CH11 CH12 CH13
CH3 CH4 CH5
CH7
CH9
CH1
CH5 CH6 CH7 CH8
CH2
CH3
CH4
CH2
CH3
CH2
CH3 CH4
CH2 CH3
CH4 CH5 CH6
CH4 CH5 CH6
CH7 CH8 CH9
CH1 CH2 CH3 CH4
CH5 CH6 CH7 CH8
CH9 CH10 CH11 CH12
CH13 CH14 CH15 CH16
CH1
CH1
CH1
CH1 CH2
CH3 CH4
CH2 CH3
CH4 CH5 CH6
CH7 CH8 CH9
CH5 CH6
CH7 CH8
CH9 CH10
CH11 CH12
CH13 CH14
CH15 CH16
CH10 CH11 CH12
CH13 CH14 CH15
CH16
CH7 CH2 CH3 CH4
CH5 CH6 CH1 CH8
CH9 CH10 CH11 CH12
CH13 CH14 CH15 CH16 CH3 CH1
CH1 CH2
CH1 CH2
CH3 CH4
CH1
CH1
CH7 CH8
CH4
CH3
CH2
CH5
CH1
CH6 CH12
CH1
CH13
CH19
CH4
CH7
CH5
CH10
CH8
CH11
CH6
CH2 CH3
CH4 CH5
CH2
CH6
CH1 CH3
CH7 CH8 CH9
CH1 CH2
CH3 CH4
CH5 CH6
CH7 CH8
CH9 CH10
CH11 CH12
CH13 CH14
CH15 CH16
CH1
CH4 CH5
CH2
CH6
CH1 CH3
CH7 CH8 CH9
CH13 CH14
CH11
CH15
CH10 CH12
CH16
CH1 CH3
CH2
CH4 CH5 CH6
CH1
CH2
CH1 CH2
CH3 CH1CH15
CH11
CH16
CH12
CH7
CH3
CH8
CH4
CH13
CH9
CH14
CH10
CH5
CH1
CH6
CH2
CH15
CH11
CH16
CH12
CH7
CH3
CH8
CH4
CH13
CH9
CH14
CH10
CH5
CH1
CH6
CH2
CH15
CH11
CH16
CH12
CH1
CH3
CH8
CH4
CH13
CH9
CH14
CH10
CH5
CH7
CH6
CH2
CH1
CH1
CH1
CH1
CH2
CH1
CH2
CH6
CH8
CH10 CH11 CH12 CH13
CH3 CH4 CH5
CH7
CH9
CH1
CH5 CH6 CH7 CH8
CH2
CH3
CH4
CH2
CH3
CH2
CH3 CH4
CH2 CH3
CH4 CH5 CH6
CH4 CH5 CH6
CH7 CH8 CH9
CH1 CH2 CH3 CH4
CH5 CH6 CH7 CH8
CH9 CH10 CH11 CH12
CH13 CH14 CH15 CH16
CH1
CH1
CH1
CH1 CH2
CH3 CH4
CH2 CH3
CH4 CH5 CH6
CH7 CH8 CH9
CH5 CH6
CH7 CH8
CH9 CH10
CH11 CH12
CH13 CH14
CH15 CH16
CH10 CH11 CH12
CH13 CH14 CH15
CH16
CH7 CH2 CH3 CH4
CH5 CH6 CH1 CH8
CH9 CH10 CH11 CH12
CH13 CH14 CH15 CH16 CH3 CH1
CH1 CH2
CH1 CH2
CH3 CH4
CH1
CH1CH7 CH8
CH4
CH3
CH2
CH5
CH1
CH6 CH12
CH1
CH13
CH19
CH4
CH7
CH5
CH10
CH8
CH11
CH6
CH2 CH3
CH4 CH5
CH2
CH6
CH1 CH3
CH7 CH8 CH9
CH1 CH2
CH3 CH4
CH5 CH6
CH7 CH8
CH9 CH10
CH11 CH12
CH13 CH14
CH15 CH16
CH1
CH4 CH5
CH2
CH6
CH1 CH3
CH7 CH8 CH9
CH13 CH14
CH11
CH15
CH10 CH12
CH16
CH1 CH3
CH2
CH4 CH5 CH6
CH1
CH2
CH1 CH2
CH3 CH1CH15
CH11
CH16
CH12
CH7
CH3
CH8
CH4
CH13
CH9
CH14
CH10
CH5
CH1
CH6
CH2
CH15
CH11
CH16
CH12
CH7
CH3
CH8
CH4
CH13
CH9
CH14
CH10
CH5
CH1
CH6
CH2
CH15
CH11
CH16
CH12
CH1
CH3
CH8
CH4
CH13
CH9
CH14
CH10
CH5
CH7
CH6
CH2
13-16
9-12
5-8
1-4
4-split mode
CH1
CH1
CH1
CH1
CH2
CH1
CH2
CH6
CH8
CH10 CH11 CH12 CH13
CH3 CH4 CH5
CH7
CH9
CH1
CH5 CH6 CH7 CH8
CH2
CH3
CH4
CH2
CH3
CH2
CH3 CH4
CH2 CH3
CH4 CH5 CH6
CH4 CH5 CH6
CH7 CH8 CH9
CH1 CH2 CH3 CH4
CH5 CH6 CH7 CH8
CH9 CH10 CH11 CH12
CH13 CH14 CH15 CH16
CH1
CH1
CH1
CH1 CH2
CH3 CH4
CH2 CH3
CH4 CH5 CH6
CH7 CH8 CH9
CH5 CH6
CH7 CH8
CH9 CH10
CH11 CH12
CH13 CH14
CH15 CH16
CH10 CH11 CH12
CH13 CH14 CH15
CH16
CH7 CH2 CH3 CH4
CH5 CH6 CH1 CH8
CH9 CH10 CH11 CH12
CH13 CH14 CH15 CH16 CH3 CH1
CH1 CH2
CH1 CH2
CH3 CH4
CH1
CH1CH7 CH8
CH4
CH3
CH2
CH5
CH1
CH6 CH12
CH1
CH13
CH19
CH4
CH7
CH5
CH10
CH8
CH11
CH6
CH2 CH3
CH4 CH5
CH2
CH6
CH1 CH3
CH7 CH8 CH9
CH1 CH2
CH3 CH4
CH5 CH6
CH7 CH8
CH9 CH10
CH11 CH12
CH13 CH14
CH15 CH16
CH1
CH4 CH5
CH2
CH6
CH1 CH3
CH7 CH8 CH9
CH13 CH14
CH11
CH15
CH10 CH12
CH16
CH1 CH3
CH2
CH4 CH5 CH6
CH1
CH2
CH1 CH2
CH3 CH1CH15
CH11
CH16
CH12
CH7
CH3
CH8
CH4
CH13
CH9
CH14
CH10
CH5
CH1
CH6
CH2
CH15
CH11
CH16
CH12
CH7
CH3
CH8
CH4
CH13
CH9
CH14
CH10
CH5
CH1
CH6
CH2
CH15
CH11
CH16
CH12
CH1
CH3
CH8
CH4
CH13
CH9
CH14
CH10
CH5
CH7
CH6
CH2
CH1
CH1
CH1
CH1
CH2
CH1
CH2
CH6
CH8
CH10 CH11 CH12 CH13
CH3 CH4 CH5
CH7
CH9
CH1
CH5 CH6 CH7 CH8
CH2
CH3
CH4
CH2
CH3
CH2
CH3 CH4
CH2 CH3
CH4 CH5 CH6
CH4 CH5 CH6
CH7 CH8 CH9
CH1 CH2 CH3 CH4
CH5 CH6 CH7 CH8
CH9 CH10 CH11 CH12
CH13 CH14 CH15 CH16
CH1
CH1
CH1
CH1 CH2
CH3 CH4
CH2 CH3
CH4 CH5 CH6
CH7 CH8 CH9
CH5 CH6
CH7 CH8
CH9 CH10
CH11 CH12
CH13 CH14
CH15 CH16
CH10 CH11 CH12
CH13 CH14 CH15
CH16
CH7 CH2 CH3 CH4
CH5 CH6 CH1 CH8
CH9 CH10 CH11 CH12
CH13 CH14 CH15 CH16 CH3 CH1
CH1 CH2
CH1 CH2
CH3 CH4
CH1
CH1CH7 CH8
CH4
CH3
CH2
CH5
CH1
CH6 CH12
CH1
CH13
CH19
CH4
CH7
CH5
CH10
CH8
CH11
CH6
CH2 CH3
CH4 CH5
CH2
CH6
CH1 CH3
CH7 CH8 CH9
CH1 CH2
CH3 CH4
CH5 CH6
CH7 CH8
CH9 CH10
CH11 CH12
CH13 CH14
CH15 CH16
CH1
CH4 CH5
CH2
CH6
CH1 CH3
CH7 CH8 CH9
CH13 CH14
CH11
CH15
CH10 CH12
CH16
CH1 CH3
CH2
CH4 CH5 CH6
CH1
CH2
CH1 CH2
CH3 CH1CH15
CH11
CH16
CH12
CH7
CH3
CH8
CH4
CH13
CH9
CH14
CH10
CH5
CH1
CH6
CH2
CH15
CH11
CH16
CH12
CH7
CH3
CH8
CH4
CH13
CH9
CH14
CH10
CH5
CH1
CH6
CH2
CH15
CH11
CH16
CH12
CH1
CH3
CH8
CH4
CH13
CH9
CH14
CH10
CH5
CH7
CH6
CH2
10-16
1-9
9-split mode
CH1
CH1
CH1
CH1
CH2
CH1
CH2
CH6
CH8
CH10 CH11 CH12 CH13
CH3 CH4 CH5
CH7
CH9
CH1
CH5 CH6 CH7 CH8
CH2
CH3
CH4
CH2
CH3
CH2
CH3 CH4
CH2 CH3
CH4 CH5 CH6
CH4 CH5 CH6
CH7 CH8 CH9
CH1 CH2 CH3 CH4
CH5 CH6 CH7 CH8
CH9 CH10 CH11 CH12
CH13 CH14 CH15 CH16
CH1
CH1
CH1
CH1 CH2
CH3 CH4
CH2 CH3
CH4 CH5 CH6
CH7 CH8 CH9
CH5 CH6
CH7 CH8
CH9 CH10
CH11 CH12
CH13 CH14
CH15 CH16
CH10 CH11 CH12
CH13 CH14 CH15
CH16
CH7 CH2 CH3 CH4
CH5 CH6 CH1 CH8
CH9 CH10 CH11 CH12
CH13 CH14 CH15 CH16 CH3 CH1
CH1 CH2
CH1 CH2
CH3 CH4
CH1
CH1CH7 CH8
CH4
CH3
CH2
CH5
CH1
CH6 CH12
CH1
CH13
CH19
CH4
CH7
CH5
CH10
CH8
CH11
CH6
CH2 CH3
CH4 CH5
CH2
CH6
CH1 CH3
CH7 CH8 CH9
CH1 CH2
CH3 CH4
CH5 CH6
CH7 CH8
CH9 CH10
CH11 CH12
CH13 CH14
CH15 CH16
CH1
CH4 CH5
CH2
CH6
CH1 CH3
CH7 CH8 CH9
CH13 CH14
CH11
CH15
CH10 CH12
CH16
CH1 CH3
CH2
CH4 CH5 CH6
CH1
CH2
CH1 CH2
CH3 CH1CH15
CH11
CH16
CH12
CH7
CH3
CH8
CH4
CH13
CH9
CH14
CH10
CH5
CH1
CH6
CH2
CH15
CH11
CH16
CH12
CH7
CH3
CH8
CH4
CH13
CH9
CH14
CH10
CH5
CH1
CH6
CH2
CH15
CH11
CH16
CH12
CH1
CH3
CH8
CH4
CH13
CH9
CH14
CH10
CH5
CH7
CH6
CH2
12_ live
live
Manual Switching
Click the arrow <
◄
/
►
> key to move to the next split mode.
Example 1) After setting to 9-split mode in TRM-1610S, if you press the Right [+] button:
Channel (CH 01~9) ;Channel (CH 10~16)
Example 2) After setting to 4-split screen mode in TRM-810S, if you press the right [+] button:
Channel (CH 1~4) ;Channel (CH 5~8)
STATUS
You can check the connection information of the camera to be connected to each channel on the live screen.
Channel info
Right-click on the live screen and select <CH Info> in the
<Status> menu to display the information on the current
video in overlay over the live video being monitored.
M
`ARB is only displayed when an ARB situation occurs.
`The letters shown next to the product name represents the
protocol used to register the camera.
-S and V represent Wisenet protocol while O represents
ONVIF.
-If connected using the RTSP protocol, then only RTSP is
displayed without any product name.
Connection
Right-click on the live screen and select <Connection> in the
<Status> menu to check the status of cameras connected to
each channel.
Live Status
Right-click on the live screen and select <Live> in the <Status> menu to check the transmitted data from a
camera connected to each channel.
•Model : Displays the model name of camera connected to
each channel.
•Status : Shows the connection status of camera set to each
channel.
•IP Address : Displays the IP address of a camera set to each
channel.
•Codec : Displays the live profile codec information for a
camera set to each channel.
•Resolution : Displays the live profile resolution of a camera set to each channel.
•Frame Rate : Displays the live profile transmission rate for a camera set to each channel.
CH4 CH5
CH2
CH6
CH1 CH3
CH7 CH8 CH9
CH4 CH5
CH2
CH6
CH1 CH3
CH7 CH8 CH9
CH1 CH2
CH3 CH4
CH4 CH5
CH2
CH6
CH1 CH3
CH7 CH8 CH9
CH15
CH11
CH16
CH12
CH7
CH3
CH8
CH4
CH13
CH9
CH14
CH10
CH5
CH1
CH6
CH2
CH1 CH2
CH3 CH4
CH6 CH7
CH3
CH2
CH4
CH1
CH5
CH4 CH5
CH2
CH6
CH1 CH3
CH7 CH8 CH9
CH10 CH11 CH12 CH13 CH14 CH15 CH16
CH12
CH1
CH13
CH9
CH4
CH7
CH5
CH10
CH8
CH11
CH6
CH2 CH3
CH1
CH2
CH1
CH1 CH2
CH1
CH4 CH5
CH2
CH6
CH1 CH3
CH7 CH8 CH9
CH13 CH14
CH11
CH15
CH10 CH12
CH16
CH4 CH5
CH2
CH6
CH1 CH3
CH7 CH8 CH9
CH1 CH2
CH3 CH4
CH1 CH2
CH3 CH4
CH5 CH6
CH7 CH8
CH9 CH10
CH11 CH12
CH13 CH14
CH15 CH16
CH15
CH11
CH16
CH12
CH7
CH3
CH8
CH4
CH13
CH9
CH14
CH10
CH5
CH1
CH6
CH2
CH15
CH11
CH16
CH12
CH1
CH3
CH8
CH4
CH13
CH9
CH14
CH10
CH5
CH7
CH6
CH2
CH3
CH4 CH5
CH2
CH6
CH1 CH3
CH7 CH8 CH9
CH4 CH5
CH2
CH6
CH1 CH3
CH7 CH8 CH9
CH1 CH2
CH3 CH4
CH4 CH5
CH2
CH6
CH1 CH3
CH7 CH8 CH9
CH15
CH11
CH16
CH12
CH7
CH3
CH8
CH4
CH13
CH9
CH14
CH10
CH5
CH1
CH6
CH2
CH1 CH2
CH3 CH4
CH6 CH7
CH3
CH2
CH4
CH1
CH5
CH4 CH5
CH2
CH6
CH1 CH3
CH7 CH8 CH9
CH10 CH11 CH12 CH13 CH14 CH15 CH16
CH12
CH1
CH13
CH9
CH4
CH7
CH5
CH10
CH8
CH11
CH6
CH2 CH3
CH1
CH2
CH1
CH1 CH2
CH1
CH4 CH5
CH2
CH6
CH1 CH3
CH7 CH8 CH9
CH13 CH14
CH11
CH15
CH10 CH12
CH16
CH4 CH5
CH2
CH6
CH1 CH3
CH7 CH8 CH9
CH1 CH2
CH3 CH4
CH1 CH2
CH3 CH4
CH5 CH6
CH7 CH8
CH9 CH10
CH11 CH12
CH13 CH14
CH15 CH16
CH15
CH11
CH16
CH12
CH7
CH3
CH8
CH4
CH13
CH9
CH14
CH10
CH5
CH1
CH6
CH2
CH15
CH11
CH16
CH12
CH1
CH3
CH8
CH4
CH13
CH9
CH14
CH10
CH5
CH7
CH6
CH2
CH3
;
CH4 CH5
CH2
CH6
CH1 CH3
CH7 CH8 CH9
CH4 CH5
CH2
CH6
CH1 CH3
CH7 CH8 CH9
CH1 CH2
CH3 CH4
CH4 CH5
CH2
CH6
CH1 CH3
CH7 CH8 CH9
CH15
CH11
CH16
CH12
CH7
CH3
CH8
CH4
CH13
CH9
CH14
CH10
CH5
CH1
CH6
CH2
CH1 CH2
CH3 CH4
CH6 CH7
CH3
CH2
CH4
CH1
CH5
CH4 CH5
CH2
CH6
CH1 CH3
CH7 CH8 CH9
CH10 CH11 CH12 CH13 CH14 CH15 CH16
CH12
CH1
CH13
CH9
CH4
CH7
CH5
CH10
CH8
CH11
CH6
CH2 CH3
CH1
CH2
CH1
CH1 CH2
CH1
CH4 CH5
CH2
CH6
CH1 CH3
CH7 CH8 CH9
CH13 CH14
CH11
CH15
CH10 CH12
CH16
CH4 CH5
CH2
CH6
CH1 CH3
CH7 CH8 CH9
CH1 CH2
CH3 CH4
CH1 CH2
CH3 CH4
CH5 CH6
CH7 CH8
CH9 CH10
CH11 CH12
CH13 CH14
CH15 CH16
CH15
CH11
CH16
CH12
CH7
CH3
CH8
CH4
CH13
CH9
CH14
CH10
CH5
CH1
CH6
CH2
CH15
CH11
CH16
CH12
CH1
CH3
CH8
CH4
CH13
CH9
CH14
CH10
CH5
CH7
CH6
CH2
CH3
CH4 CH5
CH2
CH6
CH1 CH3
CH7 CH8 CH9
CH4 CH5
CH2
CH6
CH1 CH3
CH7 CH8 CH9
CH1 CH2
CH3 CH4
CH4 CH5
CH2
CH6
CH1 CH3
CH7 CH8 CH9
CH15
CH11
CH16
CH12
CH7
CH3
CH8
CH4
CH13
CH9
CH14
CH10
CH5
CH1
CH6
CH2
CH1 CH2
CH3 CH4
CH6 CH7
CH3
CH2
CH4
CH1
CH5
CH4 CH5
CH2
CH6
CH1 CH3
CH7 CH8 CH9
CH10 CH11 CH12 CH13 CH14 CH15 CH16
CH12
CH1
CH13
CH9
CH4
CH7
CH5
CH10
CH8
CH11
CH6
CH2 CH3
CH1
CH2
CH1
CH1 CH2
CH1
CH4 CH5
CH2
CH6
CH1 CH3
CH7 CH8 CH9
CH13 CH14
CH11
CH15
CH10 CH12
CH16
CH4 CH5
CH2
CH6
CH1 CH3
CH7 CH8 CH9
CH1 CH2
CH3 CH4
CH1 CH2
CH3 CH4
CH5 CH6
CH7 CH8
CH9 CH10
CH11 CH12
CH13 CH14
CH15 CH16
CH15
CH11
CH16
CH12
CH7
CH3
CH8
CH4
CH13
CH9
CH14
CH10
CH5
CH1
CH6
CH2
CH15
CH11
CH16
CH12
CH1
CH3
CH8
CH4
CH13
CH9
CH14
CH10
CH5
CH7
CH6
CH2
CH3
; ;
CH4 CH5
CH2
CH6
CH1 CH3
CH7 CH8 CH9
CH4 CH5
CH2
CH6
CH1 CH3
CH7 CH8 CH9
CH1 CH2
CH3 CH4
CH4 CH5
CH2
CH6
CH1 CH3
CH7 CH8 CH9
CH15
CH11
CH16
CH12
CH7
CH3
CH8
CH4
CH13
CH9
CH14
CH10
CH5
CH1
CH6
CH2
CH1 CH2
CH3 CH4
CH6 CH7
CH3
CH2
CH4
CH1
CH5
CH4 CH5
CH2
CH6
CH1 CH3
CH7 CH8 CH9
CH10 CH11 CH12 CH13 CH14 CH15 CH16
CH12
CH1
CH13
CH9
CH4
CH7
CH5
CH10
CH8
CH11
CH6
CH2 CH3
CH1
CH2
CH1
CH1 CH2
CH1
CH4 CH5
CH2
CH6
CH1 CH3
CH7 CH8 CH9
CH13 CH14
CH11
CH15
CH10 CH12
CH16
CH4 CH5
CH2
CH6
CH1 CH3
CH7 CH8 CH9
CH1 CH2
CH3 CH4
CH1 CH2
CH3 CH4
CH5 CH6
CH7 CH8
CH9 CH10
CH11 CH12
CH13 CH14
CH15 CH16
CH15
CH11
CH16
CH12
CH7
CH3
CH8
CH4
CH13
CH9
CH14
CH10
CH5
CH1
CH6
CH2
CH15
CH11
CH16
CH12
CH1
CH3
CH8
CH4
CH13
CH9
CH14
CH10
CH5
CH7
CH6
CH2
CH3
CH4 CH5
CH2
CH6
CH1 CH3
CH7 CH8 CH9
CH4 CH5
CH2
CH6
CH1 CH3
CH7 CH8 CH9
CH1 CH2
CH3 CH4
CH4 CH5
CH2
CH6
CH1 CH3
CH7 CH8 CH9
CH15
CH11
CH16
CH12
CH7
CH3
CH8
CH4
CH13
CH9
CH14
CH10
CH5
CH1
CH6
CH2
CH1 CH2
CH3 CH4
CH6 CH7
CH3
CH2
CH4
CH1
CH5
CH4 CH5
CH2
CH6
CH1 CH3
CH7 CH8 CH9
CH10 CH11 CH12 CH13 CH14 CH15 CH16
CH12
CH1
CH13
CH9
CH4
CH7
CH5
CH10
CH8
CH11
CH6
CH2 CH3
CH1
CH2
CH1
CH1 CH2
CH1
CH4 CH5
CH2
CH6
CH1 CH3
CH7 CH8 CH9
CH13 CH14
CH11
CH15
CH10 CH12
CH16
CH4 CH5
CH2
CH6
CH1 CH3
CH7 CH8 CH9
CH1 CH2
CH3 CH4
CH1 CH2
CH3 CH4
CH5 CH6
CH7 CH8
CH9 CH10
CH11 CH12
CH13 CH14
CH15 CH16
CH15
CH11
CH16
CH12
CH7
CH3
CH8
CH4
CH13
CH9
CH14
CH10
CH5
CH1
CH6
CH2
CH15
CH11
CH16
CH12
CH1
CH3
CH8
CH4
CH13
CH9
CH14
CH10
CH5
CH7
CH6
CH2
CH3
10-16
1-9
RES : 1920x1080 (H.264)
SET/IN/DEC : 30/30/30.0
XXX-0000(S)
RES : 1920x1080 (H.264)
SET/IN/DEC : 30/30/30.0
XXX-0000(S)

English _13
● LIVE
Record Status
Right-click on the live screen and select <Record> in the <Status> menu to check each channel's profile,
record type, input/recording frame count, allowed/input/recorded amount of data.
•Total Bitrate (Record/Max) : Record bitrate shows the amount
of actual data recording while Total bitrate shows the
maximum data transfer allowed by the NVR.
•Profile : Shows the video profile configured to each channel.
•Frame (fps) : Show the input/record frames per second for
each channel.
•Bitrate (bps)
- Limit / Input / Record : Shows the amount of limit/input/
recording data for each channel.
- Input / Limit : Shows the data ratio of actual data
transferred from the camera and allowed maximum defined by user.
•Current : Shows the recording status information of currently transferred data.
•MAX : Shows recording information of the most biggest recording data out of configured standard and event
recordings.
•: Reloads the recording information.
•Record Setup : The menu screen will switch to the record setting screen.
M
`If an error occurs during recording, the channel's profile column turns yellow.
This profile error indicates that when a recording profile cannot be used to receive video from camera, an alternative profile
is used to record the video. When the recording profile resumes, the camera video can record by using the set recording
profile.
`If NVR exceeds the recording limit, only the key frame will be recorded. In that case, a restricted recording popup and an icon
will appear. The restricted recording popup appears only once. If you change the camera setup and record setup, the
restricted recording popup may appear once more to confirm the status. If you don't want to see it again, then check Do not
show this again in the popup.
For the maximum allowed number of recoding, see the "Record Setup" page under "Menu Setup > Setting the
Recording" in the Table of Contents.
PoE Status
This function is only available for products that support PoE. For products with PoE support, see “NVR
products supporting each feature”. (Page 4)
Right-click on the live screen and select <PoE> in the <Status> menu to check the current PoE status of each
port.
1. Select the <PoE Status>.
PoE status view window is displayed.
•Consumption(W) : Displays the power consumption in PoE.
- 0 : No device is connected to the port or a device is using
its own power supply.
- –: Trouble in the port (More detailed trouble information can
be displayed in additional information.)
M
`For more information on the whole full PoE power specs of each
product, see "Product Specification Manual”. If the power limits
of all ports exceed the PoE specification, each port will be powered
down one by one.
•PoE : Turns on/off the power supply to the camera.
If checked, it means the power supply is On; if not checked, it means it is Off.
•Additional information : If there is a problem in the power supply, it is explained here.
Power supply problems include excessive power (class 1 to 4) and voltage errors.
•Total PoE power consumption : Display the sum of power consumption for all the ports.

14_ live
live
Channel Setting
You can display the channel in a desired area of a split screen.
1. Place the cursor over the camera name of each channel to display the <
▼
> key to the right on the screen.
2. Click a camera name to display a channel list where you can select a different channel.
3. Select a desired channel and click it.
The current channel will be switched to the selected one.
M
`Use the cursor to select a channel to move, and drag and drop it to a desired channel; this can also change the channel
position.
Example) If switching CH 1 to CH 7
Switching to Single Mode
When in split mode, select and double-click a desired channel to switch to its Single mode.
Example) If double-clicking CH 3.
ZOOM
This is activated only in Live Single mode.
1. After right-clicking on the live screen, click <ZOOM>.
You can also press the [ZOOM] button on your remote controller or click < > in the launcher menu.The
Zoom in icon will appear at the bottom right.
2. Click < > icons to magnify the selected area.
By adjusting the box at the bottom, you can adjust the position of the magnified screen.
3. Click < > icons to zoom out the selected area.
4. Click < > at the top right to close zoom.
CH1
CH1
CH1
CH1
CH2
CH1
CH2
CH6
CH8
CH10 CH11 CH12 CH13
CH3 CH4 CH5
CH7
CH9
CH1
CH5 CH6 CH7 CH8
CH2
CH3
CH4
CH2
CH3
CH2
CH3 CH4
CH2 CH3
CH4 CH5 CH6
CH4 CH5 CH6
CH7 CH8 CH9
CH1 CH2 CH3 CH4
CH5 CH6 CH7 CH8
CH9 CH10 CH11 CH12
CH13 CH14 CH15 CH16
CH1
CH1
CH1
CH1 CH2
CH3 CH4
CH2 CH3
CH4 CH5 CH6
CH7 CH8 CH9
CH5 CH6
CH7 CH8
CH9 CH10
CH11 CH12
CH13 CH14
CH15 CH16
CH10 CH11 CH12
CH13 CH14 CH15
CH16
CH7 CH2 CH3 CH4
CH5 CH6 CH1 CH8
CH9 CH10 CH11 CH12
CH13 CH14 CH15 CH16 CH3 CH1
CH1 CH2
CH1 CH2
CH3 CH4
CH1
CH1CH7 CH8
CH4
CH3
CH2
CH5
CH1
CH6 CH12
CH1
CH13
CH19
CH4
CH7
CH5
CH10
CH8
CH11
CH6
CH2 CH3
CH4 CH5
CH2
CH6
CH1 CH3
CH7 CH8 CH9
CH1 CH2
CH3 CH4
CH5 CH6
CH7 CH8
CH9 CH10
CH11 CH12
CH13 CH14
CH15 CH16
CH1
CH4 CH5
CH2
CH6
CH1 CH3
CH7 CH8 CH9
CH13 CH14
CH11
CH15
CH10 CH12
CH16
CH1 CH3
CH2
CH4 CH5 CH6
CH1
CH2
CH1 CH2
CH3 CH1
CH15
CH11
CH16
CH12
CH7
CH3
CH8
CH4
CH13
CH9
CH14
CH10
CH5
CH1
CH6
CH2
CH15
CH11
CH16
CH12
CH7
CH3
CH8
CH4
CH13
CH9
CH14
CH10
CH5
CH1
CH6
CH2
CH15
CH11
CH16
CH12
CH1
CH3
CH8
CH4
CH13
CH9
CH14
CH10
CH5
CH7
CH6
CH2
CH1
CH1
CH1
CH1
CH2
CH1
CH2
CH6
CH8
CH10 CH11 CH12 CH13
CH3 CH4 CH5
CH7
CH9
CH1
CH5 CH6 CH7 CH8
CH2
CH3
CH4
CH2
CH3
CH2
CH3 CH4
CH2 CH3
CH4 CH5 CH6
CH4 CH5 CH6
CH7 CH8 CH9
CH1 CH2 CH3 CH4
CH5 CH6 CH7 CH8
CH9 CH10 CH11 CH12
CH13 CH14 CH15 CH16
CH1
CH1
CH1
CH1 CH2
CH3 CH4
CH2 CH3
CH4 CH5 CH6
CH7 CH8 CH9
CH5 CH6
CH7 CH8
CH9 CH10
CH11 CH12
CH13 CH14
CH15 CH16
CH10 CH11 CH12
CH13 CH14 CH15
CH16
CH7 CH2 CH3 CH4
CH5 CH6 CH1 CH8
CH9 CH10 CH11 CH12
CH13 CH14 CH15 CH16 CH3 CH1
CH1 CH2
CH1 CH2
CH3 CH4
CH1
CH1CH7 CH8
CH4
CH3
CH2
CH5
CH1
CH6 CH12
CH1
CH13
CH19
CH4
CH7
CH5
CH10
CH8
CH11
CH6
CH2 CH3
CH4 CH5
CH2
CH6
CH1 CH3
CH7 CH8 CH9
CH1 CH2
CH3 CH4
CH5 CH6
CH7 CH8
CH9 CH10
CH11 CH12
CH13 CH14
CH15 CH16
CH1
CH4 CH5
CH2
CH6
CH1 CH3
CH7 CH8 CH9
CH13 CH14
CH11
CH15
CH10 CH12
CH16
CH1 CH3
CH2
CH4 CH5 CH6
CH1
CH2
CH1 CH2
CH3 CH1CH15
CH11
CH16
CH12
CH7
CH3
CH8
CH4
CH13
CH9
CH14
CH10
CH5
CH1
CH6
CH2
CH15
CH11
CH16
CH12
CH7
CH3
CH8
CH4
CH13
CH9
CH14
CH10
CH5
CH1
CH6
CH2
CH15
CH11
CH16
CH12
CH1
CH3
CH8
CH4
CH13
CH9
CH14
CH10
CH5
CH7
CH6
CH2
;
CH1
CH1
CH1
CH1
CH2
CH1
CH2
CH6
CH8
CH10 CH11 CH12 CH13
CH3 CH4 CH5
CH7
CH9
CH1
CH5 CH6 CH7 CH8
CH2
CH3
CH4
CH2
CH3
CH2
CH3 CH4
CH2 CH3
CH4 CH5 CH6
CH4 CH5 CH6
CH7 CH8 CH9
CH1 CH2 CH3 CH4
CH5 CH6 CH7 CH8
CH9 CH10 CH11 CH12
CH13 CH14 CH15 CH16
CH1
CH1
CH1
CH1 CH2
CH3 CH4
CH2 CH3
CH4 CH5 CH6
CH7 CH8 CH9
CH5 CH6
CH7 CH8
CH9 CH10
CH11 CH12
CH13 CH14
CH15 CH16
CH10 CH11 CH12
CH13 CH14 CH15
CH16
CH7 CH2 CH3 CH4
CH5 CH6 CH1 CH8
CH9 CH10 CH11 CH12
CH13 CH14 CH15 CH16 CH3 CH1
CH1 CH2
CH1 CH2
CH3 CH4
CH1
CH1CH7 CH8
CH4
CH3
CH2
CH5
CH1
CH6 CH12
CH1
CH13
CH19
CH4
CH7
CH5
CH10
CH8
CH11
CH6
CH2 CH3
CH4 CH5
CH2
CH6
CH1 CH3
CH7 CH8 CH9
CH1 CH2
CH3 CH4
CH5 CH6
CH7 CH8
CH9 CH10
CH11 CH12
CH13 CH14
CH15 CH16
CH1
CH4 CH5
CH2
CH6
CH1 CH3
CH7 CH8 CH9
CH13 CH14
CH11
CH15
CH10 CH12
CH16
CH1 CH3
CH2
CH4 CH5 CH6
CH1
CH2
CH1 CH2
CH3 CH1
CH15
CH11
CH16
CH12
CH7
CH3
CH8
CH4
CH13
CH9
CH14
CH10
CH5
CH1
CH6
CH2
CH15
CH11
CH16
CH12
CH7
CH3
CH8
CH4
CH13
CH9
CH14
CH10
CH5
CH1
CH6
CH2
CH15
CH11
CH16
CH12
CH1
CH3
CH8
CH4
CH13
CH9
CH14
CH10
CH5
CH7
CH6
CH2
CH1
CH1
CH1
CH1
CH2
CH1
CH2
CH6
CH8
CH10 CH11 CH12 CH13
CH3 CH4 CH5
CH7
CH9
CH1
CH5 CH6 CH7 CH8
CH2
CH3
CH4
CH2
CH3
CH2
CH3 CH4
CH2 CH3
CH4 CH5 CH6
CH4 CH5 CH6
CH7 CH8 CH9
CH1 CH2 CH3 CH4
CH5 CH6 CH7 CH8
CH9 CH10 CH11 CH12
CH13 CH14 CH15 CH16
CH1
CH1
CH1
CH1 CH2
CH3 CH4
CH2 CH3
CH4 CH5 CH6
CH7 CH8 CH9
CH5 CH6
CH7 CH8
CH9 CH10
CH11 CH12
CH13 CH14
CH15 CH16
CH10 CH11 CH12
CH13 CH14 CH15
CH16
CH7 CH2 CH3 CH4
CH5 CH6 CH1 CH8
CH9 CH10 CH11 CH12
CH13 CH14 CH15 CH16 CH3 CH1
CH1 CH2
CH1 CH2
CH3 CH4
CH1
CH1CH7 CH8
CH4
CH3
CH2
CH5
CH1
CH6 CH12
CH1
CH13
CH19
CH4
CH7
CH5
CH10
CH8
CH11
CH6
CH2 CH3
CH4 CH5
CH2
CH6
CH1 CH3
CH7 CH8 CH9
CH1 CH2
CH3 CH4
CH5 CH6
CH7 CH8
CH9 CH10
CH11 CH12
CH13 CH14
CH15 CH16
CH1
CH4 CH5
CH2
CH6
CH1 CH3
CH7 CH8 CH9
CH13 CH14
CH11
CH15
CH10 CH12
CH16
CH1 CH3
CH2
CH4 CH5 CH6
CH1
CH2
CH1 CH2
CH3
CH1CH15
CH11
CH16
CH12
CH7
CH3
CH8
CH4
CH13
CH9
CH14
CH10
CH5
CH1
CH6
CH2
CH15
CH11
CH16
CH12
CH7
CH3
CH8
CH4
CH13
CH9
CH14
CH10
CH5
CH1
CH6
CH2
CH15
CH11
CH16
CH12
CH1
CH3
CH8
CH4
CH13
CH9
CH14
CH10
CH5
CH7
CH6
CH2
;

English _15
● LIVE
LAYOUT
In the live screen, you can set the layout for each channel.
Setting Up the Live Layout
This section outlines how to select a series of channels based on their purpose/accessibility and monitor them
in a single layout.
Example) Layout “Indoor” - Guest Room Camera 1, Guest Room Camera 2, Guest Room Camera 3
Layout “VIP” - VIP Room Camera 1, VIP Room Camera 2, VIP Room Camera 3, Corridor Camera
To create a new layout, follow these steps:
aOpen the channel layout setup menu.
bClick <New>.
cEnter a name for the selected channels (e.g., Indoor).
dSelect the channels that you want to add to the layout (e.g., 1, 2, 3, 4).
eChoose a split mode to apply (e.g., 4-way split).
fClick <OK>.
gChoose a layout to view it on the screen (e.g., change to Indoor).
1. Select the < >.
The layout setting screen will appear.
•New : You can set the new layout.
•Rename : You can make changes to the selected layout.
When the layout is changed, the channel order is initialized.
•Delete : You can delete the selected layout.
•Channel Table : You can select channels in the table to be registered in, or removed from the layout.
•Channel List : You can select channels in the list to be registered in, or removed from the layout.
2. Press the <New> button and enter the name of layout to add.
3. In the <Ch. Table> or <Channel List>, click and select the channel to be displayed on the layout screen.
4. Click on <OK> to save the selected layout.
M
`The layout for each user is saved separately.
`You can use a configured layout even in the Search Time function to facilitate search using the channel sequence and
combination that you have set.
See the "Time Search" page under "Search & Play > Search" in the Table of Contents.
AUDIO ON/OFF
You can turn the sound on/off corresponding to the channel in Live mode.
AUDIO ON/OFF in Single mode
Click on the audio icon ( ) on the screen to turn it ON/OFF.
M
`If you have configured the audio output settings properly but the audio or voice is not output, check if the connected network
camera supports the sound signal and if you have configured the sound settings as appropriate.
The sound icon can be displayed if the sound signal fails to output from noise.
`Only the channel where <AUDIO> is set to <ON> in "Setting the Device > Camera" displays the audio icon ( ) in Live
mode that you can use to turn the sound on/off.
FREEZE
This is available only in Live mode, this pauses playing the Live image temporarily.
1. Click < > of the launcher mode.
Video playing is paused.
2. Click on < >.
Pause is canceled. Playing is resumed.
def
c
b
g
a
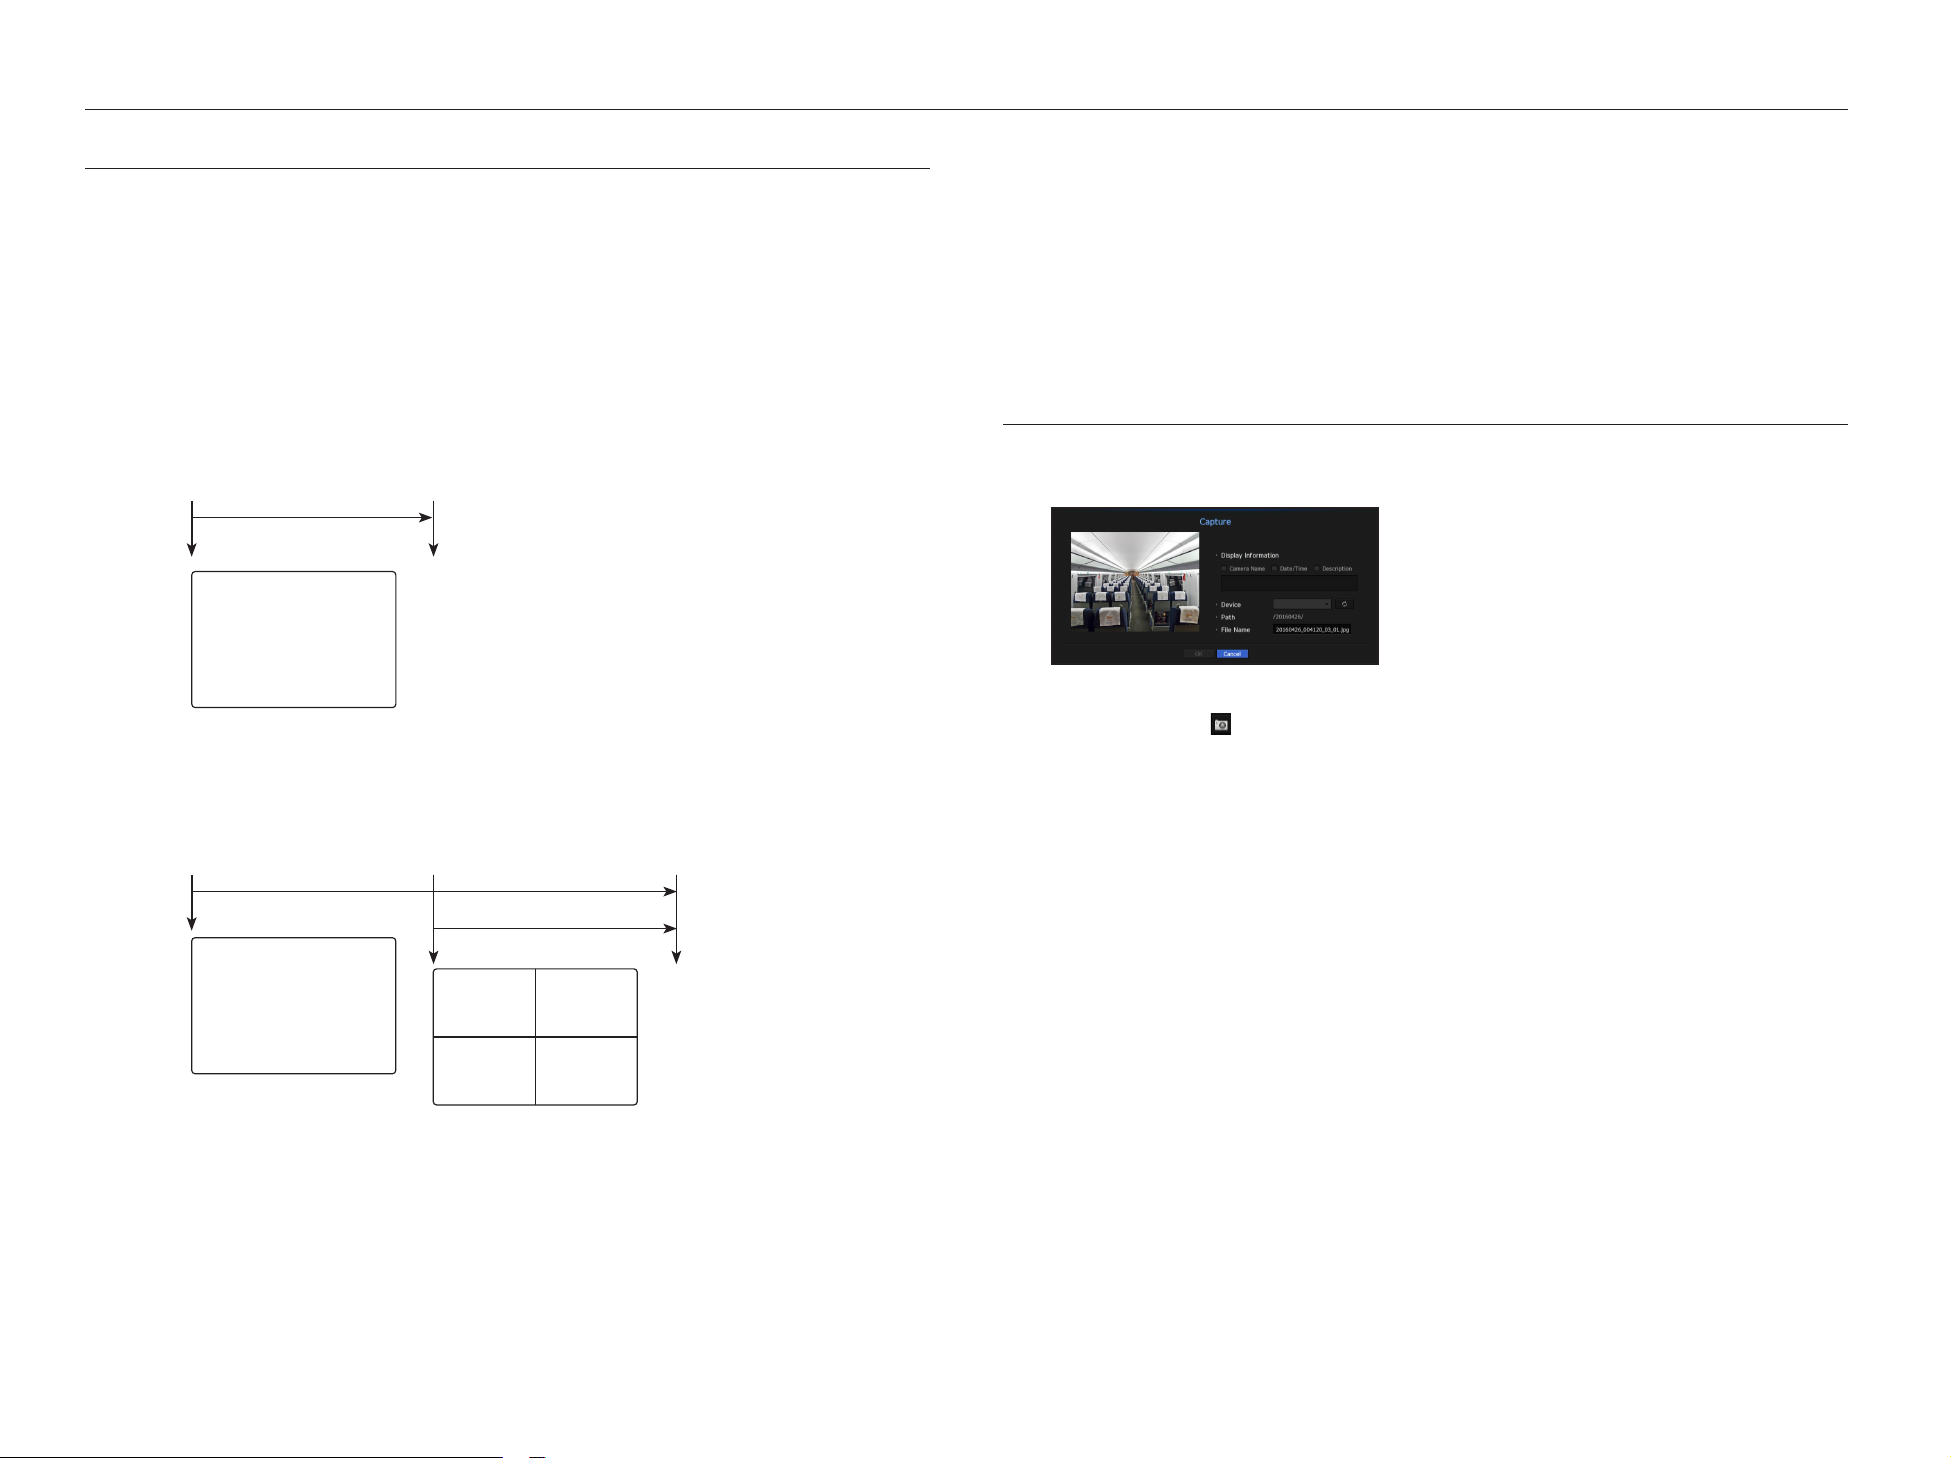
16_ live
live
EVENT MONITORING
This will display the channel in sync with a specific event (Sensor/Motion/Video Loss) if it occurs.
To use the event monitoring function, you should set the <Event Display> by referring to the "Monitor" page in the
table of contents "Menu Setup > Setting the Device".
•If multiple events occur simultaneously, the screen will switch to a split mode.
- 2 ~ 4 events : 4-split mode
- 5 ~ 9 events : 9-split mode
- 10 ~ 16 events : 16-split mode
•If the second event occurs within the set time of <Event Display>, the first event will last until the second one
is terminated.
Example1)
`If you set <Event Display> to 5 seconds, and only one event occurs in CH 1.
Example2)
`If you set <Event Display> to 5 seconds, and the second event occurs in CH 2 within the set time after the first event occurred in
CH 1.
CH1
CH1
CH1
CH1
CH2
CH1
CH2
CH6
CH8
CH10 CH11 CH12 CH13
CH3 CH4 CH5
CH7
CH9
CH1
CH5 CH6 CH7 CH8
CH2
CH3
CH4
CH2
CH3
CH2
CH3 CH4
CH2 CH3
CH4 CH5 CH6
CH4 CH5 CH6
CH7 CH8 CH9
CH1 CH2 CH3 CH4
CH5 CH6 CH7 CH8
CH9 CH10 CH11 CH12
CH13 CH14 CH15 CH16
CH1
CH1
CH1
CH1 CH2
CH3 CH4
CH2 CH3
CH4 CH5 CH6
CH7 CH8 CH9
CH5 CH6
CH7 CH8
CH9 CH10
CH11 CH12
CH13 CH14
CH15 CH16
CH10 CH11 CH12
CH13 CH14 CH15
CH16
CH7 CH2 CH3 CH4
CH5 CH6 CH1 CH8
CH9 CH10 CH11 CH12
CH13 CH14 CH15 CH16 CH3 CH1
CH1 CH2
CH1 CH2
CH3 CH4
CH1
CH1CH7 CH8
CH4
CH3
CH2
CH5
CH1
CH6 CH12
CH1
CH13
CH19
CH4
CH7
CH5
CH10
CH8
CH11
CH6
CH2 CH3
CH4 CH5
CH2
CH6
CH1 CH3
CH7 CH8 CH9
CH1 CH2
CH3 CH4
CH5 CH6
CH7 CH8
CH9 CH10
CH11 CH12
CH13 CH14
CH15 CH16
CH1
CH4 CH5
CH2
CH6
CH1 CH3
CH7 CH8 CH9
CH13 CH14
CH11
CH15
CH10 CH12
CH16
CH1 CH3
CH2
CH4 CH5 CH6
CH1
CH2
CH1 CH2
CH3
CH1
CH15
CH11
CH16
CH12
CH7
CH3
CH8
CH4
CH13
CH9
CH14
CH10
CH5
CH1
CH6
CH2
CH15
CH11
CH16
CH12
CH1
CH3
CH8
CH4
CH13
CH9
CH14
CH10
CH5
CH7
CH6
CH2
Event occurrence 5 seconds
Stop alarm
CH1
CH1
CH1
CH1
CH2
CH1
CH2
CH6
CH8
CH10 CH11 CH12 CH13
CH3 CH4 CH5
CH7
CH9
CH1
CH5 CH6 CH7 CH8
CH2
CH3
CH4
CH2
CH3
CH2
CH3 CH4
CH2 CH3
CH4 CH5 CH6
CH4 CH5 CH6
CH7 CH8 CH9
CH1 CH2 CH3 CH4
CH5 CH6 CH7 CH8
CH9 CH10 CH11 CH12
CH13 CH14 CH15 CH16
CH1
CH1
CH1
CH1 CH2
CH3 CH4
CH2 CH3
CH4 CH5 CH6
CH7 CH8 CH9
CH5 CH6
CH7 CH8
CH9 CH10
CH11 CH12
CH13 CH14
CH15 CH16
CH10 CH11 CH12
CH13 CH14 CH15
CH16
CH7 CH2 CH3 CH4
CH5 CH6 CH1 CH8
CH9 CH10 CH11 CH12
CH13 CH14 CH15 CH16 CH3 CH1
CH1 CH2
CH1 CH2
CH3 CH4
CH1
CH1CH7 CH8
CH4
CH3
CH2
CH5
CH1
CH6 CH12
CH1
CH13
CH19
CH4
CH7
CH5
CH10
CH8
CH11
CH6
CH2 CH3
CH4 CH5
CH2
CH6
CH1 CH3
CH7 CH8 CH9
CH1 CH2
CH3 CH4
CH5 CH6
CH7 CH8
CH9 CH10
CH11 CH12
CH13 CH14
CH15 CH16
CH1
CH4 CH5
CH2
CH6
CH1 CH3
CH7 CH8 CH9
CH13 CH14
CH11
CH15
CH10 CH12
CH16
CH1 CH3
CH2
CH4 CH5 CH6
CH1
CH2
CH1 CH2
CH3 CH1CH15
CH11
CH16
CH12
CH7
CH3
CH8
CH4
CH13
CH9
CH14
CH10
CH5
CH1
CH6
CH2
CH15
CH11
CH16
CH12
CH1
CH3
CH8
CH4
CH13
CH9
CH14
CH10
CH5
CH7
CH6
CH2
CH1
CH1
CH1
CH1
CH2
CH1
CH2
CH6
CH8
CH10 CH11 CH12 CH13
CH3 CH4 CH5
CH7
CH9
CH1
CH5 CH6 CH7 CH8
CH2
CH3
CH4
CH2
CH3
CH2
CH3 CH4
CH2 CH3
CH4 CH5 CH6
CH4 CH5 CH6
CH7 CH8 CH9
CH1 CH2 CH3 CH4
CH5 CH6 CH7 CH8
CH9 CH10 CH11 CH12
CH13 CH14 CH15 CH16
CH1
CH1
CH1
CH1 CH2
CH3 CH4
CH2 CH3
CH4 CH5 CH6
CH7 CH8 CH9
CH5 CH6
CH7 CH8
CH9 CH10
CH11 CH12
CH13 CH14
CH15 CH16
CH10 CH11 CH12
CH13 CH14 CH15
CH16
CH7 CH2 CH3 CH4
CH5 CH6 CH1 CH8
CH9 CH10 CH11 CH12
CH13 CH14 CH15 CH16 CH3 CH1
CH1 CH2
CH1 CH2
CH3 CH4
CH1
CH1CH7 CH8
CH4
CH3
CH2
CH5
CH1
CH6 CH12
CH1
CH13
CH19
CH4
CH7
CH5
CH10
CH8
CH11
CH6
CH2 CH3
CH4 CH5
CH2
CH6
CH1 CH3
CH7 CH8 CH9
CH1 CH2
CH3 CH4
CH5 CH6
CH7 CH8
CH9 CH10
CH11 CH12
CH13 CH14
CH15 CH16
CH1
CH4 CH5
CH2
CH6
CH1 CH3
CH7 CH8 CH9
CH13 CH14
CH11
CH15
CH10 CH12
CH16
CH1 CH3
CH2
CH4 CH5 CH6
CH1
CH2
CH1 CH2
CH3
CH1
CH15
CH11
CH16
CH12
CH7
CH3
CH8
CH4
CH13
CH9
CH14
CH10
CH5
CH1
CH6
CH2
CH15
CH11
CH16
CH12
CH1
CH3
CH8
CH4
CH13
CH9
CH14
CH10
CH5
CH7
CH6
CH2
Event occurrence 4 seconds 9 seconds
Stop alarm
M
`Select <Stop Alarm> to initialize the status of alarm output and release the event function.
`If an alarm is output with the pre-event and post-event times specified together with the event recording settings, the event
recording will perform according to the specified recording type (pre event or post event).
J `In case of continuous events such as motion detection, switching to another split mode display may not immediate if
concatenating events follow, even when you stopped alarm of the event.
`The video may be delayed depending on the network condition.
`The event output can be delayed as the transfer of the alarm event from the network camera takes time.
CAPTURE
You can capture a screen selected on the live screen.
Function to perform in single channel mode on the live screen or when selecting a channel.
1. Right-click on the live screen and select <Capture>.
You can click on < > in the launcher menu.
2. Select the output information to be displayed on the captured screen.
`If the <Description> box is checked, the description field will be enabled where you can enter up to 50 Korean letters.
3. Select a device to save a captured file, file path and file name.
4. Complete the settings and click <OK>, then the image captured from the screen is saved to the selected
device.
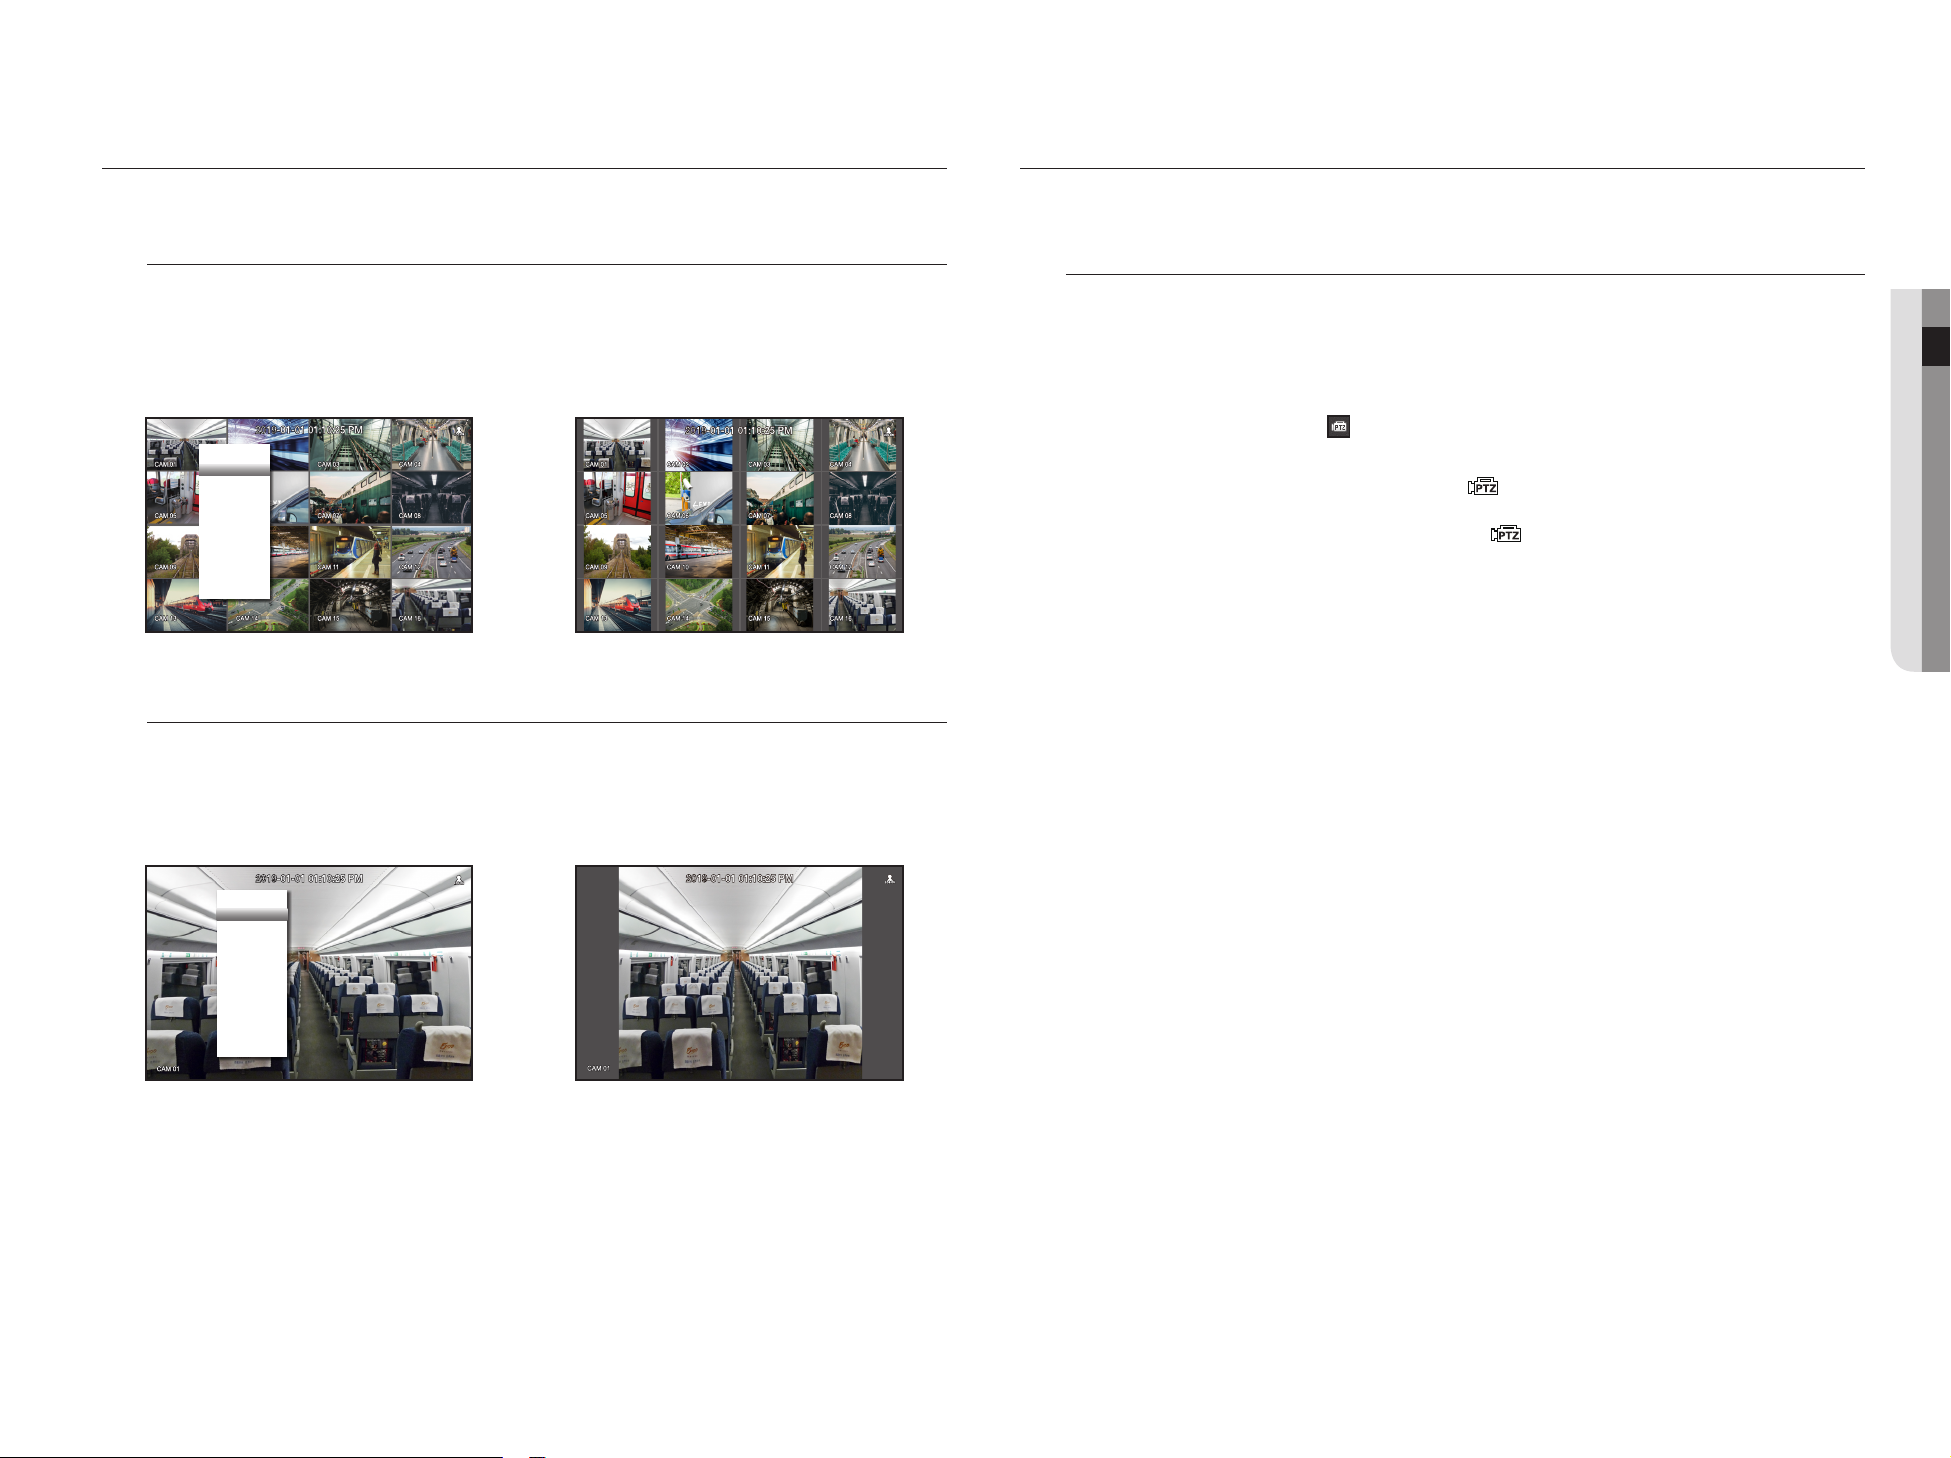
English _17
● LIVE
MAINTAIN THE SCREEN RATIO
The screen ratio for a live video can be changed.
Maintain a screen ratio for all channels
Video screen ratio for all channels can be changed in live split screen mode.
1. Right-click on the live screen and select <Keep full scr ratio>.
The screen ratio for all channels will be changed.
2. If you want to go back to the previous screen ratio, check the menu option for <Keep full scr ratio>.
Maintain a channel screen ratio
If you select a channel from a live single screen or split screen, you can change its video screen ratio.
1. Right-click on the live screen and select <Keep ch. scr ratio>.
The screen ratio of a specified channel will be changed.
2. If you want to go back to a previous screen ratio, select <Keep ch. scr ratio> again.
PTZ CONTROL
With this NVR, you can configure the settings of a PTZ camera as well as commercial cameras in the market to your
preference.
PTZ device
This is active only if a channel that a PTZ camera is connected to is selected.
Getting started with PTZ operations
The PTZ camera will be activated only if the channel of the PTZ camera is selected, which can be performed in
the following way:
•Using the launcher menu : Click < > from the launcher menu of the Live screen.
•Using the Live screen menu : Select <PTZ Control> in the context menu of the Live screen.
•Using the icons on the Live screen : Simply click the < > icon on the Live screen.
M
`This is available only if a PTZ camera is connected and the < > icon is displayed on the screen.
`Even if the connected network camera does not support the PTZ operations, you can configure the PTZ control settings
(if possible) by installing the PTZ driver (physical device).
`It only supports a network camera with Hanwha Techwin's PTZ function and a camera registered in the ONVIF.
;
Layout ►
Layout Setup ►
Keep ch. scr ratio
Status ►
PTZ
ZOOM
Audio ►
Freeze
Stop Alarm
Capture
Record
Play
Search
Backup
Menu
Shutdown
Logout
Hide Launcher
;
Layout ►
Layout Setup ►
Keep full scr ratio
Status ►
Audio Off
Freeze
Stop Alarm
Record
Play
Search
Backup
Menu
Shutdown
Logout
Hide Launcher

18_ live
live
Using the PTZ camera
You can use a single PTZ camera to perform the Pan, Tilt and Zoom operations to monitor multiple places, and
configure the custom settings of the presets in a desired mode.
1. Open the <PTZ Control> menu.
The < > icon in the left bottom of the screen will turn yellow, indicating that the system accesses "PTZ
Control" mode. You will see the "PTZ Control" launcher menu.
M
`The PTZ working (active) mark can be active even if the PTZ operation is not available in normal mode. So ensure that you
have completed the PTZ settings before proceeding.
2. Use the PTZ Wheel in the launch menu to adjust the location of recording by a camera.
•Sensitivity : Adjust sensitivity for Pan, Tilt controls.
•PTZ Wheel : Click a near area from the center to move the camera lens slowly; clicking a far area will move it
fast.
`If clicking and holding the mouse in the left will turn the camera counterclockwise; if clicking and holding the mouse in the right
will move the camera lens clockwise.
•Zoom : Activate the Zoom operation of the PTZ camera.
•Iris : Adjust the amount of light incoming to the camera.
•Focus : You can adjust the focus manually.
•Swing : Swing is a monitoring function that moves between two preset points and enables you to trace the
motion.
•Group : The group function enables you to group various presets before calling them in sequence.
•Trace : Tracking remembers the trace of movements that you instructed and reproduces it for your reference.
•Tour : Monitor all the groups created by a user in turn.
`Some cameras may differ in the menu title and operation with regard to Swing, Group, Tour and Trace.
J `Even if your network camera supports the function, you can use it only if the button is activated in the PTZ control launcher.
Using Digital PTZ (D-PTZ) function
1. Register a camera that supports the D-PTZ profile.
- In cameras that support the D-PTZ profile, you can use the D-PTZ function.
2. Both cameras that support general PTZ and cameras that support D-PTZ can control the live image using
some of the <PTZ control> function menus.
`For more information about the supported functions, please refer to the camera manual.
Preset
Preset is a set of saved data specifying the locations of a PTZ camera. A single PTZ camera can save up to
300 locations.
To add a preset
1. Check the preset checkbox.
2. Select < >.
The virtual keyboard will appear on the screen. Use it to provide the preset name.
`See "Using virtual keyboard" in the Appendix.
•: You can change the preset settings to your preference.
•: Delete a selected preset.
•: Delete all the existing preset settings.
M
`If you replace a camera that saves your preset settings with a different one, you must configure the preset settings again.
3. Select <OK>.
The preset setting will be saved in the provided name.
To change or delete a registered preset
1. Check the preset checkbox and select a preset to change or delete.
2. Press < > or < > as needed.
•: Delete all the existing preset settings.
J `Deleting all presets might delete even the default preset from the network camera.
3. Provide a new name and press <OK>.
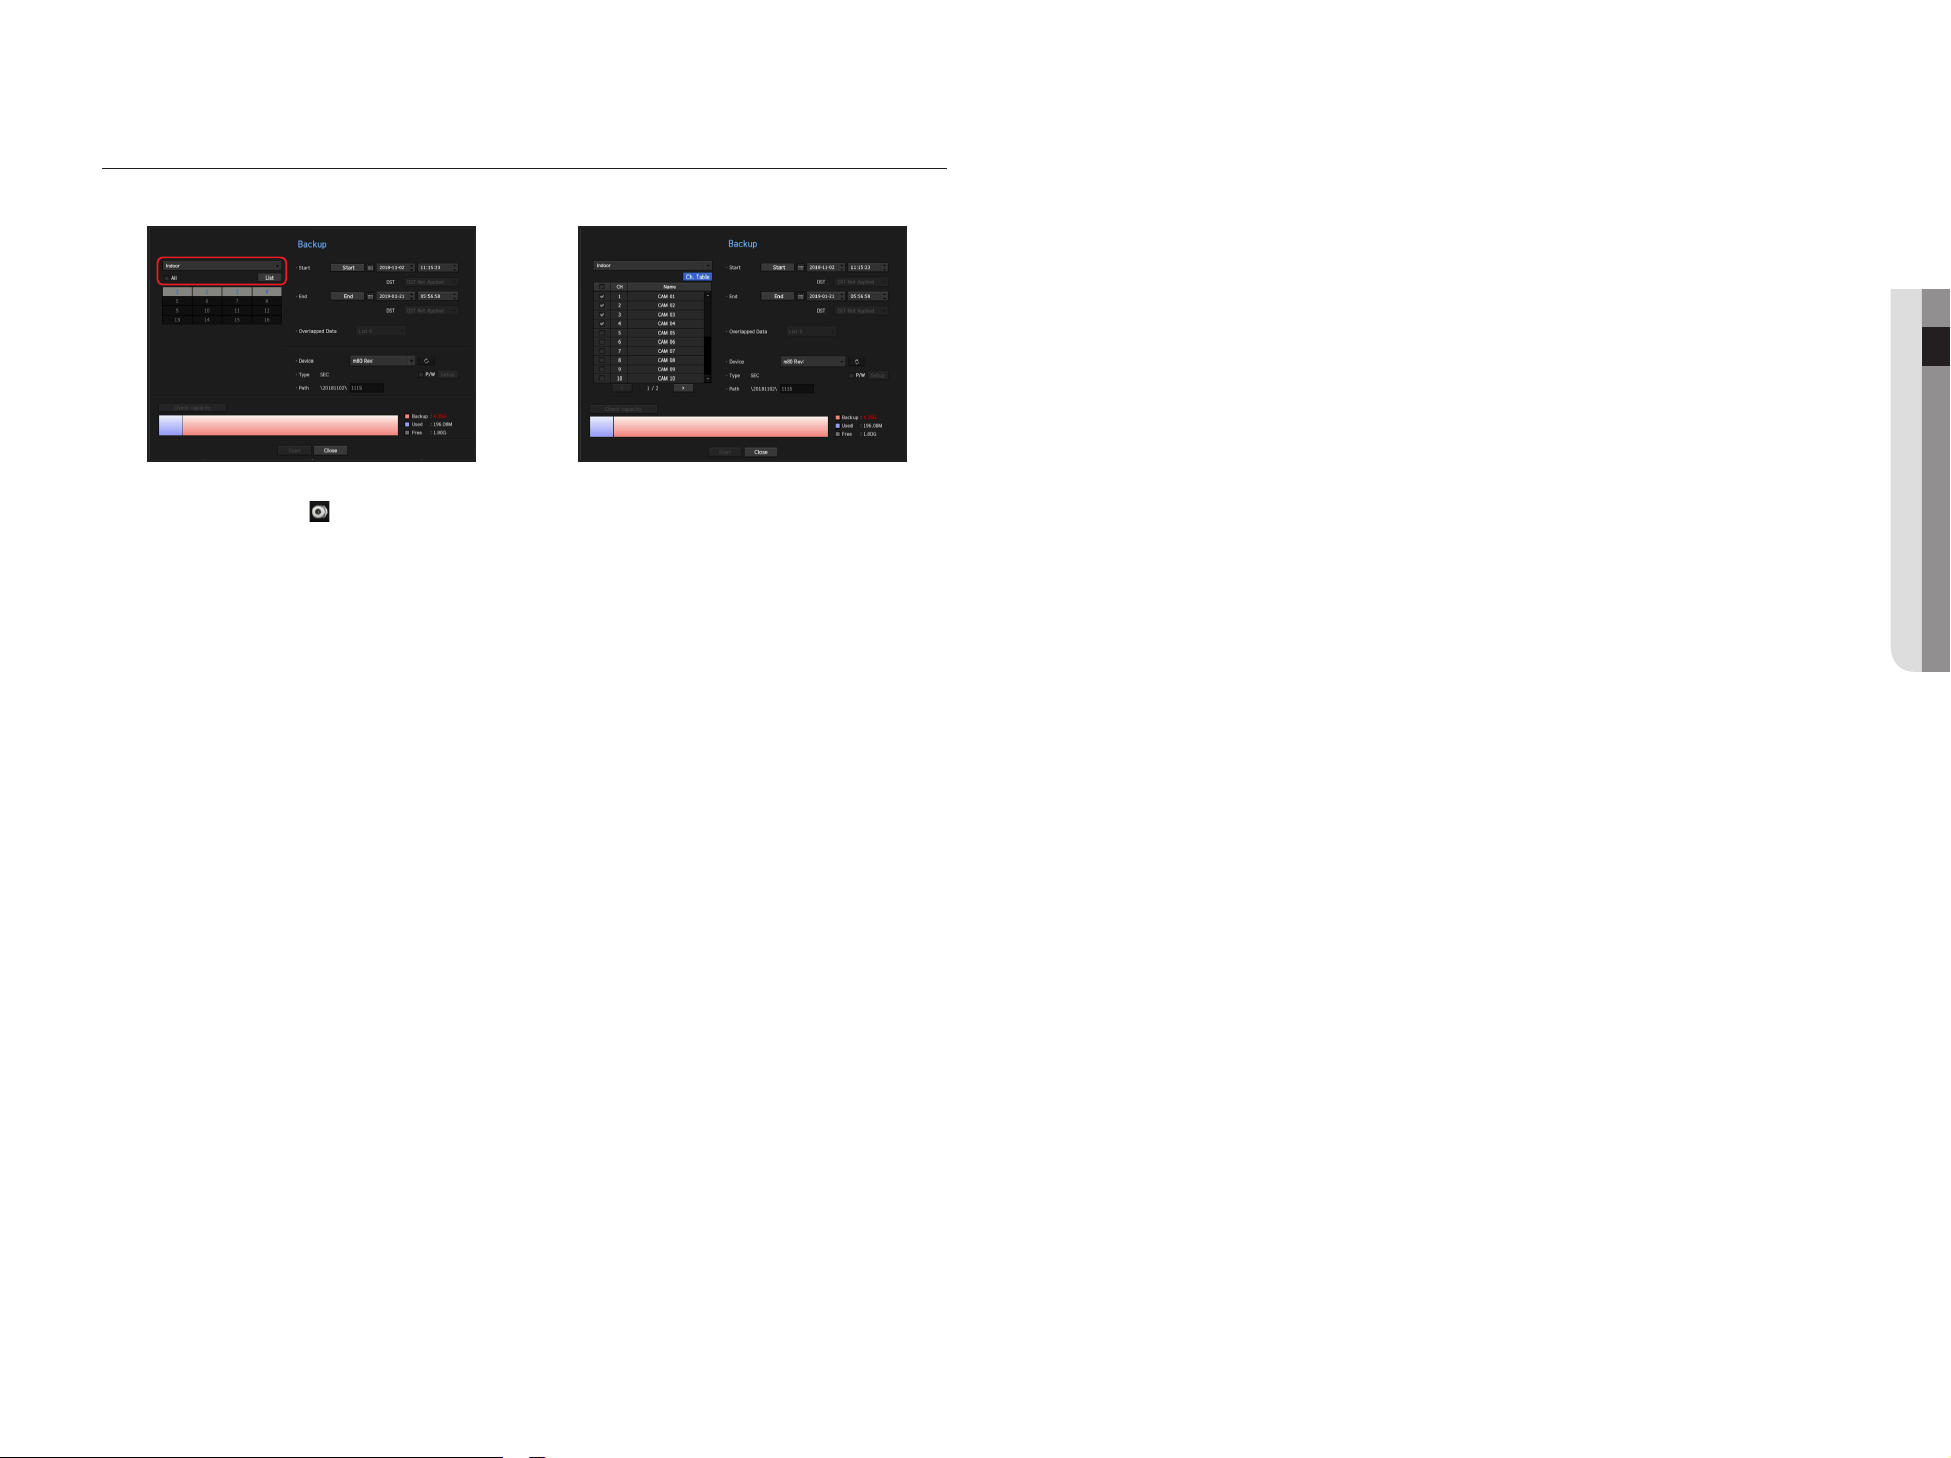
English _19
● LIVE
BACKUP
You can search for a backup device and back up video recording at your desired time for each layout or channel.
1. Right-click on the live screen and select <Backup>.
You can click on < > in the launcher menu.
2. The backup settings screen will be opened.
•Select a layout. : Select a desired layout from the layout list.
•Channel : Sets the channel to backup.
`You can select multiple channels.
If you select <All>, all channels will be selected.
•Backup Range : Sets the <Start> and <End> time for the backup.
- Start time : Set the backup start time to your desired time.
If you click the [Start] button, the Backup start time is set to the starting time of the last video recording.
However, the Start time will not be displayed on the screen. If you click the [Start] button once more, the
Backup start time is set to the time set by user.
- End : You can set the Backup end time to your desired time.
If you click the [End] button, the Backup end time is set to the ending time of the last video recording.
However, the End time will not be displayed on the screen. If you click the [End] button once more, the
Backup end time is set to the time set by user.
•Overlapped Data : Shows a list of overlapping data on a same time according to the number of data.
This is displayed when there are duplicate data in the same channel due to changes in the time or time zone.
`See the "Setting the Date/Time/Language" page under "Menu Setup > System Setup" in the Table of Contents.
•Device : Select a backup device from the recognized devices.
•Type : SEC is a proprietary file format, which can be played on the PC immediately as it is backed up with a
dedicated viewer.
`You can select whether or not to use “Password Setup”.
•Path : displays the location of the folder in which the backup file is to be saved.
•Check capacity : Shows the size of the selected backup data, used and available capacity of the selected
backup device.
3. When the backup setup is done, press <Start>.
`If there is no device to back up, the <Start> button is disabled.
J `If you insert a USB memory stick with insufficient storage space, volume calculation may be disabled.
Format the memory stick or delete some of the data on the memory stick to secure adequate storage space.
`The application may slow down during the backup.
`You can switch to the menu screen during the backup in operation, but playback of data is not available.
`The data can be played back on a Webviewer while the backup is in progress but audio does not function.
`If backup has failed, select “Device >Storage Device” and check the free space of the HDD and check also if the HDD is
properly connected.
M
`Pressing the <Hide> during the backup will return to the previous menu, while the backup progresses.
;

You can setup the system, devices, and options for recording, event and network.
SYSTEM SETUP
You can setup Date/Time/Language, User, System Properties and Log.
Date/Time/Language
Setting the Date/Time/Language
You can check and setup the current Date/Time and time related properties, as well as the language used for
the interface on the screen.
Menu > System > Date/Time/Language
•
Date : Sets the date and its format that will appear on the screen.
•
Time : Sets the time and its format that will appear on the screen.
•
Time Zone : Sets the time zone of your area based on the Greenwich Mean Time (GMT).
`GMT (Greenwich Mean Time) is standard World Time and the basis of world time zone.
•
Time Sync. : Specify the use of synchronization with the time server.
Click the <Setup> button to display time synchronization setup screen.
If <Time Server> is used, the product system time will be synchronized with the time server.
Time information cannot be modified while the time server is being used.
-
Synchronization : Select between GPS and NTP servers.
-
GPS Time Sync : Synchronizes system time by using GPS signal.
-
NTP Time Sync : Synchronizes system time through NTP Server.
-
Time Server : Enter an IP or URL address of the NTP Server.
-
Last Sync Time : Displays the most recent synchronization time with GPS or NTP Server.
-
Activate as Server : use the product as time server of a different network device.
•
DST : Set up Daylight Saving Time with its period to make the time earlier than the GMT of its time zone by 1
hour during the set period.
•
Language : Select your language. Sets the language for the interface.
English, French, German, Spanish, Italian, Chinese, Russian, Korean, Polish, Japanese, Dutch, Portuguese,
Turkish, Czech, Danish, Swedish, Thai, Romanian, Serbian, Croatian, Hungarian, Greek, Finnish, and
Norwegian are supported.
M
`Depending on the location of the product release, the language and standard time setup may vary.
•
Holiday : A user can select specific dates as holidays according to their own preferences.
Holidays are applied in the <Recording Schedule> or <Alarm Schedule> setting too.
Example) After selecting Aug. 1, if you check <Aug 1Day> only, then Aug. 1 of every year is set to holiday. If you check both <Aug
1Day> and <Aug First Wed>, Aug. 1 and First Wednesday of August every year are set to holidays.
To use the calendar
1. Select year and month.
Select the < > key on both ends of year and month to move back/forward to the previous/next year
or previous/next three month.
2. Select a date and click on the <OK> button.
`A date is marked in gray if there exist data for search for system log, event log, time search and event search.
20_ menu setup
menu setup
This manual suits for next models
6
Table of contents
Other Hanwha Techwin DVR manuals

Hanwha Techwin
Hanwha Techwin wisenet SRD-476D Installation guide

Hanwha Techwin
Hanwha Techwin Wisenet HRX-1634 Installation instructions

Hanwha Techwin
Hanwha Techwin Wisenet HRD-442 Installation guide

Hanwha Techwin
Hanwha Techwin WRR-5301 User manual

Hanwha Techwin
Hanwha Techwin Wisenet TRM-1610M Installation guide

Hanwha Techwin
Hanwha Techwin WRN-810S User manual

Hanwha Techwin
Hanwha Techwin Wisenet Series User manual

Hanwha Techwin
Hanwha Techwin WRR-5301 User manual


