Haojue HJ125-16 User manual


HJ125-16
USER’S MANUAL
This manual should be considered a permanent part of the
motorcycle and should remain with the motorcycle when resold
or otherwise transferred to a new owner or operator. The
manual contains important safety information and instructions
which should be read carefully before operating the motorcycle.
ENGLISH
(1)
IMPORTANT
BREAK-IN INFORMATION FOR YOUR
MOTORCYCLE
The initial 500km are the most important in the life of your
motorcycle. Proper break-in operation during this time
will help ensure maximum life and performance from your
new motorcycle. Haojue parts are manufactured from
high quality materials, and machined parts are finished
to close tolerances. Proper break-in operation allows
the machined surfaces to polish each other and mate
smoothly.
Motorcycle reliability and performance depend on special
care and restraint exercised during the break-in period.
It is especially important that you avoid operating the
engine in a manner which could expose the engine parts
to excessive heat.
Please refer to the “BREAK-IN” section for specific break-
in recommendations.
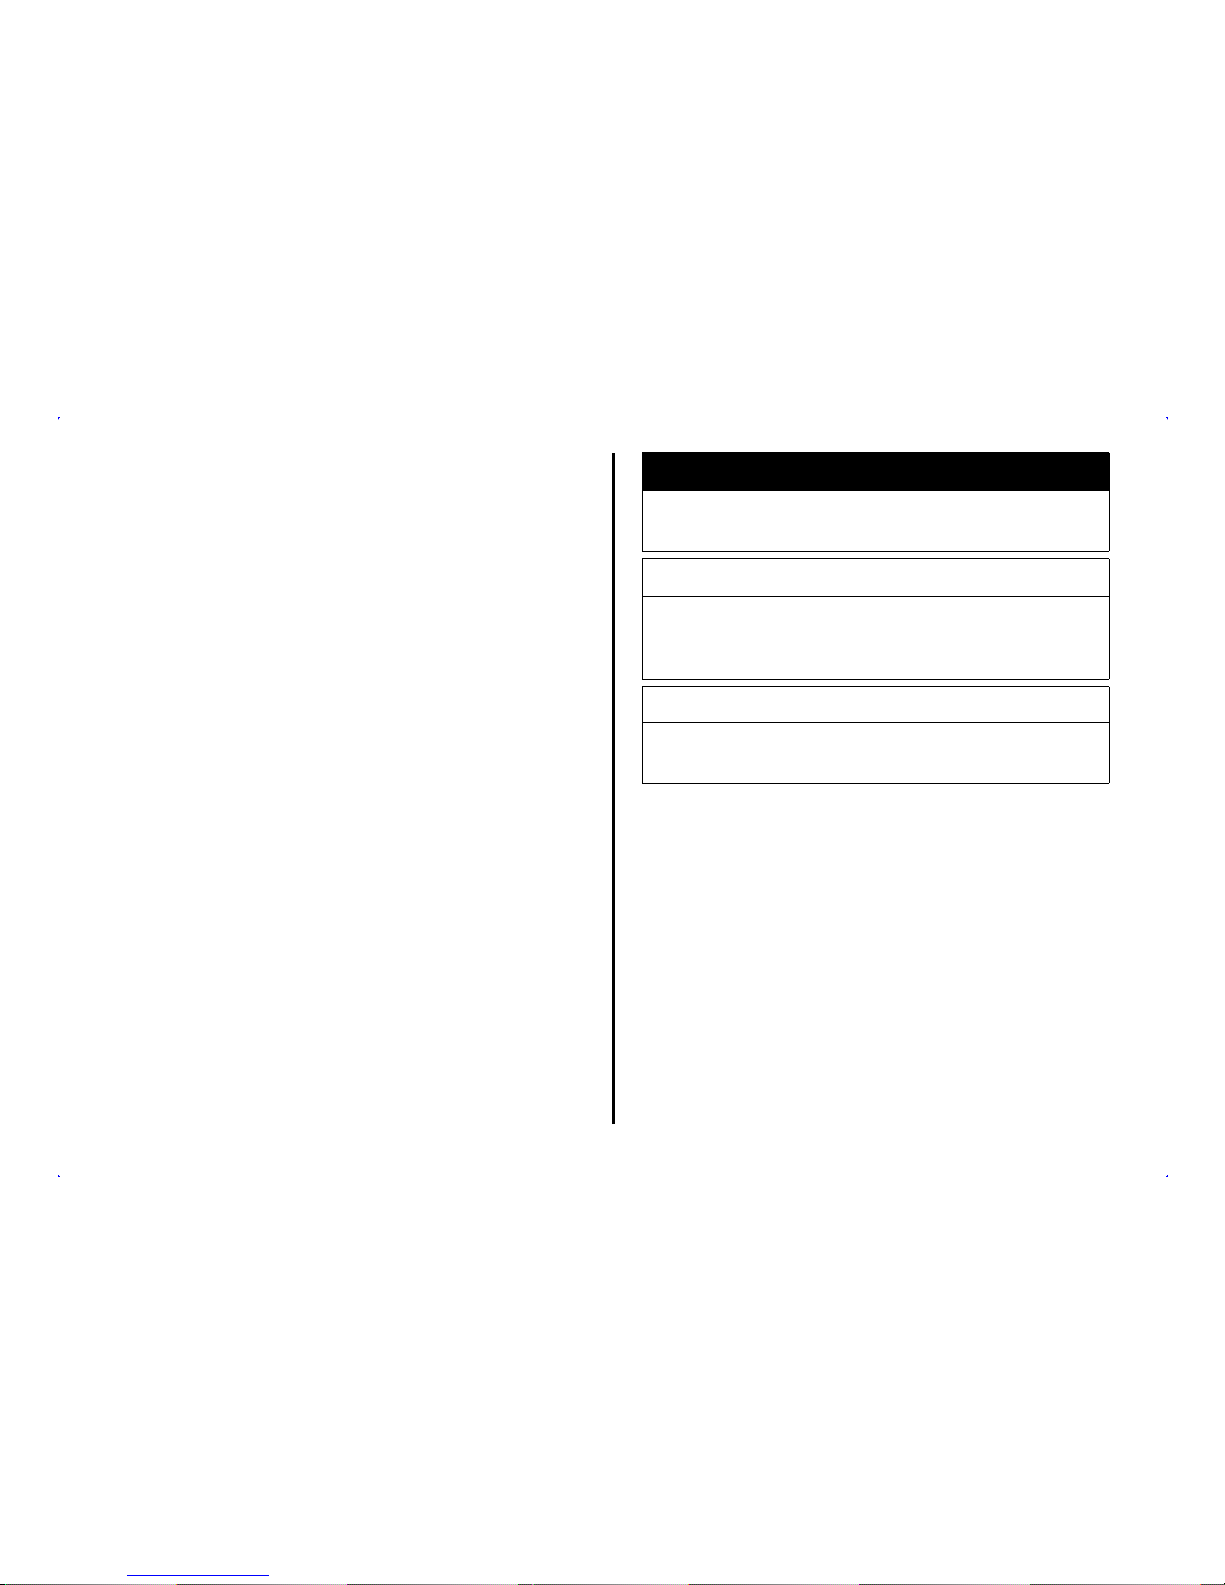
BWARNING/BCAUTION/NOTICE/NOTE
Please read this manual carefully and strictly follow the
instructions described herein. To emphasize important
issues, the words “BWARNING”,“BCAUTION”,
“NOTICE” and “NOTE” are used in this manual. Please
pay special attention to these sections.
BWARNING
May endanger the safety of the rider, neglecting
this information might lead to harm and injury.
BCAUTION
Highlights special precautions or procedures that
must be followed in order to avoid damaging the
motorcycle.
NOTICE
Indicates a potential hazard that could result in
motorcycle or equipment damage.
NOTE: Special explanations for easier maintenance or
further clarification of important instructions.
1
(2)

FOREWORD
Motorcycling is one of the most exhilarating sports and,
to ensure your riding enjoyment, you should become
thoroughly familiar with the information presented in this
Owner’s Manual before riding your motorcycle.
The proper care and maintenance that your motorcycle
requires is outlined in this manual. By following these
instructions closely you will ensure a long trouble-free
operating life for your motorcycle. Your authorized Haojue
dealer has experienced technicians that are trained to
provide your motorcycle with the best possible service
with the right tools and equipment.
All information, illustrations, photographs and
specifications contained in this manual are based
on the latest product information available at the time
of publication. Due to improvements or other changes,
there may be some discrepancies in this manual. Haojue
reserves the right to make changes at any time.
Please note that this manual applies to all specifications
for all respective destinations and explains all equipment.
Therefore, your model may have different standard
features from those shown in this manual.
CONTENTS
CONSUMER INFORMATION 3
ACCESSORY INSTALLATION AND MOTORCYCLE
LOADING 3
SERIAL NUMBERS LOCATION 4
SAFE RIDING RECOMMENDATION 5
CONTROLS 6
LOCATION OF PARTS 6
KEYS 8
IGNITION SWITCH (MAIN SWITCH) 8
DASHBOARD 8
LEFT HANDEL SWITCHES 10
RIGHT HANDEL SWITCHES 11
FUEL TANK 12
FUEL COCK 13
GEAR SHIFT LEVER 13
REAR ABSORBER SPRING ADJUSTMENT 14
REAR BRAKE PEDAL 14
KICK START LEVER 14
TOOL KIT 15
PARKING STAND 15
REAR CARRIAGE 15
FUEL AND OIL RECOMMENDATIONS 16
FUEL OCTANE RATING 16
ENGINE OIL 16
BREAK-IN 16
INSPECTION BEFORE RIDING 17
RIDING TIP 19
STARTING THE ENGINE 19
(3)
2

STARTING OFF 21
USING THE TRANSMISSION 22
RIDING ON HILLS 23
STOPPING AND PARKING 23
INSPECTION AND MAINTENANCE 25
MAINTENANCE SCHEDULE 25
ROUTINE MAINTANCE INSPECTION TABLE 26
REGULAR LUBRICATION TABLE 27
BATTERY 28
AIR CLEANER 29
SPARK PLUG 31
ENGINE OIL AND OIL STRAINER 32
CLUTCH 34
CARBURETOR 35
THROTTLE CABLE PLAY 35
DRIVE CHAIN 35
BRAKES 37
TIRES 39
LIGHT AND SIGNAL 40
FUSE 41
TROUBLESHOOTING 41
TRANSPORTATION 42
STORAGE 43
NOTICE OF BATTERY USAGE 44
TABLE OF SPECIFICATIONS 46
CONSUMER INFORMATION
ACCESSORY INSTALLATION AND
MOTORCYCLE LOADING
The addition of unsuitable accessories can lead to unsafe
operating conditions. It is not possible for Haojue to
test each accessory on the market or combinations of
all the available accessories; however, your dealer can
assist you in selecting quality accessories and installing
them correctly. Use extreme caution when selecting and
installing the accessories on your motorcycle and consult
your Haojue dealer if you have any questions.
BWARNING
Improper accessories or refitting can make your
motorcycle unsafe and can lead to an accident.
BWARNING
Never refit the motorcycle with improper or poorly
installed accessories. Follow all instructions in
this owner’s manual regarding accessories and
refitting. Use genuine Haojue accessories or
equivalent that have been designed and tested for
your motorcycle. Consult your Haojue dealer if you
have any questions.
•Never exceed the G.V.W (Gross Vehicle Weight) of
this motorcycle. The G.V.W. is the combined weight
of the machine, accessories, payload, rider and
3
(4)

passenger. When selecting your accessories, keep in
mind the weight of the rider as well as the weight of the
accessories. The additional weight of the accessories
may not only create an unsafe riding condition but may
also affect rider stability.
G.V.W.: 275kg (606lbs) at the tire pressures (cold)
Front: 175kPa (1.75kgf/cm2)
Rear: 225kPa (2.25kgf/cm2)
•Install accessories which may affect aerodynamics,
such as a fairings, windshields, backrests, saddlebags
and travel trunks, as low as possible, as close to the
motorcycle and as near to the center of gravity as is
feasible. Check that the mounting brackets and other
attachment hardware are rigidly mounted.
•Check for proper ground clearance and bank angle.
Inspect that the accessory does not interfere with the
operation of the suspension, steering or other control
operations.
•Accessories fitted to the handlebar or the front fork
area can create serious stability problems. The extra
weight will cause the motorcycle to be less responsive
to your steering control. The weight may also cause
oscillations in the front end and lead to instability
problems. Accessories added to the handle-bars or
front fork should be as light as possible and kept to a
minimum.
•Certain accessories displace the rider from his or her
normal riding position. This limits the freedom of
movement of the rider and may limit his or her ability
to control the motorcycle.
•Additional electric accessories may overload the
existing electrical system. Severe overloads may
damage the wiring harness or create a dangerous
situation due to sudden loss of electrical power during
the operation of the motorcycle.
•The motorcycle may be affected by a lifting condition
or by instability in cross winds or when being
overtaken or overtaking large vehicles. Improperly
mounted or poorly designed accessories can result in
an unsafe riding condition or lead to an accident.
SERIAL NUMBERS LOCATION
1Vehicle identification number (VIN)
2Engine number
The vehicle identification number (VIN) 1and/or the
engine number 2are used to register motorcycle. They
are also used to assist your dealer when ordering parts or
referring to special service information.
The vehicle identification number 1is stamped on the
steering tube. The engine number 2is stamped on the
(5)
4

left crankcase.
Please write down the numbers in the box provided below
for your future reference.
VIN:
Engine number:
SAFE RIDING RECOMMENDATION
Motorcycle riding requires that some extra precautions be
taken to ensure the safety of the rider and passenger.
These precautions are: Never ride a motorcycle under the
influence of alcohol or drugs.
WEAR A HELMET
Motorcycle safety equipment starts with a quality helmet.
One of the most serious injuries that can occur is a head
injury. Always wear a properly approved helmet. You
should also wear eye protection.
RIDING APPAREL
Loose, fancy clothing might be uncomfortable and unsafe
while riding a motorcycle. Choose clothing of high quality
and fit when riding.
INSPECTION BEFORE RIDING
Review thoroughly the instructions in the “INSPECTION
BEFORE RIDING” section of this manual. Do not forget
to perform an entire safety inspection to ensure the safety
of the rider and its passenger.
FAMILIARIZE YOURSELF WITH YOUR MOTORCYCLE
Your riding skills and mechanical knowledge are the
foundations for safe riding practices. We suggest that you
practice riding your motorcycle in a non-traffic situation
until you are thoroughly familiar with your motorcycle and
its controls. Remember: Practice makes perfect!
KNOW YOUR SKILLS
Ride within the boundaries of your own skills at all times.
Knowing these limits and staying within them will help you
5
(6)

avoid accidents.
BE EXTRA SAFETY CAUTIONS ON BAD ROAD
CONDITION
Riding in bad road conditions, especially wet ones,
requires extra caution. Braking distances double on rainy
days. Stay off painted surface marks, manhole covers
and areas in which the road appears greasy as they can
be especially slippery. Use extreme caution at railway
crossings, metal grates and bridges. Whenever in doubt
with of the road conditions, slow down!
SPEED LIMIT
Never ride at excessive speeds or high engine speeds.
CONTROLS
LOCATION OF PARTS
1Clutch lever
2Left handle switches
3Speedometer
4Ignition switch (main
switch)
5Tachometer
6Right handle switches
7Throttle grip
8Front brake lever
(7)
6
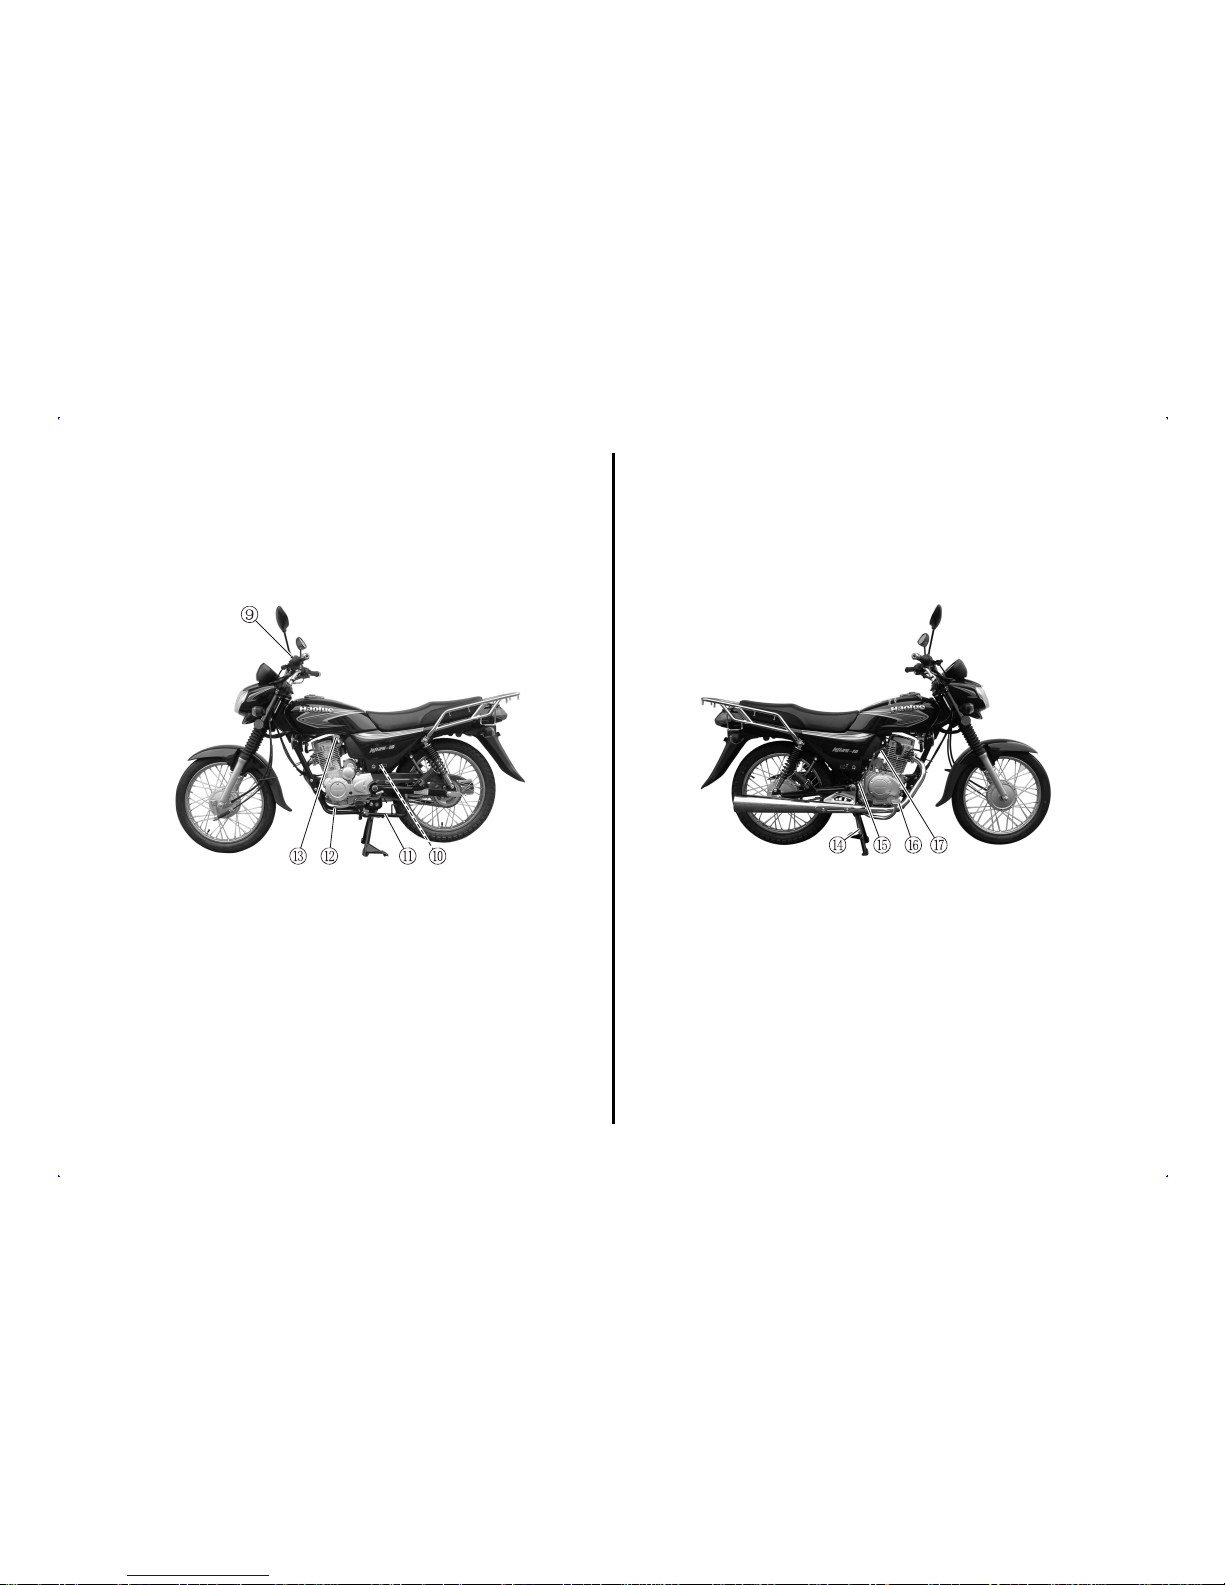
9Choke lever
:Tool kit
;Side stand
<Gearshift lever
=Fuel cock >Main stand
?Engine oil dipstick
@Rear brake pedal
AKick start lever
7
(8)

KEYS
This motorcycle comes equipped
with a main ignition key and a spare
one. Keep the spare key in a safe
place.
IGNITION SWITCH (MAIN SWITCH)
The ignition switch contains three
positions:
“*” (on) position
The ignition circuit is completed and
the engine can now be started. The
key cannot be removed from the
ignition switch in this position.
“%” (off) position
The ignition circuit are cut off. The engine will not start.
The key can be removed.
“4” (steering lock) position
In order to lock up the steering, first turn the handlebars
to the left, insert the key in the “%” position, turn
counterclockwise to the “4” position. The steering is then
locked. The ignition circuit are cut off.
BWARNING
Before turning the ignition switch to the “4”
position, safely stop the motorcycle and support it
with the main stand.
BWARNING
Never attempt to move the motorcycle when the
steering is locked.
BWARNING
Do not turn the ignition switch key to the “4”
position when riding the motorcycle, otherwise the
motorcycle will lose control.
DASHBOARD
BCAUTION
Do not spray the dashboard with high-pressure
water directly.
BCAUTION
Never wipe the dashboard with any cloth that
has been in contact with gasoline, kerosene,
alcohol, brake fluids or other organic solvents, or
else the dashboard will suffer partial cracking or
discoloration as a result.
(9)
8

ODOMETER 1
The odometer displays the total
mileage of this motorcycle from the
beginning of operation.
SPEEDOMETER 2
The speedometer indicates the
riding speed in km per hour.
FUEL GAUGE 3$
When the pointer reaches the red area, there is little fuel
left in the fuel tank. You must refill as soon as possible.
When the pointer reaches “F”, the fuel tank is full.
NOTE: The level indicated by the fuel gauge may
change during frequent ignition switch operation, urgent
acceleration or deceleration, motorcycle incline or uphill
or downhill riding. This is normal.
NOTE: When the motorcycle is held upright, turn the
ignition switch to the “*” position, don’t start the engine,
the fuel gauge will indicate correctly.
TACHOMETER 4
The tachometer displays the engine’s revs, indicating its
revolutions per minute.
RIGHT TURN SIGNAL INDICATOR LIGHT 58
When the turn signal switch is pushed to right, the panel
right turn signal indicator light will flicker accordingly.
NOTE: If the turn signal fails to work due to a broken bulb
or faulty wire connection, the indicator on the dashboard
will remain light up continuously or flicker at a high
frequency.
HIGH BEAM INDICATOR LIGHT 69
The high beam light indicator will light up when the high
beam headlight is turned on.
GEAR INDICATOR 7
The indicator on the dashboard panel indicates the current
gear the motorcycle is in. There are gear 1, 2, 3, 4 and 5.
When shifting gears, these indicators will light up. When
shifted to the neutral position, the indicator (green) “N” will
light up.
TRIP METER 8
It is mainly used to calculate distance of a trip, or for
calculation of fuel consumption.
NEUTRAL GEAR INDICATOR LIGHT 9N
When the gear is in the neutral position, this indicator will
light up. If others, this indicator will be off.
LEFT TURN SIGNAL INDICATOR LIGHT :=
When the turn signal switch is pushed to left, the panel
left turn signal indicator light will flicker accordingly.
NOTE: If the turn signal fails to work due to a broken bulb
or faulty wire connection, the indicator on the dashboard
will remain light up continuously or flicker at a high
frequency.
TRIP METER RESET BUTTON ;
Turn the knob counterclockwise to reset the trip meter 8
to zero.
9
(10)

LEFT HANDEL SWITCHES
DIMMER SWITCH 1
“'” position
The headlight low beam and taillight will light up.
“9” position
The headlight high beam and taillight will light up. The
high beam indicator on the dashboard will also be lit.
BCAUTION
Holding the dimmer switch between “9” and “'”
position will turn on both “9” and “'” headlight
beams. This operation can damage the motorcycle.
Use the dimmer switch only at “9” and “'”
position. Do not stick tape on the headlight or
place objects in front of the headlight.
OVERTAKING SWITCH 2PASS
Press the switch to flash the headlight.
CLUTCH LEVER 3
The clutch lever is used for disengaging the drive to the
rear wheel when starting the engine or shifting gears.
Grasping the lever disengages the clutch.
HORN BUTTON 4,
Pressing this button will trigger the horn.
TURNING SIGNAL SWITCH 5= 8
Moving the switch to the “=” position will engage the
left turn signals. Moving the switch to the “8” position
will engage the right turn signals. The indicator on the
dashboard will also flash. To cancel turn signal operation,
push the switch inward.
BWARNING
Failure to use and failure to turn off the turn signals
can be hazardous Other drivers may misjudge your
course and this may result in an accident. Always
use the turn signals when you intend to change
lanes or make a turn. Be sure to turn off the turn
signals after completing the turn or lane change.
CHOKE LEVER 6
(A) (B) (C)
To make starting convenient, the motorcycle is provided
with a choke. During a cold engine start, pull the choke
lever to the position (A) and open throttle grip slightly to
start the engine. After the engine is started, pull back
the choke lever by half to position (B) and open throttle
(11)
10

grip slightly to make the engine continually preheat until it
reaches the required temperature. Finally, pull the choke
lever back to its original position (C). During a hot engine
start, put the choke lever in position (C).
Accelerate
RIGHT HANDEL SWITCHES
ENGINE STOP SWITCH 1
The engine can only start up
when the switch is placed
at the “*” position, and the
ignition circuit is connected.
If the switch is at the “%”
position, the ignition circuit is
cut off. This is an emergency
stop switch.
LIGHT SWITCH 2
“+” position
The headlight, front position light, dashboard lights, tail
light will be turned on together.
“6” position
The front position light, dashboard lights, tail light will be
turned on together.
“&” position
All lights mentioned above will be turned off.
ELECTRIC STARTUP BUTTON 3#
This button is used for operating the starter motor. With
the ignition switch at the “*” position, the engine stop
switch at “*” and the transmission in neutral, grasp the
clutch lever and push the electric starter button #to
operate the starter motor to start the engine.
BWARNING
Engaging the starter motor for five at a time can
damage the start motor and wiring harness from
overheating.
BWARNING
If the electric start function is used continuously,
ensure the duration of each time electric starter
use is not longer than 5 seconds and the interval
between each two usages of the electric starter is
about 10 seconds. High-level discharge will result
in abnormal heating of the starting circuit and the
starter motor. If the engine cannot be started after
several attempts, have it inspected and repaired in
a designated distribution and maintenance facility.
BWARNING
When cleaning the motorcycle, do not directly
clean its electric parts, particularly its handle
switch.
BWARNING
Do not use the electric start function and the kick
lever function at the same time.
11
(12)

BWARNING
Do not start the motorcycle when the fuel or engine
oil is insufficient.
FRONT BRAKE LEVER 4
The front brake is applied by grasping the brake lever
gently toward the throttle grip. The brake light will be alight
when the brake lever is grasped inward.
THROTTLE GRIP 5
The engine speed is controlled by the position of the
throttle grip. Turn it toward you to increase engine speed.
Turn it away from you to decrease engine speed.
FUEL TANK
1Fuel level 2Fuel tank
To open the fuel cap, insert the ignition key into the lock
and turn it clockwise. With the key inserted, rotate and
open the fuel tank cap. To close the fuel tank cap, push
the cap down firmly with the key in the cap lock.
BWARNING
Overfilling the fuel tank can cause the fuel to
overflow when it expands due to heat from the
engine or the sun. Fuel that overflows can catch
fire.
BWARNING
Never fill the fuel above the bottom of the fuel
port. Fuel and fuel vapor are highly flammable and
toxic. Risks of fire or positioning are present while
refueling.
Turn off the engine and keep flames, sparks and
heat sources away. Refuel only outdoors or in a
well-ventilated area. Do not smoke. Wipe up spills
immediately. Avoid breathing fuel vapors. Keep
children and pets away.
NOTE: When cleaning the motorcycle, do not flush the fuel
tank cap with high-pressure water or else high-pressure
water will possibly flow into the fuel tank.
(13)
12

FUEL COCK
“2” (open) “1” (reserve) “&” (off)
“2” (open) position
The normal operating position for the fuel cock handle is
in the “2” position. In this position, fuel will flow from the
fuel cock to the carburetor whenever the fuel level in the
carburetor drops.
“1” (reserve) position
If the fuel level in the fuel tank is too low, turn the handle
to the “1” position to use the 2 of the reserve fuel supply.
“&” (off) position
Turn the handle to the “&” position whenever shutting
down the engine for more than a few minutes.
BCAUTION
When the motorcycle is turned off, the carburetor
may become excessively refueled or fuel may even
flow into the engine if the fuel cock handle is
constantly kept at the “2” position. Starting the
engine in this condition may severely damage the
engine.
NOTE: After switching the fuel cock handle to position
“1”, it is advisable that the fuel tank be refilled at the
closest gas station. After refueling, be sure to move the
fuel cock handle back to position “2”.
GEAR SHIFT LEVER
Forward
steeping
Backward
steeping
This motorcycle has a 5-speed transmission which
operates as shown. After a speed is chosen, the shift
lever will automatically return to its original position for
next gear shifting.
Reduce speed before down-shifting. When down-shifting,
the engine revs should be increased before the clutch is
engaged. This will prevent unnecessary wear on the drive
train components and the rear tire.
BCAUTION
Before shifting, grasp the clutch handle firmly and
close throttle grip completely.
NOTE: When the transmission is in neutral the green
indicator N on the dashboard will be lit. However, even
though the indicator is lit, cautiously and slowly release
the clutch lever to make sure that the transmission is truly
in neutral.
13
(14)

REAR ABSORBER SPRING ADJUSTMENT
The rear absorber spring pre-load is adjustable to
compensate for rider, load, driving style and road
conditions. The spring pre-load is adjustable to five
positions. Twist the spring tension ring to the desired
position with the spring adjuster. Position 1 provides
the softest spring tension and position 5 provides the
stiffest. This motorcycle is delivered from the factory with
its adjuster set on position 3.
BWARNING
The rear absorber springs on the left and right
sides must be placed in the same position.
Improper adjustment will affect ride stability.
REAR BRAKE PEDAL
Press on the rear brake pedal to
engage the rear wheel brake. The
brake light will also be engaged.
KICK START LEVER
Located on the right side of the
engine.
BWARNING
Do not use the electric starter and the kick start
lever at the same time.
BWARNING
After the engine is started, inspect whether the kick
lever has been returned to its normal position.
BWARNING
Do not start with the kick lever when the motorcycle
is supported on the side stand.
BWARNING
Do not start with the kick starter until you have
grasped the clutch lever.
(15)
14

TOOL KIT
The tool kit is in the tool box below the left side cover.
Unlock and remove the left chassis cover with a key, then
open the tool box cover to take out the tool kit.
PARKING STAND
The motorcycle is equipped with both a main stand and a
side stand.
Main stand 1
To support the motorcycle with the main stand, tread on
the main stand 1rod, hold the steering handlebar with
your left hand, grasp the rear carriage 3with your right
hand and pull the motorcycle upward to a standstill.
Side stand 2
The side stand is for temporary parking. When use the
side stand, stop the engine, then rotate the side stand to
lower limit, leave your motorcycle on the side stand only
after confirming it is stable. 3
BWARNING
Riding with the side stand incompletely stowed can
result in an accident when you turn left. Always
retract the side stand completely before starting
off.
REAR CARRIAGE
BWARNING
The rear carrier has a maximum load capacity 5kg,
otherwise ride balance might be affected making
riding dangerous or resulting in damage to the
chassis.
15
(16)
FUEL AND OIL RECOMMENDATIONS
FUEL OCTANE RATING
Use nonleaded gasoline with an octane rating of 90 or
higher.
NOTE: If leadless gasoline is used, the spark plug can
have a longer service life.
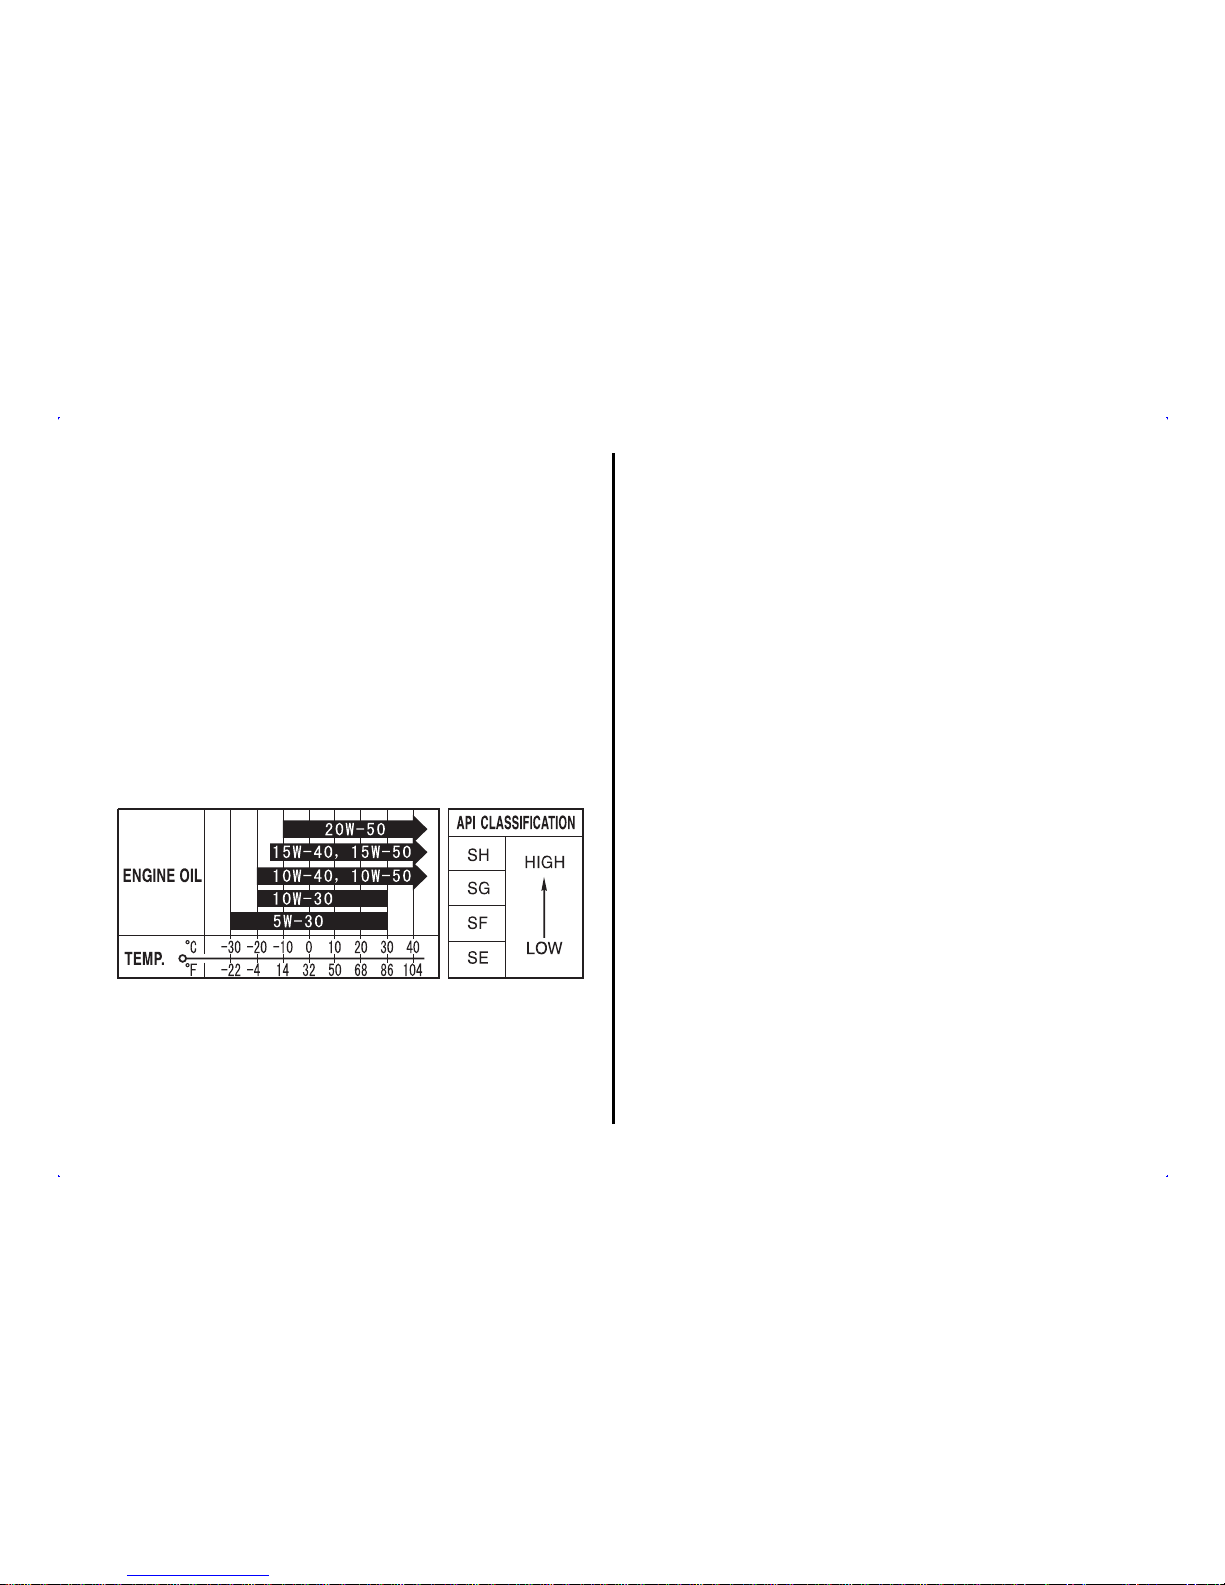
ENGINE OIL
Oil quality is a major contributor to your engine’s
performance and life. Always select good quality engine
oil. Use oil with an API classification of SF/SG. If SAE
10W-40 engine oil is not available, select an alternative
according to the following charts.
NOTE: Dispose of waste engine oil properly to avoid
environmental contamination. We suggest you to collect
the waste oil in a sealed container and take it to a nearby
recycling facility. Do not place it into a trash bin and do not
pour it on the ground.
BREAK-IN
Correctly breaking in the motorcycle can improve its life,
and at the same time fully bring out the performance
of motorcycle. The following guidelines explain proper
break-in procedures:
RECOMMENDED THROTTLE LIMIT
Throttle opening must not reach maximum during the new
motorcycle brake-in period; it is suggested to be less than
3/4 of the maximum, while snap-acceleration must be
avoided while riding.
VARY GEAR POSITION AND ENGINE SPEED
The gear position and engine speed should be changed
frequently instead of being kept in a constant gear
position and speed. During the break-in period, proper
acceleration will ensure a complete break-in. However, do
not exceed the recommended throttle opening limit.
AVOID CONSTANT LOW SPEED
Operating the engine at constant low speed (light load)
can cause parts to glaze and not seat in. Allow the engine
to accelerate freely through the gears, without exceeding
the recommended maximum limits. Do not, however, use
full throttle for the first 500 km.
CIRCULATE ENGINE OIL BEFORE RIDING
Allow sufficient idling time after warm or cold engine start
up before applying load or revving the engine. This
allows time for the lubricating oil to reach all critical engine
components.
(17)
16

FIRST AND MOST CRITICAL MAINTENANCE
The initial 1000 km maintenance is the most important
service your motorcycle will receive. During break-in
operation, all of the engine components will have engaged
together and seated. Maintenance required as part of
the initial service includes correction of all adjustments,
tightening of all fasteners and replacement of dirty oil.
Timely performance of this service will help make sure
you get the best service life and performance from the
engine.
INSPECTION BEFORE RIDING
Please check the following items carefully before riding.
Never neglect the importance of these checks. All checks
and necessary repairs must be completed before riding.
17
(18)
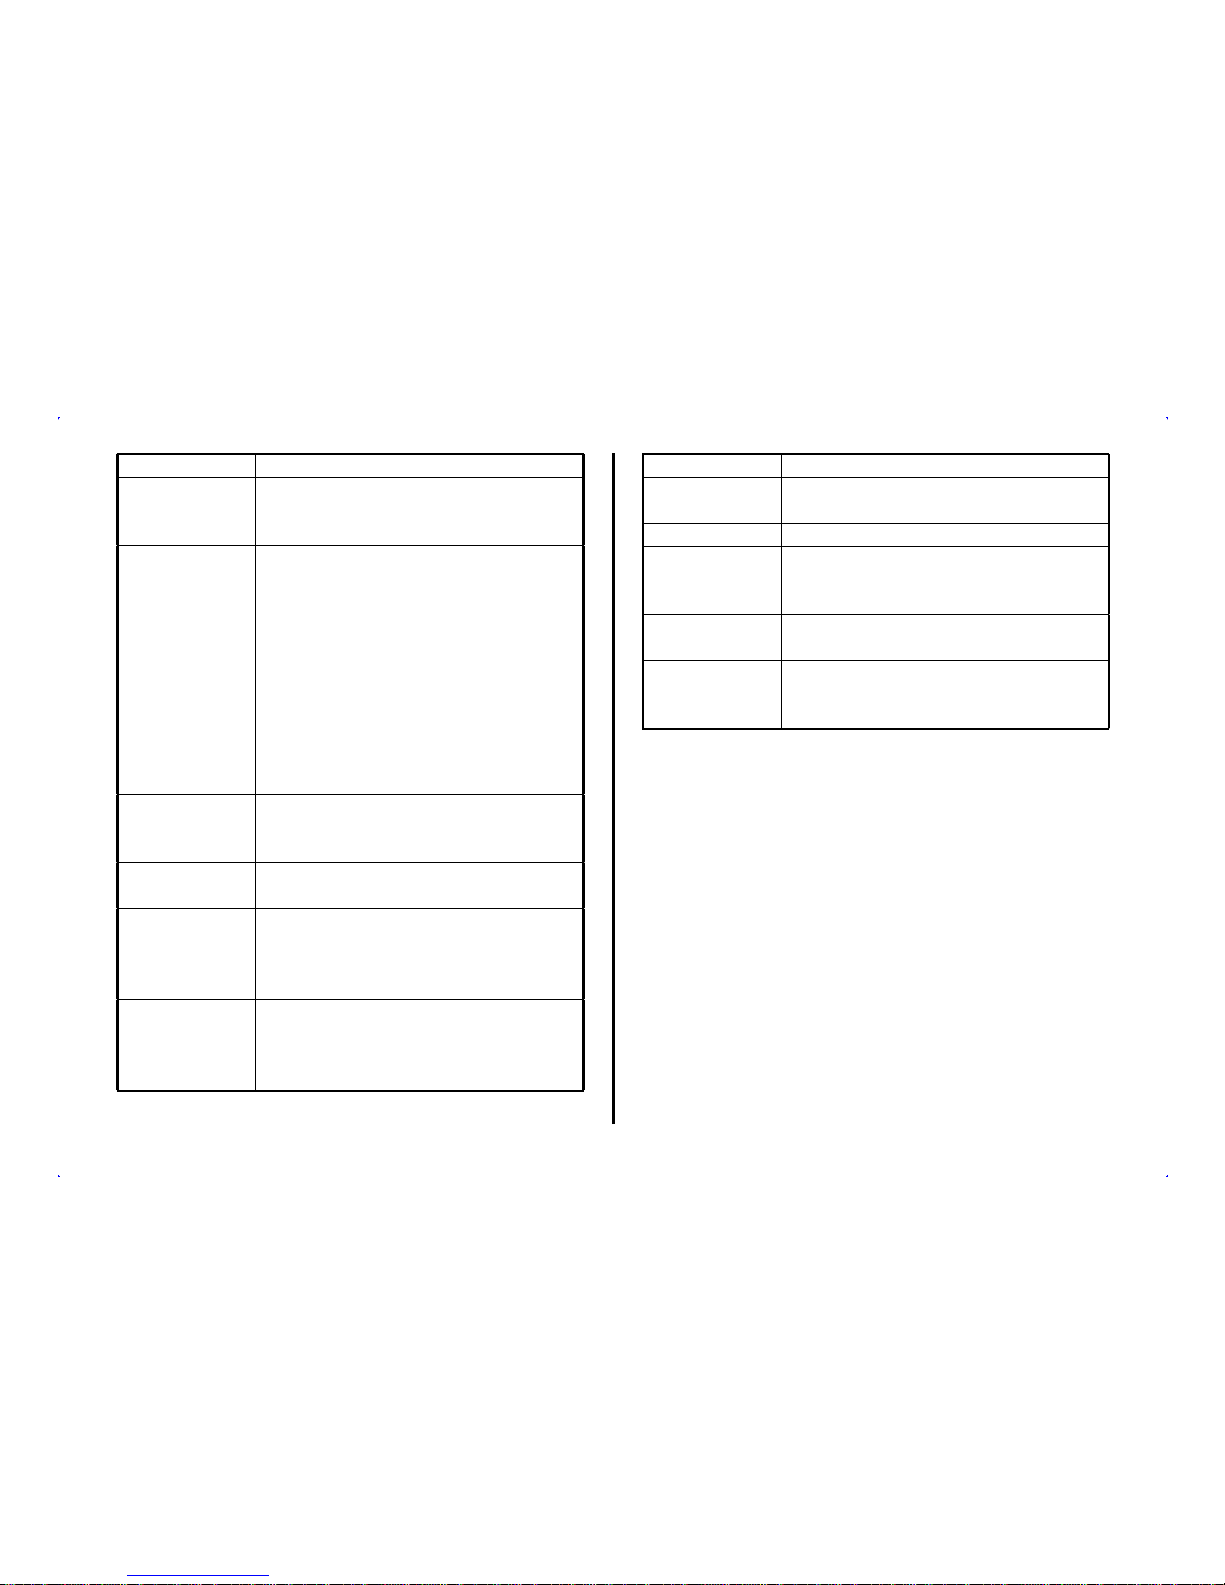
Item Key points
Steering 1. Stable.
2. Flexible turning.
3. No axial play and looseness.
Brakes 1. Brake fluid in the reservoir must not
be low.
2. No brake fluid leakage.
3. The wear of the brake disc, shoes
or pads is not beyond the permitted
range.
4. Proper and free movement of the
brake lever.
5. No “spongy feeling” when the brake
lever is pressed.
6. No brake dragging.
Tires 1. Correct tire pressure.
2. Proper tire status.
3. No punctures or fractures.
Fuel There is enough fuel for the planned
distance.
Lights The headlight, tail/brake lights,
dashboard lights, turning lights, front
position light and dashboard light can
be lit up normally.
Indicators The high beam indicator and turning
indicators, neutral gear indicator and
gear position indicators can be lit up
normally.
Item Key points
Horn and
brake switch
Its function is normal.
Engine oil Correct oil level.
Throttle 1. Appropriate play for the throttle
cable.
2. Smooth fuel supply and fast return.
Clutch 1. Appropriate play for the cable.
2. It can be operated smoothly.
Drive chain 1. Proper tension, neither too loose,
nor too tight.
2. Appropriate lubrication.
(19)
18
Table of contents
Other Haojue Motorcycle manuals

Haojue
Haojue EG150 User manual

Haojue
Haojue HJ125-8 User manual

Haojue
Haojue NK150 2020 User manual

Haojue
Haojue TZ125 User manual

Haojue
Haojue TZ150S 2015 User manual

Haojue
Haojue EG125 User manual

Haojue
Haojue XPRESS User manual

Haojue
Haojue HJ110-2 User manual

Haojue
Haojue HJ125-7 User manual

Haojue
Haojue EH150 User manual


 owner's manual")


