Happy Baby KEES K2Go User manual
Geimporteerd door/Imported by:
Happy Baby B.V.
Energieweg 8b 4231 DJ Meerkerk
Nederland
www.happybaby.nl www.kees-baby.nl
info@happybaby.nl
Volg deze instructies a.u.b. op voor de veiligheid van uw kind.
Important!!
Read these manual carefully before use and keep them for later reference.
Your child's safety may be affected if you do not follow these instructions.
Ważne!
Zapoznaj się z instrukcją obsługi przed rozłożeniem wózka i zachowaj ją na później.
Używanie wózka niezgodnie z instrukcją i ostrzeżeniami może być niebezpieczne dla dziecka
Importante !!
Leggete con attenzione le istruzioni prima di utilizzare il passeggino e consultatele per un uso futuro.
E' importante seguire attentamente queste istruzioni per la sicurezza del vostro bambino.
K2Go
015 - 100 - >>>
Belangrijk !!
Lees deze instructie aandachtig door voordat u de stroller in gebruik neemt.
Bewaar deze instructie zorgvuldig.
Handleiding / Instructions/ Instrukcja obsługi / Istruzioni per l'uso
1
16

-Het defect is ontstaan door verwaarlozing, stootschade
aan de stof of onderstel.
-Het defect is ontstaan door een ongeval of vervoer in de
auto of vliegtuig
-Het defect is ontstaan door overbelasting.
-Er sprake is van normale slijtage aan wielen/bekleding,
die men bij dagelijks gebruik mag verwachten.
-Schade aan oppervlakten, zoals vloeren door
bandensporen, of uitzweten van de banden bij warmte.
-Het voetenbandje is uitsluitend bedoeld voor steun
tijdens het rijden,dit bandje dient niet als opstapje te
worden gebruikt. Indien dit toch gebeurd vervalt de garantie!!!
Algemene richtlijnen voor gebruik van deze stroller
-Houd uw kind(eren) tijdens het in- en uitvouwen van de
stroller uit de buurt van bewegende delen teneinde
beknellingen te voorkomen.
-Hang geen tassen aan de duwer en vervoer niet meer
dan uw kind en wat kleine boodschappen in het mandje
(maximaal 4kg), teneinde instabiliteit te voorkomen.
-Het veiligheidstuigje is geen vervanging voor ouderlijk
toezicht. Gebruik deze altijd!!
-Laat uw kind nooit in de stroller wanneer u gebruik
maakt van trappen of liften.
-Plaats geen voorwerpen op de bovenkant van de kap.
-Wanneer u een regenhoes gebruikt, zorg ervoor dat
uw kind voldoende ventilatie
heeft, sluit deze dus nooit geheel af.
-Laat de stroller nooit in de buurt van warmtebronnen
zoals een verwarming of een uitlaat van verkeersvoertuigen
staan. Ook opletten bij bbq's of heathers.
3
2

-Laat uw kind(eren) nooit de stroller of onderdelen van de
stroller bedienen, het is geen speelgoed.
-Wielen en assen regelmatig schoonmaken en smeren.
-Gebruik voor het smeren van de wielen en
opvouwmechanismen alleen een neutralespray en geen
smeermiddelen op basis van olie, daar deze juist modder
etc aantrekken.
-Om roestvorming te voorkomen onderstel & velgen
(indien nodig) droogmaken na gebruik.
-Gebruik altijd de rem ook als u maar even stil staat.
-Deze stroller is slechts te gebruiken voor 1 kind tegelijk.
-U kunt gebruik maken van deze stroller tot dat uw kind
ongeveer een gewicht van 15 kg heeft bereikt.
Waarschuwing!!
-U bent zelf verantwoordelijk voor de veiligheid van uw
kind.
-Laat uw kind nooit alleen achter in de stroller.
-Controleer uw stroller regelmatig, of alles nog goed
bevestigd is.
-Alles wat u aan de duwer hangt maakt de stroller minder
stabiel, en vergroot het kantel gevaar.
-Controleer altijd de gordels of deze goed vast zit nadat u
uw kind in de stroller hebt geplaatst.
-Zorg dat bij (uitvouwen) opzetten van de stroller alles
goed vergrendeld is.
4
English
Dear customer, thanks for choosing a KEES product. This
stroller is produced against EN 1888:2012
The stroller is suitable for carrying children from 0 months
till 3 years of age. With a maximum weight
of 15 kg's. Make sure that anyone using this product knows
how it works.
Warning!!
-It may be dangerous to leave your child unattended.
-Ensure that all the locking divices are engaged before use.
-Use the harnass as soon as your child can sit unaided.
-Any load attached to the handle affects the stability of
the stroller
-Always use the scrotch strap in combination with the
waist belt.
-Check that the seat unit attachement divices are correct
engaged before use.
-This product is not suitable for use while running or
skating.
-To avoid injury ensure that your child is kept away when
unfolding and folding the stroller.
-Do not let your child play with the stroller it's not a toy.
-Always use the restraint system.
-To avoid suffication risk, remove all plastick protections
(bags) before using the stroller. This plastic
-protection has to be thrown away in a waste disposal far
from your child. Do no use accessoires or
-replacement parts they are not approved by Happy Baby.
The use of other accecoires they are not
-approved by Happy Baby can be dangerous.
General warnings!!
Before use, make sure that the safety devices on the stroller
5

or seat are correctly locked. Make sure
that straps attachements and safety harnesses are in perfect
conditions. Do not open or close the
stroller while your child is in it. Do not hang heavy bags and
packages on the handle. This might
unbalance the stroller. Do not use or apply accessories,
spare parts or components not supplied or
approved by the manufacturer. Use the brakes whenever
you stop. Never leave your child and the stroller
on a slope and with the brake on. The brake cannot
guarantee safety on very steep slopes. For your
child's safety use always the safety harness. When opening
and closing the stroller always make sure
that the parts of your child's body are not in the way of
moving parts on the frame. Do not use the stroller if some
parts are broken or missing. Do not allow other children to
play unattended near the stroller.
The stroller will overheat if left in the sun; leave it cool before
putting your vhild into the stroller.
Never care more than one child at the time. Maximum
loading of the basket is 5kg. The parking device shall be
engaged during the loading and unloading of your children.
General maintenance advice:
Consult the fabric label sewn onto the product for washing
instructions. If necessary lubricate with a dry silicon. Clean
the plastic parts periodically with a damp cloth. Dry the
metal parts to prevent rust. Check the wear and tear of the
wheels regulary and keep them free of dust and sand.
Prolonged exposure to sunshine may cause changes in
the colour of materials and fabrics. Do not allow the
stroller to come into contact with salt water: this causes
the formation of rust.
67
Gentile Cliente,
Vi ringraziamo per aver scelto un prodotto
della collezione KEES.
Questo passeggino è prodotto secondo gli standard
europei: EN 1888:2012
Questo passeggino può essere utilizzato dalla nascita fino
a 36 kg con un peso massimo di 15kg.
Assicuratevi che l'utente sappia come funziona questo
prodotto.
Garanzia
Questo passeggino ha una garanzia di 12 mesi dalla data
di acquisto valida per difetti di fabbricazione dimostrabili.
Si applica solo quando il passeggino viene utilizzato per
lo scopo per cui è stato prodotto. La garanzia è inoltre
valida solo per i prodotti sui quali non viene apportata
alcuna modifica da parte dell'utente. La garanzia può
essere utilizzata solo dal proprietario originale e non
è trasferibile a terzi.
La garanzia copre la riparazione del prodotto ma ne
esclude la sostituzione completa con uno nuovo.
E' importante, inoltre, allegare una copia della ricevuta
datata e una chiara descrizione scritta del reclamo.
La garanzia non copre il prodotto nei seguenti casi
-Il prodotto non viene fornito con la ricevuta di acquisto
originale.
-I difetti causati da un uso sbagliato o da una
manutenzione non assistita differiscono da quanto indicato
nelle istruzioni.
-Le riparazioni sono eseguite da terzi.
-Scolorimento, danni al tessuto o eventuale ruggine
-Macchie nel tessuto a causa della pioggia e / o lavaggio

89
-Il difetto è il risultato di negligenza o di danni arrecati al
tessuto o al telaio in seguito ad urti.
-Il difetto è causato da un incidente o spostamento in
macchina o in aereo.
-Il difetto è causato da sovraccarico.
-L' usura del prodotto in seguito al normale utilizzo
quotidiano.
-Danni alle superfici come pavimenti, tracce di pneumatici,
o surriscaldamento dei pneumatici
-causati da eccessiva esposizione al calore.
-Rottura del poggiapiedi causata da uso scorretto (usatelo
solo per appoggiare i piedi quando il passeggino è in
movimento)
Linee guida generali per l'uso di questo passeggino
Prima di usare il passeggino assicuratevi che il passeggino
sia in perfette condizioni. Non aprite o chiudete il passeggino
quando il bambino vi è seduto. Non attaccate borse pesanti
alle maniglie (max 4kg) per evitare che il passeggino si
sbilanci. Non utilizzate o applicate componenti non approvati
dal produttore. Usate sempre la cintura di sicurezza.
Non lasciate mai il bambino dentro il passeggino quando
prendete l'ascensore o usate le scale. Non posizionate
oggetti sulla parte superiore del paraluce. Pulite
regolarmente ruote e assali usando solo un spray neutro
e non lubrificanti a base di olio, poiché attirano il fango.
Non lasciate mai il passeggino vicino a fonti di calore.
Se utilizzate una copertura per la pioggia, assicuratevi
che il bambino abbia una ventilazione adeguata.
Per evitare la ruggine, asciugate sempre il passeggino
dopo l'uso. Usate sempre il freno.
Non lasciate il bambino da solo nel passeggino in pendenza
con il freno inserito, poiché il freno non garantisce sicurezza
in casi di pendenza elevata.
Quando aprite o chiudete il passeggino assicuratevi sempre
che le parti del corpo del vostro bambino
non si trovino in mezzo alle parti in movimento.
Non usate il passeggino se alcune parti sono rotte o
mancano.
Assicuratevi che il freno di stazionamento sia inserito
quando mettete o togliete il bambino dal passeggino.
Non mettete mai più di un bambino nel passeggino, il
peso massimo del bambino può essere 20 kg.
Il peso massimo che il cestino può sostenere è di 5 kg.
Non lasciate mai il bambino da solo con il passeggino,
non è un gioco.
Attenzione:
Voi stessi siete responsabili per la sicurezza del vostro
bambino, non lasciatelo mai da solo.
Controllate regolarmente che il passeggino sia ancora in
perfette condizioni.
Tutto ciò che appendete al passeggino lo rende meno
stabile e ne aumenta il rischio di ribaltamento.
Controllate sempre che la cintura sia chiusa bene quando
il bambino è nel passeggino e che tutto sia
bloccato correttamente.
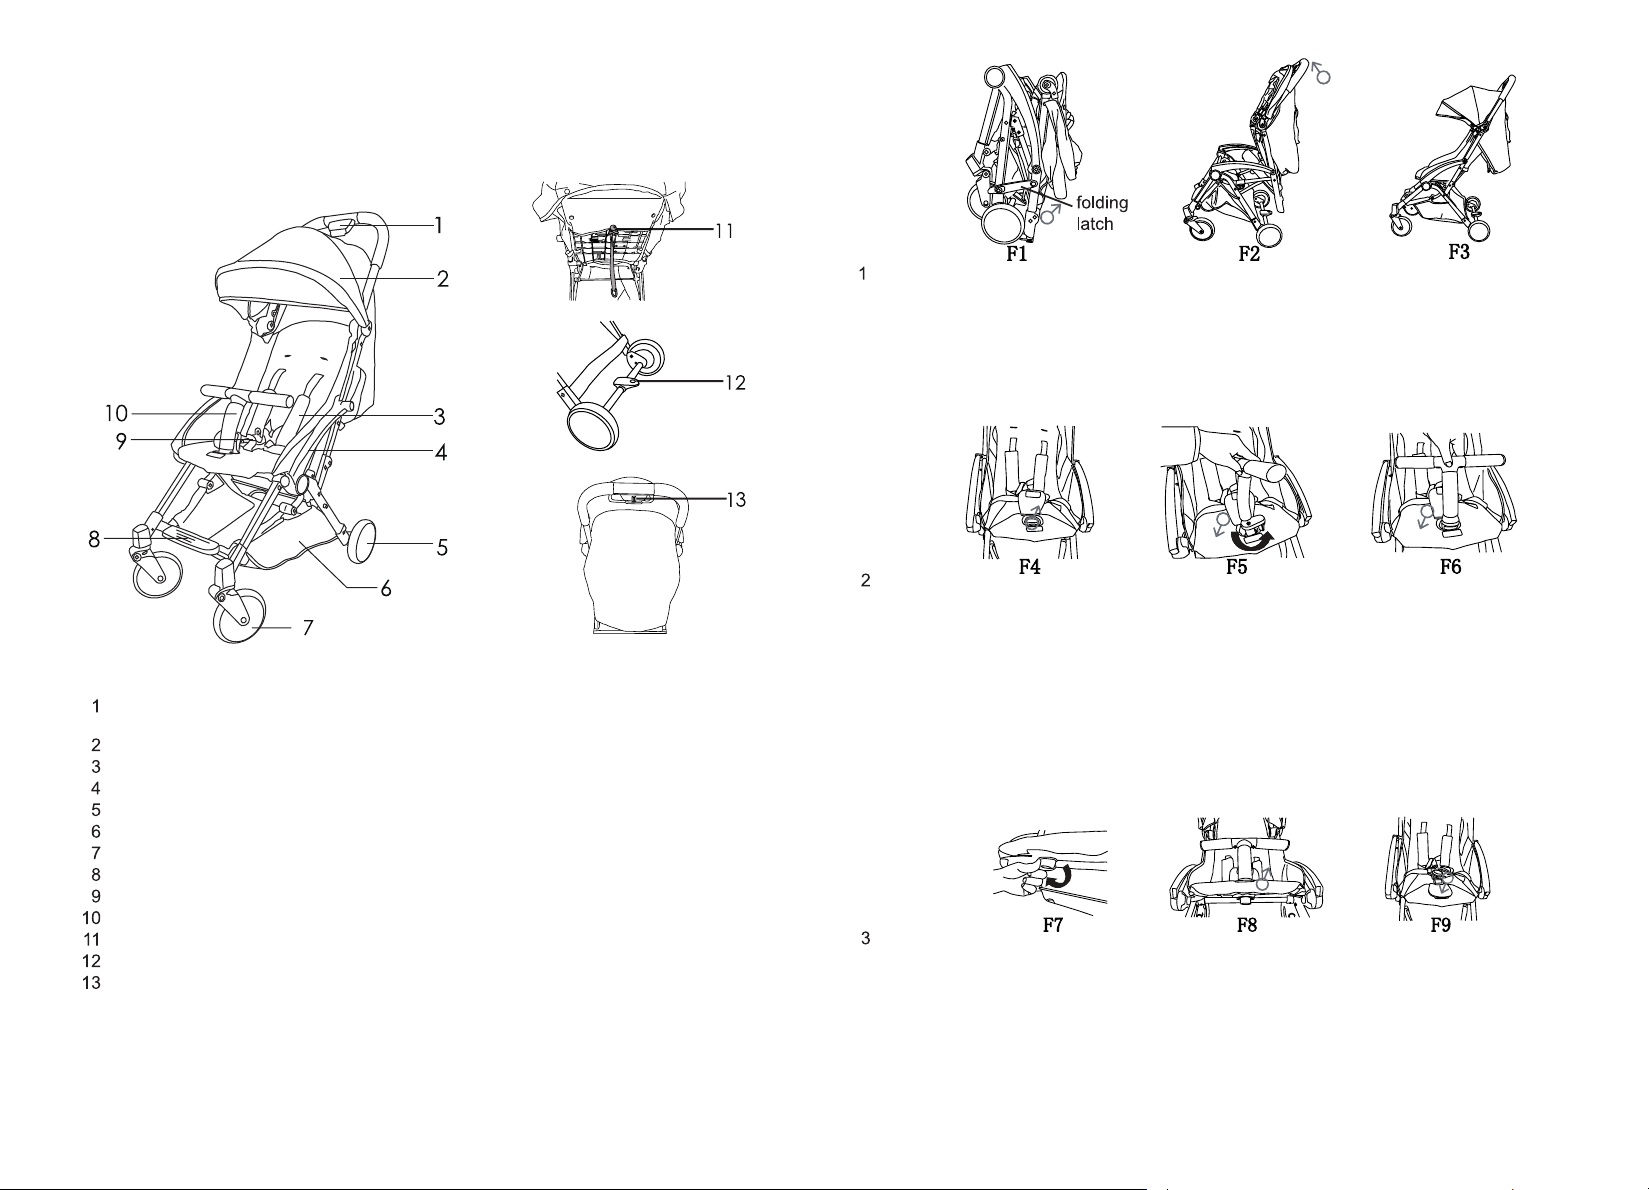
Inklap mechanisme / Folding button / mechanizm składania i rozkładania wózka /
Pulsante pieghevole
Om het frame uit te klappen moet u de vergrendenling los maken. Houd de duwer vast en vouw de
stroller in zijn geheel uit, tot u een klik hoort en deze goed in de vergrendeling zit.
To unfold the frame: see F1, release the locked folding latch. Hold the handle grip by one hand and
pull up the stroller unit unfolded complete.
Per aprire il telaio, è necessario rilasciare il blocco. Tenete la maniglia e piegate il passeggino
finché non scatta e si aggancia perfettamente
Om de bumperbar te bevestigen opent u de seat cover zie F4 . Een klein stukje stof wat op de
zitting zit. Plaats de bumper bar zoals afgebeeld in de houder, met het haaks op de stang staande
vergrendeling in het gat en draai deze daarna 90 graden. Is de bumper bar in de juiste positie zoals
bij F6 afgebeeld duwt u deze naar beneden tot deze vast klikt.
To assemble the front bumper, open the seat cover (see F4), face the backside of the bumper
button (see F5), align front bumper pegs with the holes on seat adaptors., slide and move back
with 90 degrees, press into until front bumperfix (see F6)
Per fissare il paraurti aprite il rivestimento del sedile (vedi F4) Posizionate la barra del paraurti
come mostrato nella figura (vedi F5) con l'asta posizionata perpendicolarmente rispetto al foro
e ruotatelo di 90 gradi. Quando la barra del paraurti è nella posizione corretta (vedi F6) spingete
verso il basso finché non scatta.
Om de bumper bar te verwijderen moet u de knop onder aan de bumper bar 90 graden draaien
(zie F7)Houd deze vast en trek de bumper bar uit de houder. Heeft u de bumper bar verwijderd
sluit daarna weer de seat cover.
To disassmble front bumper move the button under the seat with 90 degrees see F7 In the
meantime lift up the front bumper (see F8). Close the seat cover.
Per rimuovere la barra del paraurti ruotate il pulsante sotto di essa di 90 gradi. (Vedi F7)Tenete
il paraurti e sfilatelo dal supporto. Una volta tolto il paraurti, richiudete il copri sedile (vedi F9).
Zonnekapje / Canopy / budka / Paraluce
Schouder pads / Shoulder protector/ szelki / Protettore spalle
Armlening / Armrest/ boczek wózka / Bracciolo
Achter wielen / Rear Wheels /koła tylne / Ruote posteriori
Mandje / Basket/ kosz / Cestino
Voorwielen / Front wheels/ przednio koła / Ruote anteriori
Voetensteun / Foot rest/ podnóżek / Poggiapiedi
Veiligheidsgordel / Harness buckle/ zapięcie pasów / Cintura di sicurezza
Voorbeugel / Front bumper / baierka / Paraurti anteriore
Rugverstelling / Adjustable button / regulacja oparcia / Regolazione dello schienale
Rem / Brake lever/ hamulec / Freno
Veiligheids vergrendeling / Handle released button / guzik przy mechanizmie składania /
Blocco di sicurezza
Belangrijke kenmerken / Part list/ Elementy składowe /Componenti
del passeggino
Opklappen en montage / Unfolding & Assembling / Montaggio
10
♂
♂
♂
♂
♂
♂
♂
11
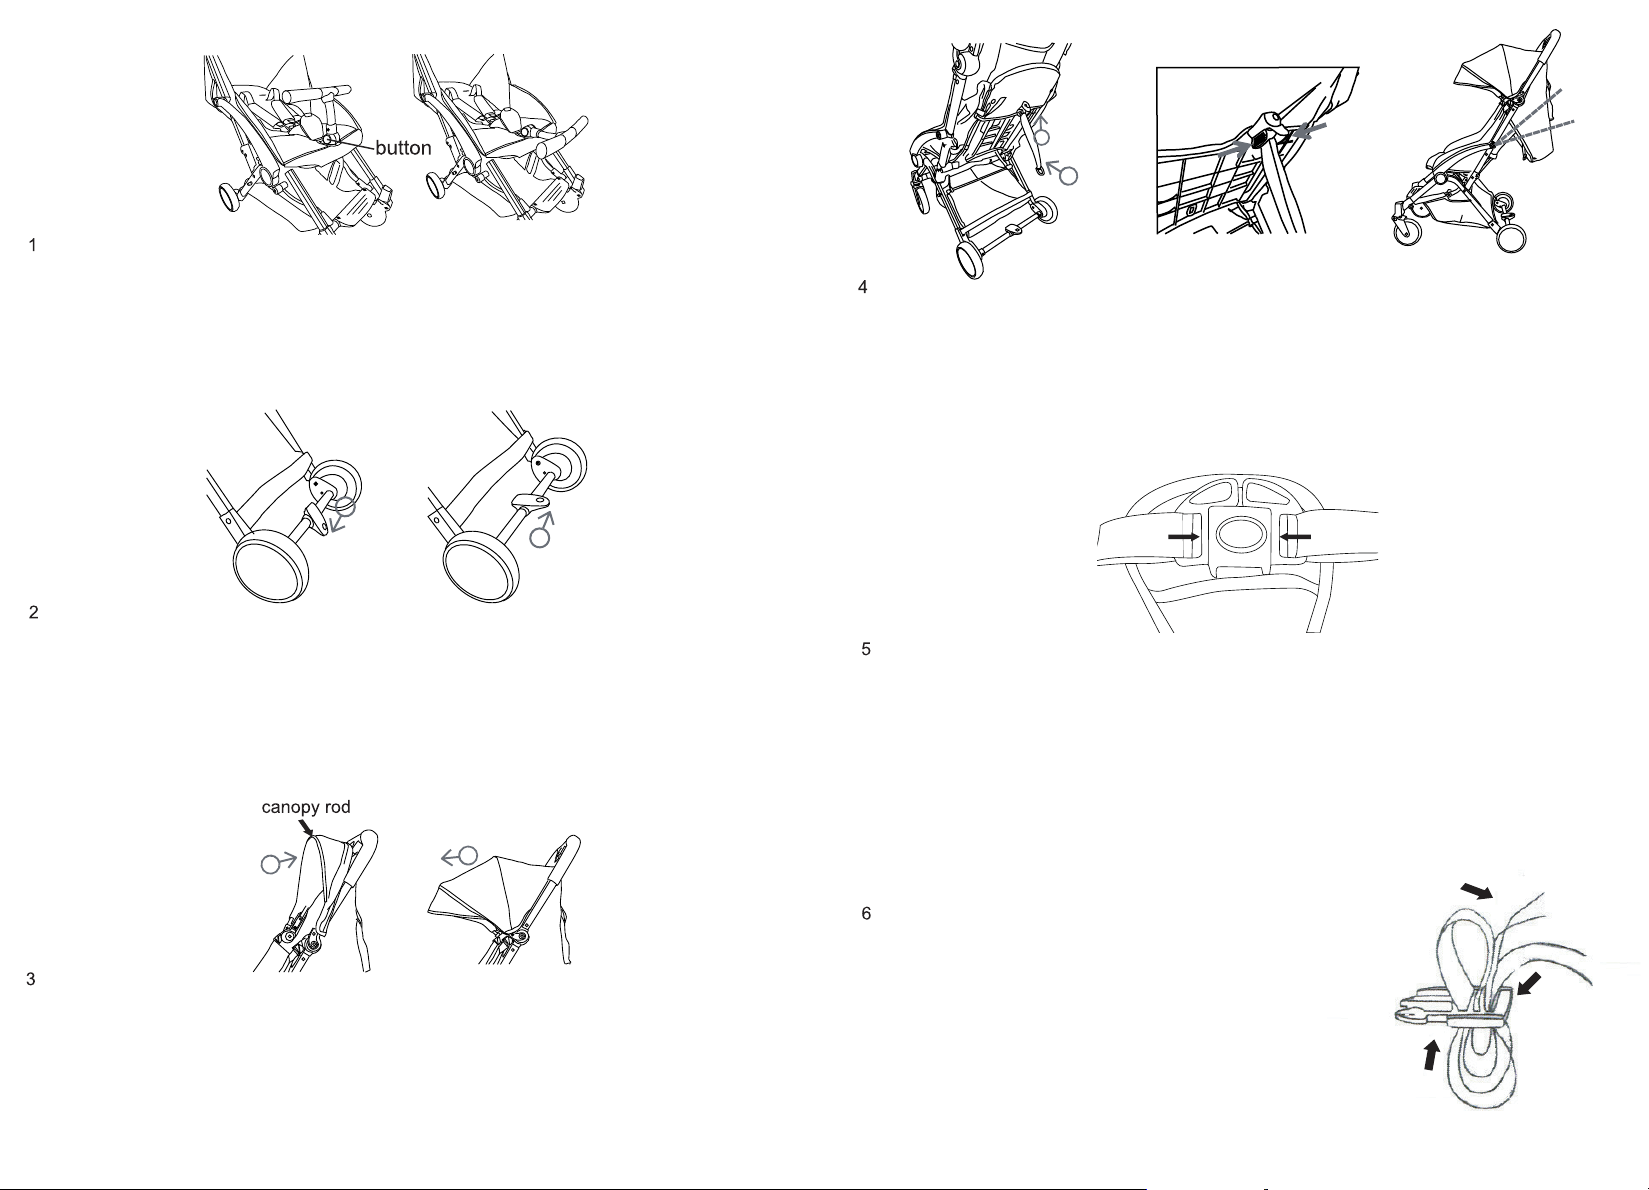
Om uw kind makkelijker in de stroller te zetten kunt u de bumper bar naar voren klappen.
Druk de ronde knop in en haal de bumper bar naar voren zoals hierboven afgebeeld.
To use front bumper: press the button and push forward, the front bumper will be release;
pull backwards until hear '' click''
Per mettere comodamente il bambino nel passeggino è
possibile tirare in avanti la barra paraurti.Premete il pulsante rosso e tirate in avanti la
barra paraurti come indicato sopra.
De rem is eenvoudig te gebruiken door op de linkbrake te drukken met uw voet zoals
hierboven afgebeeld. Door de linkbrake omhoog te doen haalt u de stroller weer van
de rem.Zodra u stil staat de buggy altijd op de rem zetten.
To use the brakes: step down the brake levers and the stroller is braked. Step up the
brake levers and the braking is released.
Il freno è facile da utilizzare premendo con il piede come mostrato sopra. Premete il
pulsante giù per inserirlo e su per toglierlo. Ricordatevi di bloccare sempre le ruote
del passeggino quando vi fermate.
Het zonnekapje kan eenvoudig ingeklapt worden door de kap naar achter te halen.
Zo kunt u hem ook weer eenvoudig uitklappen.
To use the canopy: Push back the canopy rod, the canopy can fold step by step; pull
the canopy rod, the canopy can open step by step.
Il paraluce può essere regolato
semplicemente tirandolo avanti o indietro, come mostrato nella figura.
Instructies / instructions / Istruzioni
♂
♂
♂
♂
12
De rugverstelling kent een multi positie. Door dit systeem kunt u de rugleuning in
iedere gewenste positie plaatsen tussen de 105 en de 155 graden.Door beide knoppen in te
drukken aan de gordel en aan het koordje te trekken bepaald u de positie.
To use reclining backrest; pinch the reclining button and push up, the other hand hold the
recline strap and adjust, the backrest can change between 105 degrees and 155 degrees.
E' possibile regolare lo schienale del passeggino. Questo sistema consente di posizionarlo
tra i 105 e i 155 gradi premendo il pulsante della cintura e tirando la stringa per regolarlo.
Om de 5-puntsgordel los te maken moet u de grote knop in drukken nu schieten de gespen
los.U kunt nu uw kind in de gordel vast zetten. Maak altijd gebruik van deze gordel. Door
de gespen weer in de buckle te klikken maakt u de 5punts gordel weer vast.
To use the harness: to unlock the buckle press on the center button and pull harness out
from each side. To lock; push each side of harness into the buckle until you hear a ''click''
Per slacciare la cintura, premete il pulsante centrale e toglietela da entrambi i lati. A questo
punto mettete il bambino nel passeggino e proteggetelo con la cintura di sicurezza
inserendola nuovamente finché non sentite “click”. Usate sempre la cintura.
U kunt de gordel groter of kleiner maken door deze te
verstellen zoals hiernaast afgebeeld.
To adjust the harness lenght: as picture,shorten draw to top clitellum
the draw the end belt, locked, elongate. Pull the top clitellum the shorten the end belt locked.
È possibile ridimensionare la cintura regolandola come
mostrato nella figura qui a destra. .
♂
♂
3
1
2
13
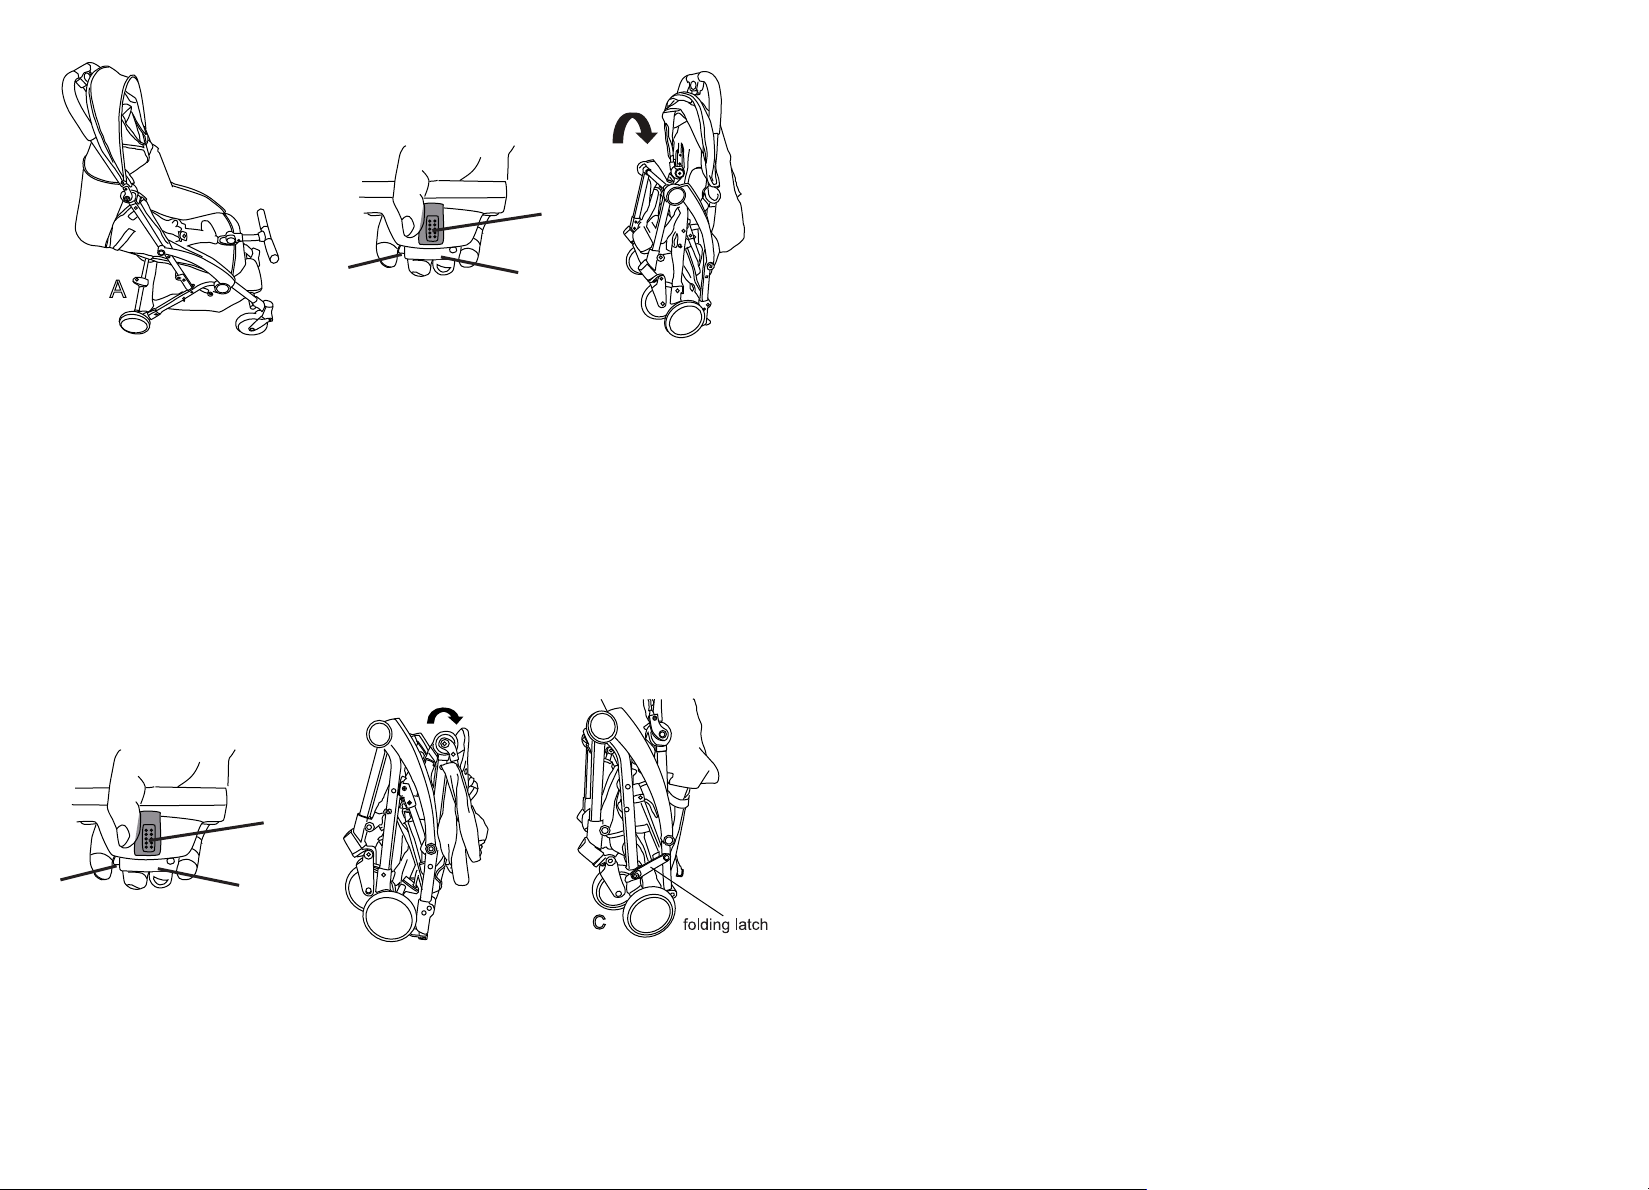
Let op!!
Voordat u de stroller in wilt klappen dient u de bumper bar altijd naar voren te klappen of in zijn geheel
te verwijderen. Klap ook altijd de kap in.
Note!!
The front bumper should always be in the down right position and the hood folded away prior to folding.
Attezione:
Prima di chiudere il passeggino piegate in avanti o togliete il paraurti anteriore.
Klik zoals hierboven afgebeeld de knop 2 en daarna knop 3 te gelijk in om de stroller in te klappen.
U kunt nu de buggy voor een klein deel inklappen door de duwer naar voren te doen.
Hold the handle and press button 2, in the meantime press button 3, press down the handles until the
buggy can stand by itself. (see above)
Premete i pulsanti 2 e 3 contemporaneamente per piegare il passeggino, come vedete nella figura
soprastante. Premete verso il basso le maniglie fino a quando il passeggino raggiunge una posizione
di chiusura stabile.
Om de stroller nog compacter in te klappen moet u eerst knop 1 in drukken om vervolgens weer
knop 2 en 3 ook in te klappen. Haal nu de duwer naar u toe. U kunt nu de klem vast maken.
Hold the handle press button 1 in the meantime press button 2 and 3 move the handle backwards
in the end position. Close the folding latch and ensure it's locked.
Per chiudere il passeggino e renderlo più compatto, premete contemporaneamente i pulsanti 1, 2 e
3 e piegate le maniglie verso di voi. A questo punto potete fissare il passegino con il blocco (vedi figura).
Inklappen / to fold / chiudere
A
C
3
1
2
3
1
2
14
I ROZKŁADANIE
1. ROZKŁADANIE WÓZKA ( F1,F2,F3 )
- należy zwolnić zabezpieczenie transportowe po
lewej stronie
- ustawić rączkę wózka do góry do pozycji pionowej
i podnieść wózek do góry do momentu „ click „
– nastąpi samoistne pełne rozłożenie
2. MONTAŻ BARIERKI (F5) ( F6)
- należy przekręcić dolne pokrętło o 90 stopni i
włożyć w otwór do momentu „ click „
3. DEMONTAŻ BARIERKI
- jest możliwość całkowitego wypięcia barierki –
w tym celu należy przekręcić guzik pod siedziskiem
(F7) o 90 stopni i wypiąć barierkę(F8)
- w powstały otwór należy wpiąć zaślepkę
dołączoną do instrukcji obsługi ( F9)
II INSTRUKCJA
1. REGULACJA BARIERKI
- należy nacisnąć boczny guzik w dolnej części
barierki
2. HAMULEC
- aby zahamować wózek należy nacisnąć na pedał
hamulca na środku w dół
- odblokowane pedału hamulca w górę – zwalnia wózek
do jazdy
15
Table of contents


