Happy Beds Houston Wooden 4 Drawer Chest User manual

Title of Product
Assembly Instructions
www.happybeds.co.uk
Important before assembly:
.
Health & Safety:
.
Read these instructions carefully before assembling or using the product.
Please check the contents of the boxes before attempting to assemble this product. The instructions will
have a checklist of parts and fittings.
It would be sensible to lay a rug or a carpet on the floor where you intend to assemble the product, to avoid
scratches and damaging the product or the floor.
Assemble the product as close to its intended final location/room as possible.
Do NOT use any power tools as this may damage the frame.
This product or some parts of this product will be heavy. Please use an assistant when lifting.
Please keep small parts out of reach of children.
Always use on a level, even surface.
DO NOT jump on the product or any of its parts.
DO NOT use this product if any parts are missing, damaged or worn.
DO NOT use this product unless all fixings are secured.
Please keep these instructions for future reference.
Houston Wooden 4 Drawer Chest

@
This product or some parts of this product will be heavy. Please use an assistant
when lifting.
Never drag or push the pieces across a hard or stone floor as this will cause
damage to the joints. Use a carpet or a rug for extra care.
If you have problems assembling or have damaged or missing pieces, please
contact us by visiting:
https://www.happybeds.co.uk/customer-service
(Not metal)
These tools are not
necessary, but may
help to assemble
certain parts of the
product.
Do NOT use any power
tools as this may
damage the frame.
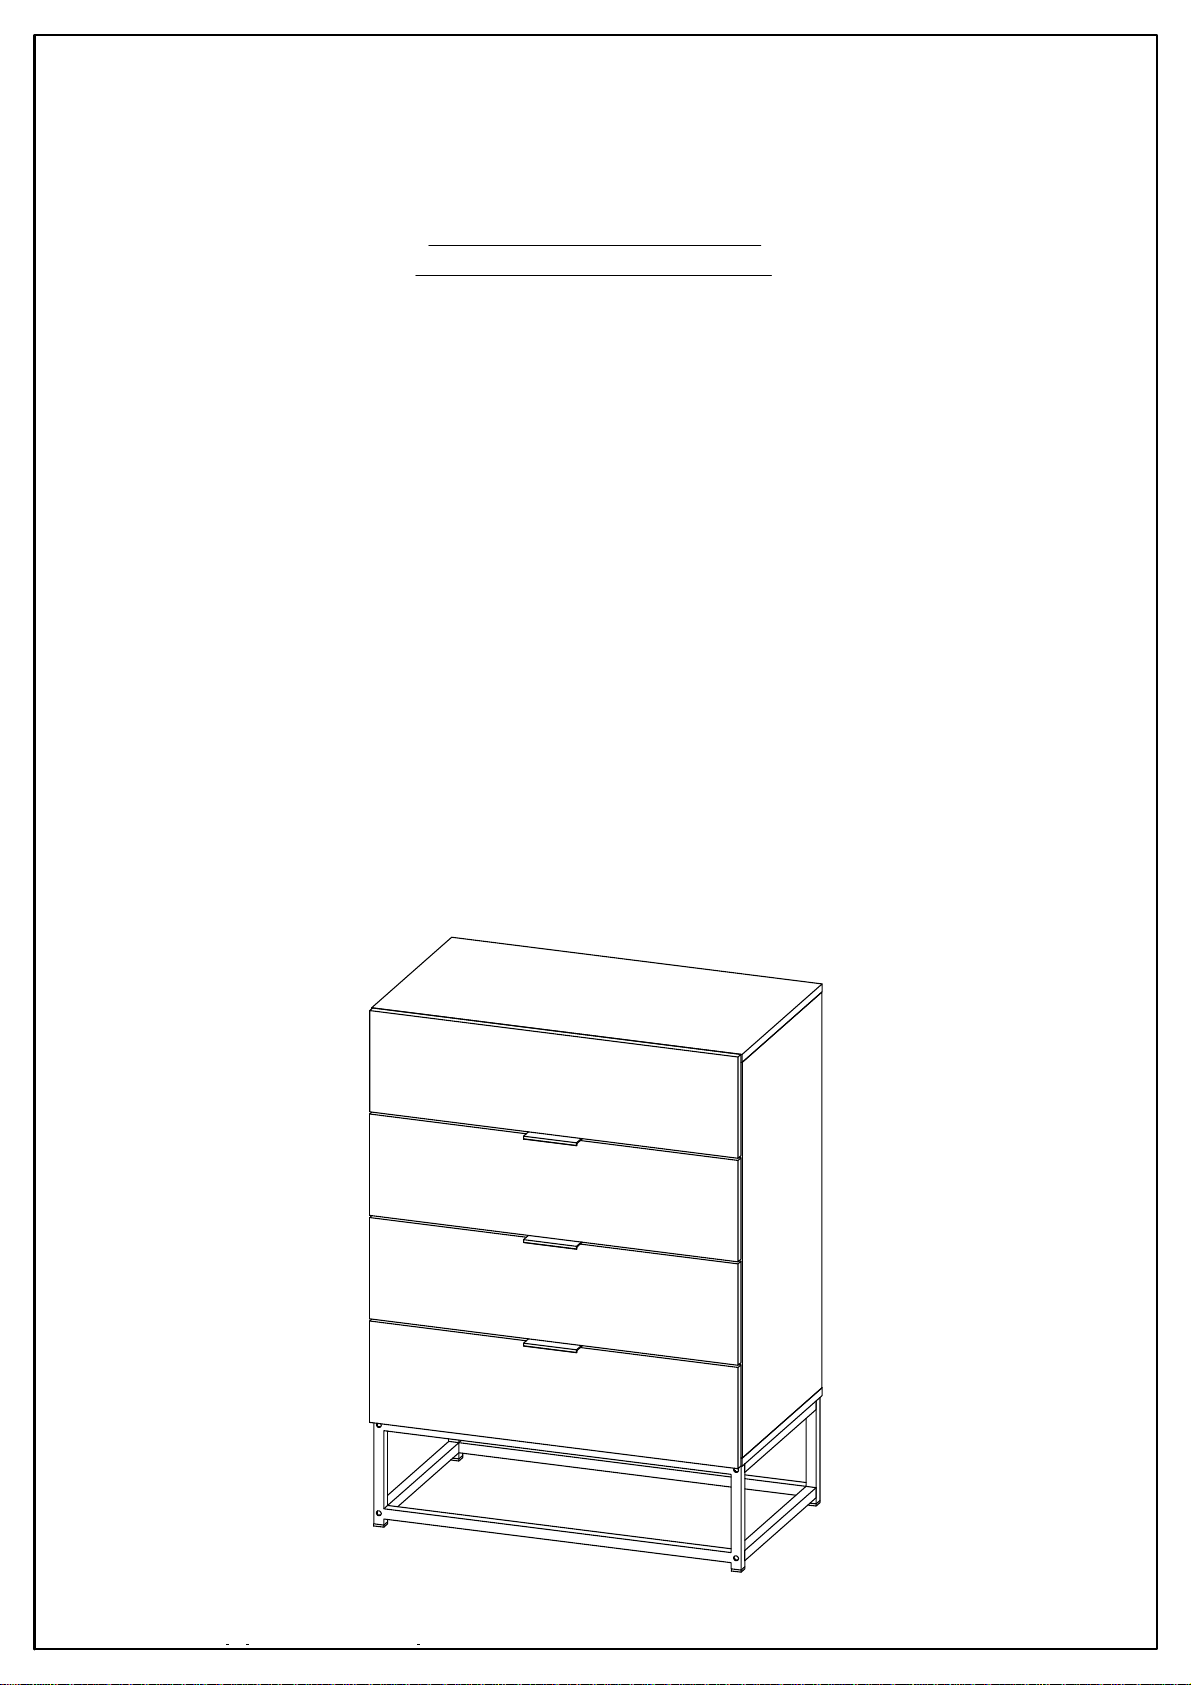
HOUSTON 4 DRAWER CHEST
IMPORTANT : READ THESE INSTRUCTIONS CAREFULLY BEFORE ATTEMPTING TO ASSEMBLE OR
USE YOUR HOUSTON 4 DRAWER CHEST .
PLEASE KEEP THESE INSTRUCTIONS FOR FUTURE REFERENCE.
ASSEMBLY:
Assembly should be carried out with this item laying flat, not standing upright.
Assemble on a soft, clean surface to prevent damages.
To erase the numbers printed on the pieces, use the rubber inside the accessories pack.
HEALTH & SAFETY:
DO NOT use this product if any parts are missing, damaged or worn.
DO NOT use this product unless all fixings are secured.
Always use on a level, even surface.
CARE & MAINTENANCE:
Periodically check all screws & fixings to ensure they are secure.
DO NOT push this product as this will cause damage.
Always lift this product with two people to repositions.
Keep any sharp objects away from this product.
ASSEMBLY INSTRUCTIONS
www.birlea.com Page of 7
Vendor: S000350
1
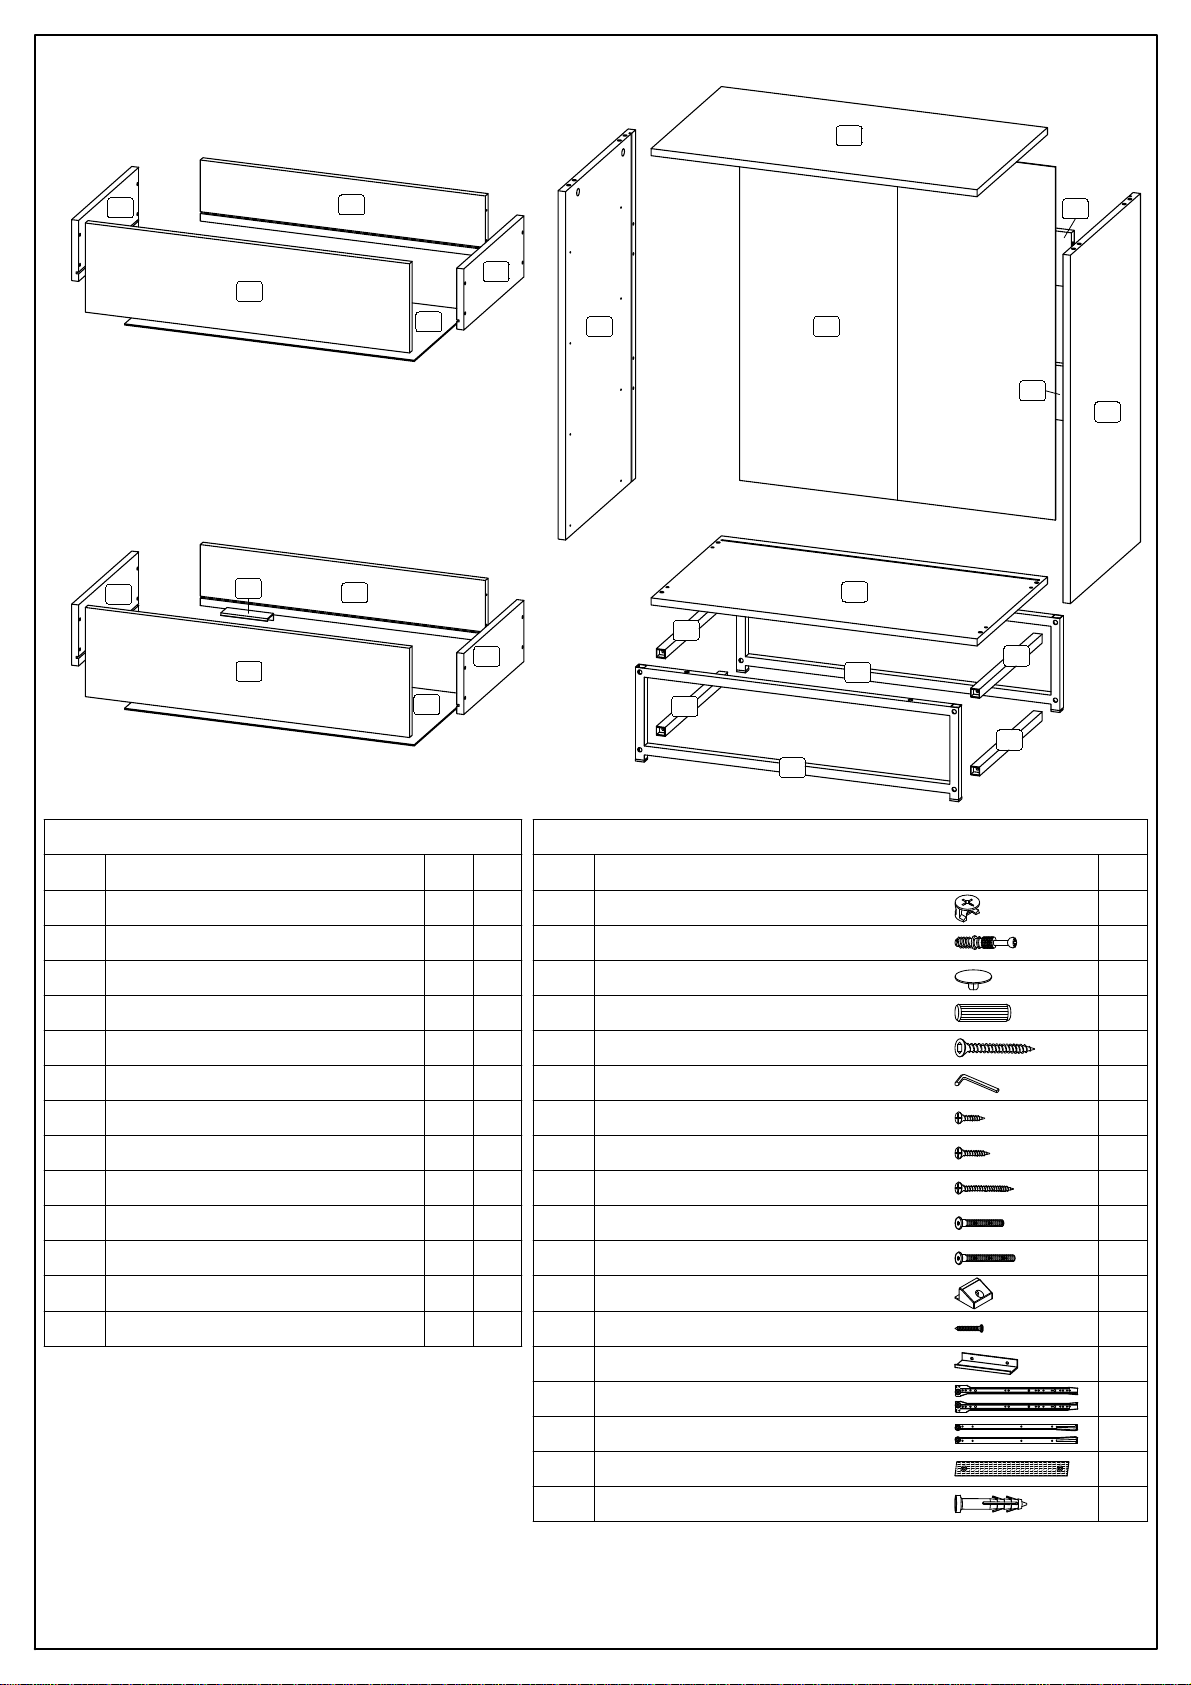
Parts List Hardware List ( BOX 2 )
Part Descripion Qty Part Description Qty
01 1
Top panel
02
03
04
05
06
07
08
09
10
Bottom panel 1
1
1
Side panel ( Left )
A2
Cam lock
Minifix screw
B
Plastic cap
M8 x 30mm Wood Dowel
C
D
E
F
G
H
I
J1
M6 x 50mm CSK Cap Wood screw
M3.5 x 16mm C.B Screw
12
12
12
8
4
1
50
Allen key M4
32
4
8
JCBC screw M6 x 30mm
8
JCBC screw M6 x 40mm
8
M4 x 38mm C.B Screw
A1
A3
2
11
14'' Drawer slide (Left / Right)
14'' Drawer slide (Left / Right)
L1
L2
Side panel ( Right )
Middle bone
Drawer front ( Up )
1
2
Drawer bottom
Metal frame
4
4
Metal bone
2 8
Drawer back
8
Drawer side
3
Stud 192
8
Stud 192 screw
Page of 7
Vendor: S000350
12
Drawer front ( Down )
1
4020 L Bar 100mm
J2
3
M3 x 12mm C.B Screw 6
K
13 4
Back panel
Box
1
1
1
1
1
2
1
1
2
2
2
2
2
M
N
8'' x 1'' PP tape
Wall plug
2
-
01
02
03
04
05
06
06
07
08
09
09
09
09
10
10
11
11
12
12
13
13
13
13
X3
KX3
X3
X3
X3
X3
** You will need a small mallet and a
screwdriver for assembly.
** Some screws and wooden dowel
may remain.
** Note : To secure the item to the wall,
hardware G ( 2 pcs ) and
N ( 2 pcs ) are not provided.
3
Page of 7
Vendor: S000350
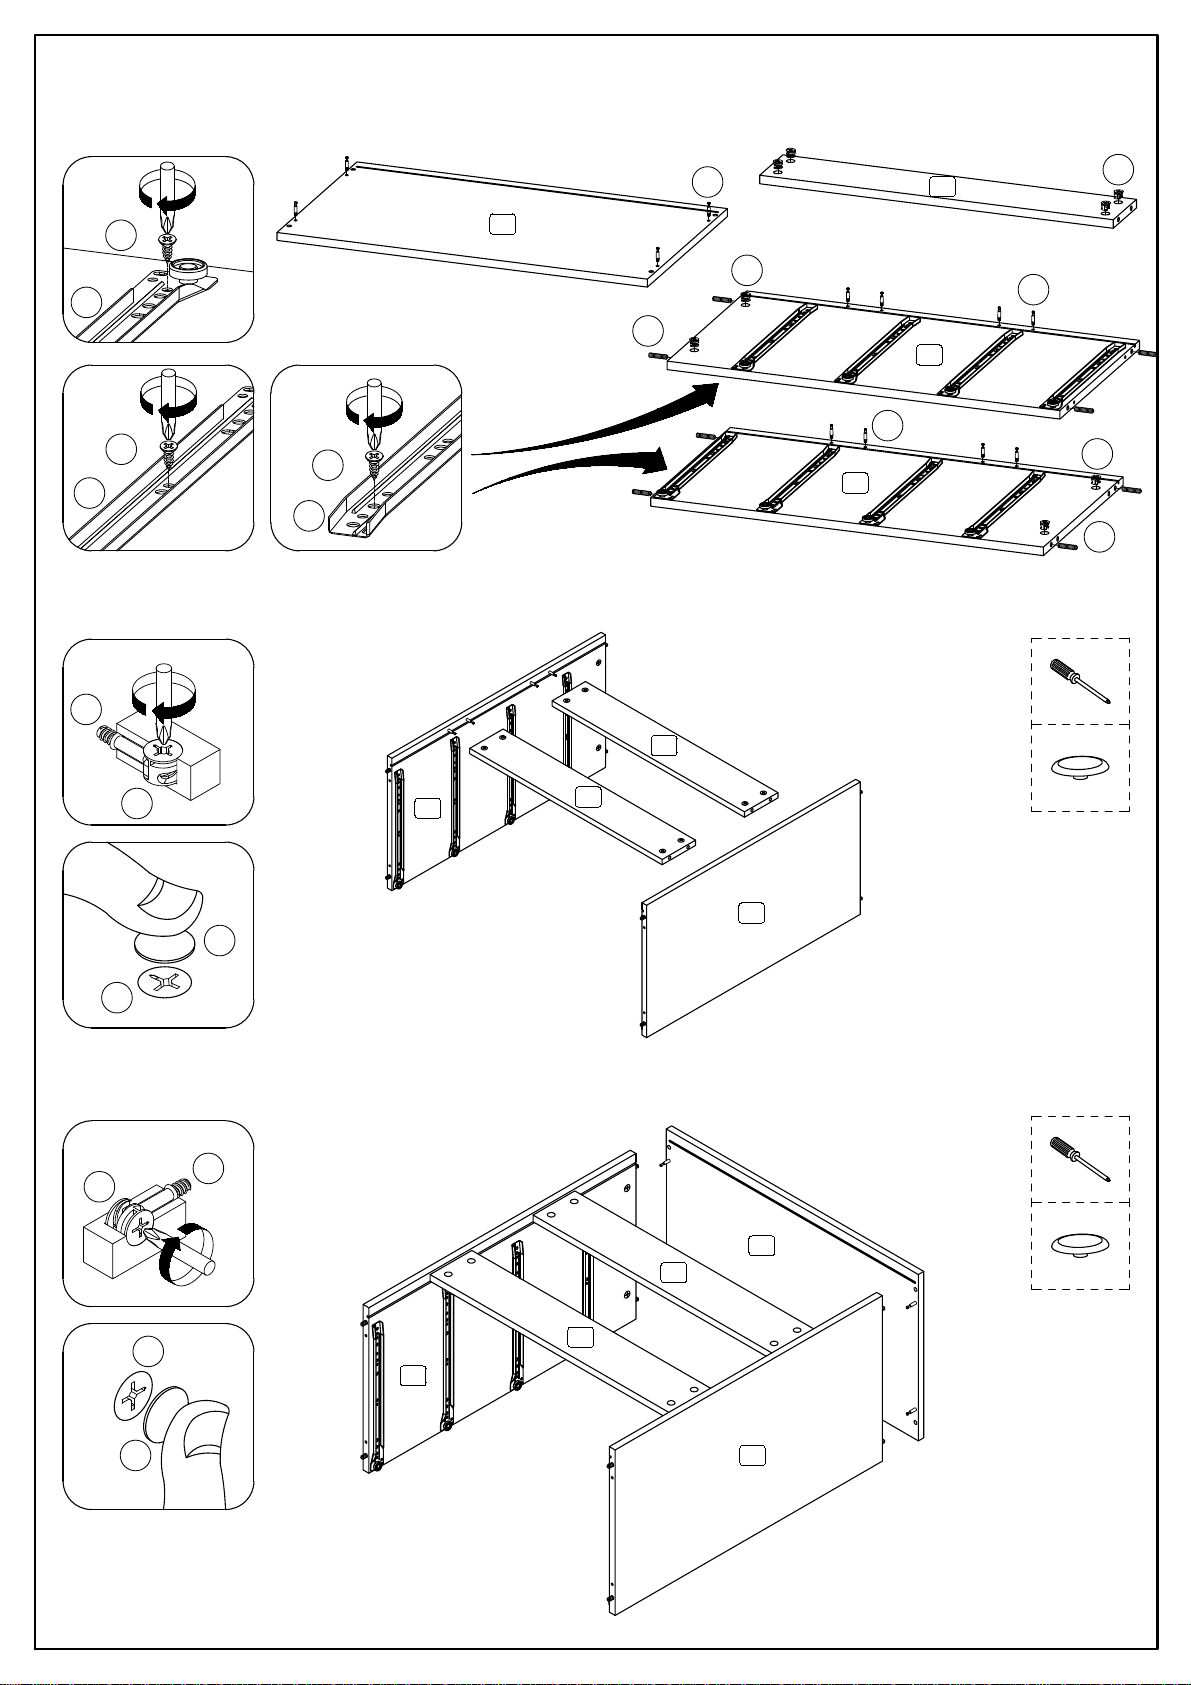
Step 1: Prepare these parts for assembly using hardware parts A1, A2, B, F and L1.
DO NOT use any power tools as this may damage the frame and will invalidate any claim.
Step 2: Attach side panel (3) and (4) to middle bone (6) using hardware A1 and A2 with a screwdriver (not provided).
DO NOT use any power tools as this may damage the frame and will invalidate any claim.
Step 3: Attach side panel (3) and (4) to top panel (1) using hardware A1 and A2 with a screwdriver (not provided).
DO NOT use any power tools as this may damage the frame and will invalidate any claim.
L1
F
FF
L1
L1
x8
x8
x8
A1 A2
A1
A3
A3 x 8
A3 x 4
A1
A2
A1
A3
01
01
03
03
03
04
04
04
06
06
06
06
06
A2 x4 A1 x4
A2 x4
A2 x4
A1 x2
Bx4
A1 x2
Bx4
4
Page of 7
Vendor: S000350
C
D
C x 4
D
J2 x 8
J1 x 8
J1
J2
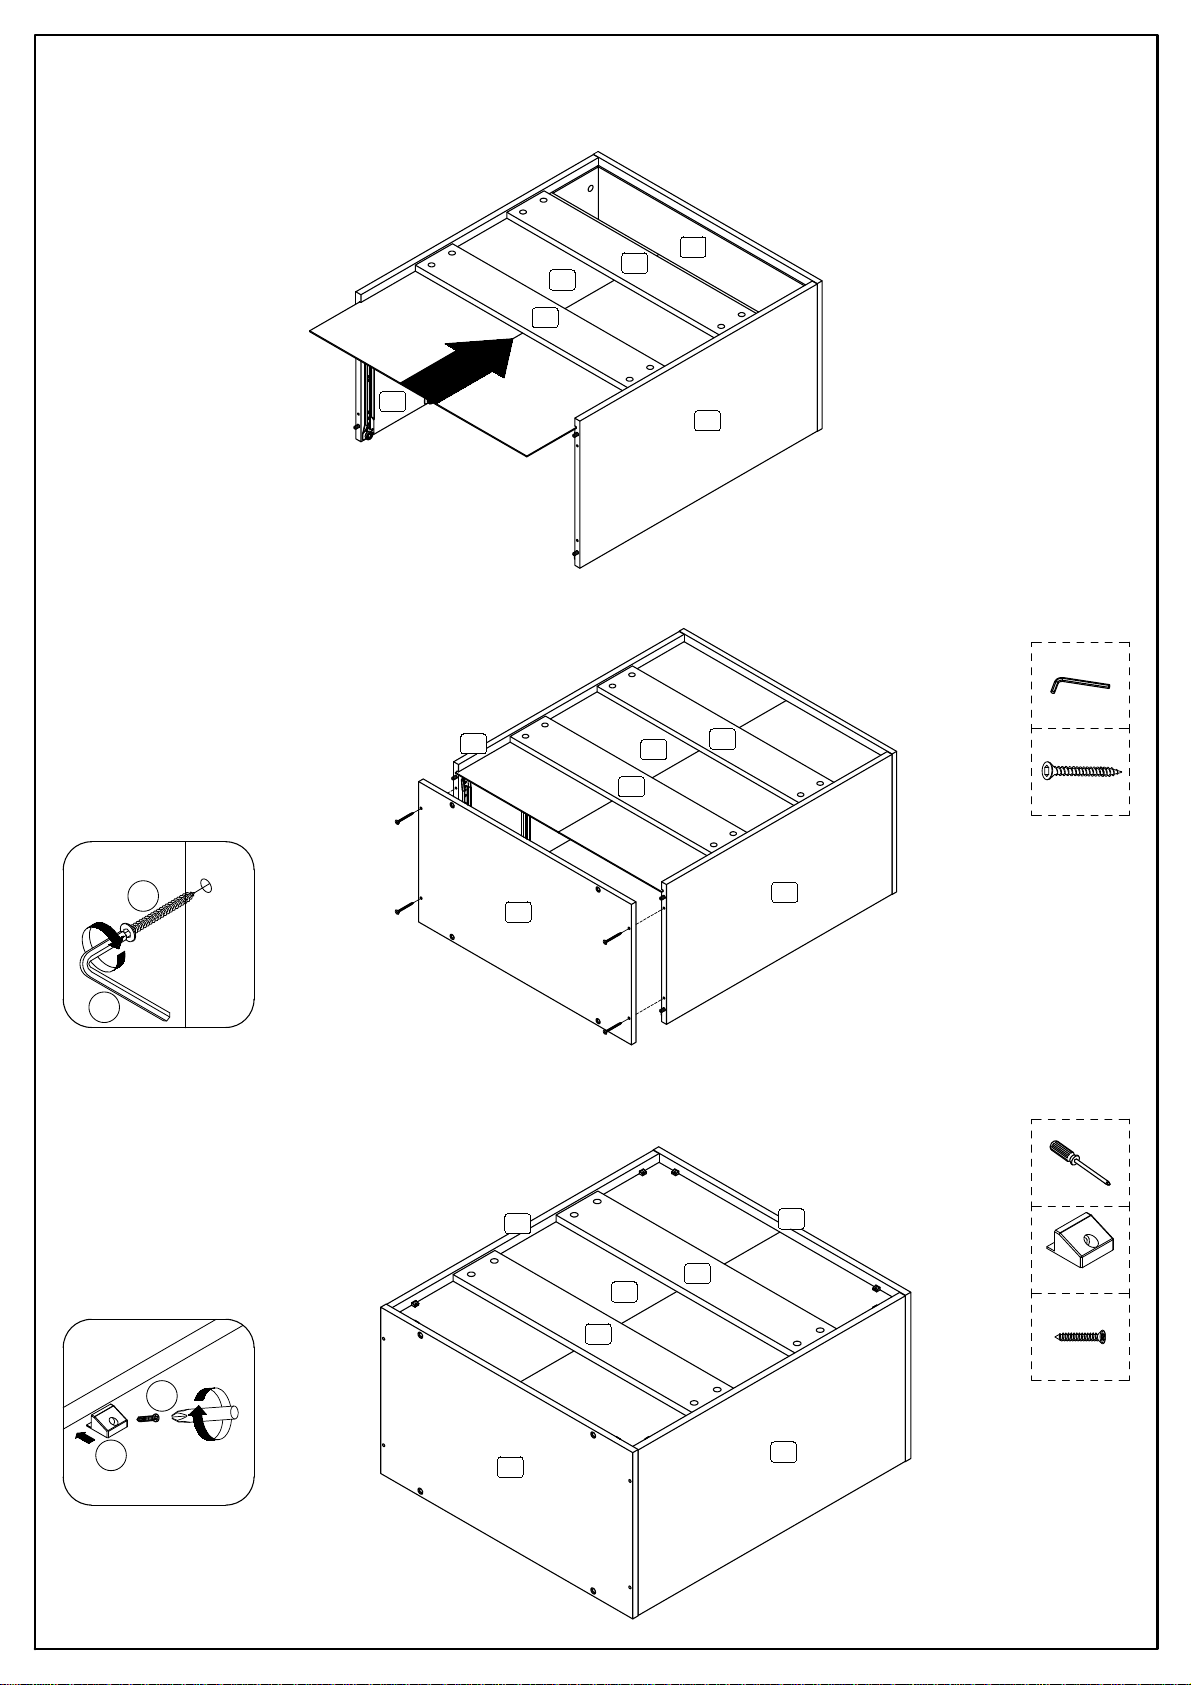
Step 4: Insert back panel (5) along the slot.
DO NOT use any power tools as this may damage the frame and will invalidate any claim.
Step 5: Attach bottom panel (2) to side panel (3) and (4) using hardware C and D.
DO NOT use any power tools as this may damage the frame and will invalidate any claim.
Step 6: Attach hardware J1 into top panel (1), bottom panel (2), side panel (3) and (4) using hardware J2 with a
screwdriver (not provided).
DO NOT use any power tools as this may damage the frame and will invalidate any claim.
01
01
02
02
03
03
03
04
04
04
05
05
05
06
06
06
06
06
06

5
Page of 7
Vendor: S000350
Step 7: Attach metal frame (12) to metal bone (13) using hardware D and I.
DO NOT use any power tools as this may damage the frame and will invalidate any claim.
D
I
12
I x 8
D
Step 8: Attach metal frame (12) to bottom panel (2) using hardware D and H.
DO NOT use any power tools as this may damage the frame and will invalidate any claim.
D
H
12
H x 4
D
02 03
05 06
06
12
12
12
12
13
13
13
13
6
Page of 7
Vendor: S000350
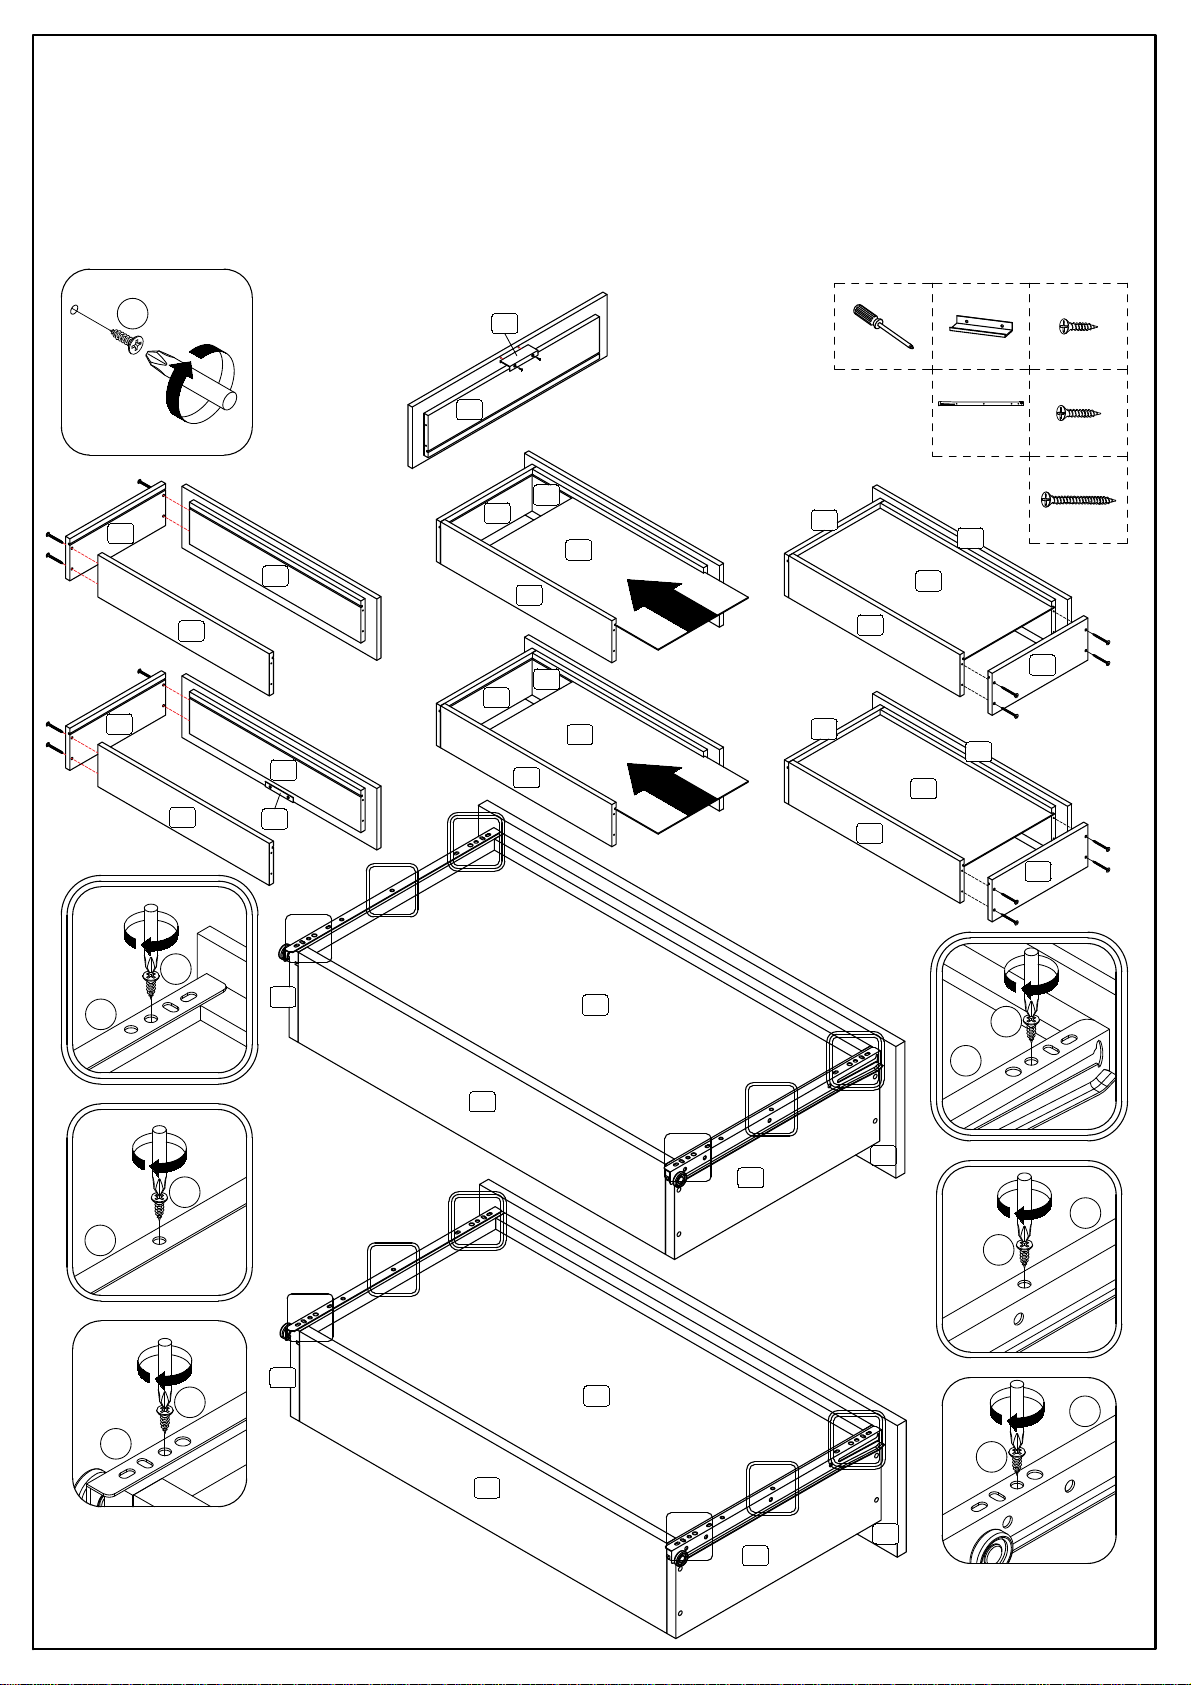
Step 9: Assemble the hardware K to the drawer front down (8) using hardware E.
1. Attach 1x drawer side (9) to the drawer front up (7) and drawer front down (8) and
the drawer back (10) using hardware G.
2. Slide in the drawer bottom (11) then attach the other drawer side (9) using hardware G.
3. Attach the hardware L2 to the drawer sides (9) using hardware F.
Repeat this process for the other drawers.
DO NOT use any power tools as this may damage the frame and will invalidate any claim.
L2
L2
L2
F
F
F
F
F
F
L2
L2
L2
F x 24
( L/R )
L2 x 8
G x 32
E
E x 6K x 3
07
07
07
07
08
08
08
08
09
09 09
09
09
09
09
09
09
09
10
10
10
10
10
10
10
10
11
11
11
11
11
11
K
K
X3
08 X3
09
09
X3
X3
X3
X3
X3
X3
X3
X3 X3
X3
X3
X3
X3
X3
X3
X3
X3
X3

Page of 7
Vendor: S000350
Step 10: Assemble the drawer in place along the drawer slides.
DO NOT use any power tools as this may damage the frame and will invalidate any claim.
L1
L2
L1
L2
Additional Information:
· For complete product information, images and dimension diagrams please visit the website
www.birlea.com
· If you have any issues with your item please contact the retailer directly you purchased it from
who will be able to resolve any issues with Birlea.
our #birleahome feature on instagram.
PLEASE NOTE that wall fixings are not supplied as different wall materials require different fixing
devices. You must use fixings devices suitable for the type of wall you intend to mount product to.
Ensure the head of any screw used has a diameter greater than the mounting hole and the fixing
is safe and secure before use.
Birlea Furniture advise you use the hardware M ( 2 pcs ) are provided to further enhance the safety
of this product.
Step 11: To secure the item to the wall use hardware G, M and N using a screwdriver (not provided).
Then attach hardware part M to top panel (1) using hardware F with a screwdriver (not provided).
DO NOT use any power tools as this may damage the frame and will invalidate any claim.
G
M
N
1.
M
F
2.
F x 2
G x 2
M x 2
N x 2
Not Provided.
Not Provided.
01
04
07
08
08
08
12
12
13
13
K
K
K
7

www.happybeds.co.uk
General Care & Maintenance
Please dispose of all packaging safely.
Wipe clean with a slightly damp cloth.
Avoid the use of all household cleaners and abrasives.
Periodically check all screw & fixings to ensure they are secure.
When moving your product, carefully lift into place. Never drag or push the product across the
floor as this will cause damage to the joints. If the product is used on hard flooring, such as
wood or laminated floor, you must place some protection under the legs to stop the product
from moving. If this is not adhered to, it could result in failure to the product that will invalidate
the warranty.
For more information on cleaning and product care visit:
https://www.happybeds.co.uk/help-and-advice
We’ve tried to make this product as easy to assemble as possible. In the unlikely event that
you have problems putting it together or have damaged or missing pieces, please contact
us by visiting:
https://www.happybeds.co.uk/customer-service
Notes
Table of contents
Other Happy Beds LCD Drawer manuals


