Harbor Freight Tools 90567 User manual

DOME TENT
6 PERSON - 2 ROOM
Model 90567
ASSEMBLY INSTRUCTIONS
3491 Mission Oaks Blvd., Camarillo, CA 93011
Visit our Web site at http//www.harborfreight.com
Copyright 2003 by Harbor Freight Tools. All rights reserved. No portion of this
manual or any artwork contained herein may be reproduced in any shape or form
without the express written consent of Harbor Freight Tools.
For technical questions, please call 1-800-444-3353.
®
90567.p65 9/26/03, 9:54 AM1

PRODUCT SPECIFICATIONS
SAVE THIS MANUAL
You will need this manual for the safety warnings and precautions, assembly,
inspection, maintenance and cleaning procedures, parts list and assembly dia-
gram. Keep your invoice with this manual. Write the invoice number on the
inside of the front cover. Keep this manual and invoice in a safe and dry place for
future reference.
GENERAL SAFETY WARNINGS AND PRECAUTIONS
1. Keep camping area clean and organized. Cluttered camping areas invite
injuries.
2. Proper Dome Tent location: Make sure the Dome Tent is located on a flat,
level, ground surface. Do not use the Dome Tent in high wind conditions.
3. Use eye protection. Wear ANSI approved safety impact eye goggles when
SKU 90567 PAGE 2
assembling this product. ANSI approved safety impact eye goggles are available
from Harbor Freight Tools. Wear gloves when assembling the fiberglass tent
poles.
4. When assembling, do not overreach. Keep proper footing and balance at all
times to prevent tripping, falling, back injury, etc.
5. Check for damaged parts. Before using this product, carefully check that it will
operate properly and perform its intended function. Check for damaged parts
and any other conditions that may affect the operation of this product. Replace
or repair damaged or worn parts immediately.
ITEM DESCRIPTION
Occupancy Capacity Sleeps Six
Polyester Walls / Polyethelene Floor
Material Fiberglass Poles
Overall Size 8’ Wide x 12’ Long x 76” High
Rainfly Size 96” Wide x 12’9” Long
Door Type Double “D” Style w/Screen
Zipper Type Nylon Dual Pull Style
Divider Flap Dimensions 6’6” High x 6’6” Long w/Elastic Cord & Hooks
Weight 17.0 Pounds
90567.p65 9/26/03, 9:54 AM2

13. Replacement parts and accessories: When servicing, use only identical re-
placement parts. Only use accessories intended for use with this product. Ap-
proved accessories are available from Harbor Freight Tools.
14. Use the right camping equipment. There are certain applications for which
this product was designed. It will do the job better and more safely at the capac-
ity for which it was intended. Do not modify this product, and do not use this
product for a purpose for which it was not intended.
15. WARNING: The warnings, precautions, and instructions discussed in this
manual cannot cover all possible conditions and situations that may occur. The
user must understand that common sense and caution are factors, which cannot
be built into this product, but must be supplied by the user.
SKU 90567 PAGE 3
6. WARNING! Keep all flame and heat sources away from the Dome Tent. The
Dome Tent is not fireproof. The fabric will burn if left in continuous contact with
any flame source. Do not pitch the Dome Tent near an open flame. Do not leave
campfires unattended. Do not use lighted candles, matches, or other flame
sources in or near the Dome Tent. Do not use heating, lighting, or cooking equip-
ment with open flames in or near the Dome Tent. Do not spray the Dome Tent
with insecticide.
7. WARNING! Never use any fuel burning device that produces fumes (including
stoves, lanterns, candles, hibachis, or heaters) in or around the Dome Tent.
Inhalation of fumes may result in carbon monoxide poisoning, injury and/or
death.
8. Always extinguish campfires before leaving the camping area.
9. Use care when using electricity and lighting in and near the Dome Tent.
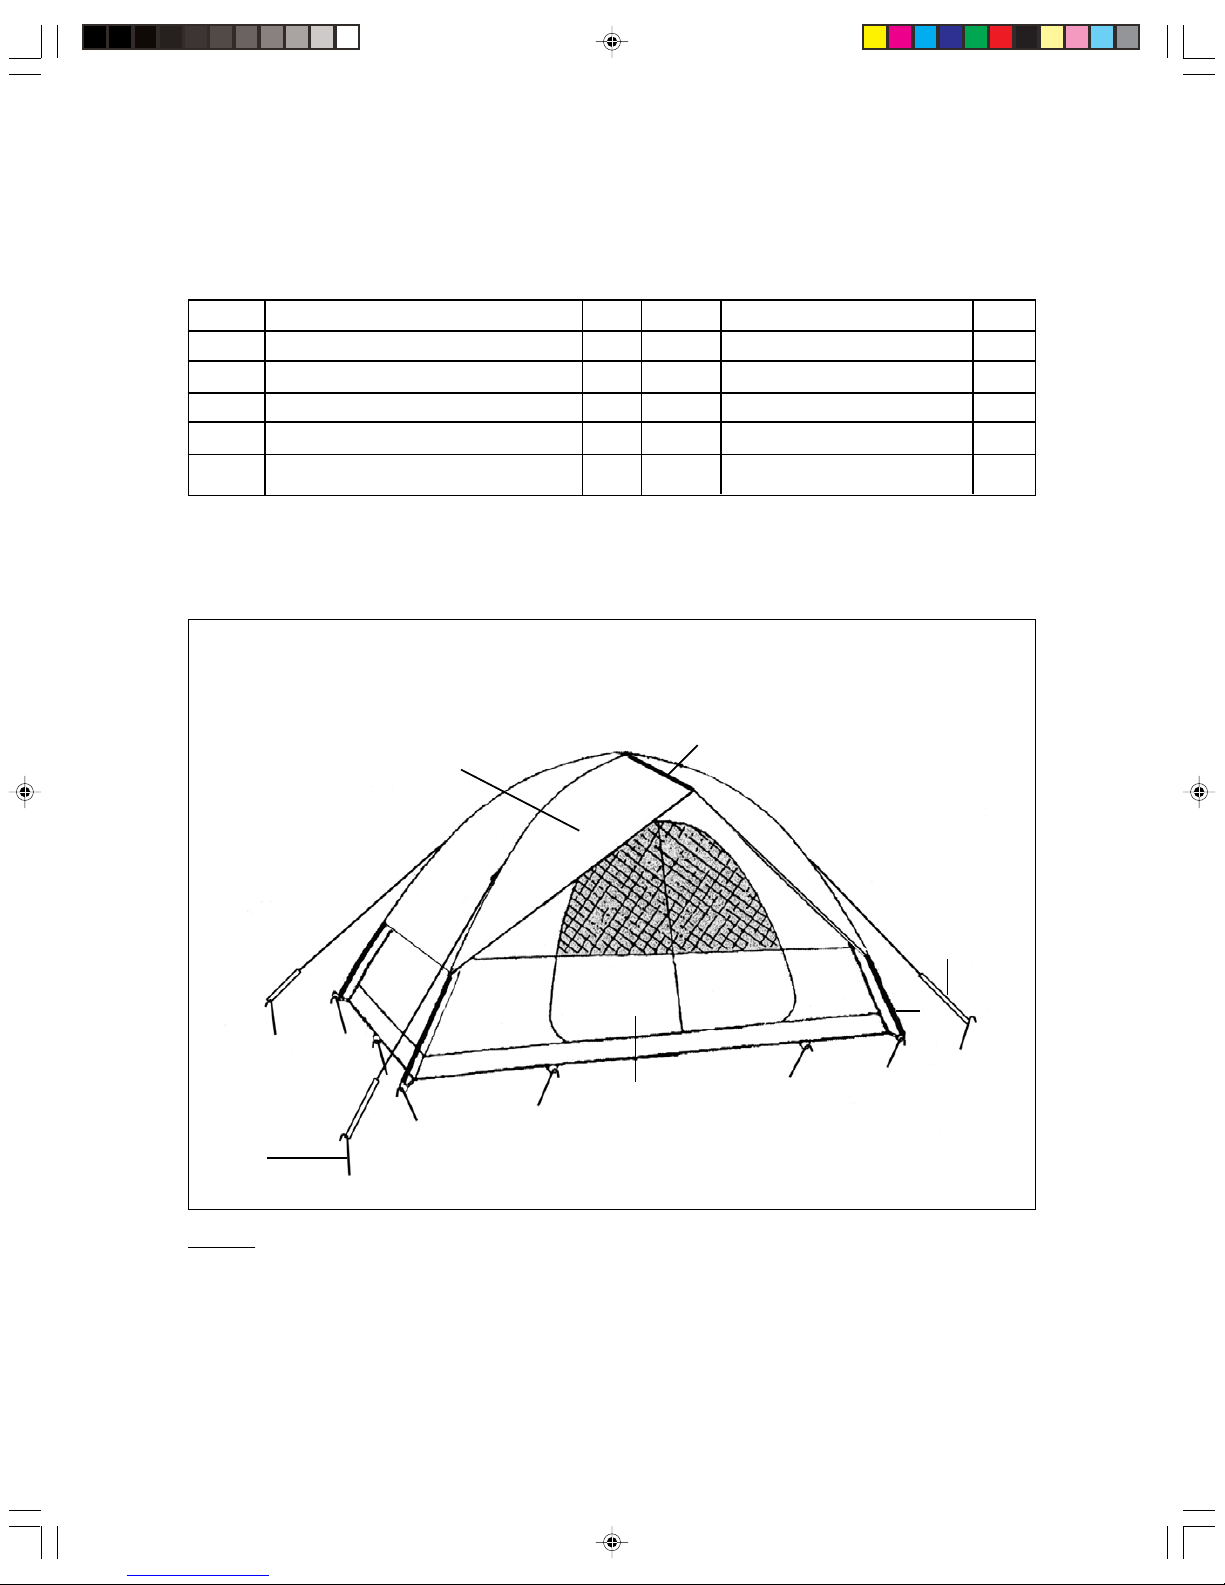
10. Always use a hammer or mallet when driving the Steel Stakes (part #8) into
the ground.
11. Properly store the Dome Tent when not in use. The Dome Tent must never
be rolled up or packed while it is damp, as mildew will quickly form. To ensure
the Dome Tent’s longevity, allow it to completely dry before rolling and storing.
12. The Dome Tent is water repellent, not waterproof. During heavy rain, some
leakage may occur. Keep objects from touching the inside of the Dome Tent, as
objects may cause leakage at the point of contact. Water pockets may also form
in the roof if the Dome Tent is not assembled taut.
90567.p65 9/26/03, 9:54 AM3

UNPACKING
When unpacking, check to make sure all the parts shown on the Parts List (page 9) are
included. If any parts are missing or broken, please call Harbor Freight Tools at the
number shown on the cover of this manual as soon as possible.
ASSEMBLY INSTRUCTIONS
NOTE: For additional references to the parts listed in the following pages, refer to the
Assembly Diagram (page 9). Always wear gloves when handling the fiberglass
poles.
1. Spread out the Dome Tent on a smooth, level area with the doorway facing the
desired direction. (See Figure A.).
2. Connect the Shock-Corded Tent Pole sections (part #1) making sure that the rods
fit securely in canopy sleeves, and insert the two Poles completely and evenly
through the diagonal Pole Slots on the Tent Body (part #3). CAUTION! Wear
ANSI approved safety impact goggles when assembling the Shock-Corded
Tent Poles, as the Poles are under considerable tension and may suddenly
whip back toward the face and/or body. (See Figure A.)
SKU 90567 PAGE 4
SHOCK-CORDED
TENT POLE
(#1)
SHOCK-CORDED
TENT POLE
(#1)
POLE SLOT
POLE SLOT POLE SLOT
POLE SLOT
TIE-STRIP
TENT DOORWAY
FIGURE A
3. Secure the two Shock-Corded Tent Pole sections (part #1) to the Tent Body
(part #3), using the Tie-Strip located at the top of the Dome Tent.
(See Figure A.)
90567.p65 9/26/03, 9:54 AM4

ance, arch one Shock-Corded Tent Pole (part #1) at a time and insert the
Pin-Ring into the ends of the Shock-Corded Tent Pole (part #1). Repeat this
Step for the remaining Shock-Corded Pole. (See Figure B.)
SHOCK-CORDED
TENT POLE
(#1)
PIN-RING
FIGURE B
5. Locate the Clips at each corner of the Dome Tent. Then, snap the Clips onto the
Shock-Corded Tent Poles (part #1). (See Figure C.)
SHOCK-CORDED
TENT POLE
(#1)
CLIP
FIGURE C
6. Secure the Dome Tent to the ground by driving Steel Stakes (part #8) through the
Pin-Rings at the bottom/corners of the Tent. Drive Steel Stakes through the
SKU 90567 PAGE 5
4. Locate the four Pin-Rings at the bottom/corners of the Dome Tent. With assist-
90567.p65 9/26/03, 9:54 AM5

Webbing Loops located on all four sides at the base of the Dome Tent.
(See Figure D.)
STEEL
STAKE
(#8)
WEBBING
LOOP
PIN-RING
FIGURE D
SHOCK-CORDED
TENT POLE
(#1)
7. Locate the Pole Pockets on the underside of the Rainfly (part #4). Insert one end
of the Shock-Corded Rainfly Pole (part #2) into a Pole Pocket. Flex the Shock-
Corded Rainfly Pole and insert its other end into the opposite Pole Pocket.
(See Figure E.)
8. Secure the Rainfly (part #4) to the Shock-Corded Rainfly Pole (part #2) by tying
the Tie-Strip around the Rainfly Pole. (See Figure E.)
SHOCK-CORDED
RAINFLY POLE
(#2)
TIE-STRIP
RAINFLY
(#4)
POLE POCKET
GUY ROPE
W/ADJUSTER
(#9)
UNDERSIDE VIEW OF RAINFLY
FIGURE E
SKU 90567 PAGE 6
90567.p65 9/26/03, 9:54 AM6

9. Position the Rainfly (part #4) over the Dome Tent, Shock-Corded Pole (part #2)
side down, and centered over the doorway. (See Figure F.)
10. Attach the four Guy Ropes w/Adjusters (part #9) to the Webbing Rings of the
Rainfly (part #4). One at a time, stretch each Guy Rope until the Rainfly be
comes taut. Then, secure the Guy Rope to the ground by driving Steel Stakes
(part #8) through the openings in the Guy Ropes. (See Figure F.)
GUY ROPE
W/ADJUSTER
(#9)
STEEL STAKE
(#8)
RAINFLY
(#4)
WEBBING
RING
FIGURE F
11. Once the Dome Tent is assembled and staked to the ground, the interior Room
Divider (part #10) may be attached to the inside/top of the Tent.
INSPECTION, MAINTENANCE, AND CLEANING
1. Before each use, inspect the general condition of the Dome Tent. Check for rips
and tears, cracked, bent, or broken parts, loose seams, and any other condition
that may affect its safe operation. If a problem occurs, have the problem cor-
rected before further use. Do not use damaged equipment.
2. When taking down the Dome Tent, unzip all doors and windows and collapse
the Tent. Disassemble the Poles, and place the Poles in the Pole Bag (part #6).
Do not remove the Steel Stakes from the ground by pulling on the Webbing
Rings. This may cause the Webbing Rings to tear out of the seam. Then, place
SKU 90567 PAGE 7
90567.p65 9/26/03, 9:54 AM7

SKU 90567 PAGE 8
the Steel Stakes in the Stake Bag (part #7). IMPORTANT: To avoid mildew,
make sure the Dome Tent is completely dry before storing it in the Tent Bag
(part #5).
3. TO CLEAN, use only water and a mild detergent.
PLEASE READ THE FOLLOWING CAREFULLY
THE MANUFACTURER AND/OR DISTRIBUTOR HAS PROVIDED THE PARTS LIST AND ASSEM-
BLY DIAGRAM IN THIS MANUAL AS A REFERENCE TOOL ONLY. NEITHER THE MANUFACTURER
OR DISTRIBUTOR MAKES ANY REPRESENTATION OR WARRANTY OF ANY KIND TO THE BUYER
THAT HE OR SHE IS QUALIFIED TO MAKE ANY REPAIRS TO THE PRODUCT, OR THAT HE OR
SHE IS QUALIFIED TO REPLACE ANY PARTS OF THE PRODUCT. IN FACT, THE MANUFACTUER
AND/OR DISTRIBUTOR EXPRESSLY STATES THAT ALL REPAIRS AND PARTS REPLACEMENTS
SHOULD BE UNDERTAKEN BY CERTIFIED AND LICENSED TECHNICIANS, AND NOT BY THE
BUYER. THE BUYER ASSUMES ALL RISK AND LIABILITY ARISING OUT OF HIS OR HER RE-
PAIRS TO THE ORIGINAL PRODUCT OR REPLACEMENT PARTS THERETO, OR ARISING OUT
OF HIS OR HER INSTALLATION OF REPLACEMENT PARTS THERETO.
90567.p65 9/26/03, 9:54 AM8

PARTS LIST
SKU 90567 PAGE 9
ASSEMBLY DIAGRAM
1
2
3
4
5: TENT BAG NOT SHOWN.
6: POLE BAG NOT SHOWN.
7: STAKE BAG NOT SHOWN.
8
9
NOTE: Some parts are listed and shown for illustration purposes only, and are not
available individually as replacement parts.
10: ROOM DIVIDER NOT SHOWN.
Part # Description Qty Part # Description Qty
1 Shock-Corded Tent Pole 2 6 Pole Bag 1
2 Shock-Corded Rainfly Pole 1 7 Stake Bag 1
3 Tent Body 1 8 Steel Stake 14
4 Rainfly 1 9 Guy Rope w/Adjuster 4
5 Tent Bag 1 10 Room Divider 1
90567.p65 9/26/03, 9:54 AM9
Table of contents
Other Harbor Freight Tools Tent manuals

Harbor Freight Tools
Harbor Freight Tools BIG TOP 92942 Installation manual

Harbor Freight Tools
Harbor Freight Tools CoverPro 62860 User manual

Harbor Freight Tools
Harbor Freight Tools 62858 Assembly instructions

Harbor Freight Tools
Harbor Freight Tools BIG TOP 92928 User manual

Harbor Freight Tools
Harbor Freight Tools CoverPro User manual

Harbor Freight Tools
Harbor Freight Tools 69456 Assembly instructions

Harbor Freight Tools
Harbor Freight Tools 69039 Assembly instructions

Harbor Freight Tools
Harbor Freight Tools 90857 User manual