Harbortronics VG-D70 User manual
VG-D70
Vertical / Battery Grip for the Nikon D70
Harbortronics LLC
Post Office Box 2663
Gig Harbor, WA. USA
98335
253-858-7769 (Phone)
253-858-9517 (Fax)
Sales & Service: Deborah@Harbortronics.com
VG-D70 – User’s Guide
Overview
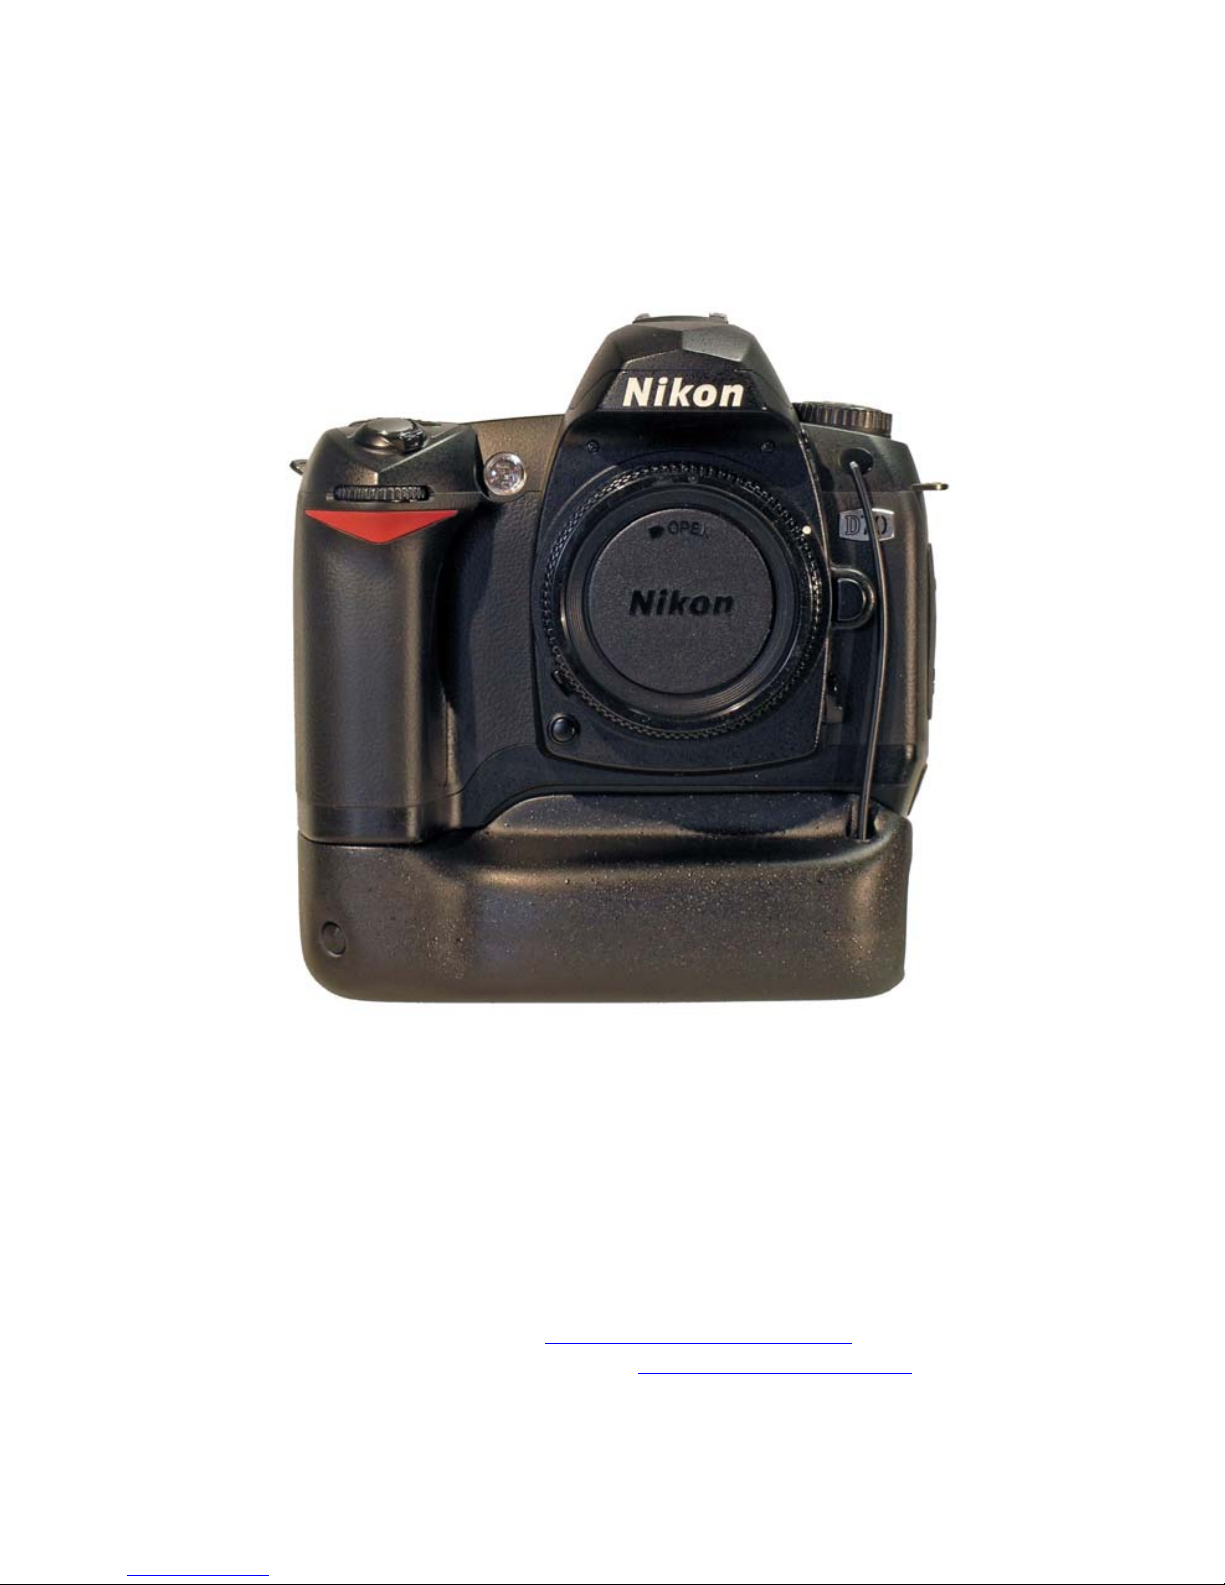
The VG-D70 is an aftermarket grip for the Nikon D70 digital SLR
camera. The VG-D70 :
• provides a means of holding the camera in a vertical orientation
without changing the orientation of the hand,
• allows for a second battery, essentially doubling the number of
shots on a charge,
• adds a second shutter release button, used in portrait
orientation.
• provides additional length to the camera body when held
horizontally (landscape), particularly useful with larger hands,
• increases the mass of the camera, helping to damp handheld
movement,
• provides a standard connector for use with remote release
cables, stereo camera connections, and other remote control
equipment,
• provides an alternate connection for external power, using an
industry standard connector,
• includes a place to store the camera’s battery door,
• retains a tripod mounting thread (metal).
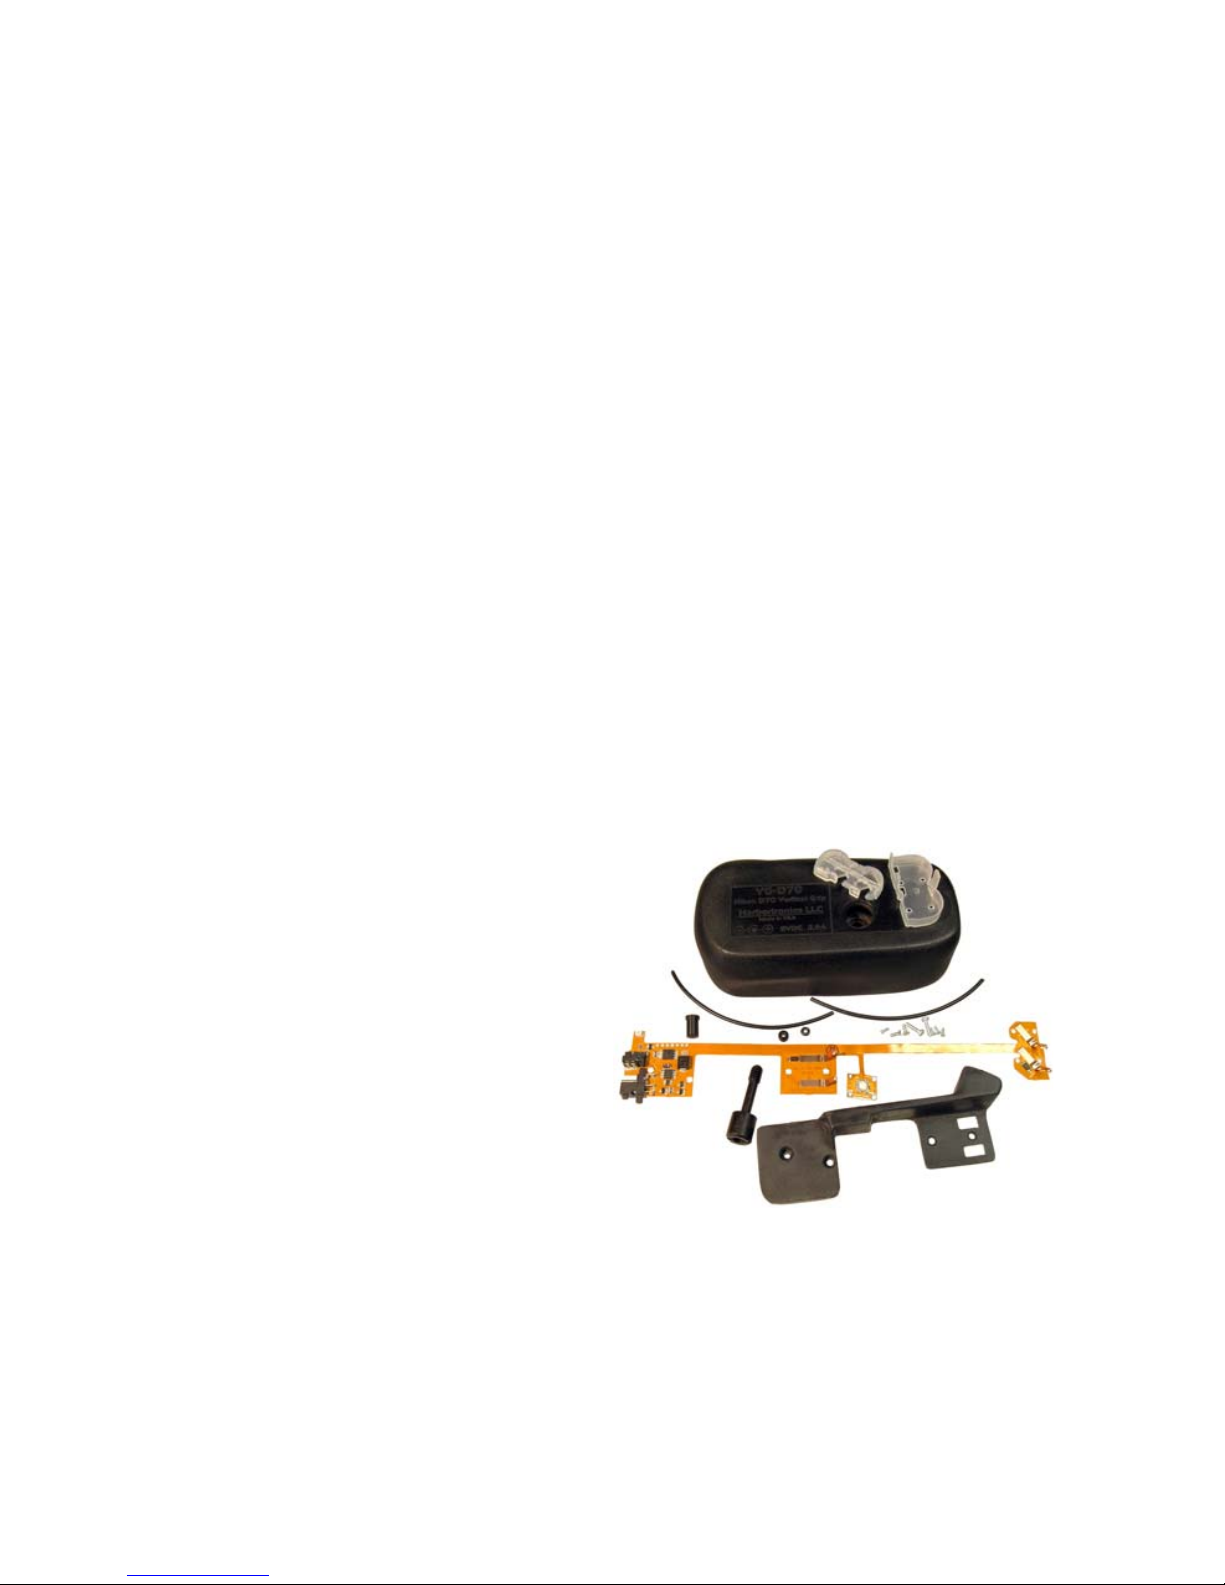
Items included:
VG-D70 grip (Fully assembled)
Fiber optic cable (spare included)
Users Guide (this document)
Installation
1) Remove D70 battery
door, store in the grip
2) Install battery packs
(one or two)
3) Attach to camera
4) Install shutter release connection
(fiber optic cable or optional jumper cable)
Harbortronics LLC 2 3/5/2005
VG-D70 – User’s Guide
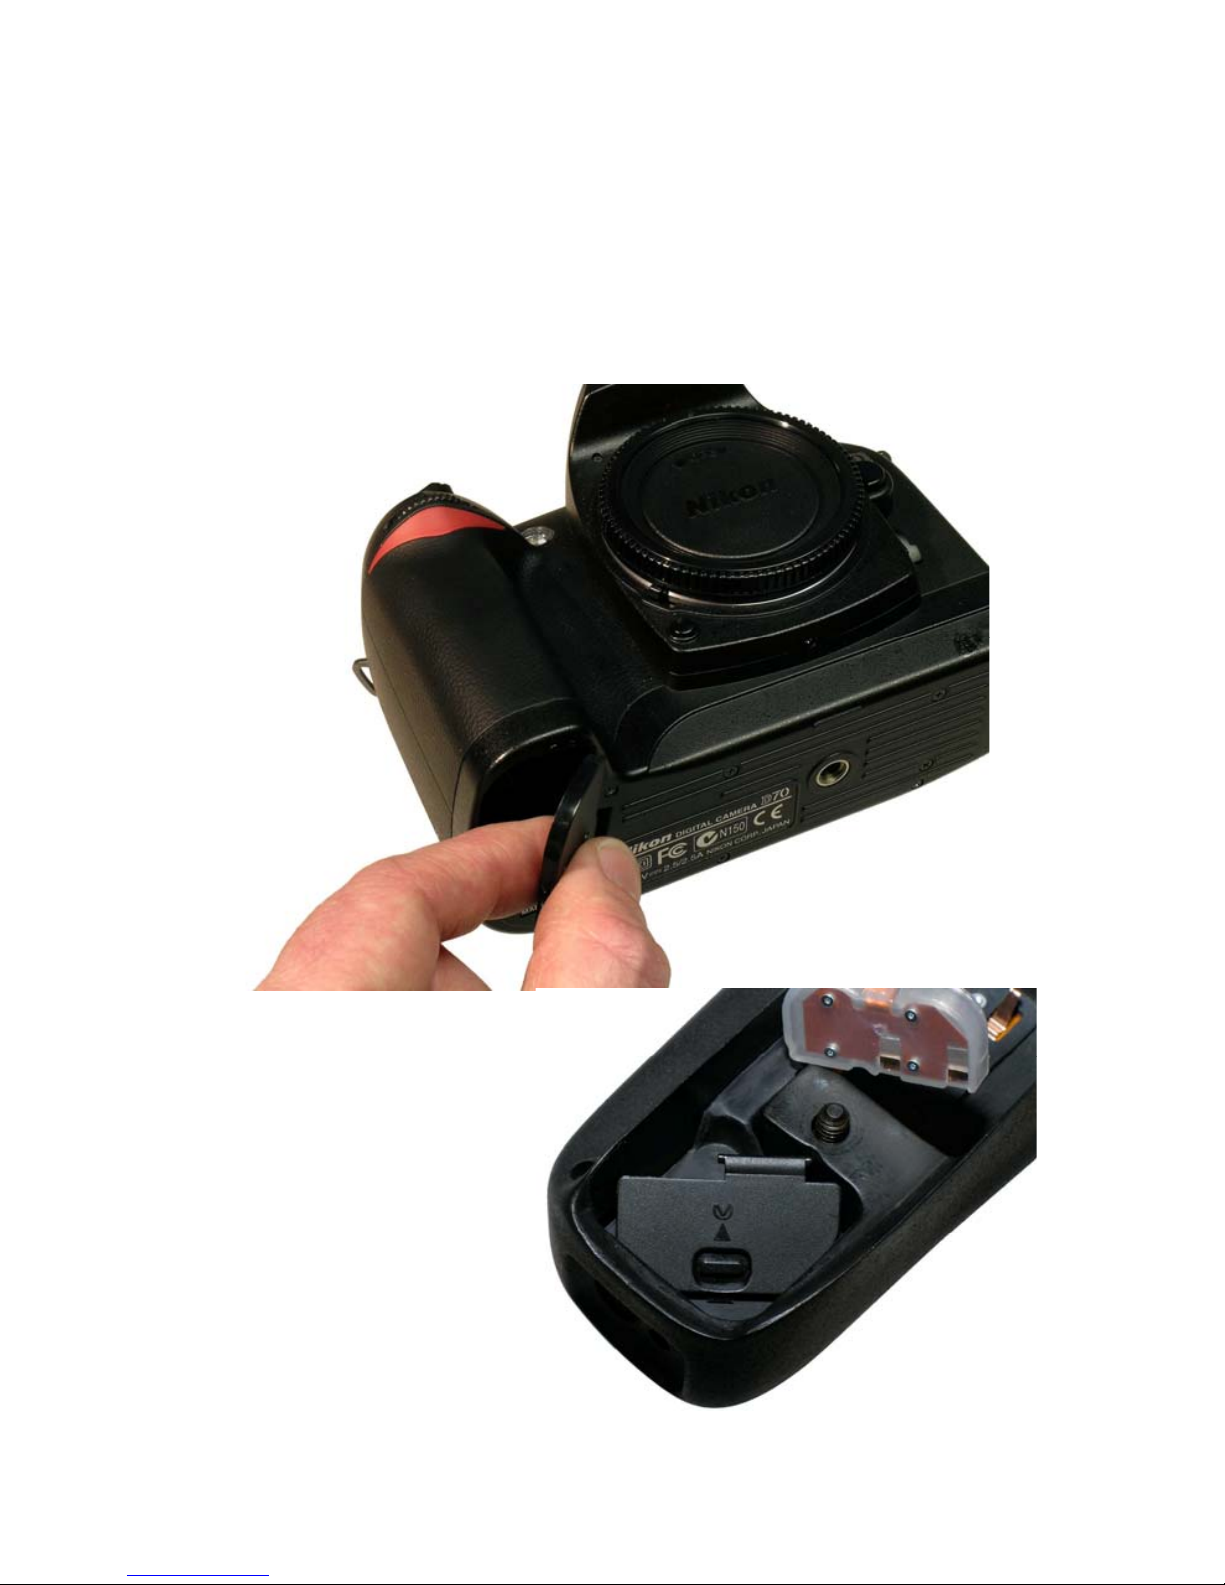
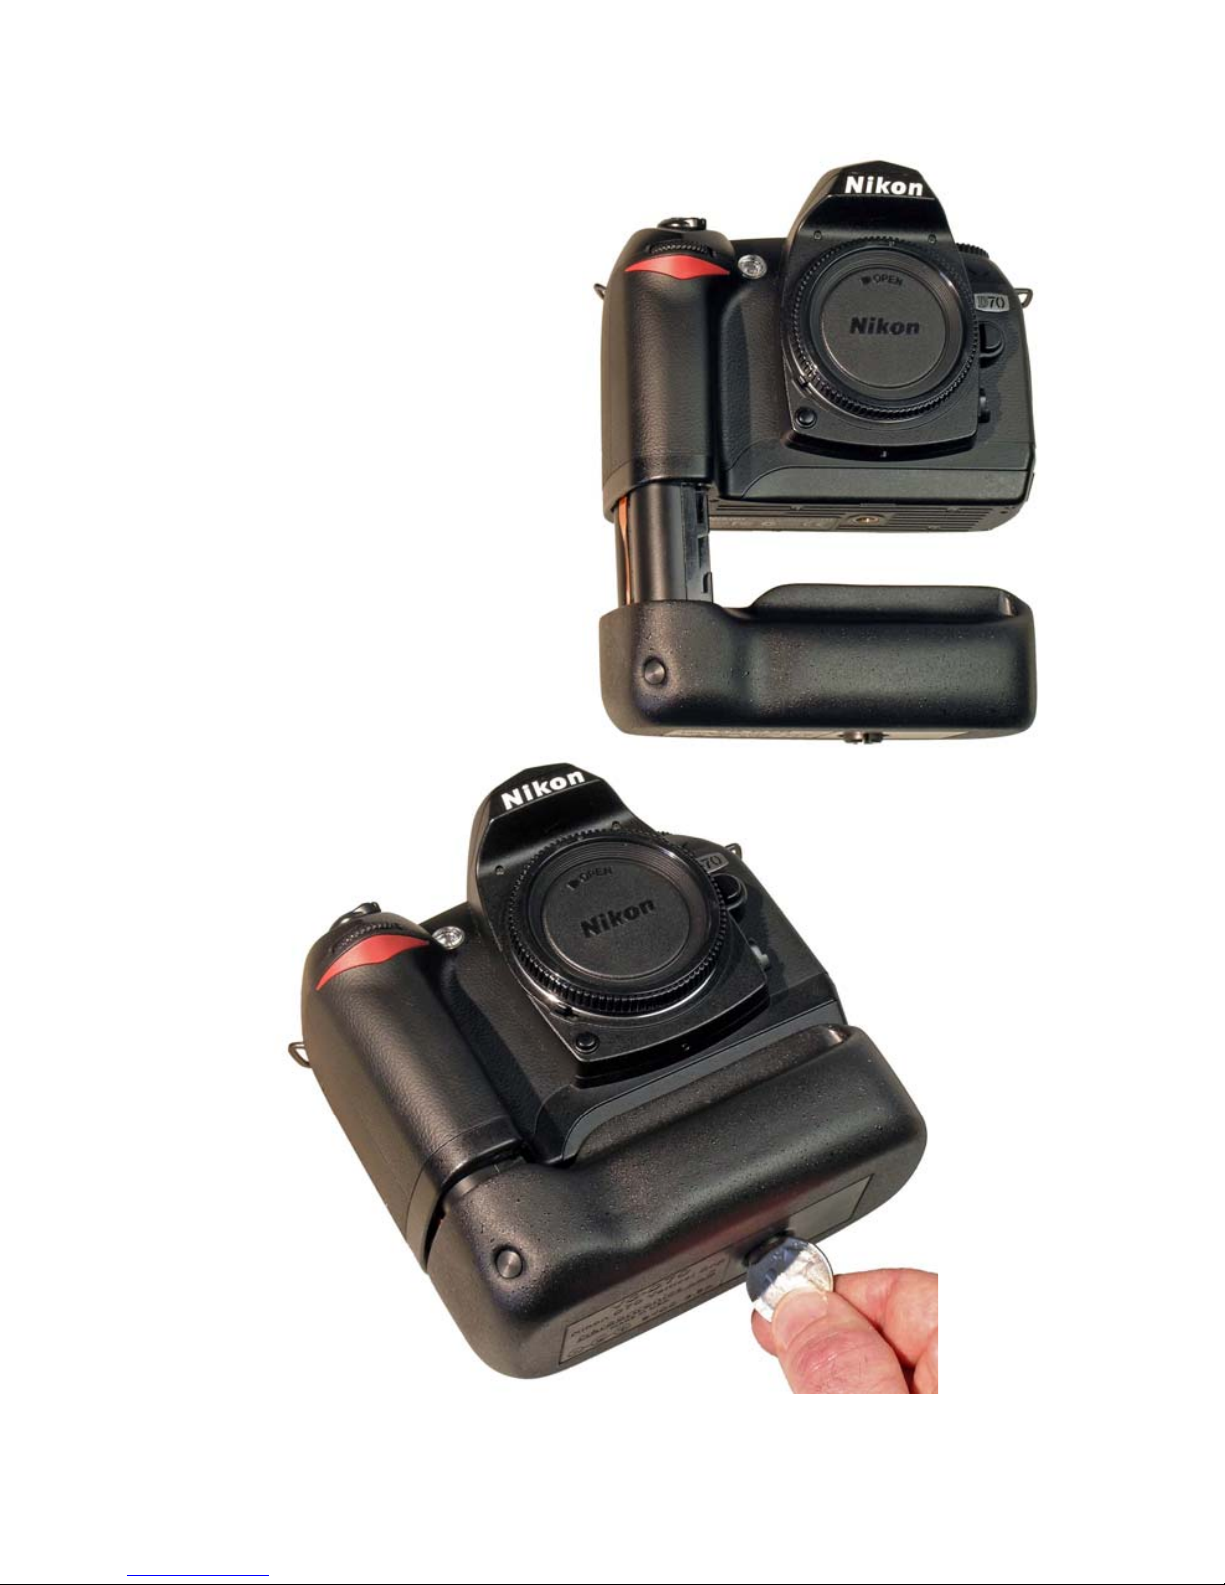
D70 Battery Door
First, place the grip on a table… flat side down. (Whew, that was easy!)
Open the battery door on the D70, remove the battery pack, and carefully
pull the door off, with it angled it at a point midway between opened and
closed. The door can be easily removed and re-installed, with no damage
to the door or the camera.
You may want to store
the battery door in the
VG-D70, so that you
don’t lose it! The door
fits nicely into the grip in
this orientation.
Harbortronics LLC 3 3/5/2005
VG-D70 – User’s Guide
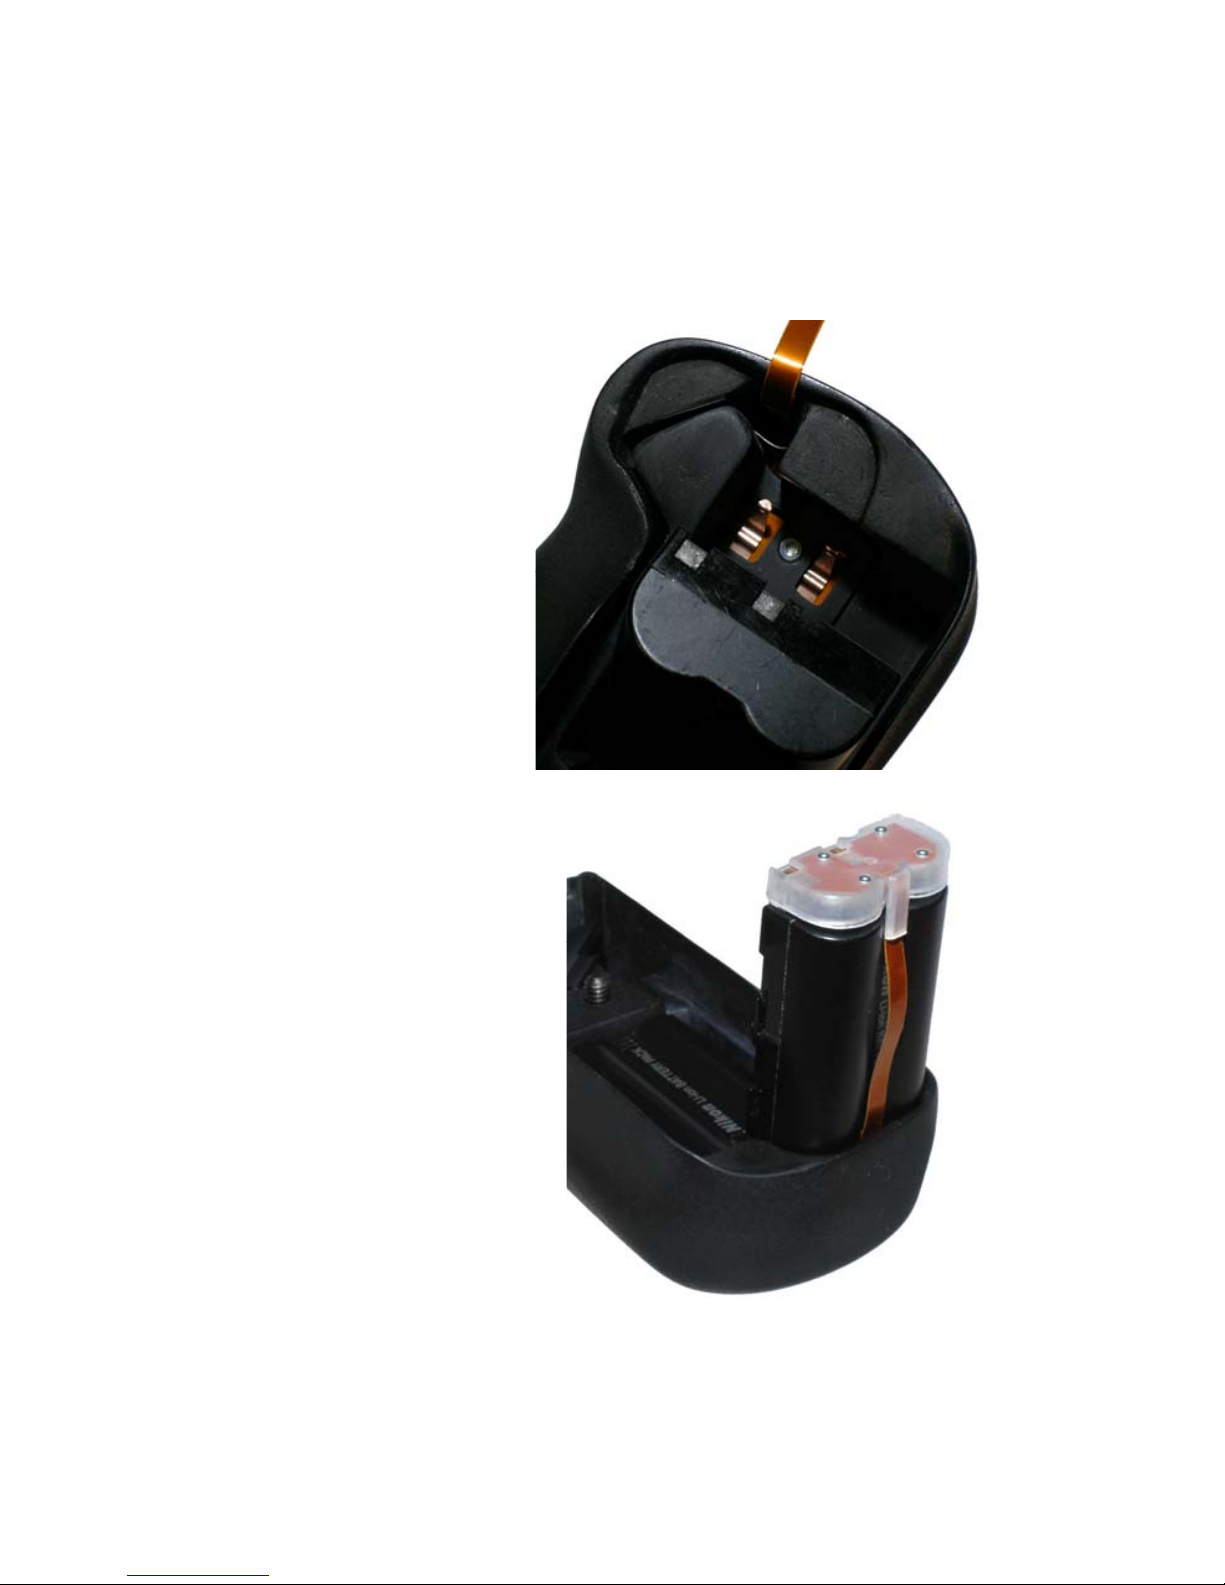
Battery Packs
The VG_D70 can operate with one or two battery packs installed. It
doesn’t matter if one of the battery packs is not charged. The grip will
automatically use the battery with the greater charge.
If two battery packs are
desired, simply drop one
into the bottom of the
grip, so that the battery
pack’s metal contacts will
touch the exposed springs
in the grip. If you install
this battery pack
incorrectly, nothing will
be damaged, but this
battery won’t be
connected.
If you use one or two packs,
one must be placed upright
on the grip, and the tethered
battery cap dropped over the
end of the battery pack.
There are contacts in the cap
which mate with the battery
pack, and the orientation
becomes obvious when you
handle it.
Harbortronics LLC 4 3/5/2005
VG-D70 – User’s Guide
Harbortronics LLC 5 3/5/2005
ttach
a
Attach to the camera
Slide the camera down on top
of the grip, guiding the battery
pack and cap into the battery
compartment. When seated,
tighten the screw firmly to
fasten the grip to the camera.
A coin will work nicely as a
screwdriver. The mounting
screw is also threaded to a
the VG-D70 and camera to
tripod.
Be a little careful when
removing the grip… the tether
to the battery cap is tough, but
it’s not indestructible!
VG-D70 – User’s Guide
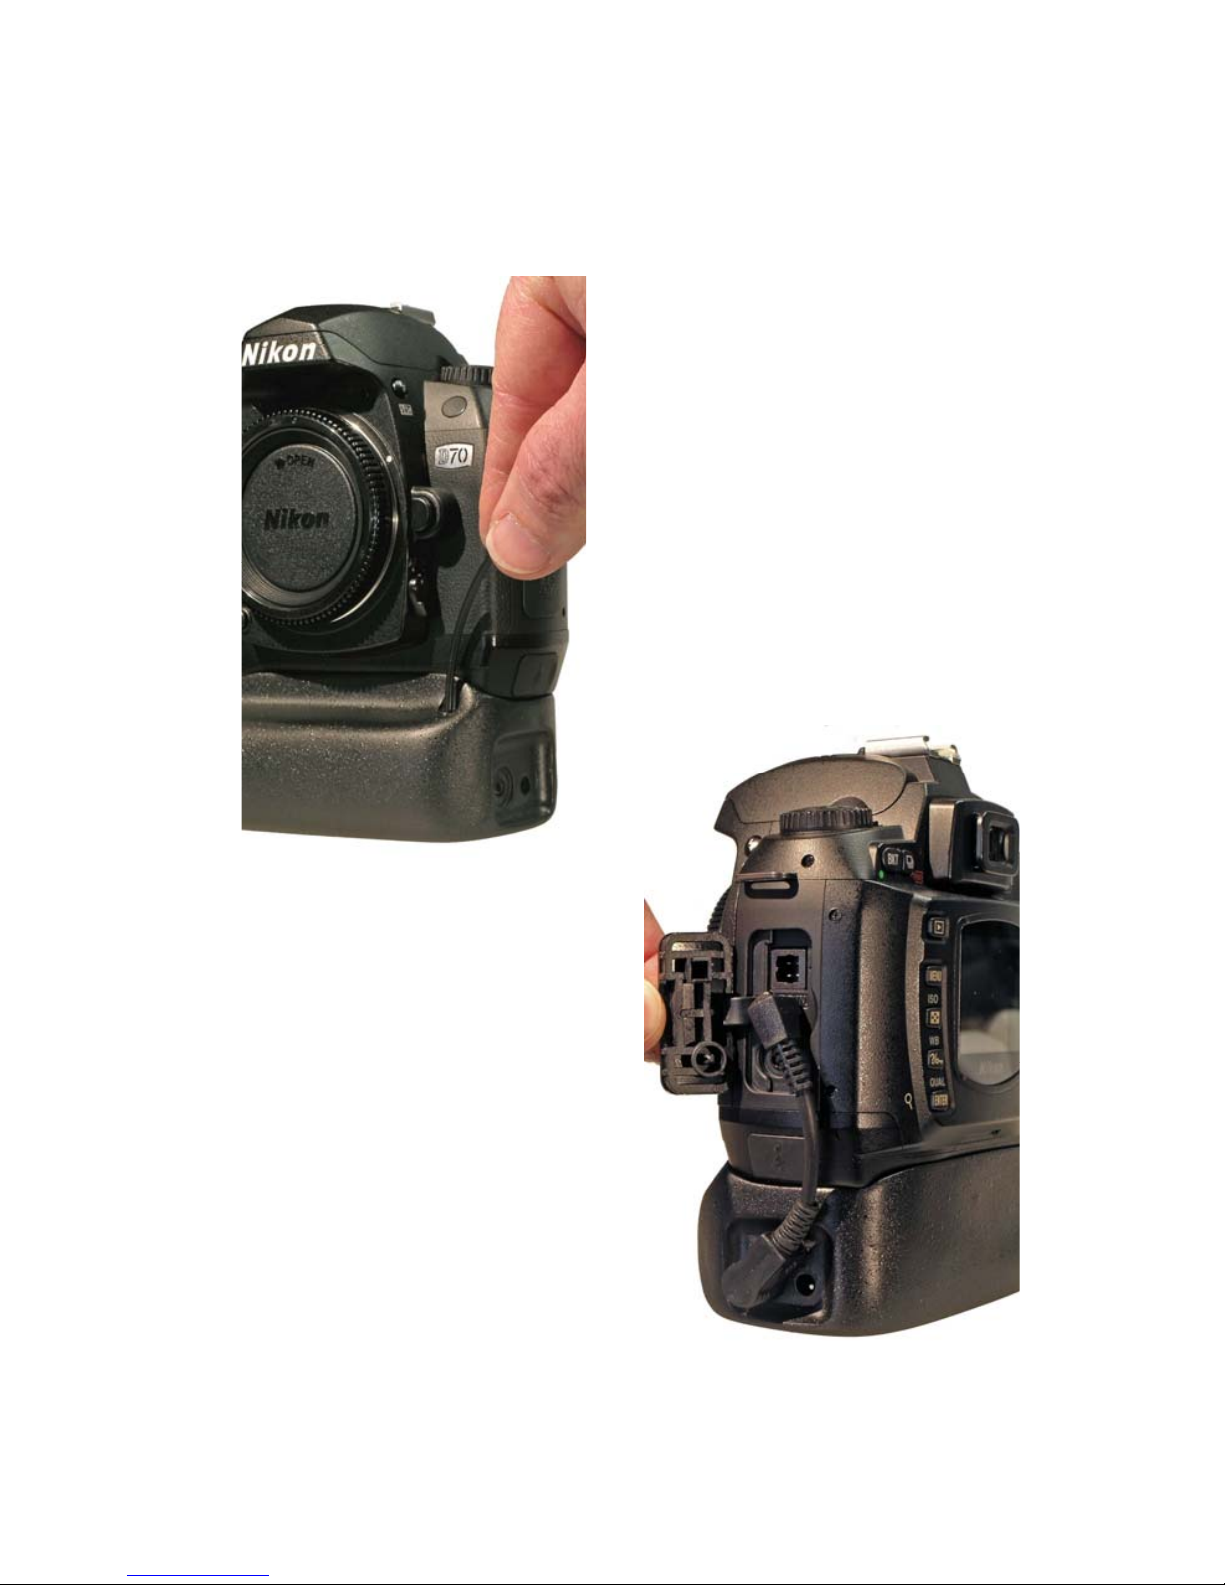
Shutter Release Connection
Fiber Optic IR Cable
The fiber optic cable simply slides
into the small hole on the front of
the grip. Push the cable in fully, and
then rotate so that it’s natural curve
places the exposed point of the fiber
near the sensor on the front of the
camera.
If the fiber optic connection is not
used, the cable can be removed and
laid inside the grip. This is a good
place to keep the spare cable as
well.
Optional Jumper Cable
If your D70 camera body has been
modified with a remote control jack
(see the Harbortronics website for
more information), then you may
install a short jumper cable between
the camera and the VG-D70, giving
you full control over the camera
shutter release functions.
The jumper cable is an optional
accessory from Harbortronics, and
simply plugs into the jacks on the
camera and the grip.
If you use the shutter release jumper
cable, you won’t need the fiber optic
cable, and may remove it.
Harbortronics LLC 6 3/5/2005

VG-D70 – User’s Guide
Shutter Release Operation
Fiber Optic IR Cable
Nikon does not provide an electrical socket for controlling the D70’s
shutter. However, the camera does have an IR (infrared) sensor, which
can be used with an optional IR remote control transmitter (Nikon ML-
L1, ML-L3, Harbortronics DigiSnap 2100 time-lapse controller, etc.).
The VG-D70 also has an internal IR transmitter, which shines up through
a plastic fiber optic cable onto the sensor.
When the shutter release button on the VG-D70 is fully pressed, the
internal transmitter will transmit the appropriate code to the camera to
activate the shutter. The IR transmitter uses very low power, and is
always ready to operate.
If you are not familiar with the operation of the camera with an IR remote
control, please review that section of the camera manual. In summary
though, you just set the camera shooting mode to ‘quick response
remote’. There are some quirks however, when using the camera in this
mode.
1) The camera will shut off the remote sensor after a period of
time, if not actively used. We recommend you configure this
for the maximum time, 15 minutes, via the cameras on-screen
menu.
2) When the shooting mode is set for IR remote control, the
shutter release button on the camera operates differently. Half-
pressing the shutter release button on the camera will activate
the metering & focusing functions, but a full-press of the button
will not take the picture. The shutter can only be released via an
IR remote controller.
3) The camera’s IR sensor cannot be used to pre-set the metering /
focusing, as is normally performed by the shutter release half-
press position. This means that the VG-D70 shutter release
button, even through it has a standard two-position shutter
release action, cannot be used to half-press the camera via the
fiber optic cable. When fully pressed, the VG-D70 will cause
the camera to take a picture, performing the metering / focusing
operations as needed.
Optional Jumper Cable
If your camera has been modified to accept a remote cable release,
installing the jumper cable ($25) will allow the VG-D70 shutter release
button to functional in half-press and full-press positions, exactly the
same as the cameras own shutter release button.
Harbortronics LLC 7 3/5/2005

VG-D70 – User’s Guide
Additional Features of the VG-D70
Remote Control Jack
The remote control jack makes use of the common 2.5mm stereo jack
interface, as do the Canon EOS-Rebel cameras (both film and digital).
The jack can serve as an input or an output connection.
When directly connected to a modified D70 body, the utility of the
shutter release button on the VG-D70 is maximized.
Harbortronics LLC 8 3/5/2005
e
When using the fiber
optic connection to the
camera, the VG-D70
can be remotely
controlled via this jack,
with low cost shutter
release cables such as
the RS-60E3 (normally
stocked at
Harbortronics), and
other remote control
devices compatible
with EOS-Rebel
cameras.
Two VG-D70’s may b
connected together
with a jumper cable for
stereo control of two
D70 cameras, using the
shutter release button
on either grip, and the
fiber optic connections to the camera. If you have two modified camera
bodies, then you can simply connect the cameras together directly.
External Power Jack
The D70 already has a connection for an AC adapter (Nikon EH-5),
which is very expensive! The VG-D70 provides an additional standard
connector (same as used on the Coolpix cameras) for this same purpose,
allowing use of lower cost AC adapters.
The VG-D70 has internal protection circuitry to prevent damage to the
camera from improper adapters. Reverse polarity connection and
overvoltages are prevented from reaching the camera.

VG-D70 – User’s Guide
Specifications
Physical
Weight 8.4 ounces, 238 grams
Note: EN-EL3 Battery Pack weighs 2.71 oz, 76.8 gm
Length 5.37 inches, 136 mm (max)
Width 2.80 inches, 71.1 mm (max)
Height 1.67 inches, 42.4 mm (max)
Mounted Height Raises the camera by 1.35”
Grip Material High strength polyurethane
Remote Control Jack
Type 2.5mm stereo jack
- Tip Full Press
- Center Half Press
- Base Common (ground)
Internal pullups 47K Ohms to 3.3V
Input Activation 5K Ohms or less to common to activate
Output Impedance < 100 Ohms from dual state switch
Input Voltage 6V, no damage
External Power Jack
Type 1.7 x 4.75 mm coaxial power jack
Polarity Center positive
Maximum Voltage 10V (automatic disconnection)
Battery Sharing
The greatest voltage among two batteries and external power is connected
to camera (Diode-Or connection).
PRICE
MSRP US $165
Service / Warranty
All Harbortronics LLC products are warranted against any manufacturing
defects for a period of one (1) year from the date of purchase. Defective
products should be returned prepaid to Harbortronics. Harbortronics will
at its discretion, repair or replace such products without charge, and will
return to the customer prepaid. Except as mentioned above, no other
warranty expressed or implied, applies to this Harbortronics product. All
other claims, of any nature, including but not limited to camera damage
are not covered. This warranty does not cover damage caused by misuse,
accident, or abuse. This warranty does not cover consequential damages
or other incidental damages. Some states do not allow the exclusion or
limitation of incidental or consequential damages, so the above
exclusions may not apply to you. Contact Harbortronics at
www.Harbortronics.com for service instructions.
Harbortronics LLC 9 3/5/2005
Table of contents
Other Harbortronics Camera Accessories manuals


Popular Camera Accessories manuals by other brands

Viltrox
Viltrox EF-NEX Mount instructions

Calumet
Calumet 7100 Series CK7114 operating instructions

Ropox
Ropox 4Single Series User manual and installation instructions

Cambo
Cambo Wide DS Digital Series Main operating instructions

Samsung
Samsung SHG-120 Specification sheet

Ryobi
Ryobi BPL-1820 Owner's operating manual


