Harger Ultraweld UltraShot US500 User manual
1
Instructions
301 Ziegler Drive, Grayslake, IL 60030
Phone: 847-548-8700
Fax: 847-548-8755
Website: www.harger.com
Revised 7.9.12
• Always follow the Welding and General Safety Instructions included with this mold.
• Always follow the Conductor Preparation Instructions included with this mold specific to the connection to be made.
4. Position mold onto conductor(s). See front of the other
instruction sheet included with this mold for positioning
of conductors into mold. Lock mold with handle clamps
or frame, which ever is the case. Note that Handle Clamp
adjustments may be made by removing adjusting screw and
turning eye bolt 180° clockwise to tighten or 180° counter
clockwise to loosen.
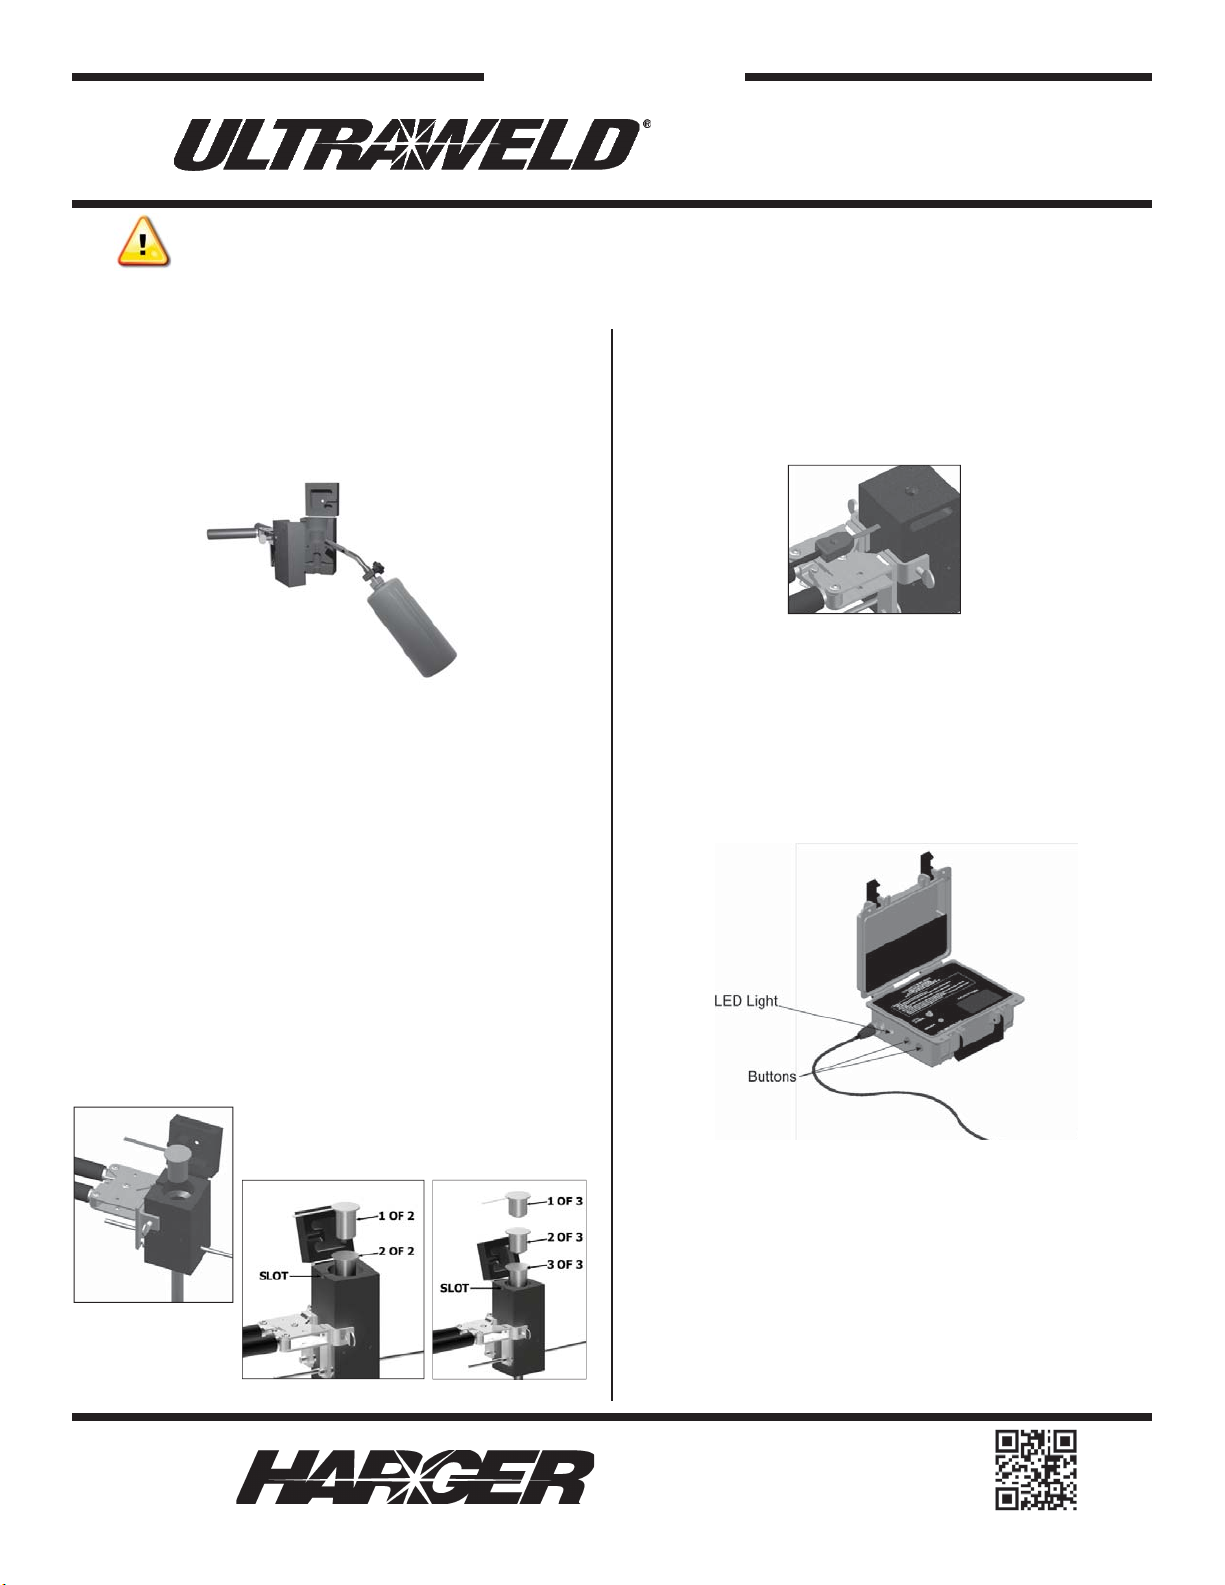
5. If using UltraShot®, drop the weld metal cartridge into the
mold with the igniter exiting the mold through the slot in the
top of the mold. Ensure the lid is closed tightly.
Note: UltraShot®weld metal US500, US750, US1000 and
US1500 are made up of two or three cartridges. To use,
cartridge(s) without an igniter should be dropped into the
mold first. The cartridge with an igniter should be on top
and should be exiting the mold through the slot in the top of
the mold. Ensure the lid is closed tightly.
Ultraweld®UltraShot®Welding Procedures
Step 5 Notes
Step 5
UltraShot®
6c. Simultaneously push and hold both buttons on the side of
the USCONTROLLER until the reaction is initiated and then
release the buttons. Note that the LED light on the side
of the USCONTROLLER will illuminate while both buttons
are pressed. Do not hold buttons for more than 5 seconds.
Should the reaction not occur, wait 30 seconds and remove
the UltraShot®cartridge and insert another cartridge. If it
fails to ignite again, it is likely that the controller needs to be
recharged.
1. Check mold tag for conductors to be welded and proper
weld metal cartridge size to use.
2. Make sure all surfaces and conductors are clean, dry and are
the proper sizes for the mold’s application per mold tag.
3. For the initial connection, torch dry the mold with a hand
operated propane torch.
6a. Before igniting, verify conductor positioning and that mold is
closed completely.
6b. Slide the igniter lead connecter over the end of the igniter.
Push connector until the igniter bottoms out inside the
connector.
6d. After ignition, remove igniter lead immediately.

2
Ultraweld®UltraShot®Welding Procedures
Continued
Ultraweld-UltraShot Welding Procedure Instructions
Battery Type:
• This ignition unit contains a lead-acid battery which is
sealed and maintenance free.
Battery Charging:
• To properly charge this Deep Cycle AGM battery only use
the dual stage charger provided with the USCONTROLLER
unit.
• Never run the battery to a point where it is completely
discharged.
• The dual stage charger provides a trickle charge so it is
impossible to over-charge and damage the battery.
• Charge before each use to achieve optimum performance.
USCONTROLLER
Flint Igniter
Do Not Use Wire Brush to Clean Mold!
7b. Pour the weldmetal (clear cap side) into the mold crucible
on top of the disk.
7c. Open starting powder side (orange cap) and put approxi-
mately two-thirds of the starting material on top of the weld
metal. Close the lid and put the remaining material on top of
the lid near the hole.
7d. Ignite starting material with a flint igniter.
8. Wait approximately 30 seconds before opening mold to
permit metal to solidify.
7a. If using Ultraweld tubes, insert disk in the bottom of the
mold crucible, concave side up. 9. To clean the mold, use a MCBRSH1 natural bristle brush be-
fore making next weld. On horizontally split molds, use end
of mold cleaning spade, a small diameter rod or screw driver
to remove slag from tap hole. Caution should be used when
cleaning molds to avoid burns from contact with hot mold.
This manual suits for next models
3
Other Harger Welding System manuals


Popular Welding System manuals by other brands

Lincoln Electric
Lincoln Electric INVERTEC V350-PRO CE Technical specifications

LENCO
LENCO L-6000 LENCOSPOT MARK III Operator's manual

Lincoln Electric
Lincoln Electric WELDMARK 225 Operator's manual

Miller Electric
Miller Electric Dynasty 700 Specifications

Parkside
Parkside PPSK 40 A1 Operation and safety notes

TOP DC
TOP DC FC 125 Operator's manual


Leister
Leister WELDPLAST S2 operating instructions

Kemppi
Kemppi KEMPOMAT 320 KEMPOMAT 320C operating instructions

Chicago Electric
Chicago Electric 93793 Set up and operating instructions

Car-O-Liner
Car-O-Liner CR510 instruction manual

Parweld
Parweld XTM 201Di Operator's manual

Miller
Miller Big Blue 251D owner's manual