Hark HK0528 User manual

Owner’s Manual
ASSEMBLY, CARE & SAFETY INSTRUCTIONS
Item No. HK0528
PATIO
GAS
SMOKER

Patio Gas Smoker
Warranty Details
The product is guaranteed to be free from defects in workmanship and parts for a period
of 12 months from the date of purchase. Defects that occur within this warranty period,
under normal use and care, will be repaired, replaced or refunded at our discretion. The
benets conferred by this warranty are in addition to all rights and remedies in respect of
the product that the consumer has under the Competition and Consumer Act 2010 and
similar state and territory laws.
Our goods come with guarantees that cannot be excluded under the Australian Consumer
Law. You are entitled to a replacement or refund for a major failure and for compensation
for any other reasonably foreseeable loss or damage. You are also entitled to have the
goods repaired or replaced if the goods fail to be of acceptable quality and the failure does
not amount to a major failure.
After Sales Support
Telephone: 1300 799 787
(03) 9702 8823
Email: [email protected]
YEAR
WARRANTY

3
READ ALL SAFEGUARDS AND INSTRUCTIONS THOROUGHLY!
YOUR SAFETY IS VERY IMPORTANT – FAILURE TO FOLLOW PROPER PROCEDURES AND SAFEGUARDS MAY RESULT
IN PROPERTY DAMAGE OR PERSONAL INJURY.
DANGER DANGER
- This smoker is for OUTDOOR USE ONLY.
- Never operate this smoker unattended.
- The use of alcohol, prescription or non prescription
drugs may impair the consumer’s ability to properly
assemble or safely operate the smoker.
- Never operate this smoker within 7.5m (25 feet) of any
flammable liquids.
- Use this smoker only on a level, stable noncombustible
surface like brick, concrete or dirt. Do not use smoker
on or around any surface that will burn or melt like
wooden decks, dry grass, leaves, wood rails, vinyl, or
plastic.
- Never operate this smoker under any overhead
roof covering, awning or overhang. Never use
inside an enclosed area such as screen patios,
garages, buildings and tents. Keep a minimum
clearance of 3m (10 feet) from all sides of the
smoker to all overhead construction and 1m (3
feet) from any walls or rails.
- Never use in or on recreational vehicles and/or
boats.
- Never use sawdust with this smoker.
- Never use this product for anything other than its
intended purposes. This smoker is not intended for
commercial use. Never use this smoker as a heater.
- So not use or store flammable materials in or near this
appliance.
- Smoker is HOT while in use and after use.
- Keep children and pets away from the smoker at all
times.
- Do not spray aerosoles in the vicinity of this appliance
while it is in operation.
- Do not modify this appliance and do not use
unauthorised spare parts.
- Avoid touching hot surfaces. Always wear protective
gloves or mitts when operating the smoker.
- Do not allow anyone to conduct activities around
the smoker during or following its use until the unit has
cooled. The smoker is hot during operation and remains
hot for a period of time following its use.
- Never move the smoker when it is in use. Allow the
smoker to cool below 115ºF (40ºC) before moving
or storing it.
- Always wear shoes and protective clothing during
operation of this smoker.
- Accessory attachments and cookware not supplied
with this smoker are not recommended for use.
- Perform a leak test before each use of the smoker.
(See page 15).
- Keep the gas supply hose away from any heated
surfaces.
- Never attach a gas cylinder, move or alter ttings
when the smoker is hot or in use.
- Do not attempt to disconnect any gas tting while
the smoker is in operation.
- Never use a gas cylinder if it appears to have dents,
gouges, bulges, re damage, erosion, leak age, excessive
rust, or other forms of visible
external damage. The cylinder may be hazardous and
should be checked by a liquid propane supplier.
- Before each use, inspect gas hose for any signs
of damage and check all nuts and bolts to be sure
that they are tight and secure.
- When lighting your smoker, do not cover the
burner or restrict airow from the burner. An
explosion could occur.
- When lighting your smoker, always have the door open.
- Do not place articles on or against this appliance.
OUTDOOR USE ONLY
SAVE AND FILE THESE INSTRUCTIONS FOR FUTURE REFERENCE
IF BURNER DOES NOT IGNITE, TURN OFF THE CONTROL KNOB AND GAS AND WAIT 5 MINUTES
BEFORE TRYING TO LIGHT IT AGAIN. IF THE BURNER GOES OUT DURING OPERATION, FIRST
TURN THE CONTROL KNOB OFF, THEN THE GAS CYLINDER OFF.

4
READ ALL SAFEGUARDS AND INSTRUCTIONS THOROUGHLY!
YOUR SAFETY IS VERY IMPORTANT – FAILURE TO FOLLOW PROPER PROCEDURES AND SAFEGUARDS MAY RESULT IN
PROPERTY DAMAGE OR PERSONAL INJURY.
DANGER DANGER
• Do not obstruct flow of combustion and
ventilation. Keep the ventilation opening(s) of
the cylinder enclosure free and clear of debris.
• Keep clear of the smoker hose. Tripping over
the smoker hose may result in the spilling of
HOT grease or water, causing personal injury
or property damage.
• In the event of an oil/grease fire, immediately
turn off gas supply and call the fire
Department. Do not attempt to extinguish
a fire with water. A type BC or ABC fire
extinguisher may in some cases contain the
fire.
• Keep your hands, hair and face away from the
burner flame. Do not lean over or in to the
smoker when lighting the burner. This smoker
has an open flame. Be careful of loose hair and
clothing during operation, which could catch
fire.
• After use, always turn the control knob OFF
first, then the gas cylinder valve OFF.
• Always allow the hot water to cool completely
below 100ºF (38C) before moving to avoid the
possibility of severe burns.
• Never use glassware, plastic, or ceramic
cookware in this smoker.
• Always disconnect the gas cylinder from your
smoker when not in use.
• Do not store a spare LP-gas cylinder under or
near the smoker.
• Cylinders must be stored outdoors, out of reach
of children, and must not be stored in a building,
garage, or any other enclosed area.
• If you smell, hear or see gas escaping,
immediately get away from the gas cylinder and
call the Fire Department.
USE CAUTION AND COMMON SENSE WHEN OPERATING YOUR SMOKER.
SAVE THESE INSTRUCTIONS
WARNING
DO NOT SPRAY AEROSOLS IN THE VICINITY OF THIS APPLIANCE WHILE IT IS IN OPERATION.
DO NOT USE OR STORE FLAMMABLE MATERIALS IN OR NEAR THIS APPLIANCE.
DO NOT PLACE ARTICLES ON OR AGAINST THIS APPLIANCE.
DO NOT MODIFY THIS APPLIANCE.

5
A.HARDWARE PACK
NO. Description. Finish Qty Note
1a 1/4-20x1/2 screw Black galvanized 15 Inside blister card
2a 1/4-20 ange nut Black galvanized 4
3c 10-24x1/2 screw Black galvanized 5
Inside blister card4c 10-24 nut Black galvanized 1
5c M5 spring washer Black galvanized 1
6d S hook for hose Chrome plated 1 Inside blister card
7d Zip tie Black 1
8e Door latch Black 1 Inside a poly bag
9e Door latch bracket Black 1
10e Damper Powder coated 1 Inside a poly bag
6
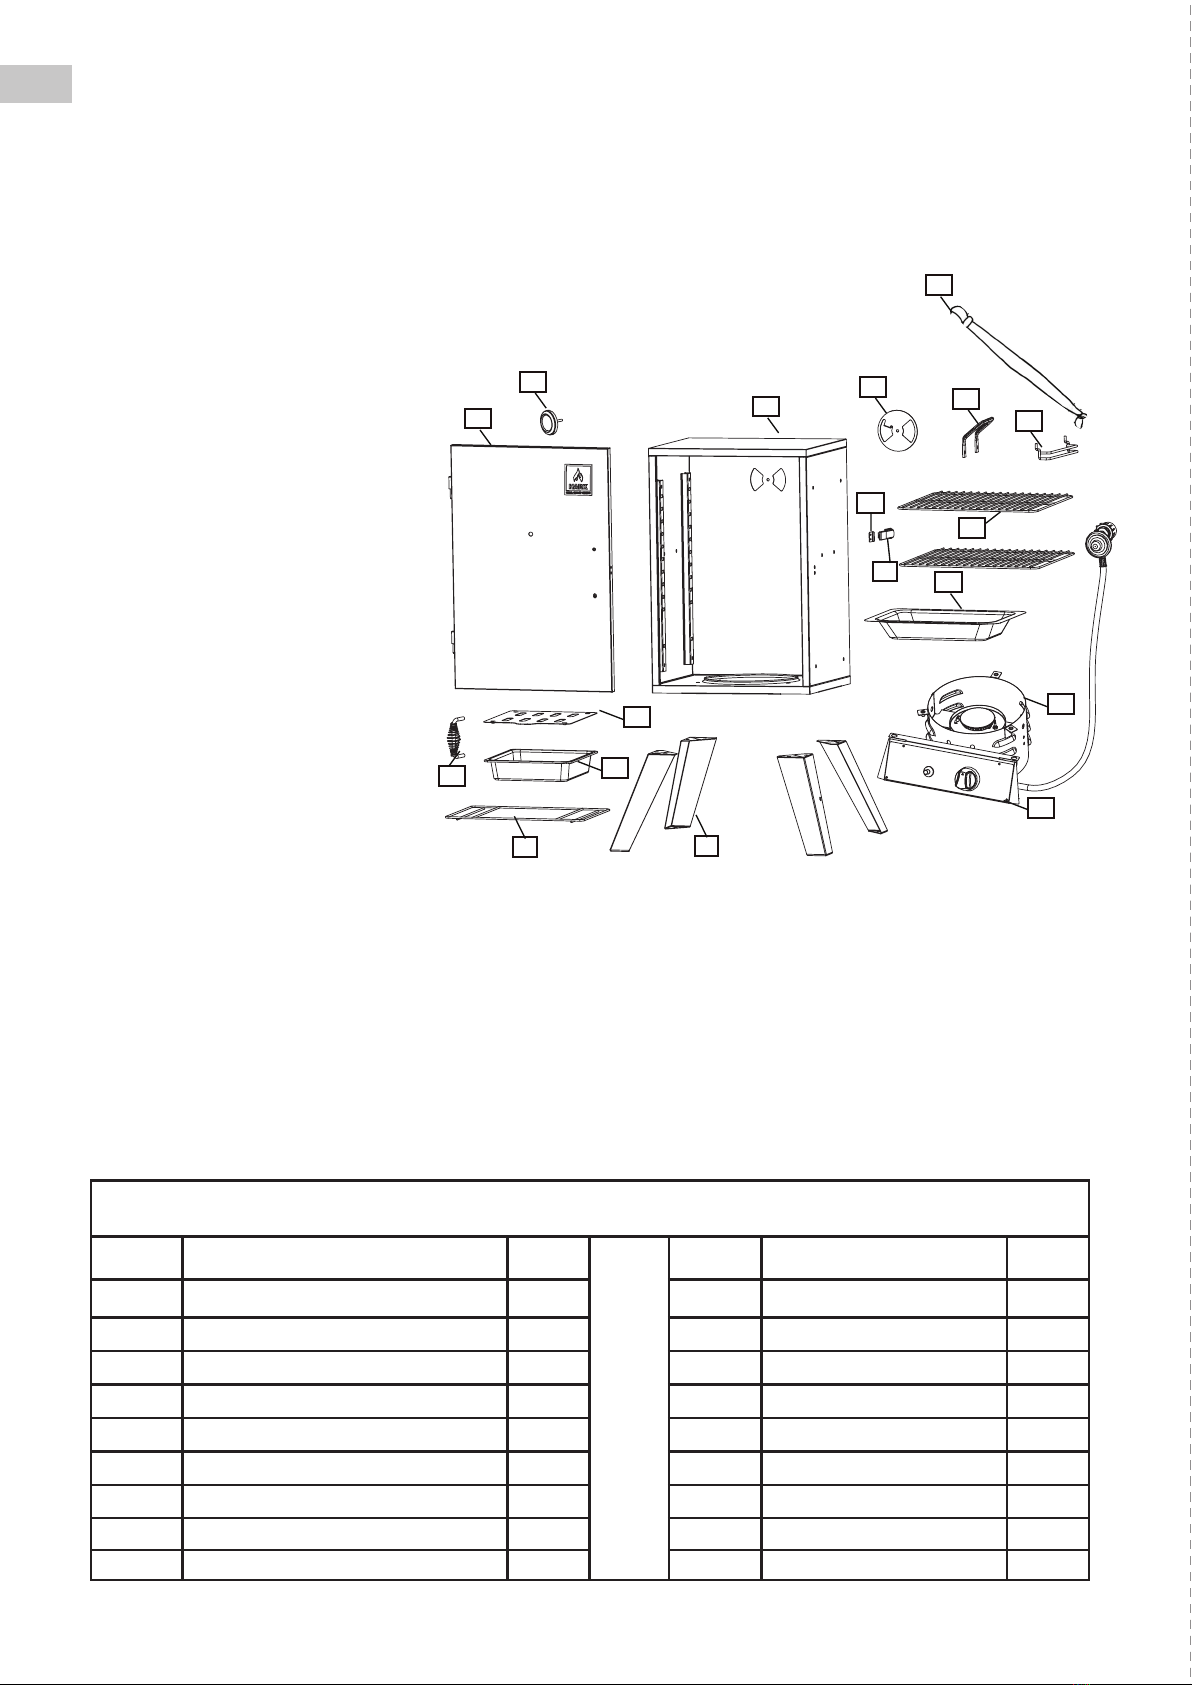
Primary Components
Item Description Qty Item Description Qty
1 Smoker Cabinet 1 10 Wood Chip Box Lid 1
2 Smoker Door 1 11 Water Bowl 1
3 Burner Chamber Assembly 1 12 Cooking Rack 2
4 Control Panel Assembly 1 13 Door Handle 1
5 Smoker Leg 4 14 Door Latch 1
6 Damper 1 15 Door Latch Plate 1
7 Temperature Gauge 1 16 Side Handle 2
8Wood Chip Box Rack 1 17 Gas Bottle Restraint Strap 1
9Wood Chip Box 1 18 Grid Track 8
Product Dimensions: 54cm(w) x 46cm(d) x 84.5cm(h)
B. PARTS LIST
Read all safeguards and assembly
instructions before assembling and
operating your smoker.
Before assembling your new smoker,
unpack all parts from the box. Carefully
remove all packing material and lay
out all the parts for easy access and
identication. Do not discard the carton
or packaging until your smoker is
fully assembled and operating to your
satisfaction.
In order to properly assemble your
smoker, you will only need two tools:
- Philips head screwdriver
- shifter or 3/8” & 7/16” wrench
(tools not included)
Be sure to have a friend help. The
smoker is heavy and must be moved
around during assembly and before use.
To use your smoker immediately after
assembly, have an LP gas cylinder lled
by an authorised LP dealer or cylinder
exchange center.
Also, be sure to have your choice of avouring wood readily available. (LP gas cylinder and avouring wood are not
included).
For further assistance, including missing or damaged parts, call 1300 799 787.
7
216
13
17
16
15
11
3
10
9
85
4
12
14
18
7
C. ASSEMBLY INSTRUCTIONS
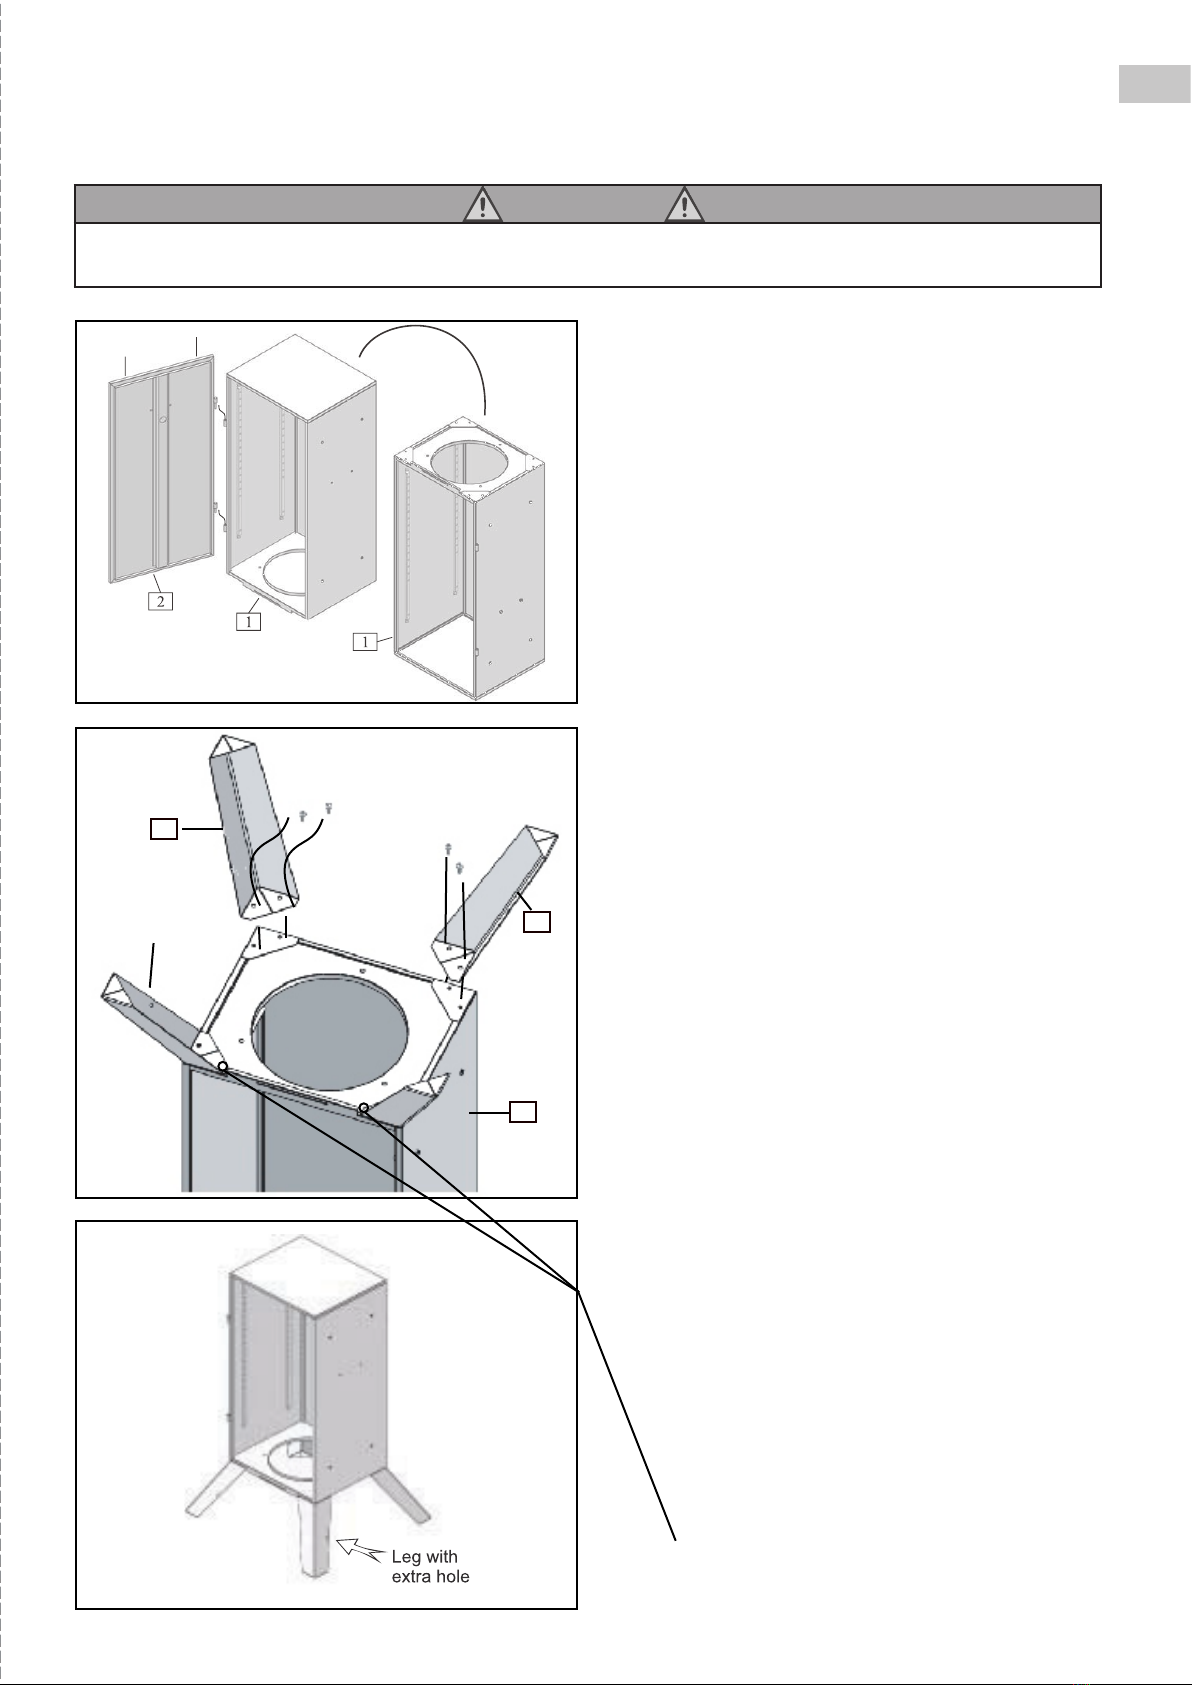
STEP 1
Locate: Cabinet (1), door (2).
Note: The door is attached to the cabinet.
Procedure:
• Remove the door (2) from the cabinet (1) by
lifting them straight up on the door to remove it
from the side cabinet hinge. Set the door aside.
• Turn the cabinet (1) upside down.
STEP 2
Locate: Four Smoker Legs [5], Eight
1/4-20x1/2” Screw [1a] from the Hardware
Pack - Bag A.
Tools needed: Philips head screwdriver.
Procedure:
• Place each leg [5] at the corners of the smoker
Cabinet Assembly [1] as shown.
• Fasten each leg [5] with two 1/4-20x1/2” Screws
[1a]. The securing nuts are pre-welded to the
cabinet.
Note: One leg contains an extra hole on its
side and must be mounted at the front in the
position shown. This hole will be used later to
secure the gas hose to the leg with a zip-tie.
Do not yet insert the two screws in the location
indicated for the front legs. These two screws will
be used in the next assembly steps.
Securely tighten six screws.
5
5
1
Leg with extra hole
WARNING
DO NOT HANDLE SMOKER BY THE CROSS BAR ON SMOKER CABINET.
DO NOT LIFT OR MOVE USING THIS CROSS BAR.

8
STEP 3
Locate: Control Panel Assembly [4] and Burner
Chamber Assy.[3], two 1/4-20x1/2” Screw [1a] (two
remaining from previous step).
Tools needed: Philips head screwdriver.
Procedure:
• Place the control panel assembly between the
front legs as shown. There are slots on the
control panel that t around the legs and line up
with the bolt holes.
• Be sure all the tabs on the back side of the
control panel are captured around the legs as
shown below.
• Insert the two remaining screws and tighten
them securely.
STEP 4
Locate: Burner Chamber Assembly [3], three
1/4-20x1/2” Screw [1a] from Hardware Pack - Blister
card.
Tools needed: Philips head screwdriver.
Note: Inspect the burner chamber prior to assembly
to make certain the burner tube is correctly over the
end of the valve as shown:
Procedure:
• Align the burner
chamber assembly
[3] underneath
the smoker as
shown. Do not
remove Control
Knob or loosen
the attaching
screws to align the
burning chamber
tube to the valve.
• Place the body of the burner chamber assembly
so that it sits ush with the bottom of the
cabinet. The mounting holes and mounting tabs
should line up.
• For each mounting hole, insert a 1/4-20x1/2”
screw [1a]. Secure the burner assembly with the
three screws from the inside of the cabinet.
• Securely tighten all three screws.
(Factory tted)
(Factory tted)
Ignition wire
Thermocouple wire
connecting thread

9
FLAME FAILURE DEVICE (FFD)
The FFD is a safety feature of this unit that shuts off gas to the appliance if the ame is not continuously burning.
Please note the sensor has been factory tted to the burner and is already in its correct position.
For FFD, the thermocouple copper wire from the burner has been factory tted into the Control Panel valve.
FACTORY ASSEMBLED BURNER CHAMBER
FFD Sensor
Thermocouple wire
Thermocouple thread
Ignition wire
Ignitor
(Factory tted)
(Factory tted)
Ignition wire
Thermocouple wire
connecting thread

10
CORRECT POSITION OF THE FFD SENSOR
The FFD Sensor is already factory tted in the correct position and should not need adjusting. The sensor needs to be
in the ame at all times.
Please see the correct position of this sensor.
ADJUSTING SENSOR
If the ame in the burner is going out after you light the unit you may have to slightly adjust the position of the sensor.
This is easily done by loosening the two nuts on either side and moving the sensor up or down and then retightening to
x in place.
Please note when you initially light the unit you will need to push the control knob in and turn to the left but continue
pushing the control knob which will release the gas for it to ignite.
Loosen the two nuts to the thermocouple
sensor, then adjust the height to correct
position.
LOW SETTING
HIGH SETTING

11
STEP 5
Locate: Damper [6], one 10-24x1/2” Screws
[3c], 10-24 Nuts [4c], M5 Spring Washers
[5c] From hardware Pack - Blister card.
Tools needed: Philips head screwdriver and
3/8” wrench or shifter.
Procedure:
• From the outside of the cabinet, insert a 10-
24x1/2” Bolt [3c] through the mounting hole for
the damper.
• From the inside of the smoker cabinet, place
the damper [6] over the vent hole in the back of
the cabinet as shown. The tab on the damper
must mount though the vent hole.
• From the inside of the cabinet, place the M5
spring washer [5c] on the bolt and tightly thread
the 10-24 nut [4c] onto the bolt.
• The damper must be able to rotate with just a
little resistance.
The damper allows adjustment of exhaust
air while cooking. Less exhaust air will allow
for the smoker to burn hotter and keep the
avouring smoke inside the smoker.
WARNING
THE DAMPER IS DESIGNED SO THAT IT WILL
NOT FULLY CLOSE.
THIS IS A SAFETY FEATURE AND
SHOULD NOT BE ALTERED.
6
12
STEP 6
Locate: Two Side Handles [16], four 1/4- 20x1/2”
Screw [1a], and four 1/4-20 Flange Nuts [2a].
Tools needed: Philips head screwdriver and
a 7/16” wrench or pliers.
Procedure:
• Use two 1/4-20x1/2” Screw [1a] and two 1/4-20
Flange Nuts [2a] to attach the handle on the
right side of the smoker cabinet [1].
• Mount the other side handle [16] to the left side
of the cabinet [1] as shown. Use two 1/4-20x1/2”
Screw [1a] and two 1/4-20 Flange Nuts [2a] to
attach the handle.
• Securely tighten the screws.
STEP 7
Locate: The smoker door.
Tools needed: None.
Procedure:
• Re-mount the smoker door [2] to the cabinet by
positioning the pin in the hinges welded to the
smoker cabinet (1).
STEP 8
Locate: The door handle (13) and 4 x ¼-20 ange
nuts. (Please note the ¼-20 ange nuts are already
located on the door handle and not in the hardware
bag.)
Tools Needed: Shifter or 3/8” & 7/16 wrench.
Procedure:
• Attach the door handle (13) through the holes in
the front of the door and secure with 2 x ¼-20
ange nuts at the back of the door.
STEP 9
Locate: Door Latch (14) and 2 x 10-24x1/2” screws.
Tools Needed: Phillips head screwdriver.
Procedure:
• Attached the Door Latch (14) to the side of the
smoker cabinet using 2 x 10-24x1/2” screws
for each latch. Make sure that the handle faces
forward.
13
STEP 11
Locate: 1 x Temperature Gauge, 1 x washer and 1 x
wing nut. (please note that the washer and wing nut
are already attached to the temperature gauge).
Tools Needed: None
Procedure:
• Attach the temperature gauge through the hole
in the middle of the door.
• Secure with washer and wing nut from the
inside of the door.
STEP 12
Locate: 8 x Grid Tracks (18), 1 x Wood Chip Box
Rack(8), 1 x Wood Chip Box(9) and 1 x Wood chip box
lid(10). 1 x Water Bowl (11).
Tools Needed: None
Procedure:
• Install one Grid Track (18) in each of the bottom
holes located in the grid support for both the
left and the right hand sides of the cabinet.
STEP 10
Locate: Door Latch Plate (15) and 2 x 10-24x1/2”
Screws.
Tools Needed: Phillips head screwdriver
Procedure:
• Attach the door latch plate (15) to the door
using 2 x 10-24x1/2” screws.

14
• The Wood chip box rack (8) can be slid into the
lowest grid tracks.
• The wood chip box (9) sits in this rack over the
burner and the wood chip box lid (10) ts on top
of this.
• The water bowl (11) is slid into the grid tracks to
be supported above the wood chip box and lid.
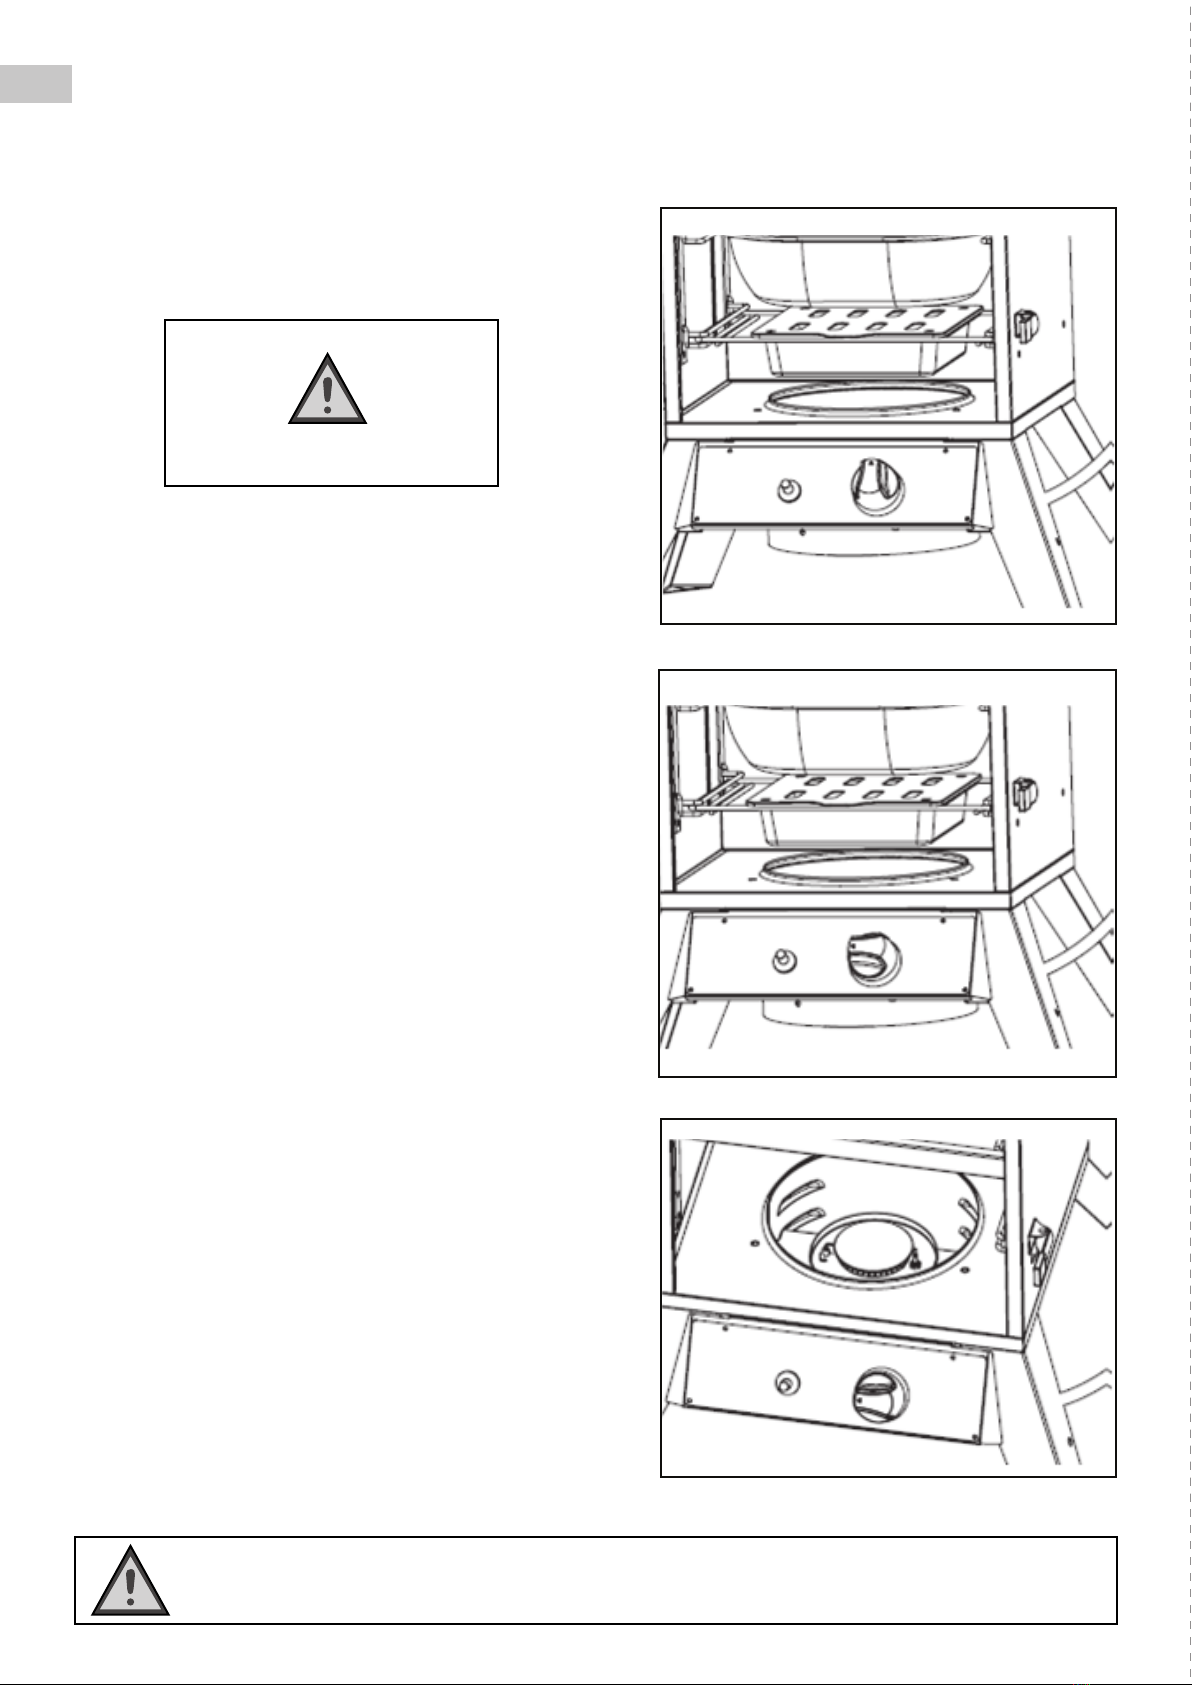
Step 13
Locate: 2 x cooking racks (12).
Tools Needed: None
Procedure:
• Slide a cooking rack (12) into the grid tracks
to secure the cooking racks at the desired
position.
Step 14
Locate: Zip Tie [7d]
Tools needed: None.
Procedure:
• Loop the Zip Tie [7d] through the outside hole of
the front smoker leg [6] as shown.
• Capture the gas hose with the zip tie to secure
it. Do not pull the zip tie too tight - it may
restrict gas ow through the hose.
CAUTION
The water bowl and wood chip box must
be inserted over the burner during
operation. This is to protect the burner
from falling particles, grease drippings
and accidental spill over from the water
bowl.

15
Assembly of your smoker is now complete. The following image shows how the assembled unit should look.
IMPORTANT
THE WATER BOWL AND WOOD CHIP
BOX MUST BE INSTALLED IN THE UNIT
DURING USE. EVEN IF YOU ARE NOT USING
SMOKING CHIPS OR WATER, THESE MUST
BE INSTALLED IN THE CORRECT POSITION
TO STOP GREASE DRIPPINGS FROM
FALLING ON THE BURNER.

16
D. THE GAS SYSTEM
GAS AND REGULATOR INFORMATION
This smoker is designed for propane (LPG) gas
use only. Gas bottles with a “POL” low pressure
connection are to be used with this smoker
Suitable regulators must have an outlet pressure
of 2.75 kPa. You must have the proper regulator
and bottle in order for the smoker to operate
safely and efciently. Ensure that a 100% propane
(LPG) rellable gas cylinder currently certied to
Australian Standard AS2030.1:2009 is used. Do not
use disposable gas cylinders. Please note the hose
and regulator supplied with this smoker are of an
approved type and are specically designed for use
with your smoker.
CONNECTING THE HOSE AND REGULATOR TO THE
GAS BOTTLE
• Only use the hose assembly supplied with this
appliance for direct connection to the cylinder – DO
NOT USE ADAPTORS. Do not use any other hose
assembly. Check the gas hose for damage or signs
of abrasion before each use.
• Keep the hose clear of sharp edges and hot
surfaces.
• Avoid twisting or kinking the exible hose.
• If damaged, do not use the hose and replace it
immediately. If there is any doubt, contact the
customer service line on 1300 799 787.
• Check the gas cylinder control knob is in the off
position. To turn off it should be turned clockwise
to a full stop.
• Check the control knob on the smoker is in the off
position.
• Hold the regulator in one hand and insert the
nipple into the gas bottle outlet. Be sure the nipple
is centered in the outlet. Use care not to cross
thread the connection.
• Hand tighten the coupling nut anti clockwise until it
comes to a rm stop.
• Firmly tighten by hand only. Do not use tools.
BE SURE TO CHECK FOR LEAKS AT ALL
CONNECTIONS
DANGER
ALL INSTRUCTIONS AND SAFEGUARDS
MUST BE FOLLOWED TO PREVENT FIRE, PROPERT Y DAMAGE, OR PERSONAL INJURY.

17
Please note that the hose is already tted to the
valve on the underside of the control panel of the
smoker. You do not have to adjust this connection
but should leak test this once the hose and
regulator are connected to the gas cylinder.
DO NOT DISCONNECT HOSE FROM VALVE.
FOR STORAGE AND CYLINDER EXCHANGE,
DISCONNECT THE CYLINDER ONLY.
DO NOT DISCONNECT HOSE FROM APPLIANCE.
— If you need a replacement hose and regulator or have any queries on the gas system, please call
our Customer Service line on 1300 799 787.
LEAK TESTING
Open the gas control valve on the cylinder. Check for leaks by brushing a solution 1/2 water and 1/2 soap over
all gas system joints, including all valve connections, hose connections and regulator connections. DO NOT
USE AN OPEN FLAME to test for leaks at anytime. If bubbles form over any of the joints, there is a leak. Turn
off the gas supply and re-tighten all joints. If bubbles form again, do not use the smoker. Please contact
customer service line on 1300 799 787. Check for leaks annually or whenever the gas cylinder is refilled.

18
GAS BOTTLE RESTRAINT
Included is a strap with a hook at either end. This is to be used to secure the gas bottle to the smoker. Once you have
fully assembled your smoker with the gas bottle connected, connect one end of the strap to the side handle of the
smoker nearest to the gas bottle and the other end of the strap to the gas bottle handle. This will ensure that the gas
bottle is secured and cannot be accidentally knocked over.

19
E. OPERATION: BEFORE USE
PRE-USE PROCEDURES:
Prior to cooking in your smoker, it is important to
“season” your smoker. Seasoning seals the paint and
interior of the smoker to enhance avouring, durability
and overall performance. This is also referred to as the
“breaking-in” process.
To season your smoker, simply place woodchips into the
wood chip box and water in the water bowl and re up
your smoker. Burn at a low temperature (with no food
inside) for 45-60 minutes. Once this is complete, let the
smoker cool and clean out the used water and ash from
the wood chips box. Once this process is complete, the
interior of your smoker will have a ne coat of residue
that will help protect your smoker.
ADDING WATER:
Note: your smoker should never be used without water
in the water bowl.
To add water prior to cooking, simply remove the water
bowl and ll it with water – up to 1” (2.5cm) below the
rim. Then place the bowl back onto the rack.
To add water whilst the smoker is in operation, DO NOT
pull out the water bowl beyond the rack. Instead using
protective mitts and a watering can or cup, add water
directly to the bowl.
To obtain extra avour, you can add herbs or marinade to
the water in the water bowl.
For easy cleaning, you can line the water bowl with
aluminium foil before each use.
CAUTION: The water bowl will get very hot during use.
Avoid handling it and always use protective mitts when
handling any hot compontents.
ADDING WOOD:
To add wood prior to cooking, simply remove the wood
chip box, take off the lid and add your choice of avoured
hardwood chips. The amount and type of wood you use is
up to you. Never use treated wood or sawdust. Once you
have added the wood chips, place the lid back onto the
top of the box and place the box inside the smoker.
To add wood chips whilst the smoker is in use, use
protective mitts and long tongs or pliers to remove the
box lid. Then add more wood chips without removing the
box. It is not recommended you remove the wood chip
box whilst smoking is in operation.
WARNING: Do not use sawdust or treated woods with
this smoker.
CAUTION: The wood chip box and lid get very hot during
use. Avoid handling them and always use protective
mitts when handling any hot compontents.
USING FLAVOURED WOOD:
• Small hardwood chips work best with this smoker.
• Use dry hardwoods such as hickory, pecan, apple,
cherry or mesquite.
• Most fruit or nut tree woods produce excellent
smoke avour.
• Do no use resinous woods such as pine or plywood.
These will produce unpleasant avours.
• Most smoke avouring takes place within the rst
hour of smoking. Less is often more and no more
wood chips maybe required after this rst hour.
• Experiment with different types and quantities of
wood chips, depending on what meats or sh you
are smoking. Different woods can also be mixed
together.
• To produce more smoke and to prevent fast burning,
pre-soak the wood chips in a separate bowl of water
for at least 20 minutes prior to smoking. Or, wrap
the chips in perforated aluminium foil.
• Only use perforated foil wraps over the wood chips
when smoking at low temperatures.
WARNING: Wood pellets must never be soaked in water.
WARNING: Do not use sawdust or treated woods with
this smoker.
20
F. OPERATION: LIGHTING
LP GAS LIGHTING PROCEDURE:
1. Check all connections for leaks using the leak test as
explained on page 17.
2. Open the smoker door.
3. Be sure the burner control knob is in the “OFF”position.
4. Open the LP cylinder valve 1-1/2 turn byturning counter-
clockwise.
5. To light the unit with the push-button ignition,push in and
turn the burner control knob counter-clockwise to the
HIGH/LIGHT setting.
Please Note: You must keep the control knob pushed in to
allow the burner to initially light.
6. Immediately push the igniter button to click it several times
(you should see a small spark jumping from the end of the
electrode rod to the side of the burner). If the burner does
not light within 3 to 5 seconds, turn the burner control knob
OFF and wait 5 minutes before repeating the steps again. If
burner still fails to light, try match lighting the smoker using
the instructions below.
7. Once the burner is lit, close the door to allow heat to
accumulate. The damper can then be adjusted to the
desired setting to allow proper air ow and combustion.
Damper adjustment tips are listed on the next page.
To match light the burner, repeat steps 1 through 5 of the igniter
lighting system above and continue with the following
procedure:
Remove the wood chip box and its rack from inside the smoker.
Strike a paper match and drop it into the burn chamber, next to
the burner.
Quickly turn the control knob to the light position. If the burner
does not light within 4 or 5 seconds, turn the control knob OFF,
wait for 5 minutes, and repeat the process.
If the burner ame is accidentally extinguished, turn the control
knob OFF, wait for 5 minutes before opening the door, and
repeat the lighting procedure.
WARNING
NEVER ATTEMPT TO LIGHT THE SMOKER WITH THE
DOOR CLOSED
OPEN DOOR TO LIGHT SMOKER
CAUTION
The water bowl and wood chip box must be inserted over the burner during operation. This is to protect
the burner from falling particles, grease drippings and accidental spill over from the water bowl.
Other manuals for HK0528
1
Table of contents
Other Hark Smoker manuals


