Hart InterCivic Verity Scan User manual

Polling Place Field Guide
VERSION 3.1.0
Document Number 6651-017 A
Humboldt County Office of Elections
Revised January 2020

Hart InterCivic Quality and Information Security Policy
Hart InterCivic is committed to consistently providing high quality products and services for its customers through
adherence to its established hardware and software Quality Management Systems, complying with customer, statutory
and regulatory requirements, and a commitment to continual improvement. Hart InterCivic is also committed to the
integrity and the security of the information used in the product development process, in the products themselves,
and in our management of customer data during the implementation process.
This DOCUMENT and the SOFTWARE, HARDWARE, and FIRMWARE to which it pertains contain confidential and
proprietary information belonging exclusively to Hart InterCivic, Inc. No part of this publication may be modified,
reproduced, stored in a retrieval system, or transmitted in any form, distributed by any electronic or mechanical
means, photocopied, recorded, or otherwise reproduced or distributed without prior written permission from
authorized personnel at Hart InterCivic, Inc. Any person receiving this document has a duty to take reasonable
precautions preventing unauthorized use or disclosure of the contents.
Trademarks
Hart InterCivic and Verity are registered trademarks of Hart InterCivic, Inc.
Hart InterCivic disclaims any proprietary interest in the marks and names of others.
Hart InterCivic, Inc.
15500 Wells Port Drive
Austin, TX 78728
Document Number 6651-017 A
© 2019 Hart InterCivic, Inc.
All Rights Reserved
about this guide
This Verity Polling Place Field Guide is a portable guide to polling place tasks using the Verity Scan and Verity Touch
Writer devices.

Polling Place Field Guide
VERSION 3.1.0

contents
Verity Scan ..................................................................................................................................................................... 5
setting up Verity Scan.................................................................................................................................................................................. 6
setting up the ballot box........................................................................................................................................................................................................6
setting up the Verity Scan .....................................................................................................................................................................................................9
Verity Scan orientation..............................................................................................................................................................................12
screen orientation ................................................................................................................................................................................................................. 12
poll worker button ................................................................................................................................................................................................................ 13
report printer operation...................................................................................................................................................................................................... 13
opening polls................................................................................................................................................................................................14
reopening polls............................................................................................................................................................................................16
voting with Verity Scan..............................................................................................................................................................................17
overview: Verity Scan ........................................................................................................................................................................................................... 17
instructions for hand-marking ballots............................................................................................................................................................................ 17
scanning ballots with Verity Scan .................................................................................................................................................................................... 17
Verity Scan help and features............................................................................................................................................................................................ 18
troubleshooting ..................................................................................................................................................................................................................... 18
spoiling printed paper ballots........................................................................................................................................................................................... 19
undervotes, overvotes, and blank ballots on Verity Scan ........................................................................................................................................ 19
provisional ballots ................................................................................................................................................................................................................. 19
the emergency ballot bag and emergency ballot slot.............................................................................................................................................. 20
multi-sheet ballots and Verity Scan ................................................................................................................................................................................ 20
suspending polls .........................................................................................................................................................................................21
closing polls ..................................................................................................................................................................................................23
Verity Touch Writer ..................................................................................................................................................26
setting up Touch Writer............................................................................................................................................................................27
setting up the ballot printer............................................................................................................................................................................................... 27
setting up the voting booth............................................................................................................................................................................................... 29
setting up the Verity Touch Writer .................................................................................................................................................................................. 31
Touch Writer orientation ..........................................................................................................................................................................35
screen orientation ................................................................................................................................................................................................................. 35
poll worker button ................................................................................................................................................................................................................ 36
about Verity Access .............................................................................................................................................................................................................. 36
installing headphones and tactile switches .................................................................................................................................................................. 36
report printer operation...................................................................................................................................................................................................... 37
opening polls................................................................................................................................................................................................38
reopening polls............................................................................................................................................................................................40
voting with Touch Writer..........................................................................................................................................................................41
overview: Verity Touch Writer ........................................................................................................................................................................................... 41
activating a ballot.................................................................................................................................................................................................................. 41
marking ballots with Verity Touch Writer ..................................................................................................................................................................... 43
making write-in choices ...................................................................................................................................................................................................... 47
printing blank ballots ........................................................................................................................................................................................................... 47
substitutions in <n of m> contests ................................................................................................................................................................................. 47
voting session idle timeout................................................................................................................................................................................................ 47
Verity Touch Writer help and features ........................................................................................................................................................................... 48
troubleshooting ..................................................................................................................................................................................................................... 48
spoiling a ballot on Verity Touch Writer........................................................................................................................................................................ 49
spoiling printed paper ballots........................................................................................................................................................................................... 49
printing a summary report ................................................................................................................................................................................................. 50
provisional voting on Verity Touch Writer.................................................................................................................................................................... 50
suspending polls .........................................................................................................................................................................................51
closing polls ..................................................................................................................................................................................................53
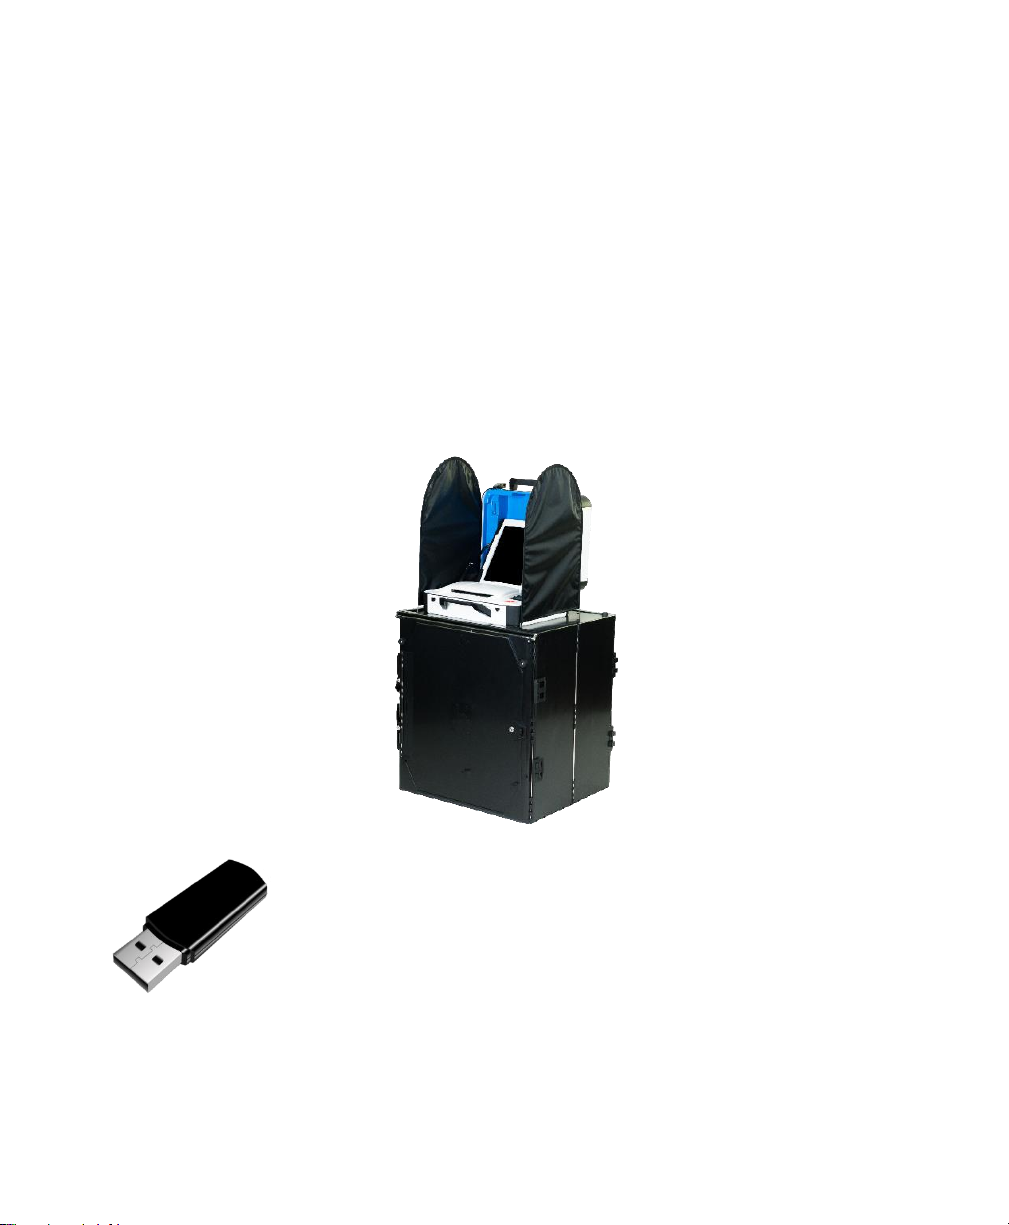
Verity Scan
Verity Scan is a polling place-based digital scanner for scanning and casting
ballots. Verity Scan can be used with hand-marked ballots or with ballots marked
and printed using Verity Touch Writer (see page 26). Verity Scan deposits scanned
ballots into its ballot box for secure storage.
vDrives are used to transfer digital ballot styles from the Verity
election definition software to Verity Scan, and to transfer voted
ballots from Verity Scan to Verity software for tabulation.
vDrives are inserted into a standard USB port located in a locked
and sealed compartment; each Verity Scan has its own vDrive.
NOTE: Software startup for each unit may take several minutes, due to security and data
integrity checks that the Verity software performs. This process is included in the design of
the Verity Voting System to verify the authenticity of the software before allowing it to
operate.

setting up Verity Scan
6
setting up Verity Scan
setting up the ballot box
1. Position the folded ballot box as shown.
2. Unlatch the four clips (two on each side).
3. Pull open the ballot box.
4. Press the side panels outward until they are flat,
being careful not to pinch your hands or fingers.

7
5. Lower the bottom panel but do not press down.
6. Release the lid by
unhooking the 3 straps.
7. Pull the string on the
underside of the lid
upward to unlock the lid
latch.
8. Lift the lid while gently pulling upward and outward, ensuring that the
double hinge is fully extended. Lay the lid across the top of ballot box, and
then press it down. Do not force it.

setting up Verity Scan
8
9. Unlock the front door with the ballot box key.
10. Press firmly on bottom panel to lock it in place.
Remove the white key from the voting
equipment manuals and supplies bag.
Using the white key, unlock the front
door of the ballot box.

9
setting up the Verity Scan
1. Assemble the ballot box, if this has not been done already (see page 6).
2. Place the Verity Scan on the ballot box, aligning
footpads with the indentations. The handle on
the Verity Scan must face the front of the ballot
box.
3. Reach inside the ballot box and pull the cord
down and away from you to lock the lid and the
Verity Scan in place.
4. Close and lock the front ballot box door.
5. Follow local procedures to remove the tamper seal
from the Verity Scan handle, if applicable. Unlock
the case (if locked). Open the case and remove the
power brick and power cord from the storage
compartment. Close the compartment and case.
5. Remove power brick and power cord from the voting equipment
manuals and supplies bag.
setting up Verity Scan
10
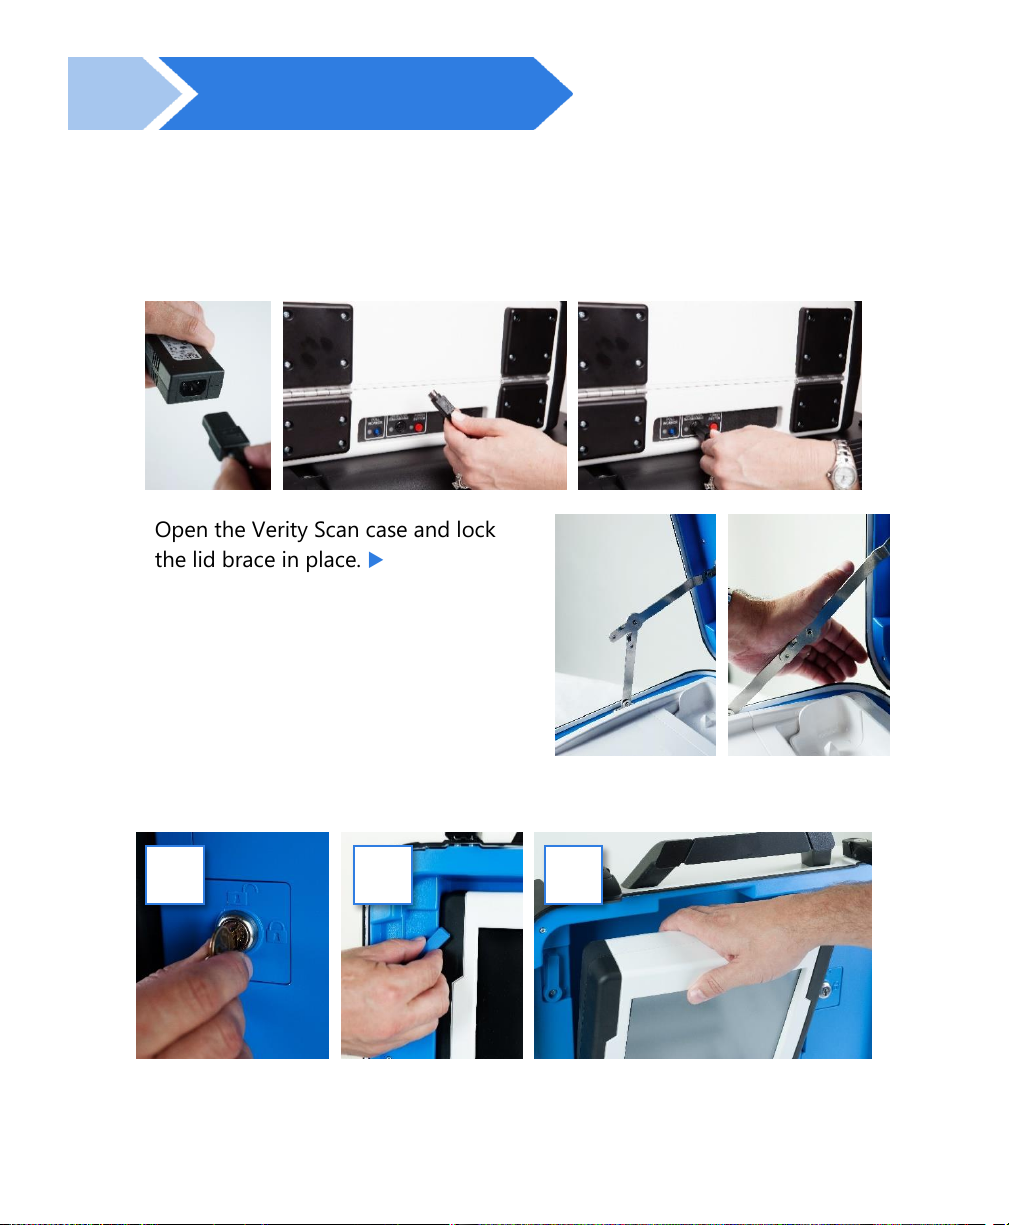
6. Plug the power cord into the power brick, and then plug the power brick
into the back of the Verity Scan (flat side up).
IMPORTANT: Do not plug the power cord into the wall yet.
7. Open the Verity Scan case and lock
the lid brace in place.
IMPORTANT: Never tilt a device
up by the handle while cords are
connected –this can damage the
cord where it connects to the
device, or cause damage to the
device itself.
8. Unlock (A), unlatch (B), and remove (C) the tablet.
A
B
C
A: Remove blue key from the voting equipment manuals and
supplies bag. Use the blue key to unlock the tablet from its cradle.
Log the yellow beaded seal number on your Security Log - AM. Open the Verity Scan
case and lock the lid brace in place
11
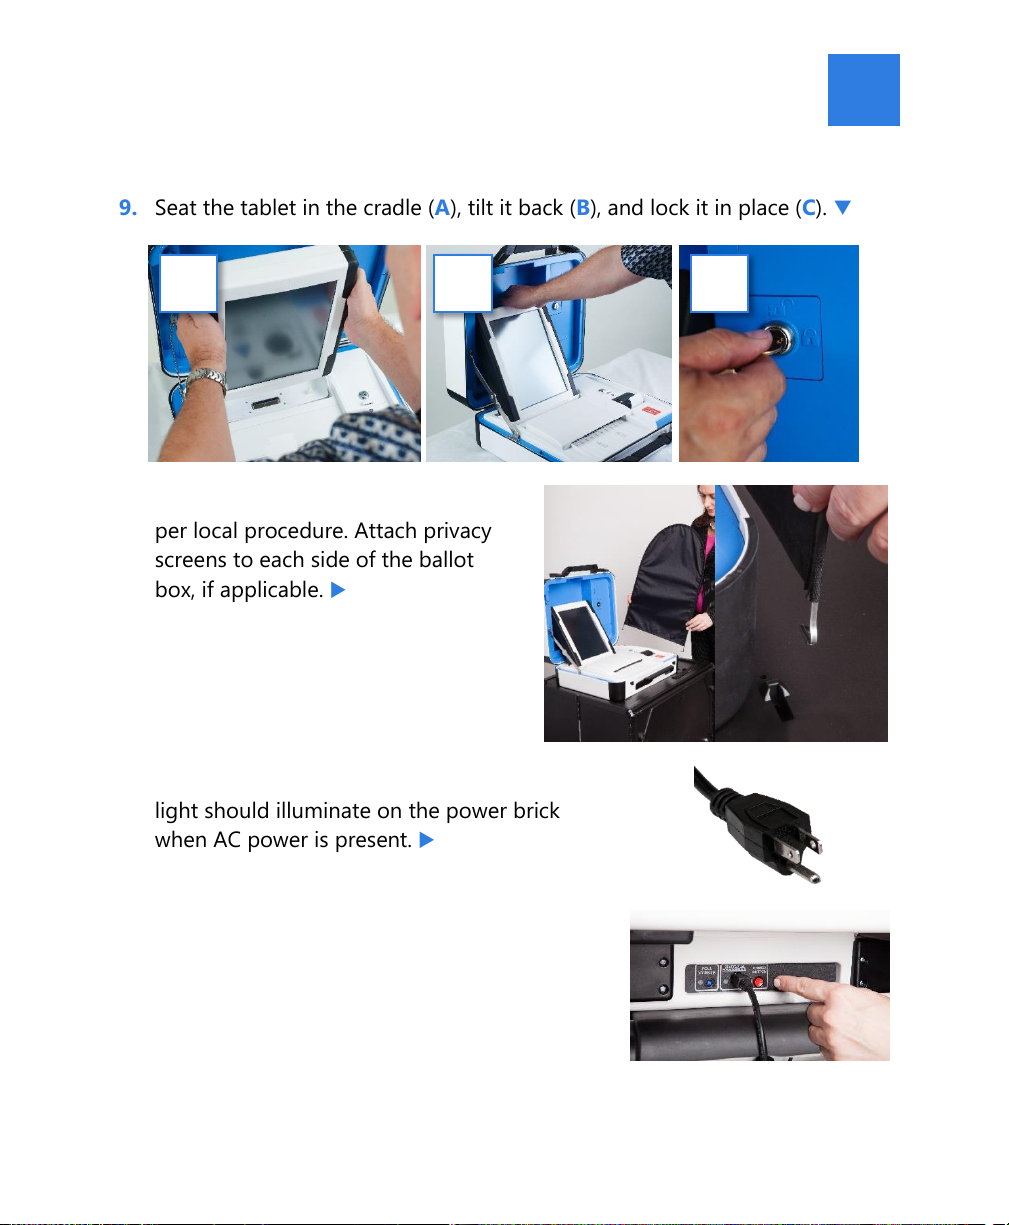
9. Seat the tablet in the cradle (A), tilt it back (B), and lock it in place (C).
10. Verify the Verity Scan device seals,
per local procedure. Attach privacy
screens to each side of the ballot
box, if applicable.
11. Plug the power cord into AC power. A green
light should illuminate on the power brick
when AC power is present.
12. Press the red button on the back of the Verity
Scan to power it on.
•During the power on process, a Power-On Self
Test report will print on Verity Scan’s built-in
printer. This report will indicate any hardware
or connection issues; if any issues are noted,
check connections and restart the device using
the red power button.
A
B
C
9. Log the red CFAST seal number on the Security Log - AM.
Seat the tablet in the cradle (A), tilt it back (B), and lock it in place (C).
Log the red wire seal number
found on the white panel box
(located to the right side of the
cradle) on the Security Log - AM.
Plug the power cord into the Uninterrupted
Power Supply (UPS) battery backup unit. A
green light should illuminate on the power
brick when power is present.

Verity Scan orientation
12
Verity Scan orientation
screen orientation
When powered up for the first time the device is used during
a voting event, Verity Scan should display the Print Zero
Report screen.
NOTE: If you are reopening polls during subsequent days of a
multiple-day voting event, then you will not print a Zero report. See
page 16.
In addition to the date and time, the following appears at the bottom of the screen:
•Ballots: The number of ballots scanned and cast on the Verity Scan for the current
election; at the start of a voting event, this number should be zero.
•Sheets: The number of ballot sheets scanned on the Verity Scan for the current
election; at the start of a voting event, this number should be zero.
•Lifetime: The number of ballots cast on the Verity Scan for the lifetime of the
device (for all elections).
•AC and battery power indicators: A green battery icon indicates the battery is
connected; a green plug icon indicates AC power is connected. Specific battery
power level can be found on the Touch Writer Power-On Self Test report.
NOTE: If AC power is not available, the device will automatically switch over to
battery power, and a warning message will display. To dismiss the message and
continue operating on battery power, touch “If the power is out, touch here to use
battery”. If a voting session is in progress, this message will not appear until the
session is completed.
When battery power is low, and AC power is disconnected, a warning message will
appear on the device screen. Reconnect the device to AC power.

13
poll worker button
The blue poll worker button is located on the back of Verity
Scan. This button is used when suspending or closing polls.
In some jurisdictions, this button may be used when
scanning ballots with undervoted or overvoted contests; see
page 19.
report printer operation
1. The thermal report printer is located on the right-
hand side of Verity Scan.
2. To open the paper compartment: While standing
in front of the device, pull the lever on the top of
the printer cover towards you, and then lift up to
open the paper compartment.
3. To replace paper: Place the new paper roll
into the printer as shown. Paper must roll
up from the bottom.
4. Close the printer cover. The paper must extend
out from underneath the front edge of the cover.
The white button can be used to advance the
paper.

opening polls
14
opening polls
You must open polls on the first day that voting will occur on that device. For
instructions on reopening polls on the second or subsequent day of multiple-day
voting events, see page 16.
1. Set up and power on the Verity Scan. Confirm that you are running on AC
power (see page 12).
2. Select Print Zero Report.
NOTE: If you are reopening polls during subsequent
days of a multiple-day voting event, then you will not
print a Zero report. See page 16.
3. Wait while the Zero report prints (on the built-in report printer). Using the
Zero report, check the following:
•Verify the ballot count total on the Zero report is ZERO and enter it in the
Reconciliation Log.
•Verify that the polling place on the report is correct.
IMPORTANT: If these items are incorrect, contact your elections office.
4. Verify that the clock in the bottom left corner of the screen displays the
correct time.
IMPORTANT: If the clock is incorrect, contact your elections office.
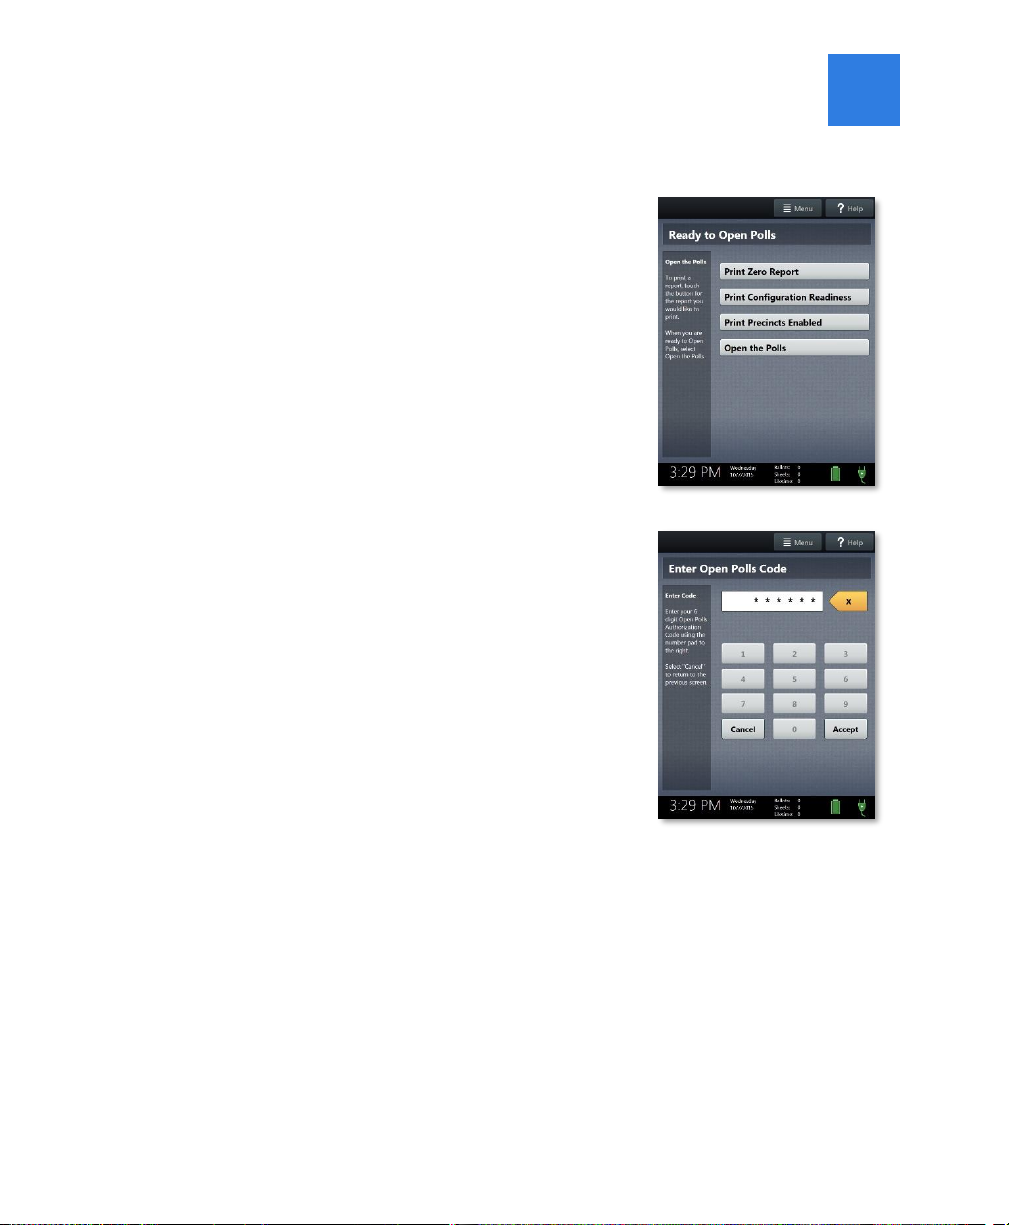
15
5. Select Open the Polls. You can also print a
Configuration Readiness report, Precincts
Enabled report, or additional copies of the
Zero report, if your jurisdiction requires them.
IMPORTANT: Once you open polls, you can
no longer print a Zero report.
6. Enter the Open Polls Code, and then select
Accept. The Open Polls report will print.
7. Wait while the Open Polls report prints. File the Zero and Open Polls
reports according to local guidelines.

reopening polls
16
reopening polls
(Early Voting)
1. To reopen polls after polls have been suspended, power on the Verity Scan.
NOTE: When reopening polls, you will not print a Zero report.
2. Enter the Open Polls Code, and then select
Accept. The Open Polls report will print.
3. Wait while the Open Polls report prints. File the Open Polls report
according to local guidelines.

17
voting with Verity Scan
overview: Verity Scan
Verity Scan is a polling place-based scanner used to scan and cast paper ballots
whether they are hand-marked, or marked using Verity Touch Writer (for Touch
Writer instructions, see page 26).
instructions for hand-marking ballots
1. The voter fills in the selection box to the left of their choices completely using
blue or black ink.
2. When the voter has finished marking their ballot, they take the ballot to Verity
Scan to cast their ballot.
scanning ballots with Verity Scan
1. Verity Scan is ready to scan when you see the Ready
to Use screen.
IMPORTANT: In elections with multi-sheet ballots,
voters must receive all sheets for their ballot. Voters
should be instructed to scan all sheets of their ballot,
even if they have made no choices on a particular
sheet. See page 20 for more information.
2. The voter removes the ballot privacy sleeve (if
applicable) and inserts the voted ballot into Verity
Scan. Flashing green arrows indicate the location and
direction of the scanner feed. Ballots must be fed
short-edge first, but may otherwise be scanned in any
orientation.
voting with Verity Scan
18
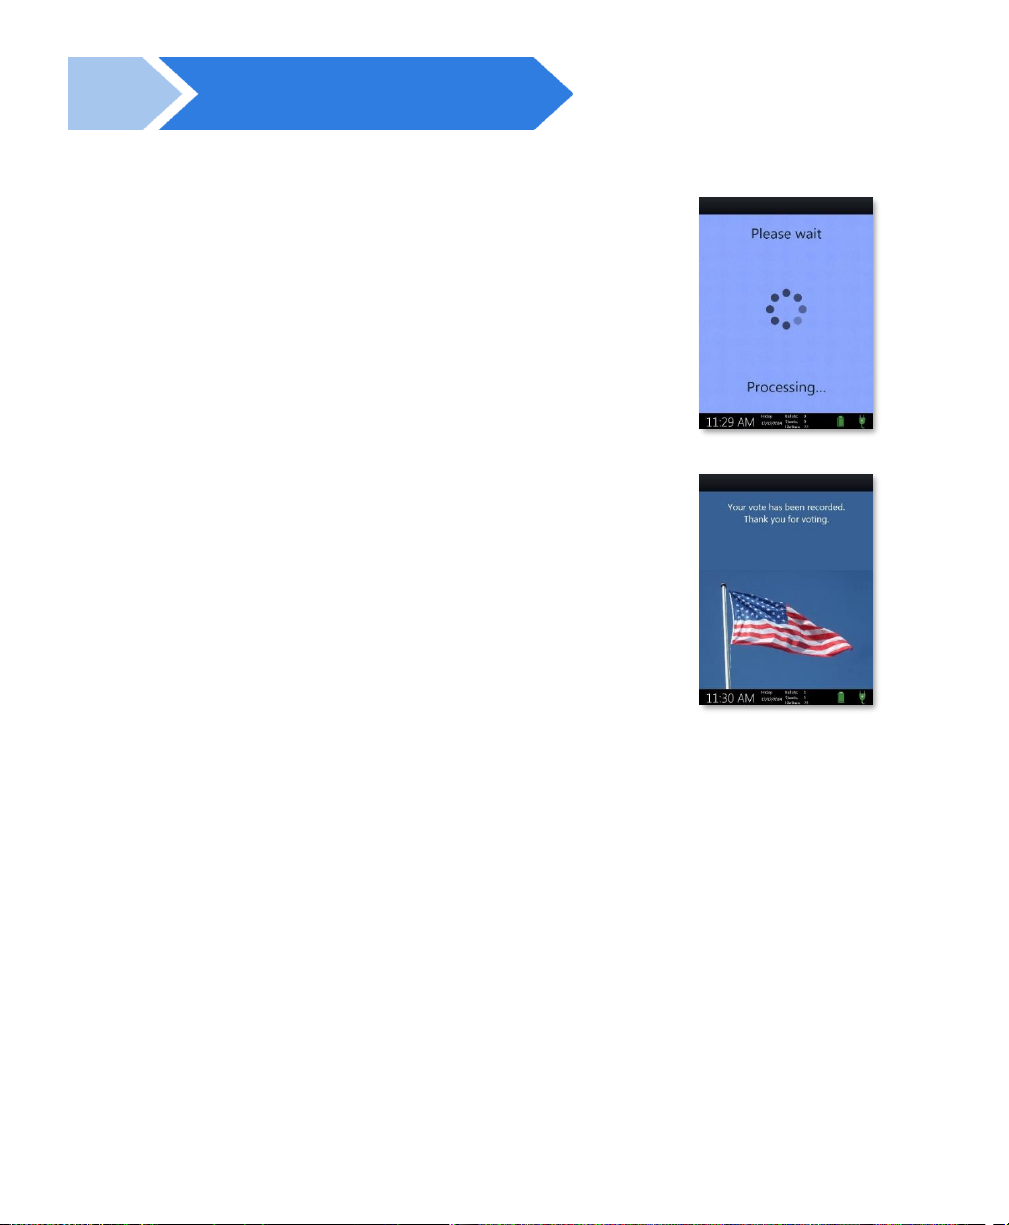
3. After scanning their ballot, the voter waits a
moment while the ballot is processed.
4. The voter’s ballot has been cast when Verity Scan
displays the American flag. If enabled, an audible
chime will also sound.
Verity Scan help and features
The Help button is located at the top right of the Verity Scan screen. This button
provides the voter with help text for the voting step currently underway. Select Exit
Help on the bottom right of the Help screen to return to scanning ballots.
If multiple languages are available, Verity Scan will also display a Language button
in the upper left. Selecting the language button will allow the voter to choose from
a list of available languages in which to display any instructions or messages.
troubleshooting
If there is a problem with the Verity Scan, follow the error instructions on the screen
(if applicable), and/or contact your elections office for assistance.

19
spoiling printed paper ballots
To spoil a printed paper ballot, follow your local procedures (for example, filling
out a spoiled ballot log and envelope).
undervotes, overvotes, and blank ballots on Verity Scan
If scanning hand-marked paper ballots, and the voter has overvoted (marked more
than the allowed number of choices in a contest), Verity Scan may prompt the voter
to choose whether to:
a) Remove their ballot and request a new ballot from the poll worker, or
b) Cast their ballot as-is (overvoted contests will not be counted)
If the voter has left a ballot or contest blank, the voter may be prompted to choose
whether to:
a) Remove their ballot and make changes, or
b) Cast their ballot as-is (blank contests will not be counted)
The voter prompts that appear on Verity Scan will vary depending on how the
election was set up (determined by your jurisdiction). Follow the directions on the
Verity Scan screen. In some jurisdictions, the voter will be prompted to contact a
poll worker, and the poll worker must press the poll worker button to accept a
ballot as-is.
provisional ballots
•IMPORTANT: Verity Scan will not accept provisional ballots printed from
Touch Writer. Preprinted ballots used for provisional voting should never be
scanned at the polling place using Verity Scan.
•Follow your local jurisdiction’s guidelines for the issuing and handling of paper
provisional ballots.
•Procedures vary from jurisdiction to jurisdiction; a typical procedure may require
that provisional ballots be placed in a provisional ballot envelope, which is then
placed in the emergency ballot bag (see page 20).
Refer to the Precinct Board Handbook for specific procedures on provisional
ballot processing.

voting with Verity Scan
20
the emergency ballot bag and emergency ballot slot
A separate, secure bag for unscanned ballots is
included inside the ballot box. It is accessible
through an additional locking door located on the
back of the Verity Scan ballot box.
The emergency ballot slot on the top of the ballot
box also feeds into this bag. This slot should
remain sealed unless the Verity Scan device cannot
accept ballots.
multi-sheet ballots and Verity Scan
When issuing paper ballots with multiple sheets, voters must receive all sheets for
each ballot. Voters should be instructed to scan all sheets of their ballot, even if
they have made no choices on a particular sheet.
•The Verity Scan ballot counter will increment when a sheet 1 is scanned but not
when a sheet 2 (or higher) is scanned. If sheet 2 of a 2-sheet ballot is scanned
without a sheet 1, the ballot counter will not increment, but all votes on sheet 2
will be counted accurately.
•If the voter has not yet scanned any part of the ballot and the voter realizes that a
sheet needs to be spoiled, it is generally considered best practice to spoil and
replace all ballot sheets. While not necessary, this may assist in the location of all
ballot sheets in the event of an audit or recount.
•If not all sheets can be spoiled (i.e. one sheet has already been scanned), spoil the
remaining sheet(s) of the ballot, provide replacement sheet(s), and spoil the
unused sheets from the replacement ballot.
Other manuals for Verity Scan
1
This manual suits for next models
1
Table of contents
Other Hart InterCivic Scanner manuals


Popular Scanner manuals by other brands


Fujitsu
Fujitsu M4097D - Fb 50PPM SCSI A3 Dupl 100Sht Adf Cleaning and maintenance

Faro
Faro Laser Line Probe HD Assembly instructions

Kodak
Kodak PROFESSIONAL RFS 3600 Support guide

Minebea Intec
Minebea Intec Puro Scanner MD2000 Safety instructions

Fujitsu
Fujitsu M3093GX INSTALLATION PROCEDURE

Polaroid
Polaroid SprintScan 45 Hardware manual