HASHIMA HI-550P User manual

INDUSTRIAL
STEAM
IRON
HI-550P
OPERATING
INSTRUCTIONS
Before
operating
th
isi
ron,
please
read
these
i
nstructions
completely
.
r 1
--
t-
••
1-
....
I .
~
-:
-
-
·-+
.
' : .
~
. t
.•
I
.
-~
r
~I
-.
"4
I
_l__r~
l
~I
~HASHIMA
From the library of: Superior Sewing Machine & Supply LLC
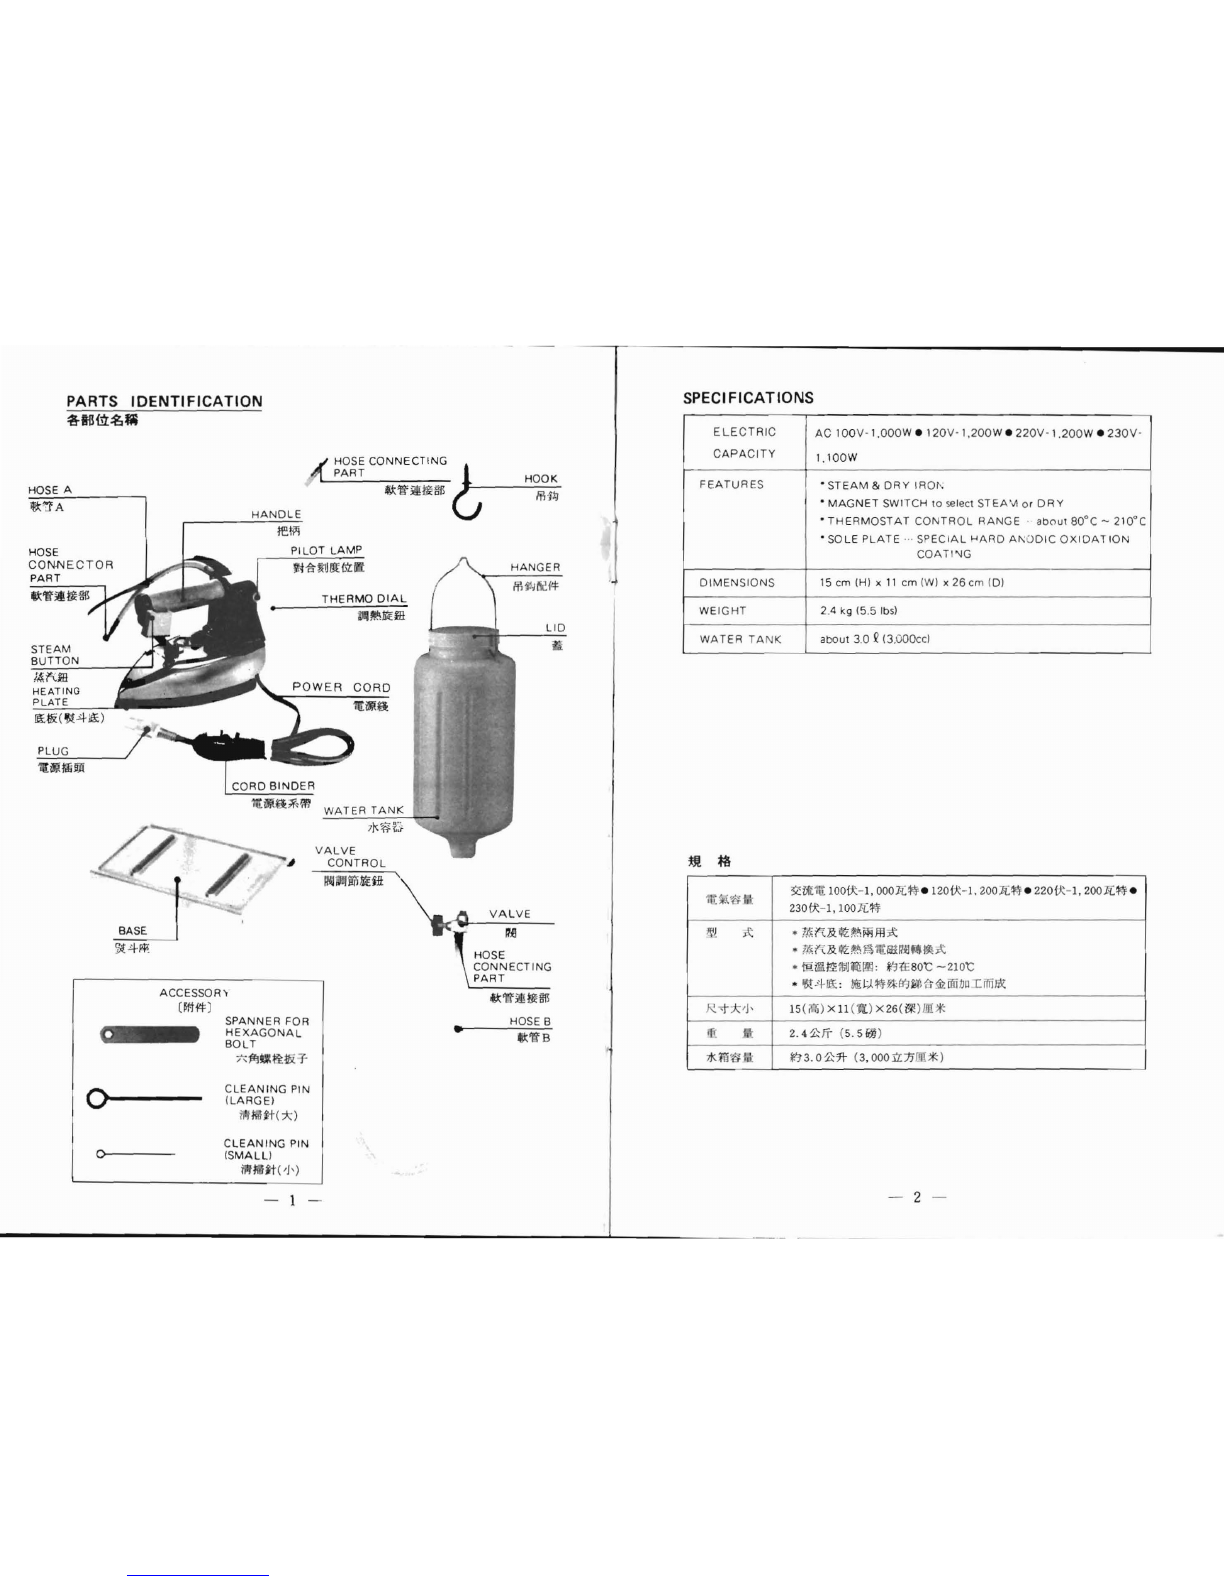
PARTS
IDENTIFICATION
~l{l
{}i
~
Wi
fL
PA
RT
HOOK
HOSE A
f H
OS
E
C
ONN
E
CT
I
NG~
~
'lf~
t)lt
gjl
!f,fl:j
A
,..------'-___;~
CORD
V
ALVE
~
CONT
R
OL
BASE
ACCES
SO
R\
(
ffl#
) S
PANN
ER FOR
HE X
AGONAL
BOLT
"
1flt.lti
ltii'f
0---
CL
EA
NIN
G PIN
(
LARGE)
l'N
I
Iut(*
l
C
LEA
N ING
PI
N
IS
MALU
l!lf
li111t(
'J')
- 1
JMJ.
Jli'j
MfJH
LID
HO
SE
CONNE
C
TING
PART
H
OSE
B
SPECIFICATIONS
ELE
C
TR
IC
C
APAC
I
TY
FEATURE
S
DI
MEN
SIONS
WEI
GHT
WA
TER
TANK
AC
lO
O
V-
l.
OOO
W e 1
20V
- 1,2
00
W e
22
0V-
1.2
00
W e
23
0V-
l .I
OO
W
• S
TE
AM
&
DRY
IROt-;
•
MAGN
ET SWI
TC
H to
se
l
ec
t ST
EA
'
v!
or D R Y
• THER
MO
ST
AT
CON
TR
OL
RA
NGE abo ut ao·c- 21
o•c
• SOLE
PLA
TE ... S
PE
CIA L
l-I
ARD At-;ODIC
OX
I
DAT
I
ON
COATI
'J
G
1
5cm(
H) x
ll
cm (W)
x2
6
cm
(D)
2.4 kg (5.5 lbs)
about 3.0 213
.0
00ccl
3CIJ[
1[
lO
O
f:k
- 1,
OOO
l[
~
e
120
f:k
-
l.
2001[~
e 220
f:k
-
l,
200
1[~
e
230
f:k
-
1
,
100
1[~
•
!.4.
fi.:&~~
m
m't:
•
~fi.
:&~
~A
lii1"0JJ8
•'t:
•
ffi:l!'ij;;,
$1
Jirr
l1l!
:
*'.J
H:
s
ot
-2
1
ot
•
~
4
111
:
~
u
~~
J
tdf:J
~t.-
~iliiJJuiffii~
15(
iQi)
X
ll
(
'lt
)
X
26
(~
)ffii
jf;
2.
4
~
/T
(5. 5/0})
*'.l3.
0
~
7t
(3,
000
:i1.
7J
l!ll
jf; )
- 2 -
From the library of: Superior Sewing Machine & Supply LLC

PREPARATION BEFORE
USE
1.
Tofixahook
Screw the
hook
tight
:y
onto
the
c~lling
or
another suitable place.
(Selo=:t
secure place for
fixing
the
hook
so
as
not
to
be
fallen out).
2.
To
fix
a metal hanger
Connect
thr
metallic hanger to hol
es
of
the tank
3.
To
fix a valve
Screw the valve
firmly
to
the metal
loc
va
l
ve
c
on
nec
tor
of the tank.
(Fog.
1)
4.
To
hang a tank
o Hang a
metallic
hanger on the hook.
o
Amount
ot
the steam
is
a
lit
:ic
different
accordong to the height of the
hung tank
T.he
most suitable l
ocatio
n
is
that the water l
eve
l in t
he
tank •s
about
1 meter high
fro
rn
the
iron
. (f-ig 2)
5. Connect a
hose
Insert the hose ends
thorough
ly
to
the hose con-
nect
rng
parts
ot
iron and tank
to
the
bottom
re-
spec
tively
.
6. Cord
binding
tube
It the
cord
IS
bot
hersome. pu t the
cord
and hose
together through the c
ord
bind
ong tube
Me
1a
lli
c
Val
ve
Co
nn
ec
tor
II;]
>I<
~JlUiJIY-.J~
1 .
!i:iE/1\~
•ffi/1\~~~~
k
rr••~
•~•~<~•~~~-
~~•
m
2.
g:L/1\~Ii!ilf
*
ffili-\~i!Cilf~!l"::(E;oj(!€¥~1'1'1-F-'f.fl
.o
3 .
!ti:'!i!llllr~
•
re~H~~~~
~~*~~">Jl?i!
, <
~$
~m 1
1J1JJ
4.
/j\""f;oj(~ft
•
ffli-l~~cf4:1#~1iHI;I..1
::,
I
Fog
.
21
(til
2[lo\1)
•
l1i~
.#.~~i11i
([,
ff
~Wl
lfi"W
t
i±l
o
J\il:ff~l!li4
llHll
f
i
JJ!(iiDA
1*"
(,
'$fl:li!.M 2
11!)
5 .
iftJij:W
·ff~-~-
~~M-~4~*-~~~a
fi••ff•E,
6.
-~ll·ll
•
lm*"
ilitm.!Hfii('f&!f,
m~rore
r
¥t~~'f!~S::
-u ~
m,
- 3
HOW
TO
USE
AS A STEAM IRON
1. Pour clean water
into
the
water tank.
1)
Remove the
lid
.
2)
Put the lid on after
iilling
(The tank can hold up to
abou
t 3Q)
2. Plug the cord
into
an
electrical
outlet
. (Set the
thermo
di
al
to
"
MIN
"
before pluggi
ng
the cord in)
3. Set the
thermo
dial
to
"
Steam"
I
U61
for
every
fabric
and place the
iron
on the
base.
(Fig.
3)
4.
Start
st
eam
flow
.
1)
Turn
t
he
valve
control
counter
clockwose
unti
l
it
stops. (Fig.
4)
2)
Pla
ce
the
oron
on
•ts
base and a
ft
er
about
2 minutes
th
e
fli
ckeri
ng
ol
the pd
ot
l
amp
will
begin.
Thi
s
ondi
cates that the
temperature
has
au
to·
matica
lly
reached the correct level. ' Fig.
5)
3)
Push
the steam
button
unt
il water fills the hose. (Fig. 6)
Never push steam
button
until
the lamp lights o
ff
.
4)
Holding the
iron
hori7ontall
y,
push the steam
button
down
. Steam
wil
l
then
be
emitted
from
the vent. (Fig.
6)
Continuous
steaming
for
over
1.5
minutes
may
cause
water
to
drip
from
the
vent
of
the
sole
plate
.
Be sure
to
use
the
iron
cloth
to
s
team
fabrics
whose
sui
table
temperature
is
lower
than
steam
range
temperature
.
0
(Fig.
3l<m
3llll
I
Fig
.4
)(
1:f!
4 Ill)
f'F~11?(Jl41Y-.l~m~~
1 . aJ.-ll:i*IY-l*
1Fig.
5l(til
5
!11
)
1
).
tJlJI.I;oj(
!€¥~Yo
2).
11#.~.
~boJ;J.i',;:~
, (
#.!€¥~.ZQ:k
'€!<
·¥3.\i3. 00-7\-, )
2.
lliA-~lii!UJl
i"i7\':J
H
141.1\l
~li:O
!!*II;~
MIN
~!lffiif-B''J~{.[
uz
Jlt
.
~~:;tlltl
'l\!
ilit¥1M9JU!&El1!!
M
A~
iJi\~J±lP
,
3 .
~~~1JU!IIl:"i.
(
4U
)
fl!fur.IY-JJI
;
"Ui
'
l!t:ili:W
>r-'tfl!iH!tzfftlJII:?e
lmfol.
~l!!!~
lfl~~
til
•
~1HtW&:t41ill::tE15t4~,
(!'11$JII,l
,
4 .
IIIIR!llfm
~
3
1111l
1)
.
:14*'1!#.~1HliillliYilBU!I~Q~&IhHt
nloJfi
JE,
(;lJI$~
;!1
4
~)
2J.
tstgl!t4*m
2 5Hitr::ti.
m;r-mitoo~r;(ltlt
tt.it'i!i;f;
ttt4zlf.
L[
e5!E!ll;
l1!!~11i!J:(£;!§"#;B'Jl!ll.[,
(
~1i
$JII,l
.
;!l
5
Ill)
3).
J1ir~i"\m.
J;J.fl!~#.ff-fllli~~'tf.(,
$~~6111)
ffi
if-
!3Hf!
.
i!l.Zlill,
~>r-J!l1i
7t.Am,
4).
-'ff;\'l!t41Jli:Jl\;oj(
lji
B'J:l*!~
.
tt.l'i11-'f-JI41.«/'{J!!J1(T1;:;,
:it
"!tt±l
Mih*o
(
!~
$~!'fl
I·
:t!Liltlttti!.\""F.
ifll{!f!l1
.5
5tii1::.LL~.
*~·~-;<\~~ttl**"
I
61111
)
•
fl:!Eii:EI!tii&J!~Ii'(/;~i"\~I
JI.[*lll!'ll
B':lllllil
!I
~.Zi'G~I!tl.ftJI;'j
,
l«UU'x:
-M1!i
lt1£~
LiiD:;j'~fo
-4-
From the library of: Superior Sewing Machine & Supply LLC

5.
To
change
from
steam
to
dry
.
As long
as
the steam
button
is
at the
UP
p
osition
the
iron
ca
n
be
u
sed
as
a
dry iron.
•It
is
normal
for
steam
to
be
emitted
for
a
while
just after changing
from
steam
to
dry
because
water
remains in the iron.
6.
To
add clean water.
Refill
cl
ean
wa
t
er
when the water level r
eac
h
es
the
"1
.
0"
li
ne
. (Fig. 71
7. Finish.
1) Turn the
va
l
ve
co
ntr
ol
cl
ockw
i
se
unt
il it stops. (F
ig
.
8)
21
Pu
shi
ng
the steam
butt
o
n.
hold the ir
on
horizo
nt
ally a
nd
wai
t
unt
il the
stea
m completely stops. (F
tg
.
91
8.
Be
s
ur
e to
set
the th
er
mo dial
to
"
MIN
" and
10
pu
ll the plug
10
di
s·
connect. (Fig.1
0)
9. Storage
Keep the iron on the b
ase.
(Fig.
111
(Fig.\01
(
ln!OI
J!i) (Fig.
ll
l (
lnll
il!)
5.
•~&~~z••
~~M~m~m.
mn~4~-
~~~
~~4o
t{(T~
fl:m,
I>Jti±l
~'l'i.z1&
.
W~if
Jg
@JQZ:
~H;'f
,
tl!.'G
:lz:~
IJtl"
.
tE.
&m~
~
~~-~-a~Wfi*~~~
M~~
~--o
6.M:1f;tli*at!*
*~~<f>~]f(-
.13.~.3§
1.
oi;I
J/Jl't'li
7 .
~ij!j:1f~lf<~*o
(
;'iii~,OO.
;g
7
l:oi)
7 .
{f!ffl:i€1"~
1
).
l1Ut!*~llil
illl ll1l
/i:£m~"~lillillff£
t
/Jial
,
l:J(fi!IUJ~Z
o
C~~
~
.m
8 tl)
2).
felt[
4~*'1':tl\!.!!\t!iT
.i"\
m.
~iiJ.
fi:7
H:IWI<:a!.l:.o
(lil!
~~.m
9
!J\l)
s.
m~
,;:
-
rz~&
.
~li<'Ha
-
:iE~i'lti!J~
MrN
+
1'1
ffiii<B'-J®:i!it'li •
ffilll
.i;
~
~
~rr
iJl\~J:tj
1-lt,il±l
iJl\Qllfi~
.l
!3i:(o
(,
~~.1fff10
IIf
)
9.
At~
.
Q:'lf
'iO:~:tE~48H
rZ.o
(ll11~
JWJ!l
ll
~)
- 5
·-
'·
J
I
HOW TO
USE
AS A
DRY
IRON
1. Set the
thermo
dial
to
"
MIN
" and plug the cord
into
an electrical
outlet,
placing the iron on the oase .
2. Set the
thermo
dial to the type of material
to
be
ironed. (Fig. 121
11
Wh
en
ironing
dif
f
er
en
t
ma
te
rial req
uiri
ng
va
rious
tem
oeratures. it
is
most
efficien
t
10
be
gin
by
troning the materials requ
iring
l
ower
temper·
atur
es
first. gr
ad
ually proceeding
to
those
req
ui
ring
ht
gher temperatures.
21
Wh
en
changing
fro
m high
10
low
t
emp
eratu
res.
be s
ur
to wait for a
wh
ile.
3. S
tart
ironing
11
Pla
ce
the iron
on
tis
ba
se
and after about 2 m
tnu
tes the flickering ol
the
pilot
lamp
will
begtn. This ind1cates that the temperature
has
au
to
matically reached t
he
corr
ec
t level. (F
ig
.
51
21
It
tS
recommended that
an
iron
clo
th
be
used
when ironing
synthetic
mater
ia
ls or
to
iron on the wrong side as a t
est
before pre
ss
ing
direct
ly
onto the mater
ia
l.
4. Fin
ish
Se
t t
he
th
ermo d
ia
l to " M I
N"
an
d pu ll t
he
plug
10
d
ts
connect.
5. Storage
Keep the iron on :he oase
1~~~~tt4rt-J<fm~~
1 .
Jli
A.
11UUI!illil.ll
( F
ig.12
) (lr{ll2)
1;<1)
8$\::~
Jm
l~
/i:££11i'fil!J~
MIN
+ltffi:if<B'1Al
!l&t'li!i't',
~1&?Jm~4~:tE'!S:t4f'l!.
;tilli:HX:!t!!lm
diJ
HJHi~JifiljA.m
1ltJi!
~J..
o o
2.
~il!llll~!td:H~W·MHID~~II!at!i;iiW
(f.II~
JI!:
iJ
(H2fl'<!
)
1
1.
n•w~
&
m•~~/Jl'~~
~~-~.
~ -
®
~•~:n••~•~~&!l&~~
Hfl
tl:$1::
,
il'il~~IXI.m'il'li
B'
~t<
n~:tE1~o
2/ .
tHl*!fllJ::.
;f!J
JX
,
l<f-<Xtf!'8!ro1
lltz1f;tf
"T
:Go
3.
llft~lflll
1) .
l'Stg
~4 *m
2
;?-
fiti:
:b,
fii;r<m~
I11!
~
1
XI~
•
.Mii!t
~iT<
R
4~
11iXm'Bm!EiiJJ
tt!!l'l!
~J
:tEj§n~IXI.Ill'o
Wi~
~
.m
s
fJll
)
2).
···~
~
---~&~
.
m
,
:tEXJ::.~~~
-
M~W
ff~
··~h~~~
t'E
B';~ (fiz
i&.
?iEAtt!!ITZo
4.
{flft'li:"J~
lmill~
tOHrN'l!J~
MIN
+1iffiiJ<B'-
J{;'Lfa
i&
,
:iE~I~i:t,
.t;!
~W
(:
t
~I:H
~
tlllti
ll
H~o
5.
~~.
Q:tf
'iO:
~tER4
8H
rZo
- 6 -
From the library of: Superior Sewing Machine & Supply LLC

CAUTIONS
1. When leaving the
!fon
even for a whtle,
be
sure
to
dtsconnect the plug
for
safety.
2.
Be
sure to
use
a wall
outlet
as
a power
supply
.
3.
Do
NOT
let the
co
rd become wet and
do
NOT
handle the cord wt
th
wet
hands.
4_
Be
sure to check the cord
ev
ery time before
use
since a damaged cord
r-:1
ay
cause
heat, fire
or
ele
c
tri
c shock .
5. Do
NOT
touch
metal parts
while
usi
ng
or
JUSt
after
use since they
are
hot.
6_ Handle the
iron
carefully
to prevent
hot
water
from
coming out
of
the
vent.
7.
To avoid having
hot
water
emitted
,
ad
here
to
the
following
precautio
ns
.
1l
Do
NOT
move the
iron
back and
forth
very fast or change the
stear
button
while
moving.
2)
Do
NOT
tip
too
much
to
left
or
right.
3)
Do
NOT
tip
forward
too
much.
4)
Do
NOT
turn
the sole plate upside
down
.
~.m...t~Ji~
1.
~••oo•4~
-
~~.
~
-
~~••m
~~llioalli·~~•u•.
u~•
-
R
~~~.
~~~~.~M·~~-L
2 . •
~
-
-·8§ftR
K
~lli-
~.
3 .
lj)7JJJ'fi1.1.
11ti8:\
fl.
'1'-J::.fl":>l<.~.
1,';1f-~!@.
~::i;lllii
~~-
4
··~fflUR
.
N -
~~-~~-·~-
~
--~
~
~
·x•J::.«m~m~.
~
a --.nan.
a~*RR
ᴥ~~.
s .
t£flt':ffl<P.
;
H.fllllii~ii.llitil
l7f
.
~aJtnm:n:
.:-:;.
tEflt':
ffl
i&'f?..a;
'
,
#~.
6.
:a:~m<P.
;o;~ii:
mUt:Jd~t.
J:J.~r.u~
~
I!Jilli1LJRi!lllli~**·
1.
SW~~-4~ffl~.
··~T.
U~JR~llift:>l<.~
1).
'l~I!Ji:R;i!(Jti!(•J
~iji&~IJJ;L,
'
i:\"
l
iPF
:OC[if
l~
·
¥11i
~
'
'd/iR$11n:Z.
2).
'l
~
I!Hti~Jtl!llil*l
ft
ti:
{Jl.t)!~t;£
i
fl!l
l.
3).
?i
~l
!l8i~.ttt!M*lftilil~!
.
4
).
¥
~~~-4.
UBflt':a4&~L
- 7 - ·-
8
Do
NOT
loop
the cord around the
hot
tron.
9.
After
co
oling
dow
n,
wipe
the sole plate.
etc.
wtth
a soft
dry
cloth
• To avoid scratching.
do
NOT polish
with
a metal
or
hard
bru
sh.
10.
Do
NOT
place t
he
i
ron
on a
button.
hook
or ztpper
directly
.
11
.
Do
NOT
po~.>r
hot
wat
er
into
the tank since it or may
defo
rm
thP.
tank.
12. Never push steam
button
whP.n
the
thermo
-swttch
is
set
at
"M
IN " or at a
lower posttion than
"STEAM"!
U61.
Remaining unvapored water tnside the steam generating chamber and
keeptng the iron
as
it
>s
will
make the soleplate
or
inside the i
ron
c
orr
od
ed
accelerate o
form
white
rust.
~
When the steam
button
is
erroneously pushed .
hold
the
iron
hortzon
ta
l·
ly
and
tu
rn on electric.> ty
until
the steamin·g
st
ops.
13. Be careful to
ke
ep the hose away
from
hot
ir
on.
o
Th
ere
is
a fear
of
melting the h
ose
.
s .
1;1J7JJ:Ill
.
t
~a
ml>1.!
t£f.!IW
4-J:t
.1:.
.
9 .
Rffl*
.
··4~
T
·;L-~fflCaM•M·~-4~RX@$~
•
W7JJ~fflW4
m
n•
*~~~u•~~~~.
u~•~
•4
~~m~
.
10. W
il'i:R:'t,
~
Wl
i!i/J~S/lj[},
IJLM~o
II
.
J!(~i!:,~
ll:
t±A.ft:>l<.ffffl.
~
-
a~J;)ij!it@.«B'7~t.J~~1
>
ft
,
l!i¥.fo!A~J!(W:l:l
il:lf
~~
o
12.
f.!l&tlllilll~tEr
MIN
,
!l\G!t
r
!.M'\(
U.
) ,
~
IJ
!(!'fttU.~.
~:-t
;
.!1i
!.
M\SI
I
o
•
llo.JI!ll!A.t£1'
\
fl::.
3I~B'1
J!(5J'i5!.fl"
!.
<li~*l:i'Jl.
~!J"tR%"~
~N!I!,
fffitEilH!If;!Jp.j$
~1'.
13
~
.
•
.ol;
-!1i1'7M\
il1H
.'f
.
le~4iill
d
ti.!J!('J
'.
gd
'
t):JtfNilfiJ!(~Ii!i~liiZ:i~!L
ll
a
R
'f
~•
ll!:Jtt
«l: 'lf
fflllii
'fll~-
!l'J'Oi
4
J:o
•
~JE~'I'fey
fl::.Ji\\ffi
o
- - 8
--
From the library of: Superior Sewing Machine & Supply LLC

WHEN STEAMING BECOMES WEAKER
Be
su
re to disconnect
th
e plug. and after cooling the iron clean it in accor·
dan
ce
wit
h
th
e foll
owi
ng
direct
ions.
1. Clean t
he
steam vent
(
1)
Clean t
horoughly
the steam vents
by
using small cleaning ptn. (Fig. 1
3)
o
Be
sure
to
make a steaming test
for
a few
minu
te
safter cleaning to
be
su
re
that iron does
not
soil clothes.
2. Clean inside
the
steam generating chamber
( 1) Remove hexagon headed bolts
by
using
accesso
r·,
too
l (spanner for
hexagon headed bolt). (Fig 14)
H
exagon
headed bo
lt
,,(q
tll(i\1;
11
;
~Pltl:l·~~~
~
;
.:·:··
..
~-
(F
ig. 13)
(;il
l
3
~)
Co
(F
ig
.
14
)
·
~
~14[
l;~j}
Acc
e
sso
ry t
ool
(spanner for
he
x
ag
on
headed bo
lt
)
) J#i'l'
I'~~
~-~~
~
•
w
~•~
m~a
re
~4~•z~
m~
•
~
~•Hmllil
.
1 , ;
A'!IlU
'\
..
ttl
D
CD
IIlii
Hi
\IH
(
+l
le'.
i#.i'\
~.ni:H
o
t~olltl<tl:f.li.
(
i
ii~
~.
\1113Jl;ll)
• illlllilillt>li:
-H,
i7*11i~.
11'ldt
·
lZ·::rile'.
i
M
C
P!t
t±ll!H
H!tlZ.t~
:t
iiJ!!I!IIl
.
2.
:A'
!I
;
"Ht~~IIB
CD!fl~
IWt
LH
("'
IEJ9Jl*'I\Jfll&
.f.)
fl'l!~~
"'f!JU:*'I\.
W1~~.
1JI\
14
1r<l)
- 9 -
(2) Remove the lid
of
steam generating chamber and packmg ( B).
(
3)
Remove
th
e fur attached inside the steam
gen
erating chamber and the
lid there of thoroughly (Fig. 15)
(4) Clean the steam hole
by
using a small cleaning pin.
(5) Remove the
fur
in the steam
passage
thoroughly
by
using a large
cleaning pin. (Fig. 16)
(
6)
Remo
ve
the
fur
on the packmg ( B ) and the
pa
cking ( B ) connecting
part. Be c
ar
eful not to damage
th
e
pa
ckmg( B
).
o Be sure to make a steami
ng
test for a few minutes after cleaning
to
be sure
th
at iron does
not
sc
iI clothes.
Saeam
oe
neral•ng
c:
hamo
e•
cove
r
®fl'll
"f
;"\
{!::
~'H
il
l!;
llt
.
(Fig.
15
)
(t
(
HS
r:ll)
(Fig 16)
(
!IH6
~)
®~fflW:A:f\ft
~
~
lilllRi"\
{!:'.
~
JI~
i'1.tliiffl
i'
;
U'i~
.
(
IJ!
$
.1\I\
~151t'l
)
@
ffl
ffllT
H
t('
J
')m
llil
~
i"
HL.
®ffl
l!lllm
£t<
*>
m~~fl:
T
l
t
U!!
~
1'1
.tlii
~
j!J
~
~
.mt
$Mjg
l6
~
l
®m~m~IR~~-
~~1'1.1/ii
.~~m~.
~~
m~
m~
•
lilt'~i.HI&'flff1'1
~:flifl.
~~~
·aj:(
le'.
~i"\
I!Jlt±llt
5Hiz~
:tiiJ!tffl
.
-10
-
From the library of: Superior Sewing Machine & Supply LLC

3. Clean
Tank
Filter
(When
water
does
not
flow
down
easily even
though
the hose
is
taken
off
and
the valve
is
ope
ned
).
( 1) Remove the valve
and
the
filter
setting
rubber.
and then
filter
.
(2)
Remove deposits and dusts attached
to
the
filter
. and wash
1!
in
water
.
(Fig
. 17)
4. Check
the
Hose (A) · ( B)
Check the hose
to
see
that
it 1s
not
broken
and preventing
water
flow
.
5.C
iea
n the Nozzle
Remove the nozzle from the hoses and clean it by the
fine
wire (Fig.
l8)
Tank
~··
(Fig 17)
(
~17
[jl)
HOSE
CONNECTOR~
tj;'lfl!l!l!l
!ll
3.
illl•*g*io!l••
(
ll!lfi!J!Hltt;:';l'
tllllll!llr,m.;;r-!ll!fJrAE
*II;'fo)
CDflllr
llllr,
J;J.:&lll
li!llilii~DJm
.
J&Tlll
li!l
o
@Mt~'ttfttE
llllfi!IJ:.B':l
!lM*~~iflrAE)j(~l!!l
o
(m
~~lfg17111
)
4.
tt•••
• I!Ut:/Ei!fti;:'J'illlilf,
~)j('f
,;
(lifiJ
o
5 .
11JliiJIIII'liJII.
(Fig.
l8)
(m1Siill)
lfffllltt'=!'
J:.B':J~.M:
.
ifl~£1
_i>
~
;jt
PJliiJii.jli!fi
~li\!lli~o
~~
~~lfglS
II!)
4:;
HASHIMACO,LTD
BUSINESS
OFFICE
: 7-6.
RYOGE
GIFU·CITY
. JAPAN
TELBI-58-247
-
8400
.
81
·
58
·245
-4
50
I
FAX
81
·
58-240·5775
BE
IJING
OFFICE
:
TEL
/
FA
X 86·I
0-8729-7235
SHANGHAI
OFF
ICE
:
TEL
86-21-6485·16
21
FAX
86·21-6484
·52
14
SINGAPORE
OFFICE
:
TEL
65·2858131
FAX
65-2858132
URL
http
://
www
.
hashima
.
co
.
JP
-
11
-
From the library of: Superior Sewing Machine & Supply LLC
Table of contents
Other HASHIMA Iron manuals


Popular Iron manuals by other brands


Myria
Myria MY4507 user manual

Philips
Philips GC7000 Series quick start guide

Black & Decker
Black & Decker AvantSteam AS700 Series Use and care book

Rowenta
Rowenta SOFT DX2500D1 manual

Steamfast
Steamfast SteamJet SF-777 Use & care instruction manual

Windmere
Windmere Everyday Living SI-750 Use and care book


