haTmed Q50B User manual

SmallSteamSterilizer
UserManual
(InternalWaterTank)
Q50B/Q70B
2460
HӓTmed(Wuxi)Co.,Ltd
V01version

I
HӓTmedSmallsteamsterilizerforsterilizingmedicalandlaboratoryequipments,Theproductdesignconforms
totheYY/T0646‐2015standardandisaClassBsterilizer.ProcessevaluationsystemaccordingtoEN13060.
Do not sterilize any liquid,Violating the use of this product to
sterilizeliquidswilldamagetheproductandtheloads.
:
Symbols Indication Description
Warning
Identifies danger points or conditions and
the correct procedures that must be
followedtoavoidinjury.
HotSurfaces Hotitems,takecaretoavoidburns.
Caution
Identifies actions that could damage the
device/component.
PrecautionsDrawuser'sattentiontoimportantmatters.
Symbolsonproducts:
Symbols Description
takecaretoavoidburns
Manufacturerofmedicalequipment
Dateofmanufactureofthisdevice
Serialnumber
Symbolsdescription
Application

II
NameandaddressofauthorizedagentofthisproductintheEuropeanUnion.
Serviceshouldbeperformedbyqualifiedtechniciansonly.Observealllocal
andnationaldirectivesrelatedtoserviceandsafetystandards.
Thefunctionandlifespanofthisproductaredirectlyrelatedtowhetherthe
userfollowstheoperatingspecificationsandmaintenancerequirementsin
theinstallationandusemanual.
ManufacturerconfirmsthatthisproductcomplieswiththeEuropeanUnion
MedicalDeviceSpecification.
Drawuser'sattentiontoimportantmatters.
Identifies danger points or conditions and the correct proceduresthatmustbefollowedto
avoidinjury.
Liquidsterilization Donotsterilizeanyliquid
Professionals Theoperatorwhousesterilizersandfabricmustbegotatrainedprofessional.
Powercordandpowerplug
Donotreplacethepowercableorpowerplug.Donotuseadamagedpowercableor
powerplug.
Donotusethisproductifthepowercableorpowerplugisdamaged.Thepowercable
orpowerplugmustbereplacedbyaprofessionalauthorizedbythemanufacturerof
thisproduct.
Donotuseforceonthepowercable,besuretooperatetheplugitselfwhenplugging
andunplugging.
Makesurethepowercableisnotknotted。
Donotplacethepowercablenearaheatsource.
Donottouchthepowercablewithasharpobject.
Installation,setupand
commissioning
Installation, setup and commissioning should be performed by a professional
authorizedbythemanufacturerofthisproduct.
Safetyinstruction

III
Donotuseoroperatethisproductatsiteswherethereisariskofexplosion.
Theelectricalconnectionofthis productandtheconnectionoftheinletandoutlet
pipesshouldbecarriedoutbyprofessionals.
Thisproductshouldnotbeindirectcontactwiththepatient.Placethisproductoutside
therangeofatleast1.5meters(radius)inthetreatmentarea.
Ifanexternalprinterisconfiguredforthisproduct,theprintershouldnotbeplacedin
alocationwherethereisariskofcontactwithliquid.
Emergencydoor
openingdevice
Donotusethisdevicetoopenthedoorundernormalconditions.
Sewagepretreatment
andsterilization
Pretreatmentandsterilizationofinstrumentsandfabricsshouldfollowtheregulations
oftheinstrumentandfabricmanufacturers.
Strictly follow the relevant standards for disinfection and sterilization,e.g.WS506‐
2016,WS310‐2016.
Usepackagingmaterialsorcontainersthathavebeenconfirmedbytheirmanufacturer
forsterilization.
Sterilizationtermination
Thisproductterminatesabnormallyatcertainstagesoftheprogram,hightemperature
steamwillemergefromthechamberafteropeningthedoor.
Theloadeditemmaynotbesterilizedwhenthesterilizationisabnormallyterminated.
Please note the status of the program showed on the display when itterminates.If
necessary,theloadeditemsshouldberepackagedandsterilized.
Removetheloadeditem
Donotusestrongdooropening.
Usethetrayhandletotakeoutthetray.Donottouchthesterilizeditemswithbare
hand,includingchamberanddoorcover.
Checkiftheloadeditemsispackagedcompletelyaftersterilization.Ifthepackageis
damaged,pleasepackinstrumentorfabricagain.
Deliveryandtransportation
Atleast2peopleneedtomoveordeliverthisproduct.
Useproperbelts.
The shipping box provided by the manufacturer of this product must be used for
transportation.
Sterilizationload
Theloadmustbesterilizedwithallowedsteambythemanufacturerbeforeitcanbe
sterilized.
maintenance
Maintenanceofthisproductmustbeperformedbyaprofessionalauthorizedbythe
manufacturer.
Pleasemaintaintheproductatthetimeintervalsspecifiedinthismanual.
Mustusetheaccessoriessuppliedbythemanufacturerofthisproduct.

IV
malfunction
Ifthesamefaultmessageappearsrepeatedlyinthisproduct,pleaseturnoffthepower.
Repairmustbeperformedbyaprofessionalauthorizedbythemanufacturerofthis
product.
Nameofsterilization Standard
134
Standard
121 QuickB Quick
S 134+ Fabric
Classofsterilization B B B S B B
Dynamicpressuremonitoring√ √√√√√
Airleak √ √ √ √ √ √
Noload √ √ √ √ √ √
Solidload√√√√√
Smallamount,porous,permeable
mixedload √ √ √
Smallamount,porous,permeable√ √ √ √
Porous,permeablefullload√√√√
Bhollowload √ √ √ √ √
Ahollowload √ √ √ √
Simplepackaging√√√√√√
Compositepackaging √ √ √ √ √
Dry,solidload√√√√√
Dry,porouspermeableload√√√√
Sterilization Program Introduction

V
TABLEOFCONTENTS
1DeviceDescription........................................................................................................................................1
1.1Deliverylist...........................................................................................................................................1
1.1.1Standarddeliverylist.....................................................................................................................1
1.2Productview.........................................................................................................................................1
1.2.1Frontview.....................................................................................................................................2
1.2.2Frontview.....................................................................................................................................2
1.2.3Sideview.......................................................................................................................................3
1.2.4Rearview.......................................................................................................................................3
1.2.5Insideview.....................................................................................................................................4
1.2.6Topview........................................................................................................................................4
1.3TechnicalParameters............................................................................................................................4
1.4Loadingmethod....................................................................................................................................5
1.5Intelligentcontrollerandcontrolpanel..................................................................................................5
1.5.1Operationbuttons.........................................................................................................................6
1.6Emergencydooropeningdevice............................................................................................................6
1.7Equipmentworkflow.............................................................................................................................6
1.7.1Sterilizationprogram.....................................................................................................................6
1.7.2Vacuumtest...................................................................................................................................7
2Installationandhandlinginstructions...........................................................................................................7
2.1Unpackingprecautions..........................................................................................................................7
2.2Installationsiterequirements................................................................................................................8
2.3Deviceheightadjustment......................................................................................................................8
2.4Connectionrequirements......................................................................................................................9
2.4.1Electricalconnections.....................................................................................................................9
2.4.2Distilledwaterconnection.............................................................................................................9
2.4.3Wastewaterconnection...............................................................................................................10
2.5Installationservicelist.........................................................................................................................10
2.6Handlinginstructions...........................................................................................................................10
3Firsttimeoperation....................................................................................................................................11
3.1Startup................................................................................................................................................11
3.2Afterstartup.......................................................................................................................................11
3.3Openandclosethedoor......................................................................................................................11
3.4Distilledwaterinjection.......................................................................................................................12
3.5Drainage.............................................................................................................................................12
3.6Sterilizationeffectverification.............................................................................................................13
4Sterilizationprogram..................................................................................................................................13
4.1Loadingitemstobesterilized..............................................................................................................13
4.2Selectsterilizationprogram.................................................................................................................13
4.3Auxiliaryoption...................................................................................................................................14
4.3.1Warm‐upsetting..........................................................................................................................14
4.3.2Automaticprinting.......................................................................................................................15
4.3.3Extradrying.................................................................................................................................15
4.4Runningasterilizationprogram...........................................................................................................15
4.4.1Startsterilization.........................................................................................................................15
4.4.2Programrunningprocess.............................................................................................................15
4.5Manualstop........................................................................................................................................15
4.6Sterilizationprocesscompleted...........................................................................................................17
4.7Sterileitemstorage.............................................................................................................................18
5Functionaltestingandotherprocedures.....................................................................................................19
5.1Vacuumtest........................................................................................................................................19
5.2B&Dtest..............................................................................................................................................20

VI
5.3Helixtest.............................................................................................................................................20
5.4Drainageprogram................................................................................................................................21
6Systemsettings...........................................................................................................................................21
6.1Timesetting.........................................................................................................................................21
6.2Datesetting.........................................................................................................................................22
6.3Languagesettings................................................................................................................................22
6.4Warm‐upsetting..................................................................................................................................23
6.5Printingsettings...................................................................................................................................23
6.6Extradryingsettings.............................................................................................................................24
6.7Waterqualitytesting...........................................................................................................................24
6.8Systemreset........................................................................................................................................25
6.9Systeminformation..............................................................................................................................25
7Sterilizationlog...........................................................................................................................................25
7.1Logexport............................................................................................................................................26
7.2Logprinting..........................................................................................................................................26
7.3Loginterpretation................................................................................................................................26
8Smallsteamsterilizrmaintenance...............................................................................................................27
8.1Cleaningofitemsbeforesterilization...................................................................................................27
8.2Maintenance........................................................................................................................................27
8.2.1Cleaningandmaintenance............................................................................................................27
8.2.2Regularmaintenance....................................................................................................................29
9Failureandcommonproblem...........................................................................................错误!未定义书签。
9.1Noinformationonthedisplay..............................................................................................................29
9.2Largeconsumptionofdistilledwater....................................................................................................30
9.3Baddryingeffect..................................................................................................................................30
9.4Nodistilledwater.................................................................................................................................30
9.5Unabletoopenthedoor......................................................................................................................30
9.6Leakageatthedoorordrippingunderneath.........................................................................................31
Appendix1 Safetydevicedescription.............................................................................................................31
Appendix2 Schematicdiagramofpipingsystem............................................................................................31
Appendix3 Electricalschematicdiagram........................................................................................................32

- 1 -
1 Devicedecription
1.1 Deliverylist
1.1.1 Standarddeliverylist
Thestandardaccessoriessentwithsterilizerarelistedinthetablebelow.Pleasecheckthelistwhenunpacking.
1.2 ProductView
1.2.1 FrontView
1.1.1 Standarddeliverylist
AccessorynameAccessory
PictureQ’ty Description
Airlevel 1
Airlevelisplacedabovethesterilizerduring
installation.Twofootpadsatthefrontishigherthan
thebackend.Theanglebetweenthebottomof
sterilizerandcountertopisaround5‐10°.
Tray
3 Aluminumtraywithholesatthebottomforplacing
sterilizeditems.
Trayhandling
1 Tooltotakeoutthetray
Chamberrack 1 Racktoholdthetray
Fuse
2 220V/16Afuse
Airfilter
1
Airfiltertoensurethattheairenteringthe
sterilizationchamberishighlyfilteredtoreduce
bacteriaanddustentry.
Wastewater
pipe
2Transparentsiliconetubefordrainingwaste
water(Φ9*62M).
Drainconnector
(internaltank
only)2 Ajointconnectingthedrainpipetothesterilizer
wastewaterinterface
RandomDocument
Installationand
manual
1 Manualbook
ProductService
Manual1 Userguidance,installationserviceorder,
maintenancerecord
Operation
precautions1 commonproblemsandprecautions

- 2 -
Fig1.1frontview
1.2.2 Sideview
Fig1.2sideview
Door
handle
Power
switch
Display

- 3 -
1.2.3 Rearview
Fig1.4RearView
1.2.4 InsideView
Fig1.5insideview
Wastewater
drainageinterfaceA(empty)
PowerSwitch
Printerinterface
Testinterface
USBinterface
Emergencydoor
openingdevice
Airfilter
Powercable
Safetyvalve
Wastewater
drainageinterfaceB(halfdrainage)
Coolingfan

- 4 -
1.2.5 TopView
Fig1.6Topview
1.3 Technicalparameters
parametername Q50B Q51B Q70B Q71B
Externalsize 570mm*450mm*470mm680mm*450mm*470mm
Packagingsize 688mm*576mm*688mm 806mm*576mm*688mm
Chambersize Φ253mm*355mmΦ253mm*475mm
CapacityofSterilizer 18L 23L
Pressurevesselweight 4.8kg 6.2kg
Equipmentweight 59.6kg 71.6kg 64.8kg 66.8kg
Built‐incleanwatertank
volume3.8L
Built‐inwastewatertank
volume4.5L
Softwareversion V00
Pressurevesseltechnical
indicators
Workingpressureislessthan0.25Mpa
Operatingtemperature
:
115℃‐138℃
Workingvoltage A.C220V±22V,50Hz±1Hz
Maximumpower 2000VA
Fuse 16A
Distilledwatertank
(Internal)

- 5 -
Workingenvironment
pressure70Kpa~106Kpa
Workingtemperature5
oC~40oC
Storageandtransportation
environmenttemperature‐20oC~55oC
environmenthumidity ≤85%
Maximumwastewater
temperature100oC
Maximumnoise 70dB(A)
Electromagnetic
compatibility
CompliancewithGB/T18268.1‐2010;Worksproperlyinitselectromagnetic
environment,butdoesnotconstituteanunacceptableelectromagnetic
harassmentofanythingintheenvironment。Atthesametime,ithasthe
abilitytoresistelectromagneticinterference.
AccordingtoGB4824‐2013,ElectromagneticradiationmeetsGroup1Class
Brequirements.
Standardscompliant YY/T0646‐2015;GB4793.1‐2007;GB4793.4‐2001;
Note1:Themaximumoperatingvoltagerange:198V~242V
Note2:Anti‐electromagneticinterferenceistheabilityofthesterilizerto
workproperlyinthepresenceofelectromagneticinterference
1.4 Loadingmethod
The tray rack is included in the delivery of sterilizer. The space inside the tray rack is a space that can be
effectivelysterilized,alwaysusethetrayrackwhenloadingitemstobesterilized.Thetrayrackcanhold5traysor
adapttothicknessofdifferentloadsorcontainersafterrotating90oC.
Fig1.6Loadingmethod
1.5 Intelligentcontrollerandcontrolpanel
Intelligentcontrolleristhecoreofsmallsteamsterilizer,Inadditiontocompletingoperationssuchasrapid
acquisition, processing, fault detection, and control of the system's real‐time parameters, the controller also
intuitivelyplotsthetemperatureandpressureversustimecurveinthechamber.
TheintelligentcontrolleriseasyandefficienttooperatewithLCDscreenwith4buttons.
- 6 -
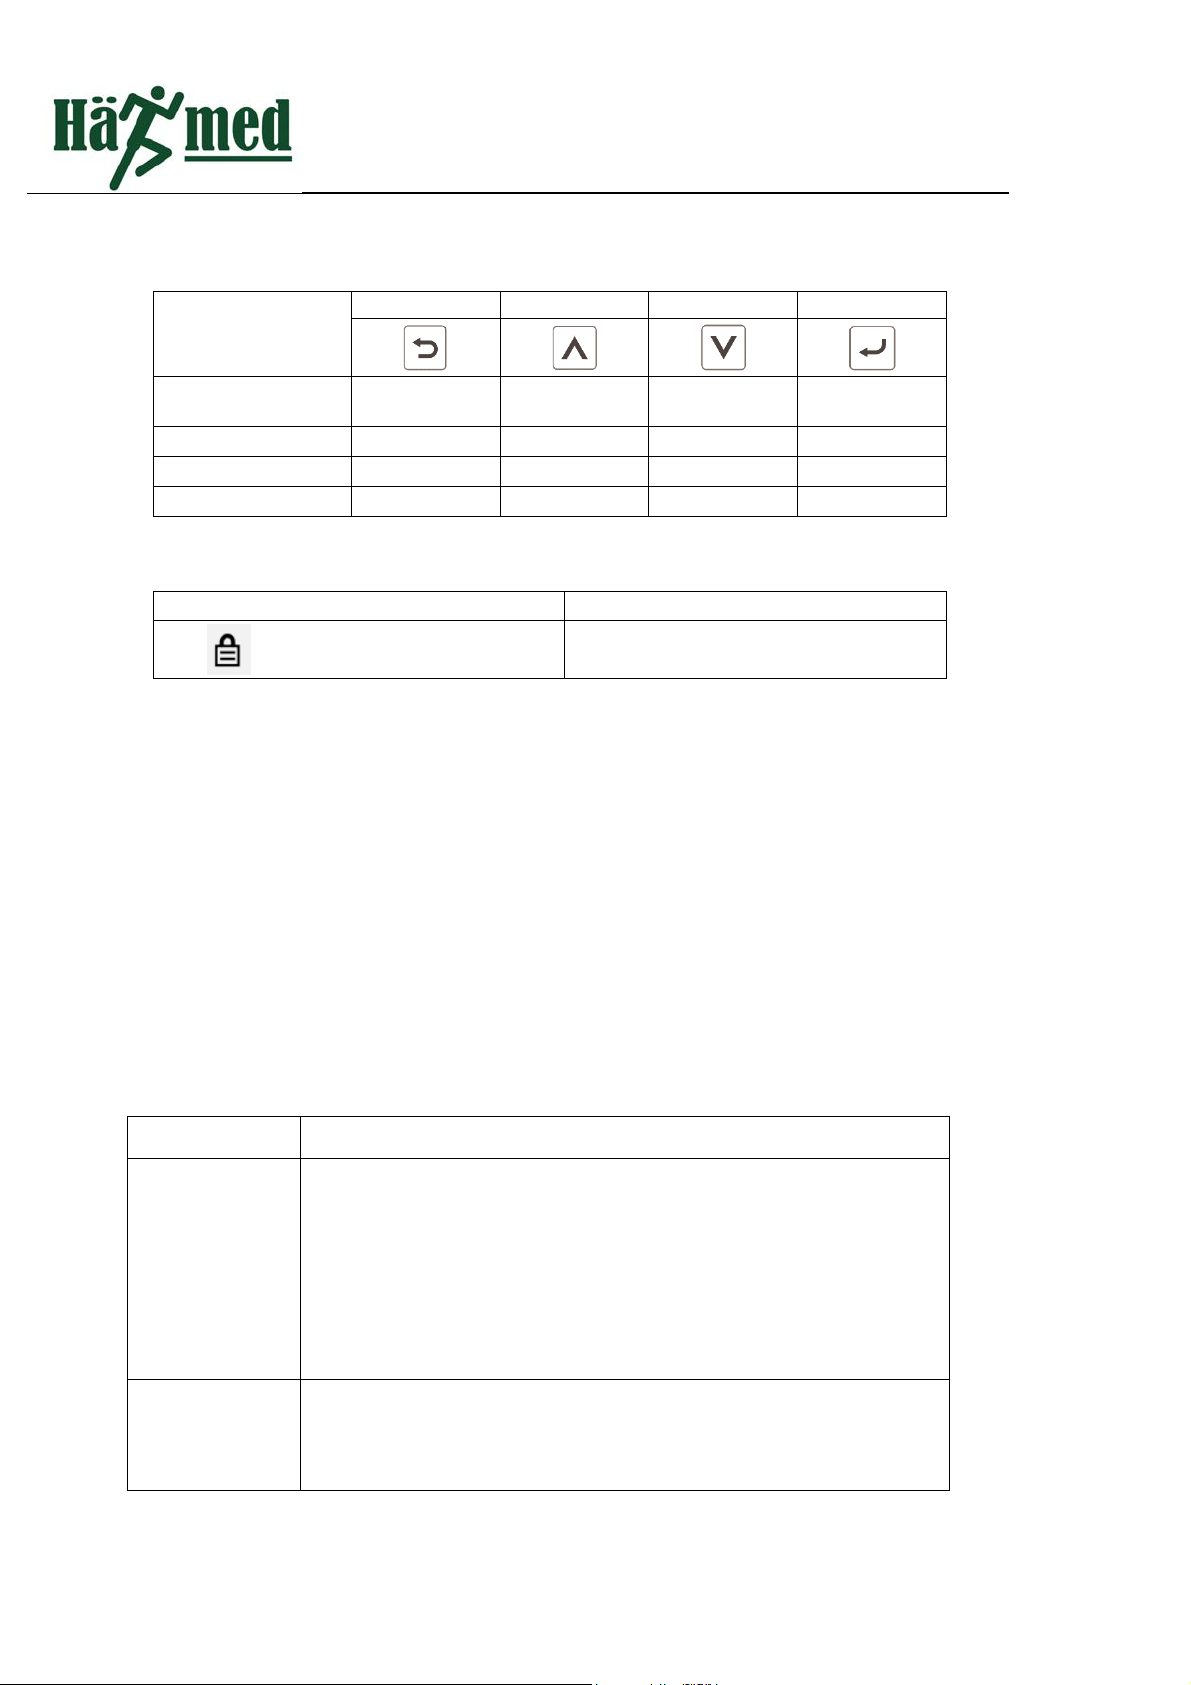
1.5.1 OperationbuttonsandIdentification
Theuseof4buttonsindifferentsituationsisasfollows:
Buttonposition
(Faceupfromleft
toright)
1234
Whentheprogramis
selectedreturnPrevious
optionNextoptionSelect
standbymode Openthedoor Startup
Programruntime Stop
WhensettingConfirm
Thereisaniconintheinterfacetodisplaythedoorlockstatus.
StatusIdentificationDescription
DoorlockstatusThestatusofthedoorlock:onoroff
1.6 Emergencydooropeningdevice
Emergencyopeningisanunconventionalwaytoopenthedoorwhensterilizercannotbepoweredondueto
other reasons or the safety door failure.Please do not open thedoorinthiswayundernormalcircumstances.
Removethescrewontheemergencyprotectioncoveronthebackoftheproduct(Fig.1.4),thenusingyourright
hand to grasp the white plastic disc inside the protective cover,gently pull(distance is about 1CM).At the same
time,useyourlefthandtoliftthedoorhandleuptoopenthedoor
1.7 EquipmentWorkflow
1.7.1 Sterilizationprogram
Sterilizationprocessconsistsof3stages,pre‐vacuum,sterilization,drying.Aftertheprogramisstarted,the
usercanseethestageoftheprogramrunningontheinterface.
Processname Description
1.Pre‐vacuum
Duringthestageofpre‐vacuum,theprocessofevacuatingandinjecting
steamisproceededrepeatedly,Asthemixtureofairandsteamis
continuouslyextracted,theairinthechamberisminimized.Thenumberof
thisprocessvariesaccordingtotheselectedprogram,standardsterilization
procedurerepeated3times,Helixprogramand134+programrepeated4
times.
2.Heating
Afterthepre‐vacuumistheheatingstage,steamiscontinuouslyinjected
intothechamber,thetemperatureandpressureinthechamberrise
continuouslyuntilthespecifiedvalueoftheselectedprogramisreached.

- 7 -
3.Holding
Afterthetemperatureandpressurereachedthesetvalue,holdingphase
beginsandmaintainsstabletemperatureandpressureforaperiodoftime
toensurethatthesterilizationeffectmeetstherequirementsofthe
specification
4.Depressurizatio
n
Thepressureinthechamberisreleasedaftertheholdingtimeisover.Atthe
sametime,thesteaminthesteamgeneratorisdischarged.
5.Drying
Aftersterilization,thesterilizeditemsaredried.Dryingbeginsafterpressure
isreleased.Undertheeffectofahighefficiencyairfilter,theairinthe
chamberisalwayssterileduringthedryingprocess
6.Intake
Thedryingprocessisalsotheprocessofintake,makesurethatthepressure
inthechamberreturnstoenvironmentalpressureattheendofthe
program.
1.7.2 Vacuumtest
Thepurposeofthevacuumtestistotesttheleakrateofthesterilizer.Nosterilizationoftheitemsinthe
chamberduringtheprocess.Pleaserunthevacuumtestinacoldanddrychamberwithoutloads.
Processname Description
1.Vacuum Theairinthechamberisevacuatedtillthepressureinthechamberreaches
thesetvalueofthevacuumtest
2.Balancingtime Afterwaitingfor5minutes,thevacuumeverywhereinthechambertendsto
beuniform.
3.Testholding
time
Testholdingtimeis10minutes,Thedevicecontinuouslymonitorsthe
pressureinthechamberduringtheperiod
4.Endoftest Afterthetestisover,thescreendisplaysthetestresults:vacuumandleak
rate.
2 Installationandhandlinginstructions
2.1 Unpackingprecautions
Installation,setup,andcommissioningshouldbeperformedbya
professionalauthorizedbythemanufacturerofthisproduct.
Thisproductistakenoutoftheboxandtransportedmustbe
operatedby2people.
Totalweight:Q50B59.6kg;Q51B61.6kg;
Q70B64.8kg;Q71B66.8kg
- 8 -
Pleasecarefullychecktheboxandtakeoutthedevice.Ifthe
packageisdamagedortheequipmentisdamaged,pleasecontact
anauthorizeddealerorlogisticscompanyimmediately.
Pleasecheckthepackingboxandtherandomaccessoriesinside
thesterilizer.Alistofstandardaccessoriescanbefoundinsection
1.1ofthismanual.
2.2 Installationsiterequirements
Thisproductshouldbeplacedinadust‐freeanddryenvironment。Surroundinghumidityislessthan85%,
Temperaturebetween5oCand40oC.
Donotuseoroperatethisproductatasitewherethereisariskof
explosion.
Countertopmustbeabletosupporttheweightofthisproduct:
Q50B59.6kg;Q51B61.6kg;
Q70B64.8kg;Q71B66.8kg
Eachsurfaceofthedevice(exceptthebottom)musthaveagap
of10cmoutward.Toosmallagapwillresultinheatbuildup,
shortenthelifeoftheequipment,reducetheperformanceofthe
equipmentandextendtherunningtimeoftheprogram.
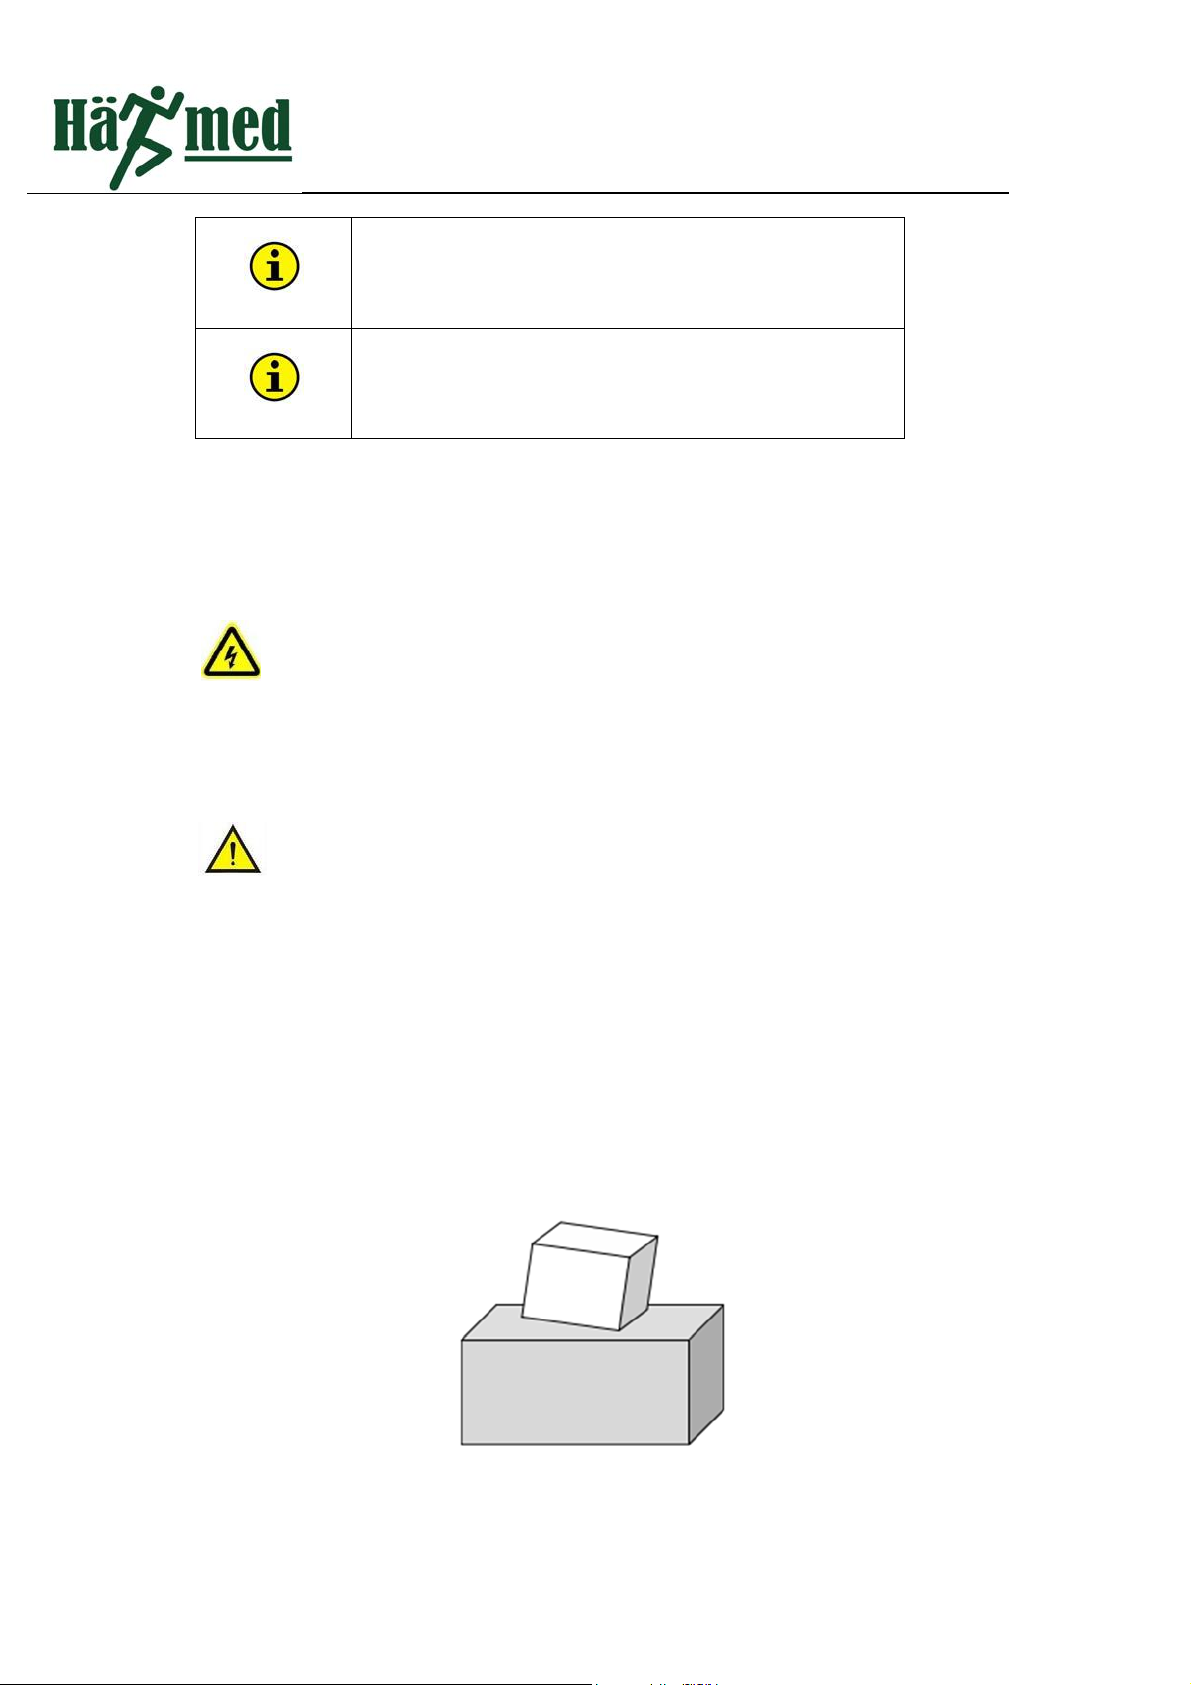
2.3 Deviceheightadjustment
Takeoutairlevelandputitinthehorizontalpositionatthetopoftheproductandadjustthetwofootpadsat
thefrontendtomakesurethefrontishigherthantherearside.Theanglebetweenthebottomofsterilizerand
countertopisaround5‐10°.Itisbeneficialtorealizethedryingoftheloadsandsavesdistilledwater.
Fig2.1Deviceheightadjustment
Rearend
Frontend

- 9 -
2.4 Connectionrequirements
2.4.1 Electricalconnections
220V/50Hzpowersupply.Themaximumpowersupply
fluctuationrangeis198V~242V.
Useaseparate16Apowercircuit.Provides30mAleakage
protection.
Makesurethepowercableisnotknottedorpressed.
Donotuseforcetopullthepowercable,
Donotplacethepowercablenearaheatsource.
Donottouchthepowercablewithasharpobject.
Donotreplacethepowercableorpowerplug.Donotusea
damagedpowercableorpowerplug
Do not use this device if the power cable or power plug is
damaged.Thepowercableorpowerplugmustbereplacedbya
professionalauthorizedbythemanufacturerofthisdevice.
2.4.2 Distilledwaterinjection
OpenupcoveroftheinternalwatertankandInjectthedistilledwaterintotheinternalwatertankthroughthe
watertank deflector,pleasebenotedthatthedistilledwateraddedshouldnotexceedtheheightof thewater
deflector,generallystoredinastandard12Ldistilledwatertank.Fulltankofdistilledwatercancompleteupto20
sterilizations.Please payattentiontotheamountofdistilledwaterremaininginthetanktoavoidaffectingthe
normaloperationofthisdevice.
Compliance with YY/T 0646‐2015 high quality distilled water as
specifiedinappendixBordemineralizedwaterbecausethedegree
offormationofruststainsdependsonwhetherthewaterqualityof
thedistilledwaterisuptostandard.
Conductivity≤20μs/cm;
Iftheinletpressureis>30Kpamaycauseexcessdistilledwaterto
enterthechamberandaffecttheoperationofthedevice.
Inordertopreventthedistilledwaterfrombeingcontaminated,the
lidofthedistilledwatertankmustbetightenedortightatalltimes.
Forsmallsteamsterilizerwithinternalwatertank,pleasedrainthe
wastewatertankbeforeinjectingdistilledwater.
Regularlycleanthedistilledwatertankatleastonceamonth.

- 10 -
This product has water quality monitoring device,it will not work
properlywhenunqualifiedwaterandwillgivewarningthatwater
quality cannot reach the standard.When you see this message,
pleasereplacehighqualitydistilledwaterintime.
If you need to use the water purifier, please consult the
manufacturerofthisdevicefirst.
Itisbesttotiltandsecureallthewaterpipesconnectedtotheback
ofthedevicearenotbentorknotted.
2.4.3 Wastewaterconnection
Forsmallsteamsterilizerswithoutinternalwatertank,takeoutthedrainpipefromtheaccessorybag
andinsertthewastewaterconnectiontothebackofthedevice(Figure1.4).
Itisbest totiltandsecureallthe water pipesconnectedto the
backofthedevicearenotbentorknotted.
2.5 Installationservicelist
After installation please carefully fill out the installation service
forminthemanualwhichisusefulinformationformaintenance.
2.6 Handlinginstructions
Thisdevicehastobestoredandtransportedathumiditylessthan85%andtemperature‐20oC~55oC.
Beforetransportation,pleasecarryout“drainageprogram”firstandtakeoffallpipes(includingdistilled
waterpipesandwastewaterpipes),ifprinterisconnected,removetheprintercable.
Ifthetrayrackandtrayareplacedinthechamberduringtransportation.Beforeclosingthedoor,placeafoam
pad between the door and the tray holder to prevent the tray frame from being damaged by shaking during
transportation
Forlong‐distancetransportation,theproductmustbereturnedtothepackageintheorderinwhichitwas
unpacked,andthepackagemustbesealed.
Pleasecarrydrainageprogrambeforehandlingthisdevice
- 11 -
3 Firsttimeoperation
3.1 Startup
Turnonthepowerswitch,thepowerswitchpositionisinthelowerrightcornerofthedeviceinsideview
(Figure1.4).
Makesuretoremovethelatexplugfromtheairfiltermounting
hole at the back of the device and install the air filter from the
accessoriesincluded.
3.2 AfterStartup
Afterstartupatthefirsttime,pleasesetuplanguageandcarryoutpressuretest.Afterthepressureverification
issuccessful,theinitialsettingiscompleted.Thedateandtimecanalsobesetasrequired.SeeChapter6system
settingsinthismanual.
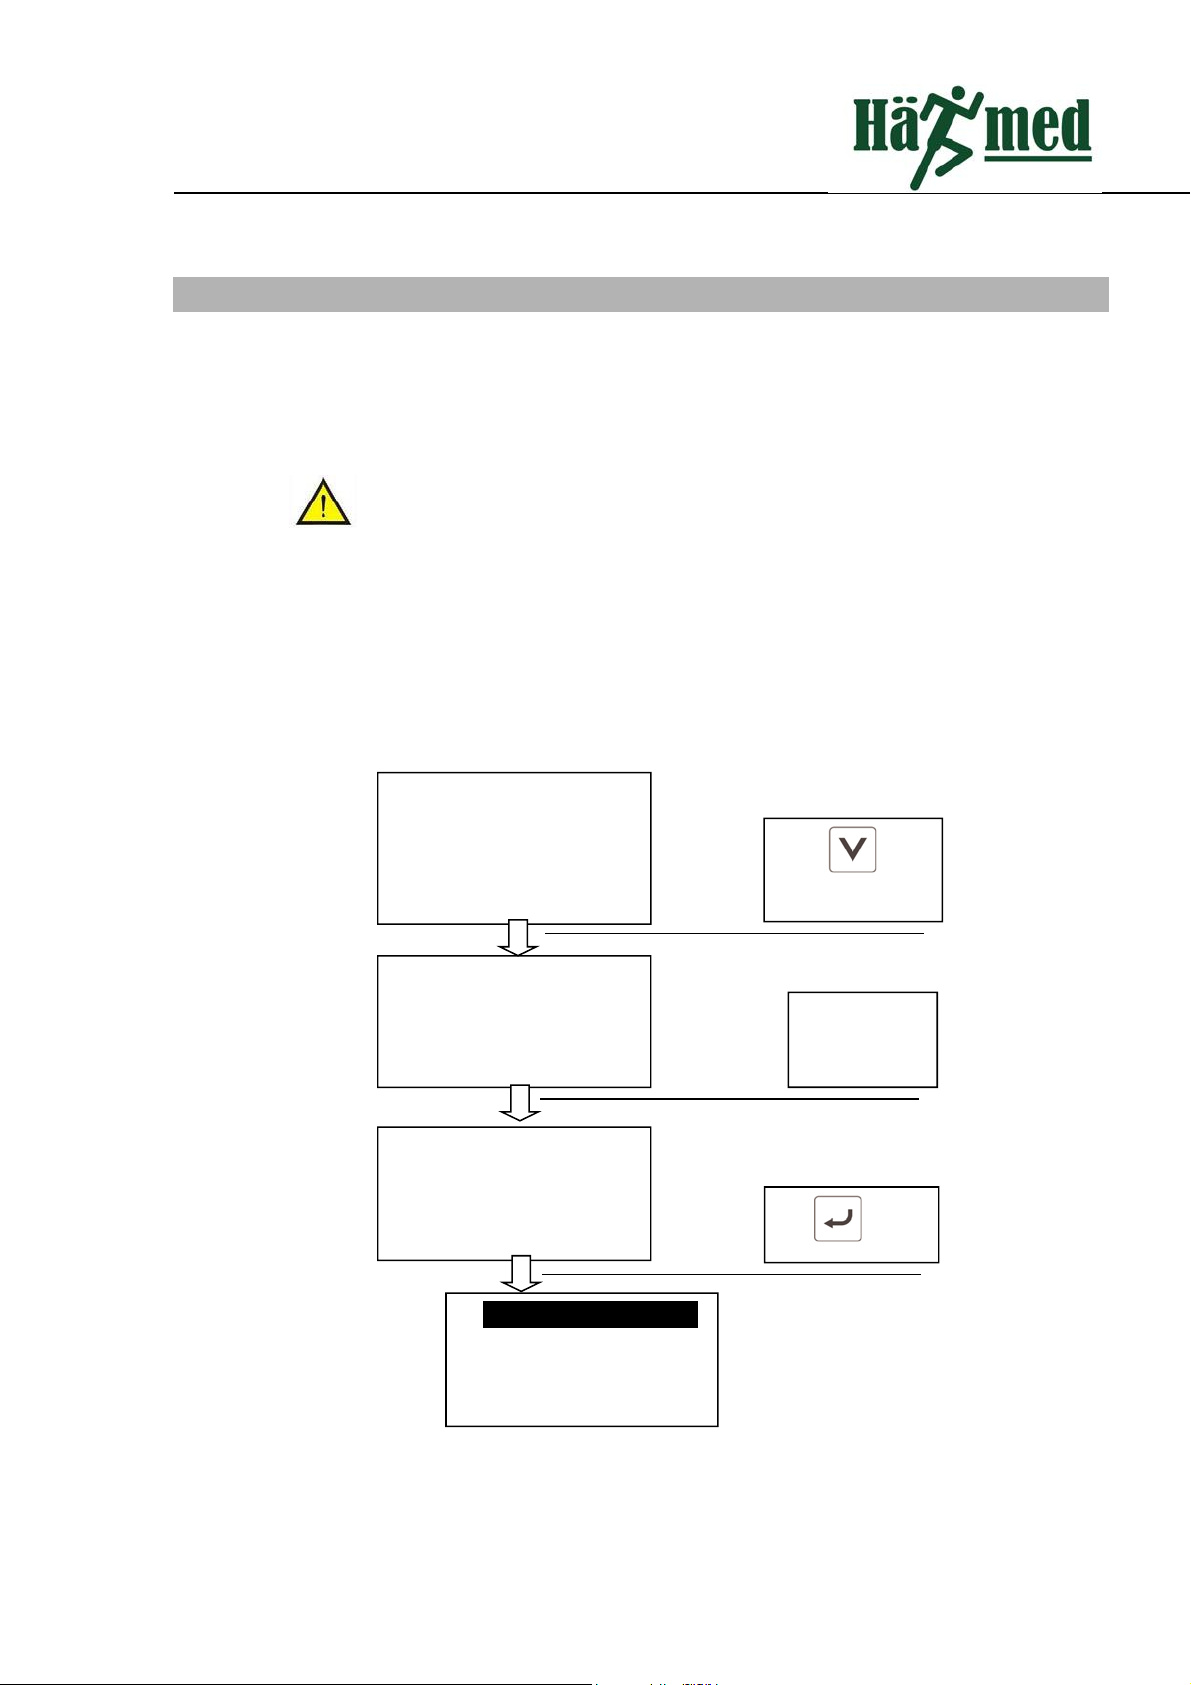
Stepsofpressureverificationisasfollows:
3.3 Open/closethedoor
Pressureverification
Verificationischecking…
P:0.00Bar
Pressureverification
Pressureverification
successful
Door open to complete
pressureverification
press button
andopenupthedoor
Wait for
calibration and
make sure the
doorisopen.
press toselect
1–Sterilizationprogram
2–Testprogram2‐
3–Sytemsetting
4–Filerecord
- 12 -
Dooropenupoperation:Pleasepress buttonatstandbymode,youwillseedoorlockiconwillchange
itsstatusonthedisplaytoindictedthedoorisopened.Atthistime,openthedoorhandleontherightsideofthe
deviceupwardsbyabout90oCandthenopenthedooroutward.
Closingoperation:Closethedoorofsterilizer,Thedoorhandleisturneddowntotheend。
Whenclosingthedoor,pleasepressthedoorhandledowntothe
end.Thestrengthrequiredafter using for a period of time may
increase
Don’tslamthedooratanytime.
Failure to comply with the above requirements may affect the
functionandreliabilityofthedoorlockdevice
Openthedooronlywhenloadingandunloading,Keepingthedoor
closedatothertimesisbeneficialtoenergysaving
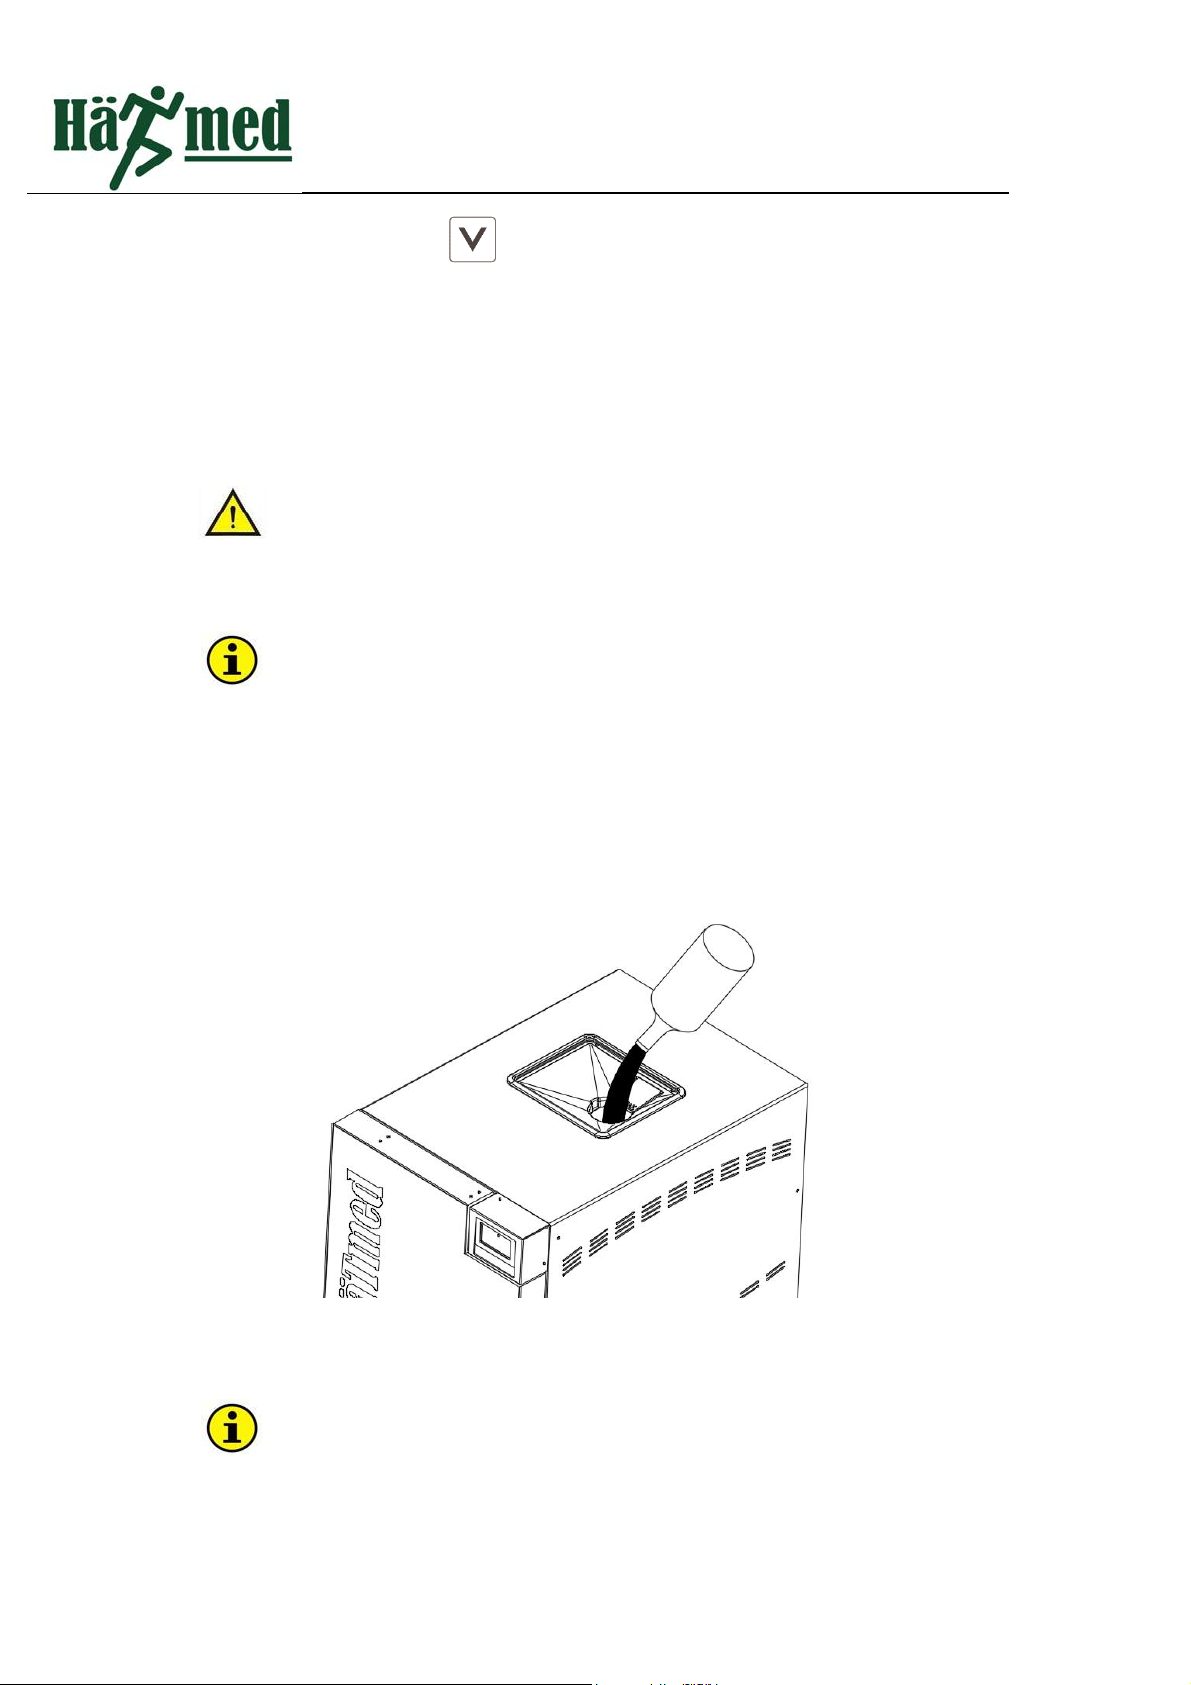
3.4 Distilledwaterinjection
Injectqualifieddistilledwaterintothedistilledwatertankandmakesurethewaterlevelisbetweenthelowest
mark(MIN)andthehighestmark(MAX).Alwayscheckthewaterlevel inthewatertank andreplenishdistilled
waterintime.
Fig3.1Injectdistilledwater
Forthesterilizerwithinternalwatertank,pleasedischargewaste
watertankeverytimebeforeinjectingdistilledwater.

- 13 -
3.5 Drainage
Forsterilizerwithinternalwatertank.Afterusingitafewtimespleasetakeoutplasticdrainconnectorand
pipefromaccessorybagwhentodischargethewastewatertank.Pleaseinsertoneendofthedrainconnector
withoutablackrubbersealintothedrainpipeandinserttheotherintodrainageinterface(Figure1.4andFigure
1.5).
For sterilizer with internal water tank, please empty the waste
watertankbeforeinjectingthedistilledwater.
3.6 Sterilizationeffectverification
Smallsteamsterilizerinstalledorusedfor12monthsoraftermaintenanceshallcarryoutB&Dtestwithout
loadandcarryoutphysical,chemicalandbiologicalmonitoringwithfullload.Aftermonitoringisprovedsuccessful,
thesterilizercanbeusedagain.VerificationofsterilizationresultsshallcomplywiththerequirementsofAppendix
EofWS506‐2016
4 Sterilizationprogram
4.1 Loadstobesterilized
Properloadingisakeyfactorforeffectivesterilizationanddrying.You
mustalsopayattentiontothefollowingwhenloading
The load must be sterilized by the manufacturer if steam
sterilizationispermitted.
Packaging materials for packaged sterilization products shall
complywithGB/T19974standard.
Sterilizeditemspackedinpaperandplasticbags,Thepapermust
befacedupandlaidflatinthetray.
Formixedloadforsterilization,fabricisonthetopandthemetal
isonthelowerlayer.
Theremustbeagapbetweenthesterilizationbags.
Metalbagsanddressingbagscannotbeattachedtogether.
Theloadcapacitymustnotexceed90%ofthechambercapacity.
4.2 Selectsterilizationprogram
This product has 7 preset sterilization programs. Please select the appropriate sterilization program
accordingtotheloadtypeandpackagingmaterial.Theparametersettingofthesterilizationprogramandthetypical
loaddescriptionareasfollows.ThemaximumloadofQ50B/Q51Bis6kginstrumentsor2kgfabric.Themaximum
loadofQ70/Q71Bis7kginstrumentsor2.5kgfabric.
This manual suits for next models
3
Table of contents
Popular Laboratory Equipment manuals by other brands


BSi
BSi BT-71 Operation manual

Parker Laboratories
Parker Laboratories Thermasonic Gel Warmer operating instructions

GE
GE AKTApilot Site preparation guide

Oxford Instruments
Oxford Instruments ANDOR Sona 4.2B-6 Hardware guide

Curiox
Curiox Laminar Wash HT1000 user manual

Gamry Instruments
Gamry Instruments Reference 30k Booster Operator's manual