Havis KK-K9-F18-K Service manual

KK-K9-F18-K_INST_2-13.docx
KK-K9-F18-K INSTALLATION INSTRUCTIONS
K9 Kit for 2013-2017 FORD INTERCEPTOR
UTILITY
** For K9 applications, it is recommended to order the Interceptor Utility with the
OEM optional Aux Rear Air conditioning. (Ford option code 17A)
TOOLS Needed:
Phillips Screw Driver Trim panel removal tool Caulk Gun
Standard Socket set Wire Cutters /Crimpers Foam cutting tool
Metric Socket set T-20 Torx bit
PARTS & HARDWARE:
QTY DESCRIPTION PART #
1 Front bulkhead with sliding door KNM005039
2 Lower “B” pillar bracket KNM004369
2 Upper “B” pillar bracket KNM004370
1 Rear bulkhead KNM005037
1 Rear bulkhead reinforcement bracket KNM005115
1 Floor KNM005036
1 Front floor bracket KNM004393
1 Rear floor bracket (lower) KNM005042
1 Rear floor bracket (upper) KNM005076
1 Ceiling KNM005038
2 Ceiling air duct vents KNM004992
1 Passenger side upper filler (large) KNM005078
1 Passenger side upper filler (small) KNM005079
1 Driver side upper filler (large) KNM005084
1 Driver side upper filler (small) KNM005085
1 Passenger side lower filler KNM005086
1 Driver side lower filler KNM005087
1 Rubber Mat KNM005116
1 Driver side door panel DP-F18-1A
1 Passenger side door panel DP-F18-6A
1 Driver side hinged window guard WGI-F18-1-K9
1 Passenger side hinged window guard WGI-F18-6-K9
1 Dome Light Kit KK-K9-DOME-LED
30 1/4” serrated flange nut GSM30170
4 1/4 x 3/4” Hex head bolt GSM33001
4 1/4 Lock washer GSM31026
30 1/4 x 3/4” Carriage bolt – SS GSM32024
22 1/4 x 3/4” Phillips pan head screw - SS GSM34102
26 1/4 Flat washer - SS GSM31048
10 #10 x 1/2 Phillips flat head sheet metal screw - SS GSM34150
17 #10 x 1/2 Phillips pan head sheet metal screw –SS GSM34169
20 #10 x 3/4 Phillips pan head sheet metal screw- SS GSM34170
1 Silicone caulk (sealant) PRM97343
2 Rubber Bumper GSM21105
2 6MM nut GSM30201
KK-K9-F18-K_INST_2-13.docx
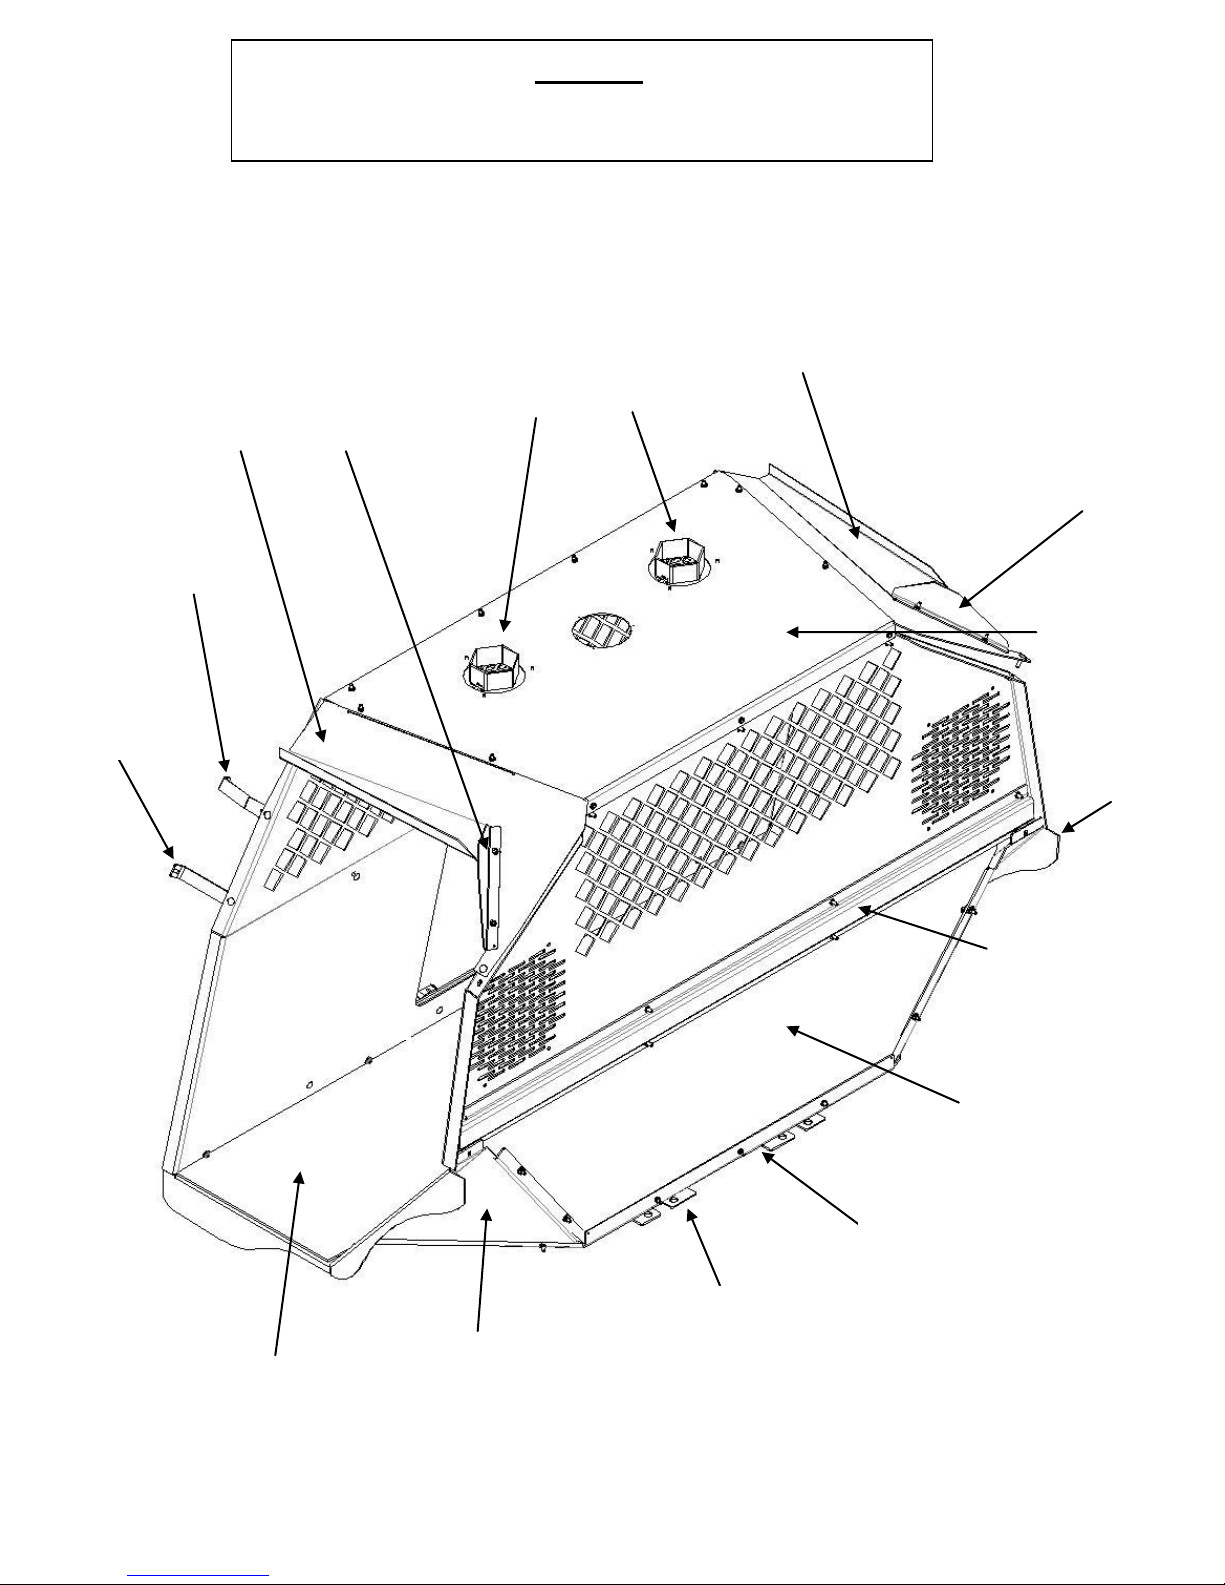
KK-K9-F18-K Assembly
(Door panels and window guards not shown)
KNM005039
Front Bulkhead
KNM005084
Driver side
Large upper filler
KNM005037
Rear Bulkhead
KNM005036
Floor
KNM005087
Driver side
lower filler
KNM005086
Passenger
side lower
filler
KNM005076
Upper rear
floor bracket
NOTES!
Read all instructions before installing any Havis, Inc. products.
Use hardware provided with install kit.
KNM005038
Ceiling
KNM005079
Passenger side
Small upper filler
KNM005042
Lower rear
floor bracket
KNM005078
Passenger side
Large upper filler
KNM004370
Upper “B”
Pillar Bracket
KNM004369
Lower “B”
Pillar Bracket
KNM005085
Driver side
Small upper filler
KNM005036
Front floor
Not Shown
KNM004992
Air Duct Vents
KNM005115 Rear
bulkhead
reinforcement
bracket
KK-K9-F18-K_INST_2-13.docx
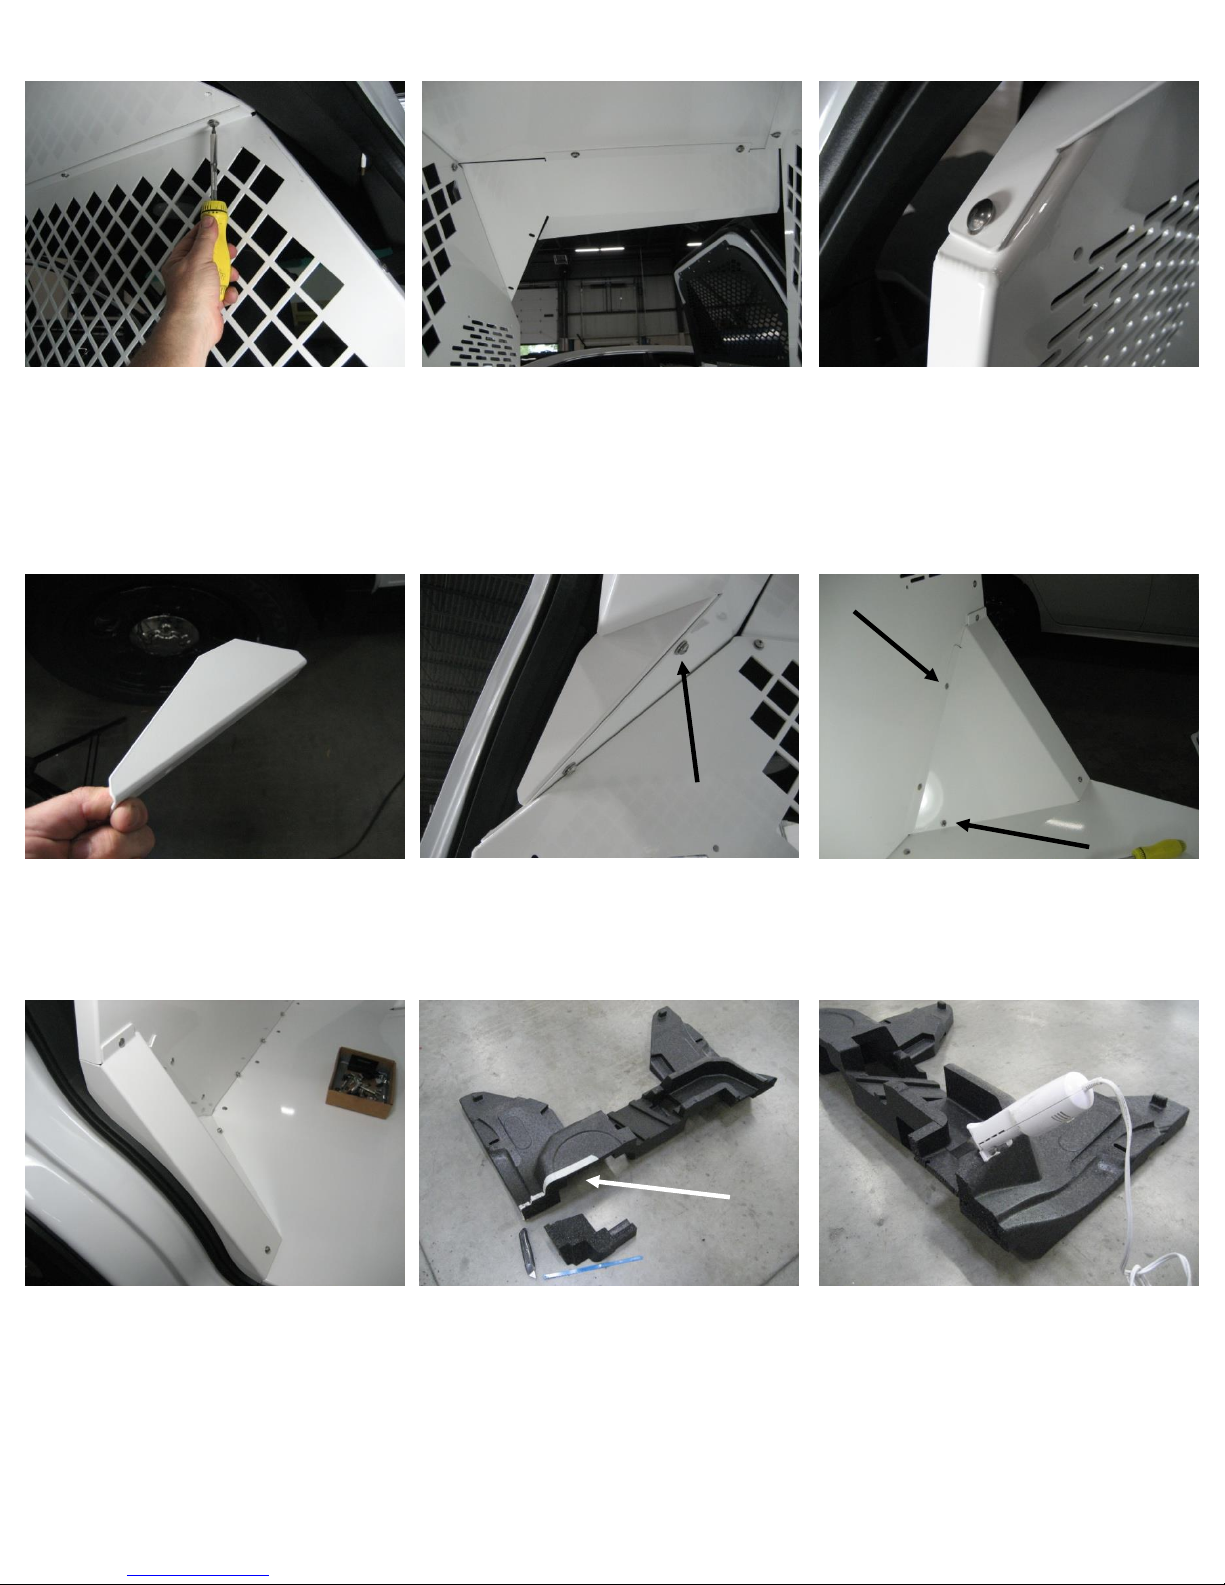
Remove / unsnap entire door
panel from door.
(Trim removal tool)
Disconnect latch cable from door
handle.
Remove door speaker.
(7mm socket)
Remove rear passenger door panels
first. Behind the door open paddle
handle, remove plastic cover and bolt.
(10mm socket)
Underneath door handle, remove
plastic cover and bolt.
(10mm socket)
Note: A small 90° scribe helps to
pick plastic covers off.
Remove screws at bottom of door
panel. (7mm socket)
Remove window switch from door
panel and reattach it to original
plug. Tape the switch to the vapor
barrier to protect it from moisture.
Carefully remove the door lock
rod from O.E.M. lock assembly.
NOTE: It is very important
that lock rod does not prevent
the electric lock from working.
Removing the rod is
recommended
Example mounting of lock latch release
solenoid for optional Hot-N-Pop
# K9-A-201 kit.
1. Drill inner door skin and bolt on
solenoid. 2. OEM latch cable attaches
directly to solenoid. 3. You will need to
keep tension on the latch cable using
cable clamps. 4. Turn latch override
switch to enable lock.
KK-K9-F18-K_INST_2-13.docx
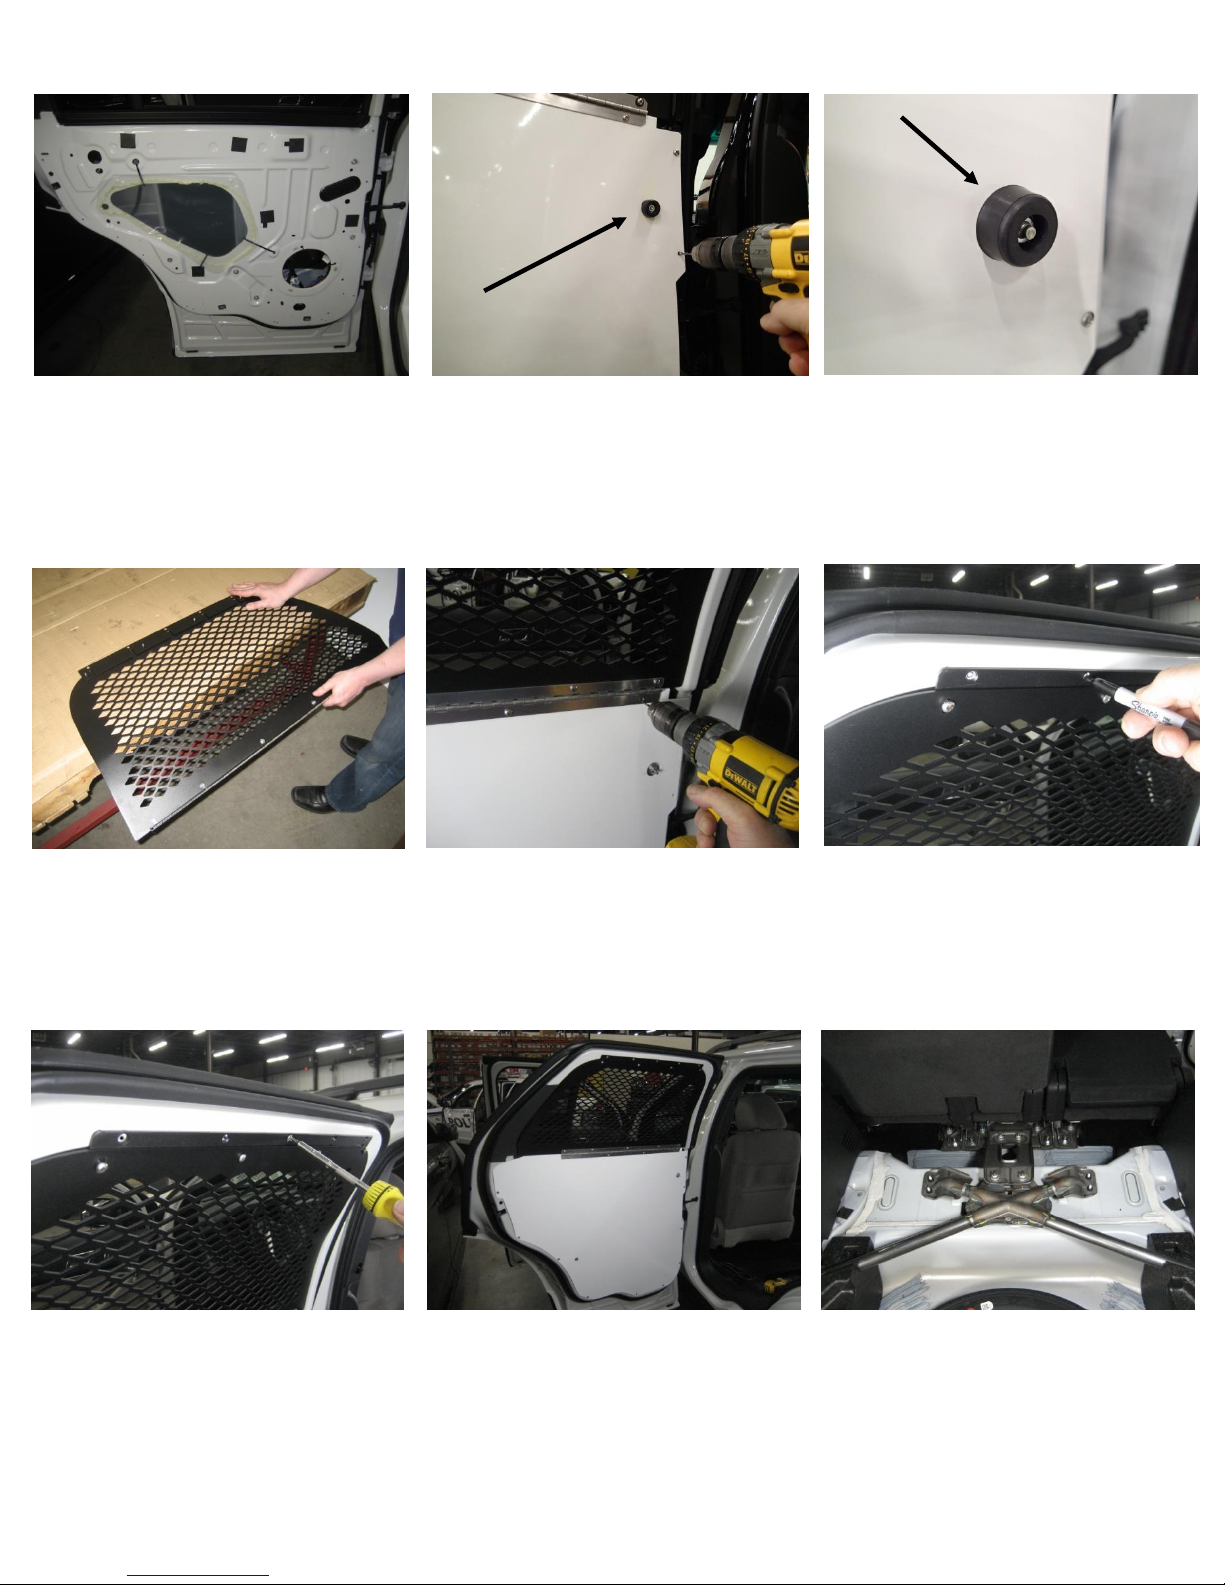
Position window guard inside window
frame. Use 5/32” drill bit and drill
hinge mounting holes in door panel.
Attach hinge with # 10 x 1/2 Phillips
pan head sheet metal screws.
Attach rubber bumper to OEM door
stud with 6mm nut. This will go on top
of existing nut.
Bumper is used as a stud guard.
This step can be done before or after the
door panel installation, but make sure
the stud is center on the hole.
Unplug O.E.M. housing
harness.
Remove one (1) floor nut on
driver side and passenger side.
Door Panel and Window Guard
complete.
NOTE: It is very important to
check the lock and window
operation several times before
closing door.
Attach upper mount bracket with
#10 x 1/2 Phillips flat head sheet
metal screws.
Note: As of 2/2014, Door window
guards have obround slotted holes
to minimize the possibility of fingers
accidently being put into the K9
compartment.
Remove (2) passenger side
floor bolts and harness clip.
Temporarily remove rear cargo tire
cover, small forward cargo floor
and hard foam block filler.
Make sure O.E.M. door parts are
secure and locks and windows are
operational by using front door
controls. NOTE: Double check the
lock operation several times before
installing the new K9 door panel.
Place K9 kit door panel onto door. The
top will hook onto rubber molding.
Position so it lines up with the two
existing (protruding) bolts.
Drill mounting holes with 5/32” drill bit.
Attach door panels with #10 x 3/4
Phillips pan head sheet metal screws.
NOTE: Window guards are
shipped flat. On the edge of a work
bench, bend a contour in the
middle of the guard so it will fit
tight against the window frame.
With upper mount bracket attached
to window guard, mark mounting
hole locations in upper door /
window frame.
Drill 5/32 holes.
KK-K9-F18-K_INST_2-13.docx
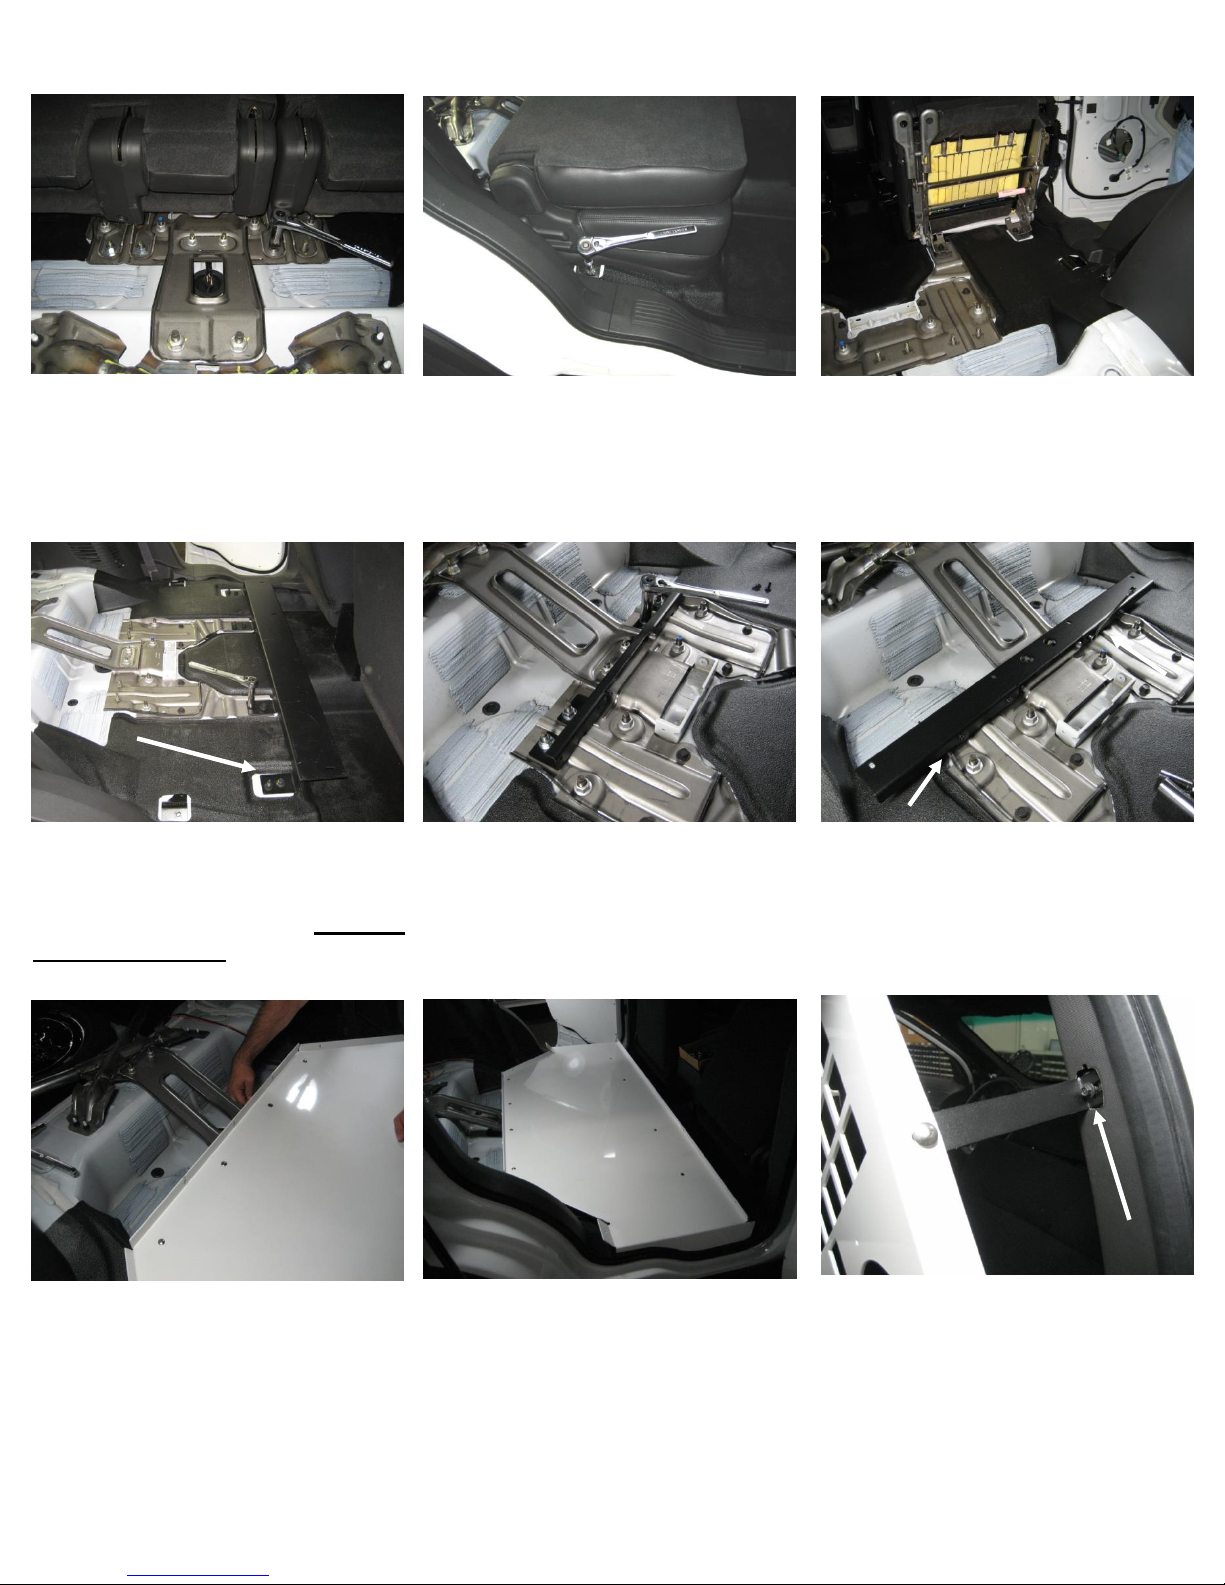
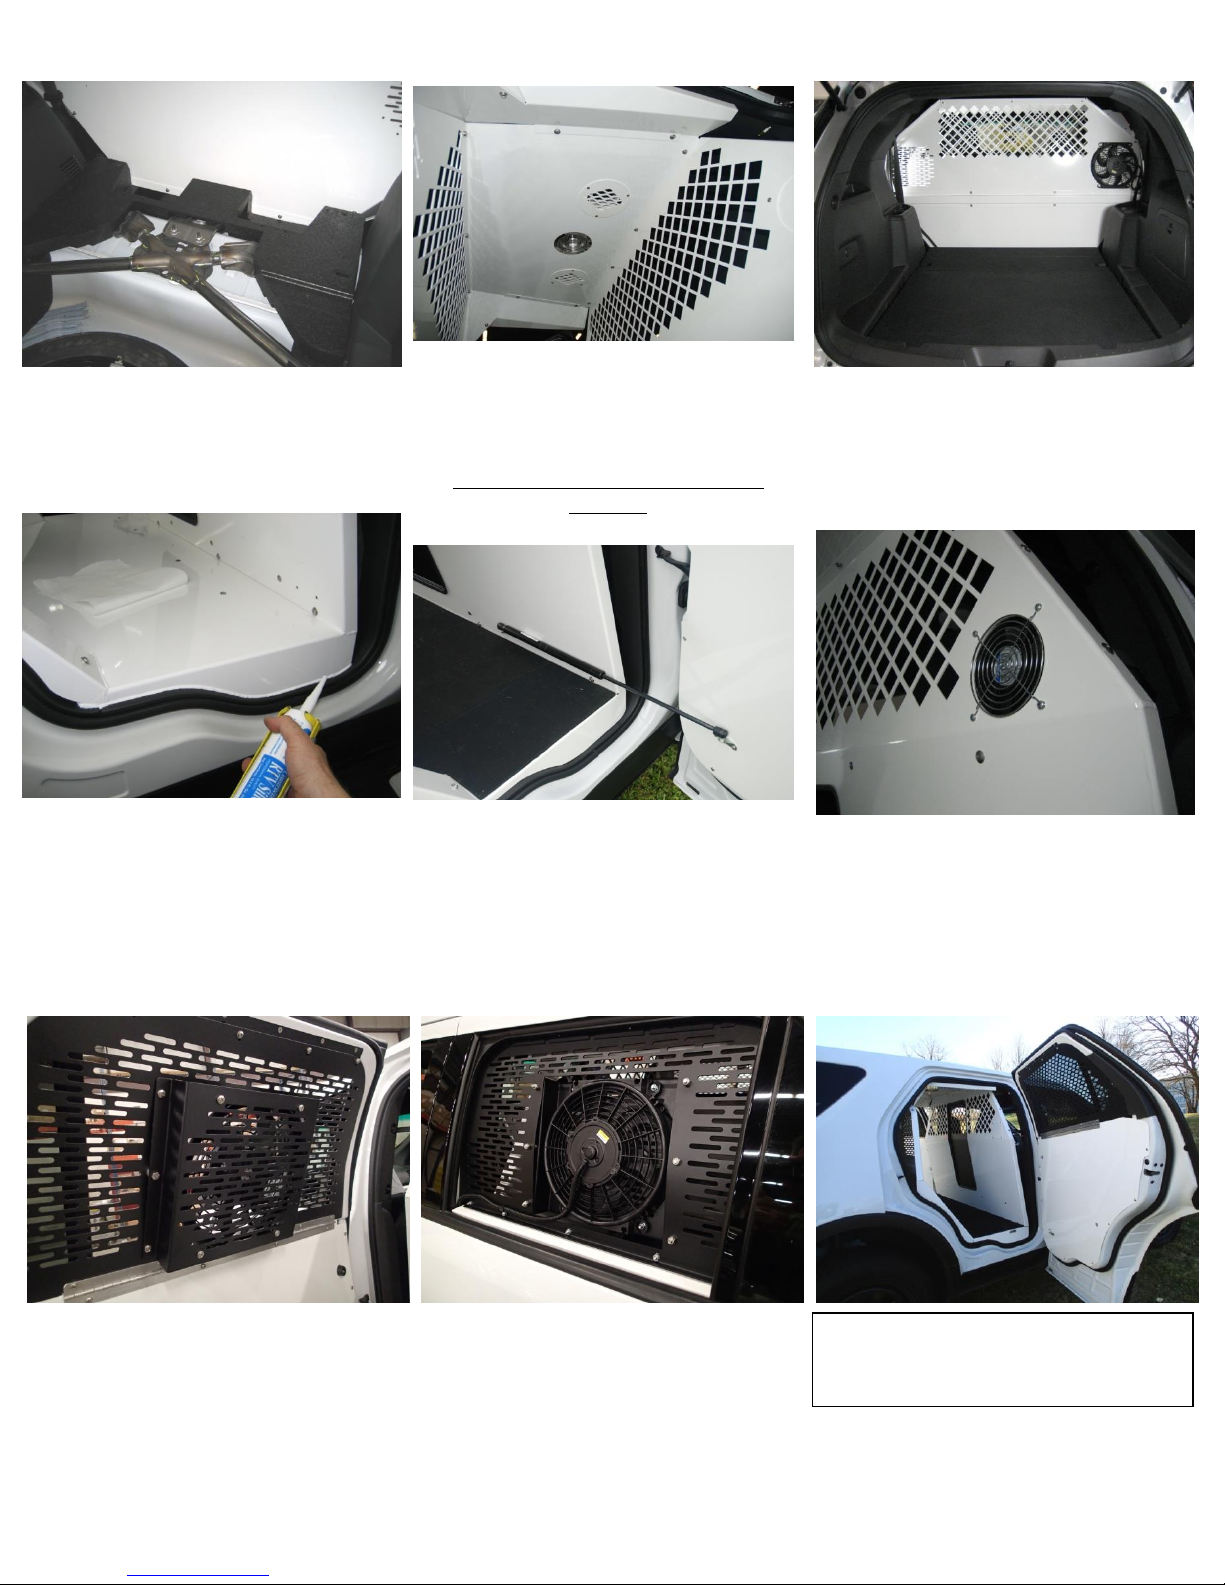
Shift floor rearward and all floor
tighten hardware.
(7/16 socket)
Note: Run wiring for Dome light,
rear fan and other equipment prior
to installing floor.
Prior to front bulkhead installation,
remove OEM “B” pillar grab
handles. Attach upper front
bulkhead flat “L” bracket to “B”
pillar with OEM grab handle screw.
(“L” flange faces out as shown)
(7 mm socket)
Remove rear seat bracket nuts only.
(21 mm socket) Save Hardware.
DO NOT remove OEM support
brace hardware.
Remove rear seat side bolts.
(15 mm socket)
Flip seats forward and remove
remaining seat nuts and bolts.
(15 mm socket) Save Hardware
Remove seats.
Use OEM nuts and bolts to attach
forward K9 kit floor bracket to seat
mount locations.
Note: If vehicle includes the Optional
OEM wire conduit, the conduit will
need to be cut or removed.
Use OEM nuts to attach rear / lower
K9 kit bracket to rear seat mount
locations.
Note: Run wiring for Dome light,
rear fan and other equipment
prior to installing floor.
Attach rear upper floor mount
bracket to lower bracket with four
(4) 1/4”x 3/4" hex head bolts and
lock washers. (7/16 socket)
Tighten all floor bracket hardware.
Loosely attach floor to floor
brackets with eight (8) 1/4" x 3/4"
carriage bolts and serrated flange
nuts.

KK-K9-F18-K_INST_2-13.docx
Loosely attach ceiling to rear
bulkhead with 1/4 x 3/4 round head
Phillips bolts and flat washers.
Place ceiling on top of front and
rear bulkheads.
Front and rear bulkheads in place.
Loosely attach rear bulkhead to
floor with 1/4 x 3/4 round head
Phillips bolts and flat washers.
Note: Rear cross support brace
goes to rear of vehicle.
Loosely attach front bulkhead to
floor with 1/4 x 3/4 carriage bolts
and serrated flange nuts.
Note: Old version had round head
Phillips bolts.
Loosely attach front bulkhead to “B”
pillar brackets with 1/4 x 3/4 carriage
bolts and serrated flange nuts.
Bracket goes on inside of bulkhead
flange.
View of rear bulkhead with
reinforcement bracket.
Temporarily remove and save
lower outside 1/4 x 3/4 carriage
bolts and serrated nuts.
Attach lower front bulkhead
(double bend) bracket to “B” pillar
with OEM grab handle screw.
(“L” flange faces in as shown)
Remove OEM plastic side hanger
brackets.
(T-20 Torx)
KK-K9-F18-K_INST_2-13.docx
View of passenger side lower filler
panel installed.
The previously removed rear
hard foam block will need to be
cut before reinstallation.
Mark and cut 3” inches off
forward end of foam block.
Cutting foam is very easy with an
electric steak knife.
Cut with other tool as desired.
Loosely attach upper filler panel to
rear bulkhead with 1/4 x 3/4
carriage bolt and serrated nut.
Note: It may be easier to attach this
bolt prior to the two ceiling bolts.
Loosely attach upper filler panel to
ceiling 1/4 x 3/4 round head Phillips
bolts and flat washers.
Loosely attach ceiling to front
bulkhead with 1/4 x 3/4 round head
Phillips bolts and flat washers.
View of small upper filler panel.
Attach small upper filler panel to
large upper filler panel with 1/4 x 3/4
round head Phillips bolts and flat
washers.
Attach lower filler panel to floor
with 1/4 x 3/4 round head Phillips
bolts and flat washers.
Attach to rear bulkhead with 1/4 x
3/4 carriage bolts and serrated nuts.
KK-K9-F18-K_INST_2-13.docx
Reinstall foam block into original
position.
Attach rear of housing to
O.E.M. bracket with O.E.M.
bolts. (10mm)
Mount dome light and vents to ceiling
with #10 x 1/2 Phillips pan sheet metal
screws. (connect wire before installing)
Wire dome light to on/off switch. Switch
location to be determined by the installer.
K9 kits include an LED dome as of
1/3/2014
See instructions included with LED light.
Reattach chrome trim bezel.
Install optional 10” emergency exhaust
fan # KK-K9-HA-FKT-10 on rear bulk
head. Reinstall OEM rear cargo floor.
Note: See optional window guard fan
mount part number WGI-F18-FAN-1
For alternative fan mounting.
Neatly silicone / caulk the lower
seams to shed water out of vehicle.
Note: The floor is designed to
minimize the need for sealant. Caulk
(sealant) is mostly needed where the
floor meets the door sill and lower
filler panels.
.
Example mounting location for the
door gas spring for the optional #
KK-K9-HP-5010-X kit
Hot-N-Pop
Example mounting location for the
optional air circulation fan
# KK-K9-FAN
KK-K9-F18-K Installation
Complete
Optional driver side window guard / fan mount shown.
Part number WGI-F18-FAN-1
**Only works with optional KK-K9-HA-FKT-10 fan**
Passenger side fan mount also available - # WGI-F18-FAN-6
NOTE: 12” fan not recommended for the Interceptor Utility.
Other Havis Other manuals


