Hawaiian 954397 User manual

- 1 -
Cod.954397
(EN) Spot welder
(IT) Puntatrice
(FR) Poste de soudage par points
(ES) Soldadora por puntos
(DE) Punktschweißmaschine
(RU) Аппарат для точечной сварки
(PT) Aparelho de soldar por pontos
(NL) Puntlasmachine
(EL) Πόντα
(RO) Aparat de sudură în puncte
(SV) Punktsvets
(CS) Bodovačka
(HR-SR) Stroj za točkasto varenje
(PL) Spawarka punktowa
(FI) Pistehitsauslaite
(DA) Punktsvejsemaskine
(NO) Punktesveiseapparat
(SL) Točkalnik
(SK) Bodovačka
(HU) Ponthegesztő
(LT) Taškinio suvirinimo aparatas
(ET) Punktkeevitusseade
(LV) Punktmetināšanas aparāts
(BG) Апарат за точково заваряване
(TR) Punto kaynak makinesi
(AR)
EN IT FR ES DE RU PT
NL EL RO SV CS HR-SR
PL FI DA NO SL SK HU
LT ET LV BG TR AR
(EN) INSTRUCTION MANUAL
(IT) MANUALE D’ISTRUZIONE
(FR) MANUEL D’INSTRUCTIONS
(ES) MANUAL DE INSTRUCCIONES
(DE) BEDIENUNGSANLEITUNG
(RU) РУКОВОДСТВО ПОЛЬЗОВАТЕЛЯ
(PT) MANUAL DE INSTRUÇÕES
(NL) INSTRUCTIEHANDLEIDING
(EL) ΕΓΧΕΙΡΙΔΙΟ ΧΡΗΣΗΣ
(RO) MANUAL DE INSTRUCŢIUNI
(SV) BRUKSANVISNING
(CS) NÁVOD K POUŽITÍ
(HR-SR)
PRIRUČNIK ZA UPOTREBU
(PL) INSTRUKCJA OBSŁUGI
(FI) OHJEKIRJA
(DA) INSTRUKTIONSMANUAL
(NO) BRUKERVEILEDNING
(SL) PRIROČNIK Z NAVODILI ZA UPORABO
(SK) NÁVOD NA POUŽITIE
(HU) HASZNÁLATI UTASÍTÁS
(LT) INSTRUKCIJŲ KNYGELĖ
(ET) KASUTUSJUHEND
(LV) ROKASGRĀMATA
(BG) РЪКОВОДСТВО С ИНСТРУКЦИИ
(TR) KULLANIM KILAVUZU
(AR)
- 2 -
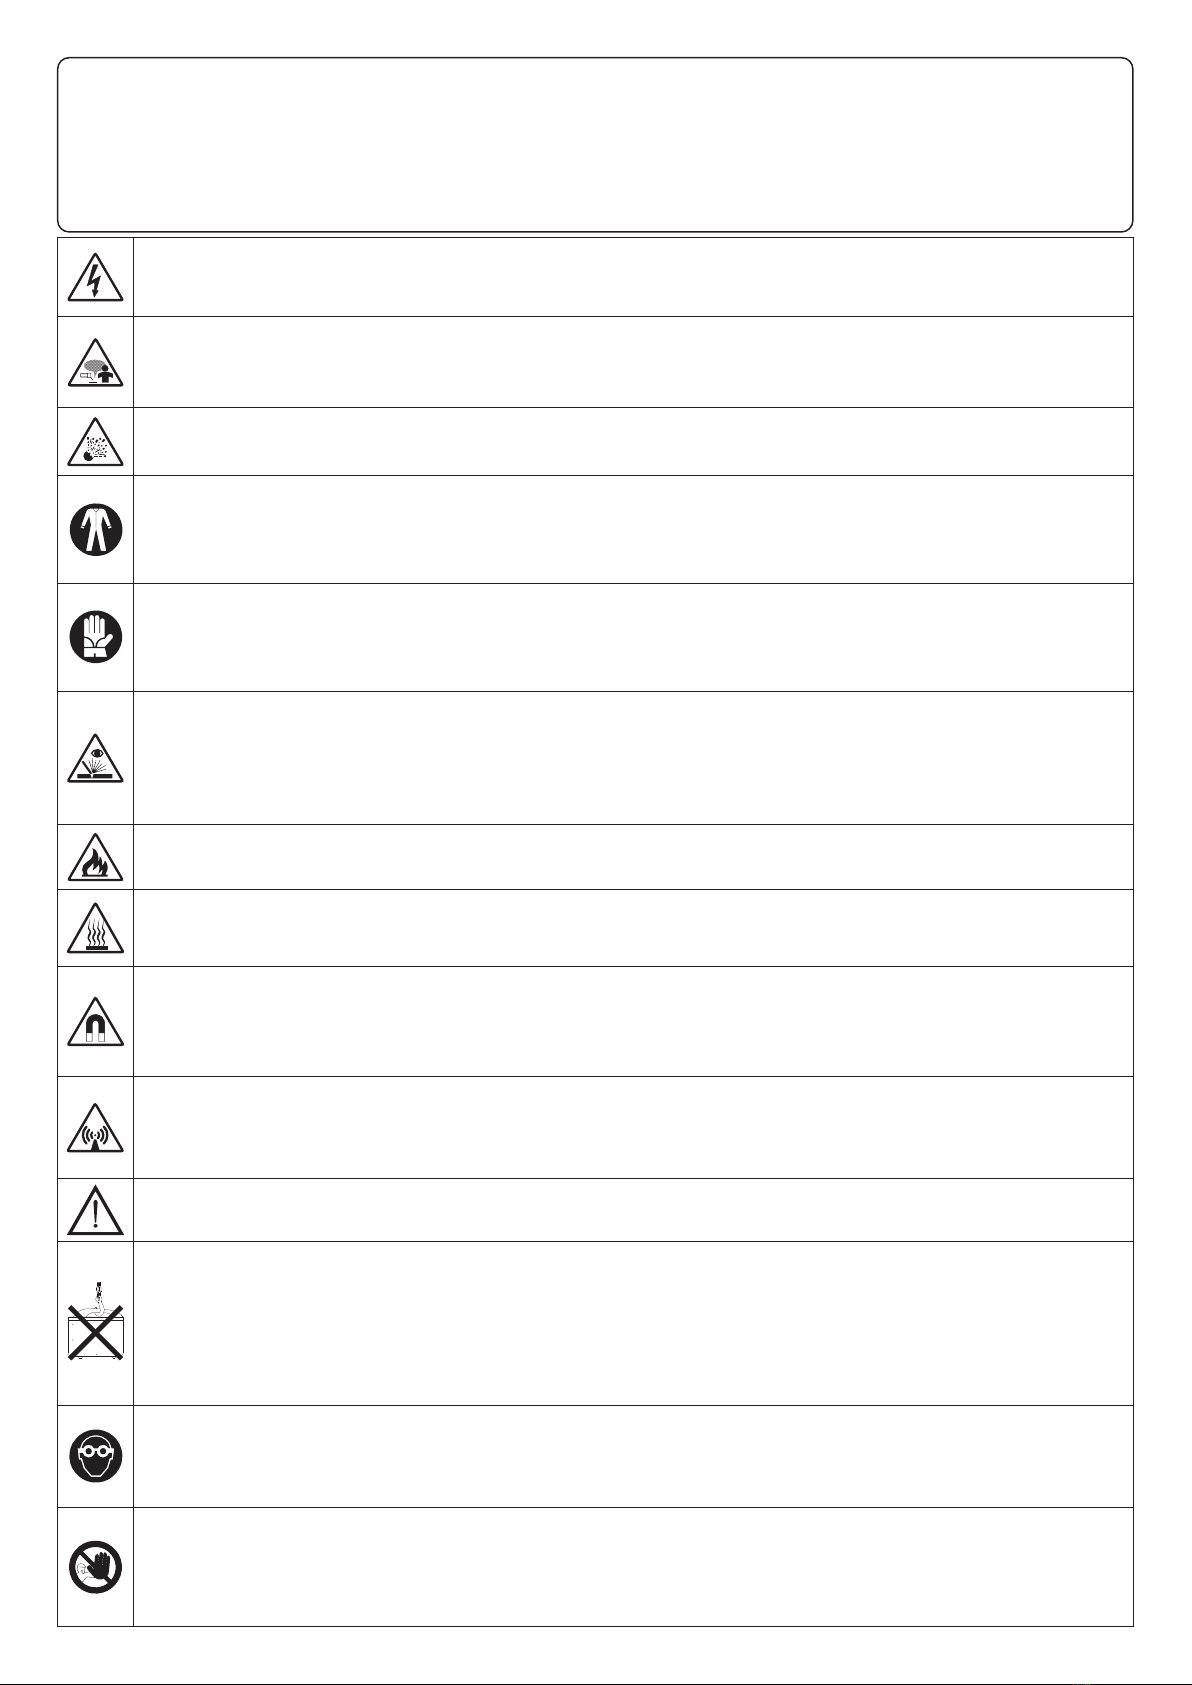
(EN) EXPLANATION OF DANGER, MANDATORY AND PROHIBITION SIGNS.
(IT) LEGENDA SEGNALI DI PERICOLO, D’OBBLIGO E DIVIETO.
(FR) LÉGENDE SIGNAUX DE DANGER, D’OBLIGATION ET D’INTERDICTION.
(ES) LEYENDA SEÑALES DE PELIGRO, DE OBLIGACIÓN Y PROHIBICIÓN.
(DE) LEGENDE DER GEFAHREN-, GEBOTS- UND VERBOTSZEICHEN.
(RU) ЛЕГЕНДА СИМВОЛОВ БЕЗОПАСНОСТИ, ОБЯЗАННОСТИ И ЗАПРЕТА.
(PT) LEGENDA DOS SINAIS DE PERIGO, OBRIGAÇÃO E PROIBIDO.
(NL) LEGENDE SIGNALEN VAN GEVAAR, VERPLICHTING EN VERBOD.
(EL) ΛΕΖΑΝΤΑ ΣΗΜΑΤΩΝ ΚΙΝΔΥΝΟΥ, ΥΠΟΧΡΕΩΣΗΣ ΚΑΙ ΑΠΑΓΟΡΕΥΣΗΣ.
(RO) LEGENDĂ INDICATOARE DE AVERTIZARE A PERICOLELOR, DE OBLIGARE ŞI DE INTERZI-
CERE.
(SV) BILDTEXT SYMBOLER FÖR FARA, PÅBUD OCH FÖRBUD.
(CS) VYSVĚTLIVKY K SIGNÁLŮM NEBEZPEČÍ, PŘÍKAZŮM A ZÁKAZŮM.
(HR-SR) LEGENDA OZNAKA OPASNOSTI, OBAVEZA I ZABRANA.
(PL) OBJAŚNIENIA ZNAKÓW OSTRZEGAWCZYCH, NAKAZU I ZAKAZU.
(FI) VAROITUS,VELVOITUS, JA KIELTOMERKIT.
(DA) OVERSIGT OVER FARE, PLIGT OG FORBUDSSIGNALER.
(NO) SIGNALERINGSTEKST FOR FARE, FORPLIKTELSER OG FORBUDT.
(SL) LEGENDA SIGNALOV ZA NEVARNOST, ZA PREDPISANO IN PREPOVEDANO.
(SK) VYSVETLIVKY K SIGNÁLOM NEBEZPEČENSTVA, PRÍKAZOM A ZÁKAZOM.
(HU) A VESZÉLY, KÖTELEZETTSÉG ÉS TILTÁS JELZÉSEINEK FELIRATAI.
(LT) PAVOJAUS, PRIVALOMŲJŲ IR DRAUDŽIAMŲJŲ ŽENKLŲ PAAIŠKINIMAS.
(ET) OHUD, KOHUSTUSED JA KEELUD.
(LV) BĪSTAMĪBU, PIENĀKUMU UN AIZLIEGUMA ZĪMJU PASKAIDROJUMI.
(BG) ЛЕГЕНДА НА ЗНАЦИТЕ ЗА ОПАСНОСТ, ЗАДЪЛЖИТЕЛНИ И ЗА ЗАБРАНА.
(TR) TEHLİKE, ZORUNLULUK VE YASAK İŞARETLERİNİN AÇIKLAMASI.
(AR)
(EN) DANGER OF ELECTRIC SHOCK - (IT) PERICOLO SHOCK ELETTRICO - (FR) RISQUE DE CHOC ÉLECTRIQUE - (ES) PELIGRO DESCARGA ELÉCTRICA - (DE) STROMSCHLAGGEFAHR - (RU) ОПАСНОСТЬ
ПОРАЖЕНИЯ ЭЛЕКТРИЧЕСКИМ ТОКОМ - (PT) PERIGO DE CHOQUE ELÉTRICO - (NL) GEVAAR ELEKTROSHOCK - (EL) ΚΙΝΔΥΝΟΣ ΗΛΕΚΤΡΟΠΛΗΞΙΑΣ - (RO) PERICOL DE ELECTROCUTARE - (SV) FARA
FÖR ELEKTRISK STÖT - (CS) NEBEZPEČÍ ZÁSAHU ELEKTRICKÝM PROUDEM - (HR-SR) OPASNOST STRUJNOG UDARA - (PL) NIEBEZPIECZEŃSTWO SZOKU ELEKTRYCZNEGO - (FI) SÄHKÖISKUN VAARA -
(DA) FARE FOR ELEKTRISK STØD - (NO) FARE FOR ELEKTRISK STØT - (SL) NEVARNOST ELEKTRIČNEGA UDARA - (SK) NEBEZPEČENSTVO ZÁSAHU ELEKTRICKÝM PRÚDOM - (HU) ÁRAMÜTÉS VESZÉLYE
- (LT) ELEKTROS SMŪGIO PAVOJUS - (ET) ELEKTRILÖÖGIOHT - (LV) ELEKTROŠOKA BĪSTAMĪBA - (BG) ОПАСНОСТ ОТ ТОКОВ УДАР - (TR) ELEKTRİK ÇARPMASI TEHLİKESİ - (AR)
(EN) DANGER OF WELDING FUMES - (IT) PERICOLO FUMI DI SALDATURA - (FR) DANGER FUMÉES DE SOUDAGE - (ES) PELIGRO HUMOS DE SOLDADURA - (DE) GEFAHR DER ENTWICKLUNG
VON RAUCHGASEN BEIM SCHWEISSEN - (RU) ОПАСНОСТЬ ДЫМОВ СВАРКИ - (PT) PERIGO DE FUMAÇAS DE SOLDAGEM - (NL) GEVAAR LASROOK - (EL) ΚΙΝΔΥΝΟΣ ΚΑΠΝΩΝ
ΣΥΓΚΟΛΛΗΣΗΣ - (RO) PERICOL DE GAZE DE SUDURĂ - (SV) FARA FÖR RÖK FRÅN SVETSNING - (CS) NEBEZPEČÍ SVAŘOVACÍCH DÝMŮ - (HR-SR) OPASNOST OD DIMA PRILIKOM VARENJA
- (PL) NIEBEZPIECZEŃSTWO OPARÓW SPAWALNICZYCH - (FI) HITSAUSSAVUJEN VAARA - (DA) FARE P.G.A. SVEJSEDAMPE - (NO) FARE FOR SVEISERØYK - (SL) NEVARNOST VARILNEGA
DIMA - (SK) NEBEZPEČENSTVO VÝPAROV ZO ZVÁRANIA - (HU) HEGESZTÉS KÖVETKEZTÉBEN KELETKEZETT FÜST VESZÉLYE - (LT) SUVIRINIMO DŪMŲ PAVOJUS - (ET) KEEVITAMISEL
SUITSU OHT - (LV) METINĀŠANAS IZTVAIKOJUMU BĪSTAMĪBA - (BG) ОПАСНОСТ ОТ ПУШЕКА ПРИ ЗАВАРЯВАНЕ - (TR) KAYNAK DUMANI TEHLİKESİ - (AR)
(EN) DANGER OF EXPLOSION - (IT) PERICOLO ESPLOSIONE - (FR) RISQUE D’EXPLOSION - (ES) PELIGRO EXPLOSIÓN - (DE) EXPLOSIONSGEFAHR - (RU) ОПАСНОСТЬ ВЗРЫВА - (PT) PERIGO DE
EXPLOSÃO - (NL) GEVAAR ONTPLOFFING - (EL) ΚΙΝΔΥΝΟΣ ΕΚΡΗΞΗΣ - (RO) PERICOL DE EXPLOZIE - (SV) FARA FÖR EXPLOSION - (CS) NEBEZPEČÍ VÝBUCHU - (HR-SR) OPASNOST OD EKSPLOZIJE
- (PL) NIEBEZPIECZEŃSTWO WYBUCHU - (FI) RÄJÄHDYSVAARA - (DA) SPRÆNGFARE - (NO) FARE FOR EKSPLOSJON - (SL) NEVARNOST EKSPLOZIJE - (SK) NEBEZPEČENSTVO VÝBUCHU - (HU)
ROBBANÁS VESZÉLYE - (LT) SPROGIMO PAVOJUS - (ET) PLAHVATUSOHT - (LV) SPRĀDZIENBĪSTAMĪBA - (BG) ОПАСНОСТ ОТ ЕКСПЛОЗИЯ - (TR) PATLAMA TEHLİKESİ - (AR)
(EN) WEARING PROTECTIVE CLOTHING IS COMPULSORY - (IT) OBBLIGO INDOSSARE INDUMENTI PROTETTIVI - (FR) PORT DES VÊTEMENTS DE PROTECTION OBLIGATOIRE - (ES) OBLIGACIÓN DE
LLEVAR ROPA DE PROTECCIÓN - (DE) DAS TRAGEN VON SCHUTZKLEIDUNG IST PFLICHT - (RU) ОБЯЗАННОСТЬ НАДЕВАТЬ ЗАЩИТНУЮ ОДЕЖДУ - (PT) OBRIGATÓRIO O USO DE VESTUÁRIO DE
PROTEÇÃO - (NL) VERPLICHT BESCHERMENDE KLEDIJTE DRAGEN - (EL) ΥΠΟΧΡΕΩΣΗ ΝΑ ΦΟΡΑΤΕ ΠΡΟΣΤΑΤΕΥΤΙΚΑ ΕΝΔΥΜΑΤΑ - (RO) FOLOSIREA ÎMBRĂCĂMINTEI DE PROTECŢIE OBLIGATORIE - (SV)
OBLIGATORISKT ATT BÄRA SKYDDSPLAGG - (CS) POVINNÉ POUŽITÍ OCHRANNÝCH PROSTŘEDKŮ - (HR-SR) OBAVEZNO KORIŠTENJE ZAŠTITNE ODJEĆE - (PL) NAKAZ NOSZENIA ODZIEŻY OCHRONNEJ
- (FI) SUOJAVAATETUKSEN KÄYTTÖ PAKOLLISTA - (DA) PLIGT TIL AT ANVENDE BESKYTTELSESTØJ - (NO) FORPLIKTELSE Å BRUKE VERNETØY - (SL) OBVEZNO OBLECITE ZAŠČITNA OBLAČILA - (SK)
POVINNÉ POUŽITIE OCHRANNÝCH PROSTRIEDKOV - (HU) VÉDŐRUHA HASZNÁLATA KÖTELEZŐ - (LT) PRIVALOMA DĖVĖTI APSAUGINĘ APRANGĄ - (ET) KOHUSTUSLIK KANDA KAITSERIIETUST -
(LV) PIENĀKUMS ĢĒRBT AIZSARGTĒRPUS - (BG) ЗАДЪЛЖИТЕЛНО НОСЕНЕ НА ПРЕДПАЗНО ОБЛЕКЛО - (TR) KORUYUCU GİYSİ GİYMEK ZORUNLUDUR - (AR)
(EN) WEARING PROTECTIVE GLOVES IS COMPULSORY - (IT) OBBLIGO INDOSSARE GUANTI PROTETTIVI - (FR) PORT DES GANTS DE PROTECTION OBLIGATOIRE - (ES) OBLIGACIÓN DE LLEVAR GUANTES
DE PROTECCIÓN - (DE) DAS TRAGEN VON SCHUTZHANDSCHUHEN IST PFLICHT - (RU) ОБЯЗАННОСТЬ НАДЕВАТЬ ЗАЩИТНЫЕ ПЕРЧАТКИ - (PT) OBRIGATÓRIO O USO DE LUVAS DE SEGURANÇA - (NL)
VERPLICHT BESCHERMENDE HANDSCHOENEN TE DRAGEN - (EL) ΥΠΟΧΡΕΩΣΗ ΝΑ ΦΟΡΑΤΕ ΠΡΟΣΤΑΤΕΥΤΙΚΑ ΓΑΝΤΙΑ - (RO) FOLOSIREA MĂNUŞILOR DE PROTECŢIE OBLIGATORIE - (SV) OBLIGATORISKT
ATT BÄRA SKYDDSHANDSKAR - (CS) POVINNÉ POUŽITÍ OCHRANNÝCH RUKAVIC - (HR-SR) OBAVEZNO KORIŠTENJE ZAŠTITNIH RUKAVICA - (PL) NAKAZ NOSZENIA RĘKAWIC OCHRONNYCH - (FI)
SUOJAKÄSINEIDEN KÄYTTÖ PAKOLLISTA - (DA) PLIGT TIL AT BRUGE BESKYTTELSESHANDSKER - (NO) FORPLIKTELSE Å BRUKE VERNEHANSKER - (SL) OBVEZNO NADENITE ZAŠČITNE ROKAVICE - (SK)
POVINNÉ POUŽITIE OCHRANNÝCH RUKAVÍC - (HU) VÉDŐKESZTYŰ HASZNÁLATA KÖTELEZŐ - (LT) PRIVALOMA MŪVĖTI APSAUGINES PIRŠTINES - (ET) KOHUSTUSLIK KANDA KAITSEKINDAID - (LV)
PIENĀKUMS ĢĒRBT AIZSARGCIMDUS - (BG) ЗАДЪЛЖИТЕЛНО НОСЕНЕ НА ПРЕДПАЗНИ РЪКАВИЦИ - (TR) KORUYUCU ELDİVEN KULLANMAK ZORUNLUDUR - (AR)
(EN) DANGER OF ULTRAVIOLET RADIATION FROM WELDING - (IT) PERICOLO RADIAZIONI ULTRAVIOLETTE DA SALDATURA - (FR) DANGER RADIATIONS ULTRAVIOLETTES DE SOUDAGE -
(ES) PELIGRO RADIACIONES ULTRAVIOLETAS - (DE) GEFAHR ULTRAVIOLETTER STRAHLUNGEN BEIM SCHWEISSEN - (RU) ОПАСНОСТЬ УЛЬТРАФИОЛЕТОВОГО ИЗЛУЧЕНИЯ СВАРКИ - (PT)
PERIGO DE RADIAÇÕES ULTRAVIOLETAS DE SOLDADURA - (NL) GEVAAR ULTRAVIOLET STRALEN VAN HET LASSEN - (EL) ΚΙΝΔΥΝΟΣ ΥΠΕΡΙΩΔΟΥΣ ΑΚΤΙΝΟΒΟΛΙΑΣ ΑΠΟ ΣΥΓΚΟΛΛΗΣΗ - (RO)
PERICOL DE RADIAŢII ULTRAVIOLETE DE LA SUDURĂ - (SV) FARA FÖR ULTRAVIOLETT STRÅLNING FRÅN SVETSNING - (CS) NEBEZPEČÍ ULTRAFIALOVÉHO ZÁŘENÍ ZE SVAŘOVÁNÍ Í - (HR-SR)
OPASNOST OD ULTRALJUBIČASTIH ZRAKA PRILIKOM VARENJA - (PL) NIEBEZPIECZEŃSTWO PROMIENIOWANIA NADFIOLETOWEGO PODCZAS SPAWANIA - (FI) HITSAUKSEN AIHEUTTAMAN
ULTRAVIOLETTISÄTEILYN VAARA - (DA) FARE FOR ULTRAVIOLETTE SVEJSESTRÅLER - (NO) FARE FOR ULTRAFIOLETT STRÅLNING UNDER SVEISINGSPROSEDYREN - (SL) NEVARNOST SEVANJA
ULTRAVIJOLIČNIH ŽARKOV ZARADI VARJENJA - (SK) NEBEZPEČENSTVO ULTRAFIALOVÉHO ŽIARENIA ZO ZVÁRANIA - (HU) HEGESZTÉS KÖVETKEZTÉBEN LÉTREJÖTT IBOLYÁNTÚLI SUGÁRZÁS
VESZÉLYE - (LT) ULTRAVIOLETINIO SPINDULIAVIMO SUVIRINIMO METU PAVOJUS - (ET) KEEVITAMISEL ERALDUVA ULTRAVIOLETTKIIRGUSEOHT - (LV) METINĀŠANAS ULTRAVIOLETĀ IZSTAROJUMA
BĪSTAMĪBA - (BG) ОПАСНОСТ ОТ УЛТРАВИОЛЕТОВО ОБЛЪЧВАНЕ ПРИ ЗАВАРЯВАНЕ - (TR) KAYNAKTAN ULTRAVİOLE IŞIMATEHLİKESİ - (AR)
(EN) DANGER OF FIRE - (IT) PERICOLO INCENDIO - (FR) RISQUE D’INCENDIE - (ES) PELIGRO DE INCENDIO - (DE) BRANDGEFAHR - (RU) ОПАСНОСТЬ ПОЖАРА - (PT) PERIGO DE
INCÊNDIO - (NL) GEVAAR VOOR BRAND - (EL) ΚΙΝΔΥΝΟΣ ΠΥΡΚΑΓΙΑΣ - (RO) PERICOL DE INCENDIU - (SV) BRANDRISK - (CS) NEBEZPEČÍ POŽÁRU - (HR-SR) OPASNOST OD POŽARA
- (PL) NIEBEZPIECZEŃSTWO POŻARU - (FI) TULIPALON VAARA - (DA) BRANDFARE - (NO) BRANNFARE - (SL) NEVARNOST POŽARA - (SK) NEBEZPEČENSTVO POŽIARU - (HU)
TŰZVESZÉLY - (LT) GAISRO PAVOJUS - (ET) TULEOHT - (LV) UGUNSGRĒKA BĪSTAMĪBA - (BG) ОПАСНОСТ ОТ ПОЖАР - (TR) YANGIN TEHLİKESİ - (AR)
(EN) DANGER OF BURNS - (IT) PERICOLO DI USTIONI - (FR) RISQUE DE BRÛLURES - (ES) PELIGRO DE QUEMADURAS - (DE) VERBRENNUNGSGEFAHR - (RU) ОПАСНОСТЬ
ОЖОГОВ - (PT) PERIGO DE QUEIMADURAS - (NL) GEVAAR VOOR BRANDWONDEN - (EL) ΚΙΝΔΥΝΟΣ ΕΓΚΑΥΜΑΤΩΝ - (RO) PERICOL DE ARSURI - (SV) RISK FÖR BRÄNNSKADA
- (CS) NEBEZPEČÍ POPÁLENIN - (HR-SR) OPASNOST OD OPEKLINA - (PL) NIEBEZPIECZEŃSTWO OPARZEŃ - (FI) PALOVAMMOJEN VAARA - (DA) FARE FOR FORBRÆNDINGER
- (NO) FARE FOR FORBRENNINGER - (SL) NEVARNOST OPEKLIN - (SK) NEBEZPEČENSTVO POPÁLENÍN - (HU) ÉGÉSI SÉRÜLÉS VESZÉLYE - (LT) NUSIDEGINIMO PAVOJUS
- (ET) PÕLETUSHAAVADE SAAMISE OHT - (LV) APDEGUMU GŪŠANAS BĪSTAMĪBA - (BG) ОПАСНОСТ ОТ ИЗГАРЯНИЯ - (TR) YANIK TEHLİKESİ - (AR)
(EN) DANGER OF STRONG MAGNETIC FIELD - (IT) PERICOLO CAMPI MAGNETICI INTENSI - (FR) DANGER CHAMPS MAGNÉTIQUES INTENSES - (ES) PELIGRO CAMPOS MAGNÉTICOS
INTENSOS - (DE) GEFAHR STARKER MAGNETFELDER - (RU) ОПАСНОСТЬ ИНТЕНСИВНЫХ МАГНИТНЫХ ПОЛЕЙ - (PT) PERIGO DE CAMPOS MAGNÉTICOS INTENSOS - (NL) GEVAAR INTENSE
MAGNETISCHE VELDEN - (EL) ΚΙΝΔΥΝΟΣ ΕΝΤΟΝΩΝ ΗΛΕΚΤΡΟΜΑΓΝΗΤΙΚΩΝ ΠΕΔΙΩΝ - (RO) PERICOL CÂMPURI MAGNETICE INTENSE - (SV) RISK FÖR INTENSIVA MAGNETFÄLT - (CS)
NEBEZPEČÍ INTENZIVNÍCH MAGNETICKÝCH POLÍ - (HR-SR) OPASNOST OD INTENZIVNIH ELEKTROMAGNETSKIH POLJA - (PL) NIEBEZPIECZEŃSTWO SILNYCH PÓL MAGNETYCZNYCH - (FI)
VOIMAKKAIDEN MAGNEETTIKENTTIEN VAARA - (DA) FARE STÆRKE MAGNETISKE FELTER - (NO) FARE FOR INTENSIVE MAGNETISKE FELT - (SL) NEVARNOST MOČNIH MAGNETNIH POLJ
- (SK) NEBEZPEČENSTVO INTENZÍVNYCH MAGNETICKÝCH POLÍ - (HU) INTENZÍV MÁGNESES MEZŐK VESZÉLYE - (LT) INTENSYVAUS MAGNETINIO LAUKO PAVOJUS -
(ET) OHT - TUGEVAD
MAGNETVÄLJAD
- (LV) SPĒCĪGĀ MAGNĒTISKĀ LAUKA BĪSTAMĪBA - (BG) ОПАСНОСТ ОТ СИЛНИ МАГНИТНИ ПОЛЕТА - (TR) GÜÇLÜ MANYETİK ALAN TEHLİKESİ - (AR)
(EN) DANGER OF NON-IONISING RADIATION - (IT) PERICOLO RADIAZIONI NON IONIZZANTI - (FR) DANGER RADIATIONS NON IONISANTES - (ES) PELIGRO RADIACIONES NO IONIZANTES
- (DE) GEFAHR NICHT IONISIERENDER STRAHLUNGEN - (RU) ОПАСНОСТЬ НЕ ИОНИЗИРУЮЩЕЙ РАДИАЦИИ - (PT) PERIGO DE RADIAÇÕES NÃO IONIZANTES - (NL) GEVAAR NIET
IONISERENDE STRALEN - (EL) ΚΙΝΔΥΝΟΣ ΜΗ ΙΟΝΙΖΟΝΤΩΝ ΑΚΤΙΝΟΒΟΛΙΩΝ - (RO) PERICOL DE RADIAŢII NEIONIZANTE - (SV) FARA FÖR ICKE JONISERANDE - (CS) NEBEZPEČÍ
NEIONIZUJÍCÍHO ZÁŘENÍ - (HR-SR) OPASNOST NEJONIZIRAJUĆIH ZRAKA - (PL) ZAGROŻENIE PROMIENIOWANIEM NIEJONIZUJĄCYM - (FI) IONISOIMATTOMAN SÄTEILYN VAARA -
(DA) FARE FOR IKKE-IONISERENDE STRÅLER - (NO) FARE FOR UJONISERT STRÅLNING - (SL) NEVARNOST NEJONIZIRANEGA SEVANJA - (SK) NEBEZPEČENSTVO NEIONIZUJÚCEHO
ZARIADENIA - (HU) NEM INOGEN SUGÁRZÁS VESZÉLYE - (LT) NEJONIZUOTO SPINDULIAVIMO PAVOJUS - (ET) MITTEIONISEERITUDKIIRGUSTE OHT - (LV) NEJONIZĒJOŠA
IZSTAROJUMA BĪSTAMĪBA - (BG) ОПАСТНОСТ ОТ НЕ ЙОНИЗИРАНО ОБЛЪЧВАНЕ - (TR) İYONLAŞTIRICI OLMAYAN RADYASYON TEHLİKESİ - (AR)
(EN) GENERAL HAZARD - (IT) PERICOLO GENERICO - (FR) DANGER GÉNÉRIQUE - (ES) PELIGRO GENÉRICO - (DE) GEFAHR ALLGEMEINER ART - (RU) ОБЩАЯ ОПАСНОСТЬ - (PT)
PERIGO GERAL - (NL) ALGEMEEN GEVAAR - (EL) ΓΕΝΙΚΟΣ ΚΙΝΔΥΝΟΣ - (RO) PERICOL GENERAL - (SV) ALLMÄN FARA - (CS) VŠEOBECNÉ NEBEZPEČÍ - (HR-SR) OPĆA OPASNOST - (PL)
OGÓLNE NIEBEZPIECZEŃSTWO - (FI) YLEINEN VAARA - (DA) ALMEN FARE - (NO) GENERISK FARE STRÅLNING - (SL) SPLOŠNA NEVARNOST - (SK) VŠEOBECNÉ NEBEZPEČENSTVO
- (HU) ÁLTALÁNOS VESZÉLY - (LT) BENDRAS PAVOJUS - (ET) ÜLDINE OHT - (LV) VISPĀRĪGA BĪSTAMĪBA - (BG) ОБЩИ ОПАСТНОСТИ - (TR) GENEL TEHLİKE - (AR)
(EN) DO NOT USE THE HANDLE TO HANG THE WELDING MACHINE. - (IT) VIETATO UTILIZZARE LA MANIGLIA COME MEZZO DI SOSPENSIONE DELLA SALDATRICE - (FR) INTERDIT D’UTILISER
LA POIGNÉE COMME MOYEN DE SUSPENSION DU POSTE DE SOUDAGE - (ES) SE PROHÍBE UTILIZAR LA MANILLA COMO MEDIO DE SUSPENSIÓN DE LA SOLDADORA - (DE) ES IST UNTERSAGT,
DEN GRIFF ALS MITTEL ZUM AUFHÄNGEN DER SCHWEISSMASCHINE ZU BENUTZEN - (RU) ЗАПРЕЩЕНО ПОДВЕШИВАТЬ СВАРОЧНЫЙ АППАРАТ ЗА РУЧКУ - (PT) É PROIBIDO UTILIZAR A
MAÇANETA COMO MEIO DE SUSPENSÃO DO APARELHO DE SOLDAR - (NL) DE HANDGREEP MAG NIET WORDEN GEBRUIKT OM HET LASAPPARAAT AAN OP TE HANGEN - (EL) ΑΠΑΓΟΡΕΥΕΤΑΙ Η
ΧΡΗΣΗ ΤΗΣ ΧΕΙΡΟΛΑΒΗΣ ΣΑΝ ΜΕΣΟ ΑΝΥΨΩΣΗΣ ΤΗΣ ΣΥΓΚΟΛΛΗΤΗΤΙΚΗΣ ΣΥΣΚΕΥΗΣ - (RO) SE INTERZICE FOLOSIREA MÂNERULUI CA MIJLOC DE SUSŢINERE A APARATULUI DE SUDURĂ
- (SV) DET ÄR FÖRBJUDET ATT ANVÄNDA HANDTAGET FÖR ATT HÄNGA UPP SVETSEN - (CS) JE ZAKÁZÁNO POUŽÍVAT RUKOJEŤ JAKO PROSTŘEDEK K ZAVĚŠENÍ SVAŘOVACÍHO PŘÍSTROJE
- (HR-SR) ZABRANJENO JE UPOTREBLJAVATI RUČKU ZA PODIZANJE STROJA ZA VARENJE - (PL) ZABRANIA SIE UŻYWANIA UCHWYTU JAKO ŚRODKA DO ZAWIESZANIA SPAWARKI - (FI) ON
KIELLETTYÄ KÄYTTÄÄ KÄSIKAHVAA HITSAUSLAITTEEN RIPUSTUSVÄLINEENÄ - (DA) DET ER FORBUDT AT ANVENDE HÅNDREBET TIL AT HÆVE SVEJSEMASKINEN - (NO) DET ER FORBUDT
Å BRUKE HÅNDTAKET FOR Å HENGE SVEISEMASKINEN OPP - (SL) ROČAJA NE SMETE UPORABLJATI ZA OBEŠANJE VARILNEGA APARATA - (SK) JE ZAKÁZANÉ VEŠAŤ ZVÁRACÍ PRÍSTROJ ZA
RUKOVÄŤ - (HU) TILOS A HEGESZTŐGÉPET A FOGANTYÚJÁNÁL FOGVA FELAKASZTANI - (LT) DRAUDŽIAMA NAUDOTI RANKENĄ KAIP PRIEMONĘSUVIRINIMO APARATO SUSTABDYMUI
- (ET) ON KEELATUD RIPUTADA KEEVITUSSEADET KASUTADES SELLEKS KÄEPIDET - (LV) IR AIZLIEGTS IZMANTOT ROKTURI METINĀŠANAS APARĀTA PIEKĀRŠANAI - (BG) ЗАБРАНЕНО Е ДА СЕ
ИЗПОЛЗВА РЪКОХВАТКАТА КАТО СРЕДСТВО ЗА ОКАЧВАНЕ НА ЗАВАРЪЧНИЯ АПАРАТ - (TR) KAYNAK MAKİNESİNİ SAPINDAN ASMAYIN - (AR)
(EN) EYE PROTECTIONS MUST BE WORN - (IT) OBBLIGO DI INDOSSARE OCCHIALI PROTETTIVI - (FR) PORT DES LUNETTES DE PROTECTION OBLIGATOIRE - (ES) OBLIGACIÓN DE USAR GAFAS DE
PROTECCIÓN - (DE) DAS TRAGEN EINER SCHUTZBRILLE IST PFLICHT - (RU) ОБЯЗАННОСТЬ НОСИТЬ ЗАЩИТНЫЕ ОЧКИ - (PT) OBRIGAÇÃO DE VESTIR ÓCULOS DE PROTECÇÃO - (NL) VERPLICHT
DRAGEN VAN BESCHERMENDE BRIL - (EL) ΥΠΟΧΡΕΩΣΗ ΝΑ ΦΟΡΑΤΕ ΠΡΟΣΤΕΤΕΥΤΙΚΑ ΓΥΑΛΙΑ - (RO) ESTE OBLIGATORIE PURTAREA OCHELARILOR DE PROTECŢIE - (SV) OBLIGATORISKT ATT
ANVÄNDA SKYDDSGLASÖGON - (CS) POVINNOST POUŽÍVÁNÍ OCHRANNÝCH BRÝLÍ - (HR-SR) OBAVEZNA UPOTREBA ZAŠTITNIH NAOČALA - (PL) NAKAZ NOSZENIA OKULARÓW OCHRONNYCH
- (FI) SUOJALASIEN KÄYTTÖ PAKOLLISTA - (DA) PLIGT TIL AT ANVENDE BESKYTTELSESBRILLER - (NO) DET ER OBLIGATORISK Å HA PÅ SEG VERNEBRILLEN - (SL) OBVEZNA UPORABA ZAŠČITNIH
OČAL - (SK) POVINNOSŤ POUŽÍVANIA OCHRANNÝCH OKULIAROV - (HU) VÉDŐSZEMÜVEG VISELETE KÖTELEZŐ - (LT) PRIVALOMA DIRBTI SU APSAUGINIAIS AKINIAIS - (ET) KOHUSTUS KANDA
KAITSEPRILLE - (LV) PIENĀKUMS VILKT AIZSARGBRILLES - (BG) ЗАДЪЛЖИТЕЛНО ДА СЕ НОСЯТ ПРЕДПАЗНИ ОЧИЛА - (TR) KORUYUCU GÖZLÜK KULLANILMALIDIR - (AR)
(EN) NO ENTRY FOR UNAUTHORISED PERSONNEL - (IT) DIVIETO DI ACCESSO ALLE PERSONE NON AUTORIZZATE - (FR) ACCÈS INTERDIT AUX PERSONNES NON AUTORISÉES - (ES) PROHIBIDO
EL ACCESO A PERSONAS NO AUTORIZADAS - (DE) UNBEFUGTEN PERSONEN IST DER ZUTRITT VERBOTEN - (RU) ЗАПРЕТ ДЛЯ ДОСТУПА ПОСТОРОННИХ ЛИЦ - (PT) PROIBIÇÃO DE ACESSO
ÀS PESSOAS NÃO AUTORIZADAS - (NL) TOEGANGSVERBOD VOOR NIET GEAUTORISEERDE PERSONEN - (EL) ΑΠΑΓΟΡΕΥΣΗ ΠΡΟΣΒΑΣΗΣ ΣΕ ΜΗ ΕΠΙΤΕΤΡΑΜΕΝΑ ΑΤΟΜΑ - (RO) ACCESUL
PERSOANELOR NEAUTORIZATE ESTE INTERZIS - (SV) TILLTRÄDE FÖRBJUDET FÖR ICKE AUKTORISERADE PERSONER - (CS) ZÁKAZ VSTUPU NEPOVOLANÝM OSOBÁM - (HR-SR) ZABRANA PRISTUPA
NEOVLAŠTENIM OSOBAMA - (PL) ZAKAZ DOSTĘPU OSOBOM NIEUPOWAŻNIONYM - (FI) PÄÄSY KIELLETTY ASIATTOMILTA - (DA) ADGANG FORBUDT FOR UVEDKOMMENDE - (NO) PERSONER
SOM IKKE ER AUTORISERTE MÅ IKKE HA ADGANG TIL APPARATEN - (SL) DOSTOP PREPOVEDAN NEPOOBLAŠČENIM OSEBAM - (SK) ZÁKAZ NEOPRÁVNENÉHO PRÍSTUPU K OSÔB - (HU) FEL NEM
JOGOSÍTOTT SZEMÉLYEK SZÁMÁRA TILOS A BELÉPÉS - (LT) PAŠALINIAMS ĮEITI DRAUDŽIAMA - (ET) SELLEKS VOLITAMATA ISIKUTEL ON TÖÖALAS VIIBIMINE KEELATUD - (LV) NEPIEDEROŠĀM
PERSONĀM IEEJA AIZLIEGTA - (BG) ЗАБРАНЕН Е ДОСТЪПЪТ НА НЕУПЪЛНОМОЩЕНИ ЛИЦА - (TR) YETKİLİ OLMAYAN KİŞİLER GİREMEZ - (AR)

- 3 -
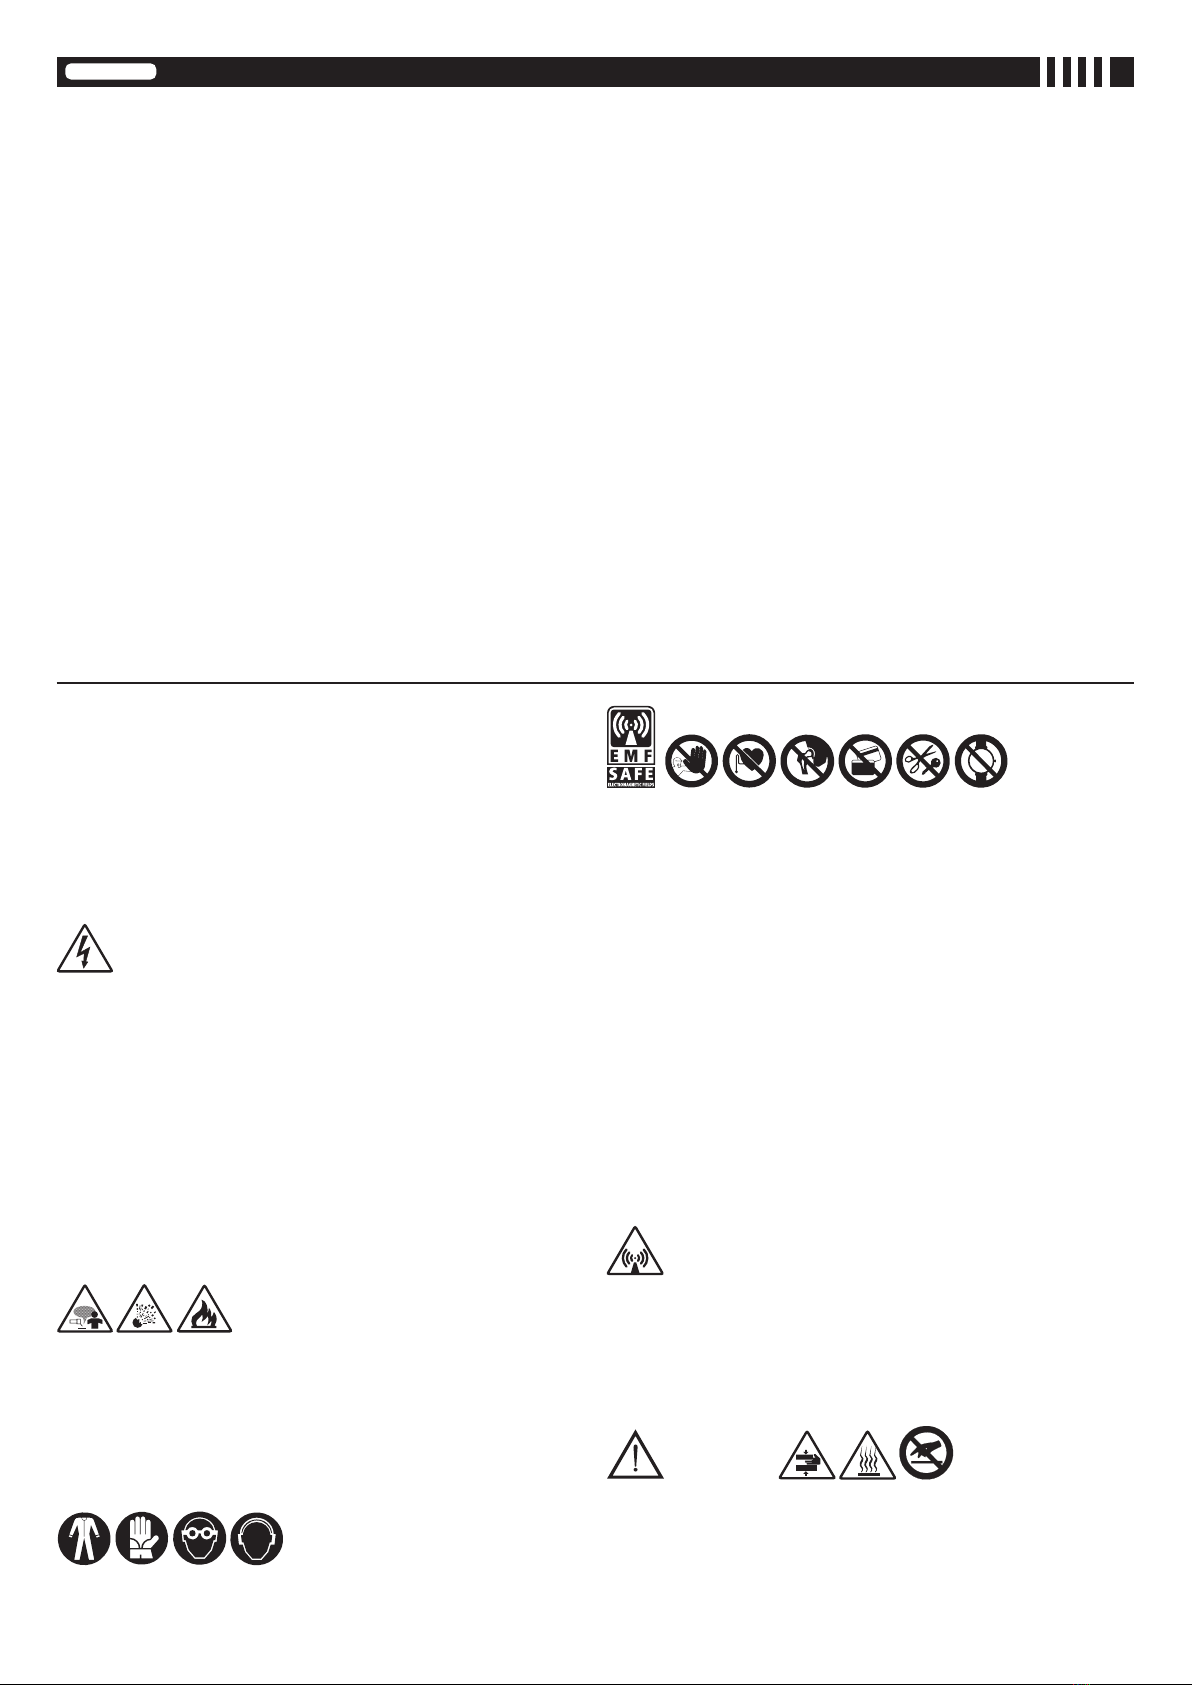
(EN) WEARING A PROTECTIVE MASK IS COMPULSORY - (IT) OBBLIGO USARE MASCHERA PROTETTIVA - (FR) PORT DU MASQUE DE PROTECTION OBLIGATOIRE - (ES) OBLIGACIÓN DE USAR
MÁSCARA DE PROTECCIÓN - (DE) DER GEBRAUCH EINER SCHUTZMASKE IST PFLICHT - (RU) ОБЯЗАННОСТЬ ПОЛЬЗОВАТЬСЯ ЗАЩИТНОЙ МАСКОЙ - (PT) OBRIGATÓRIO O USO DE MÁSCARA
DE PROTEÇÃO - (NL) VERPLICHT GEBRUIK VAN BESCHERMEND MASKER - (EL) ΥΠΟΧΡΕΩΣΗ ΝΑ ΦΟΡΑΤΕ ΠΡΟΣΤΑΤΕΥΤΙΚΗ ΜΑΣΚΑ - (RO) FOLOSIREA MĂŞTII DE PROTECŢIE OBLIGATORIE - (SV)
OBLIGATORISKT ATT BÄRA SKYDDSMASK - (CS) POVINNÉ POUŽITÍ OCHRANNÉHO ŠTÍTU - (HR-SR) OBAVEZNO KORIŠTENJE ZAŠTITNE MASKE - (PL) NAKAZ UŻYWANIA MASKI OCHRONNEJ - (FI)
SUOJAMASKIN KÄYTTÖ PAKOLLISTA - (DA) PLIGT TIL AT ANVENDE BESKYTTELSESMASKE - (NO) FORPLIKTELSE Å BRUKE VERNEBRILLER - (SL) OBVEZNOST UPORABI ZAŠČITNE MASKE - (SK)
POVINNÉ POUŽITIE OCHRANNÉHO ŠTÍTU - (HU) VÉDŐMASZK HASZNÁLATA KÖTELEZŐ - (LT) PRIVALOMA UŽSIDĖTI APSAUGINĘ KAUKĘ - (ET) KOHUSTUSLIK KANDA KAITSEMASKI - (LV) PIENĀKUMS
IZMANTOT AIZSARGMASKU - (BG) ЗАДЪЛЖИТЕЛНО ИЗПОЛЗВАНЕ НА ПРЕДПАЗНА ЗАВАРЪЧНА МАСКА - (TR) KORUYUCU MASKE TAKMAK ZORUNLUDUR - (AR)
(EN) WEARING EAR PROTECTORS IS COMPULSORY - (IT) OBBLIGO PROTEZIONE DELL’UDITO - (FR) PROTECTION DE L’OUÏE OBLIGATOIRE - (ES) OBLIGACIÓN DE PROTECCIÓN DEL OÍDO - (DE) DAS
TRAGENVON GEHÖRSCHUTZ IST PFLICHT - (RU) ОБЯЗАННОСТЬ ЗАЩИЩАТЬ СЛУХ - (PT) OBRIGATÓRIO PROTEGER O OUVIDO - (NL) VERPLICHTE OORBESCHERMING - (EL) ΥΠΟΧΡΕΩΣΗ ΠΡΟΣΤΑΣΙΑΣ
ΑΚΟΗΣ - (RO) PROTECŢIA AUZULUI OBLIGATORIE - (SV) OBLIGATORISKT ATT SKYDDA HÖRSELN - (CS) POVINNOST OCHRANY SLUCHU - (HR-SR) OBAVEZNA ZAŠTITA SLUHA - (PL) NAKAZ OCHRONY
SŁUCHU - (FI) KUULOSUOJAUS PAKOLLINEN - (DA) PLIGT TIL AT ANVENDE HØREVÆRN - (NO) FORPLIKTELSE Å BRUKE HØRSELVERN - (SL) OBVEZNA UPORABA GLUŠNIKOV - (SK) POVINNÁ
OCHRANA SLUCHU - (HU) HALLÁSVÉDELEM KÖTELEZŐ - (LT) PRIVALOMOS APSAUGOS PRIEMONĖS KLAUSOS ORGANAMS - (ET) KOHUSTUS KANDA KUULMISKAITSEVAHENDEID - (LV) PIENĀKUMS
AIZSARGĀT DZIRDES ORGĀNUS - (BG) ЗАДЪЛЖИТЕЛНО ДА СЕ НОСЯТ ПРЕДПАЗНИ СРЕДСТВА ЗА СЛУХА - (TR) KORUYUCU KULAKLIK KULLANMAK ZORUNLUDUR - (AR)
(EN) DANGER OF CRUSHING UPPER LIMBS - (IT) PERICOLO SCHIACCIAMENTO ARTI SUPERIORI - (FR) RISQUE D’ÉCRASEMENT DES MEMBRES SUPÉRIEURS - (ES) PELIGRO DE APLASTAMIENTO DE LOS
MIEMBROS SUPERIORES - (DE) QUETSCHGEFAHR FÜR DIE OBEREN GLIEDMASSEN - (RU) ОПАСНОСТЬ РАЗДАВЛИВАНИЯ ВЕРХНИХ КОНЕЧНОСТЕЙ - (PT) PERIGO DE ESMAGAMENTO DOS MEMBROS
SUPERIORES-(NL)GEVAARVOORVERPLETTINGBOVENSTELEDEMATEN-(EL)ΚΙΝΔΥΝΟΣΣΥΝΘΛΙΨΗΣΑΝΩΜΕΛΩΝ-(RO)PERICOLDESTRIVIREAMEMBRELORSUPERIOARE-(SV)RISKFÖRKLÄMNINGAV
DEÖVREEXTREMITETERNA-(CS)NEBEZPEČÍPŘITLAČENÍHORNÍCHKONČETIN-(HR-SR)OPASNOSTODGNJEČENJAGORNJIHUDOVA-(PL)NIEBEZPIECZEŃSTWOZGNIECENIAKOŃCZYNGÓRNYCH-(FI)
YLÄRAAJOJENPURISTUMISVAARA-(DA)FAREFORFASTKLEMNINGAFDEØVRELEMMER-(NO)FAREFORÅKLEMMEARMENE-(SL)NEVARNOSTZMEČKANINZGORNJIHUDOV-(SK)NEBEZPEČENSTVO
PRITLAČENIA HORNÝCH KONČATÍN - (HU) FELSŐ VÉGTAGOK ÖSSZENYOMÁSÁNAKVESZÉLYE - (LT) VIRŠUTINIŲ GALŪNIŲ SUSPAUDIMO PAVOJUS - (ET) ÜLAJÄSEMETE MULJUDASAAMISE OHT - (LV)
AUGŠĒJO EKSTREMITĀŠU SASPIEŠANAS BĪSTAMĪBA - (BG) ОПАСНОСТ ОТ ПРЕМАЗВАНЕ НА ГОРНИТЕ КРАЙНИЦИ - (TR) ÜST UZUVLARIN EZİLME TEHLİKESİ - (AR)
(EN) WARNING: MOVING PARTS - (IT) ATTENZIONE ORGANI IN MOVIMENTO - (FR) ATTENTION ORGANES EN MOUVEMENT - (ES) ATENCIÓN ÓRGANOS EN MOVIMIENTO - (DE)
VORSICHT BEWEGUNGSELEMENTE - (RU) ВНИМАНИЕ, ЧАСТИ В ДВИЖЕНИИ - (PT) CUIDADO ÓRGÃOS EM MOVIMENTO - (NL) OPGELET ORGANEN IN BEWEGING - (EL) ΠΡΟΣΟΧΗ
ΟΡΓΑΝΑ ΣΕ ΚΙΝΗΣΗ - (RO) ATENŢIE PIESE ÎN MIŞCARE - (SV) VARNING FÖR ORGAN I RÖRELSE - (CS) POZOR NA POHYBUJÍCÍ SE SOUČÁSTI - (HR-SR) POZOR DIJELOVI U POKRETU
- (PL) UWAGA: RUCHOME CZĘŚCI MASZYNY - (FI) VARO LIIKKUVIA OSIA - (DA) PAS PÅ DELE I BEVÆGELSE - (NO) ADVARSEL: BEVEGELIGE DELER - (SL) POZOR, NAPRAVE
DELUJEJO - (SK) POZOR NA POHYBUJÚCE SA SÚČASTI - (HU) VIGYÁZAT: GÉPALKATRÉSZEK MOZGÁSBAN VANNAK - (LT) DĖMESIO! JUDANČIOS DETALĖS - (ET) TÄHELEPANU!
LIIKUVAD MASINAOSAD - (LV) UZMANĪBU KUSTĪGĀS DAĻAS - (BG) ВНИМАНИЕ ДВИЖЕЩИ СЕ МЕХАНИЗМИ - (TR) DİKKAT: HAREKETLİ PARÇALAR - (AR)
(EN) USERS OF VITAL ELECTRICAL AND ELECTRONIC APPARATUS MUST NEVER USE THE MACHINE - (IT) VIETATO L’USO DELLA MACCHINA AI PORTATORI DI APPARECCHIATURE ELETTRICHE ED
ELETTRONICHE VITALI - (FR) L’UTILISATION DE LA MACHINE EST DÉCONSEILLÉE AUX PORTEURS D’APPAREILS ÉLECTRIQUES OU ÉLECTRONIQUES MÉDICAUX - (ES) PROHIBIDO EL USO DE LA
MÁQUINA A LOS PORTADORES DE APARATOS ELÉCTRICOSY ELECTRÓNICOSVITALES - (DE) TRÄGERN LEBENSERHALTENDER ELEKTRISCHER UND ELEKTRONISCHER GERÄTE IST DER GEBRAUCH DER
MASCHINE UNTERSAGT - (RU) ИСПОЛЬЗОВАНИЕ УСТАНОВКИ ЗАПРЕЩЕНО ЛИЦАМ, ИСПОЛЬЗУЮЩИМ ЭЛЕКТРОННУЮ И ЭЛЕКТРОАППАРАТУРУ ОБЕСПЕЧЕНИЯ ЖИЗНЕДЕЯТЕЛЬНОСТИ - (PT) É
PROIBIDO O USO DA MÁQUINA AOS PORTADORES DE APARELHAGENS ELÉCTRICAS E ELECTRÓNICAS VITAIS - (NL) HET GEBRUIK VAN DE MACHINE ISVERBODEN AAN DRAGERS VAN ELEKTRISCHE
EN ELEKTRONISCHE VITALE APPARATUUR - (EL) ΑΠΑΓΟΡΕΥΕΤΑΙ Η ΧΡΗΣΗ ΤΟΥ ΜΗΧΑΝΗΜΑΤΟΣ ΣΕ ΑΤΟΜΑ ΠΟΥ ΦΕΡΟΥΝ ΗΛΕΚΤΡΙΚΕΣ ΚΑΙ ΗΛΕΚΤΡΟΝΙΚΕΣ ΣΥΣΚΕΥΕΣ ΖΩΤΙΚΗΣ ΣΗΜΑΣΙΑΣ - (RO) SE
INTERZICEFOLOSIREAMAŞINII DE CĂTRE PERSOANELEPURTĂTOARE DE APARATE ELECTRICE ŞI ELECTRONICEVITALE-(SV) FÖRBJUDET FÖRANVÄNDAREAV LIVSUPPEHÅLLANDE ELEKTRISKA ELLER
ELEKTRONISKA APPARATER ATT ANVÄNDA DENNA MASKIN - (CS) ZÁKAZ POUŽITÍ STROJE NOSITELŮM ELEKTRICKÝCH A ELEKTRONICKÝCH ŽIVOTNĚ DŮLEŽITÝCH ZAŘÍZENÍ - (HR-SR) ZABRANJENO
JE UPOTREBLJAVATI STROJ OSOBAMA KOJE IMAJU UGRAĐENE VITALNE ELEKTRIČNE ILI ELEKTRONIČKE UREĐAJE - (PL) ZABRONIONE JEST UŻYWANIE URZĄDZENIA OSOBOM STOSUJĄCYM
ELEKTRYCZNE I ELEKTRONICZNE URZĄDZENIA WSPOMAGAJĄCE FUNKCJE ŻYCIOWE - (FI) KONEEN KÄYTTÖKIELTO SÄHKÖISTEN JA ELEKTRONISTEN HENKILÖNSUOJALAITTEIDEN KÄYTTÄJILLE
- (DA) DET ER FORBUDT FOR PERSONER, DER ANVENDER LIVSVIGTIGT ELEKTRISK OG ELEKTRONISK APPARATUR, AT ANVENDE MASKINEN - (NO) DET ER FORBUDT FOR PERSONER SOM BRUKER
LIVSVIKTIGEELEKTRISKEELLERELEKTRONISKEAPPARATERÅBRUKEMASKINEN-(SL)PREPOVEDANAUPORABASTROJAZAUPORABNIKEŽIVLJENJSKOPOMEMBNIHELEKTRIČNIH INELEKTRONSKIH
NAPRAV - (SK) ZÁKAZ POUŽÍVANIA STROJA OSOBÁM SO ŽIVOTNE DÔLEŽITÝMI ELEKTRICKÝMI A ELEKTRONICKÝMI ZARIADENIAMI - (HU) TILOS A GÉP HASZNÁLATA MINDAZOK SZÁMÁRA, AKIK
SZERVEZETÉBEN ÉLETFENNTARTÓ ELEKTROMOS VAGY ELEKTRONIKUS KÉSZÜLÉK VAN BEÉPÍTVE - (LT) GRIEŽTAI DRAUDŽIAMA SU ĮRANGA DIRBTI ASMENIMS, BESINAUDOJANTIEMS GYVYBIŠKAI
SVARBIAIS ELEKTRINIAIS AR ELEKTRONINIAIS PRIETAISAIS - (ET) SEADET EI TOHI KASUTADA ISIKUD, KES KASUTAVAD MEDITSIINILISI ELEKTRI-JA ELEKTROONIKASEADMEID - (LV) ELEKTRISKOVAI
ELEKTRONISKO MEDICĪNISKO IERĪČU LIETOTĀJIEM IR AIZLIEGTS IZMANTOT MAŠĪNU - (BG) ЗАБРАНЕНО Е ПОЛЗВАНЕТО НА МАШИНАТА ОТ ЛИЦА, НОСИТЕЛИ НА ЕЛЕКТРИЧЕСКИ И ЕЛЕКТРОННИ
МЕДИЦИНСКИ УСТРОЙСТВА - (TR) HAYATİ ELEKTRİKLİ VE ELEKTRONİK CİHAZ KULLANANLAR MAKİNEYİ KULLANMAMALIDIR - (AR)
(EN) PEOPLE WITH METAL PROSTHESES ARE NOT ALLOWED TO USETHE MACHINE - (IT)VIETATO L’USO DELLA MACCHINA AI PORTATORI DI PROTESI METALLICHE - (FR) UTILISATION INTERDITE DE LA
MACHINE AUX PORTEURS DE PROTHÈSES MÉTALLIQUES - (ES) PROHIBIDO EL USO DE LA MÁQUINA A LOS PORTADORES DE PRÓTESIS METÁLICAS - (DE) TRÄGERN VON METALLPROTHESEN IST DER
UMGANGMITDERMASCHINEVERBOTEN-(RU)ИСПОЛЬЗОВАНИЕМАШИНЫЗАПРЕЩАЕТСЯЛЮДЯМ,ИМЕЮЩИММЕТАЛЛИЧЕСКИЕПРОТЕЗЫ-(PT)PROIBIDOOUSODAMÁQUINAAOSPORTADORES
DE PRÓTESES METÁLICAS - (NL) HET GEBRUIK VAN DE MACHINE IS VERBODEN AAN DE DRAGERSVAN METALEN PROTHESEN - (EL) ΑΠΑΓΟΡΕΥΕΤΑΙ Η ΧΡΗΣΗ ΤΗΣ ΜΗΧΑΝΗΣ ΣΕ ΑΤΟΜΑ ΠΟΥ ΦΕΡΟΥΝ
ΜΕΤΑΛΛΙΚΕΣ ΠΡΟΣΘΗΚΕΣ - (RO) SE INTERZICE FOLOSIREA MAŞINII DE CĂTRE PERSOANELE PURTĂTOARE DE PROTEZE METALICE - (SV) FÖRBJUDET FÖR PERSONER SOM BÄR METALLPROTES ATT
ANVÄNDA MASKINEN - (CS) ZÁKAZ POUŽITÍ STROJE NOSITELŮM KOVOVÝCH PROTÉZ - (HR-SR) ZABRANJENA UPOTREBA STROJA OSOBAMA KOJE NOSE METALNE PROTEZE - (PL) ZAKAZ UŻYWANIA
URZĄDZENIAOSOBOMSTOSUJĄCYMPROTEZYMETALOWE-(FI)KONEENKÄYTTÖKIELLETTYMETALLIPROTEESIENKANTAJILTA-(DA)DETERFORBUDTFORPERSONERMEDMETALPROTESERATBENYTTE
MASKINEN-(NO)BRUKAVMASKINENERIKKETILLATT FORPERSONERMEDMETALLPROTESER-(SL)PREPOVEDANAUPORABASTROJAZANOSILCEKOVINSKIHPROTEZ-(SK)ZÁKAZPOUŽITIASTROJA
OSOBÁMSKOVOVÝMIPROTÉZAMI-(HU)TILOSAGÉPHASZNÁLATAFÉMPROTÉZISTVISELŐSZEMÉLYEKSZÁMÁRA- (LT)SUSUVIRINIMOAPARATUDRAUDŽIAMADIRBTIASMENIMS,NAUDOJANTIEMS
METALINIUS PROTEZUS - (ET) SEADET EI TOHI KASUTADA ISIKUD, KES KASUTAVAD METALLPROTEESE - (LV) CILVĒKIEM AR METĀLA PROTĒZĒM IR AIZLIEGTS LIETOT IERĪCI - (BG) ЗАБРАНЕНА Е
УПОТРЕБАТА НА МАШИНАТА ОТ НОСИТЕЛИ НА МЕТАЛНИ ПРОТЕЗИ - (TR) METAL PROTEZLİ İNSANLAR MAKİNEYİ KULLANAMAZ - (AR)
(EN) DO NOTWEAR OR CARRY METAL OBJECTS,WATCHES OR MAGNETISED CARDS - (IT) VIETATO INDOSSARE OGGETTI METALLICI, OROLOGI E SCHEDE MAGNETICHE - (FR) INTERDICTION DE PORTER
DES OBJETS MÉTALLIQUES, MONTRES ET CARTES MAGNÉTIQUES - (ES) PROHIBIDO LLEVAR OBJETOS METÁLICOS, RELOJES, Y TARJETAS MAGNÉTICAS - (DE) DAS TRAGEN VON METALLOBJEKTEN,
UHREN UND MAGNETKARTEN IST VERBOTEN - (RU) ЗАПРЕЩАЕТСЯ НОСИТЬ МЕТАЛЛИЧЕСКИЕ ПРЕДМЕТЫ, ЧАСЫ ИЛИ МАГНИТНЫЕ ПЛАТЫЮ - (PT) PROIBIDO VESTIR OBJECTOS METÁLICOS,
RELÓGIOSEFICHASMAGNÉTICAS - (NL) HET ISVERBODENMETALENVOORWERPEN, UURWERKEN EN MAGNETISCHEFICHESTEDRAGEN - (EL) ΑΠΑΓΟΡΕΥΕΤΑΙ ΝΑΦΟΡΑΤΕ ΜΕΤΑΛΛΙΚΑ ΑΝΤΙΚΕΙΜΕΝΑ,
ΡΟΛΟΓΙΑ ΚΑΙ ΜΑΓΝΗΤΙΚΕΣ ΠΛΑΚΕΤΕΣ - (RO) ESTE INTERZISĂ PURTAREA OBIECTELOR METALICE, A CEASURILOR ŞI A CARTELELOR MAGNETICE - (SV) FÖRBJUDET ATT BÄRA METALLFÖREMÅL,
KLOCKOR OCH MAGNETKORT - (CS) ZÁKAZ NOŠENÍ KOVOVÝCH PŘEDMĚTŮ, HODINEK A MAGNETICKÝCH KARET - (HR-SR) ZABRANJENO NOŠENJE METALNIH PREDMETA, SATOVA I MAGNETSKIH
ČIPOVA - (PL) ZAKAZ NOSZENIA PRZEDMIOTÓW METALOWYCH, ZEGARKÓW I KART MAGNETYCZNYCH - (FI) METALLISTEN ESINEIDEN, KELLOJEN JA MAGNEETTIKORTTIEN MUKANA PITÄMINEN
KIELLETTY - (DA) FORBUD MOD AT BÆRE METALGENSTANDE, URE OG MAGNETISKE KORT - (NO) FORBUDT Å HA PÅ SEG METALLFORMÅL, KLOKKER OG MAGNETISKE KORT - (SL) PREPOVEDANO
NOŠENJE KOVINSKIH PREDMETOV, UR IN MAGNETNIH KARTIC - (SK) ZÁKAZ NOSENIA KOVOVÝCH PREDMETOV, HODINIEK A MAGNETICKÝCH KARIET - (HU) TILOS FÉMTÁRGYAK, KARÓRÁK VISELETE
ÉS MÁGNESES KÁRTYÁK MAGUKNÁL TARTÁSA - (LT) DRAUDŽIAMA PRIE SAVĘS TURĖTI METALINIŲ DAIKTŲ, LAIKRODŽIŲ AR MAGNETINIŲ PLOKŠTELIŲ - (ET) KEELATUD ON KANDA METALLESEMEID,
KELLASID JA MAGENTKAARTE - (LV) IR AIZLIEGTS VILKT METĀLA PRIEKŠMETUS, PULKSTEŅUS UN ŅEMT LĪDZI MAGNĒTISKĀS KARTES - (BG) ЗАБРАНЕНО Е НОСЕНЕТО НА МЕТАЛНИ ПРЕДМЕТИ,
ЧАСОВНИЦИ И МАГНИТНИ СХЕМИ - (TR) METAL NESNELER, SAATLER YA DA MANYETİK KARTLARI KULLANMAYIN VEYA TAŞIMAYIN - (AR)
(EN) NOT TO BE USED BY UNAUTHORISED PERSONNEL - (IT) VIETATO L’USO ALLE PERSONE NON AUTORIZZATE - (FR) UTILISATION INTERDITE AU PERSONNEL NON AUTORISÉ - (ES)
PROHIBIDO EL USO A PERSONAS NO AUTORIZADAS - (DE) DER GEBRAUCH DURCH UNBEFUGTE PERSONEN IST VERBOTEN - (RU) ИСПОЛЬЗОВАНИЕ ЗАПРЕЩАЕТСЯ ЛЮДЯМ, НЕ ИМЕЮЩИМ
РАЗРЕШЕНИЯ - (PT) PROIBIDO O USO ÀS PESSOAS NÃO AUTORIZADAS - (NL) HET GEBRUIK IS VERBODEN AAN NIET GEAUTORISEERDE PERSONEN - (EL) ΑΠΑΓΟΡΕΥΣΗ ΧΡΗΣΗΣ ΣΕ ΜΗ
ΕΠΙΤΕΤΡΑΜΕΝΑ ΑΤΟΜΑ - (RO) FOLOSIREA DE CĂTRE PERSOANELE NEAUTORIZATE ESTE INTERZISĂ - (SV) FÖRBJUDET FÖR ICKE AUKTORISERADE PERSONER ATT ANVÄNDA APPARATEN
- (CS) ZÁKAZ POUŽITÍ NEPOVOLANÝM OSOBÁM - (HR-SR) ZABRANJENA UPOTREBA NEOVLAŠTENIM OSOBAMA - (PL) ZAKAZ UŻYWANIA OSOBOM NIEAUTORYZOWANYM - (FI) KÄYTTÖ
KIELLETTY VALTUUTTAMATTOMILTA HENKILÖILTÄ - (DA) DET ER FORBUDT FOR UVEDKOMMENDE AT ANVENDE MASKINEN - (NO) BRUK ER IKKE TILLATT FOR UAUTORISERTE PERSONER - (SL)
NEPOOBLAŠČENIM OSEBAM UPORABA PREPOVEDANA - (SK) ZÁKAZ POUŽITIA NEPOVOLANÝM OSOBÁM - (HU) TILOS A HASZNÁLATA A FEL NEM JOGOSÍTOTT SZEMÉLYEK SZÁMÁRA - (LT)
PAŠALINIAMS NAUDOTIS DRAUDŽIAMA - (ET) SELLEKS VOLITAMATA ISIKUTEL ON SEADME KASUTAMINE KEELATUD - (LV) NEPILNVAROTĀM PERSONĀM IR AIZLIEGTS IZMANTOT APARĀTU
- (BG) ЗАБРАНЕНО Е ПОЛЗВАНЕТО ОТ НЕУПЪЛНОМОЩЕНИ ЛИЦА - (TR) YETKİSİZ PERSONEL TARAFINDAN KULLANILAMAZ - (AR)
(EN) Symbol indicating separation of electrical and electronic appliances for refuse collection. The user is not allowed to dispose of these appliances as solid, mixed urban refuse, and must
do it through authorised refuse collection centres. - (IT) Simbolo che indica la raccolta separata delle apparecchiature elettriche ed elettroniche. L’utente ha l’obbligo di non smaltire questa
apparecchiatura come riuto municipale solido misto, ma di rivolgersi ai centri di raccolta autorizzati. - (FR) Symbole indiquant la collecte diérenciée des appareils électriques et électroniques.
L’utilisateur ne peut éliminer ces appareils avec les déchets ménagers solides mixtes, mais doit s’adresser à un centre de collecte autorisé. - (ES) Símbolo que indica la recogida por separado
de los aparatos eléctricos y electrónicos. El usuario tiene la obligación de no eliminar este aparato como desecho urbano sólido mixto, sino de dirigirse a los centros de recogida autorizados.
- (DE) Symbol für die getrennte Erfassung elektrischer und elektronischer Geräte. Der Benutzer hat pichtgemäß dafür zu sorgen, daß dieses Gerät nicht mit dem gemischt erfaßten festen
Siedlungsabfall entsorgt wird. Stattdessen muß er eine der autorisierten Entsorgungsstellen einschalten. - (RU) Символ, указывающий на раздельный сбор электрического и электронного
оборудования. Пользователь не имеет права выбрасывать данное оборудование в качестве смешанного твердого бытового отхода, а обязан обращаться в специализированные
центры сбора отходов. - (PT) Símbolo que indica a reunião separada das aparelhagens eléctricas e electrónicas. O utente tem a obrigação de não eliminar esta aparelhagem como lixo municipal
sólido misto, mas deve procurar os centros de recolha autorizados. - (NL) Symbool dat wijst op de gescheiden inzameling van elektrische en elektronische toestellen. De gebruiker is verplicht deze
toestellen niet te lozen als gemengde vaste stadsafval, maar moet zich wenden tot de geautoriseerde ophaalcentra. - (EL) Σύμβολο που δείχνει τη διαφοροποιημένη συλλογή των ηλεκτρικών
κια ηλεκτρονικών συσκευών. Ο χρήστης υποχρεούται να μην διοχετεύει αυτή τη συσκευή σαν μικτό στερεό αστικό απόβλητο, αλλά να απευθύνεται σε εγκεκριμένα κέντρα συλλογής. - (RO)
Simbol ce indică depozitarea separată a aparatelor electrice şi electronice. Utilizatorul este obligat să nu depoziteze acest aparat împreună cu deşeurile solide mixte ci să-l predea într-un centru
de depozitare a deşeurilor autorizat. - (SV) Symbol som indikerar separat sopsortering av elektriska och elektroniska apparater. Användaren får inte sortera denna anordning tillsammans med
blandat fast hushållsavfall, utan måste vända sig till en auktoriserad insamlingsstation. - (CS) Symbol označující separovaný sběr elektrických a elektronických zařízení. Uživatel je povinen
nezlikvidovat toto zařízení jako pevný smíšený komunální odpad, ale obrátit se s ním na autorizované sběrny. - (HR-SR) Simbol koji označava posebno sakupljanje električnih i elektronskih
aparata. Korisnik ne smije odložiti ovaj aparat kao običan kruti otpad, već se mora obratiti ovlaštenim centrima za sakupljanje. - (PL) Symbol, który oznacza sortowanie odpadów aparatury
elektrycznej i elektronicznej. Zabrania się likwidowania aparatury jako mieszanych odpadów miejskich stałych, obowiązkiem użytkownika jest skierowanie się do autoryzowanych ośrodków
gromadzących odpady - (FI) Symboli, joka ilmoittaa sähkö- ja elektroniikkalaitteiden erillisen keräyksen. Käyttäjän velvollisuus on kääntyä valtuutettujen keräyspisteiden puoleen eikä välittää
laitetta kunnallisena sekajätteenä. - (DA) Symbol, der står for særlig indsamling af elektriske og elektroniske apparater. Brugeren har pligt til ikke at bortskae dette apparat som blandet, fast
byaald;der skal rettes henvendelse til et autoriseret indsamlingscenter. - (NO) Symbol som angir separat sortering av elektriske og elektroniske apparater. Brukeren må oppfylle forpliktelsen
å ikke kaste bort dette apparatet sammen med vanlige hjemmeavfallet, uten henvende seg til autoriserte oppsamlingssentraler. - (SL) Simbol, ki označuje ločeno zbiranje električnih in
elektronskih aparatov. Uporabnik tega aparata ne sme zavreči kot navaden gospodinjski trden odpadek, ampak se mora obrniti na pooblaščene centre za zbiranje. - (SK) Symbol označujúci
separovaný zber elektrických a elektronických zariadení. Užívateľnesmie likvidovaťtoto zariadenie ako pevný zmiešaný komunálny odpad, ale je povinný doručiťho do autorizovaný zberní.
- (HU) Jelölés, mely az elektromos és elektronikus felszerelések szelektív hulladékgyűjtését jelzi. A felhasználó köteles ezt a felszerelést nem a városi törmelékhulladékkal együttesen gyűjteni,
hanem erre engedéllyel rendelkezőhulladékgyűjtőközponthoz fordulni. - (LT) Simbolis, nurodantis atskirųnebenaudojamųelektriniųir elektroniniųprietaisųsurinkimą. Vartotojas negali
išmesti šiųprietaisųkaip mišriųkietųjųkomunaliniųatliekų, bet privalo kreiptis įspecializuotus atliekųsurinkimo centrus. - (ET) Sümbol, mis tähistab elektri- ja elektroonikaseadmete eraldi
kogumist. Kasutaja kohustuseks on pöörduda volitatud kogumiskeskuste poole ja mitte käsitleda seda aparaati kui munitsipaalne segajääde. - (LV) Simbols, kas norāda uz to, ka utilizācija ir
jāveic atsevišķi no citām elektriskajām un elektroniskajām ierīcēm. Lietotāja pienākums ir neizmest šo aparatūru municipālajācieto atkritumu izgāztuvē, bet nogādāt to pilnvarotajāatkritumu
savākšanas centrā. - (BG) Символ, който означава разделно събиране на електрическата и електронна апаратура. Ползвателят се задължава да не изхвърля тази апаратура като смесен
твърд отпадък в контейнерите за смет, поставени от общината, а трябва да се обърне към специализираните за това центрове - (TR) Atık toplama için elektrikli ve elektronik cihazların
ayrılmasınıbelirten sembol. Kullanıcının bu cihazlarıkatı, karışık kentsel atık olarak bertaraf etmesine izin verilmez, bertaraf yetkili çöp toplama merkezlerince yapılmalıdır. - (AR)
.

- 4 -
(EN) GUARANTEE AND CONFORMITY - (IT) GARANZIA E CONFORMITÀ - (FR) GARANTIE ET CONFORMITÉ - (ES) GARANTÍA Y CONFORMIDAD - (DE) GARANTIE UND KONFORMITÄT
- (RU) ГАРАНТИЯ И СООТВЕТСТВИЕ - (PT) GARANTIA E CONFORMIDADE - (NL) GARANTIE EN CONFORMITEIT - (EL) ΕΓΓΥΗΣΗ ΚΑΙ ΣΥΜΜΟΡΦΩΣΗ ΣΤΙΣ ΔΙΑΤΑΞΕΙΣ - (RO) GARNŢIE
ŞI CONFORMITATE - (SV) GARANTI OCH ÖVERENSSTÄMMELSE - (CS) ZÁRUKA A SHODA - (HR-SR) GARANCIJA I SUKLADNOST - (PL) GWARANCJA I ZGODNOŚĆ - (FI) TAKUU JA
VAATIMUSTENMUKAISUUS’ - (DA) GARANTI OG OVERENSSTEMMELSESERKLÆRING - (NO) GARANTI OG KONFORMITET - (SL) GARANCIJA IN UDOBJE - (SK) ZÁRUKA A ZHODA - (HU)
GARANCIA ÉS A JOGSZABÁLYI ELŐÍRÁSOKNAK VALÓ MEGFELELŐSÉG - (LT) GARANTIJA IR ATITIKTIS - (ET) GARANTII JA VASTAVUS - (LV) GARANTIJA UN ATBILSTĪBA - (BG) ГАРАНЦИЯ И
СЪОТВЕТСТВИЕ - (TR) GARANTİ VE UYGUNLUK - (AR)
INSTRUCTIONS FOR USE AND MAINTENANCE...............................................pag. 5
WARNING! BEFORE USING THEWELDING MACHINE READ THE INSTRUCTION MANUAL CAREFULLY! EN
ISTRUZIONI PER L’USO E LA MANUTENZIONE...................................................pag. 10
ATTENZIONE! PRIMA DI UTILIZZARE LA SALDATRICE LEGGERE ATTENTAMENTE IL MANUALE DI ISTRUZIONE! IT
INSTRUCTIONS D’UTILISATION ET D’ENTRETIEN...................................................pag. 16
ATTENTION! AVANTTOUTE UTILISATION DU POSTE DE SOUDAGE, LIRE ATTENTIVEMENT LE MANUEL D’INSTRUCTIONS! FR
INSTRUCCIONES PARA EL USO Y MANTENIMIENTO...........................................pág. 22
ATENCIÓN! ANTES DE UTILIZAR LA SOLDADORA LEER ATENTAMENTE EL MANUAL DE INSTRUCCIONES! ES
BETRIEBS- UND WARTUNGSANLEITUNG........................................................................s. 28
ACHTUNG!VOR GEBRAUCH DER SCHWEISSMASCHINE LESEN SIE BITTE SORGFÄLTIG DIE BETRIEBSANLEITUNG! DE
ИНСТРУКЦИИ ПО РАБОТЕ И ТЕХОБСЛУЖИВАНИЮ..........................................стр. 34
ВНИМАНИЕ! ПЕРЕД ТЕМ, КАК ИСПОЛЬЗОВАТЬ МАШИНУ, ВНИМАТЕЛЬНО ПРОЧИТАТЬ РУКОВОДСТВО ПОЛЬЗОВАТЕЛЯ! RU
INSTRUÇÕES DE USO E MANUTENÇÃO.................................................................pág. 40
CUIDADO! ANTES DE UTILIZAR A MÁQUINA DE SOLDA LER CUIDADOSAMENTE O MANUAL DE INSTRUÇÕES ! PT
INSTRUCTIES VOOR HET GEBRUIK EN HET ONDERHOUD...............................pag. 46
OPGELET! VOORDAT MEN DE LASMACHINE GEBRUIKT MOET MEN AANDACHTIG DE INSTRUCTIEHANDLEIDING LEZEN! NL
ΟΔΗΓΙΕΣ ΧΡΗΣΗΣ ΚΑΙ ΣΥΝΤΗΡΗΣΗΣ......................................................................σελ. 52
ΠΡΟΣΟΧΗ! ΠΡΙΝ ΧΡΗΣΙΜΟΠΟΙΗΣΕΤΕ ΤΟ ΣΥΓΚΟΛΛΗΤΗ ΔΙΑΒΑΣΤΕ ΠΡΟΣΕΚΤΙΚΑ ΤΟ ΕΓΧΕΙΡΙΔΙΟ ΧΡΗΣΗΣ! EL
INSTRUCŢIUNI DE FOLOSIRE ŞI ÎNTREŢINERE.......................................................pag. 58
ATENŢIE: CITIŢI CU ATENŢIE ACEST MANUAL DE INSTRUCŢIUNI ÎNAINTE DE FOLOSIREA APARATULUI DE SUDURĂ! RO
INSTRUKTIONER FÖR ANVÄNDNING OCH UNDERHÅLL........................................sid. 64
VIKTIGT! LÄS BRUKSANVISNINGEN NOGGRANT INNAN NI ANVÄNDER SVETSEN! SV
NÁVOD K POUŽITÍ A ÚDRŽBĚ...................................................................................str. 70
UPOZORNĚNÍ: PŘED POUŽITÍM SVAŘOVACÍHO PŘÍSTROJE SI POZORNĚ PŘEČTĚTE NÁVOD K POUŽITÍ! CS
UPUTSTVA ZA UPOTREBU I SERVISIRANJE.............................................................str. 76
POZOR: PRIJE UPOTREBE STROJA ZA VARENJE POTREBNO JE PAŽLJIVO PROČITATI PRIRUČNIK ZA UPOTREBU! HR SR
INSTRUKCJE OBSŁUGI I KONSERWACJI......................................................................str. 82
UWAGA: PRZED ROZPOCZĘCIEM SPAWANIA NALEŻY UWAŻNIE PRZECZYTAĆ INSTRUKCJĘ OBSŁUGI! PL
KÄYTTÖ- JA HUOLTO-OHJEET..........................................................................................s. 88
HUOM! ENNEN HITSAUSKONEEN KÄYTTÖÄ LUE HUOLELLISESTI KÄYTTÖOHJEKIRJA! FI
BRUGS- OG VEDLIGEHOLDELSESVEJLEDNING............................................................sd. 93
GIV AGT! LÆS BRUGERVEJLEDNINGEN OMHYGGELIGT, FØR MASKINEN TAGES I BRUG! DA
INSTRUKSER FOR BRUK OG VEDLIKEHOLD................................................................s. 99
ADVARSEL! FØR DU BRUKER SVEISEBRENNEREN MÅ DU LESE BRUKERVEILEDNINGEN NØYE! NO
NAVODILA ZA UPORABO IN VZDRŽEVANJE.....................................................................str. 104
POZOR: PRED UPORABO VARILNE NAPRAVE POZORNO PREBERITE PRIROČNIK Z NAVODILI ZA UPORABO! SL
NÁVOD NA POUŽITIE A ÚDRŽBU.......................................................................................str. 109
UPOZORNENIE: PRED POUŽITÍM ZVÁRACIEHO PRÍSTROJA SI POZORNE PREČÍTAJTE NÁVOD NA POUŽITIE! SK
HASZNÁLATI UTASÍTÁSOK ÉS KARBANTARTÁSI SZABÁLYOK...................................oldal 115
FIGYELEM: A HEGESZTŐGÉP HASZNÁLATÁNAK MEGKEZDÉSE ELŐTT OLVASSA EL FIGYELMESEN A HASZNÁLATI UTASÍTÁST!
HU
EKSPLOATAVIMO IR PRIEŽIŪROS INSTRUKCIJOS...........................................................psl. 121
DĖMESIO: PRIEŠ NAUDOJANT SUVIRINIMO APARATĄ, ATIDŽIAI PERSKAITYTI INSTRUKCIJŲ KNYGELĘ! LT
KASUTUSJUHENDID JA HOOLDUS....................................................................................lk. 127
TÄHELEPANU: ENNE KEEVITUSAPARAADI KASUTAMIST LUGEGE KASUTUSJUHISED TÄHELEPANELIKULT LÄBI! ET
IZMANTOŠANAS UN TEHNISKĀS APKOPES ROKASGRĀMATA.....................................lpp. 132
UZMANĪBU: PIRMS METINĀŠANAS APARĀTA IZMANTOŠANAS UZMANĪGI IZLASIET ROKASGRĀMATU! LV
ИНСТРУКЦИИ ЗА УПОТРЕБА И ПОДДРЪЖКА.............................................................стр. 138
ВНИМАНИЕ: ПРЕДИ ДА ИЗПОЛЗВАТЕ ЕЛЕКТРОЖЕНА, ПРОЧЕТЕТЕ ВНИМАТЕЛНО РЪКОВОДСТВОТО С ИНСТРУКЦИИ ЗА ПОЛЗВАНЕ.
BG
KULLANIM VE BAKIM TALİMATLARI……………………..............................................sayfa 144
UYARI! KAYNAK MAKİNESİNİ KULLANMADAN ÖNCE KULLANIM KILAVUZUNU DİKKATLE OKUYUNUZ! TR
149 .................................................................
! ! AR
.............................................................................................................................................................................................163-164
- 5 -
APPLIANCES FOR RESISTANCE WELDING FOR INDUSTRIAL AND PROFESSIONAL USE
Note: In the following text the term “spot welder”will be used.
1. GENERAL SAFETY RULES FOR RESISTANCE WELDING
The operator should be properly trained to use the spot welder safely and should
be informed of the risks connected with resistance welding procedures, of related
protection measures and of emergency procedures.
(Only for pneumatic cylinder-operated versions) The spot welder is provided with a
main switch with emergency functions, tted with a padlock for locking it in the “O”
(open) position.
The padlock key should be handed over only and exclusively to an expert operator
or to an operator who has been trained for the tasks assigned to him and has been
warned of the possible hazards arising from this welding procedure and from
neglectful use of the spot welder.
When the operator is absent the switch should be set to the “O”position, the padlock
should be closed and the key removed.
- Electrical installation should be carried out following accident-prevention
legislation and standards.
- The spot welder should be connected only and exclusively to a power supply with
the neutral conductor connected to earth.
- Make sure the power supply outlet is correctly connected to the earth protection.
- Do not use cables with worn or damaged insulation or with loosened connections.
- Use the spot welder in an ambient air temperature ranging from 5°C to 40°C,
with relative humidity equal to 50% up to a temperature of 40°C, and 90% for
temperatures up to 20°C.
- Do not use the spot welder in damp or wet environments or in the rain.
- The connection of the welding cables and any routine maintenance operations
on the arms and/or electrodes must be carried out with the spot welder switched
o and disconnected from the electric and pneumatic (if present) power supply
networks.
- Pneumatic cylinder-operated spot welders should be locked with the main switch
in the“O”position and the padlock closed.
The same procedure must be respected for connection to the water mains or a
cooling unit with closed circuit (liquid cooled spot welding machines) and in any
case repair work (extraordinary maintenance).
- It is forbidden to use the equipment in environments comprising areas classed as
being at risk of explosion because of the presence of gas, dust or mist.
- Do not weld on containers, receptacles or piping that contain or have contained
ammable liquid or gas products.
- Do not operate on materials cleaned with cholorinated solvents or near such
substances.
- Do not weld on pressurised containers.
- Remove all ammable substances from the work area (e.g. wood, paper, rags etc.).
- Allow newly-welded pieces to cool! Do not leave the piece near ammable
substances.
- Make sure there is sucient ventilation or provide means for removing welding
fumes near the electrodes;a systematic approach is necessary to evaluate limits of
exposure to the welding fumes depending on their composition and concentration
and on the length of exposure.
- Always protect the eyes with suitable eye protectors.
- Wear protective gloves and clothing suitable for resistance welding work.
- Noise levels: If the personal daily exposure level (LEPd) is found to be greater
than 85db(A) due to particularly intensive welding operations, wearing personal
protection devices is compulsory.
- The owing of spot welding currents generates electromagnetic elds (EMF)
around the spot welding circuit.
Electromagnetic elds can interfere with certain medical equipment (e.g. Pace-
makers, respiratory equipment, metallic prostheses etc.).
Adequate protective measures must be adopted for persons with these types of
medical apparatus. For example, they must be forbidden access to the area in which
spot welding machines are in operation.
This spot welder conforms to technical product standards for exclusive use in an
industrial environment for professional purposes. It does not assure compliance with
the basic limits relative to human exposure to electromagnetic elds in the domestic
environment.
The operator must adopt the following procedures in order to reduce exposure to
electromagnetic elds:
- Fasten the two spot welding cables (if present) as close together as possible.
- Keep head and trunk as far away as possible from the spot welding circuit.
- Never wind spot welding cables around the body.
- Avoid spot welding with the body within the spot welding circuit. Keep both cables
on the same side of the body.
- Connect the spot welding current return cable to the piece being spot welded, as
close as possible to the welding joint.
- Do not spot weld while close to, sitting on or leaning against the spot welder (keep
at least 50 cm away from it).
- Do not leave objects in ferromagnetic material in proximity of the spot welding
circuit.
- Minimum distance:
- d=3cm, f=50cm (Fig. M);
- d=3cm, f=50cm (Fig. N);
- d=30cm (Fig. O);
- d=20cm (Fig. P) Studder.
- Class A equipment:
This spot welder conforms to technical product standards for exclusive use in an
industrial environment and for professional purposes. It does not assure compliance
with electromagnetic compatibility in domestic dwellings and in premises directly
connected to a low-voltage power supply system feeding buildings for domestic use.
INTENDED USE
The system was designed to be used only and exclusively in body shops to repair
vehicles: it must be used for spot welding one or more steel plates with a low carbon
content, having a shape and size that vary according to the work to be carried out.
RESIDUAL RISKS
RISK OF UPPER LIMBS BEING CRUSHED
DO NOT PLACE HANDS NEAR MOVING PARTS!
Both the operating method for the spot welder and the variability in shape and size of
the piece being welded make it impossible to provide integrated protection against
the danger of the upper limbs being crushed: ngers, hands, forearm.
The risk should be reduced by appropriate preventive measures:
- The operator should either be expert or trained in resistance welding procedures
using this type of appliance.
- A risk evaluation must be performed for each type of work to be carried out;it
is necessary to use equipment and masks that support and guide the piece to be
ENGLISH INDEX
1. GENERAL SAFETY RULES FOR RESISTANCE WELDING................................................................5
2. INTRODUCTION AND GENERAL DESCRIPTION............................................................................6
2.1 Introduction...............................................................................................................................................................6
2.2 STANDARD ACCESSORIES.....................................................................................................................................6
2.3 ACCESSORIES ON DEMAND .................................................................................................................................6
3. TECHNICAL INFORMATION ...........................................................................................................6
3.1 RATING PLATE (Fig. A).............................................................................................................................................6
3.2 OTHER TECHNICAL DATA .....................................................................................................................................6
3.2.1 Spot welder....................................................................................................................................................6
3.2.2 Cooling system (GRA).................................................................................................................................6
4. DESCRIPTION OF THE SPOT WELDER ...........................................................................................6
4.1 SPOT WELDER UNIT AND MAIN COMPONENTS (Fig. B) .............................................................................6
4.2 CONTROL AND ADJUSTMENT DEVICES...........................................................................................................6
4.2.1 Control panel (Fig. C) ..................................................................................................................................6
4.2.2 Pressure regulator and gauge unit (Fig. B-10)...................................................................................6
4.3 SAFETY FUNCTIONS AND INTERLOCK..............................................................................................................6
4.3.1 Protection and alarms (TAB. 1)................................................................................................................6
5. INSTALLATION................................................................................................................................7
5.1 UNPACKING................................................................................................................................................................7
5.2 LIFTING MEANS (Fig. E) ..........................................................................................................................................7
5.3 POSITIONING.............................................................................................................................................................7
5.4 CONNECTION TO THE MAINS ..............................................................................................................................7
5.4.1 Warnings .........................................................................................................................................................7
5.4.2 Plug and mains outlet................................................................................................................................7
5.5 PNEUMATIC CONNECTION...................................................................................................................................7
5.6 PREPARATION OF THE COOLING UNIT (GRA).................................................................................................7
5.7 PNEUMATIC CLAMP CONNECTION (Fig. F) .....................................................................................................7
5.8 CLAMP “C”: CONNECTION TO THE ARM................................................................................................................7
6. WELDING (Spot welding)...............................................................................................................7
6.1 PRELIMINARY OPERATIONS..................................................................................................................................7
6.1.1 Main switch at“O”and lock closed!.......................................................................................................7
6.1.1.1 Adjusting and xing the“C”clamp arm................................................................................7
6.1.2 Main switch at the“ I ”position...............................................................................................................7
6.2 ADJUSTING THE SPOT WELDING PARAMETERS ............................................................................................7
6.2.1 Setting the arm and the electrode ........................................................................................................8
6.2.2 Adjustment of force and approach function (pneumatic clamp only).....................................8
6.2.3 Automatic setting the spot welding parameters (Fig. U-6)..........................................................8
6.2.4 Semi-automatic setting the spot welding parameters (Fig. U-7) ...............................................8
6.2.5 Manual setting of the spot welding parameters and creation of a
customised program (Fig. U-8) ..............................................................................................................8
6.3 AUTOMATIC SPOT WELDING PROCEDURE .....................................................................................................8
6.4 SEMI-AUTOMATIC OR MANUAL SPOT WELDING PROCEDURE ...............................................................8
6.4.1 PNEUMATIC CLAMP ....................................................................................................................................8
6.4.2 STUDDER GUN ............................................................................................................................................8
6.4.2.1 Connection of the earth cable to the sheet metal............................................................8
6.4.2.2 Procedure to spot weld and use various tools...................................................................8
7. SETTINGS MENU ............................................................................................................................9
7.1 MENU MODE (Fig. U-7)...........................................................................................................................................9
7.2 MENU (Fig. U-12)......................................................................................................................................................9
7.2.1 SETUP MENU (Fig. U-13)............................................................................................................................9
7.2.2 SERVICE MENU (Fig. U-14).........................................................................................................................9
7.2.2.1 INFO MENU .....................................................................................................................................9
7.2.2.2 FIRMWARE MENU..........................................................................................................................9
7.2.2.3 REPORT MENU ...............................................................................................................................9
7.3 JOBS MENU (Fig. U-15)...........................................................................................................................................9
7.4“QUICK MENU”KEY (Fig. U-16-17) ......................................................................................................................9
8. MAINTENANCE...............................................................................................................................9
8.1 ROUTINE MAINTENANCE ......................................................................................................................................9
8.2 SPECIAL MAINTENANCE........................................................................................................................................9
8.2.1 Intervention on the GRA ...........................................................................................................................9
8.2.2 Replacing the internal battery ................................................................................................................9
9. TROUBLESHOOTING......................................................................................................................9
page page

- 6 -
worked in order to distance hands from the electrode danger area.
- When using a portable spot welder: solidly grasp the clamp with both hands
placed on the relative handles;always keep hands away from the electrodes.
- Whenever the shape of the piece allows it, adjust the electrode distance so that the
stroke does not exceed 6mm.
- Do not allow more than one person to work on the same spot welder at the same
time.
- Unauthorised persons should not be allowed in the working area.
- Do not leave the spot welder unattended: in such a case it should be disconnected
from the power supply;for pneumatic cylinder-operated spot welders turn the
main switch to“O”and lock it with the supplied padlock, take out the key and leave
it with the person in charge.
- Only use electrodes that are recommended for the machine (see spare parts list)
without altering their shape.
- RISK OF BURNS
Some parts of the spot welder (electrodes arms and nearby areas) may reach
temperatures of over 65°C: suitable protective clothing must be worn.
Allow newly-welded pieces to cool before touching them.
- RISK OF TIPPING AND FALLING
- Place the spot welder on a level horizontal surface that is able to support its
weight;conne the spot welder to the support surface (when required in the
“INSTALLATION”section of this manual). Otherwise with inclined or uneven
oors or moveable supporting surfaces there is the danger of tipping.
- Never lift the spot welder unless explicitly required by the “INSTALLATION”
section of this handbook.
- When using machines on wheels: disconnect the spot welder from the electric
and pneumatic (if present) power supplies before moving the unit to another
work area. Pay attention to obstacles and unevenness on the ground (for
example cables and piping).
- UNINTENDED USE
It is dangerous to use the spot welder for any purpose other than that for which it
is intended (see INTENDED USE).
PROTECTIONS
The safeguards and moveable parts of the spot welder casing should all be in position
before connection to the power supply.
WARNING: All manual operations on moveable accessible parts of the spot welder, for
example:
- Electrode replacement or maintenance
- Adjusting the position of the arms or electrodes
MUST BE CARRIED OUT WITHTHE SPOT WELDER SWITCHED OFF AND DISCONNECTED
FROM THE ELECTRIC AND PNEUMATIC (if present) POWER SUPPLY.
MAIN SWITCH LOCKED AT “O”WITH LOCK CLOSED AND KEY REMOVED in the models
with PNEUMATIC CYLINDER movement).
STORAGE
- Place the machine and its accessories (with or without packaging) in closed areas.
- The relative humidity of the air must not exceed 80%.
- The environmental temperature must be between -15°C and 45°C.
If the machine is planned with liquid cooling and an ambient temperature under 0°C:
use the anti-freeze liquid suggested by the manufacturer or completely empty the
hydraulic circuit and the tank of liquid.
Always use adequate measures to protect the machine from humidity, dirt and
corrosion.
2. INTRODUCTION AND GENERAL DESCRIPTION
2.1Introduction
Mobile system for resistance welding (spot welder) controlled by a microprocessor, medium
frequency inverter technology, three-phase power supply and direct output current.
The spot welder is equipped with a pneumatic clamp that contains the transforming and
rectifying unit. In this way higher welding currents are obtained than from traditional spot
welders, with reduced network absorption and fewer magnetic elds near the cables.
Longer, lighter cables can be used to improve handling and give a wider working range.
The spot welder can work on iron plates with a low carbon content, galvanized iron plates,
high resistance steel plates and boron steel plates. Equipped with quick couplings for use
with the accessory equipment (Studder, X Clamp), it can be used for many dierent types of
hot machining on panels and all the specic work of car body shops.
The main system characteristics are:
- Backlit TFT display that shows the controls and the set parameters;
- Manual choice (MANUAL), semi-automatic (EASY) or completely automatic (SMART) of
the spot welding parameters;
- Possibility of setting pre-heating and post-heating of the sheet metal to optimise
welding of the high resistant and galvanised materials;
- Possibility of setting dierent types of electrodes and arms;
- Automatic recognition of the clamp or studder connected;
- Automatic control of the spot welding current;
- Manual and automatic control of the electrode forces;
- USB port.
2.2STANDARD ACCESSORIES
- Arm support;
- Clamp cable support;
- Regulator lter group (supply of compressed air);
- “C”clamp with standard arms, complete with cable with a plug that can be disconnected
from the generator and built-in sensors for automatic spot;
- Cooling system (integrated GRA).
2.3ACCESSORIES ON DEMAND
- Arms and electrodes with a dierent length and/or shape for “C” clamp (see spare parts
list);
- Electrodes kit (see spare parts list);
- Supporting pole and weight discharger for the clamp;
- “X”,“C” clamp (see spare parts list);
- Studder kit;
- “C”clamp ring kit.
3. TECHNICAL INFORMATION
3.1RATING PLATE (Fig. A)
The main information about use and performance of the spot welder is summarised on the
rating plate and has the following meanings:
1 - Number of phases and frequency of the power line
2 - Power supply voltage
3 - Network output at permanent capacity (100%).
4 - Nominal network output with duty cycle of 50%.
5 - Maximum no-load voltage to electrodes.
6 - Maximum current with electrodes in short-circuit.
7 - Secondary output at permanent capacity (100%).
8 - Arm gauge and length (standard).
9 - Minimum and maximum adjustable force to electrodes.
10 - Nominal pressure of the compressed air source.
11 - Compressed air pressure required to obtain maximum force to the electrodes.
12 - Cooling liquid capacity.
13 - Drop in nominal pressure of the cooling liquid.
14 - Spot welder device earthing
15 - Safety symbols whose meanings are illustrated in Chapter 1 “General safety for
resistance welding”.
N.B.: The rating plate shown is an example to explain the meanings of the symbols and
gures; the exact technical specications for your machine should be taken directly from
the rating plate on the machine itself.
3.2OTHERTECHNICAL DATA
3.2.1Spot welder
General features
- Power supply voltage and frequency : 400V (±15%) ~ 3-ph-50/60 Hz
- Electric protection rating : I
- Insulation rating : H
- Casing protection rating : IP 20
- Cooling type : liquid
- (*) Overall size (LxWxH) : 820 x 610 x 1150 mm
- (**) Weight : 80 kg
Input
- Max. power in short-circuit (Scc) : 88 kVA
- Delayed network fuses : 32 A
- Automatic circuit breaker : 32A (“C”- IEC60947-2)
- Power supply cable (L≤8m) : 4 x 6 mm²
Output
- Loadless secondary voltage (U2d) : 13V
- Max. spot welding current (I2max) : 13kA
- Spot welding capacity : max 3 + 3 + 3 mm
- Intermittence ratio : 2%
- Maximum power at electrodes : 580 daN
- Length of“C”arm : 95 mm standard
- Spot welding current adjustment : automatic and programmable
- Spot welding current time adjustment : automatic and programmable
- Squeeze time adjustment : automatic and programmable
- Slope time adjustment : automatic and programmable
- Maintenance time adjustment : automatic and programmable
- Cold time adjustment : automatic and programmable
- Adjustment of number of impulses : automatic and programmable
- Electrode force adjustment : automatic or manual
- Post-heating time/current adjustment : automatic and programmable
- Post-heating time adjustment : automatic and programmable
(*) NOTE: the overall dimensions do not include the cables and the supporting pole.
(**) NOTE: the generator weight does not include the clamp and the supporting pole.
3.2.2Cooling system (GRA).
General features
- Maximum pressure (pmax) : 3 bar
- Cooling capacity (P @ 1l/min) : 2 kW
- Tank capacity : 8 l
- Cooling liquid : coolant
4. DESCRIPTION OF THE SPOT WELDER
4.1SPOTWELDER UNIT AND MAIN COMPONENTS (Fig. B)
On the front:
On front:
1 - Control panel;
2 - USB port;
3 - Outlet for clamp connection;
4 - Rapid hold to attach the cooling tubes;
5 - Outlet for connecting the sensors used with the automatic spot;
6 - Clamp cable support.
On the back:
7 - Main switch;
8 - Supply cable input;
9 - Arm supports;
10 - Pressure regulator, pressure gauge and air intake lter;
11 - Cooling system tank cap (GRA);
12 - GRA liquid level;
13 - GRA air exhauster.
4.2CONTROL AND ADJUSTMENT DEVICES
4.2.1Control panel (Fig. C)
1- TFT Display.
2- Cooling unit locking button. It allows you to lock the “GRA” during the welding process
to facilitate replacement of the arm and/or electrodes.
3- “Quick Menu”button. Rapid access to the useful menus during welding.
4- Multi-function button:
- : access to the“SERVICE” menu in alarm conditions or before pressing START;
- : enabling/disabling recording of a welding job;
5- Browser knob and START button:
- rotate the knob to scroll through the various menu items;
- press to access the selected item, rotate to change the setting, press again to conrm
the value;
- if pressed on start-up or following an alarm, it enables the machine to spot weld
(START button)
6- ESC button:
- : back to the main menu;
- : back to the previous menu.
7- USB port.
4.2.2Pressure regulator and gauge unit (Fig. B-10)
It allows you to adjust the pressure exerted on the electrodes of the pneumatic clamp using
the adjustment knob (only for pneumatic clamps in“Manual” mode).
4.3SAFETY FUNCTIONS AND INTERLOCK
4.3.1Protection and alarms (TAB. 1)
a) Thermal protection:

- 7 -
This is triggered by overheating of the spot welding machine due to low capacity or total
lack of cooling uid, or by a work cycle that exceeds the allowed threshold permitted.
Intervention is described and signalled in the display.
EFFECT: all movement is blocked, the electrodes open (exhauster cylinder); power is shut
down (welding inhibited).
RESET: manual (action on “START” button after falling within the allowed temperature
limits).
b) Main switch:
- Position“O”= open and lockable (see chapter 1).
WARNING! The internal power cable connection terminals (L1+L2+L3) are live when
turned to the“O”position.
- Position“I” = closed: spot welding machine powered up but not operating (STAND BY
- requires pressing of the START button).
- Emergency function
Opening the spot welding machine when it is operating (pos. “I” => pos. “O”) will
instantly stop the machine in safe shutdown mode with:
- current inhibited;
- opening of the electrodes (exhauster cylinder);
- automatic restart inhibited.
WARNING! PERIODICALLY MAKE SURE THE SAFE SHUTDOWN FUNCTION
OPERATES CORRECTLY.
c) Cooling unit safety
This is triggered in the event of no or loss of cooling liquid pressure;
Intervention is described and signalled in the display.
EFFECT: all movement is blocked, the electrodes open (exhauster cylinder); power is shut
down (welding inhibited).
RESET: top-up cooling liquid then switch o and back on the machine (also see Par. 5.6
“preparation of the cooling unit”).
d) Compressed air safety
This is triggered in the event of no or loss of pressure (p < 3bar) of the compressed air
power supply;
Intervention is described and signalled in the display.
EFFECT: all movement is blocked, the electrodes open (exhauster cylinder); power is shut
down (welding inhibited).
RESET: manual (using the “START” button) after the machine pressure falls within the
allowed threshold (indication on the gauge>3bar).
e) Short circuit safety outbound (pneumatic clamp only)
Before carrying out the welding cycle, the machine checks the poles (positive and
negative) of the secondary spot welding circuit is free of accidental contact points.
Intervention is described and signalled in the display.
EFFECT: all movement is blocked, the electrodes open (exhauster cylinder); power is shut
down (welding inhibited).
RESET: manual (pressing the “START” button having removed the cause of the short
circuit).
f) Phase failure trip switch
Intervention is described and signalled in the display.
EFFECT: all movement is blocked, the electrodes open (exhauster cylinder); power is shut
down (welding inhibited).
RESET: manual (pressing the“START” button).
g) Overvoltage and undervoltage trip switch
Intervention is described and signalled in the display.
EFFECT: all movement is blocked, the electrodes open (exhauster cylinder); power is shut
down (welding inhibited).
RESET: manual (pressing the“START” button).
h) “START”button (Fig. C-5).
This push-button must be pressed to control welding in each of the following conditions:
- every time the main switch has tripped (pos. “O”=> pos.“I”);
- each time the safety/protection devices cut in;
- when the power supply is reinstated (electricity and compressed air) following a
shutdown of power supplies or a malfunction;
WARNING! PERIODICALLY MAKE SURE THE SAFE START FUNCTION
OPERATES CORRECTLY
5. INSTALLATION
WARNING! ALL INSTALLATION OPERATIONS AND ELECTRICAL AND
PNEUMATIC CONNECTIONS MUST ALWAYS BE CARRIED OUT WITH THE
SPOTWELDER SWITCHED OFF AND DISCONNECTED FROMTHE POWER SUPPLY.
THE ELECTRIC AND PNEUMATIC CONNECTIONS MUST ONLY BE CARRIED OUT BY
EXPERT OR QUALIFIEDTECHNICIANS.
5.1UNPACKING
Unpack the spot welder, assemble the separate parts (to be found in the packaging) as
indicated in this chapter (Fig. D).
5.2LIFTING MEANS (Fig. E)
The spot welder must be lifted using a double cable and hooks that are suitably sized for the
machine weight, and using the relative M12 rings.
It is forbidden to sling the spot welder using means other than those indicated.
5.3POSITIONING
Make sure the installation area is suitably large and without obstacles to guarantee that the
control panel, the main switch and the working area can be accessed in complete safety.
Make sure there are no obstacles near the cooling air entry or exit points, and make sure that
conductive dust, corrosive vapours, humidity, etc. cannot be sucked in.
Position the spot welder on a at surface made of homogeneous, compact material that is
suitable for supporting the weight of the machine (see“technical data”) to avoid the danger
of toppling or dangerous movements.
5.4CONNECTION TO THE MAINS
5.4.1Warnings
Before carrying out any electric connection, make sure the machine plate data corresponds
with the voltage and frequency of the mains available in the installation place.
The spot welder must be connected only and exclusively to a power supply with the neutral
conductor connected to earth.
To guarantee protection against indirect contact use these types of residual current device;
- A type ( ) for single-phase machines;
- B type ( ) for three-phase machines.
- The IEC/EN 61000-3-12 Standard is not applicable to the spot welder.
If the welding machine is connected to a public electricity grid, the installer or user must
make sure that the machine can be connected (if necessary, consult the company that
manages the electricity grid).
5.4.2Plug and mains outlet
Connect the power supply cable to a standard (3P + T) plug of appropriate capacity
and prepare a power supply outlet tted with fuses or an automatic circuit-breaker; the
corresponding earth terminal must be connected to the (yellow-green) earth conductor of
the power supply.
The capacity and intervention characteristics of the fuses and circuit-breaker switch are
given in the“OTHER TECHNICAL DATA”paragraph.
WARNING!Not observingthe regulationsaboverendersthemanufacturer’s
safety system (class I) inecient, with resulting serious risks to people (e.g.
electric shock) and goods (e.g. re).
5.5PNEUMATIC CONNECTION
- Prepare a compressed air line with a working pressure of 8 bar.
- Fit one of the available compressed air connections to the lter group reducer to make
the reducer suitable for the connections where the spot welder is to be installed.
5.6PREPARATION OF THE COOLING UNIT (GRA)
WARNING! The lling operations should always be performed with the
machine switched o and disconnected from the mains supply.
Never use polypropylene based antifreeze liquids.
Only use the coolant recommended by the manufacturer of the cooling unit.
- Open the discharge valve (FIG. B-13).
- Fill the tank with coolant using the nozzle (Fig. B-11): capacity of the tank = 8 l; pay
attention to avoid excess leakage of liquid at the end of lling.
- Close the tank cap.
- Close the discharge valve.
5.7PNEUMATIC CLAMP CONNECTION (Fig. F)
WARNING! Presence of dangerous voltage! Never connect the spot welder
sockets to plugs other than those planned by the manufacturer. Do not
attempt to insert any other type of object in the sockets!
- Machine disconnected from the power supply mains.
- Insert the polarised plug (Fig. F-1) in the clamp in the specic socket of the machine,
then lift the two levers until complete fastening of the plug is obtained.
- Insert the 8 pin polarised plug in Figure F-2 to use the automatic spot welding mode.
- Insert the cooling tubes(*), respecting the colours (blue tube on blue socket, red tube on
red socket). Check rapid coupling of the tubes is correctly carried out (Fig. F-3).
NOTE(*): if the cooling tubes are not inserted, the clamp is NOT cooled correctly
resulting in thermal stress which damages the electric parts.
5.8CLAMP“C”: CONNECTION TO THE ARM
WARNING! Residual risk of crushing the upper limbs!
Follow the instructions below in the exact order indicated!
- Disconnect the machine from the mains.
- Turn the block as seen in Fig. G1.
- Now assemble the clamp support (Fig. G2) if used.
- Angle the arm as necessary and slide it into its seat (Fig. G3).
- Align the arm with the piston electrode and tighten the block in place (Fig. G4-A).
- Connect the cooling tubes to the relative quick couplings (Fig. G4-B).
- Check that the pipe quick coupling is fastened rmly in place.
- Now assemble the clamp support sleeve from the correct side (Fig. G5) if used.
NOTE: if the cooling tubes are not connected, the clamp will NOT be cooled
properly which will cause thermal stress and damage to the electrical parts.
6. WELDING (Spot welding)
6.1PRELIMINARY OPERATIONS
6.1.1Main switch at“O”and lock closed!
A series of checks and adjustments must be carried out before starting to spot weld, with
the main switch in the“O”position and the lock closed.
Connecting to the electric and pneumatic supply sources:
- Make sure the electric connection has been carried out correctly in compliance with the
instructions given previously.
- Check compressed air connection: connect the supply hose to the pneumatic supply
point and adjust the pressure using the reducer knob until the manometer shows a
value close to 8 bar (116 psi).
6.1.1.1Adjusting and xing the“C”clamp arm
This operation must only be carried out if the arm moves horizontally even after having
been locked as explained in paragraph 5.8 (Fig. Q)
For this operation proceed as follows:
- Release the arm by rotating the release lever (Fig. R);
- Loosen the dowel (Fig. S-1) and tighten the ring nut (Fig. S-2) by one-eighth of a turn
(approx. 45 degrees);
- Lock the ring nut, tightening the locking dowel (Fig. S-1);
- Lock the arm, following the operation shown in Fig. T.
This operation may need to be carried out several times, either tightening or loosening the
ring nut (Fig. S-2), until the arm is locked horizontally and the locking lever, using rotational
power that is suitable for manual release, simultaneously closes at the stop created by the
reference plug (Fig. T-1).
NOTE: when the operation ends, the lever must be against the end stop plug (Fig. T-1). This
position guarantees that the“C”arm is locked mechanically and therefore safe.
6.1.2Main switch at the“I ”position
The following checks must be carried out before doing any spot welding, and with the main
switch at“I”(ON).
Clamp electrode alignment:
- Place a shim having the same thickness as the panels to be spot welded between
the electrodes; make sure the electrodes, which are now “squeezing” the panels (see
paragraph 6.2.2), are aligned.
- If necessary, make sure that the arm is correctly xed (see previous paragraphs).
6.2ADJUSTING THE SPOT WELDING PARAMETERS
The parameters that determine the diameter (section) and mechanical seal of the spot are:
- Power applied by the electrodes.
- Spot welding current.
- Spot welding time.
If the operator does not have specic experience, it is best to try some spot welding on
pieces of panel with the same thickness and of the same quality as the ones to be spot
welded.
- 8 -
6.2.1Setting the arm and the electrode
Press the“START”key (Fig. U-1) and set the arm among those available (Fig. U-2) turning the
central knob (Fig. C-5).
6.2.2Adjustment of force and approach function (pneumatic clamp only)
Adjustment of force takes place in automatic or manual mode (using the pressure regulator
on the air unit).
Setting the automatic mode (default setting) or manual mode allows you to choose from
the main menu selecting the icon and then the icon as in the gures U-3-
4.
Automatic adjustment“AUTO daN”:
Choosing“AUTO daN”, you can set the desired value of the force expressed in“deca Newton”
using the“MANUAL” mode (Fig. U-5).
In “SMART AUTOSET” and “EASY” mode, during the spot welding cycle, the force of the
electrodes is automatically adjusted.
Manual adjustment:
Choosing “no AUTO daN” you can set the force value manually on the pressure regulator
(Fig. B-10).
During the spot welding cycle, the force of the electrodes will be manually regulated
according to the procedure described above.
Approach function :
It allows approach of the electrodes with the force set without supplying current.
You can approach the electrodes in any spot welding program with the following procedure
(double click):
Press and release the clamp button and then immediately press the button. The clamp
approaches and keeps closed the electrodes up to subsequent release of the button. The
led in clamp ashes.
WARNING: using the protective gloves can make it dicult to approach by
double clicking. It is therefore advisable to select the approach function
.
WARNING!
RESIDUAL RISK! This operating mode also causes the residual risk of
crushing of the upper limbs: take all necessary precautions (see safety chapter).
6.2.3Automatic setting the spot welding parameters (Fig. U-6)
The spot welding parameters are all set automatically by the machine: “SMART AUTOSET”
mode. You need that both the plugs on the clamps C are connected to the machine (Fig. F).
6.2.4Semi-automatic setting the spot welding parameters (Fig. U-7)
The spot welding parameters are set by the machine selecting the thickness and the
material (*) of the sheet metal to weld.
The spot weld is deemed to have been performed correctly when a piece undergoes a
traction test and causes the extraction of the welding point kernel from one of the two
sheets.
(*) NOTE: the standard materials available are:
- “Fe”: sheet metal in iron with low carbon content;
- “FeZn”: galvanised sheet metal in iron with low carbon content;
- “Hss”: sheet metal in steel with high tensile strength (700 MPa max);
- “Br”: sheet metal in boron steel.
6.2.5Manual setting of the spot welding parameters and creation of a customised
program (Fig. U-8)
You can manually set the spot welding parameter to execute test welding or to create a
customised program.
6.3AUTOMATIC SPOT WELDING PROCEDURE
This function is available with the pneumatic clamp“C”in standard supply with the machine.
Select“SMART AUTOSET”mode using the“MODE”icon: you enter the preliminary“ZEROING”
procedure (Fig. U-9).
For correct zeroing, keep the clamp button pressed for the entire time necessary following
the instructions on the display; then proceed as follows:
- Rest the electrode on the xed arm of the surface of one of the two metal sheets to spot
weld.
- Press the button on the handle of the clamp to obtain:
a) Closing of the sheet metal between the electrodes.
b) Start-up of the spot welding cycle with current passage.
- At the end of the spot welding, the average spot welding current is displayed (excluding
the initial and nal ramps), the force of the electrodes, the time of spot welding and the
energy supplied to the electrodes for the spot.
The values displayed may also have an added “warning”, signalled by the red led on the
ashing clamp (see TAB. 1), based on the result obtained with spot welding.
- At the end of the work, place the clamp back in the specic support on the trolley.
To carry out zeroing again, press the “ESC” key (Fig. C-6) until the icon appears on
the display, then select it. To exit this procedure, without zeroing, press the“ESC”key.
IMPORTANT:
For a good outcome of automatic spot welding, repeat zeroing when:
- you replace the electrodes.
- you clean the electrodes (recommended after 30 spots approx.).
- you change the arm.
- you change welding job.
WARNING: during zeroing of the clamp, execute a particular spot welding
cycle by supplying current and closing the electrodes on multiple
occasions. Repeat all the provisions outlined in the paragraph “GENERAL SAFETY”IN
THIS MANUAL!
6.4SEMI-AUTOMATIC OR MANUAL SPOT WELDING PROCEDURE
- In “EASY” mode, select the sheet metal to weld (materials and thicknesses) using the
knob (Fig. U-7-11).
- In“MANUAL”mode, you can create your own spot welding program by setting the value
of each parameter (Fig. U-5-8):
- Force of electrodes.
- Pre-heating time/current.
- Pause time.
- Ramp time.
- Spot welding time/current.
- Number of impulses.
- Cold time.
- Post-heating time/current.
- Maintenance time.
6.4.1PNEUMATIC CLAMP
- Rest the electrode on the xed arm of the surface of one of the two metal sheets to spot
weld.
- Press the button on the handle of the clamp to obtain:
a) Closing of the sheet metal between the electrodes.
b) Start-up of the spot welding cycle with current passage.
- At the end of spot welding, the average current of spot welding is displayed (excluding
the initial and nal ramps) and the force of the electrodes.
The values displayed may also have an added “warning”, signalled by the red led on the
ashing clamp (see TAB. 1), based on the result obtained with spot welding.
- At the end of the work, place the clamp back in the specic support on the trolley.
WARNING: presence of dangerous voltage! Always check the integrity of
the power supply cable of the clamp;the protective corrugated tube must
not be cut, broken or crushed! Before and during use of the clamp, check the cable is
far from moving parts, heat sources, sharp surfaces, liquids, etc.
WARNING: the clamp contains the transformation, isolation and
straightening assembly necessary for spot welding;if in doubt on the
integrity of the clamp (due to falls, violent knocks, etc.) disconnect the spot welding
machine and consult an authorised support centre.
6.4.2STUDDER GUN
WARNING!
- To fasten or dismantle the accessories from the chuck of the gun, use two xed hex
keys to prevent rotation of the chuck.
- If working on doors or bonnets, it is compulsory to connect the earth bar on these
parts to prevent passage of current through the hinges, and however near the
zone to spot weld (long current paths reduce the eciency of the spot).
6.4.2.1Connection of the earth cable to the sheet metal
a) Bare the sheet metal as near as possible to the point where you intend to work, for a
surface corresponding to the contact surface of the earth bar.
b1) Fasten the copper bar to the sheet metal surface using an ARTICULATED CLAMP
(model for welding).
An alternative to mode“b1”(impractical) implement the solution:
b2) Spot weld a washer on the surface of the previously prepared sheet metal; pass the
washer through the slit of the copper bar and fasten it with a specic washer terminal
supplied.
6.4.2.2Procedure to spot weld and use various tools
Connect the studder gun and the earth cable to the clamp supplied, carefully following the
instructions sheet contained in the Studder kit.
Press the“START”button pressing the knob and select the tool you want to use (Fig. U-1-10).
Select the material and the thickness of the sheet metal you want to weld (Fig. U-18).
Based on the tool selected, follow the procedures described below:
Washer spot welding for earth terminal fastening
On the chuck of the gun, assemble the specic electrode (POS.9, Fig. I) and insert the washer
(POS.13, Fig. I).
Rest the washer in the chosen zone. Place in contact, in the same zone, the earth terminal;
press the gun button implementing welding of the washer on which fastening should be
carried out as previously described.
Spot welding of screws, washers,
nails and rivets
Equip the gun of the suitable electrode by inserting the element on it to spot weld and rest
it on the sheet metal on the desired spot; press the button on the gun; release the button
only having passed the time set.
Sheet metal spot welding from one side only
On the gun chuck, assemble the electrode planned (POS.6, Fig. I) pressing on the surface
to spot weld. Activate the gun button, release the button only having passed the time set.
WARNING!
Maximum thickness of the sheet metal for spot welding, from one side only: 1+1 mm. This
spot welding is not permitted on support structures of the bodywork.
To obtain correct spot welding results on the sheet metal, you need to take some
fundamental precautions:
1 - A perfect earth connection.
2 - The two parts to spot weld must be free of paint, grease and oil.
3 - The parts to spot weld must be in contact with one another, without air gaps, if
necessary press with a tool, not with the gun. Too heavy pressure leads to poor results.
4 - The thickness of the upper part must not exceed 1 mm.
5 - The tip of the electrode must have a diameter of 2.5 mm.
6 - Tighten the nut well fastening the electrode, check the connectors of the welding
cable are fastened.
7 - Then spot weld, resting the electrode to exert light pressure (3÷4 kg). Press the button
and pass the spot welding time, only then move away with the gun.
8 - Never move more than 30 cm from the fastening point of the earth.
Spot welding and simultaneous traction of the special washers
This function should be carried out assembling and fully tightening the chuck (POS.4, Fig.
I) on the body of the extractor (POS.1, Fig. I), couple and tighten the other terminal of the
extractor on the gun (Fig. I). Insert the special washer (POS.14, Fig. I) on the chuck (POS.4, Fig.
I), fastening it with the specic screw (Fig. I). Spot weld the relevant zone, adjusting the spot

- 9 -
welding machine as for spot welding the washers and start traction.
When complete, turn the extractor 90° to detach the washer, which can be spot welded
again in a new position.
Heating and sheet metal recalculation
In this operating mode, the TIMER is disabled by default: by selecting the welding time, the
display shows“inf ”= Innite time.
Operation duration is therefore manual, being determined by the time for which the gun
button is kept pressed.
Current intensity is adjusted automatically according to the thickness of the selected sheet.
Sheet metal heating
Assemble the carbon electrode (POS. 12, Fig. I) on the gun chuck and block in place with
the ring nut. Touch the area, that was previously bared, with the carbon tip and tighten with
the gun button. Work from the outside to the inside, using a circular movement to heat the
sheet which undergoes work hardening and returns to its original position.
To prevent the sheet from drawing too much, treat small areas and immediately after wipe
using a damp cloth to cool the treated part.
Sheet metal recalculation
In this position, working with the specic electrode, you can atten the sheet metal that
underwent localised deformation.
Intermittent spot welding (patching)
This function is suitable for spot welding small rectangles of sheet metal to cover holes due
to rust or other causes.
Place the specic electrode (POS.5, Fig. I) on the chuck, accurately tighten the fastening ring
nut. Bare the relevant zone and ensure the piece of sheet metal you want to spot weld is
clean and free of grease or paint.
Position the piece and rest on the electrode, then push the gun button keeping the button
always pressed, advance rhythmically following the work/rest intervals given by the spot
welding machine.
NB: During the work, exert light pressure (3÷4 kg), working following an ideal line 2÷3 mm
from the edge of the new piece to weld.
To obtain good results:
1 - Do not move more than 30 cm from the fastening point of the earth.
2 - Use coverage sheet metal with a maximum thickness of 0.8 mm, better if stainless
steel.
3 - Rhythm advanced movement with the frequency dictated by the spot welder.
Advance during the pause time, stop during spot welding time.
Use the extractor supplied (POS. 1, Fig. I)
Washer coupling and traction
This function is carried out by assembling and tightening the chuck (POS.3, Fig. I) on the
body of the electrode (POS.1, Fig. I). Couple the washer (POS.13, Fig. I), spot welded as
previously described, and start traction. In the end, rotate the extractor 90° to detach the
washer.
Plug coupling and traction
This function is carried out by assembling and tightening the chuck (POS.2, Fig. I) on the
body of the electrode (POS.1, Fig. I). Insert the plug (POS.15-16, Fig. I), spot welded as
previously described in the chuck (POS.1, Fig. I) keeping the terminal itself pulled towards
the extractor (POS.2, Fig. I).With insertion complete, release the chuck and start traction. On
completion, pull the chuck towards the hammer to remove the plug.
7. SETTINGS MENU
7.1MENU MODE (Fig. U-7)
It enables setting the dierent work modes described in the previous paragraph:
- : automatic mode.
- : semi-automatic mode.
- : manual mode.
- : approach mode.
7.2MENU (Fig. U-12)
Used to set the following:
- : adjustment of automatic force.
7.2.1SETUP MENU (Fig. U-13)
Used to set the following:
- : language.
- : time and date.
- : unit of metric or imperial measurement.
7.2.2SERVICE MENU (Fig. U-14)
This provides information on the spot welding machine status.
7.2.2.1INFO MENU
- : spot welding machine operation in days (DDDD), hours (HH), minutes (mm).
- : number points.
- : list of alarms.
7.2.2.2FIRMWARE MENU
- : use to update the spot welding machine software via USB pen drive.
- : use to reset the spot welding machine to its default settings.
- : software release installed.
7.2.2.3REPORT MENU
Use to generate a report and save it to a USB pen drive. The report contains various
information on the machine status (software installed, life/working hours, alarms, selected
spot welding process etc.).
7.3JOBS MENU (Fig. U-15)
Used to:
- : save a job in the spot welding machine internal memory.
- : load a previously saved job.
- : delete a previously saved job.
- : import jobs from a USB device.
- : export jobs on a USB device.
- : allow saving of spot welding parameters to the USB device.
7.4“QUICK MENU”KEY (Fig. U-16-17)
Used to set the following:
- : spot welding block: the spot welding parameters are always blocked at the
same value for all the points executed.
- : maximum number of points and countdown of the points executed.
8. MAINTENANCE
WARNING! BEFORE CARRYING OUT MAINTENANCE, MAKE SURE THE
MACHINE IS OFF AND DISCONNECTED FROM THE MAINS.
The switch must be locked at“O”using the supplied lock.
8.1ROUTINE MAINTENANCE
ROUTINE MAINTENANCE CAN BE CARRIED OUT BYTHE OPERATOR.
- adaptation/restoration of the diameter and prole of the electrode tip;
- replacement of the electrodes and the arms;
- electrode alignment check;
- cooling check on cables and clamp;
- condensate discharge from the compressed air entry lter.
- periodic control of the level of the cooling liquid tank.
- periodic control of the total absence of liquid leaks.
- control the power supply cable is intact on the spot welding machine and the
clamp.
- change of the cooling liquid every 6months.
8.2SPECIAL MAINTENANCE
SPECIAL MAINTENANCE MUST ONLY BE CARRIED OUT BY TECHNICIANS WHO ARE
EXPERT OR QUALIFIED IN AN ELECTRIC-MECHANICAL AMBIT.
WARNING! BEFORE REMOVING THE SPOT WELDER OR CLAMP PANELS
AND LOOKING INSIDE, MAKE SURE THE SPOT WELDER IS OFF AND
DISCONNECTED FROM THE ELECTRIC AND PNEUMATIC (if present) POWER SUPPLIES.
Carrying out checks while the inside of the spot welder is live can cause serious electric
shock due to direct contact with live parts and/or injury due to direct contact with moving
parts.
Periodically and as frequently as required by the use and environmental conditions, inspect
inside the spot welder and clamp and remove the dust and metal particles that have
deposited on the transformer, diode module, power terminal board, etc. using a blast of dry
compressed air (max. 5 bar).
Do not direct the jet of compressed air onto the electronic circuit board; if necessary clean
with a very soft brush or suitable solvents.
At the same time:
- Make sure the wiring does not show signs of insulation damage or loose-oxidised
connections.
- Make sure the screws that connect the transformer secondary with the output bars /
wires are tight and that there are no signs of oxidation or overheating.
8.2.1Intervention on the GRA
In case of:
- excess need to restore the liquid level in the tank;
- excess frequency of alarm 7 activation;
- liquid leaks;
you should proceed to check for any problems inside the cooling unit.
Always refer to section 7.2 for overall warnings and however having disconnected the spot
welding machine from the power supply mains, proceed with removing the side panel (FIG.
L).
Check there are no leaks both on connections and tubing. If liquid is leaking, replace the
damaged part. Eliminate the liquid residue possibly leaked during maintenance and close
the side panel again.
Then proceed to reset the spot welding machine using the appropriate information
indicated in paragraph 6 (Spot welding).
8.2.2Replacing the internal battery
If the memory does not maintain the correct date and time, replace the battery (CR2032 -
3V) found in the compartment at the back of the control panel.
When the spot welder is disconnected from the mains, remove the control panel screws,
remove the connectors and replace the battery.
WARNING! Make sure all the connectors have been connected before
returning the panel to the machine.
9. TROUBLESHOOTING
SHOULD MACHINE OPERATION NOT BE SATISFACTORY, AND BEFORE CARRYING OUT MORE
SYSTEMATIC CHECKS OR CONTACTING YOUR TECHNICAL ASSISTANCE CENTRE, MAKE SURE
THAT:
- With the main switch of the spot welder closed (pos. “ I “) the display is lit; if not the
problem is in the power line (cables, plug and socket, fuses, excessive voltage drop, etc.).
- The display does not have any alarm signals (see TAB. 1): once the alarm stops, press
“START”to re-activate the spot welding machine; check correct circulation of the cooling
liquid and, if necessary, reduce the intermittence ratio of the work cycle.
- The elements that are part of the secondary circuit (fuses – arm-holders – arms –
electrode holders – cables) are not inecient because of loose screws or oxidation.
- The welding parameters are suitable for the work to be carried out
- After having carried out maintenance or repairs, restore the connections and wiring as
they were before, making sure they do not come into contact with moving parts or parts
that can reach high temperatures. Band all the wires as they were before, being careful
to keep the primary high voltage connections separate from the secondary low voltage
ones.
Use all the original washers and screws when re-closing the structural work.
Table of contents

 Operator's manual")


