Hawking HomeRemote HRGZ1 User manual

1

2
Limited Warranty
Hawking Technology guarantees that every HRGZ1 HomeRemote Gateway is free from physical defects in material
and workmanship under normal use for two (1) years from the date of purchase. If the product proves defective
during this two-year warranty period, call Hawking Customer Service in order to obtain a Return Authorization
number. Warranty is for repair or replacement only. Hawking Technology does not issue any refunds. BE SURE
TO HAVE YOUR PROOF OF PURCHASE. RETURN REQUESTS CAN NOT BE PROCESSED WITHOUT
PROOF OF PURCHASE. When returning a product, mark the Return Authorization number clearly on the outside
of the package and include your original proof of purchase.
IN NO EVEN SHALL HAWKING TECHNOLOGY’S LIABILTY EXCEED THE PRICE PAID FOR THE
PRODUCT FROM DIRECT, INDIRECT, SPECIAL, INCIDENTAL OR CONSEQUENTIAL DAMAGES
RESULTING FROM THE USE OF THE PRODUCT, ITS ACCOMPANYING SOFTWARE OR ITS
DOCUMENTATION.
Hawking Technology makes no warranty or representation, expressed, implied or statutory, with respect to its
products or the contents or use of this documentation and all accompanying software, and specifically disclaims its
quality, performance, merchantability, or fitness for any particular purpose. Hawking Technology reserves the right
to revise or updates its products, software, or documentation without obligation to notify any individual or entity.
Please direct all inquiries to:techsupport@hawkingtech.com
Federal Communication Commission
Interference Statement
This equipment has been tested and found to comply with the limits for a Class B digital device, pursuant to Part 15
of FCC Rules. These limits are designed to provide reasonable protection against harmful interference in a
residential installation. This equipment generates, uses, and can radiate radio frequency energy and, if not installed
and used in accordance with the instructions, may cause harmful interference to radio communications. However,
there is no guarantee that interference will not occur in a particular installation. If this equipment does cause harmful
interference to radio or television reception, which can be determined by turning the equipment off and on, the user
is encouraged to try to correct the interference by one or more of the following measures:
1. Reorient or relocate the receiving antenna.
2. Increase the separation between the equipment and receiver.
3. Connect the equipment into an outlet on a circuit different from that to which the receiver is connected.
4. Consult the dealer or an experienced radio technician for help.
FCC Caution
This device and its antenna must not be co-located or operating in conjunction with any other antenna or transmitter.
This device complies with Part 15 of the FCC Rules. Operation is subject to the following two conditions: (1) this
device may not cause harmful interference, and (2) this device must accept any interference received, including
interference that may cause undesired operation.
Any changes or modifications not expressly approved by the party responsible for compliance could void the
authority to operate equipment.

3
Table of Contents
Table of Contents............................................................................................................................ 3
1 - Introduction ............................................................................................................................... 5
2 - Product Contents........................................................................................................................ 5
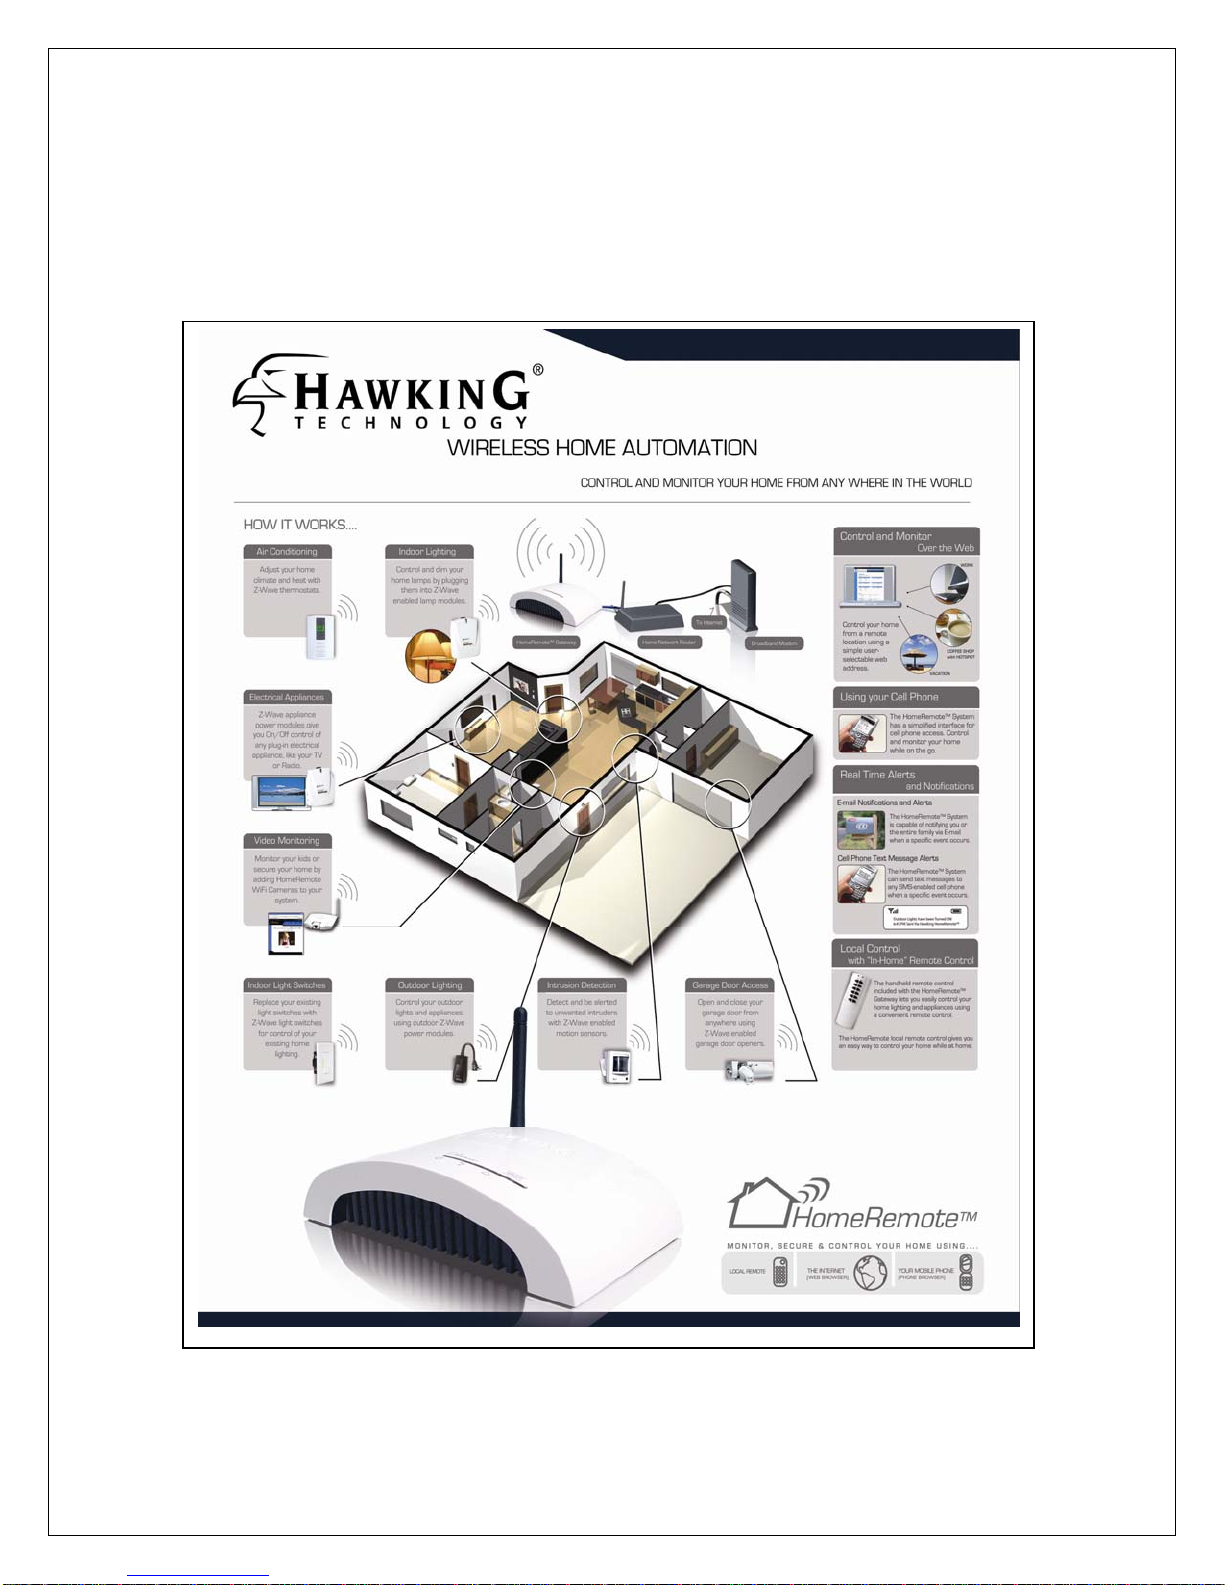
3 - What is Z-Wave Technology?................................................................................................... 6
4 - System Requirements................................................................................................................ 6
5 - System Diagram ........................................................................................................................ 7
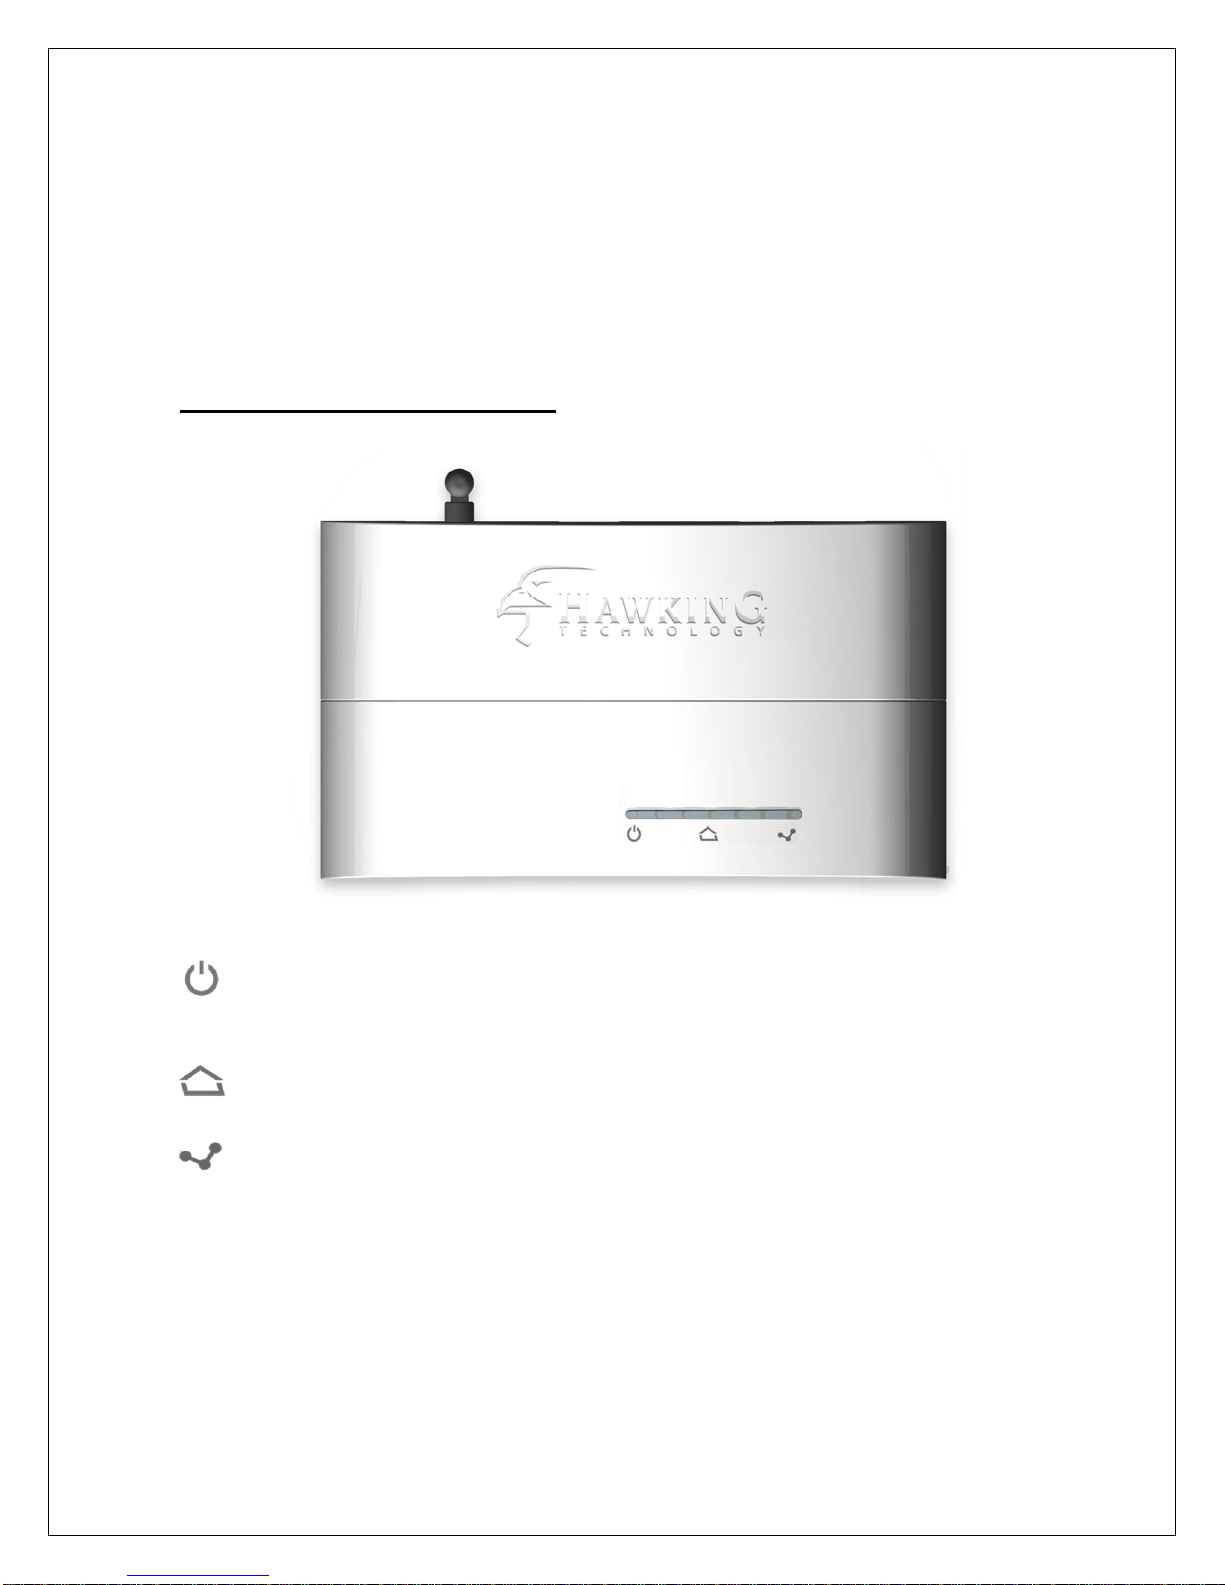
6 - HRGZ1 – HomeRemote Wireless Internet Gateway Overview................................................ 8
6.1 - Gateway Front Panel (LEDs) ............................................................................................. 8
6.2 - Gateway Back Panel........................................................................................................... 9
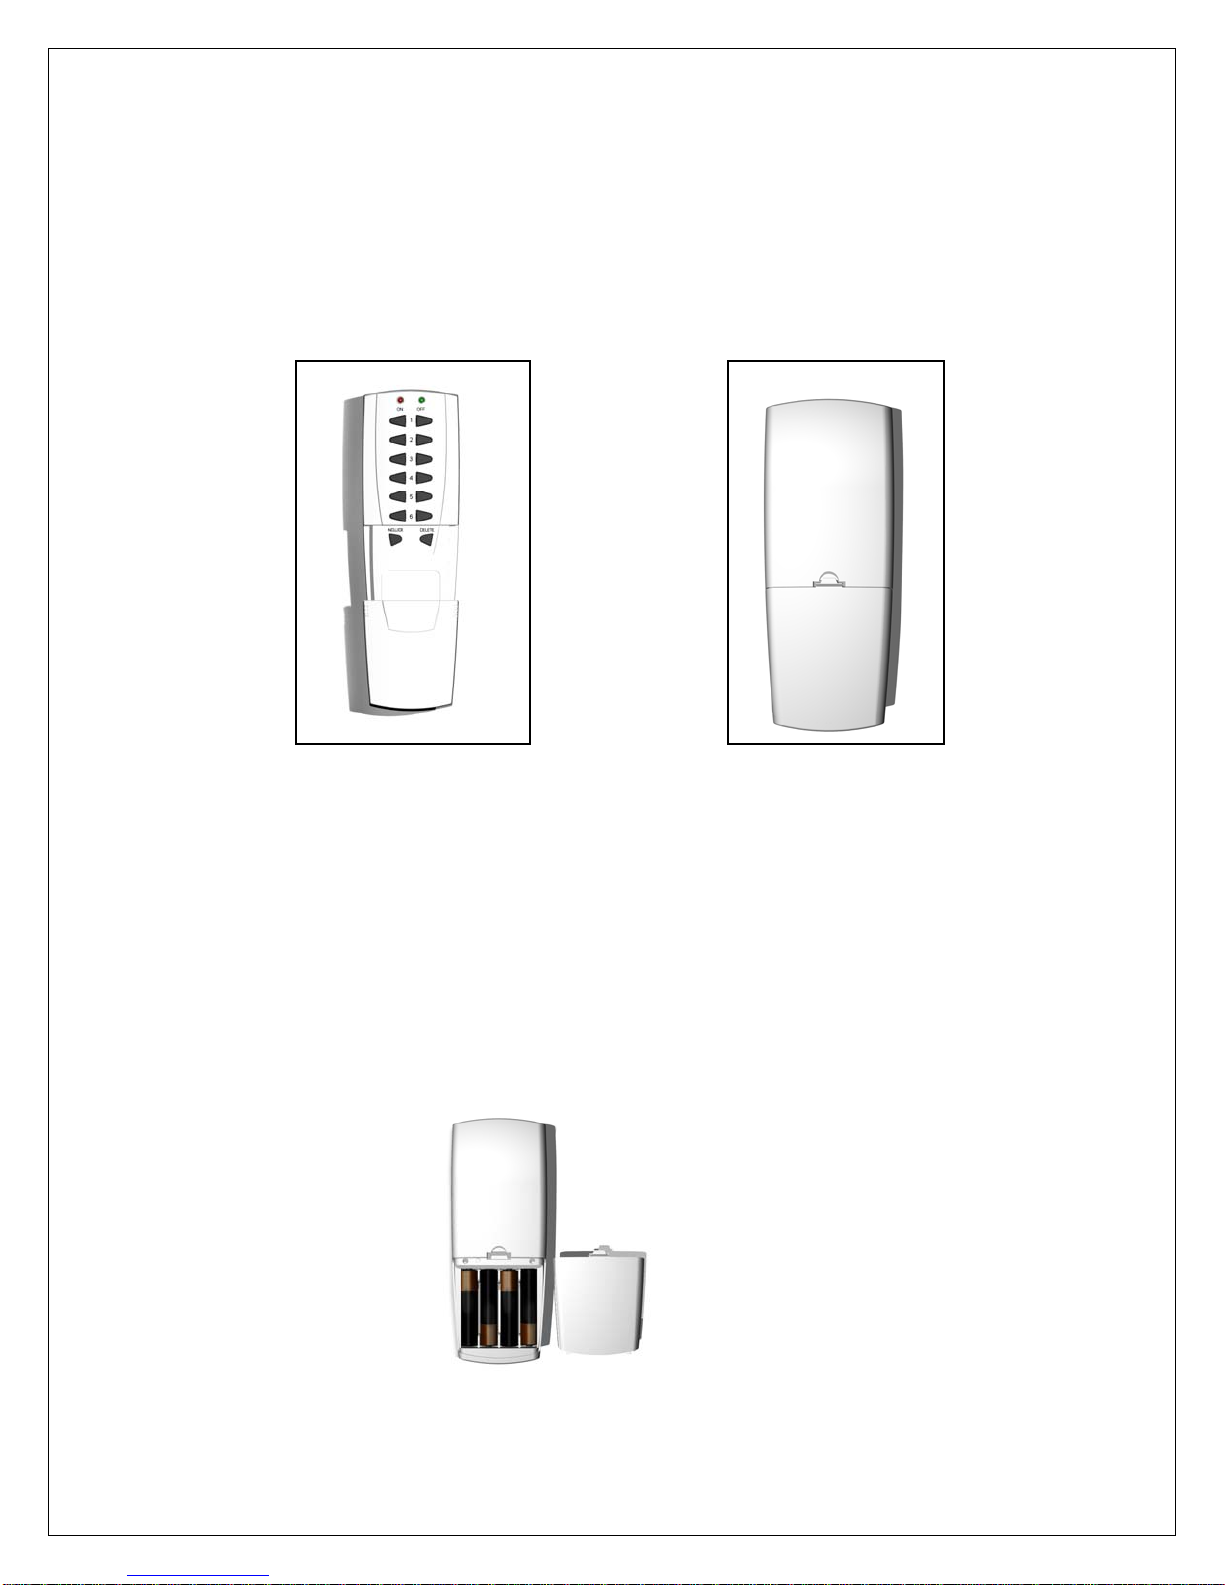
7 - HomeRemote Handheld Remote Control................................................................................ 10
8 - First Time Setup ...................................................................................................................... 11
9 - HomeRemote Setup Wizard Walk-Through ........................................................................... 12
9.1 - Introduction ...................................................................................................................... 12
9.2 - Hardware Setup ................................................................................................................ 13
9.3 - Locate the Gateway.......................................................................................................... 13
9.4 - Network Setup.................................................................................................................. 13
9.5 - Password Setup................................................................................................................. 14
9.6 - Software Update............................................................................................................... 14
9.7 - Clock Setup....................................................................................................................... 14
9.8 - Wireless Home Automation Setup Overview .................................................................. 15
9.9 - Home Layout Setup.......................................................................................................... 15
9.10 - Adding Modules and Devices......................................................................................... 15
9.11 - Transfer Settings to the Gateway.................................................................................... 16
9.12 - Customizing / Naming Modules and Devices................................................................ 16
9.13 - Notification Setup........................................................................................................... 16
9.14 - Notification Setup / User Accounts................................................................................ 17
9.15 - Custom Web-Address..................................................................................................... 17
9.16 - Internet Access Setup (Router Configuration) ............................................................... 17
9.17 - Internet Access Setup (Manual Setup) ........................................................................... 18
9.18 - Cell Link Setup............................................................................................................... 18
9.19 - TZO DDNS Service........................................................................................................ 18
9.20 - Setup Complete............................................................................................................... 19
10 - Setting Up the Handheld Remote Control............................................................................. 20
11 - Using other Z-Wave Remote Controls.................................................................................. 21
12 - How to use the HomeRemote Web-Based Interface............................................................. 22
12.1 - Home Status Page........................................................................................................... 22
12.2 - Control Page................................................................................................................... 24
12.3 - Device Management....................................................................................................... 25
12.3.1 - Setting up Scenes..................................................................................................... 26
12.3.2 - Alerts and Notifications........................................................................................... 26
12.3.3 - Linking Devices....................................................................................................... 27
12.4 - Recent Activity............................................................................................................... 28
12.5 - Setup Page ...................................................................................................................... 29
12.5.1 - Clock Setup.............................................................................................................. 29
12.5.2 - Creating Rooms / Areas........................................................................................... 30

4
12.5.3 - Add / Edit or Remove Devices................................................................................ 30
12.5.4 - Notification Setup.................................................................................................... 32
12.5.5 - Adding Network Cameras....................................................................................... 34
12.5.6 - Network Settings / IP Address / Login Setup.......................................................... 35
12.5.7 - Firmware Upgrades ................................................................................................. 36
12.5.8 - Saving and Loading Profiles.................................................................................... 37
12.5.9 - Resetting the Gateway............................................................................................. 38
12.5.10 - TZO/DDNS Configurations .................................................................................. 38
13 - Using the HomeRemote Cell Link Service ........................................................................... 39
13.1 - Subscription Requirements............................................................................................. 39
13.2 - Setting up Cell Link (First Time Use)............................................................................ 39
13.3 - Software Security ........................................................................................................... 40
13.4 - Navigating the Cell Link Customer Web Portal............................................................. 40
13.5 - Launching Cell Link from your Cell Phone................................................................... 41
13.6 - Activate your Phone and Software................................................................................. 42
13.7 - Navigating Menus and Executing Commands with your Cell Phone............................ 42
13.7.1 - Viewing Cameras using Cell Link........................................................................... 43
13.7.2 - Other Devices (Thermostats, Window Shades etc…)............................................. 44
13.8 - Cell Link Options Menu and Navigation Tips ............................................................... 45
13.8.1 - Set Cell Link PIN / Disable PIN.............................................................................. 45
13.8.2 - Reset Cell Link........................................................................................................ 45
13.8.3 - BlackBerry® Connection Options and Select Button............................................. 45
13.8.4 - Connection Options................................................................................................. 46
13.8.5 - Select Button............................................................................................................ 46
13.8.6 - Demo/Active Mode ................................................................................................. 46
13.8.7 - Help ......................................................................................................................... 46
13.8.8 - About....................................................................................................................... 46
13.9 - Exiting Cell Link............................................................................................................ 47
13.10 - Customer Support......................................................................................................... 47
14 - HomeRemote Accessories (Compatible Z-Wave Devices)................................................... 47
14.1 - Lighting .......................................................................................................................... 47
14.2 - Electrical Appliances...................................................................................................... 48
14.3 - Climate Control .............................................................................................................. 49
14.4 - Window Shades.............................................................................................................. 49
14.5 - Security........................................................................................................................... 49
14.6 - Access Control................................................................................................................ 50
14.7 - Remote Controls............................................................................................................. 50
15 - Frequently Asked Questions.................................................................................................. 51
15.1 - General Questions........................................................................................................... 51
15.2 - Remote Control and Z-Wave Modules........................................................................... 51
15.3 - HomeRemote Gateway Installation................................................................................ 53
15.4 - HomeRemote Gateway Web Interface........................................................................... 54
15.5 - HomeRemote Cell Link Interface and Web Portal......................................................... 55
16 – HomeRemote Gateway Specifications and Ranges.............................................................. 57

5
1 - Introduction
Thank you for your purchase of the Hawking Technologies HomeRemote™ Home Automation /
Control Gateway. This manual will give you detailed instructions on all you need to know to
setup, maintain and expand your HomeRemote System. With your HomeRemote Gateway and
handheld Remote Control you will be able to control, monitor and secure your home from
anywhere in the world. The HomeRemote Gateway connects your Z-Wave™ home accessories
to the internet for easy control via a cellular phone or the HomeRemote web-based interface.
With the HomeRemote System you will be able to:
-Customize the HomeRemote interface to match the exact layout of your home
-Customize the names of your rooms and devices
-Control and monitor lights, windows, doors, window shades, air conditioning, electrical
appliances and much, much more…
-Keep an eye on your kids and pets while away
-Secure your business and ensure that no lights are on when not needed
-Secure your home while away on vacation
-Schedule lights and appliances to activate on a set interval
-Be alerted when any activity is detected within your home via cell phone text message or
E-mail
-Set scenes for the control of multiple devices with the touch of a button (i.e. for romantic
mood setting or movie watching lighting schemes)
The possibilities of applications for the HomeRemote system are endless. Customize one for
your lifestyle today.
2 - Product Contents
The purchase of your HRGZ1 HomeRemote Wireless Home Automation Gateway includes the
following units. Please take the time now to check that your packaging is not missing any items.
1 x HomeRemote Gateway
1 x HomeRemote Handheld Remote Control (Batteries not included)
1 x Ethernet Cable
1 x Power Adapter
1 x Installation CD
1 x Home Planning Guide / Remote Control Quick Reference Guide
1 x Getting Started Installation Guide

6
3 - What is Z-Wave Technology?
Z-Wave is an award-winning home control wireless standard. Using fail-safe wireless mesh
technology, Z-Wave provides reliable and secure connections for all Z-Wave devices within the
home. The HomeRemote System uses Z-Wave technology to communicate with home control
devices and modules. To ensure that the Home Control devices you purchase are compatible
with the HomeRemote System, make sure to look for the Z-Wave logo on the module plastic or
packaging.
Z-Wave is a next-generation wireless "ecosystem" that lets all your home electronics talk to each
other, and to you, via remote control and the HomeRemote Gateway. It uses simple, reliable,
low-power radio waves that easily travel through walls, floors and cabinets. Z-Wave
functionality can be added to almost any electronic device in your house, even devices that you
wouldn't ordinarily think of as "intelligent," such as appliances, window shades, thermostats and
home lighting.
Z-Wave unifies all your home electronics into an integrated wireless network, with no
complicated programming and no new cables to run. Any Z-Wave enabled device can be
effortlessly added to this network, and many non-Z-Wave devices can be made compatible by
simply plugging them into a Z-Wave accessory module. In seconds, your device gets joined to
the network and can communicate wirelessly with other Z-Wave modules and controllers.
Because Z-Wave operates on its own unique frequency, it will not interfere with other wireless
equipment in your home, like cordless telephones and Wi-Fi routers. And because Z-Wave is a
modular system, you can build your network one device at a time, one room at a time, or the
whole house at once. The choice is yours, and the possibilities are nearly endless. Best of all, Z-
Wave technology is extremely affordable, giving you powerful home control that you can
integrate yourself in moments, at a fraction of the cost of conventional smart home technologies.
4 - System Requirements
Before you begin the installation you will need to make sure you have the following items:
-Broadband Internet Service (such as Cable Modem or DSL)
-Home Network Router with Available LAN port (802.11b or 802.11g Wireless Router
required to connect HomeRemote Wireless Video Camera wirelessly)
-Windows 98SE, 2K, ME or XP or Macintosh OSX 10.2 or later computer with Internet
access
-Available CD-Rom or DVD-Rom drive (Setup CD)
-Any Z-Wave Home Automation modules and devices you wish to add to your system
-4 x AAA Batteries for the Handheld Remote Control
-(Optional) If you plan to use the Cell Link service you will need to have an Internet
enabled cellular phone. (If you have not subscribed to a data plan you may be charged
per data usage by your cellular carrier)

7
5 - System Diagram
The HomeRemote System gives you remote control of your home from anywhere in the world.
Using Z-Wave technology, the HomeRemote System is customizable to your specific needs and
lifestyle.

8
6 - HRGZ1 – HomeRemote Wireless Internet Gateway
Overview
The HomeRemote Wireless Internet Gateway acts as the brain of your home control system. It
connects your home to the internet and manages all devices within your system.
6.1 - Gateway Front Panel (LEDs)
Power LED – Solid blue light when the power adapter is attached and working.
Z-Wave Activity LED – Blinks when activity between home control devices is initiated.
Home Network LED – Solid light when a link is established between your home network
and the HomeRemote Gateway.

9
6.2 - Gateway Back Panel
RESET – The reset button can reboot (when pressed for 1 second) your HomeRemote
Gateway when an error occurs or your HomeRemote Gateway stops functioning
for some reason. A small pin or paper clip may be required to access the recessed
button. When held for over 10 seconds, the Gateway will reset itself to the
original default settings and all prior configurations will be lost.
POWER – The power jack is used for connecting your power adapter to.
NETWORK – The port is for connecting your HomeRemote Gateway to an available LAN port
on your home router. The Network port accepts standard RJ-45 Ethernet cabling.
ANTENNA – The antenna on the HomeRemote Gateway is a non-removable antenna used for
sending out wireless commands to your Z-Wave home control modules.

10
7 - HomeRemote Handheld Remote Control
The Handheld Remote Control is used to add and remove Z-Wave devices from your home
control system. The remote is also used for convenient control your home appliances and lights
while at home.
Front Panel Back Panel
The remote control is organized by ‘Channels’ which are the buttons ranging from 1 through 6
and each Channel has a single ON button and OFF button. A ‘Channel’ can be associated with a
single wireless device or multiple devices. By pushing the ON or OFF button will turn ON all
devices in the Channel or OFF all devices in the Channel. The ‘Include’ button is used for
configuring the remote control and the ‘Delete’ button is used for removing devices from the
remote control.
Preparing to use your Handheld Remote Control
Before you begin your initial setup you will need to place 4 AAA batteries into the battery
compartment on the back of the remote as shown below.
(Batteries are not included)

11
8 - First Time Setup
The first time you setup your HomeRemote system you will need to locate the included Setup
CD and the HomeRemote Gateway. Make sure that you have all the requirements before
installing the Gateway (see System Requirements).
Before placing the CD into your CD-Rom drive you will need to connect the hardware. Locate
the HomeRemote Gateway, Power Adapter and Ethernet Cable from your packaging. Connect
the HomeRemote Gateway to your home router as shown below.
When you have verified that there is power to the Gateway and the connection to the router has
been made locate the Setup CD and place it into your PC.
A menu page should load automatically. If it does not, locate your CD-Rom or DVD-Rom drive
icon to browse the contents on the Setup CD and click “autoload.”

12
Autoload Menu Page
Select “Setup Wizard” from the menu page and
follow the steps to begin the setup process.
The Autoload menu page also gives you the option
to view video tutorials on how to setup and use your
remote control, view the User’s Manual, register
your product and purchase extra modules from
Hawking Technologies.
9 - HomeRemote Setup Wizard Walk-Through
(Also in the Getting Started guide)
The Setup Wizard will first check that the Internet
connection to your computer is working. The Wizard
will not allow you to continue until it confirms that
Internet access is OK.
Once your Internet connection has been confirmed
click NEXT to continue.
9.1 - Introduction
The Introduction page gives you an overview of the
installation process. You will need to register your
product before continuing with the installation process.
Registering your product gives you Software Updates
and free Technical Support.
Click Next to continue after you have registered your
product.

13
9.2 - Hardware Setup
The Hardware setup page will guide you through the
correct setup of your HomeRemote Gateway to your
home router. Follow the diagram to correctly connect
your Gateway and then click Next.
If there is something wrong with your hardware setup,
the Setup Wizard will let you know and give you
instructions on how to correct your setup.
9.3 - Locate the Gateway
The Locate the Gateway page will scan your network
for your Gateway. If your hardware connections have
been setup correctly the Gateway should appear in the
table on the page. Highlight the Gateway and click
NEXT to continue.
9.4 - Network Setup
The Network Setup page will go over your current
network settings. The Setup Wizard will pull an IP
Address from your router’s DHCP server or your
computers IP address (in the case that you are using a
Static IP network) and assign itself an IP in the same
subnet. If the IP address does not automatically appear
you may click Query IP to have the wizard select
another IP Address.
Click Next to continue.

14
9.5 - Password Setup
The HomeRemote Gateway uses your Email address as
your username and a password that you create to access
the interface. Select a password that is easy to
remember, but hard for someone to guess. A
combination of letters and numbers is recommended
(up to 15 characters). After you have selected your
Username and Password click Next.
9.6 - Software Update
The Setup Wizard will now automatically check for the
latest software for the HomeRemote Gateway. The
software updates contain new features and more
reliable software for your HomeRemote Gateway to
run on. The upgrade may take a few minutes so be
patient. Click NEXT when the update has completed.
9.7 - Clock Setup
The Clock Setup page will customize the HomeRemote
clock to your current time zone. Select the Time Zone
from the drop down menu and click Next, or manually
input your time and click Next.

15
9.8 - Wireless Home Automation Setup
Overview
After you have successfully completed the setup of
your Gateway to your home network, the Home
Control setup will begin. This page gives you an
overview of the steps necessary to customize the
HomeRemote system to your home.
9.9 - Home Layout Setup
The Home Layout setup page lets you customize the
system with the specific rooms within your house.
The HomeRemote Gateway organizes your home with
your custom room names along with the section of
your home that each room is in. For example, a
sample room would be Living Room. The section of
the Living Room would be the 1st Floor. When you
are finished adding in the rooms, click Next to move
on.
9.10 - Adding Modules and Devices
After you have setup the rooms in your home, you will
need to add devices and modules to these rooms.
Click the link to watch the Video Tutorial for detailed
instructions on how to do this.
You will need to use the included Home Planning
Guide here to document each module that you add to
your home. (This will be used later for organizing and
naming your devices and modules)

16
9.11 - Transfer Settings to the Gateway
After you have finished adding your modules and
devices to your Handheld Remote Control, the
Transfer Settings page will add the settings to your
Gateway. Click the link to watch the Video Tutorial
for detailed instructions on how to do this.
Place the Remote Control next to the Gateway and
hold the INCLUDE button down until the LEDs begin
to flash. Next push the Channel 1 ON button and
release (the Green LED should remain solid) Click the
Detect Remote button on the Wizard page to begin the
transfer.
9.12 - Customizing / Naming Modules and
Devices
When the Setup Wizard finishes transferring the
settings to your Gateway from your Handheld Remote,
the modules will be listed in the order that they were
added in the Setup Wizard customizing modules page.
For each module you will need to create a custom name
(i.e. Floor Lamp), select a Room that the module is
installed in and select a graphical Icon for the module.
When you have finished click Next to move on.
9.13 - Notification Setup
The Notification Setup page guides you through the
setup of your outgoing mail server for use with the
HomeRemote Alerts and Notifications feature. If you
do not know what your Internet Service Provider’s
Outgoing Mail Server is click the link on the Wizard
page to see the online tutorial. Next you will need to
enter any Email address (this will be the “From” Email
address used when sending text messages and E-mails)
that you have as well as a login and password if
necessary. Test your Email settings to confirm that are
correct, then click Next.

17
9.14 - Notification Setup / User Accounts
Notification accounts are used to determine where the
Alerts and Notifications from your HomeRemote
system get delivered to. There are two types of
accounts to setup: Email and SMS Text Message. To
setup an account, enter a name for the account (i.e.
Sidd’s Cell Phone) select the type of account (i.e. Cell
Phone), select the cellular carrier of the cell phone (i.e.
Verizon) and enter the 10-digit cell phone number
without dashes. After you have finished adding your
Notification user accounts click Next to move on.
9.15 - Custom Web-Address
The Internet Setup page is where you will select a
custom web address for accessing your HomeRemote
system from when using an Internet web browser (i.e.
Internet Explorer)
Select a name such as, “myhome” and click Next to
continue.
Note: If the name you have selected is already taken
the Setup Wizard will notify you and ask for another
name.
9.16 - Internet Access Setup (Router
Configuration)
The Internet Access Setup page will configure your
router to allow Internet access of your HomeRemote
System. It is recommended that you select the Novice
setup to allow the Setup Wizard to automatically
attempt to configure your router. If you are a more
advanced user and wish to customize your router
settings you may click Advanced setup to enter your
own web port or Manual to see instructions on how to
manually configure your router.

18
9.17 - Internet Access Setup (Manual Setup)
In the event that the Router configuration fails the
Wizard will display help page letting you know that the
configuration has failed. If this happens, simply click
on the link to view the Step-by-Step tutorial on how to
manually configure your home Router. The tutorial
will provide step-by-step instructions with pictures on
how to easily open a port on your router.
9.18 - Cell Link Setup
The Cell Link Setup page will guide you through the
initial installation of your cellular phone. Your
purchase of the HomeRemote Gateway gives you a free
trial of the service which allows you to control your
HomeRemote system from your cellular phone. If you
have HomeRemote Cameras installed on your network
you will be able to view them on your cell phone as
well. Click the Set Up Cell Link button to continue.
(View the Cell Link Setup portion of this Manual for
more instructions)
9.19 - TZO DDNS Service
The HomeRemote Gateway uses TZO’s award winning
DDNS service to allow you to select your custom
domain. TZO’s DDNS service also helps keep track of
your Internet IP Address so that you do not have to.
Your purchase of the HomeRemote Gateway gives you
a free trial of this service. You may choose to pre-pay
for this service to avoid any interruption in your
service. Click the Pre-Pay button to do so.

19
9.20 - Setup Complete
Your Setup is now complete. The final Wizard page
gives you the links you will use to access your
HomeRemote System from your home, the Internet as
well as your Cellular phone.
Note: When using a web-browser to access your
HomeRemote System from your home, you will need
to enter the local IP address of the Gateway instead of
your custom domain name. When viewing from the
internet remotely, you can use your custom domain
name that you selected earlier.

20
10 - Setting Up the Handheld Remote Control
The HomeRemote Handheld Remote Control is a powerful and convenient tool for use around
your home to control a single device or multiple devices with the touch of a single button. The
remote is capable of dimming lights, raising window shades or turning off electrical appliances
all at once.
The instructions below will give you detailed instructions on how to customize the remote towards your
preferences.
Other manuals for HomeRemote HRGZ1
2
Table of contents
Other Hawking Gateway manuals