hayneedle Beach House User manual

OWNER’S MANUAL
Table of Contents
Important Safeguards ...........................................................Page 2
Expanded View and Hardware......................................................... 5
Assembly Instructions............................................................... 6
Installing LP Gas Tank............................................................... 8
Operating Instructions............................................................... 9
Cleaning and Care ................................................................. 9
Product Registration ............................................................... 10
Replacement Parts . . . . . . . . . . . . . . . . . . . . . . . . . . . . . . . . . . . . . . . . . . . . . . . . . . . . . . . . . . . . . . . . 10
Limited Warranty ................................................................. 10
Troubleshooting .................................................................. 11
The use and installation of this product must conform to local codes. In absence of local codes, use the
latest edition of the National Fuel Gas Code, ANSI Z223.1/NFPA 54, or International Fuel Gas Code. This
appliance, when installed, must be electrically grounded in accordance with local codes, or in the absence
of local codes with the National Electrical Code, ANSI/NFPA 70, if applicable.
For installation in Canada - these instructions, while generally acceptable, do not necessarily comply with
the Canadian installation codes, particularly with piping above and below ground. In Canada the installation
of this appliance must comply with local codes and/or standard CAN/CGA B149.1 (installation code for
propane burning appliances and equipment).
THIS INSTRUCTION BOOKLET CONTAINS IMPORTANT SAFETY INFORMATION. PLEASE READ AND KEEP
FOR FUTURE REFERENCE.
If you are assembling this unit for someone else, give this manual to them to read and save for future reference.
WARNING: This product can expose you to chemicals, including carbon monoxide, soot, Diisononyl
Phthalate (DINP), lead and lead components which are known to the State of California to cause cancer,
birth defects, and other reproductive harm. Wash your hands after handling this product. For more
information go to www.P65Warnings.ca.gov.
Made from 75% Bagasse
(environmentally friendly sugar
cane pulp by-product)
CARBON MONOXIDE HAZARD
• This appliance can produce carbon monoxide which has
no odor.
• Using it in an enclosed space can kill you.
• Never use this appliance in an enclosed space such as a
camper, tent, car or home.
·DANGER
Patents Pending
Manufactured in China for: Mr. Bar-B-Q Products LLC
10 Hub Dr., Ste 101, Melville, NY 11747 • 1.888.398.8643 • MrBarBQProducts.com
© Mr. Bar-B-Q Products LLC
Hayneedle™ is a Registered Trademark of Mr. Bar-B-Q Products LLC GAD15293HN-ES-OM-F100
WARNING
FOR OUTDOOR USE ONLY.
WInstallation and service must be performed
by a qualified installer, service agency or
gas supplier.
WARNING
FOR YOUR SAFETY:
WIf the information in this manual is not
followed exactly, a fire or explosion may
result causing property damage, personal
injury or loss of life.
WWHAT TO DO IF YOU SMELL GAS:
• Do NOT try lighting any appliance.
• Do NOT touch any electrical switch; do
NOT use any phone in your building.
• Immediately call your gas supplier from a
neighbor’s phone.
• Follow the gas supplier’s instructions.
• If you cannot reach your gas supplier, call
the fire department.
WDo Not Use For Cooking.
WARNING
FOR YOUR SAFETY:
WINSTALLER: Leave this manual with the
appliance.
WCONSUMER: Retain this manual for future
reference.
WARNING
FOR YOUR SAFETY:
Improper installation, adjustment,
alteration, service or maintenance can
cause injury or property damage.
Read the installation, operation and
maintenance instructions thoroughly before
installing or servicing this equipment.
DANGER
FIRE OR EXPLOSION HAZARD
If you smell gas:
• Shut off gas to appliance.
• Extinguish any open flame.
• If odor continues, leave the area
immediately.
• After leaving the area, call your gas
supplier or fire department.
Failure to follow these instructions could
result in fire or explosion, which could cause
property damage, personal injury, or death.
WARNING
FOR YOUR SAFETY:
1. Do not store or use gasoline, or other
flammable vapors and liquids, in the vicinity
of this or any other appliance.
2. An LP-cylinder not connected for use shall
not be stored in the vicinity of this or any
other appliance.
DANGER
Do NOT leave this appliance unattended while
it is in operation.
“Beach House”
LP Gas Outdoor Fire Pit
Model No. GAD15293HN

Need help? 1.888.398.8643
Do not return to place of purchase.
Replacement Parts
1.888.398.8643 2
Important Safeguards
DANGER • FLAMMABLE GAS UNDER PRESSURE.
LEAKING LP-GAS MAY CAUSE A FIRE OR EXPLOSION IF IGNITED CAUSING
SERIOUS BODILY INJURY OR DEATH.
CONTACT LP GAS SUPPLIER FOR REPAIRS, OR DISPOSAL OF THIS
CYLINDER OR UNUSED LP-GAS.
WARNING • FOR OUTDOOR USE ONLY.*
DO NOT USE OR STORE CYLINDER IN A BUILDING,
GARAGE OR ENCLOSED AREA.
• Know the odor of LP-gas. If you hear, see or smell
leaking LP-gas, immediately get everyone away from
the cylinder and call the Fire Department. Do not attempt
repairs.
• Caution your LP-gas supplier to:
Be certain cylinder is purged of trapped air prior to
first filling.
Be certain not to over fill the cylinder.
Be certain cylinder requalification date is checked.
• LP-gas is heavier than air and may settle in low places
while dissipating.
• Contact with the liquid contents of cylinder will cause
freeze burns to the skin.
• Do not allow children to tamper or play with cylinder.
• When not connected for use, keep cylinder valve turned
off. Self contained appliances shall be limited to a
cylinder of 30 lb capacity or less.
• Do not use, store or transport cylinder where it would
be exposed to high temperatures. Relief valve may open
allowing a large amount of flammable gas to escape.
• When transporting, keep cylinder secured in
an upright position with cylinder valve turned off.
WHEN CONNECTING FOR USE:
• Use only in compliance with applicable codes.
• Read and follow manufacturer’s instructions.
• Consult manufacturer’s instructions concerning the
cylinder connection provided with your appliance.
• Be sure regulator vent is not pointing up.
• Turn off all valves on the appliance.
• Do not check for gas leaks with a match or open flame.
Apply soapy water at areas marked “X”. Open cylinder
valve. If bubble appears, close valve and have LP-gas
service person make needed repairs. Also, check
appliance valves and connections to make sure they do
not leak before lighting appliance.
• Light appliance(s) following manufacturer’s instructions.
• When appliance is not in use, keep the cylinder valve
closed.
WARNING:
DO NOT REMOVE, DEFACE, OR OBLITERATE THIS LABEL
*EXCEPT AS AUTHORIZED BY ANSI/NFPA 58.
DANGER. Do not store a spare LP cylinder under or near a barbecue grill, or other heat sources.
NEVER fill an LP cylinder beyond 80% full: a fire causing death or serious injury may occur.

3 LP Gas Outdoor Fire Pit
Model No.: GAD15293HN
WDo NOT use this outdoor fire pit without reading the entire owner’s
manual.
WThis appliance is for outdoor use only, and should NOT be used in a
building, garage or any other enclosed area.
WDo NOT operate, light or use this appliance within ten feet (3.05 m) of
walls, structures or buildings.
WFor residential use only. This outdoor fire pit is NOT for commercial use.
WDo NOT use this outdoor fire pit for indoor heating. TOXIC carbon
monoxide fumes can accumulate and cause asphyxiation.
WThis outdoor fire pit is safety certified for use in the United States
and/or Canada only. Do NOT modify for use in any other location.
Modification will result in a safety hazard and will void your warranty.
WApartment dwellers: Check with management to learn the requirements
and fire codes for using a liquid propane (LP) gas outdoor fire pit in your
apartment complex. If allowed, use outside on the ground floor with a
ten foot (3.05 m) clearance from any structure. Do NOT use on or under
balconies.
WThis outdoor fire pit, from the factory, is for use with LP gas only. The
conversion to or attempted use of natural gas in this outdoor fire pit is
dangerous, may cause bodily harm and will void your warranty.
WLP gas characteristics:
a. LP gas is flammable and hazardous if handled improperly. Become
aware of the characteristics before using any LP gas product.
b. LP gas is explosive under pressure, heavier than air, and settles/
pools in low areas.
c. LP gas in its natural state has no odor. For your safety, an odorant is
added that smells like rotten cabbage.
d. Contact with LP gas can cause freeze burns to skin.
WLP gas tank needed to operate. Only tanks marked “propane” may be
used.
a. The LP gas cylinder must be constructed and marked in accordance
with the U.S. Department of Transportation (D.O.T.) Specifications for
LP-Gas Cylinders, or the Standard for Cylinders, Spheres and Tubes
for the Transportation of Dangerous Goods and Commission, CAN/
CSA-B339 as applicable.
b. LP gas tank must be arranged for vapor withdrawal.
c. The LP gas tank must have a listed overfilling prevention device
(OPD) and a QCCI or Type I (CGA810) LP gas tank connection.
d. The LP gas tank must have a tank collar to protect the tank valve.
e. Never use an LP gas tank with a damaged body, valve, collar or
footing.
f. Dented or rusted LP gas tanks may be hazardous and should be
checked by your LP gas supplier prior to use.
g. The LP gas tank should not be dropped or handled roughly.
h. Tanks must be stored outdoors, out of the reach of children and
must not be stored in a building, garage or any other enclosed area.
Your LP gas tank must never be stored where temperatures can
reach over 125°F.
i. Do NOT insert any tool or foreign object into the valve outlet or
safety relief valve. You may damage the valve and cause a leak.
Leaking propane may result in explosion, fire, severe personal injury
or death.
j. Never keep an LP gas tank in a hot car or trunk. Heat will cause the
gas pressure to increase, which may open the relief valve and allow
gas to escape.
k. Place dust cap on cylinder valve outlet whenever the cylinder is not
in use. Only install the type of dust cap on the cylinder valve outlet
that is provided with the cylinder valve. Other types of caps or plugs
may result in leakage of propane.
l. Do NOT store a spare LP gas tank under or near this appliance.
m. Never fill the cylinder beyond 80 percent full.
n. A fire causing serious injury or damage to property may occur if the
above is not followed exactly.
WYour outdoor fire pit has been checked at all factory connections
for leaks. Recheck all connections as described in the “Operating
Instructions” section, as shipping can loosen connections.
WCheck for leaks even if your unit was assembled for you by someone
else.
WDo NOT operate if a gas leak is present. Gas leaks may cause a fire or
explosion.
WYou must follow all instructions in the “Checking for Leaks” section
before operating. To prevent a fire or explosion when testing for a leak:
a. Always perform a leak test before lighting this outdoor fire pit and
each time the tank is connected for use.
b. No smoking. Do NOT use or permit sources of ignition in the area
while conducting a leak test.
c. Conduct the leak test outdoors in a well-ventilated area.
d. Do NOT use matches, lighters or a flame to check for leaks.
e. The use of alcohol, prescription or non-prescription drugs may
impair the consumer’s ability to properly assemble or safely operate
the appliance.
f. Strong odors, colds, sinus congestion, etc. may prevent the
detection of propane. Use caution and common sense when testing
for leaks.
g. Do NOT use this outdoor fire pit until any and all leaks are corrected.
If you are unable to stop a leak, disconnect the LP gas supply. Call a
gas appliance serviceman or your local LP gas supplier.
WDo NOT store or use gasoline or other flammable liquids or vapors
within 25 feet (7.62 m) of this appliance.
WDo NOT use in an explosive atmosphere. Keep outdoor fire pit area clear
and free from combustible materials, gasoline and other flammable
vapors and liquids.
WThis outdoor fire pit is NOT to be operated by children.
WThis outdoor fire pit is NOT to be used in or on boats or recreational
vehicles.
WDo NOT connect to a remote gas supply.
WNever attempt to attach this outdoor fire pit to the self-contained LP gas
system of a camper trailer, motor home or house.
WAlways use in accordance with all applicable local, state and national
codes. Contact your local fire department for details on outdoor burning.
WWhen using this outdoor fire pit, exercise the same precautions you
would with any open fire.
WDo NOT burn solid fuels such as: wood, charcoal briquettes, lump
charcoal, manufactured logs, driftwood, trash, leaves, paper, cardboard,
plywood, painted/stained/pressure treated wood in this outdoor fire pit.
WIt is essential to keep the outdoor fire pit’s valve compartment, burners,
and circulating air passages clean. Inspect outdoor fire pit before each
use.
WDo NOT use this outdoor fire pit until it is COMPLETELY assembled and
all parts are securely fastened and tightened.
WDo NOT use this outdoor fire pit near automobiles, trucks, vans or
recreational vehicles.
WDo NOT use this outdoor fire pit under any overhang or near any
unprotected combustible constructions. Avoid using near or under
overhanging trees and shrubs.
WAlways use this outdoor fire pit on a hard, level, non-combustible
surface such as concrete, rock or stone. An asphalt or blacktop surface
may not be acceppit for this purpose.
WDo NOT use this outdoor fire pit for cooking.
WDANGER: Failure to follow the dangers, warnings and cautions in this manual may result in serious bodily injury or death, or in a fire or an explosion
causing damage to property.
WWARNINGS:
Important Safeguards

Need help? 1.888.398.8643
Do not return to place of purchase.
Replacement Parts
1.888.398.8643 4
WDo NOT use this appliance if any part has been under water.
Immediately call a qualified service technician to inspect the appliance
and to replace any part or control system and any gas control which
has been under water.
WDo NOT wear flammable or loose clothing when operating this outdoor
fire pit.
WDo NOT use in windy conditions.
WNever lean over this outdoor fire pit when lighting or when in use.
WDo NOT use this outdoor fire pit unless burner is securely in place.
WKeep all electrical cords away from this outdoor fire pit during use.
WCertain areas of this outdoor fire pit when in use will become too
hot to touch. To avoid burns, do NOT touch hot surfaces until the unit
has completely cooled (about 45 minutes), unless you are wearing
protective gear (such as insulated pot holders or heat-resistant gloves/
mittens).
WDo NOT leave a lit outdoor fire pit unattended, especially around children
and pets.
WChildren and adults should be alerted to the hazards of high surface
temperatures and should stay away to avoid burns or clothing ignition.
WYoung children should be carefully supervised when they are in the area
of the appliance.
WDo NOT hang or place clothing or other flammable material on or near
this appliance.
WAny guard or other protective device removed for servicing the
appliance must be replaced prior to operating the appliance.
WIf applicable, protective cover must be removed when burner is in
operation.
WDo NOT attempt to move outdoor fire pit when in use. Allow the outdoor
fire pit to cool before moving or storing.
WThis outdoor fire pit should be thoroughly cleaned and inspected on
a regular basis. Clean and inspect the hose before each use of the
appliance. If there is evidence of abrasion, wear, cuts, or leaks, the hose
must be replaced prior to the appliance being operated.
WThis outdoor fire pit should be inspected at least annually by a qualified
service person. Depending on amount of use, more frequent cleaning
may be required. Do NOT operate until all parts have been repaired or
replaced.
WUse only the regulator and hose assembly provided. Use only the
replacement regulator and hose assembly specified by Mr. Bar-B-Q
Products LLC.
WUse only Mr. Bar-B-Q Products LLC factory-authorized parts. The use of
any part that is not factory-authorized can be dangerous and will void
your warranty.
WUse only Mr. Bar-B-Q Products LLC factory-authorized fire glass /lava
rock. The use of any fire glass/lava rock that is not factory-authorized
can be dangerous and will void your warranty.
WDo NOT operate this appliance without reading “Operating Instructions”
in this manual.
WStorage of this outdoor fire pit indoors is permissible only if the tank
is disconnected, removed from the outdoor fire pit and properly stored
outdoors.
WDo NOT attempt to disconnect the gas regulator from the tank or any
gas fitting while the outdoor fire pit is in use.
WIf the outdoor fire pit is not in use, the gas must be turned off at the
supply tank.
WCAUTION: The gas pressure regulator provided with this appliance must
be used. This regulator is set for an outlet pressure of 11 inches water
column.
WThe minimum inlet gas pressure for this outdoor fire pit is 11 inches of
water column, for the purpose of input adjustment.
WThe maximum inlet gas pressure for this outdoor fire pit is 11 inches of
water column.
WBefore pressure testing, close LP gas tank valve and disconnect gas
regulator. The gas supply piping system must test at pressures equal to
or less than ½ psi (3.5 kPa).
WDo NOT sit or stand on the mantle or any part of this appliance.
WDo NOT throw anything onto the fire when the unit is in operation.
WFire glass/lava rock are very hot. Keep children or pets at a safe
distance from this appliance.
WThe opening of the tank collar should face toward the door side for easy
access.
WDo NOT store any combustible materials in the base enclosure.
WUse protective gloves when assembling this product.
WDo NOT force parts together as this can result in personal injury or
damage to the product.
WDeath, serious injury or damage to property may occur if the above is
not followed exactly.
Important Safeguards

5 LP Gas Outdoor Fire Pit
Model No.: GAD15293HN
Expanded View
Tools Required for Assembly (Not Included)
#2 Phillips Head Screwdriver 1 pc
Hardware
AScrew M5x12 Black Nickel Plated Truss Head 16 pcs
BScrew M6x12 Black Nickel Plated Truss Head 4 pcs
CScrew M6X12 Black Nickel Plated Step Head 1 pc
DAA Battery 1 pc
10
10
10
Parts List
1White Fire Glass GLS-BRN
2Table Insert 58-23-854
3Bowl Assembly* 58-23-895
4Igniter Cover* 58-23-896
5Burner* 58-23-138
6Control Knob* 58-23-139
7Battery Cap 58-23-897
8Regulator/Hose
Assembly* 58-23-922
9Mantel 58-23-855
10 Side Panel (3) 58-23-856
11 Leg A (2) 58-23-857
12 Leg B 58-23-858
13 Magnet (2)* 58-23-145
14 Leg C 58-23-859
15 Foot (4)* 58-23-147
16 Base* 58-23-148
17 LP Gas Tank Retainer
Bolt* 58-23-149
18 Door 58-23-860
19 Door Handle* 58-23-861
20 Cover 55-24-366
21 Lava Rock (not required
and sold separately)**
* Pre-assembled
W**CAUTION: Use only Mr. Bar-B-Q
Products LLC factory-authorized
fire glass/lava rock. The use of
any fire glass/lava rock that is
not factory-authorized can be
dangerous and will void your
warranty. 18
17
12
3
9
2
8
6
14
11
11
4
19
16
Sold Separately
20
15
15
13
5
7
1
15 15
21
13

Need help? 1.888.398.8643
Do not return to place of purchase.
Replacement Parts
1.888.398.8643 6
1
DO NOT RETURN TO PLACE OF PURCHASE.
For assistance, call 1.888.398.8643 toll-free. Please have your owner’s
manual and model number available for reference.
Note: The model number is printed on a label which can be found on the inside door,
back or side of the base assembly.
Assembly Tips:
1. Select an area where you will assemble this product. To protect components,
choose a smooth surface that’s free of cracks or openings.
2. Spread out all parts.
3. Tighten all hardware connections by hand first. Then, before completing each
step, go back and fully tighten all hardware. Be careful not to over-tighten.
That could damage surfaces or strip threads.
4. For best results, complete each step in the order presented.
To complete assembly you will need:
• (1) Leak detection solution (instructions on how to make the solution are
included in the “Operating Instructions” section of this manual).
• (1) Precision-filled LP gas grill tank with Acme Type 1 external threaded valve
connection (standard grill size) (not included).
Typical assembly is approximately one hour.
WCAUTION: Two (2) people will be required for assembly.
WWARNING: Failure to position the parts in accordance with
these diagrams or failure to use only parts specifically
approved with this appliance may result in property damage
or personal injury.
Assembly Instructions
3
Attach Side and Rear Panels
Note: Attach bottom screws before attaching top screws. Do not fully tighten screws
until step 5.
Ax 12
A
2
Attach Legs
WCAUTION: Two (2) people will be required to turn the outdoor
fire pit over.
WCAUTION: To avoid scratches choose a smooth surface that’s
free of cracks or openings.
Note: Do not fully tighten srews until step 4.
Bx 4
B
4
Attach Base
Note: Tighten all screws from steps 2-4.
Ax 4
A

7 LP Gas Outdoor Fire Pit
Model No.: GAD15293HN
Assembly Instructions (continued)
7
Place Fire Glass
WCAUTION: Do NOT dump fire glass out of package. Carefully
place fire glass by hand so dust does not clog burner.
WCAUTION: Use only Mr. Bar-B-Q Products LLC factory-
authorized fire glass. The use of any fire glass that is not
factory-authorized can be dangerous and will void your
warranty.
WCAUTION: Do NOT cover igniter cover.
Note: Fire glass should be 0.8-1.6 in (2-4 cm) diameter. Approx. 13.2 lbs (6 kg) of
fire glass is needed.
8
Place Table Insert
WWARNING: NEVER place table insert on outdoor fire pit while
in use.
WWARNING: NEVER place table insert on outdoor fire pit while
the outdoor fire pit is still hot.
5
Attach Door and Turn Outdoor Fire Pit Over
WCAUTION: Two (2) people will be required to turn the outdoor
fire pit upright on feet.
CX 1
C
6
Insert Battery
Note: Remove plastic wrapper before installing battery.
+
-
Dx 1
D

Need help? 1.888.398.8643
Do not return to place of purchase.
Replacement Parts
1.888.398.8643 8
Installing LP Gas Tank
To operate, you will need one precision-filled standard grill LP gas
tank with external valve threads.
WCAUTION: LP gas tank must be properly
disconnected and removed prior to moving this
outdoor fire pit.
Inserting LP Gas Tank
WWARNING: Make sure LP gas tank valve is closed.
1. Open door.
2. Loosen LP gas tank retainer bolt by turning counter-clockwise.
3. Place precision-filled LP gas tank upright into hole in outdoor fire pit base so the tank valve
is facing the gas line connection.
4. Secure tank by turning LP gas tank retainer bolt clockwise until tight.
5. Close door.
Connecting LP Gas Tank
1. Make sure the control knob is in the “ OFF” position
(Figure 3).
2. Before connecting, be sure there is no debris caught in the
head of the LP gas tank, head of the regulator valve or in the
head of the burner or burner ports.
3. Connect regulator/hose assembly to tank by turning knob
clockwise until it stops.
4. Perform leak check per “Checking for Leaks” section.
Disconnecting LP Gas Tank
1. Make sure the control knob is in the “ OFF” position
(Figure 3).
2. Before disconnecting, make sure the LP gas tank valve is
“CLOSED.”
3. Disconnect regulator/hose assembly from LP gas tank by
turning knob counterclockwise until it is loose.
WCAUTION: LP gas tank must be properly
disconnected and removed prior to moving
this outdoor fire pit.
4. Place the protective cap cover on the LP tank and store the tank outdoors in a well
ventilated area out of direct sunlight.
20 lb
9 Kg
17.9 in. / 45.5 cm
12.2 in. / 31 cm
OPTIONAL ITEM SOLD SEPARATELY
10
Place Lava Rocks
WCAUTION: When switching from fire glass, remove all fire
glass before placing lava rock.
WCAUTION: Do NOT dump lava rocks out of package. Carefully
place lava rocks by hand so dust does not clog burner.
WCAUTION: Use only Mr. Bar-B-Q Products LLC factory-
authorized lava rock. The use of any lava rock that is not
factory-authorized can be dangerous and will void your
warranty.
WCAUTION: Do NOT cover igniter cover.
Note: Lava rocks should be 0.8-2.0 in. (2-5 cm) diameter. Approx. 6.6 lbs. (3.0 kg)
of lava rocks are needed.
9
Store Table Insert
Hang the table insert on the inner side of door.
WWARNING: NEVER place table insert onto outdoor fire pit while
in use.
WWARNING: NEVER take out and place table insert onto outdoor
fire pit while the outdoor fire pit is still hot.
Assembly Instructions (continued)

9 LP Gas Outdoor Fire Pit
Model No.: GAD15293HN
1.
2.
3.
4.
5. Connect LP gas tank per “Installing LP Gas Tank” section.
6. Slowly turn LP gas tank valve 1 revolution to “OPEN.”
7. Push and turn control knob to (HIGH). Continue to hold the control knob in to light.
8. After the fire pit lights, continue to hold the control knob in for 20 seconds to heat the
thermocouple, a safety device that stops the gas flow when a firepit is not lit. Holding the
knob in for 20 seconds warms it up so the gas flow will continue.
9. After 20 seconds, release and turn control knob counterclockwise to adjust flame to
desired height.
10. After three attempts, if ignition does not occur, turn the burner control knob to “ OFF.”
11. Wait 5 minutes, fan with a newspaper or magazine, and repeat lighting procedure.
12. If igniter does not light burner:
a. Wearing heat-resistant gloves, position a lit long match or lit long butane lighter near
the pilot housing.
b. Push and turn control knob to (HIGH).
c. Remove match/lighter once burner is lit.
WCAUTION: After lighting - using a fire pit tool and heat-resistant
gloves, carefully move the fire glass/lava rock back to their proper
position, being careful to avoid the flame.
13. After lighting, observe the burner flame. Make sure all burner ports are lit and flame height
matches illustration (Figure 5).
WCAUTION: If ignition does not occur in 5 seconds, turn control knob
to “ OFF,” wait 5 minutes, fan with a newspaper or magazine, and
repeat lighting procedure.
Turning Off
1. Turn LP gas tank valve to “CLOSED.”
2. Turn control knob to the “ OFF” position.
Note: A “poof” sound is normal as the last of the LP gas is burned.
3. Disconnect LP gas tank per “Disconnecting LP Gas Tank” section.
Cleaning and Care
WCAUTION:
1. All cleaning and maintenance should be done when outdoor fire pit
is cool and with the fuel supply disconnected.
2. Do NOT clean any outdoor fire pit part in a self-cleaning oven. The
extreme heat will damage the finish.
3. Do NOT enlarge valve orifices or burner ports when cleaning the
valves or burners.
4. All components on this outdoor fire pit can become hot.
5. Do NOT clean this outdoor fire pit until all components are cool.
Notices
1. This outdoor fire pit should be thoroughly cleaned and inspected on a regular basis.
2. Abrasive cleaners will damage this product.
3. NEVER use oven cleaner to clean any part of this outdoor fire pit.
Before Each Use:
1. Keep the outdoor fire pit area clear and free from any combustible materials, gasoline, and
other flammable vapors and liquids.
2. Do NOT obstruct the flow of the combustion of LP gas and the ventilation of air.
3. Keep the ventilation opening(s) of the LP gas tank area free and clear from debris.
4. Visually check the burner flames to make sure your outdoor fire pit is working properly
(Figure 5).
5. See below for proper cleaning instructions.
6. Check all gas connections for leaks.
7. Check components for any signs of damage or rust.
8. Check for obstructions of airflow to the burner. Spiders, insects and webs can clog the
burner/venturi tube. A clogged burner/venturi tube can lead to a fire.
9. If damage to any component is detected, do NOT operate until repairs are completed.
Cleaning Surfaces
1. Wipe surfaces clean with mild dishwashing detergent or baking soda mixed with water.
2. For stubborn stains, use a citrus-based cleaner and a nylon scrubbing brush.
3. Rinse clean with water.
4. Allow to air dry.
Cleaning Burner
WWARNING: All cleaning should be done when appliance is cool and
with the fuel supply disconnected per “Disconnecting LP Gas Tank.”
1. Remove the fire glass/lava rock.
2. Remove all dirt/dust from the burner, igniter cover and venturi area with a small brush and/
or compressed air.
Checking for Leaks
WWARNING: Before using this outdoor
fire pit, make sure you have read,
understand and are following
all information provided in the
“Important Safeguards” section
on page 2. Failure to follow those
instructions can cause death, serious
injury or property damage.
W
WWARNING: The burner must be
replaced prior to the appliance being
put into operation if it is evident
that the burner is damaged. The
replacement burner shall be that
specified by the manufacturer.
Burner Connections
1. Make sure the regulator hose and valve
connections are securely fastened to the burner
and the tank.
2. Visually check the connection between the
burner/venturi tube and orifice.
3. Make sure the burner/venturi tube fits over the
orifice.
WWARNING: Failure to inspect
this connection or follow these
instructions could cause a fire or an
explosion which can cause death,
serious bodily injury or damage to
property.
4. Please refer to diagram for proper installation
(Figures 1 and 2).
5. If the burner/venturi tube does not rest flush
to the orifice, as shown, please contact
1.888.398.8643 for assistance.
Tank/Gas Line Connection
1. Make 2-3 oz. of leak detection solution by
mixing one part liquid dishwashing soap with
three parts water.
2. Make sure control knob is in the “ OFF”
position (Figure 3).
3. Connect LP gas tank per “Installing LP Gas
Tank” section.
4. Turn LP gas tank valve to “OPEN.”
5. Spoon several drops of solution, or use a squirt
bottle, at all “X” locations (Figures 1 and 2).
a. If any bubbles appear, turn LP gas tank valve
to “CLOSED,” reconnect and re-test.
b. If you continue to see bubbles after
several attempts, turn LP gas tank valve to
“CLOSED” and disconnect LP gas tank, per
“Disconnecting LP Gas Tank” section. Contact
1.888.398.8643 for assistance.
c. If no bubbles appear after one minute, turn
LP gas tank valve to “CLOSED,” wipe away
solution and proceed.
Lighting
WDANGER: Failure to follow these
lighting instructions may result in
serious bodily injury or death, or in a fire or an explosion causing
damage to property.
WWARNING: NEVER light the burner with the cover on the outdoor fire
pit.
WCAUTION: Keep outdoor gas appliance area clear and free from
combustible materials, gasoline and other flammable vapors and
liquids.
WCAUTION: Do NOT obstruct the flow of combustion and ventilation air.
WCAUTION: Check and clean burner/venturi tubes for insects and insect
nests. A clogged tube can lead to a fire.
1. Make sure all labels, packaging and protective films have been removed from the outdoor
fire pit.
2. Check for obstructions of airflow to the burner. Spiders, insects and webs can clog the
burner/venturi tube. A clogged burner tube can lead to a fire.
3. Make sure control knob is in the “ OFF” position (Figure 3).
4. Clear small area of lava rocks / fire glass away from the igniter cover (Figure 4).
Operating Instructions
Figure 1
LP Gas
Connection
LP Gas Valve
with Orifice
Figure 2
X
XX
XX
Figure 3
OFF / APAGADO
Figure 4
K
F
AA
Figure 5
15.75 in - 23.6 in
40 – 60 cm
Operating Instructions (continued)

Need help? 1.888.398.8643
Do not return to place of purchase.
Replacement Parts
1.888.398.8643 10
1. Visually inspect the burner for any rust or damage. If damage is found, replace necessary
parts with new from the manufacturer.
2. Clean any clogged burner ports with a stiff wire (such as an opened paper clip).
3. Carefully replace the fire glass/lava rock being cautious not to block the igniter cover.
Before Storing
1. Turn LP gas tank valve to “CLOSED.”
2. Turn control knob to the “ OFF” position.
Note: A “poof” sound is normal as the last of the gas is burned.
3. Disconnect LP gas tank per “Disconnecting LP Gas Tank” section.
4. Clean all surfaces.
5. Lightly coat the burner with cooking oil to prevent excess rusting.
WCAUTION: NEVER place cover on hot outdoor fire pit.
6. If storing the outdoor fire pit indoors, cover the outdoor fire pit and store in a cool dry
location away from children and pets.
7. If storing the outdoor fire pit outdoors, cover the outdoor fire pit with a cover for protection
from the weather.
Product Registration
For faster warranty service, please register your product immediately. To register, email
call 1.888.398.8643.
Replacement Parts
For replacement parts, call 1.888.398.8643.
Limited Warranty
Mr. Bar-B-Q Products LLC warrants to the original retail purchaser of this product, and to no
other person, that if this product is assembled, maintained, and operated in accordance with
the printed instructions accompanying it, then for a period of one (1) year from the date of
purchase, all parts in such product shall be free from defects in material and workmanship.
Mr. Bar-B-Q Products LLC may require reasonable proof of your date of purchase. Therefore,
you should retain your sales slip or invoice. This Limited Warranty shall be limited to the repair
or replacement of parts, which prove defective under normal use and service and which
Mr. Bar-B-Q Products LLC shall determine in its reasonable discretion upon examination to be
defective. Before returning any parts, you should contact Mr. Bar-B-Q Products LLC Customer
Care Department using the contact information listed below. If Mr. Bar-B-Q Products LLC
confirms, after examination, a defect covered by this Limited Warranty in any returned part,
and if Mr. Bar-B-Q Products LLC approves the claim, Mr. Bar-B-Q Products LLC will replace
such defective part without charge. If you return defective parts, transportation charges must
be prepaid by you. Mr. Bar-B-Q Products LLC will return replacement parts to the original retail
purchaser, freight or postage prepaid.
This Limited Warranty does not cover any failures or operating difficulties due to accident,
abuse, misuse, alteration, misapplication, improper installation or improper maintenance or
service by you or any third party, or failure to perform normal and routine maintenance on
the product as set out in this owner’s manual. In addition, the Limited Warranty does not cover
damage to the finish, such as scratches, dents, discoloration, rust or other weather damage,
after purchase.
This Limited Warranty is in lieu of all other express warranties. Mr. Bar-B-Q Products LLC
disclaims all warranties for products that are purchased from sellers other than authorized
retailers or distributors, including the warranty of merchantability or the warranty of
fitness for a particular purpose. Mr. Bar-B-Q Products LLC ALSO DISCLAIMS ANY AND ALL
IMPLIED WARRANTIES, INCLUDING WITHOUT LIMITATION THE IMPLIED WARRANTIES OF
MERCHANTABILITY AND FITNESS FOR A PARTICULAR PURPOSE. Mr. Bar-B-Q Products LLC
SHALL HAVE NO LIABILITY TO PURCHASER OR ANY THIRD PARTY FOR ANY SPECIAL, INDIRECT,
PUNITIVE, INCIDENTAL, OR CONSEQUENTIAL DAMAGES. Mr. Bar-B-Q Products LLC further
disclaims any implied or express warranty of, and assumes no responsibility for, defects in
workmanship caused by third parties.
This Limited Warranty gives the purchaser specific legal rights; a purchaser may have other
rights depending upon where he or she lives. Some jurisdictions do not allow the exclusion or
limitation of special, incidental or consequential damages, or limitations on how long a warranty
lasts, so the above exclusion and limitations may not apply to everyone.
Mr. Bar-B-Q Products LLC does not authorize any person or company to assume for it any
other obligation or liability in connection with the sale, installation, use, removal, return, or
replacement of its equipment, and no such representations are binding on
Mr. Bar-B-Q Products LLC.
Mr. Bar-B-Q Products LLC
10 Hub Dr., Ste 101, Melville, NY 11747 USA
1.888.398.8643
Cleaning and Care (continued)

11 LP Gas Outdoor Fire Pit
Model No.: GAD15293HN
Troubleshooting
Problem Possible Cause Prevention/Cure
Burner will not light using igniter
LP gas tank valve is closed Make sure regulator is securely attached to the LP gas tank per “Installing LP
Gas Tank,” then turn LP gas tank valve to “OPEN”
LP gas tank is low or empty Exchange, refill or replace LP gas tank
LP gas leak
1. Turn LP gas tank valve to “CLOSED”
2. Wait 5 minutes for gas to clear
3. Follow “Checking for Leaks” section
Battery needs to be changed Replace the “AA” battery (follow assembly step for inserting battery)
Electrode and burners are wet Wipe dry with cloth
Electrode cracked or broken - sparks at crack Replacement part(s) may be needed - contact Customer Care at 888.398.8643
Wire loose or disconnected Reconnect wire or replacement part(s) may be needed - contact Customer Care
at 888.398.8643
Wire is shorting (sparking) between igniter and electrode Replacement part(s) may be needed - contact Customer Care at 888.398.8643
Thermocouple is not operating correctly
1. Disconnect LP Gas tank per “Disconnect LP Gas Tank” section.
2. Clean area around thermocouple.
3. Connect LP gas tank per “Connect LP Gas Tank” section.
4. Relight per “Lighting” section.
5. If the outdoor fire pit is still not working, please contact Customer Care at
888.398.8643 for additional assistance.
Bad igniter Replacement part(s) may be needed - contact Customer Care at 888.398.8643
Burner will not light with match
No gas flow
Check if LP gas tank is empty
a. If empty, exchange, refill or replace LP gas tank
b. If LP gas tank is not empty, refer to “Sudden drop in gas flow or
reduced flame height” (see below)
LP gas tank is low or empty Exchange, refill or replace LP gas tank
LP gas leak
1. Turn LP gas tank valve to “CLOSED”
2. Wait 5 minutes for gas to clear
3. Follow “Checking for Leaks” section
Coupling nut and regulator not fully connected Turn the coupling nut about one-half to three-quarters additional turn until solid
stop. Tighten by hand only - do NOT use tools.
Obstruction of gas flow 1. Clear burner/venturi tube
2. Check for bent or kinked hose
Disengagement of burner to valve Re-engage burner and valve
Spider webs or insect nest in burner/venturi tube Clean burner/venturi tube
Thermocouple is not operating correctly
1. Disconnect LP Gas tank per “Disconnect LP Gas Tank” section.
2. Clean area around thermocouple.
3. Connect LP gas tank per “Connect LP Gas Tank” section.
4. Relight per “Lighting” section.
5. If the outdoor fire pit is still not working, please contact Customer Care at
888.398.8643 for additional assistance.
Burner ports clogged or blocked Clean burner ports
Sudden drop in gas flow or reduced flame height
Out of gas Exchange, refill or replace LP gas tank
Overfilling prevention device may have been activated
1. Turn control knob to “ OFF”
2. Wait 30 seconds and light outdoor fire pit per “Lighting” section
3. If flames are still too low, reset the overfilling prevention device:
a. Turn control knob “ OFF”
b. Turn LP gas tank valve to “CLOSED”
c. Disconnect LP gas tank from regulator
d. Turn control knob to (HIGH)
e. Wait two minutes
f. Turn control knob to “ OFF”
g. Reconnect LP gas tank to regulator and leak check connections, being
careful not to fully open valve
h. Light outdoor fire pit per “Lighting” section
Irregular flame pattern, flame does not run the
full length of burner Burner ports are clogged or blocked Clean burner ports
Flame is yellow or orange
New burner may have residual manufacturing oils Burn outdoor fire pit for 15 minutes and reinspect
Spider webs or insect nest in burner/venturi tube Clean burner/venturi tube
Poor alignment of valve to burner/venturi tube Ensure burner/venturi tube is properly engaged with valve
Flame goes out
High or gusting winds Do not use outdoor fire pit in high winds
Low on LP gas Exchange, refill or replace LP gas tank
Excess flow valve tripped Refer to “Sudden drop in gas flow or reduced flame height”
Thermocouple is not operating correctly
1. Disconnect LP Gas tank per “Disconnect LP Gas Tank” section.
2. Clean area around thermocouple.
3. Connect LP gas tank per “Connect LP Gas Tank” section.
4. Relight per “Lighting” section.
5. If the outdoor fire pit is still not working, please contact Customer Care at
888.398.8643 for additional assistance.
Flashback (fire in venturi/burner tube(s)) Burner and/or burner/venturi tube is blocked Clean burner and/or burner/venturi tube
Flame seems to lose heat when burning in cold
weather - temperature below 50ºF
Ice has built up on the outside of the LP gas tank
because the vaporization process is too slow
1. Turn off per “Turning Off” section
2. Replace with a spare LP gas tank
3. Reconnect LP gas tank per “Installing LP Gas Tank” section
4. Follow “Checking for Leaks” section
5. Light outdoor fire pit per “Lighting” section
For assistance, please visit us at MrBarBQProducts.com or call 1.888.398.8643.

13 Chimenea para exteriores a gas propano líquido
Modelo no. : GAD15293HN

¿Necesita ayuda? Llame al 1.888.398.8643.
No vuelva al lugar de compra. Para piezas de repuesto
1.888.398.8643 12
Caída repentina del flujo de gas o altura de la
llama insuficiente.
Sin gas Cambie, reemplace o vuelva a llenar el tanque de propano.
Flujo excesivo: puede que se haya activado el dispositivo
de seguridad de exceso de flujo.
1. Gire la perilla de control a la posición “ APAGADO ”.
2. Espere 30 segundos y encienda la chimenea siguiendo las instrucciones
descritas en la sección “Encendido” del manual.
3. Si las llamas continúan siendo demasiado bajas reinicie el dispositivo de
seguridad de flujo excesivo:
a. Gire la(s) perilla(s) de control a la posición “ APAGADO ”.
b. Cierre el gas girando la válvula del tanque de propano líquido a la
posición “CLOSED” (cerrado).
c. Desconecte el regulador.
d. Gire las perillas de control a la posición (alto).
e. Espere 1 minuto.
f. Gire las perillas de control a la posición “ APAGADO ”
g. Vuelva a conectar el regulador y verifique las conexiones para
averiguar que no haya fugas. Tenga cuidado, asegúrese de no abrir la
válvula completamente.
h. Encienda la chimenea para exteriores conforme a las instrucciones de
encendido.
Problema Causa posible Prevención/solución
Falta de uniformidad en la llama, la llama no
cubre toda la longitud del quemador. Los orificios del quemador están atascados u obstruidos. Limpie los orificios del quemador.
La llama es de color amarillo o anaranjado.
Puede que el nuevo quemador tenga aceites residuals
del proceso de fabricación.
Haga funcionar la chimenea para exteriores durante 15 minutos y vuelva a
inspeccionarla.
Telarañas o nidos de insectos en el tubo/venturi del
quemador. Limpie el tubo/venturi del quemador.
La válvula no queda correctamente alineada con el
venturi del quemador.
Asegúrese de que el tubo/venturi del quemador está conectado adecuadamente
a la válvula.
La llama se apaga.
Vientos fuertes o racheados. No use la chimenea para exteriores cuando hay vientos fuertes.
Nivel de gas del tanque de propano bajo. Cambie, reemplace o vuelva a llenar el tanque de propano.
Puede que se haya activado el dispositivo de seguridad
de exceso de flujo.
Consulte la sección “Caída repentina del flujo de gas o altura de llama
insuficiente” de esta página.
El termopar no funciona correctamente
1. Desconecte el tanque de gas propano líquido siguiendo las instrucciones
descritas en la sección “Desconectar el tanque de gas propano líquido”.
2. Limpie el área alrededor del termopar
3. Conecte el tanque de gas propano líquido siguiendo las instrucciones
descritas en la sección “Conectar el tanque de gas propano líquido”.
4. Vuelva a encender siguiendo las instrucciones de la sección “Encendido”.
5. Si la chimenea para exteriores no funciona todavía, sírvase comunicarse
con el Servicio al Cliente llamando al 888.398.8643 para pedir ayuda.
Fogonazo (fuego dentro del venturi/tubo(s) del
quremador.
El quemador y/o el tubo venturi del quemador está
Bloqueado. Limpie el tubo/venturi del quemador.
La llama pierde calor cuando la temperatura
exterior baja debajo de 50ºF (10ºC)
Puede que haya escarcha en el exterior del tanque si el
proceso de vaporización es demasiado lento.
1. Apáguela siguiendo las instrucciones de la sección “Para apagar”.
2. Cambie, reemplace o vuelva a llenar el tanque de propano.
3. Vuelva a conectar el tanque de propano siguiendo las instrucciones
descritas en la sección “Instalar el tanque de propano” del manual.
4. Siga las indicaciones de “Detección de fugas” descritas en el manual del
usuario.
5. Encienda la chimenea para exteriores conforme a las instrucciones de
encendido.
Para ayuda más detallada, sírvase visitarnos en MrBarBQProducts.com o llamarnos al 1.888.398.8643.
Resolución de problemas (continuación)

11 Chimenea para exteriores a gas propano líquido
Modelo no. : GAD15293HN
Resolución de problemas
Problema Causa posible Prevención/solución
El quemador no se enciende utilizando el
encendedor.
La válvula del tanque de gas propano está cerrada.
Asegúrese de que el regulador esté conectado de manera segura en el tanque
de gas propano siguiendo las instrucciones descritas en la sección “Instalar
el tanque de propano” y luego gire la válvula del tanque de gas propano a la
posición “OPEN” (abierta)
Nivel de gas del tanque de propano bajo o tanque vacío. Cambie, reemplace o vuelva a llenar el tanque de propano.
Fuga de gas propano
1. Cierre la válvula del tanque de gas propano líquido girándola a la posición
“CLOSED” (cerrado).
2. Espere 5 minutos para que se disperse el gas.
3. Siga las indicaciones de “Inspección de fugas” descritas en el manual del
usuario.
Hay que cambiar la pila. Cambie la pila “AA” (siga el paso de armado para insertar la batería).
Los electrodos y los quemadores están mojados. Séquelos con un paño.
Electrodo agrietado o roto; chispas en las grietas. Pueden necesitarse piezas de repuesto. Comuníquese con el Servicio al Cliente
al 888.398.8643
Cable suelto o desconectado. Puede ser necesario volver a conectar el cable u obtener piezas de repuesto.
Comuníquese con el Servicio al Cliente al 888.398.8643
El cable tiene un cortocircuito (chispeo) entre el encendedor
y el electrodo.
Pueden necesitarse piezas de repuesto. Comuníquese con el Servicio al Cliente
al 888.398.8643
El termopar no funciona correctamente
1. Desconecte el tanque de gas propano líquido siguiendo las instrucciones
descritas en la sección “Desconectar el tanque de gas propano líquido”.
2. Limpie el área alrededor del termopar
3. Conecte el tanque de gas propano líquido siguiendo las instrucciones
descritas en la sección “Conectar el tanque de gas propano líquido”.
4. Vuelva a encender siguiendo las instrucciones de la sección “Encendido”.
5. Si la chimenea para exteriores no funciona todavía, sírvase comunicarse
con el Servicio al Cliente llamando al 888.398.8643 para pedir ayuda.
Encendedor defectuoso. Pueden necesitarse piezas de repuesto. Comuníquese con el Servicio al Cliente
al 800.762.1142
El quemador no se enciende con una cerilla.
No hay flujo de gas.
Compruebe si el tanque de propano líquido está vacío.
a. Si está vacío, cámbielo, reemplácelo o vuelva a llenarlo.
b. Si el tanque de propano líquido no está vacío, consulte la sección
“Caída repentina del flujo de gas o altura de llama insuficiente” de
esta página.
Nivel de gas del tanque de propano bajo o tanque vacío. Cambie, reemplace o vuelva a llenar el tanque de propano.
Fuga de gas propano
1. Cierre la válvula del tanque de gas propano líquido girándola a la posición
“CLOSED” (cerrado).
2. Espere 5 minutos para que se disperse el gas.
3. Siga las indicaciones de “Detección de fugas” descritas en el manual del
usuario.
La tuerca de acoplamiento no está conectada por
completo.
Gire la tuerca de acoplamiento entre media vuelta y tres cuartos de vuelta hasta
que haga tope con firmeza. Apriete únicamente a mano, SIN utilizar ninguna
herramienta.
Obstrucción del flujo de gas. 1. Limpie los tubos del quemador.
2. Verifique que la manguera no esté torcida o doblada.
Desacoplamiento del quemador a la válvula. Vuelva a conectar el quemador y la válvula.
Telarañas o nidos de insectos en el venturi. Vuelva a conectar el quemador y la válvula.
El termopar no funciona correctamente
1. Desconecte el tanque de gas propano líquido siguiendo las instrucciones
descritas en la sección “Desconectar el tanque de gas propano líquido”.
2. Limpie el área alrededor del termopar
3. Conecte el tanque de gas propano líquido siguiendo las instrucciones
descritas en la sección “Conectar el tanque de gas propano líquido”.
4. Vuelva a encender siguiendo las instrucciones de la sección “Encendido”.
5. Si la chimenea para exteriores no funciona todavía, sírvase comunicarse
con el Servicio al Cliente llamando al 888.398.8643 para pedir ayuda.
Orificios del quemador atascados u obstruidos. Limpie los orificios del quemador.

¿Necesita ayuda? Llame al 1.888.398.8643.
No vuelva al lugar de compra. Para piezas de repuesto
1.888.398.8643 10
1.
2.
3.
4. Visualmente examine la llama del quemador para estar seguro de que la chimenea para
exteriores está funcionando adecuadamente (vea la Figura 11).
5. Vea a continuación las instrucciones de limpieza apropiadas.
6. Revise todas las conexiones de gas para asegurarse de que no hayan fugas.
7. Revise los componentes para asegurarse de que no haya daño u óxido.
8. Verifique que no hayan obstrucciones en el quemador. Las arañas, insectos y telas de
araña pueden obstruir el quemador/tubo venturi. Un quemador/tubo venturi obstruido
puede causar incendio.
9. Si se detecta daño en cualquiera de los componentes, NO haga funcionar el artefacto
hasta que se haya reparado.
Limpieza de las superficies
1. Limpie las superficies con un detergente suave de lavado de platos o con soda de hornear
mezclado con agua.
2. En superficies de limpieza difícil, use un desengrasador a base de cítricos y un cepillo de
nilón.
3. Enjuague las superficies con agua limpia.
4. Deje las superficies secar al aire libre.
Limpieza del quemador
WADVERTENCIA: La limpieza siempre debe hacerse cuando el equipo
se ha enfriado y con el suministro de combustible desconectado
conforme a la sección “Desconectar el tanque de gas propano
líquido”.
1. Retire las piedras de vidrio o de lava.
2. Limpie toda la suciedad y polvo del quemador, de la cubierta del encendedor y del área del
tubo venturi con un cepillo pequeño y/o con aire comprimido.
3. Visualmente inspeccione el quemador para determinar si está oxidado o dañado. Si
encuentra daño, reemplace las piezas necesarias con piezas nuevas del fabricante.
4. Limpie las salidas obstruidas de los quemadores con un cable rígido (por ejemplo con un
sujetapapeles abierto).
5. Cuidadosamente reemplace las piedras de vidrio o de lava, teniendo cuidado de no
bloquear la tapa del encendedor.
Antes de almacenar
1. Cierre la válvula del tanque de gas propano líquido girándola a la posición “CLOSED”
(cerrado).
2. Gire la perilla de control a la posición “ APAGADO”
Nota: El ruido de “puf” es normal cuando el residuo de gas propano licuado en la línea se
ha extinguido.
3. Desconecte el tanque de propano de acuerdo con las instrucciones descritas en la sección
“Desconectar el tanque de gas propano líquido” y guárdelo en un lugar apropiado.
4. Limpie las superficies.
5. Cubra con una capa delgada de aceite de cocinar el quemador para evitar que se oxide
excesivamente.
WPRECAUCIÓN: NUNCA coloque la cubierta sobre la chimenea de
exteriores caliente.
6. Si guarda la chimenea de exteriores en interiores, cúbrala y guárdela en un lugar fresco y
seco lejos de los niños y las mascotas.
7. Si guarda la chimenea de exteriores al aire libre, cúbrala con una cubierta a fin de
protegerla contra la intemperie.
Limpieza y cuidado (continuación) Registro del producto
Para recibir un servicio de garantía más rápido, sírvase registrar su producto inmediatamente.
número de teléfono y su recibo de compra o llame al 1.888.398.8643.
Piezas de repuesto
Para ordenar piezas de repuesto, sírvase llamar al 1.888.398.8643.
Garantía limitada
Mr. Bar-B-Q Products LLC garantiza al comprador original al detal de este producto, y a
ninguna otra persona, que si la unidad se arma y opera de acuerdo con las instrucciones
impresas que la acompañan y por un período de un (1) año a partir de la fecha de compra,
todas las piezas de este producto estarán libres de defectos en material y mano de obra.
Mr. Bar-B-Q Products LLC podrá requerir prueba razonable de la fecha de compra. Por lo tanto,
usted debe conservar el recibo de venta o la factura. Esta garantía limitada estará limitada a
la reparación o reemplazo de las piezas que resulten defectuosas en condiciones de servicio
y uso normal y las que un examen indique, a satisfacción de Mr. Bar-B-Q Products LLC, que
están defectuosas. Antes de devolver cualquier pieza, comuníquese con el Departamento
de Servicio al Cliente de Mr. Bar-B-Q Products LLC. Si Mr. Bar-B-Q Products LLC confirma
el defecto y aprueba el reclamo, Mr. Bar-B-Q Products LLC decidirá reemplazar tales partes
sin costo alguno. Si se le pide que devuelva las partes defectuosas, los costos de transporte
deberán ser prepagados. Mr. Bar-B-Q Products LLC devolverá las partes al cliente con costo de
transporte o envío prepagados.
Esta garantía limitada no cubre fallas o dificultades de operación debidas a accidente, abuso,
mal uso, alteración, empleo en usos inapropiados, instalación defectuosa o mantenimiento
o servicio inapropiado o falla en la realización de mantenimiento normal y rutinario como
se prescribe en este manual del usuario. Además, la garantía limitada no cubre daños al
terminado de la unidad, tales como rasguños, abolladuras, descoloridos, oxidaciones y otros
daños causados por la intemperie después de la compra de la unidad.
Esta garantía limitada reemplaza cualquier otra garantía. Mr. Bar-B-Q Products LLC no
asume ninguna responsabilidad por garantías de productos vendidos por quienes no sean
distribuidores o vendedores al detal autorizados. Esta exención de responsabilidad incluye
cualquier garantía de comerciabilidad o la garantía de aptitud para un propósito en particular.
MR. BAR-B-Q PRODUCTS LLC NO SE HACE RESPONSABLE POR NINGUNA GARANTIA IMPLICITA
INCLUYENDO, SIN LIMITACIONES, LAS GARANTIAS IMPLICITAS DE COMERCIABILIDAD Y
ADAPTABILIDAD A UN PROPOSITO PARTICULAR. MR. BAR-B-Q PRODUCTS LLC NO ASUME
RESPONSABILIDAD ANTE EL COMPRADOR O ANTE CUALQUIER TERCERA PERSONA POR DAÑOS
ESPECIALES, INDIRECTOS, PUNITIVOS, INCIDENTALES O CONSEQUENCIALES.
Mr. Bar-B-Q Products LLC, además, no asume responsabilidad por garantías implícitas o
expresas por defectos de mano de obra causados por terceras personas.
Esta garantía limitada le da al comprador derechos legales específicos y el comprador puede
tener otros derechos según el lugar donde el comprador o la compradora residan. Ciertas
jurisdicciones no permiten limitaciones en cuanto a la duración de una garantía implícita, de
manera que esta limitación puede no ser aplicable a usted.
Mr. Bar-B-Q Products LLC no autoriza a ninguna persona o compañía para asumir por
Mr. Bar-B-Q Products LLC cualquier otra obligación a responsabilidad relacionada con la venta,
instalación, uso, remoción, devolución o reemplazo de este equipo y cualquier representación
de esta naturaleza no obliga a Mr. Bar-B-Q Products LLC.
Mr. Bar-B-Q Products LLC
10 Hub Dr., Ste 101, Melville, NY 11747 USA
1.888.398.8643

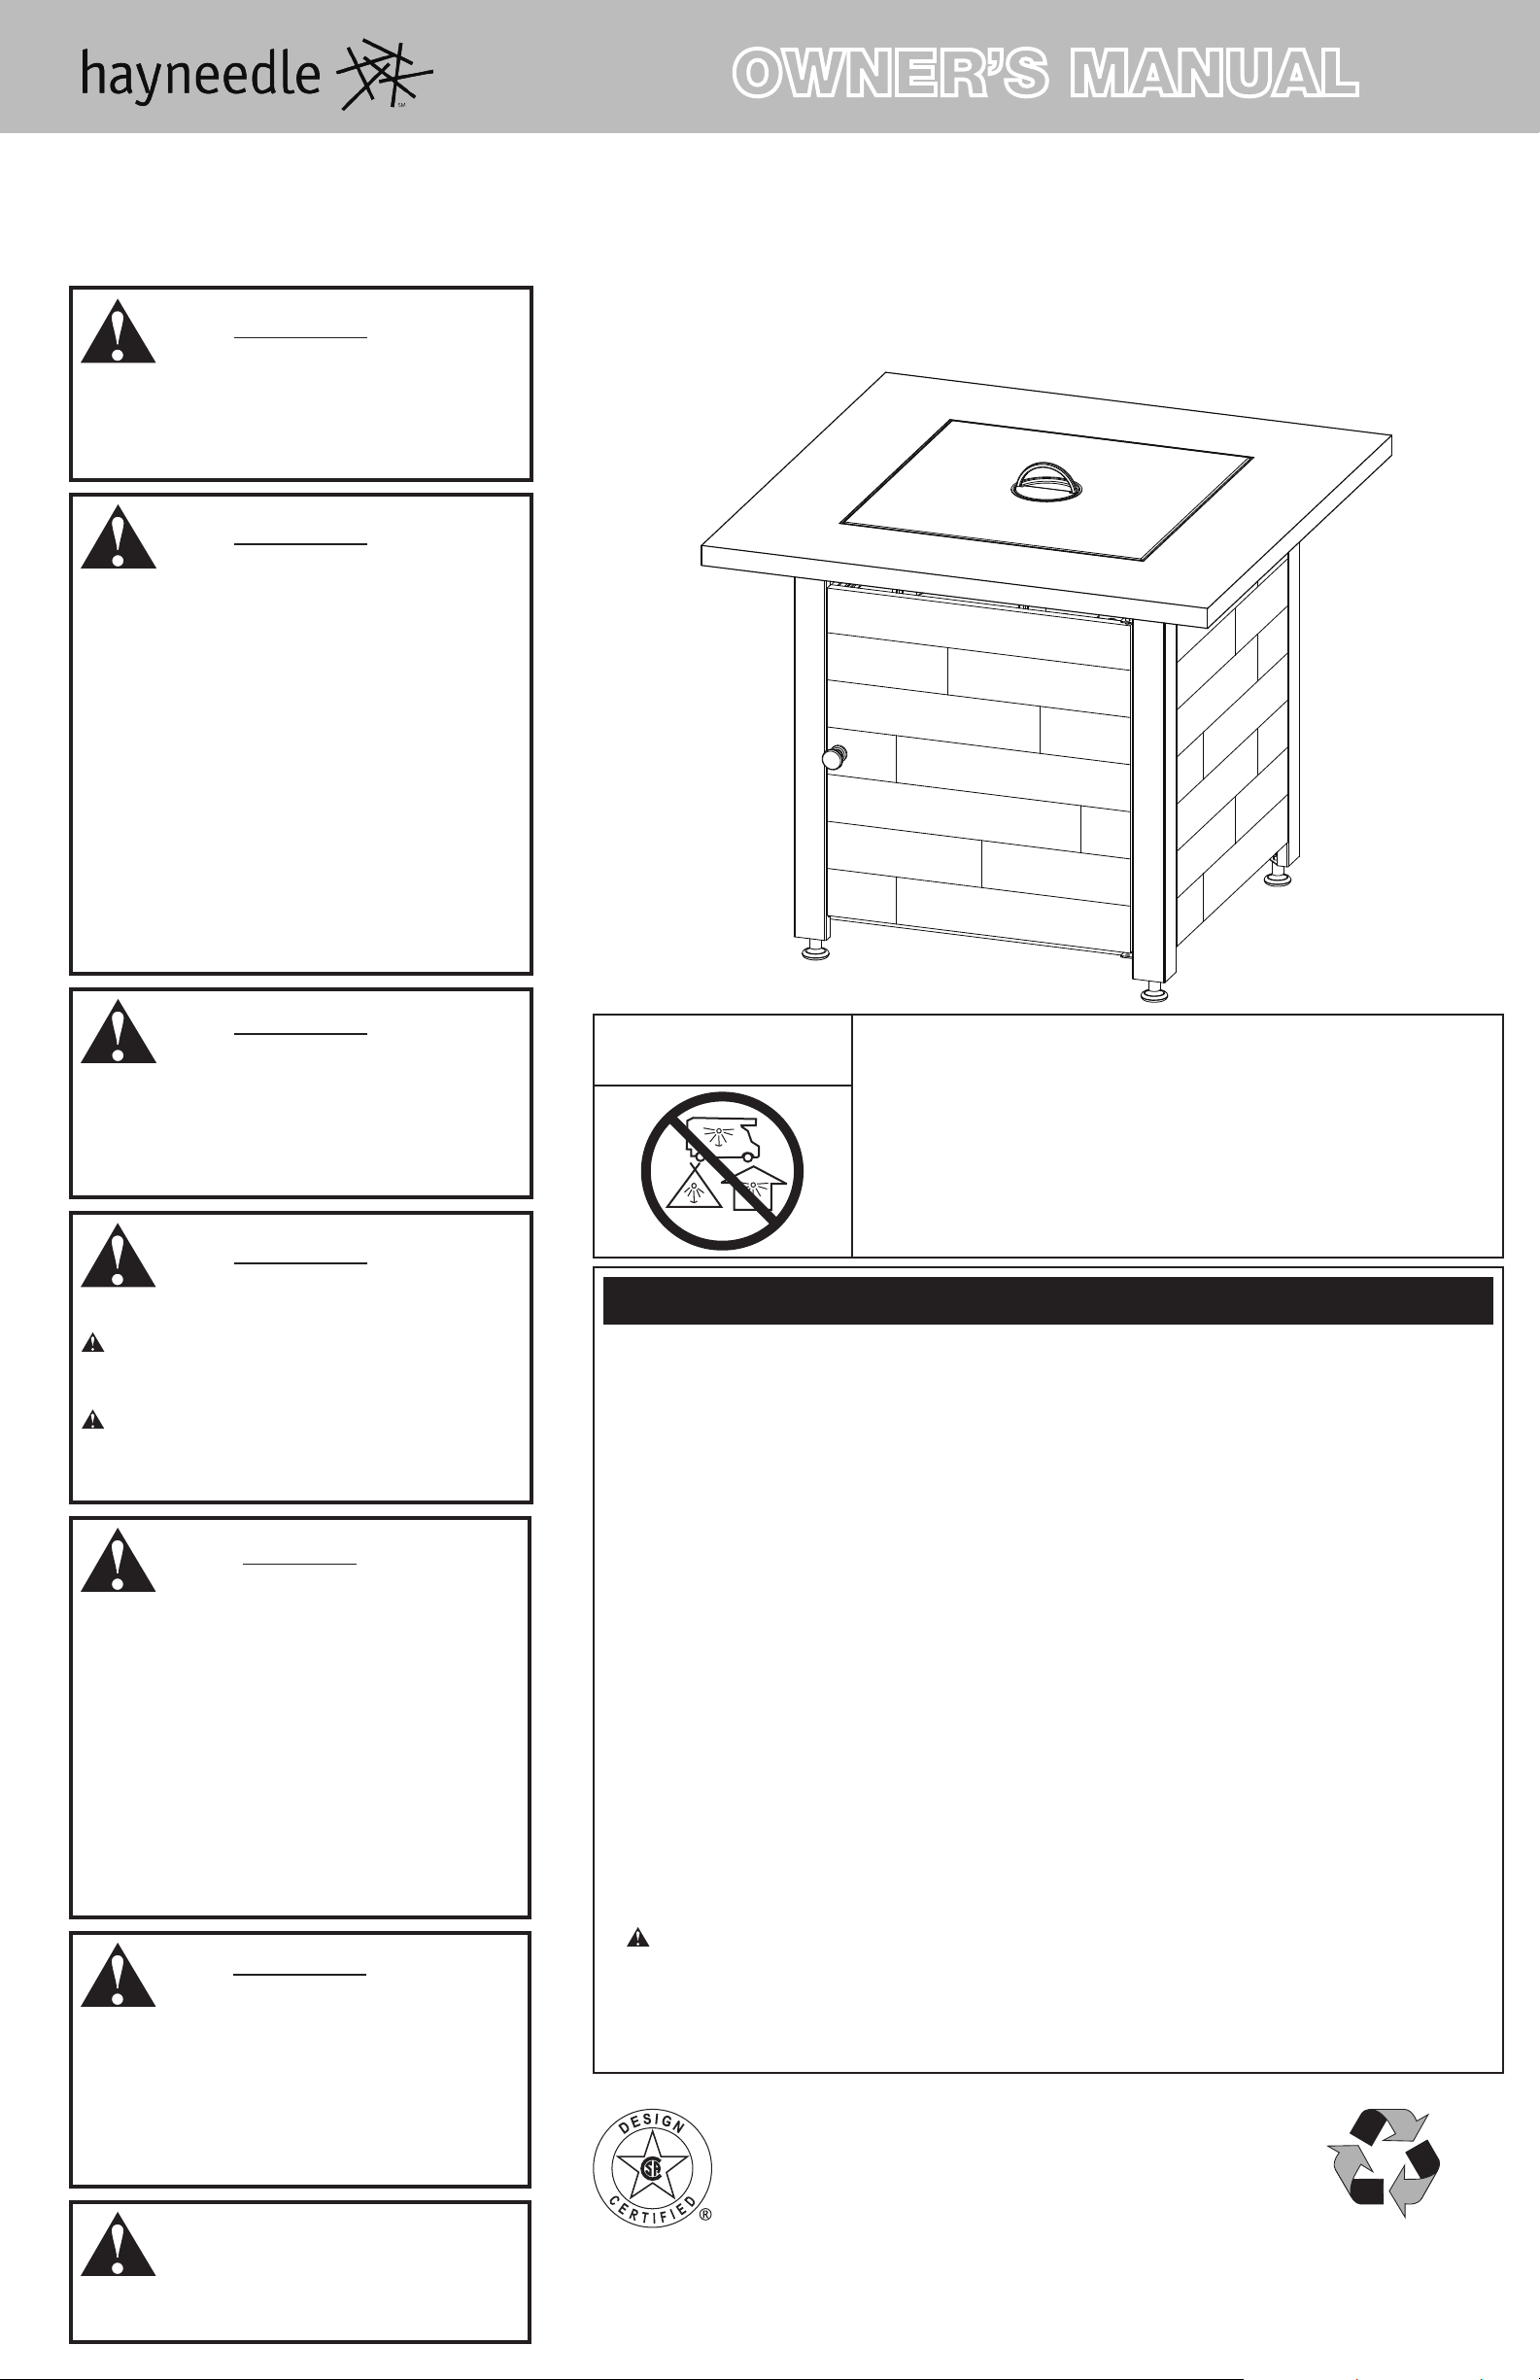
9 Chimenea para exteriores a gas propano líquido
Modelo no. : GAD15293HN
Detección de fugas
WADVERTENCIA: Antes de usar esta
chimenea para exteriores, asegúrese
de leer y entender la siguiente
información proporcionada en la
sección “Salvaguardias importantes”
en la página 2. El incumplimiento de
dichas instrucciones puede causar
la muerte, lesiones graves o daños
materiales.
WADVERTENCIA: Si el quemador
muestra señales evidentes de estar
dañando, debe reemplazarlo antes
de hacer funcionar la chimenea. El
quemador de repuesto debe ser el
que especifique el fabricante.
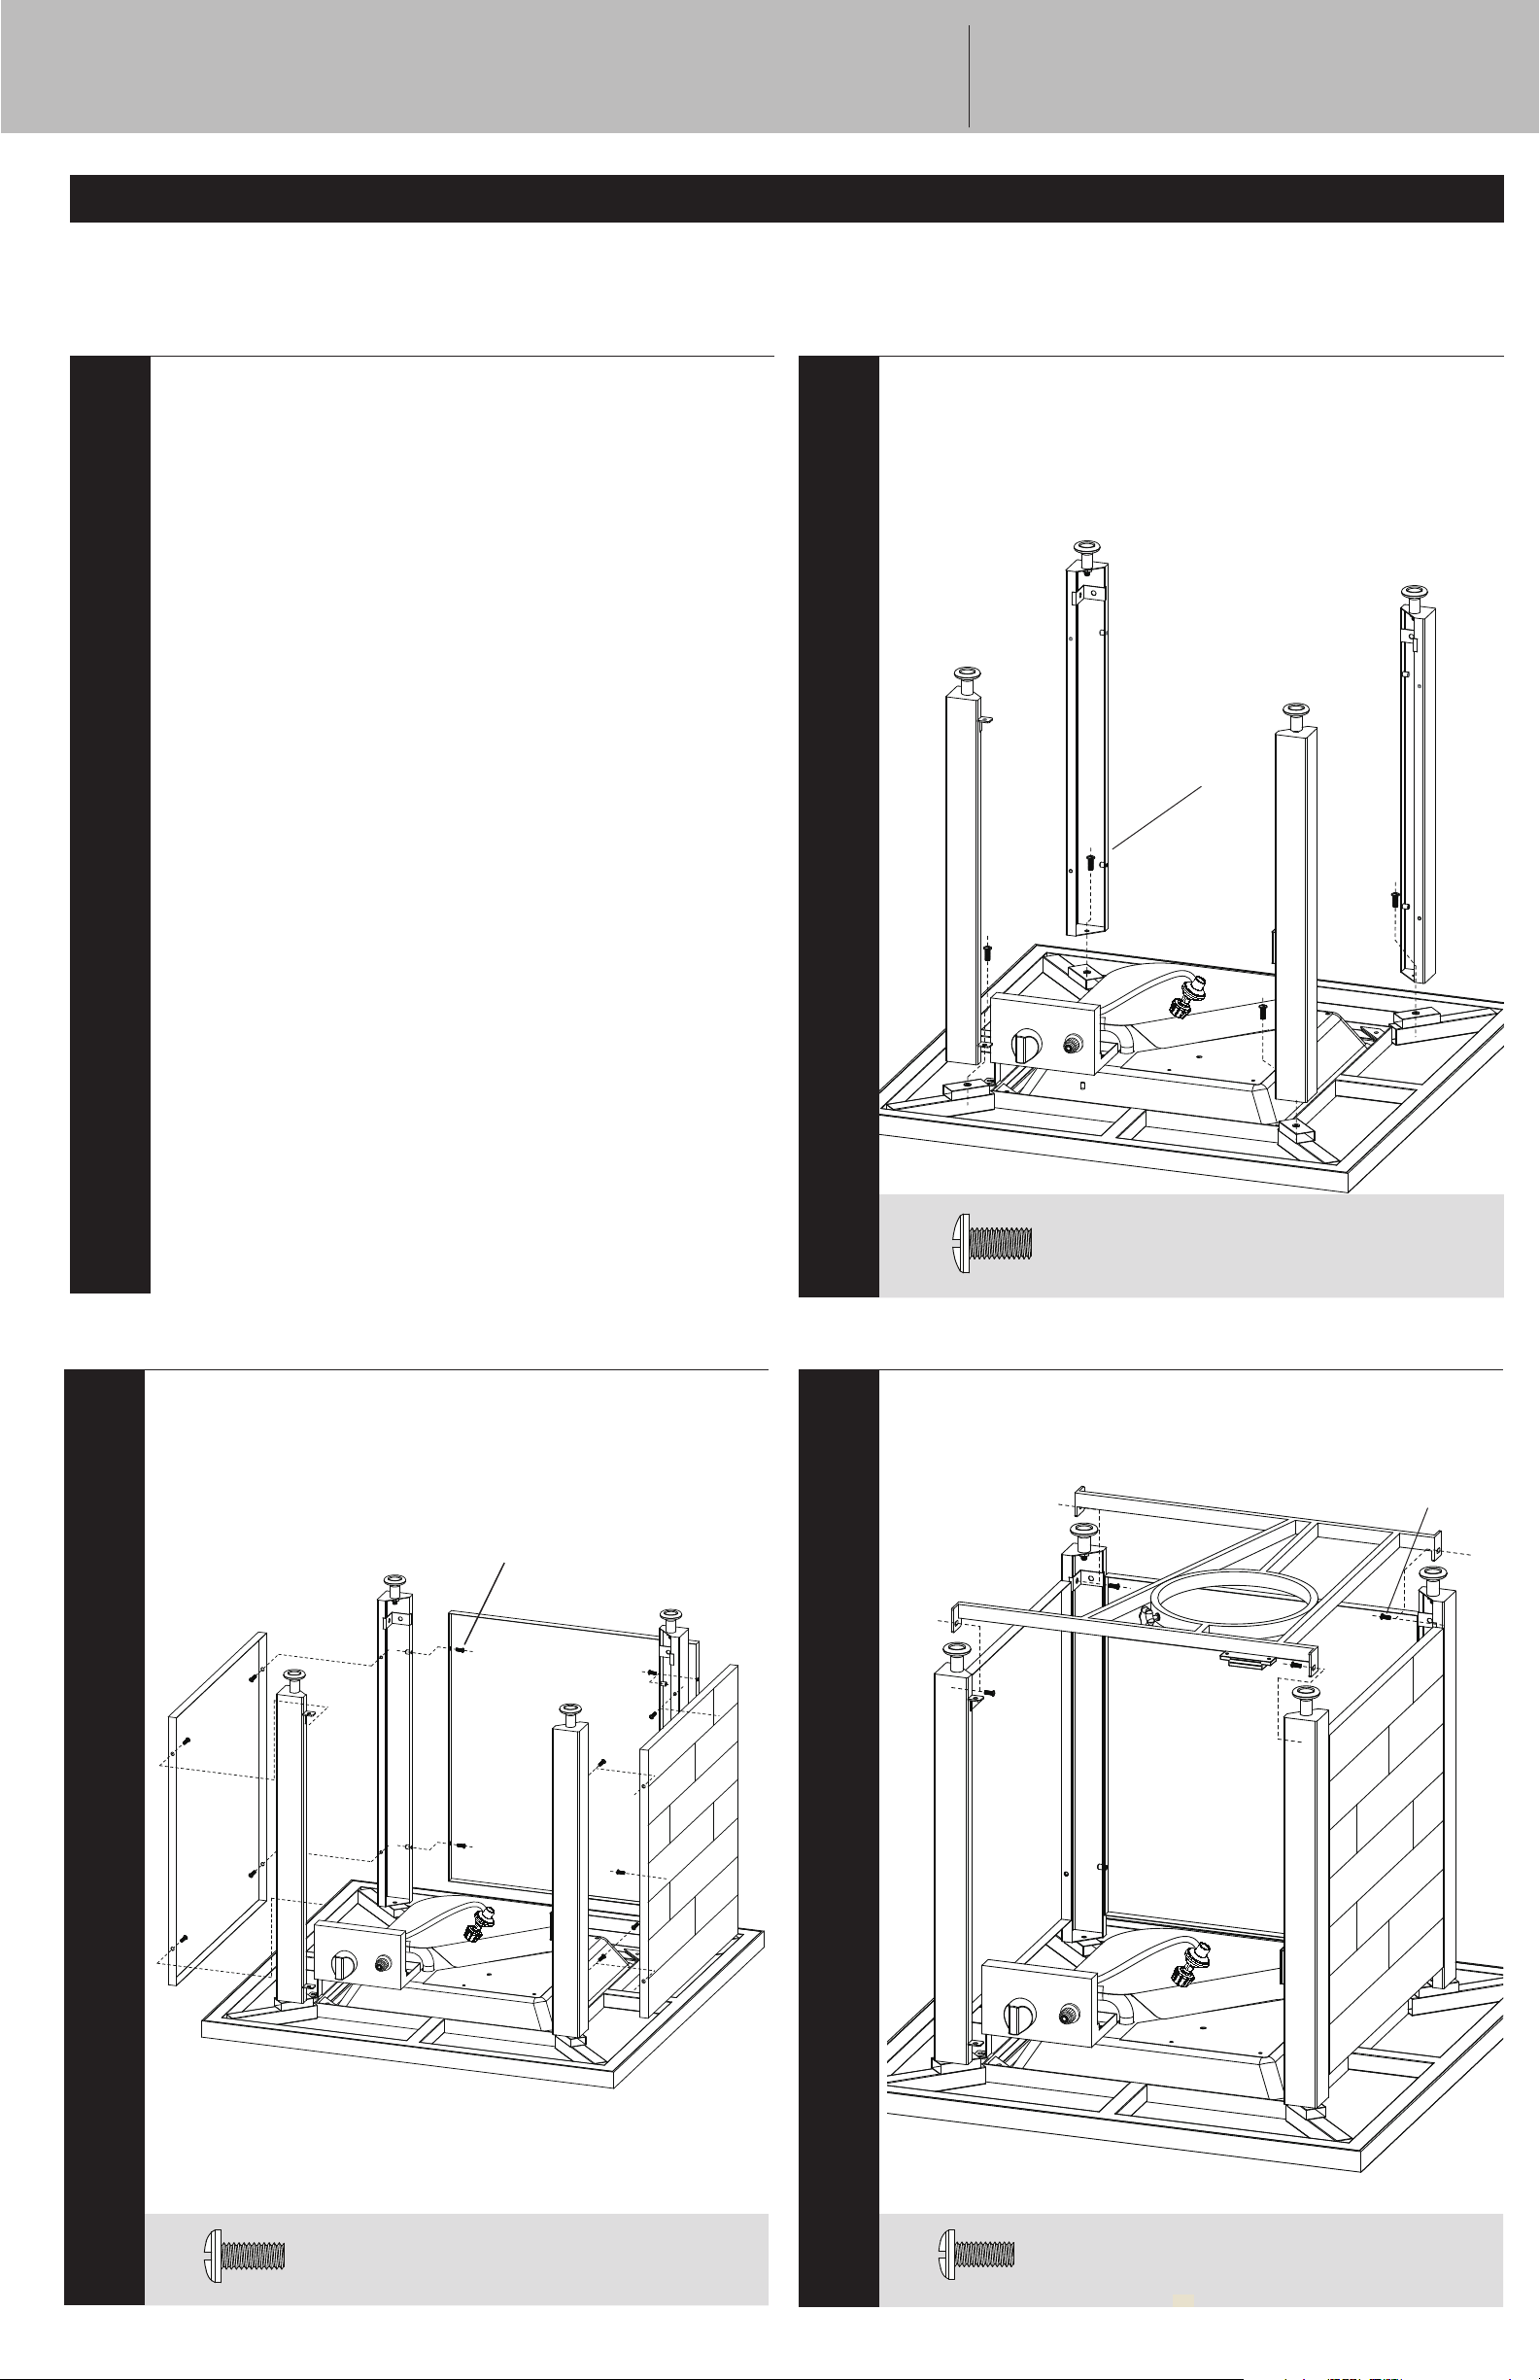
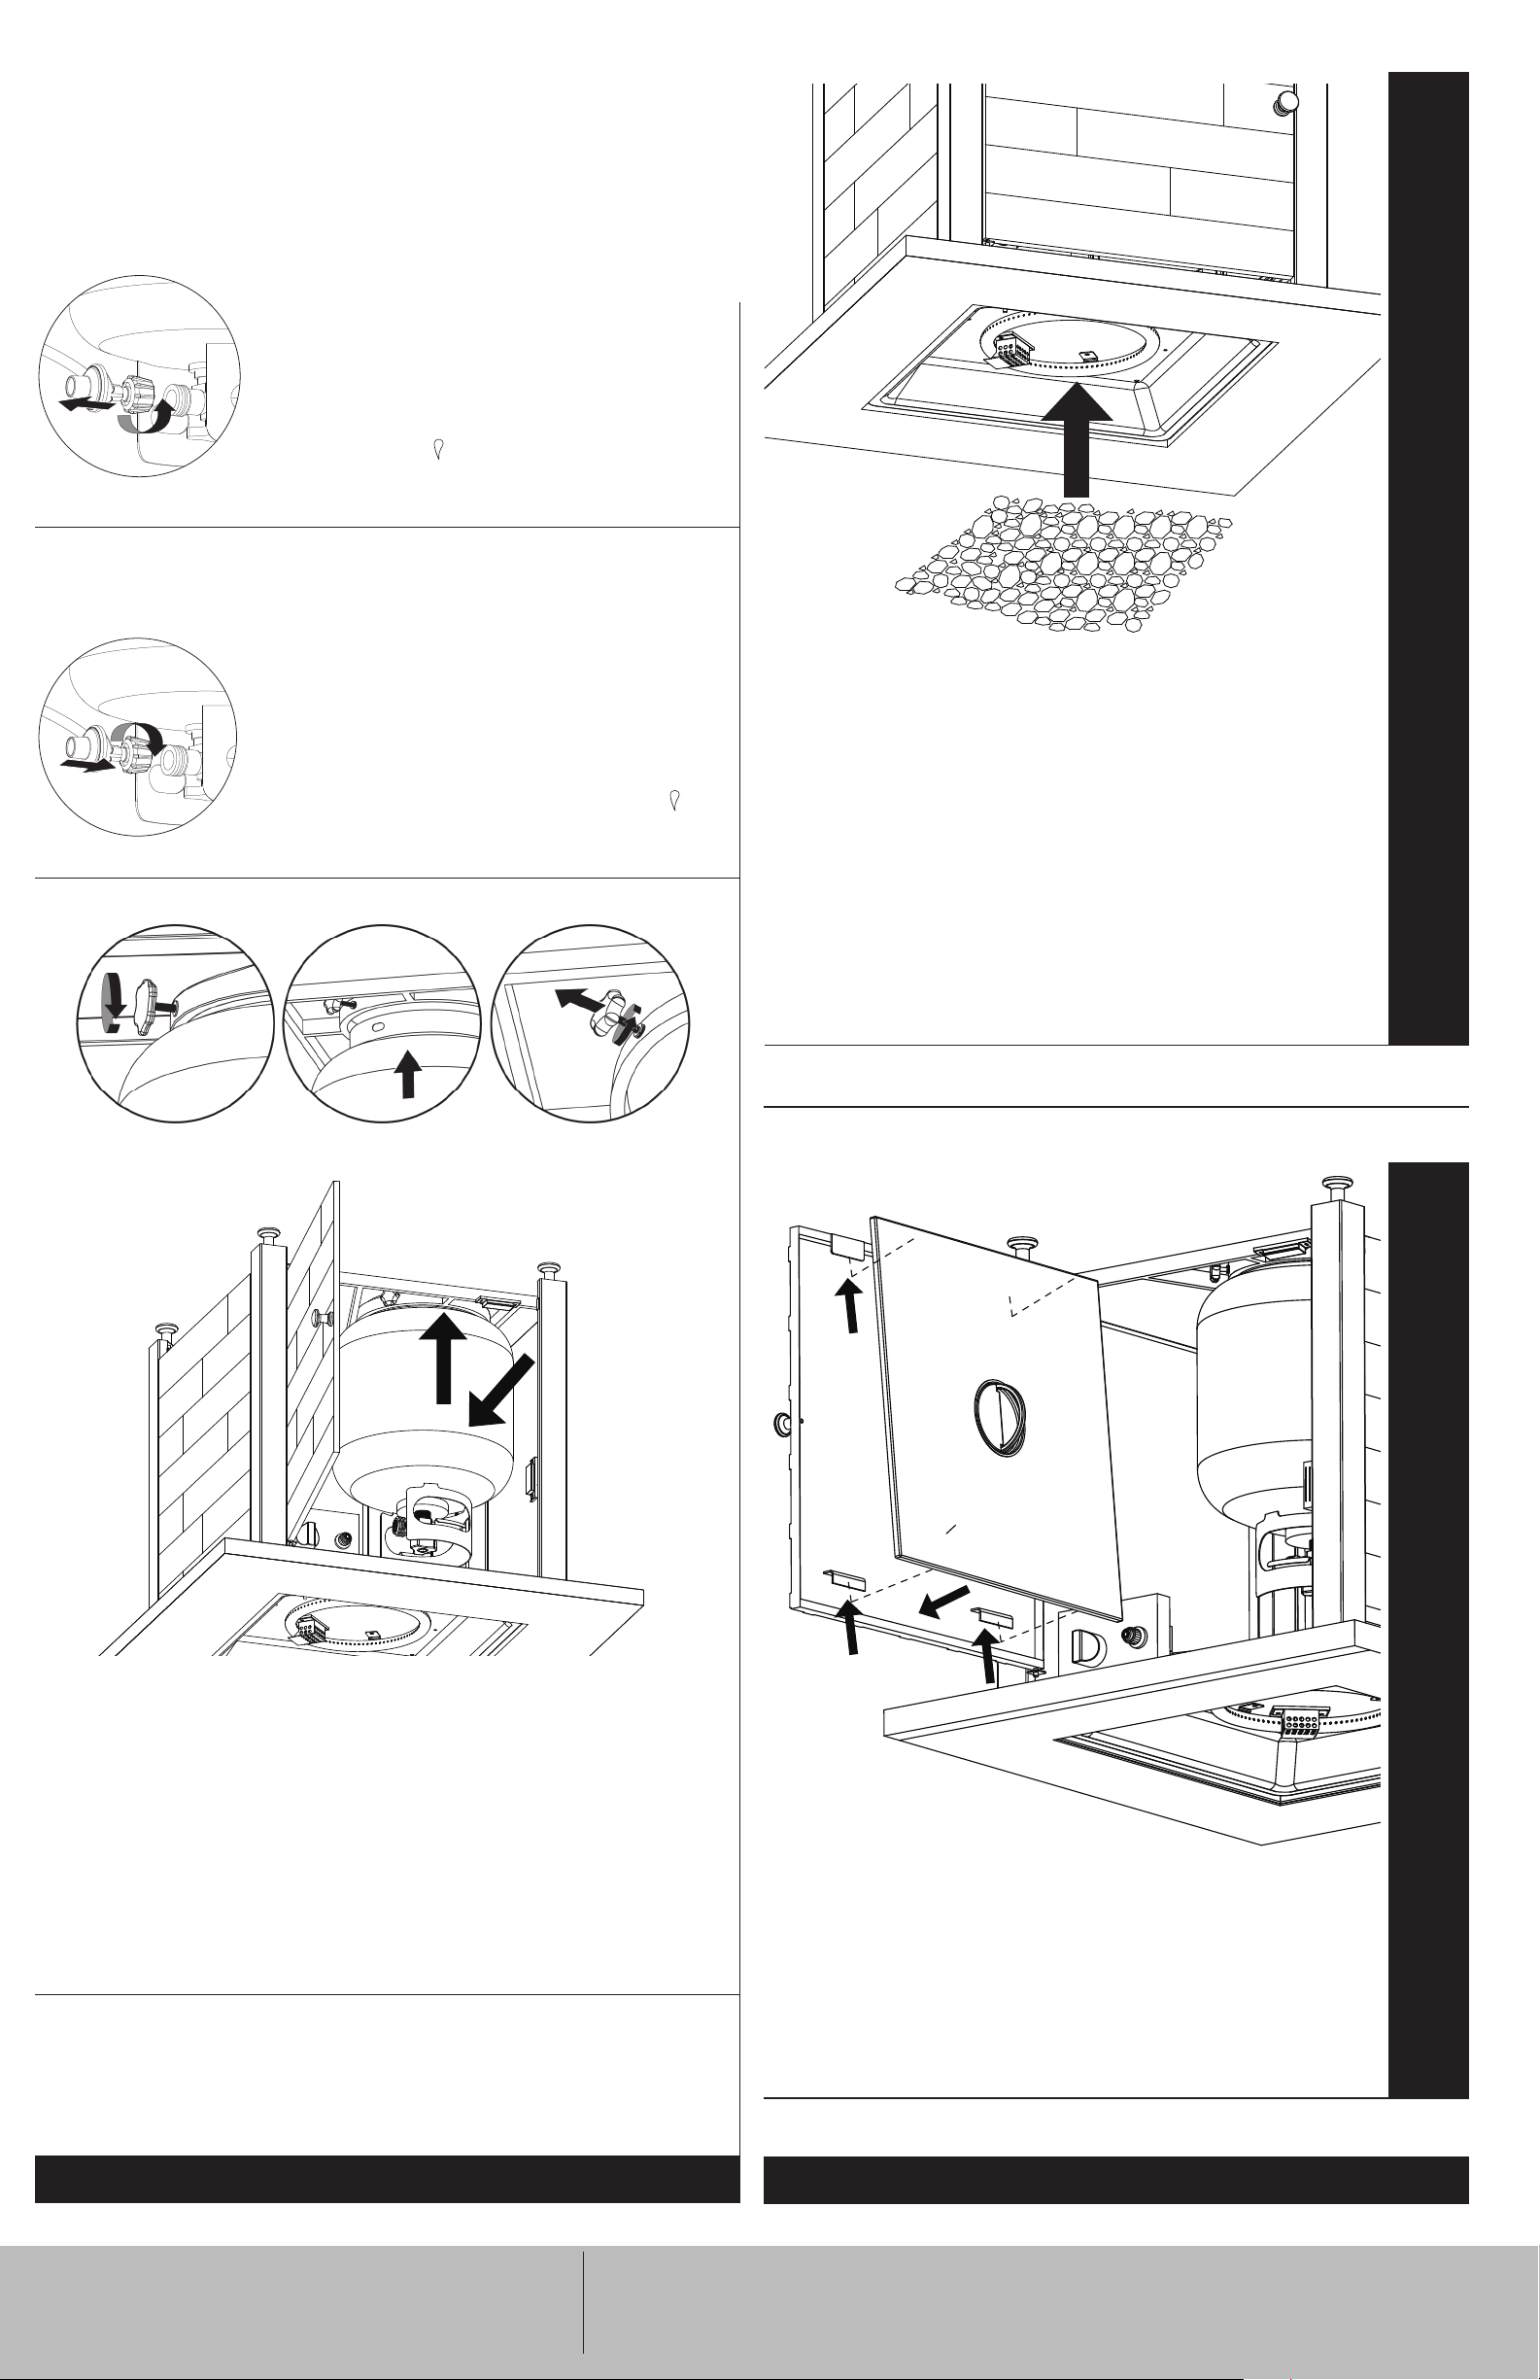
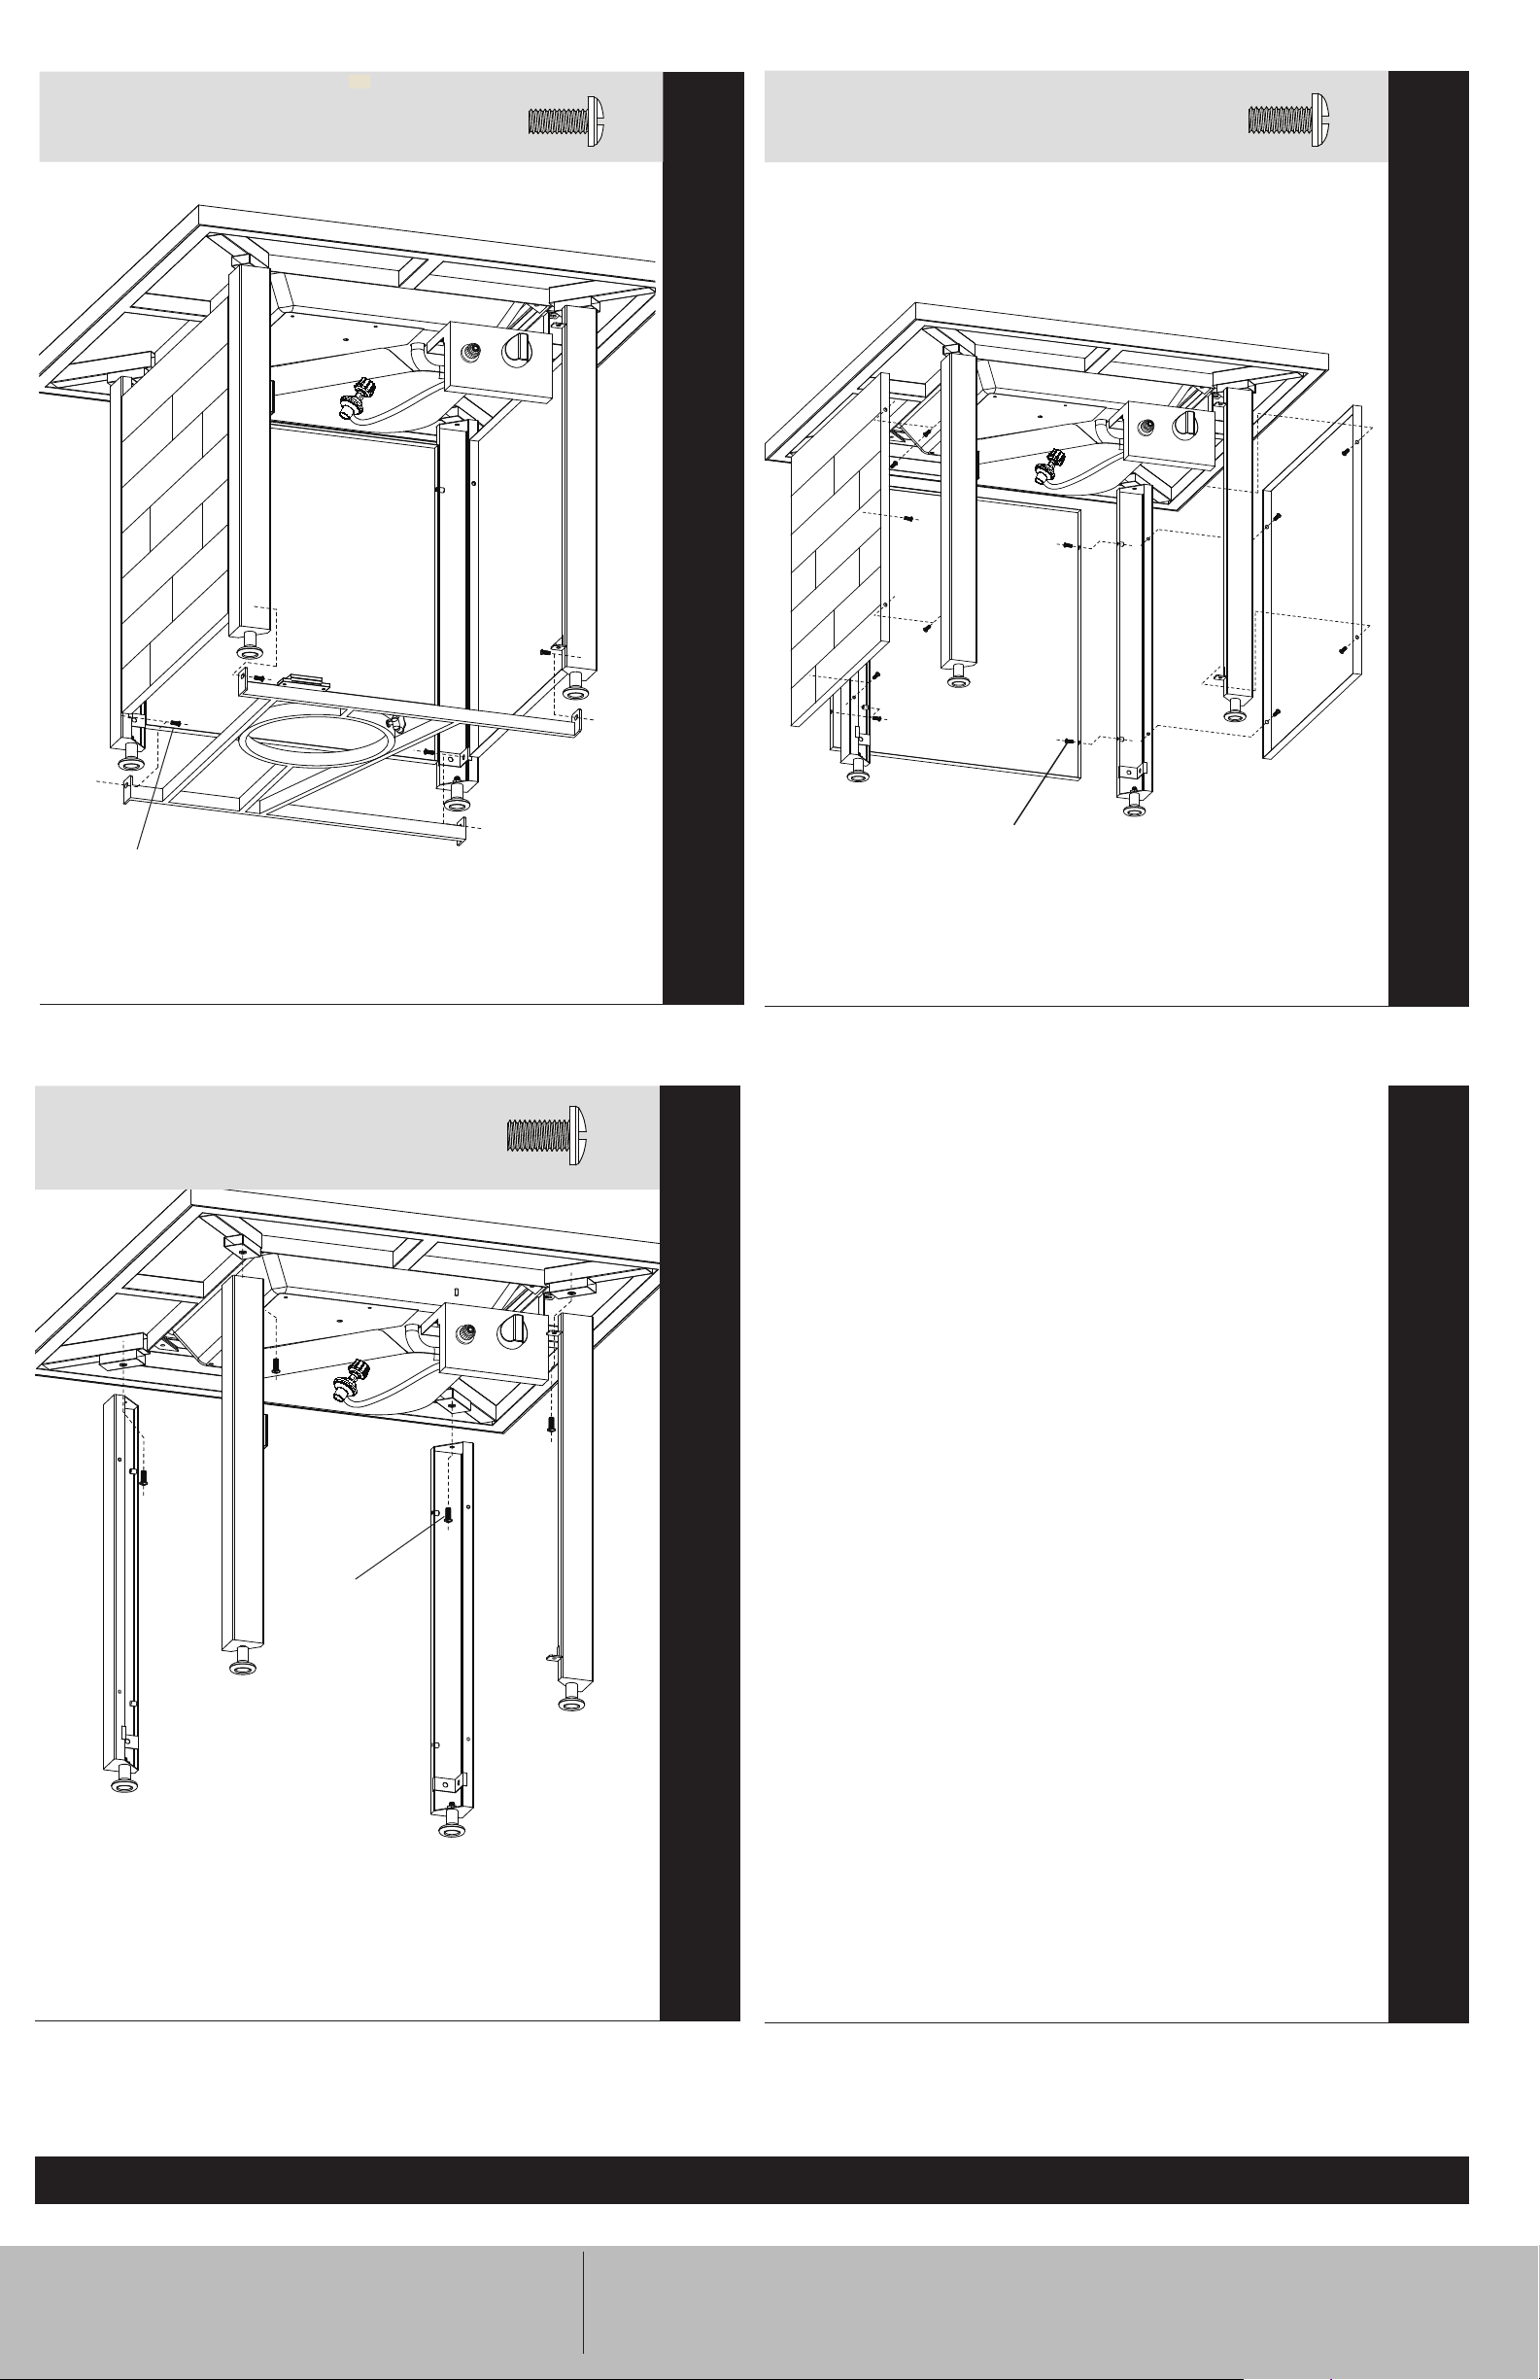
Conexiones del quemador
1. Asegúrese de conectar adecuadamente
la válvula del regulador y su manguera al
quemador y al tanque.
2. Si alguien armó la unidad para usted, verifique
visualmente la conexión entre el tubo del
quemador y el orificio.
3. Asegúrese de que el tubo del quemador encaja
sobre el orificio.
WADVERTENCIA: El no inspeccionar
esta conexión o seguir debidamente
estas instrucciones puede causar
incendio o explosión ocasionando
muerte, graves lesiones o daños a la
propiedad.
4. Por favor, consulte el diagrama para llevar a
cabo correctamente la instalación (Figura 1).
5. Si el tubo del quemador / tubo de venturi del
quemador no queda a ras con el orificio, por
favor llame al 1.888.398.8643.
Conexión de la línea de gas y del tanque
1. Prepare unos 80 ml de solución para comprobar
si hay fugas mezclando una parte de jabón
líquido para lavar platos y tres partes de agua.
2. Asegúrese de que las perillas de control están
en la posición “ APAGADO”. Vea la Figura 3.
3. Conecte el tanque de gas propano líquido
siguiendo las instrucciones descritas en la
sección “Instalar el tanque de gas propano
líquido”.
4. Coloque la válvula del tanque de gas propano
líquido en la posición “OPEN” (abierto).
5. Aplique con una cuchara varias gotas de la
solución, o use un frasco rociador, en todas las
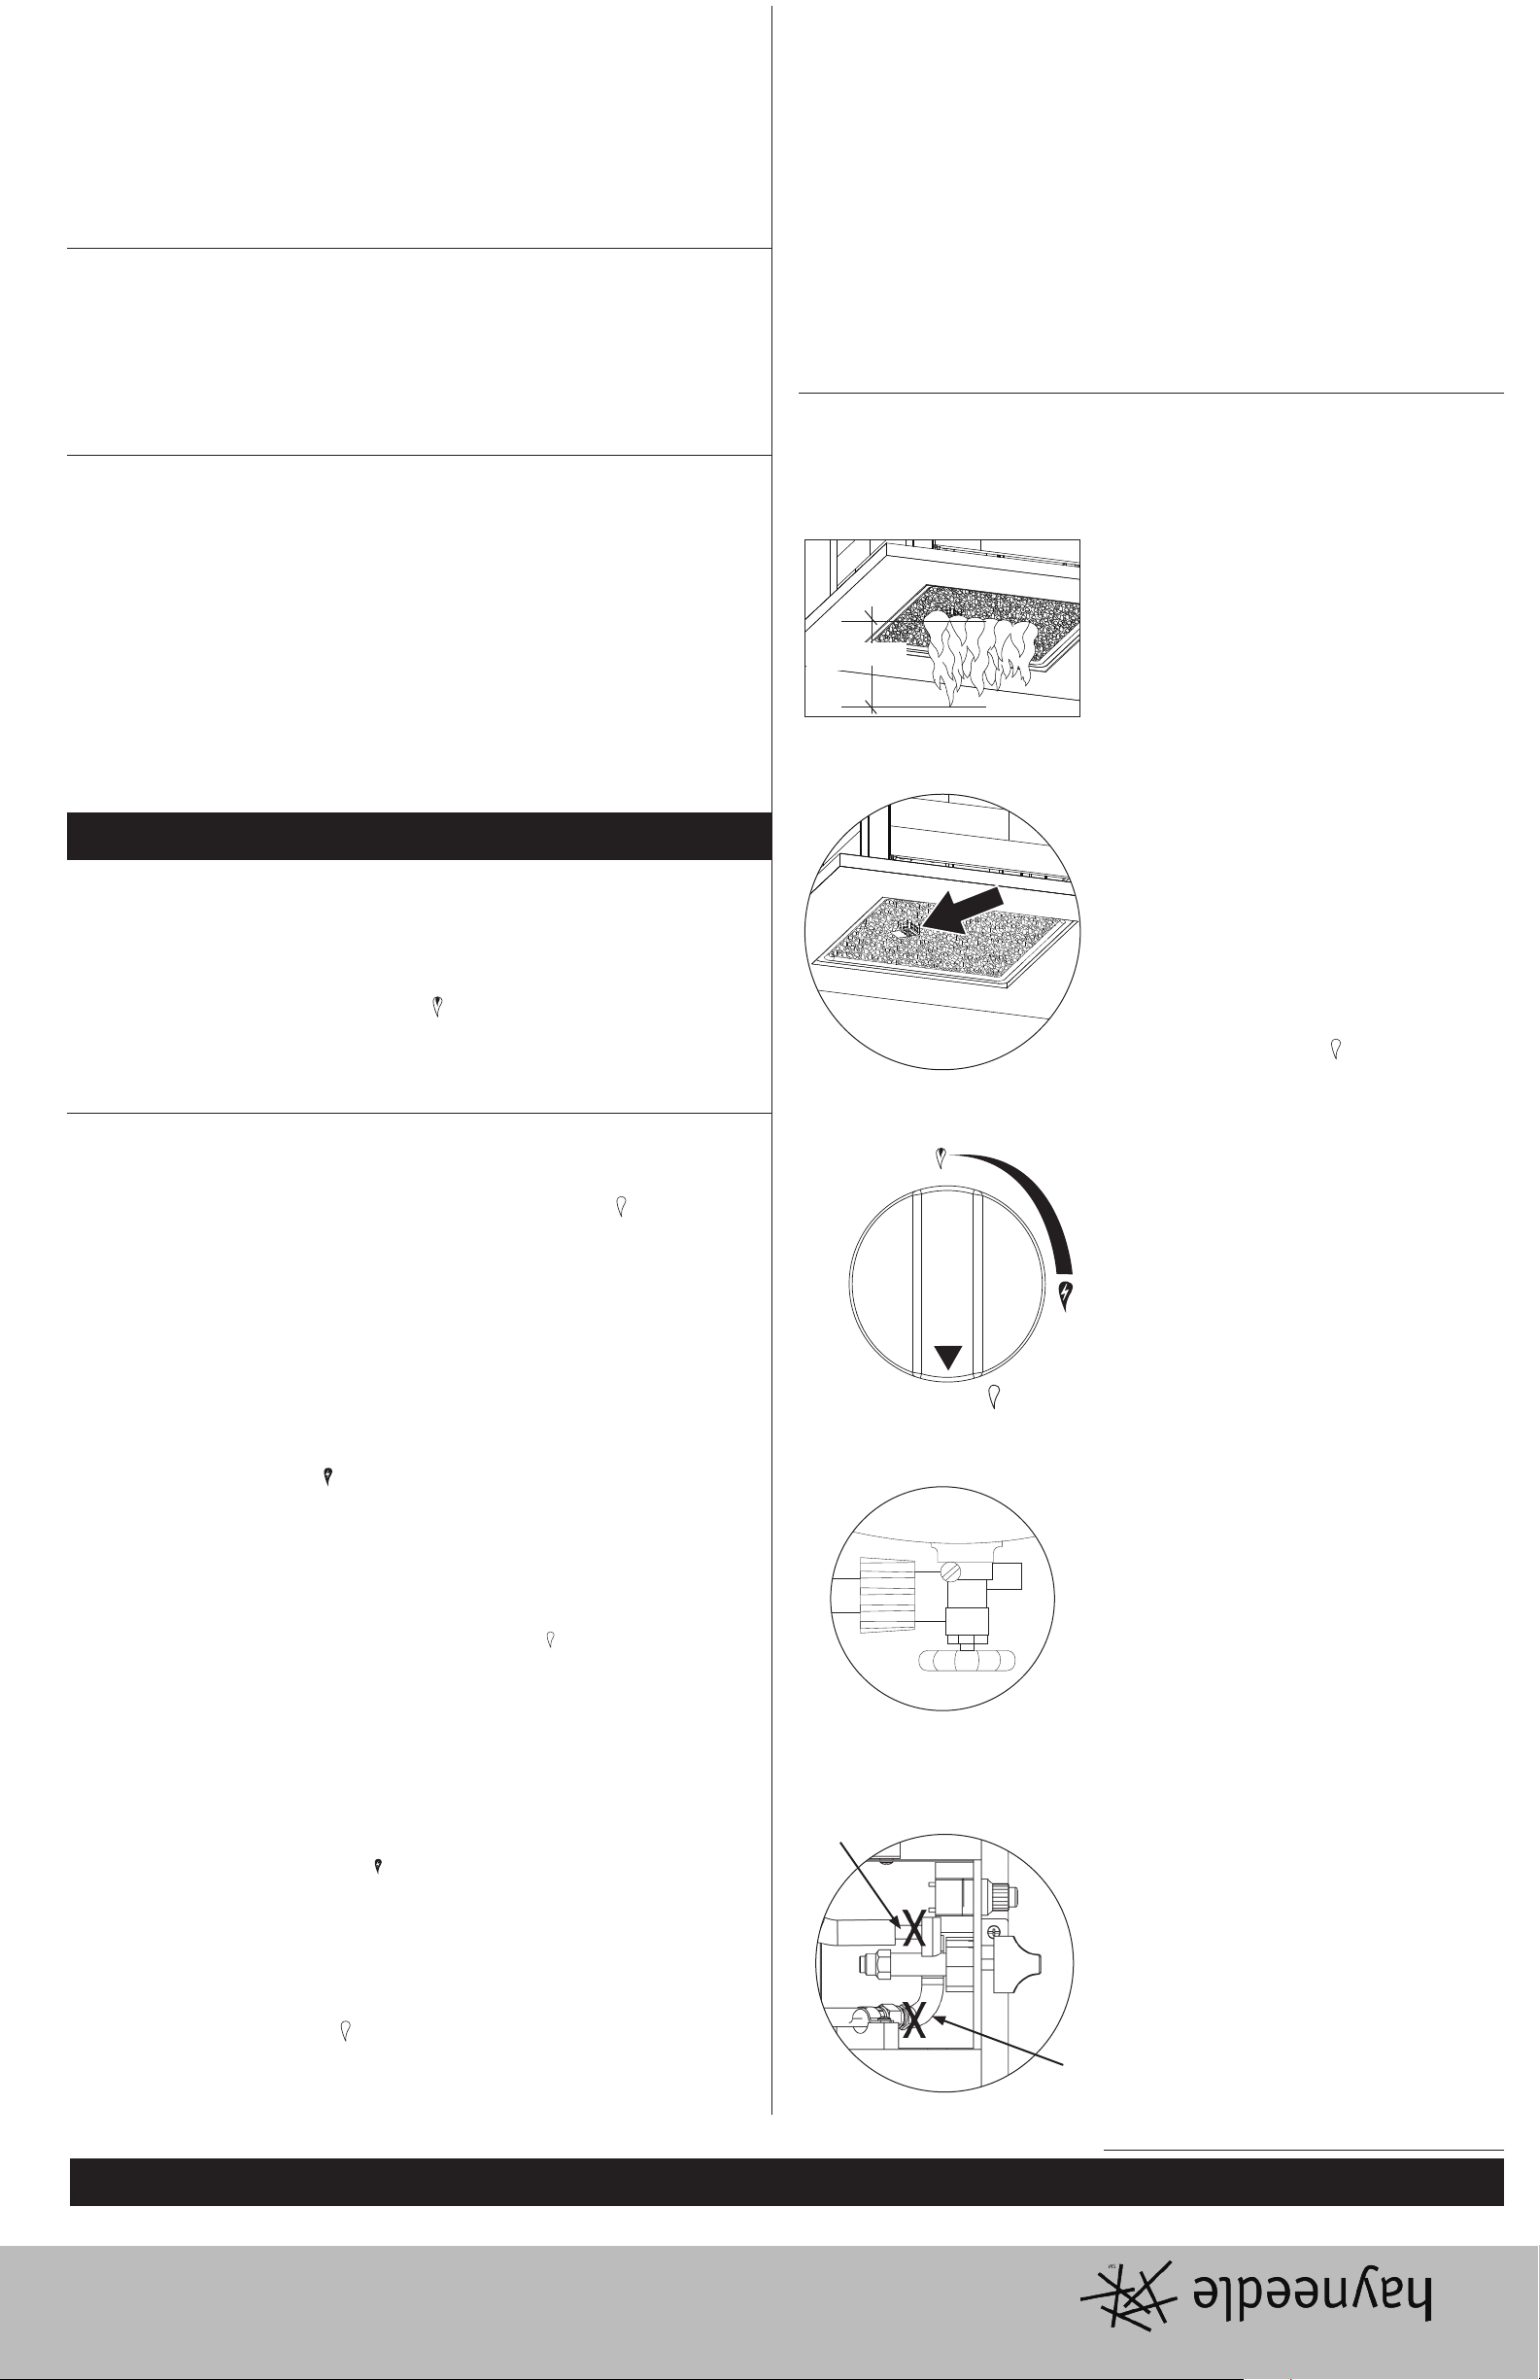
ubicaciones marcadas con “X” (vea Figuras 1, y 2).
a. Si en cualquier punto aparecen burbujas,
cierre el gas girando la válvula del tanque de
propano a la posición “CLOSED” (cerrado),
vuelva a conectar y verifique nuevamente.
b. Si las burbujas continúan apareciendo
después de varios ensayos, cierre el gas
girando la válvula del tanque de propano a
la posición “CLOSED” (cerrado), desconecte
el tanque de propano de acuerdo con
las instrucciones descritas en la sección
“Desconectar el tanque de gas propano
líquido” y llame al teléfono 1.888.398.8643
para obtener ayuda.
c. Si no aparecen burbujas por un lapso de un minuto, cierre el gas girando la válvula del
tanque de propano a la posición “CLOSED” (cerrado) y limpie la solución para continuar
el proceso.
Encendido
WPELIGRO: El incumplimiento de estas instrucciones de encendido puede
causar lesiones personales graves o la muerte, así como también un
incendio o explosión con daños materiales.
WADVERTENCIA: NUNCA encienda el quemador con la cubierta de la
chimenea para exteriores puesta.
WPRECAUCIÓN : Mantenga el área de la chimenea para exteriores limpia
y libre de materiales combustibles, gasolina y otros líquidos y vapores
inflamables.
WPRECAUCIÓN : No obstruya el flujo del aire de ventilación y combustión.
WPRECAUCIÓN : Revise y limpie el quemador/tubos venturi para
eliminar los insectos y nidos de insectos. Un tubo obstruido puede
causar un incendio.
Fonctionnement
Figura 1
Conexión de
gas propano
Válvula de gas
propano con
orificio
Figura 2
X
XX
XX
Figura 3
OFF / APAGADO
Figura 4
K
F
AA
Figura 5
15.75 - 23.6 pulg.
40 - 60 cm
1. Verifique que todos los empaques, etiquetas y envolturas de protección han sido
removidos de la chimenea para exteriores.
2. Asegúrese de que no hay nada que obstruya el flujo de aire hasta el quemador. Un tubo de
quemador/venturi obstruido puede provocar un incendio.
3. La perilla de control tiene que estar en la posición “ APAGADO”. Vea la Figura 3.
4. Despeje un área pequeña alejando las piedras de lava o de vidrio de la tapa del
encendedor (Figura 4).
5. Conecte el tanque de gas propano líquido siguiendo las instrucciones descritas en la
sección “Instalar el tanque de gas propano líquido”.
6. Coloque la válvula del tanque de gas propano líquido en la posición “OPEN” (abierto).
7. Oprima y gire la perilla de control a la posición (ALTO). Debe encenderse el quemador. Si
no se enciende, repita hasta un máximo de tres veces.
8. Después de encender la chimenea, siga presionando hacia adentro la perilla de control
durante 20 segundos para calentar el termopar, un dispositivo de seguridad que detiene
el flujo de gas cuando no se enciende la chimenea. Al presionar hacia adentro la perilla
durante 20 segundos, se calienta el termopar y permite que continúe el flujo de gas.
9. Después de 20 segundos, suelte y gire la perilla de control en el sentido contrario a las
manecillas del reloj para ajustar la llama a la altura deseada.
10. Si la chimenea no enciende después de tres intentos, coloque la perilla de control en la
posición de apagado (“ OFF”).
11. Espere 5 minutos, ventile con un periódico o revista, y repita el procedimiento de
encendido.
12. Si el encendedor no enciende el quemador:
a. Colóquese guantes resistentes al calor y coloque un fósforo largo encendido o un
encendedor de butano largo encendido cerca de la carcasa del piloto.
b. Presione y gire la perilla de control a la posición (HIGH).
c. Retire la cerilla o encendedor una vez que el quemador esté encendido.
WPRECAUCIÓN: Después de encender la unidad, con una herramienta de
chimenea y con guantes resistentes al calor puestos, cuidadosamente
mueva las piedras de lava o las piedras de vidrio a su lugar apropiado,
teniendo cuidado de no acercarse a las llamas.
13. Después de encender el quemador observe su llama y asegúrese de que todos los orificios
estén encendidos y que la altura de la llama corresponda a la del diagrama (vea Figura 5).
WPRECAUCIÓN: Si la llama del quemador se apaga durante el
funcionamiento, cierre el gas inmediatamente girando la perilla a la
posición “ APAGADO”. Deje que el gas se despeje y luego abanique
con un periódico o revista durante aproximadamente 5 minutos antes
de volver a encender la unidad.
Apagado
1. Cierre la válvula del tanque de gas propano líquido girándola a la posición “CLOSED”
(cerrado).
2. Gire la perilla de control a la posición “ APAGADO”
Nota: El ruido de “puf” es normal cuando el residuo de gas propano licuado en la línea se
ha extinguido.
3. Desconecte el tanque de propano de acuerdo con las instrucciones descritas en la sección
“Desconectar el tanque de gas propano líquido”.
Limpieza y cuidado
WPRECAUCIÓN:
1. Todas la operaciones de limpieza y mantenimiento deben
realizarse con la chimenea para exteriores fría y con el tanque de
propano desconectado.
2. NO limpie ninguna pieza de esta chimenea para exteriores en
un horno de limpieza automática. El calor extremo dañará el
terminado.
3. NO agrande los orificios de las válvulas ni los orificios de los
quemadores al limpiar las válvulas o quemadores.
4. Todos los componentes de esta fogata al aire libre pueden calentarse.
5. Todos los componentes de esta fogata al aire libre pueden calentarse.
Avisos
1. Esta chimenea para exteriores debe limpiarse y verificarse completamente de
manera regular.
2. No use productos de limpieza abrasivos pues dañarán este aparato.
3. No utilice nunca productos limpiahornos para limpiar cualquier pieza de la
chimenea para exteriores.
Cada vez que vaya a usar la unidad:
1. Mantenga el rededor de la unidad limpio y libre de materiales combustibles, gasolina, y
otros líquidos y vapores inflamables.
2. No obstruya el flujo aire de combustión del propane líquido ni el aire de ventilación.
3. Mantenga la abertura o aberturas de la zona del tanque de gas propano líquido abiertas y
libres de basura.

10
Coloque las piedras de lava
WPRECAUCIÓN: Al cambiar de piedras de vidrio a piedras de
lava, retire toda las piedras de vidrio antes de colocar las
piedras de lava.
WPRECAUCIÓN: NO eche las rocas de lava directamente
del paquete. Coloque cuidadosamente las rocas de lava
manualmente de modo que el polvo no obstruya el quemador.
WPRECAUCIÓN: Use únicamente rocas de vidrio autorizadas de
fábrica de Mr. Bar-B-Q Products LLC. El uso de rocas de vidrio
no autorizadas por la fábrica puede ser peligroso. Su uso
invalidará su garantía.
WPRECAUCIÓN: NO cubra la cubierta del encendedor.
Nota: Las rocas de lava deben tener una longitud de 0,8 a 2,0 pulg. (2 - 5 cm).
Se necesitarán aproximadamente 6,6 libras (3,0 kg) de rocas de lava.
ARTÍCULO OPCIONAL VENDIDO POR SEPARADO
Instalación del tanque de gas propano líquido (PL)
Para operar la chimenea para exteriores usted necesitará un (1) tanque de gas propano líquido
para parrilla estándar llenado con precisión con válvula roscada externa.
WPRECAUCIÓN: El tanque de gas propano líquido debe desconectarse
correctamente y retirarse antes de mover esta chimenea para
exteriores.
Insertar el tanque de gas PL
WADVERTENCIA: Asegúrese de que la válvula del tanque de gas de
propano líquido esté cerrada.
1. Abra la puerta.
2. Afloje el perno de retención del tanque de gas propano líquido girándolo en sentido
contrario a las manecillas del reloj.
3. Coloque el tanque de gas propano líquido llenado a precisión en forma vertical dentro del
orificio del soporte de la chimenea de manera que la válvula del tanque quede orientada
hacia la conexión de la línea de gas.
4. Asegure el tanque girando el perno de retención del gas propano líquido en sentido de las
manecillas del reloj hasta que esté apretado firmemente.
5. Cierre la puerta.
Conectar el tanque de gas PL
1. Asegúrese de que la perilla de control esté en la posición de
“ APAGADO” (Figura 3).
2. Antes de conectar, asegúrese de que no haya residuos
atrapados en el cabezal del tanque de gas propano líquido,
en el cabezal de la válvula reguladora, ni en el cabezal del
quemador y puertos del quemador.
3. Conecte el conjunto del regulador y manguera al tanque
girando la perilla en sentido de las manecillas del reloj hasta
que se detenga.
4. Asegúrese de que no haya fugas siguiendo las instrucciones de la sección “Detección de
fugas”.
Desconectar el tanque de gas PL
1. Asegúrese de que la perilla de control esté en la posición
de “ APAGADO” (Figura 3).
2. Antes de desconectar, asegúrese de que la válvula del
tanque de gas propano líquido esté en la posición CLOSED
(cerrada).
3. Desconecte el conjunto del regulador y manguera del
tanque de gas propano líquido girando la perilla en sentido
contrario a las manecillas del reloj hasta que esté floja.
WPRECAUCIÓN: El tanque de gas propano
líquido debe desconectarse debidamente y retirarse antes de mover la
chimenea para exteriores.
4. Coloque la tapa protectora en el tanque de gas propano líquido y guarde el tanque en
exteriores en un área con buena ventilación y protegido contra la luz solar directa.
9
Para guardar la pieza de mesa
Cuelgue la pieza de mesa en el lado interior de la puerta.
WADVERTENCIA: NUNCA coloque la pieza de mesa sobre la
chimenea para exteriores cuando esté en uso.
WADVERTENCIA: NUNCA saque y coloque la pieza de mesa
sobre la chimenea para exteriores cuando esta esté todavía
caliente.
Instrucciones de armado (continuación)
¿Necesita ayuda? Llame al 1.888.398.8643.
No vuelva al lugar de compra. Para piezas de repuesto
1.888.398.8643 8

7
Instrucciones de armado (continuación)
7
Coloque las piedras de vidrio
WPRECAUCIÓN: NO eche las piedras de vidrio directamente
del paquete. Coloque cuidadosamente las piedras de vidrio
manualmente de modo que el polvo no obstruya el quemador.
WPRECAUCIÓN: Use únicamente piedras de vidrio autorizadas
de fábrica de Mr. Bar-B-Q Products LLC. El uso de piedras de
vidrio no autorizadas por la fábrica puede ser peligroso. Su
uso invalidará su garantía.
WPRECAUCIÓN: NO cubra el compartimiento del piloto.
Nota: Las piedras de vidrio deben tener una diámetro de 0,8 a 1,6 pulg. (2 - 4 cm).
Se necesitarán aproximadamente 13,2 libras (6,0 kg) de piedras de vidrio.
8
Coloque la pieza de mesa
WADVERTENCIA: NUNCA coloque la pieza de mesa sobre la
chimenea para exteriores mientras se encuentra en uso.
WADVERTENCIA: NUNCA coloque la pieza de mesa sobre
la chinenea para exteriores hasta que la unidad se haya
enfriado.
Chimenea para exteriores a gas propano líquido
Modelo no. : GAD15293HN
5
Instale la puerta y voltee la chimenea para exteriores
WPRECAUCIÓN: Se necesitarán dos (2) personas para volver a
colocar la chimenea para exteriores sobre sus patas.
CX 1
C
6
Inserte la pila
Nota: Retire la envoltura de plástico antes de instalar la pila.
Dx 1
+
-
D

Instrucciones de armado
1
NO DEVUELVA EL PRODUCTO AL LUGAR DE COMPRA
.
Si necesita ayuda llame, sin cargo, al 1.888.398.8643. Por
favor tenga a mano su manual y el modelo número de la
unidad, para referencia.
Note: The model number is printed on a label which can be found on
the inside door, back or side of the base assembly.
Para facilitar el armado:
1. Elija el lugar en el que armará este producto. Para proteger los
componentes, elija una superficie lisa, sin fisuras ni hendijas.
2. Presente todas las piezas.
3. Ajuste todas las conexiones de los elementos de ferretería,
primero en forma manual. Luego, después de completar cada
paso, ajústelos por completo. Tenga cuidado de no ajustar
demasiado. Se podrían dañar las superficies o forzar las roscas.
4. Para obtener mejores resultados, siga todos los pasos en el
orden indicado.
Para terminar el armado de la unidad necesitará:
• una (1) solución para detección de fugas. Las instrucciones
sobre cómo preparar esta solución se encuentran en la sección
“Instrucciones de operación”.
• un (1) un tanque de gas propano líquido, para parrilla, llenado
con precisión y con rosca externa Acme Tipo 1 para conexión
de válvula (non incluidas).
El tiempo promedio para armar es aproximadamente una hora.
WPRECAUCIÓN: Se necesitarán dos (2) personas
para armar la unidad.
WADVERTENCIA: El no colocar las piezas de acuerdo
a estos diagramas o el no utilizar las piezas
específicamente aprobadas para este artefacto,
puede resultar en daños materiales o lesiones
personales.
3
Instale los paneles lateral y trasero
Nota: Coloque los tornillos inferiores antes de colocar los tornillos superiores. No
apriete completamente los tornillos hasta llegar al paso 5.
Ax 12
A
¿Necesita ayuda? Llame al 1.888.398.8643.
No vuelva al lugar de compra. Para piezas de repuesto
1.888.398.8643 6
4
Instale la base
Nota: Apriete todos los tornillos mencionados en los pasos 2 a 4.
Ax 4
A
2
Instale las patas
WPRECAUCIÓN: Se necesitarán dos (2) personas para voltear la
chimenea para exteriores.
WPRECAUCIÓN: Para evitar rasguños, elija una superficie suave
sin grietas ni rendijas.
Nota: No apriete completamente los tornillos hasta llegar al paso 5.
Bx 4
B

5
Despiece
Chimenea para exteriores a gas propano líquido
Modelo no. : GAD15293HN
Herramientas necesarias para el armado (non incluidas)
Destornillador en cruz (Phillips) no. 2 1 pz
Elementos de ferretería
ATornillo Tornillos niquelados negros de cabeza segmentada, M5x12 16 pcs
BTornillo Tornillos niquelados negros de cabeza segmentada, M6x12 4 pcs
CTornillo Tornillo niquelado negro de grada,M6X12 1 pc
DPila AA 1 pc
10
10
10
Lista de piezas
1Piedras de vidrio Blanco GLS-BRN
2Pieza de mesa 58-23-854
3Conjunto del crisol* 58-23-895
4ITapa del encendedor* 58-23-896
5Quemador* 58-23-138
6Perilla de control* 58-23-139
7Tapón de la pila 58-23-897
8Conjunto de manguera y
regulador* 58-23-922
9Repisa 58-23-855
10 Panel superior (3) 58-23-856
11 Pata A (2) 58-23-857
12 Pata B 58-23-858
13 Imán (2)* 58-23-145
14 Pata C 58-23-859
15 Tapón (4)* 58-23-147
16 Base* 58-23-148
17 Perno de retención del
tanque de gas PL* 58-23-149
18 Puerta 58-23-860
19 Perilla de la puerta* 58-23-861
20 Funda 55-24-366
21
Piedras de lava
(no se requieren y se
venden por separado)**
* Viene ensamblado
W**PRECAUCIÓN: Use piedras
de vidrio y piedras de lava
autorizadas por la fábrica de Mr.
Bar-B-Q Products LLC, solamente.
Usar piedras de vidrio o piedras
de lava no autorizadas por la
fábrica puede ser peligroso y
anulará su garantía.
18
17
12
3
9
2
8
6
14
11
11
4
19
16
Artículos vendidos por separado
20
15
15
13
5
7
1
15 15
21
13
This manual suits for next models
1
Table of contents
Other hayneedle Outdoor Fireplace manuals
Popular Outdoor Fireplace manuals by other brands

CobraCo
CobraCo FB8001 owner's manual

Flash Furniture
Flash Furniture YL20222GG Assembly instructions

Kenwood
Kenwood KXT754GL instructions

Outland Living
Outland Living FMPPC2E-410 owner's manual

Decofire
Decofire Milano Series Assembly, Safety & Operating Instructions

Target
Target Foxborough Assembly instructions

Agio
Agio ART00600 manual

Firegear
Firegear FPB-25SFBSTMSI-N Installation and operating instructions

MODENO
MODENO OFG116 owner's manual

Outdoor Plus
Outdoor Plus DEL MAR OPT-DEL7228 manual

Backyard Creations
Backyard Creations ST. CROIX HD WT17YL Safety manual

Ashley
Ashley Signature Design P016-772 user guide