HEADRUSH Looperboard User manual

Quickstart Guide
English (2–19)
Guía de inicio rápido
Español (20–37)
Guide d’utilisation rapide
Français (38–55)
Guida rapida
Italiano (56–73)
Schnellstart-Anleitung
Deutsch (74–91)
Appendix
English (93–95)

2
Quickstart Guide (English)
Introduction
Box Contents
HeadRush Looperboard
USB Cable
Power Adapter
Software Download Card
Quickstart Guide
Safety & Warranty Manual
Important: This Quickstart Guide covers the basic functionality of the HeadRush Looperboard. Please
visit headrushfx.com to download the detailed User Guide, which may also contain additional
information on new features and improvements in firmware updates.
Support
For the latest information about this product (documentation, technical specifications, system
requirements, compatibility information, etc.) and product registration, visit headrushfx.com.
For additional product support, visit headrushfx.com/support.

3
Features
Top Panel
1. Touchscreen: This full-color multi-touch display shows information relevant to the HeadRush
Looperboard’s current operation. Touch the display (and use the hardware controls) to control the
interface. See Operation > Overview to learn how it works.
2. Encoder: Turn this encoder to scroll through the available menu options or adjust the parameter
values of the selected field in the display. Push the encoder to confirm your selection.
3. Input Gain: Turn these knobs to adjust the independent gain level of each input.
4. Footswitches: Use these footswitches to perform different functions. The eight right-most
footswitches correspond to the four tracks of a loop. See the Operation chapter to learn how to
use them.
5. Footswitch Indicators: These lights indicate the status of different functions (performed by the
footswitch below each one). See the Operation chapter to learn about them.
6. Main: Turn this knob to adjust the volume level of the outputs.
7. Phones: Turn this knob to adjust the volume level of the Phones output.
8. Aux: Turn this knob to adjust the volume level of the Aux input.
Important:The audio signal from the Aux input is routed directly to the outputs and cannot be
used for recording directly to a looper track. It is also unaffected by the Main volume or phones
volume knobs.

4
Rear Panel
1. Power Input (19 VDC, 3.42 A, center-positive): Connect this input to a power outlet using the
included power adapter.
2. Power Adapter Restraint: Secure the power adapter cable to this restraint to prevent it from
accidentally unplugging.
3. Power Switch: Press this button to turn the HeadRush Looperboard’s power on. Press and hold
this button to turn the HeadRush Looperboard’s power off.
4. Vent: Make sure this vent is unobstructed while using the HeadRush Looperboard.
5. Inputs (XLR or 1/4”/6.35 mm, balanced): Connect your guitar, instrument, drum machine,
keyboard, or other audio source to these inputs. You can enable or disable +48V phantom power
for these inputs in the Global Settings page.
Important: Only enable phantom power if your microphone requires it. Most dynamic microphones
and ribbon microphones do not require phantom power, while most condenser microphones do.
Consult your microphone's documentation to find out whether it needs phantom power.
6. Aux Input (1/8”/3.5 mm, TRS): Connect an optional audio source (e.g., smartphone, tablet, etc.)
to this input. Use the Aux knob to control the volume level.
7. Outputs (XLR): Connect these outputs to the inputs of your mixer, active loudspeaker, etc. Use
the Main knob to control the volume level. You can adjust the ground-lift setting for these outputs
in the Global Settings page.
8. Outputs (1/4”/6.35 mm, balanced): Connect these outputs to the inputs of your amplifier, audio
interface, mixer, etc. Use the Main knob to control the volume level. You can switch the level of
these outputs between Amp and Line in the Global Settings page.
9. Phones Output (1/4”/6.35 mm, TRS): Connect stereo headphones to this output. Use the Phones
knob to control the volume level.
10. Expression Pedal Input (1/4”/6.35 mm, TRS): Connect an optional expression pedal to this input.
11. MIDI In (5-pin DIN): Use a standard MIDI cable to connect this input to the MIDI output of an
optional external MIDI device. See External MIDI Control for more information.
12. MIDI Out/Thru (5-pin DIN): Use a standard MIDI cable to connect this output to the MIDI input of
an optional external MIDI device. You can set this output to be a standard MIDI output or MIDI
throughput in the Global Settings page.
13. USB Type-B Port: Connect this USB port to a computer using a standard USB cable. This
connection allows the HeadRush Looperboard to send and receive the digital audio signal to and
from your computer. You can also use this connection to import or export loops, individual audio
files, backing tracks, etc. See USB Connection for more information.
This connection is also used to update the firmware. Visit headrushfx.com to check for available
firmware updates.

5
14. USB Type-A Ports: Connect USB flash drives to these USB ports for additional storage. You can
save and load loops with the connected USB flash drive, as well as record loops directly to the
USB flash drive. Backing tracks can be played directly from the USB flash drive. Class-compliant
USB devices can be connected to these USB ports for external MIDI control.
15. SD Card Slot: Insert a standard SD/SDHC card into this slot for additional storage. You can save
and load loops with the SD card, as well as record loops directly to the SD card. Backing tracks
can be played directly from the SD card.
Important: To avoid file loss or damage to your media, only disconnect USB and SD storage
devices from HeadRush Looperboard while it is powered off. Alternatively, go to the Storage page
and then tap the storage device’s eject icon.
Setup
Items not listed under Introduction > Box Contents are sold separately.
Microphone
SD
Card
Keyboard
USB
Drive
Guitar
Headphones
Computer
PA Loudspeakers
or Mixer
Power Outlet
Amplifier
Drum Machine

6
Operation
This chapter describes some of HeadRush Looperboard’s basic functions.
Overview
Timeline Page
Mixer Page
This is the length of
the longest track in
this loop.
This is the current tempo, which you
can change by pressing the Tempo
footswitch at the desired speed, or
by tapping here and turning the
encoder.
Tap here to save the
loop.
Each lane displays the track’s recorded audio.
Tap here to access the
navigation menu.
This is the name of the loop.
This is the current
playback position.
These track info
boxes show each
track’s name,
number of bars, and
the number of
recorded layers.
Double-tap the track
name to change it.
This is the Looper Mode
indicator.
Touch and drag
these sliders to
adjust the balance of
each track. Double-
tap to enlarge the
slider for fine
adjustments.
These meters show
the volume level of
the tracks as they
play. Tap and drag
the white line at the
top of a meter to
adjust the volume
level of a track.

7
Navigation Menu
On the Navigation Menu page, you can tap an icon to quickly navigate to HeadRush Looperboard’s
features:
•Timeline: Tap here to access the HeadRush Looperboard’s timeline performance view.
•Mixer: Tap here to adjust volume and panning of looper tracks, click track, and backing track.
•FX: Tap here to assign and use the built-in FX.
•Function: Tap here to access the Function footswitch features.
•Loop Settings: Tap here to adjust the available settings that can be adjusted per loop.
•New Loop: Tap here to discard the current loop and create a new loop.
•Load Loop: Tap here to load a previously saved loop.
•Audio Routing: Tap here to adjust the HeadRush Looperboard’s audio routing settings.
•Backing Track: Tap here to access the backing track player feature.
•Tuner: Tap here to access the tuner feature.
•Storage: Tap here to view available storage and to select a target storage device.
•Transfer: Tap here to enter USB Transfer Mode and transfer files to/from a computer.
•Global Settings: Tap here to adjust the available settings that can be adjusted globally.
•Firmware Update: Tap here to enter Firmware Update mode.
Tap here to return to the previous page. This indicator shows the space used on
your currently selected storage device.

8
Recording & Playing Tracks
The HeadRush Looperboard lets you record audio onto four tracks and store each set of four tracks
as a loop. Each track can have up to 99 layers. Each track can be a minimum of 1 second long, and
each track has no maximum length limit. You can record, play, and stop tracks independently of each
other depending on the loop mode and other settings.
Each track’s info box, meter, and/or waveform will use a color to indicate its current state:
•Red: recording or overdubbing
•Green: playing
•Blue: stopped
Use the Timeline page to view the waveforms of each track’s recorded audio in your loop.
To show the Timeline page, tap the Navigation Menu icon at the top left of the touchscreen,
then tap the Timeline icon.
Use the Mixer page to adjust the volume levels and panning of each track.
To show the Mixer page, tap the Navigation Menu icon at the top left of the touchscreen, then
tap the Mixer icon.
To adjust the volume level of a track, tap and drag the white line at the top of a meter.
To adjust the volume of the main outputs, turn the Main knob.
The left time counter in the bottom bar of the Timeline and Mixer pages indicates the current playback
position of the loop. The right time counter in the bottom bar indicates the length of the longest track
in the loop. Both are displayed as hours:minutes:seconds.centiseconds.
Tip: You can tap the Function footswitch twice to quickly return to the Timeline page from any other
HeadRush Looperboard page.

9
To record a track, press its •Rec/Play/Dub footswitch.
Important: Before recording anything, set the input volume level by turning the Input (1–4) knob for
each input you want to use.
To finish recording and start playback of a track, press its •Rec/Play/Dub footswitch again.
To overdub on a track that is currently playing, press the •Rec/Play/Dub footswitch again.
Tip: Use the Global Settings page to set HeadRush Looperboard to overdub immediately after
recording a track (instead of just playing it).
To stop a track at any point, press its •Stop/–Undo footswitch.
To restart a track's playback, press its •Stop/–Undo footswitch again.
To restart a track and immediately start overdubbing, press its •Rec/Play/Dub footswitch.
Tip: Use the Global Settings page to set HeadRush Looperboard to restart a track’s playback without
overdubbing when pressing the •Rec/Play/Dub footswitch.
To stop all tracks at any point, press the Start/Stop All footswitch when one or more tracks are
playing.
To start playback of all tracks simultaneously, press the Start/Stop All footswitch when all tracks
are stopped.
To undo everything you have recorded since you last pressed a •Rec/Play/Dub footswitch, press
and hold the •Stop/–Undo footswitch for that track for approximately 1.5 seconds.
To re-add everything you just undid, press and hold the •Stop/–Undo footswitch for that track for
approximately 1.5 seconds again.
To peel the most recent layer of a track, hold the •Rec/Play/Dub footswitch for approximately 1.5
seconds.
Important: If a track only has 1 layer, performing the undo function will clear the track, and the layer
cannot be restored.
Tip: Use the Global Settings page to customize the hold functions for the •Stop/–Undo and
•Rec/Play/Dub footswitches.

10
Looper Modes
The HeadRush Looperboard provides 5 different
Looper Modes to record, overdub and play your
looper tracks. The currently selected Looper Mode
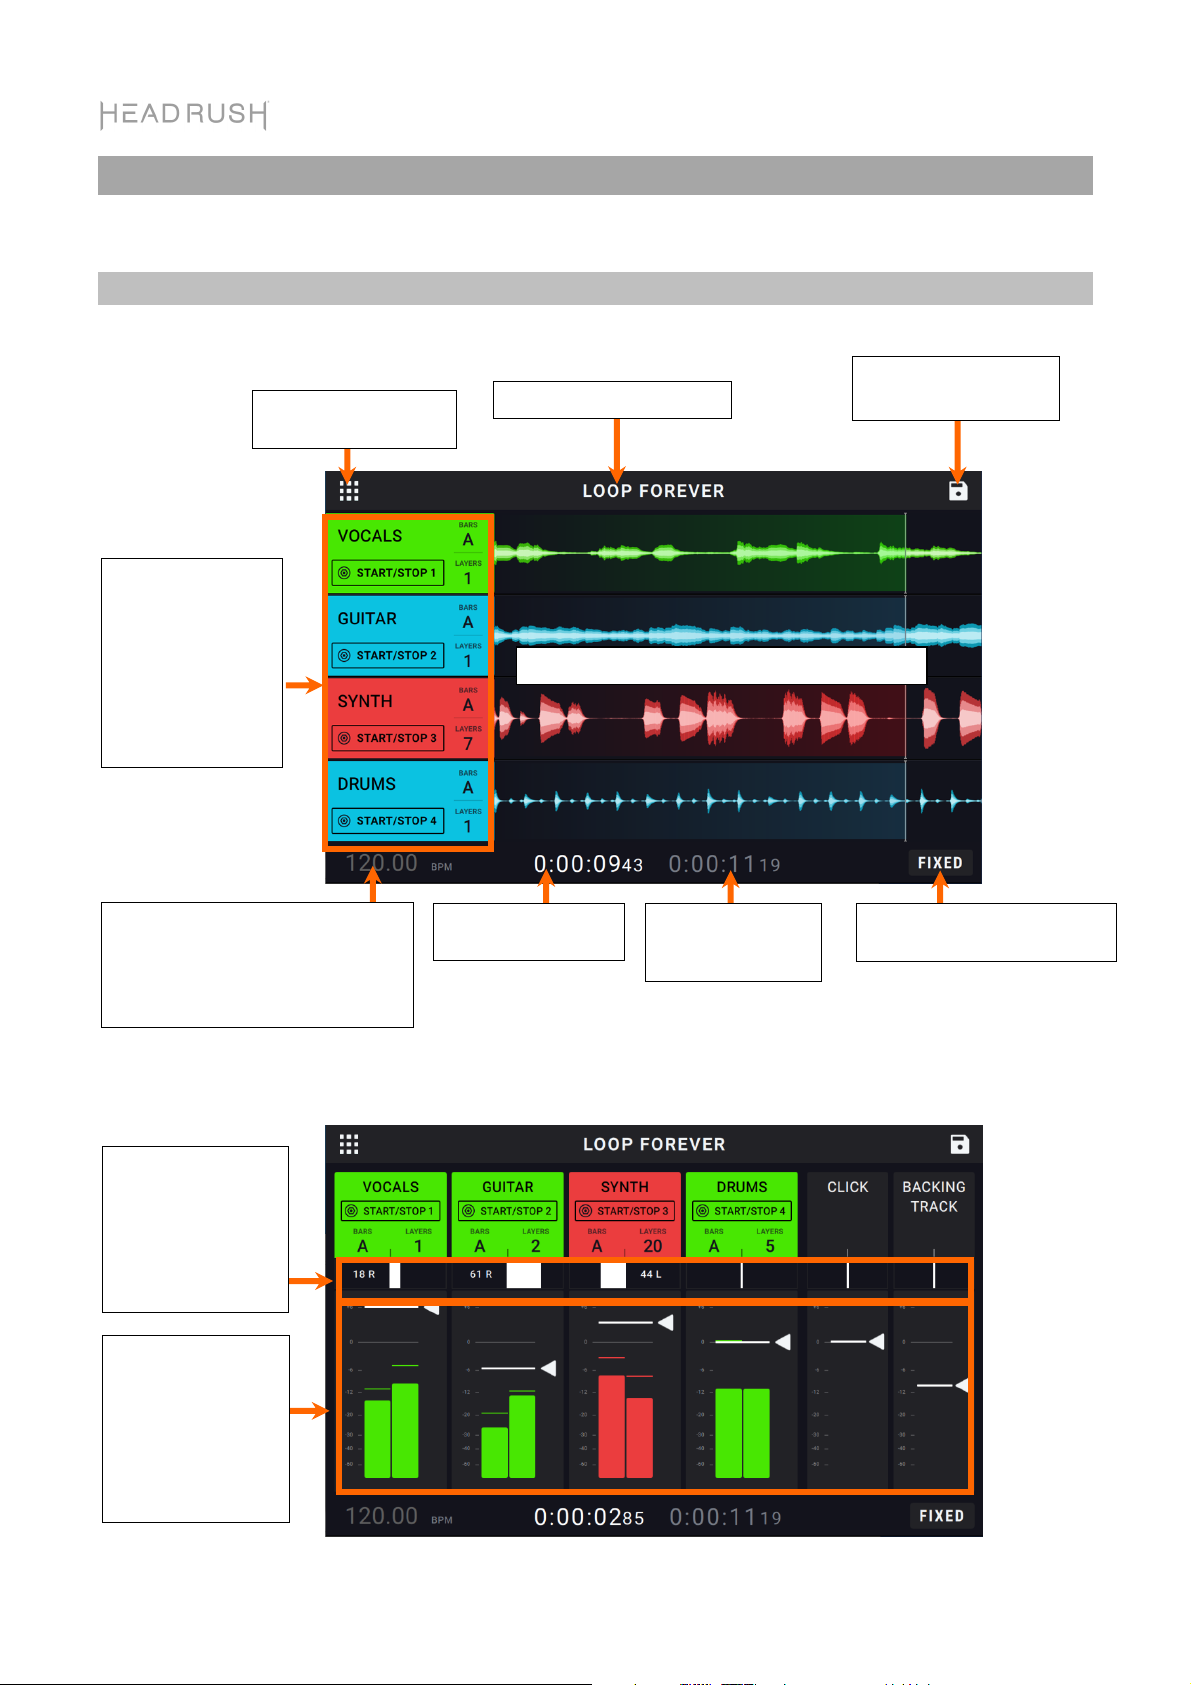
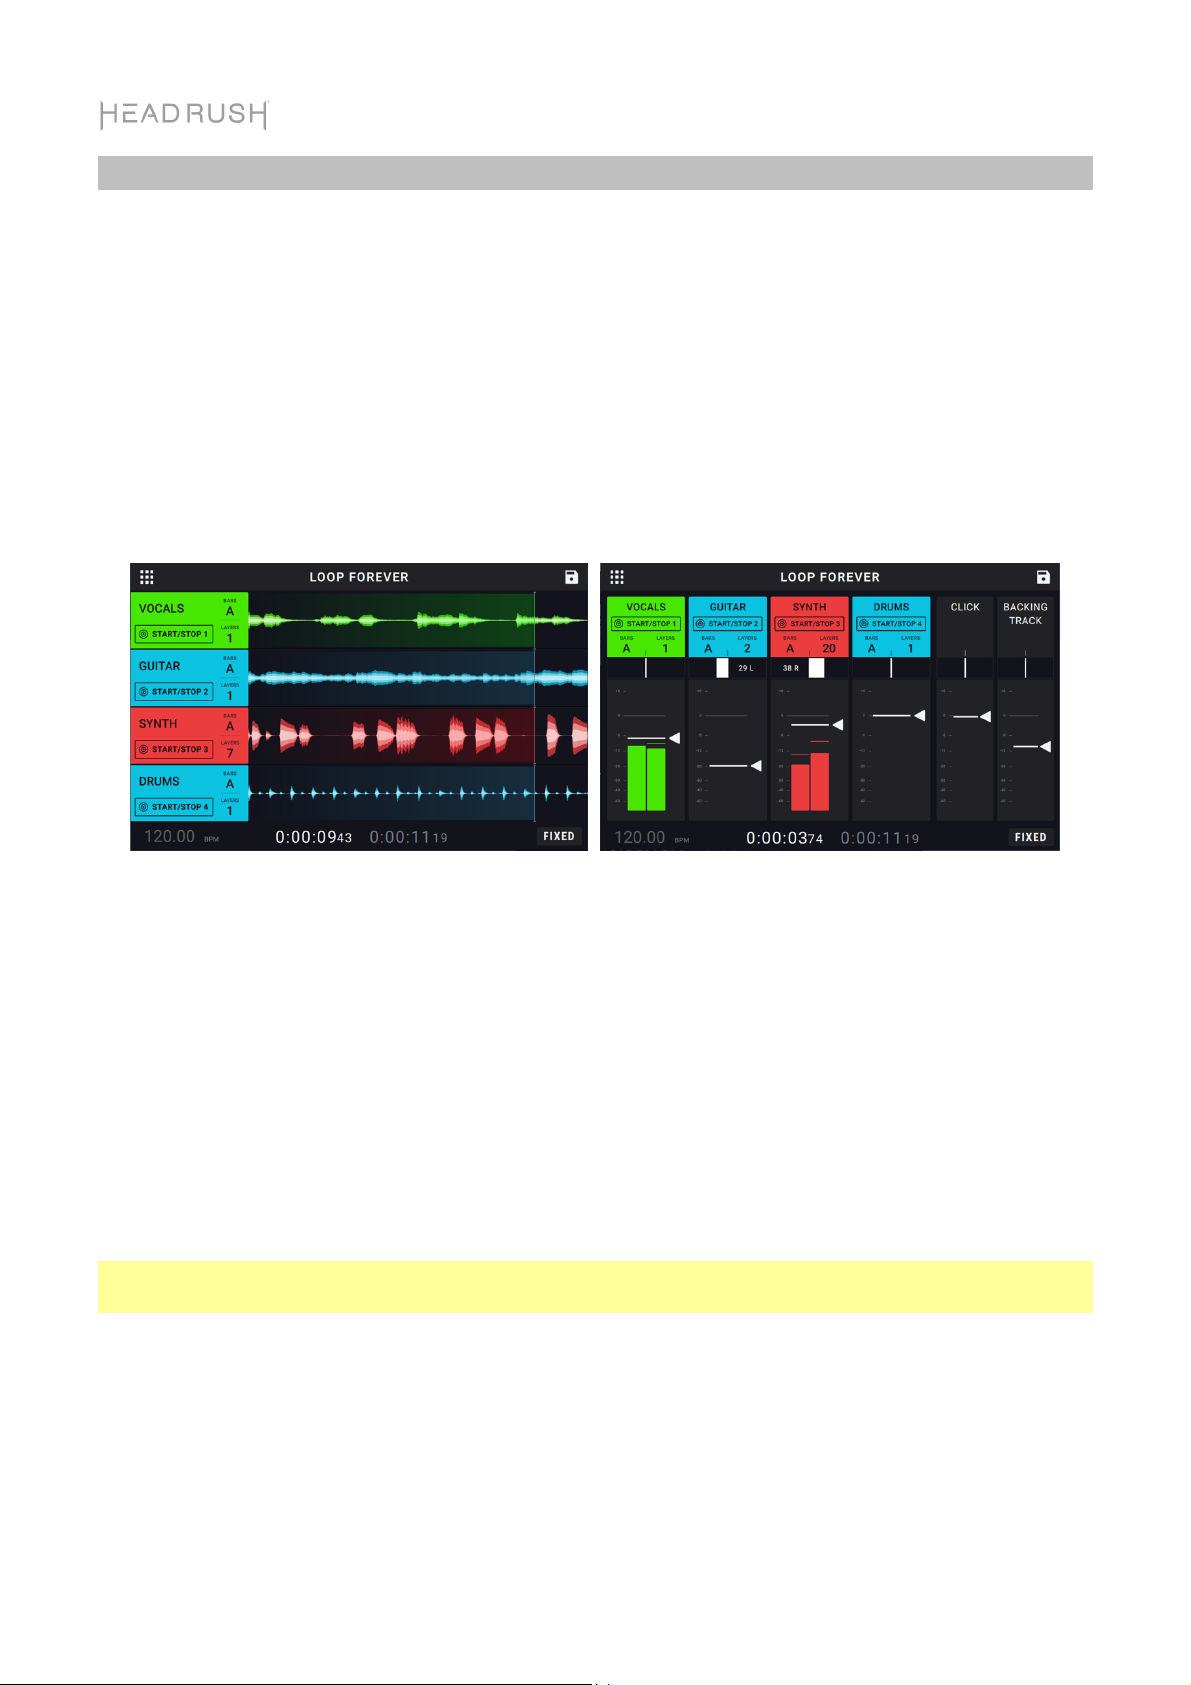
is indicated in the bottom right of the touchscreen
on the Timeline View and Mixer View pages.
Generally, each mode supports a different style of
looping workflow. The best way to find out which
Looper Mode works best with your workflow is to
experiment and have fun!
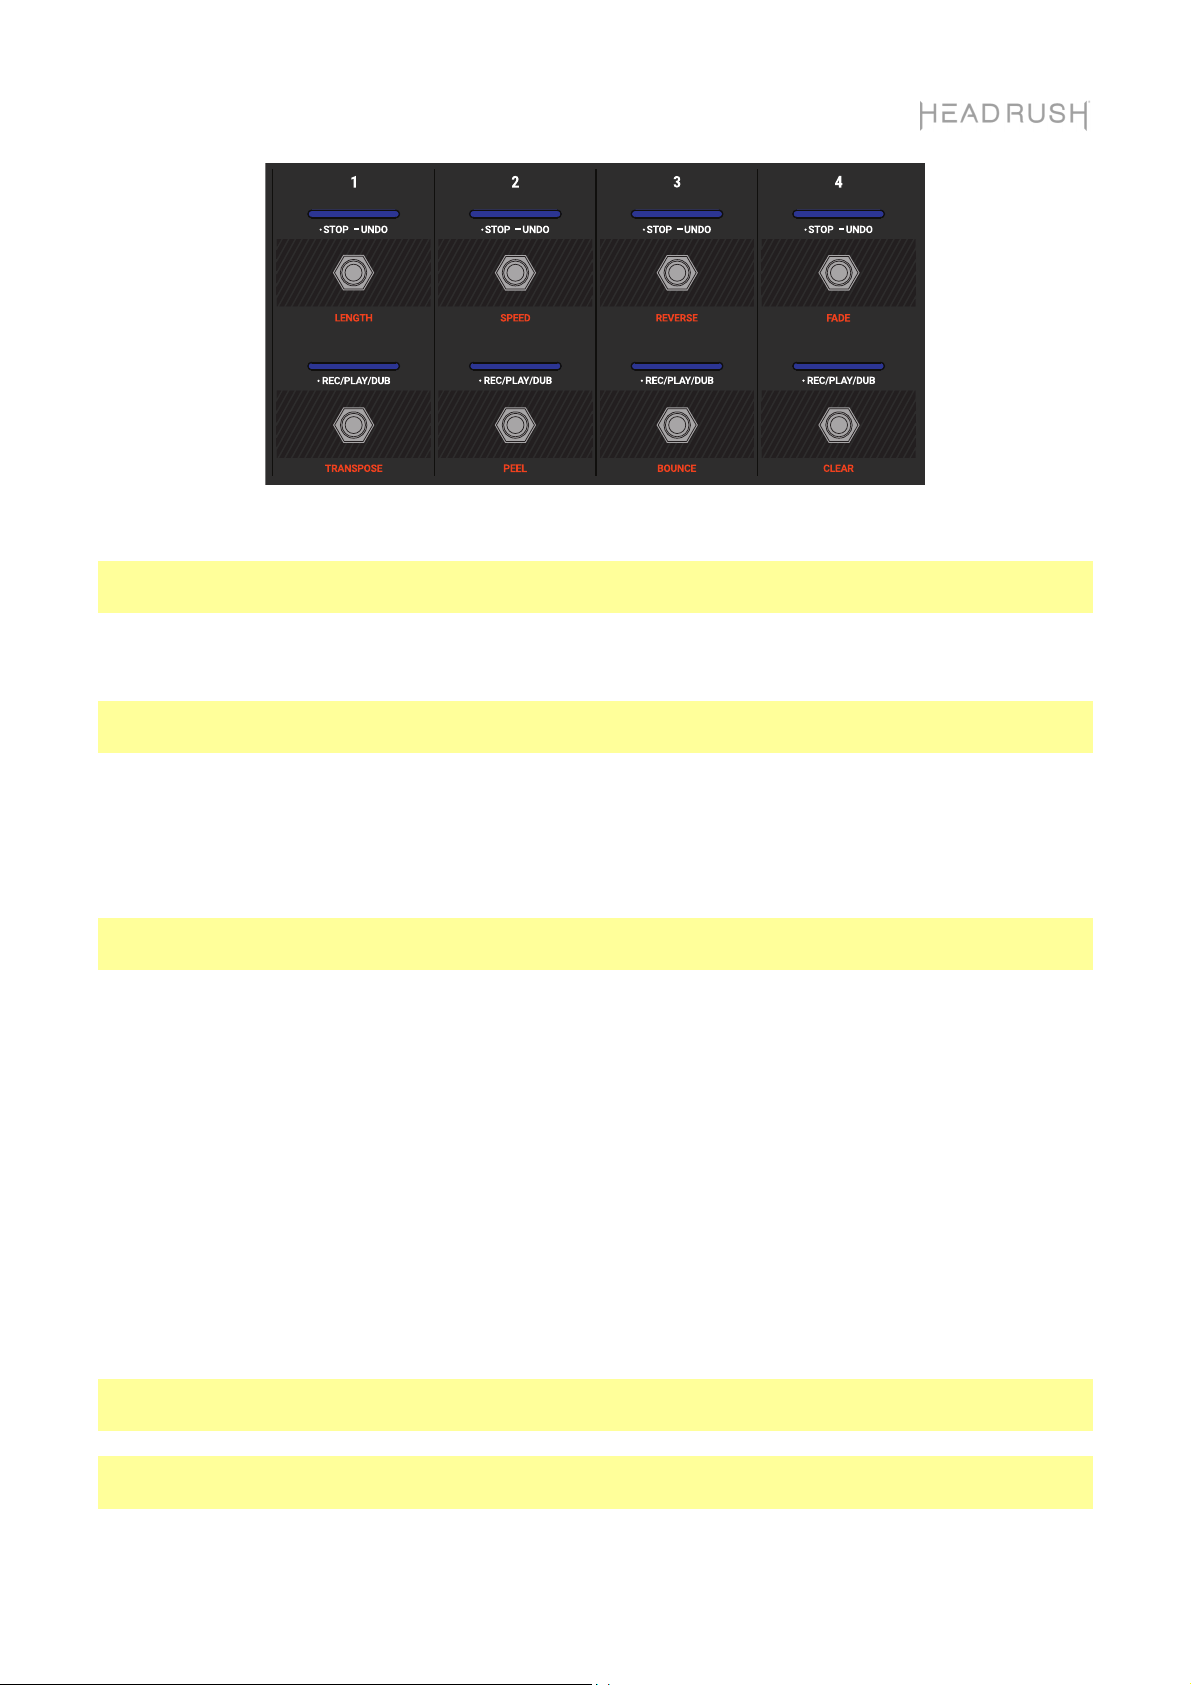
To set how the looper records, overdubs, or
plays your tracks, tap the Looper Mode tab on the
Loop Settings page and then select a mode. You
can access this setting quickly by tapping the
Looper Mode icon on the Timeline or Mixer pages.
Tip: Set your Looper Mode before recording or importing any audio into your loop. While you may be
able to change the selected mode after recording, your options may be limited.
1. Fixed Mode: Use this mode if you want 4 looper tracks with the same length. In this mode:
•You can record, overdub or play all looper tracks simultaneously.
•All track lengths will be the same length as the first recorded looper track.
•When you set a track to record, overdub or play, it will happen immediately.
2. Serial Mode: Use this mode if you want to use each of the 4 looper tracks as a different section
of a song (e.g., verse, chorus, bridge and outro). In this mode:
•You can record, overdub or play on only one looper track at a time.
•All looper tracks can be different lengths.
•When you set a currently playing track to overdub, it will happen immediately.
•When you set a currently stopped track to play or record/overdub, it will happen as soon as
the currently playing track reaches its end and stops. When a track is armed for playback or
recording/overdubbing while another track is playing back, the corresponding LED will flash
green or red, respectively.
3. Sync Mode: Use this mode if you want 4 looper tracks with different lengths that always stay in
sync. In this mode:
•You can record or play multiple tracks simultaneously.
•You must record a primary track first.
•After the primary track has been recorded, all other looper tracks must be the same length, or
a multiple of its length.
•If new tracks are shorter or longer than the primary track, HeadRush Looperboard will
automatically quantize them to keep them in sync with the primary track.
Tip: You can change how tracks will start and stop in Sync Mode on the Track Start/Stop tab of
the Loop Settings page.

11
4. Serial-Sync Mode: This mode is similar to Serial Mode, but it enables you to keep 1 primary looper
track (e.g., a drum or percussion track) playing at all times while switching between different song
sections on looper tracks 2, 3 and 4 (e.g., verse, chorus and bridge). In this mode:
•The primary track and only one other looper track can be playing, recording or overdubbing at
the same time.
•You must record a primary track first.
•After the primary track has been recorded, all other looper tracks must be the same length, or
a multiple of its length.
•HeadRush Looperboard will auto-trim (or extend) the endpoints of the other looper tracks to
always keep them in sync.
Tip: You can change how tracks will start and stop in Serial-Sync Mode on the Track Start/Stop
tab of the Loop Settings page.
5. Free Mode: This mode is useful for creating ambient soundscapes or for musicians who just like
to break the rules! In this mode:
•You can record, overdub or play all looper tracks simultaneously.
•All looper tracks can be different lengths.
•When you set a track to record, overdub or play, it will happen immediately.

12
Importing Audio
In addition to creating loops using input sources, you can also import a .WAV or .MP3 audio file (such
as a recorded drum beat) directly into an empty looper track.
To import an audio file:
1. While viewing the Timeline page, tap the Import
Audio icon on any empty track.
2. Select a source by tapping one of the icons on
the left column of the browser:
•Factory: This is a collection of over 300
exclusive drum and percussion loops
provided by HeadRush.
•Internal: This is the internal storage of
HeadRush Looperboard.
•USB 1/USB 2/SD: These sources will appear
if you have external storage connected to the
respective ports on the rear panel of
HeadRush Looperboard.
3. Use the touchscreen to navigate through
folders, as necessary. You can search for an
audio file in a folder by tapping in the field in the
top center of the touchscreen, next to the
magnifying glass. Tap the X icon to clear your
search.
4. Select a file, and then tap the Play button if you
would like to preview the audio file or tap the
Import button to load the audio file into the
looper track.
5. After tapping the Import button, a dialog will
appear with up to 3 options:
•ADJUST BPM: This will change your loop’s
tempo to match the auto detected tempo of
the imported audio file.
•MATCH BPM: This will change the imported
audio file to match the current tempo of your
loop.
•AS IS: This will import the audio file without
changing the tempo of the audio file, or the
tempo of your loop.
6. You may also need to indicate the number of
bars of your imported file. You can tap the Play
icon to preview the file at this point if needed for
reference.

13
FX Racks
Applying FX
On the FX Page, you can assign multiple effects (called FX Racks) at once to an audio input or looper
track. Each FX Rack is made up of multiple effects that can be individually edited and toggled on the
FX Rack Edit page.
To enter the FX Page, press the footswitch labeled FX, or tap the Navigation Menu icon at the top-
left of the touchscreen, and then tap the FX icon.
To add an FX Rack, tap the plus sign (+) in an empty slot.
To enable or bypass an FX Rack, tap the footswitches labeled 1–4, or tap the On/Off button on the
touchscreen.
To change the FX Rack type of an existing FX Rack, tap the FX Rack icon on the touchscreen.
This icon looks like a guitar, drums, etc.
To change the settings for the FX Rack, tap the knob icon on the touchscreen.
To remove an FX Rack, tap the X icon on the touchscreen.
To customize the footswitch assignments of the FX Racks, tap the Footswitch Assign button at
the bottom of the touchscreen.
To assign FX parameters to an external expression pedal, tap the Expression Pedal Assign
button at the bottom of the touchscreen.
To exit the FX Page, press the footswitch labeled FX,or tap the Navigation Menu icon in the top-
left corner of the touchscreen.
Add
FX Rack
Change FX
Rack Type
Remove FX
Rack
Edit FX Rack
Enable/Bypass
FX Rack

14
Editing FX
To enable or bypass the full FX Rack, tap the Enable/Bypass button in the top left corner of the
touchscreen, underneath the back arrow.
To change the FX Rack type, tap the FX Rack drop-down menu, and then tap the FX Rack type you
would like to load.
To load a factory or previously saved FX Rack preset, tap the Preset drop-down menu, and then
tap the preset you would like to load.
To save your settings as an FX Rack preset, tap the save icon in the top right corner of the
touchscreen.
To set the target audio for the FX Rack, tap the target dropdown menu and then select Inputs 1–4
or Tracks 1–4. If you have previously named your loop’s tracks, the new names will appear instead
of Tracks 1-4.
To enable or bypass individual effects within the FX rack, tap the Enable/Bypass buttons located
below each individual effect’s name.
To access and adjust an individual effect parameter within the FX rack, tap the individual FX
rack’s name, and then tap and drag a parameter slider in the lower section. You can also tap the
parameter slider and then turn the encoder for fine adjustment.
Load Preset
Enable/Bypass
FX Rack
Change FX Rack
Type
Save PresetReturn to FX Page
Enable/Bypass
Individual FX
Individual FX
Parameters
Access
Individual FX
Parameters
Change Target

15
Managing Loops
To create a new loop (and discard unsaved changes), tap the Navigation Menu icon, and then
tap New Loop icon.
To save the current loop, tap the Save icon in the top right corner of the Timeline, Mixer, or
Navigation Menu pages. Tap Save (to save over the existing file) or Save New Loop (to save the loop
as a new file), or tap Cancel to return to the previous screen. A save browser will then appear for you
to select your desired target storage device and folder for saving.
Note: When saving to a storage device using the exFAT or FAT32 file system, the maximum file size
for saving .WAV files is 4GB (about 6 hours and 11 minutes of audio). If you are saving to a storage
device using the FAT16 file system, then the limit for saving .WAV files is 2GB.
To load a previously saved loop, tap the Navigation Menu icon, and then tap the Load Loop icon.
The Load Loop browser will then appear, where you can locate a loop and then tap the Load button
to load it.
You can also Delete or Rename a previously saved loop in the load loop browser by tapping the loop
name, and then tapping Delete or Rename buttons accordingly.
Tip: You can search for a Loop in a folder in the Load or Save Loop browsers by tapping in the search
field in the top center of the touchscreen, next to the magnifying glass. Tap the Xicon to clear your
search.
Tap to create a new loop
Navigation Menu Ta
p
to save
y
our loo
p
Tap to load an existing loop

16
Storage
As you create and save loops, your HeadRush Looperboard's internal storage may become full. To
prevent this, you can connect external USB or SD storage as needed. This gives you virtually unlimited
storage of loops!
To enter the Storage page, tap the Navigation Menu icon in the top-left corner, and then tap the
Storage icon.
On the storage page, you will see meters that show the available storage space as well as the
remaining available looping time for HeadRush Looperboard’s internal storage, as well as any
connected USB/SD external storage devices.
To select a new storage device to use for looping, tap the name of the device. Once the device
has been selected, all new loops created will be using this storage device.
After making your selection, you can exit the Storage page by tapping the Navigation Menu icon in
the top-left corner of the touchscreen.
Tip: If you save a loop to an external storage device before changing to the external storage device
on the storage page, you will still be working with the loop in its initial location. If you want to continue
to work on the external storage device, you will need to load the loop from its new storage device.
Important: To avoid file loss or damage to your media, only disconnect external USB and SD storage
devices from HeadRush Looperboard while it is powered off. Alternatively, tap the device’s eject icon
on the storage page.

17
Audio Routing
You can use the Audio Routing page to control where your input, looper track and output audio signals
are sent. These settings are global settings (not per loop) so that you can quickly configure HeadRush
Looperboard to work best for your gear and performance settings.
To show the Audio Routing page, tap the Audio Routing icon on the Navigation Menu page.
To show the page for the inputs, tracks, or outputs, tap Input Setup, Track Setup or Output
Setup, respectively.
Input Setup
To adjust the level of an input signal, turn its
Input Gain knob (1–4) on the top panel.
To adjust the panning of an input signal, tap its
Pan slider and drag left or right. You can enlarge
this slider to make more detailed adjustments by
double-tapping.
To select an output to directly monitor the input
signal, tap the desired Output 1–4button under
Dry Sends or the Headphones Icon button under
Monitor. Audio signal from the input will be sent
directly to the selected output(s). Use the Main and
Phones knobs to adjust the output volume level of
the outputs and phones, respectively.
To stereo link your inputs if you are using a stereo audio source (e.g., drum machine, keyboard,
etc.), tap the On button for Inputs 1+2 and/or Inputs 3+4 under Stereo Link on the right side of the
touchscreen. Tap the Off button to disable stereo link.
Monitor Setup
You can use the Monitor Setup page for listening
to your inputs while recording, overdubbing, and
playing back loops. You can control the level of
each input, as well as which output that you would
like to monitor to them on.
To adjust the monitor level of an input, tap and
drag the white line at the top of its meter.
To select an output for monitoring, tap the
desired Output 1–4buttons under Sends or the
Headphone Icon button Monitor.

18
Track Setup
To route an input to a looper track, tap the desired
Input 1–4 button. When Stereo Link is enabled,
Inputs 1+2 and/or Inputs 3+4 will be selected
together.
To select a track output mode, tap the Mono
(monoaural) or Stereo (binaural) buttons.
To route a track to an output, tap the desired
Output 1–4button. If the output mode is Stereo,
Outputs 1+2 and/or Outputs 3+4 will be selected
together.
To route a track to the phones output, tap the
headphone icon at the bottom of each track. Use the
Phones knob to adjust the output volume level.
To route the click to an output, tap an Output 1–4button under Click Output on the left side of the
touchscreen. Tap the headphone icon to route the click to the phones output. Use the Main and
Phones knobs to adjust the output volume level of the outputs and phones, respectively.
To select routing for the stereo backing track, tap the 1+2 or 3+4 buttons under Backing Track
Output on the left side of the touchscreen. Tap the headphone icon to route the backing track to the
phones output. Use the Main and Phones knobs to adjust the output volume level of the outputs
and phones, respectively.
Output Setup
To adjust the output level of an individual output,
tap and drag the white line at the top of its meter.

19
Using Other Functions
Press the Function footswitch to show the
Functions page in the touchscreen. The
footswitch indicator will be lit orange.
To select a function, press the
corresponding footswitch (labeled on the
top panel in orange) or tap it on the
touchscreen.
You can access these functions by using
their corresponding footswitches or tapping
the respective icon on the touchscreen:
•Length: Select this function to multiply or divide the length of all tracks.
•Speed: Select this function to multiply or divide the speed and pitch of all tracks.
•Reverse: Select this function to reverse the playback direction of one or more tracks.
•Fade: Select this function to create a fade-out or fade-in effect on one or more tracks.
•Transpose: Select this option to shift the pitch of one or more tracks up or down in semitones.
•Peel: Select this option to permanently delete the top-most layer from a track of the loop. You
can use this function to strip the track all the way down to its original layer!
•Bounce: Select this option to copy one or more tracks of the loop to a single track, creating
available tracks in your loop.
•Clear: Select this option to delete the entire contents of one or more tracks.
You can access these functions by using their corresponding footswitches only:
•Loop Select: Select this function to load a different loop.
•Backing Track: Select this option to control the backing track feature.
•Tuner: Select this option to use the built-in tuner.
•Exit: Select this option to return to the previous page.
To exit the Functions page, press the Exit footswitch.

20
Guía de inicio rápido (Español)
Introducción
Contenido de la caja
HeadRush Looperboard
Cable USB
Adaptador de alimentación
Tarjeta de descarga de software
Guía de inicio rápido
Manual sobre la seguridad y garantía
Importante: Esta guía de inicio rápido abarca la funcionalidad básica de la HeadRush Looperboard.
Visite headrushfx.com para descargar la Guía del usuario completa y detallada, la cual también puede
contener información adicional sobre nuevas características y mejoras tras las actualizaciones de
firmware.
Soporte
Para obtener la información más reciente acerca de este producto (documentación, especificaciones
técnicas, requisitos de sistema, información de compatibilidad, etc.) y registrarlo, visite
headrushfx.com.
Para obtener soporte adicional del producto, visite headrushfx.com/support.
Other manuals for Looperboard
3
Table of contents
Languages:
Other HEADRUSH Recording Equipment manuals
Popular Recording Equipment manuals by other brands

Test-Um
Test-Um Turbo Tone TG200 operating instructions

Argiriadis Analogue Electronics
Argiriadis Analogue Electronics DU EQ 2022 user guide

ALLEN & HEATH
ALLEN & HEATH Qu Series Service guide

Ambient
Ambient ASF-2 MKII manual

Panasonic
Panasonic AJ-HPM100P operating instructions

Novation
Novation LaunchPad S Getting started guide