HEADRUSH PRIME User manual

User Guide
English
Manual Version 1.0.0

2
Table of Contents
(1.0) Introduction................................ 4
(1.1) Box Contents .......................................4
(1.2) Support.................................................4
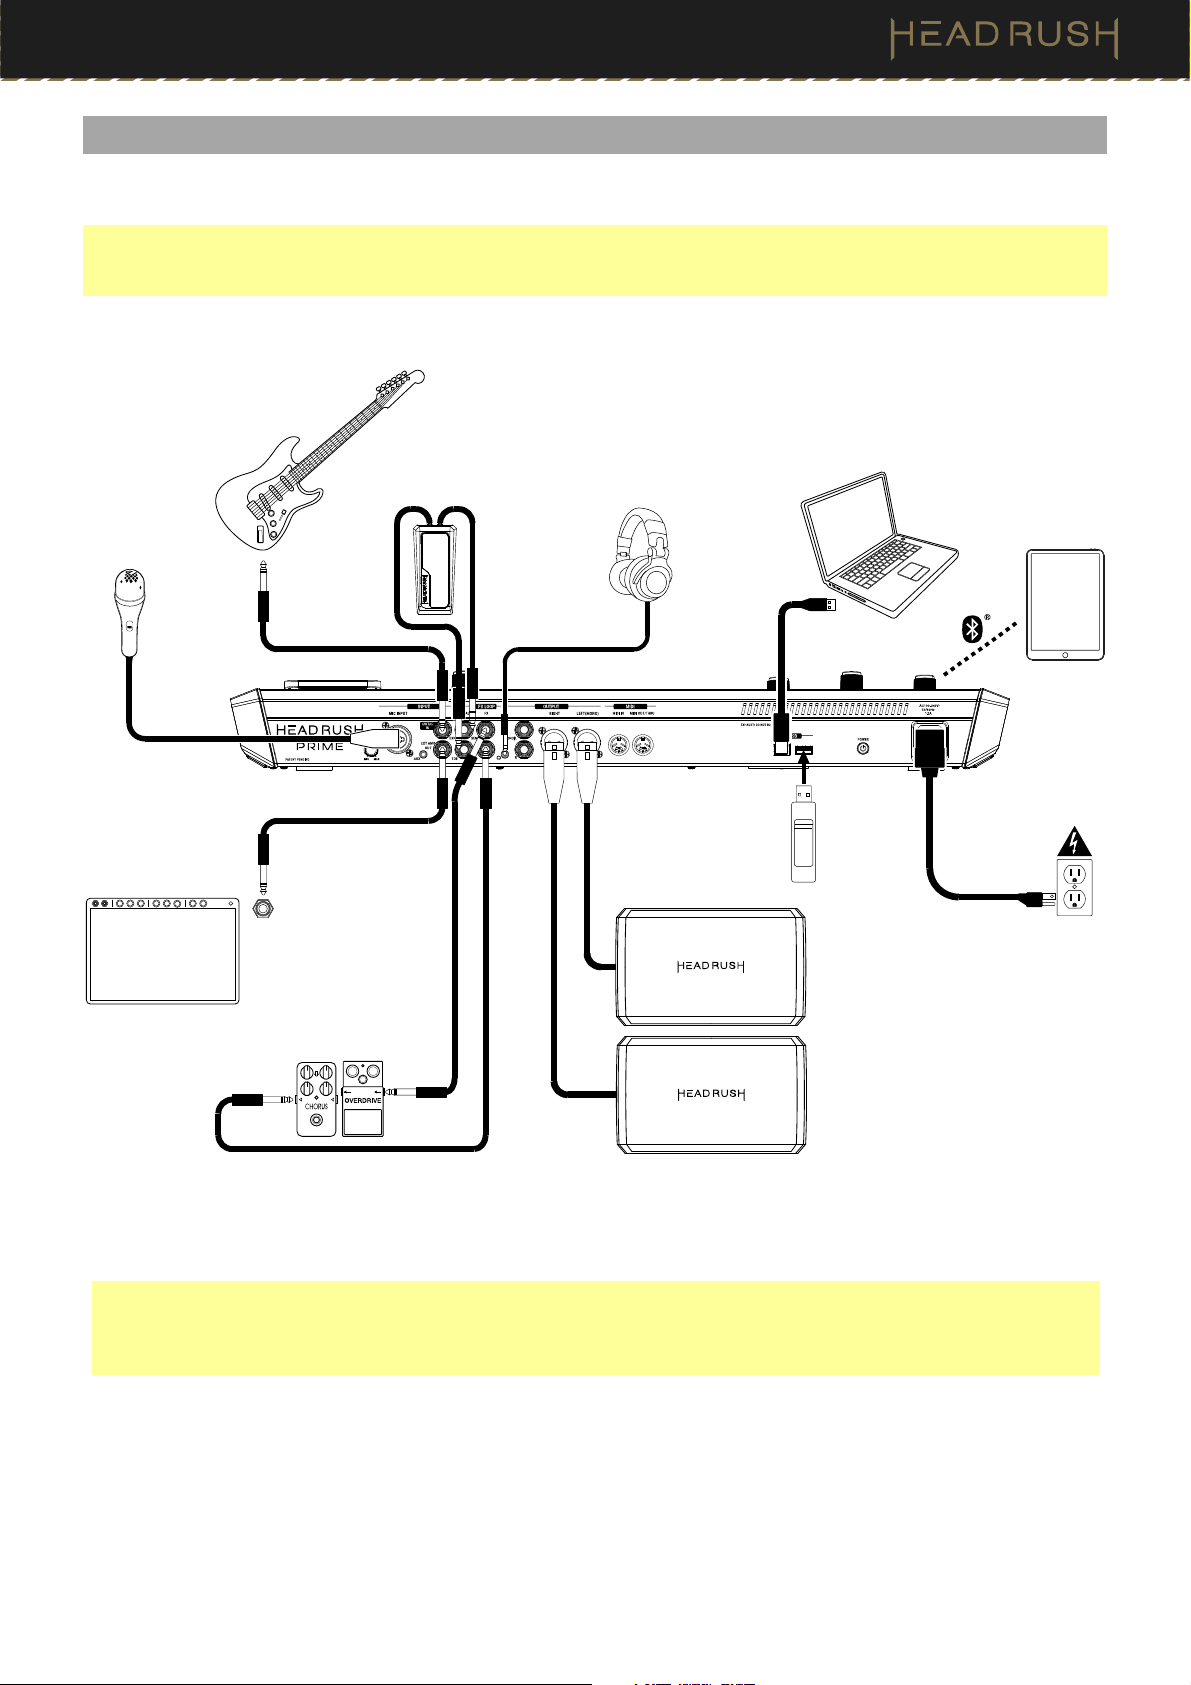
(2.0) Setup .......................................... 5
(3.0) Features ..................................... 6
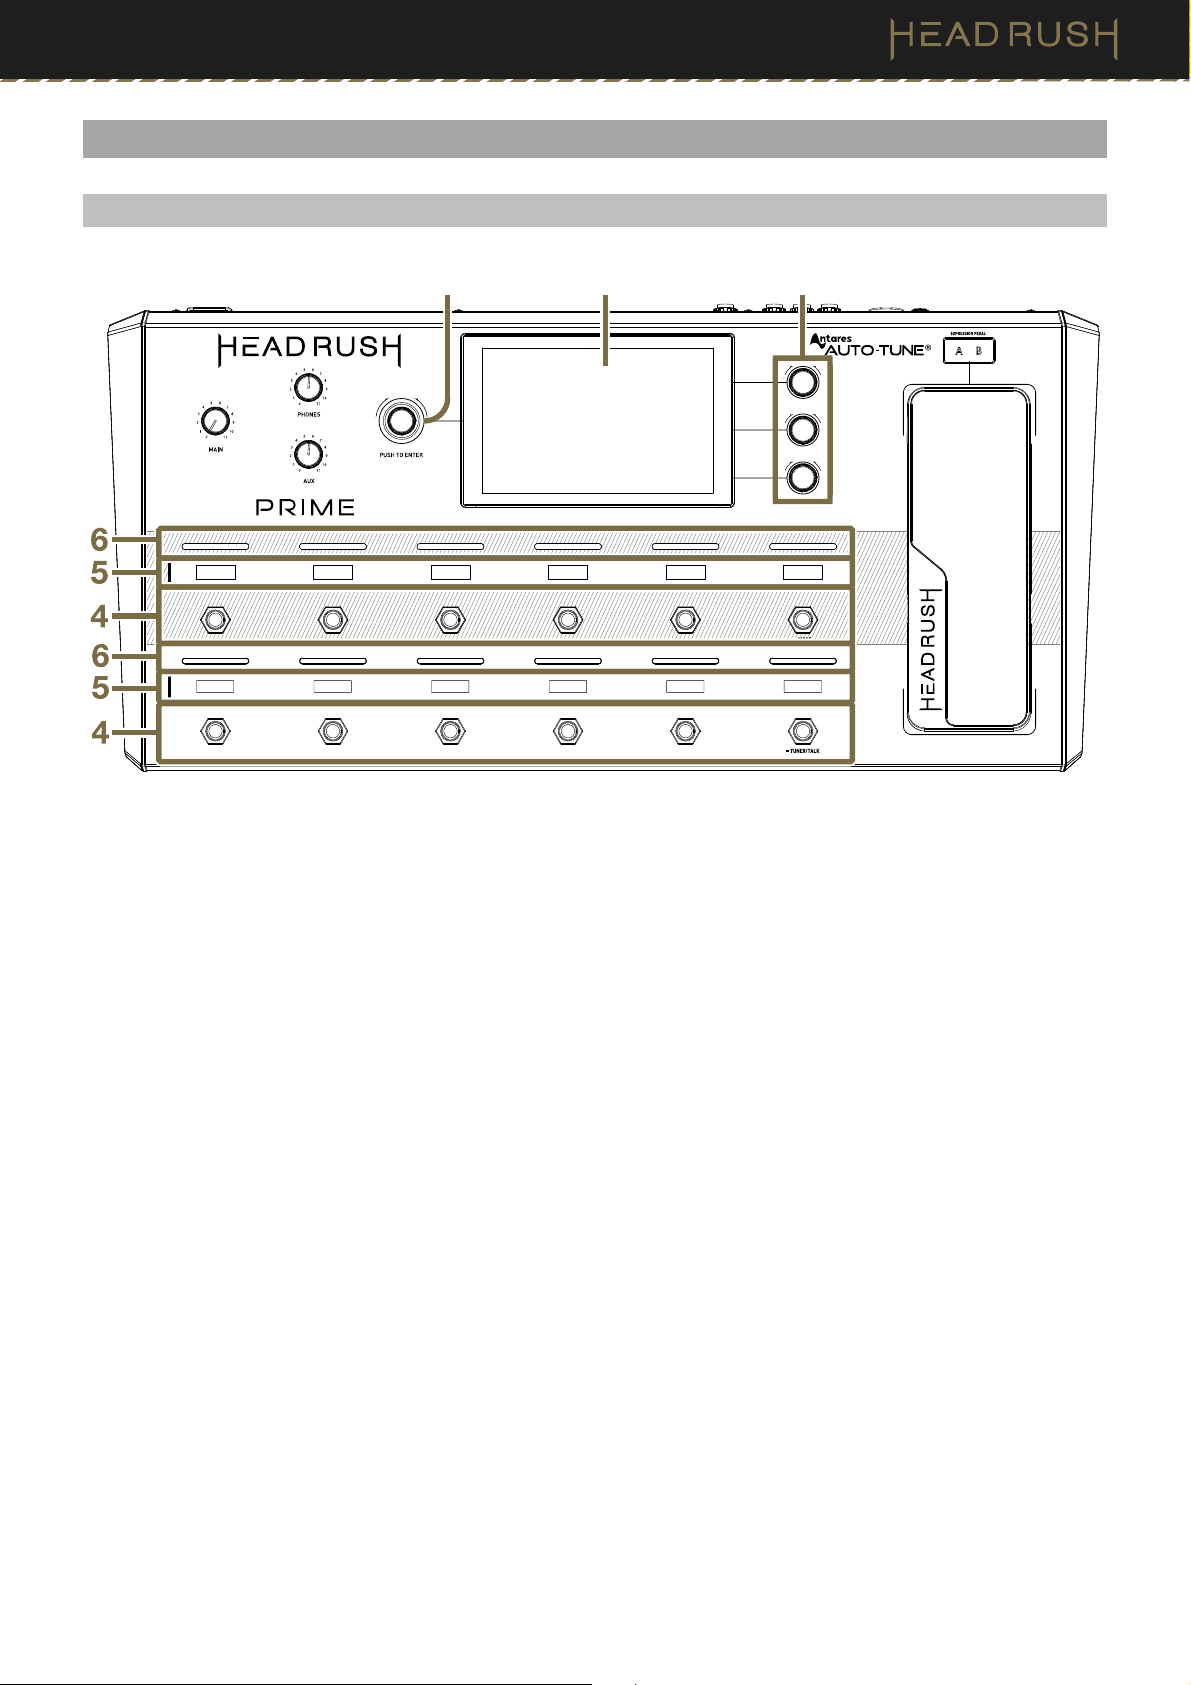
(3.1) Top Panel .............................................6
(3.2) Rear Panel............................................8
(4.0) Operation ................................. 10
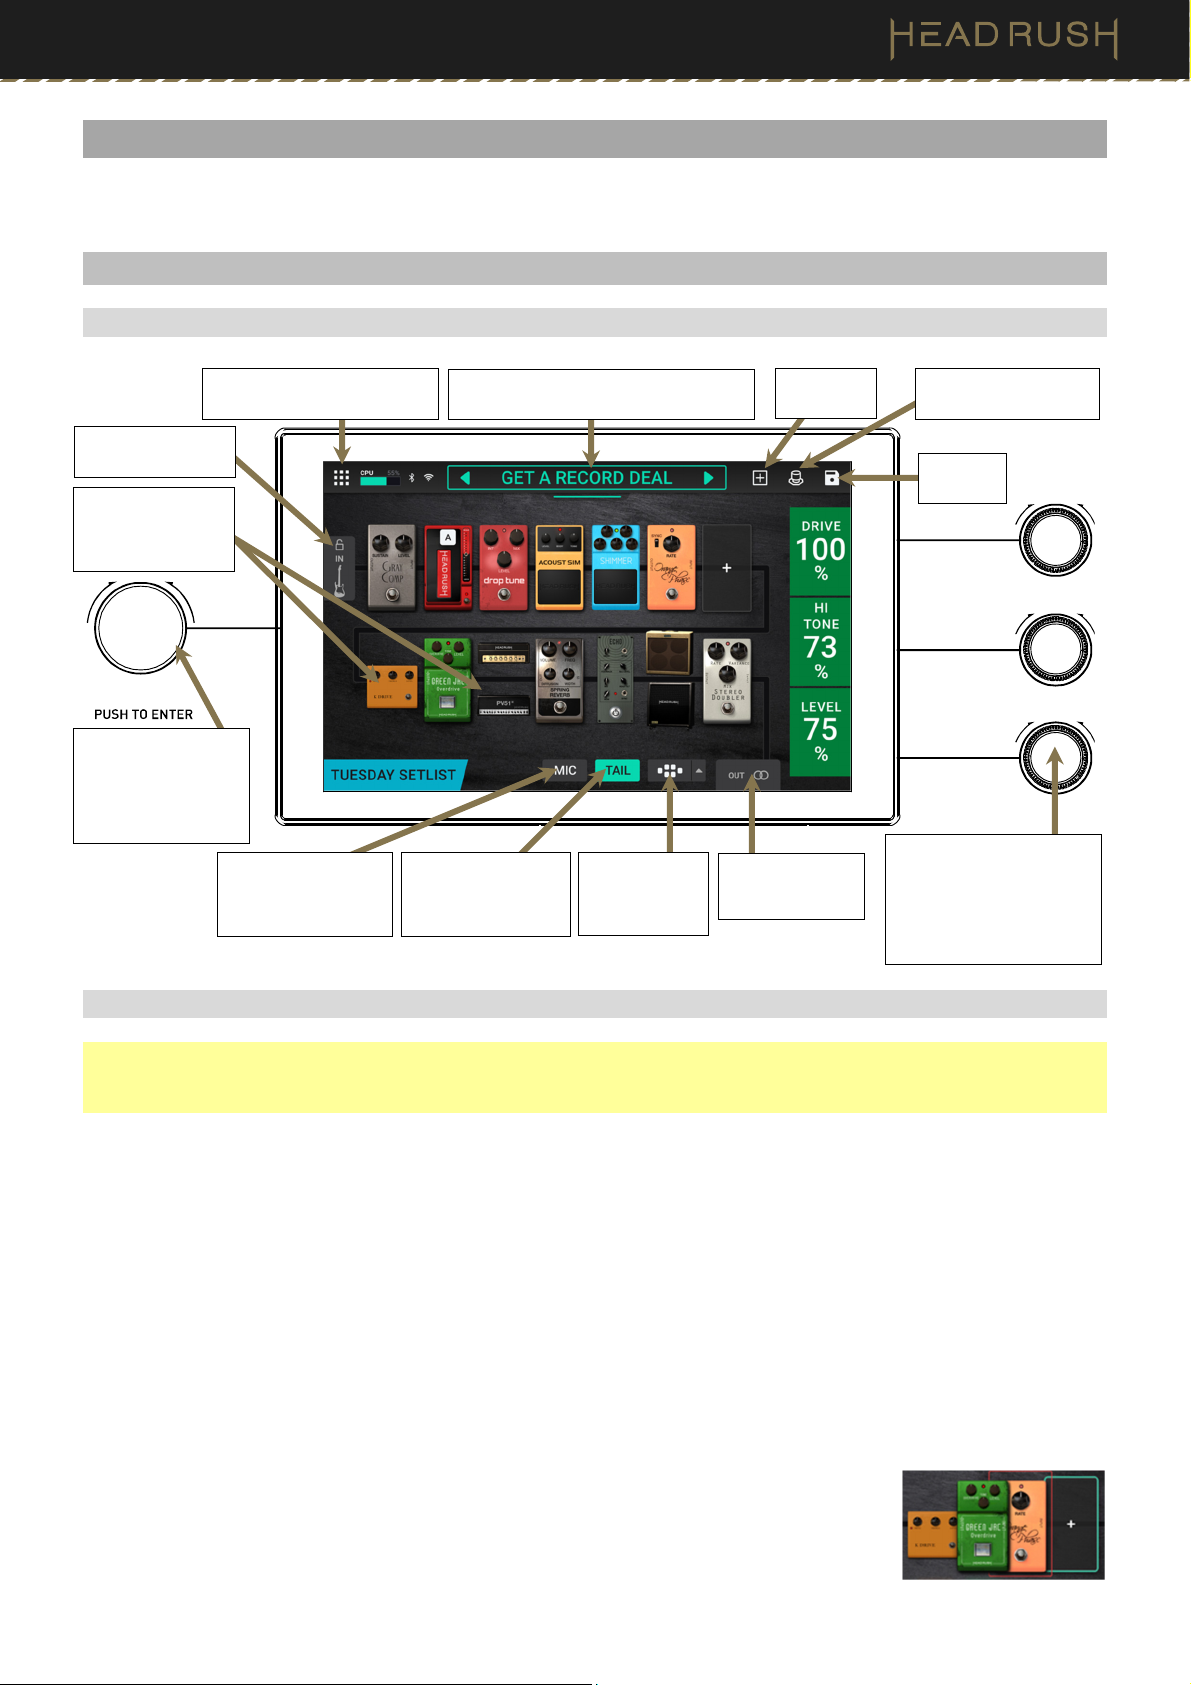
(4.1) Main Screen ....................................... 10
(4.1.1) Overview ..............................................10
(4.1.2) Basic Operations .................................10
(4.1.3) Reverb/Delay Tail Spillover..................11
(4.2) Menu Screen...................................... 12
(4.3) Rigs.....................................................13
(4.3.1) Creating a New Rig..............................13
(4.3.2) Signal Path...........................................14
(4.3.3) Stereo vs. Mono...................................16
(4.3.4) Saving a Rig.........................................17
(4.3.5) Renaming a Rig....................................18
(4.3.6) Deleting a Rig.......................................18
(4.4) Adjusting Settings .............................19
(4.4.1) Overview ..............................................19
(4.4.2) Parameters...........................................19
(4.4.3) Saving a Block Preset..........................24
(4.5) Footswitch Modes............................. 25
(4.5.1) Stomp Mode ........................................25
(4.5.2) Rig Mode..............................................25
(4.5.3) Hybrid Mode ........................................26
(4.5.4) Setlist Mode .........................................26
(4.5.5) Song Mode...........................................26
(4.6) Hardware Assign ............................... 27
(4.6.1) Footswitches........................................28
(4.6.2) Scenes..................................................29
(4.6.3) Quick Parameters.................................30
(4.6.4) Expression Pedal .................................30
(4.7) Hands-Free Mode ............................. 32
(4.8) File Browser....................................... 33
(4.9) Setlists................................................ 34
(4.10) Song View ........................................ 36
(4.11) Practice Tool.................................... 37
(4.12) Tuner ................................................ 38
(4.13) Metronome ...................................... 39
(4.14) Looper .............................................. 40
(4.14.1) Additional Looper Settings ................42
(4.15) HeadRush Cloud .............................43
(4.16) USB................................................... 45
(4.16.1) Transferring Files & Settings ..............45
(4.16.2) Recording...........................................46
(4.16.3) Reamping ...........................................47
(4.17) Lock Screen..................................... 48
(4.18) Amp Cloner ...................................... 49

3
(4.19) Mic Dry Out ......................................51
(4.20) Global EQ ..........................................52
(4.21) Global Settings .................................53
(4.22) External MIDI Control ......................59
(5.0) Appendix ................................... 60
(5.1) Technical Specifications....................60
(5.2) Trademarks & Licenses .....................60

4
(1.0) Introduction
(1.1) Box Contents
HeadRush Prime
USB Cable
Power Cable
Software Download Card
Quickstart Guide
Safety & Warranty Manual
(1.2) Support
For the latest information about this product (documentation, technical specifications, system requirements,
compatibility information, etc.) and product registration, visit headrushfx.com.
For additional product support, visit headrushfx.com/support.

5
(2.0) Setup
Items not listed under (1.1)Introduction >Box Contents are sold separately.
IMPORTANT! In the (4.21) Global Settings menu, make sure you set the Outputs to send signal at amp level if
you are using a traditional guitar amplifier, or line level (default) if you are using a full-range flat-response amplifier,
mixer, PA speaker or audio interface.
Guitar
Full-range, flat-response amplifier
Headphones
External effect stompboxes,
modules, etc.
Computer
(optional)
Power
outlet
Expression
Pedal
Microphone
USB Flash
Drive
* IMPORTANT! Only connect this output to amplifiers that have a "short-to-sleeve" footswitch input. If you
connect this output to any other type of footswitch input, you may cause permanent damage to your equipment.
If you are unsure if your amplifier has a "short-to-sleeve" footswitch input, please consult the amplifier's manual
or manufacturer to confirm before attempting.
Amp
Footswitch
Input*
Tablet

6
(3.0) Features
(3.1) Top Panel
1. Main Display
This full-color multi-touch display shows information relevant to HeadRush Prime’s current operation. Touch
the display (and use the hardware controls) to control the interface. See (4.1) Main Screen to learn how it works.
2. Parameter Knobs
Turn these knobs to adjust the parameters or settings shown next to them in the main display.
3. Encoder
Turn this encoder to scroll through the available menu options or adjust the parameter values of the selected
field in the display. Push the encoder to confirm your selection.
4. Footswitches
Press these footswitches to activate or deactivate the assigned block or scene, or to load the assigned rig. See
(4.5) Footswitch Modes for more information.
5. Footswitch Displays
These display strips indicate the block, rig, or scene assigned to each footswitch.
6. Footswitch Indicators
These lights indicate whether the block, rig, or scene assigned to each footswitch is on (brightly lit) or off (dimly
lit).
3 1 2

7
7. Expression Pedal
Use this pedal to adjust the assigned parameter/parameters. See the (4.6.4) Hardware Assign > Expression
Pedal for more information.
8. Expression Pedal Status
These small LEDs indicate the current status of the expression pedal.
9. Main Volume
Turn this knob to adjust the volume level of the Outputs.
10. Phones Volume
Turn this knob to adjust the volume level of the Phones Output.
11. Aux Volume
Turn this knob to adjust the volume level of the Aux Input.
Important:The audio signal from the aux input is routed directly to the outputs of HeadRush Prime without any
modeling or effects applied and cannot be used by the looper. It is also unaffected by the main volume or
phones volume knobs.
9 8
7
10
11

8
(3.2) Rear Panel
1. Power Input (IEC)
Connect this input to a power outlet using the included power cable.
2. Power Switch
Press this button to turn HeadRush Prime’s power on.
3. Vent
Make sure this vent is unobstructed while using HeadRush Prime.
4. USB-B Port
Connect this USB port to a computer using a standard USB cable. This connection allows HeadRush Prime to
send and receive the digital audio signal to and from your computer. You can also use this connection to import
or export rigs, block presets, and setlists. See (4.16) USB for more information.
5. USB Type-A Port
Connect a USB flash drive to this USB port for additional storage. A class-compliant USB device can also be
connected to this USB port for external MIDI control.
6. Guitar Input (1/4”/6.35 mm, TS)
Connect your guitar to this input using a standard instrument cable.
7. Mic Input (XLR or 1/4”/6.35 mm, balanced)
Connect a microphone to this input using a standard XLR or 1/4” (6.35 mm) microphone cable. You can enable
or disable +48V phantom power for these inputs in the (4.21) Global Settingsscreen.
Important: Only enable phantom power if your microphone requires it. Most dynamic microphones and ribbon
microphones do not require phantom power, while most condenser microphones do. Consult your microphone's
documentation to find out whether it needs phantom power.
8. Mic Input Gain
Use this knob to adjust the level of the Mic Input. View the current level of the microphone by double tapping
the input block to make sure the level is not low or clipping.
9. Aux Input (1/8”/3.5 mm, TRS)
Connect an optional audio source (e.g., smartphone, tablet, etc.) to this input using an 1/8” (3.5 mm) stereo
cable.
10. Expression Pedal Input (1/4”/6.35 mm, TRS)
Connect an optional secondary expression pedal to this input using a standard instrument cable.
12354
9
678

9
11. Expression Pedal Toe Switch Input (1/4”/6.35 mm, TS)
Connect the toe switch output of your optional expression pedal to this input using a standard 1/4” (6.35 mm)
TS cable.
12. FX Send Output (1/4”/6.35 mm, TRS)
Connect this output to the input of another effects module, an effect pedal, or the effects loop return of an
amplifier.
13. FX Return Input (1/4”/6.35 mm, TRS)
Connect this input to the output of another effects module, an effect pedal, or the effects loop send of an
amplifier.
14.External Amp Footswitch Output(1/4”/6.35 mm, TRS)
Connect this output to the footswitch input of an external guitar amplifier to toggle channels or turn reverb on and
off on the amplifier using HeadRush Prime.
IMPORTANT!Only connect this output to amplifiers that have a “short-to-sleeve” footswitch input. If you
connect this output to any other type of footswitch input, you may cause permanent damage to your equipment.
If you are unsure if your amplifier has a “short-to-sleeve” footswitch input, please consult the amplifier's manual
or manufacturer to confirm before attempting.
15. Phones Output (1/8”/3.5 mm, TRS)
Connect standard 1/8” (3.5 mm) stereo headphones to this output. Use the phones volume knob to control
the volume level.
16. Outputs (1/4”/6.35 mm, TRS)
Connect these outputs to the inputs of your amplifier, audio interface, etc. If you only need to use one output,
use the one labeled (Mono) L.
17. Outputs (XLR)
Connect these outputs to the inputs of your mixer, active loudspeaker, etc. If you only need to use one output,
use the one labeled Left (Mono).
18. MIDI Input (5-pin DIN)
Use a standard MIDI cable to connect this input to the MIDI output of an optional external MIDI device.
19. MIDI Out/Thru (5-pin DIN)
Use a standard MIDI cable to connect this output to the MIDI input of an optional external MIDI device. You
can set this output to be a standard MIDI output or MIDI throughput in the (4.21) Global Settings screen.
12 16 1817
14 11
15
13
19

10
(4.0) Operation
This chapter describes HeadRush Prime’s functions.
(4.1) Main Screen
(4.1.1) Overview
(4.1.2) Basic Operations
Important: The sequence of blocks in your signal chain is not necessarily reflected in the footswitches. You can
freely assign blocks to available footswitches without changing your signal chain at all—and vice versa. See (4.6.1)
Hardware Assign > Footswitches to learn about this.
To assign a block (amp, cab, impulse response, or effect) to an empty slot, tap the () icon and then use the list
that appears. See (4.3.1) Rigs > Creating a New Rig to learn about this.
To show a block’s Detailed Settings screen, double-tap it. Its settings screen will appear with its preset menu,
parameters, and assigned color. See (4.4) Adjusting Settings to learn about this.
To show a block’s parameters on the right edge of the screen, tap the block so it is outlined in green. You can
then turn the parameter knobs to adjust the parameters to their left. If a block has more than three parameters
that you would like to adjust, drag your finger up or down the column to bring the additional parameters into
focus. When no block is selected, the parameters will be ones that you assign in the (4.6) Hardware Assign screen.
To rearrange the blocks in your signal chain, tap and drag a block to another slot or
between two other blocks (the ones after that position will shift one slot further down
the signal chain).
Tap to view the Hardware
Assign screen.
Tap and drag this bar downward to view the
Rig List screen. Double-tap to rename the rig.
Tap to create
a new rig.
Tap to view the Menu screen and
access more features and settings.
Double-tap to view the
Input Settings screen.
Double-tap an effect,
amp, or cab to view its
Detailed Settings
screen.
Turn the parameter knobs to
adjust the corresponding
parameters. If a block has more
than three parameters, drag
your finger up or down this
column to bring the additional
parameters into focus.
This button enables or
disables reverb and
delay tails when
switching to another rig.
Tap to turn on/off the dry
microphone input when
using a signal chain type
without vocal FX.
Tap to change the
signal chain type
(guitar, vocal,
guitar/vocal, etc.).
Double-tap to view
the Output Settings
screen.
Tap to save
the rig.
Turn the encoder to
move through selectable
items onscreen or to
adjust parameters. Press
the encoder as an Enter
command.

11
To activate or deactivate a block, press the footswitch assigned to it, or tap the block
and then tap the On/Off button that appears at the bottom of the screen.
To switch an amp, cab, or IR between a dual and single configuration, tap the amp,
cab, or IR, then tap thethe 2X button that appears at the bottom of the screen.
To remove a block, tap and hold the block, and then drag it to the bottom bar.
To load another rig (preset), do any of the following:
•Press the upper-left (Rig ) or lower-left (Rig ) footswitch
to load the previous or next rig immediately.
•Tap the or next to the name of the current rig on the
screen.
•Tap the name of the rig on the screen and then turn the
encoder.
•Tap the bar below the rig name and drag downwards until a
rig list is shown, then tap a rig to load it. When this list is
shown, you can use the search bar to help find a specific rig
quickly.
To view other options, tap the menu icon in the upper-left
corner, and then tap an option.
(4.1.3) Reverb/Delay Tail Spillover
HeadRush Prime features two types of Reverb/Delay Tail Spillover:
1. If you have reverb and/or delay effect(s) active on your rig and then switch to a different rig, the effect(s)
will continue to decay after switching to the second rig.
2. If you have a reverb or delay effect active on your rig and then bypass this effect, it will continue to decay
after it is bypassed.
To enable or disable Reverb/Delay Tail Spillover for the whole rig, tap Tail on the main screen.
Alternatively, press and hold the upper-left (Rig ) footswitch for one second.
Note: This feature will not work if you are using an effects loop or if USB Audio is enabled in the Global
Settings.
To enable or disable Reverb/Delay Tail Spillover for an individual effect, first tap the effect in the Main
Screen. Then turn the parameter knob corresponding to the Tail parameter and toggle between Off
and On.
Note: Adjusting this parameter will not impact the Reverb/Delay Tail Spillover setting for the whole rig.

12
(4.2) Menu Screen
Most of the key features of HeadRush Prime are accessible from the Menu Screen.
To access the menu screen, tap the Menu icon in the upper left corner of the Main screen.
To return to the Main screen, tap the icon in the upper left corner of the Menu screen.
The following screens can be accessed from the Menu screen:
•My Rig: See (4.1.1) Main Screen > Overview and (4.3) Rigs to learn more about this screen.
•Browse: See (4.8) File Browser to learn more about this screen.
•Setlists: See (4.9) Setlists to learn more about this screen.
•Song View: See (4.10) Song View to learn more about this screen.
•Practice Tool: See (4.11) Practice Tool to learn more about this screen.
•Tuner: See (4.12) Tuner to learn more about this screen.
•Metronome: See (4.13) Metronome to learn more about this screen.
•Looper: See (4.14) Looper to learn more about this screen.
•HeadRush Cloud: See (4.15) HeadRush Cloud to learn more about this screen.
•Firmware Update: Tap here to enter Firmware Update mode. This will allow you to update HeadRush Prime
when new firmware is available, using either a USB connection to your computer or over-the-air via Wi-Fi.
•USB Transfer: See (4.16.1) USB > Transferring Files & Settings to learn more about this screen.
•Lock Screen: See (4.17) Lock Screen to learn more about this screen.
•Amp Cloner: See (4.18) Amp Cloner to learn more about this screen.
•Mic Dry Out: See (4.19) Mic Dry Out to learn more about this screen.
•Global EQ: See (4.20) Global EQ to learn more about this screen.
•Global Settings: See (4.21) Global Settings to learn more about this screen.

13
(4.3) Rigs
When you are using HeadRush Prime, a rig is a preset: the combination of assigned models—the amps, cabs, IRs,
clones, and effects—and the parameter settings of each of them. You can create, edit, save, and load rigs, making
it easy to recall the perfect sound for each part of your performance.
Each rig has 14 slots, each of which can have one model (amp, cab, or effect) assigned to it. An exception is when
a slot is using an amp, cab, or IR in a dual configuration (when the 2X button next to it is enabled).
Assigned slots will show graphical representations of the models, and empty slots will show a symbol.
(4.3.1) Creating a New Rig
To create a new rig, tap the button in the upper-right corner of the main screen,
and then tap New Rig.
To assign a block (amp, cab, IR, clone, or effect) to an empty slot:
1. Tap the empty slot ().
2. In the list that appears, tap the type of block you want to assign.
3. In the list that appears, tap the specific block you want to assign.
4. In the next list that appears, tap the preset you want to load for that model.
As you add blocks, you will notice the CPU meter in the top left screen fill up. There is
no limit to the number of the same type of blocks you can add; however, if this CPU
meter reaches 100%, you may experience some unwanted tonal side effects (popping,
clicks, etc.).
If you are loading an impulse response (IR) file, you can select one that is truncated to 1024 samples, which are
less DSP-intensive, freeing up more resources to load and use additional models and/or IRs to your rigs.
To load a truncated IR, select the IR 1024 model instead of the normal setting (2048) when adding an IR to your
rig.
Available presets
for each block.
Available block types
(Amp, Cab, IR,
Clone, or Effects).
Available blocks
for each type.
Tap here to return
to the list of block
types.

14
(4.3.2) Signal Path
The signal path is the direction that the audio signal follows from
your guitar, through your 14 available blocks, and ends at the outputs
of HeadRush Prime. You can easily reconfigure your signal path to
best suit your needs, especially when it comes to creating more
complex rigs.
To reconfigure the signal path, tap the arrow next
to the signal path button, located at the bottom of
the Main screen. An overlay with your available
signal chain routings will appear.
The following signal path options are available:
Guitar: Straight Path
This straight signal path is the default and the most common
for users that are creating non-complex guitar tones.
Guitar: Middle Split
This signal path splits in the middle and rejoins near the end.
This configuration is useful for using two types of effects (or
chains of effects) but want to keep their signals separate.
See (4.4.2) Adjusting Settings > Parameters > Mix to learn
how to mix the split paths together.
Guitar: Immediate Split
This signal path splits immediately from the source and
rejoins near the end. Like the second configuration, this one
is useful for using two types of effects (or chains of effects)
independently, but it allows for more models in the split
paths and the rejoined one.
See (4.4.2) Adjusting Settings > Parameters > Mix to learn
how to mix the split paths together.

15
Guitar: Dual Straight Path
This straight signal path is the most common for users that
would like to connect two guitars simultaneously while
maintaining separate singal paths for each guitar. This can
be useful for making easy switches between electric and
acoustic guitars on stage or playing along with a friend.
Vocals: Straight Path
This straight signal path is the most common for users that
are creating non-complex vocal tones.
Vocals and Guitar: Straight Path
This straight signal path is the most common for users who
want to utilize effects for both guitar and voice.

16
Optimizing Your Signal Path
After adding blocks to a rig, you can use the touchscreen to arrange your selected blocks in any sequence, but you
may find that some configurations will sound better than others.
Here are some common model placement suggestions for creating great rigs with HeadRush Prime:
•Dynamics (e.g., compressors), filters (e.g., wah, pitch shifters), and volume pedals are generally placed
at the beginning of the signal chain. Alternatively, you can place volume pedals at the end of the signal
chain to provide a slight variance in functionality.
•Gain-based effects (e.g., overdrive/distortion, fuzz) usually come next.
•Equalization (EQ) is often used to shape the tonal characteristics of overdrive/distortion and fuzz effects,
so put an EQ after them. Alternatively, place it before them to shape the guitar’s general tone—cutting
unwanted frequencies—before the gain pedals.
•Modulation effects like flangers, phasers, and chorus are typically placed next.
•Time-based effects like delays and reverbs are generally placed in between the amp and cab blocks (to
simulate an amp’s built in FX loop), or near the end of the signal chain.
•Amp models, cab models, IRs, and amp clones are often placed near end of the signal chain, although you
can place it wherever you want, depending on your needs.
(4.3.3) Stereo vs. Mono
The outgoing signal from HeadRush Prime can be mono or stereo, depending on the models
in your rig, the signal path, and which outputs you are using. An indicator near the end of the
signal path indicates the current configuration.
The signal will be stereo if you do any one of the following:
•Use any stereo effect model in your signal chain. Even if you have placed mono effect models after it. (This
is possible because the mono effect is simply applied identically to both channels and not summed.)
•Use a split signal path, even if the split paths rejoin before the output.
•Use a double-amp, double-cab, and/or double-IR configuration (i.e., if 2X is on).
The signal will be mono if you do all of the following:
•Use no stereo effect models in your signal chain.
•Use the linear (not split) signal path.
•Use only single-amp and single-cab configurations, if you use an amp or cab model at all.
Alternatively, the signal will be mono if you do any one of the following:
•Use only the L/Mono output (of a stereo pair) on the rear panel.
•Reduce the Rig Width output setting to 0%.
To adjust the width of the stereo field, tap the Out icon at the end of your signal path, and turn the third parameter
knob to adjust the Rig Width output setting. This affects stereo signals only, not mono signals. 100% uses the
full stereo field, while 0% produces a mono signal.

17
(4.3.4) Saving a Rig
If you have made certain changes to a rig, you will see an asterisk () next to its name at the top of the screen,
indicating that you have changed the rig in some way and may want to save it.
You will see an asterisk if you have done any of the following:
•assigned a block to the rig.
•deleted a block from the rig.
•moved a block in the signal path.
•changed a block’s preset (see (4.4) Adjusting Settings to learn more).
•made any change in the Hardware Assign screen (see (4.6) Hardware Assign to learn more).
Activating or deactivating a block, using the parameter knobs on any screen, or using the expression pedal on any
screen will not cause the asterisk to appear. You can save these changes to this rig, save these changes as another
rig, or discard them altogether.
If the asterisk is shown and you try to load a different rig, you will be asked to select one of these options:
•Cancel: This option returns to the previous screen without saving the current rig or loading a new rig.
•Discard Changes: This option loads a new rig without saving any changes to the previous rig.
•Save as a New Rig: This option lets you save the current rig as a new rig. In the screen that appears, use the
keyboard that appears to enter a name, and then tap Save. That rig will be saved, and the new rig will load.
•Save Changes to Rig: This option saves any changes you made to the rig and then loads the new rig.
Note: Select Do not show this dialog again in the message to disable these confirmation messages. You can
re-enable them in the (4.21) Global Settings screen.
To save a rig while you are editing it, tap the Save icon in the
upper-right corner.
To save your changes to the current rig, tap Save.
To save your changes as a new rig, tap Save New Rig,
use the keyboard that appears to enter a name, and then
tap Save.
To return to the previous screen without saving, tap
Cancel at any time.

18
(4.3.5) Renaming a Rig
To quickly rename a rig that you are currently editing, double tap the Rig Name in the top bar. Use the virtual
keyboard that appears to type the new name, and then tap Rename.
To rename a rig that you are not currently editing, tap and drag the bar below the Rig Name to show the list of
rigs on your HeadRush Prime. Then, tap the button next to the name of the rig you would like to rename, and
tap the pencil icon that appears. Finally, use the virtual keyboard to type the new rig, and then tap Rename.
Note: You can also rename rigs using HeadRush Prime’s built-in File Browser. See the (4.8) File Browser section
of this manual for more information.
(4.3.6) Deleting a Rig
To delete a Rig, tap and drag the bar below the Rig Name to show the list of rigs on your HeadRush Prime. Then,
tap the button next to the name of the rig you would like to delete, tap the trash can icon that appears, and
then confirm that you would like to delete the rig.
Note: You can also delete rigs using HeadRush Prime’s built-in File Browser. See the (4.8) File Browser section of
this manual for more information.

19
(4.4) Adjusting Settings
To adjust the settings of a block in your rig, double-tap it to open its settings screen. You can adjust the settings
of any block (amp, cab, IR, clone, or effect), the input (the In/Lock icon), the output (the Out icon), or mix (the Mix
icon).
(4.4.1) Overview
(4.4.2) Parameters
Listed below are some of the common parameters that you can adjust for each type of block. The block types
include amps, cabs, IRs, clones, effects, input settings, output settings, and mix settings (if you are using a split
signal path). See (4.4.3) Saving a Block Preset to learn how to save a preset after adjusting parameters.
Amp (HeadRush / Revalver)
The Amp category is a list of popular guitar and bass
amplifiers.
Preset: This is the current amp preset, which includes the
model, all its settings, and its color assignment.
Model: This is the amp model.
Amp Settings: These are the settings for the selected
amp model (different models may have more or fewer
settings).
Color: This is the assigned color, which will appear in
the Hardware Assign screen and the switch indicator
if the amp is assigned to a switch.
Tap the Preset
menu to select a
preset.
Tap this icon to discard any
changes you’ve made since
opening this screen.
Tap Delete to
unassign the block
from the slot.
Tap the block name
to assign a different
block to this slot.
Tap to return to retain
your changes and return
to the main screen.
See (4.4.3)
Saving a Block
Preset.
Tap a button to
change a
parameter’s
setting.
Tap and slide a fader to
change a parameter’s
value.
Tap a color to assign it to this block. That color will be
shown on the main screen, in the Hardware Assign
screen, and in the footswitch indicator for this model.
Tap this icon to enter
the (4.6) Hardware
Assign menu.
Turn encoder to move
through selectable
items onscreen or to
adjust parameters.
Press encoder as an
Enter command.
Tap Cancel to
return to discard
your changes
and return to the
main screen.

20
Cab (HeadRush / Revalver)
The Cab category is a list of popular guitar and bass amp
cabinets, which contain the speakers. HeadRush Prime
recreates not only the sound of the cabinet but also the type
of microphone recording it.
Preset: This is the current cab preset, which includes the
model, all its settings, and its color assignment.
Cab Type: This is the cab type. Numbers notated as
_X__ indicate the number of speakers it has and the
size of each speaker (e.g., 2X12 denotes a cab with
two 12-inch speakers, 4X10 denotes a cab with four
10-inch speakers). Numbers notated as __W indicate
the emulated wattage (output power) of the speaker.
Mic Type: This is the type of microphone being used on the cab. You can select different models of dynamic
(Dyn), condenser (Cond), or ribbon (Ribbon) microphones.
Mic Settings: These are the settings for the microphone:
•Break Up: This determines the amount of speaker “breakup”—the natural distortion that occurs when the
audio signal overdrives the speaker.
•On-Axis: This determines the microphone position relative to the cab. On-axis placement (On) positions the
microphone at the center of the speaker, usually resulting in a brighter sound with more definition. Off-axis
placement (Off) is slightly offset at an angle from the center of the speaker, and it often sounds darker in tone.
•Out Gain: This is the cab’s output gain level.
•Amp Gain: This is the amplifier’s gain level.
Color: This is the assigned color, which will appear in the Hardware Assign screen and the switch indicator if
the cab is assigned to a switch.
Impulse Response (2048 / 1024)
An Impulse Response (IR) is a popular alternative to
traditional guitar cabinet models, typically stored as a .WAV
file. HeadRush Prime includes over 300 Impulse
Responses onboard; however, there are also many
reputable third-party companies, producers, and artists
that capture and distribute impulse responses that can be
imported into HeadRush Prime.
If you are loading an impulse response (IR) file, you can do
so at the highest quality (2048 samples) or choose to load
at a lower quality (truncated to 1024 samples), which is less
DSP-intensive, freeing up more resources to load and use
additional blocks and/or IRs to your rigs.
Preset: This is the current IR preset, which includes the selected IR, all its settings, and its color assignment.
IR File: Tap here to select an IR file from your internal storage.
IR Settings: After the IR has been selected, you can further dial in the IR’s sound by adjusting the Gain, Hi-
Cut, Lo-Cut, and Mix parameters on screen.
Other manuals for PRIME
1
Table of contents
Other HEADRUSH Recording Equipment manuals