Headwaver TAG User manual


Welcome
Headwaver!

1
B
B
A
A
E
D
C
B
A
87654321
A
B
C
D
E
F
12345
CAD-Zeichnung darf nicht manuell geaendert werden
Schutzvermerk nach DIN 34 -
ISO 16016 beachten
All rights reserved ISO 16016
Form
A2
CAD
Unit
mm
0.2
0.2
0.2
0.4
1.5
Dateiname des Zeichnungsobjektes/file name part:
11117-000-00
Dateityp/type
ASSEM
Dateiname der Zeichnung/ file name drawing:
11117-000-02
Allgemeintol.
general tolerances
DIN ISO
16742 TG3
Maßstab/scale 1:1 Gew./weight:0.2956kg
Werkstoff/material: -
Halbzeug/beginning part: -
Dat./date Name/name Benennung/title:
HEADWAVE
ASSEMBLY
Bear. 19-Jun-15 Rossow
B-B
A-A
61
123
40.6
1.6
0.5
0.2
0.4
0.6
Gepr.
Norm
Zeichnungsnummer/drawing number:
11117-000-03
Blatt/page
1
2 Bl./pages
Nr./no
Ändg./modification
Dat./date
Name (Urspr.) (Ers.f.:) (Ers.d.:)
TAPE
Button
Charging
LEDs Tape
Tape Cover
Headwave TĀG
2

3
English
Included in Packaging:
1 Headwave TĀG (mounting tape already attached)
1 Replacement mounting tape
1 Charging cable
1 Manual
Before Mounting
Connect charging cable to Headwave TĀG and proper charging
outlet (any computer USB port should be suitable).
Leave to charge until LED light displays continuous
GREEN (indicates battery is fully charged).

4
English
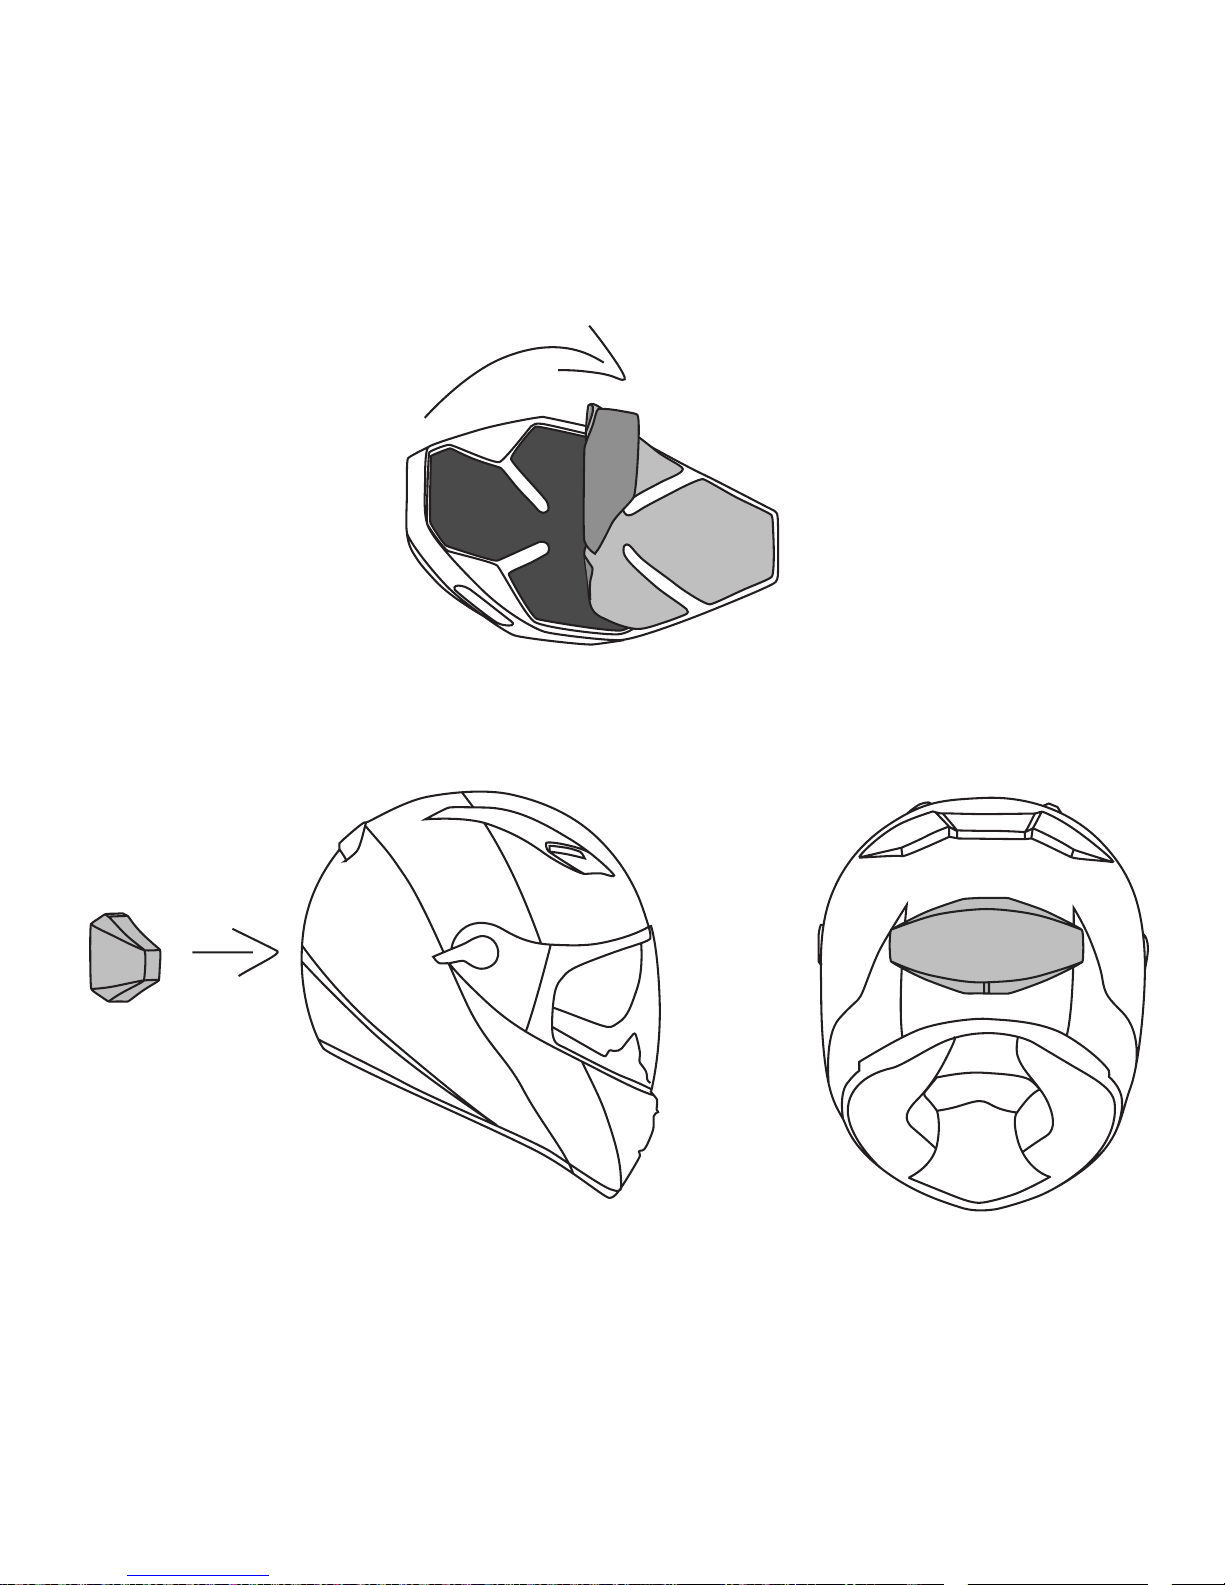
Mounting Headwave TĀG
Identify area on the back the helmet, close to the center,
both vertically and horizontally.
Clean this area - It must be free from oil, dust and humidity upon mounting.
Remove the backing of the mounting tape already preattached
to Headwave TĀG. Gently place Headwave TĀG in the horizontal
position against the identied area. Please make sure that
the entire product is rmly axed to your helmet.
Depending on your helmet’s curvature, the edges may not
be ush against the helmet’s surface. If so, gently push on
each side until the edges are rmly axed. TĀG is designed to
accommodate some exing, so don’t worry about damaging it.

5
English
Using Headwave TĀG
1. Press the button once to power the unit on. The
LEDs are green while turning one.
2. If you haven’t paired the device already the LEDs blink blue to indicate
it’s searching for a connection. If you have paired the device already
and the LEDs are GREEN then you can skip the next two steps.
3. Go to your mobile device and to Bluetooth® settings. The device should
be listed as “Headwave TAG”. If a key is required please enter 0000.
4. Once it’s paired, the LEDs switch to GREEN.
5. Headwave TĀG is capable of streaming music over Bluetooth® either
from a mobile phone or any other Bluetooth® device supporting
A2DP. Once you have paired TĀG with your device, use your
music player to play, pause, stop, skip and adjust the volume.
6. To power o, press and hold the button for
2 seconds. The LED will turn o.

6
English
7. To connect a new device, please turn your Bluetooth® o or disconnect
Headwave TĀG in the Bluetooth® settings of your Bluetooth® device. If
TĀG cannot nd a already paired device it will switch into pairing mode.
Event
Press Button once (short) Product on GREEN Ascending tones
Press Button long (2 sec.) Product o O Descending tones
Bluetooth® not connected Pairing Mode BLUE -
Press Button once short
while streaming
Pause GREEN -
Battery low Battery low RED + GREEN 1x Alerting sound
Battery very low Battery very low RED + GREEN 2x Alerting sound
No connection for 10 min. Product o O Decreasing tone
Plug charger on Charging RED One short tone
Temperature too high (>60°C) Product o O Descending tones

7
English
Removing Headwave TĀG
NOTE: We don’t recommend removing TĀG, unless you wish to switch helmets.
Also, using any tools to remove TĀG may result in damage to your helmet.
Gently pull on the top of TĀG. It should slowly come away.
After TĀG is completely removed, gently peel away mounting
tape. It should come o without any additional tools.
If you wish to re-mount TĀG on a helmet, please nd the replacement
mounting Tape, and attach to the backside of TĀG.

8
English
Warranty, Terms and Conditions:
We at Headwave value both your patronage
and your safety. If at any time, the use of this
product aects or impairs your judgment
or abilities, please refrain from usage.
If at any time you are dissatised with
your purchase, please contact us and we
will do our best to rectify the situation.
This product may be used while operating
a motorcycle or motorized vehicle. Please
exercise caution and good judgment,
and be aware of your surroundings
at all time. Always drive safely, avoid
distractions and obey all local trac laws!
Safety Guidelines:
Prior to use, please follow these
steps: Before putting on the product,
adjust the volume control to its lowest
level. Put the product on slowly, and
then adjust the volume control to
a comfortable and safe level.
During the use of the product: Keep the
volume at the lowest functional level;
if higher volume is necessary, adjust
slowly and carefully. If you experience
any discomfort or ringing in your ears,
discontinue usage immediately. Continued
use at high volumes may result in
permanent damage to your hearing without
any obvious or noticeable discomfort.
Safety Information:
This product contains some small parts that
may be hazardous to children. Always store
the product out of reach from children, as the
parts may cause a choking risk if ingested.
Never dismantle the product yourself or
attempt to insert/add-on additional parts.
Doing so will not only void the warranty, but
it may also cause short circuits, which could
result in electrical shocks, or start a re.
Observe all signs, instructions and
regulations that require an electrical
device or RF radio product to be switched
o, such as in aircrafts or hospitals.
This product contains LiPoly batteries.
Do not leave the battery discharged or
unused for extended periods of time. If
the product will be unused for extended
periods, leave the batteries fully charged

9
English
during this time, if possible. The product
should be stored in a cool, dry place to
avoid damage and increase its lifespan.
Product should only be used between -15
and 50°C (5 and 122°F) - avoid using the
product otherwise. Using the product outside
this range may cause damage to some
or all of the components. If the ambient
temperature exceeds this range please
turn o the unit and refrain from use until
the temperature is back within this range.
Limitation of Liability:
By using this product, I release Headwave
GmbH from any direct or indirect damage
that may result from usage, including, but
not limited to, accidents, injuries, death, or
any other types losses. In no event shall
Headwave GmbH be liable for any special
or consequential damages that result
from the use of, or the inability to use, this
product, even if Headwave GmbH has been
advised of the possibility of such damages.
The maximum liability for which Headwave
GmbH may be responsible will be no more
than the amount paid for the product that
is the subject of the claim. Applicable law
may not allow the limitation of exclusion
of liability or incidental or consequential
damages, so the above limitation or
exclusion may not apply to you.
Warranty:
Headwave GmbH warrants to the original
retail purchaser that the product shall be
free of defects in materials or workmanship
in the product’s internal components for
a period of one (1) year from the date of
purchase if the product is properly used
and maintained. If this product proves
defective in either material or workmanship,
Headwave GmbH at its option, will either
(a) repair the product or (b) replace the
product at no charge for parts or labor to
the original retail purchaser. If the product
model is no longer available and cannot
be repaired eectively or replaced with an
identical model, Headwave GmbH at its
sole discretion may replace the unit with a
current model of equal or greater value. To
obtain a repair or replacement under the
terms of this warranty, please contact our
customer service group via the “Contact”
page on this website. You will be required
to submit a copy of the original receipt via
email. The receipt must reect that you are
the original purchaser, the product was

10
English
bought from an authorized source, and the
product is still within warranty. You will be
issued a return authorization number (RA#)
and asked to ship the defective product,
together with proof of purchase and RA#
prepaid insured to a specied address.
Risk of loss or damage in transit is
to be borne by the purchaser. Once
Headwave GmbH receives the defective
product, a repair or replacement will be
initiated. Headwave’s responsibility for
malfunctions and defects in the hardware
is limited to replacement or repair as
set forth in this warranty statement.
Headwave GmbH disclaims all express
and implied warranties for this product.
Headwave GmbH does not accept
any liability for any special, indirect,
consequential or incidental damages,
including without limitation, any liability for
third party claims against you for damages
or for product not being available for use.
There are no other expressed or
implied warranties. This warranty
is subject to change at any time
without disclosure/notice.
Limitations/Restrictions:
This warranty does not cover any
failures of the product resulting from
abuse, accidents, neglect, mishandling,
misuse, ordinary use, or environmental
deterioration (expressed or otherwise).
This warranty does not cover damage
resulting from normal use to other
components than the product, nor are
other components covered by this
warranty. This warranty cannot be applied
to any non-Headwave product, even if
it is included in the same packaging.
This warranty is null and void if the
product is altered in any way, or purchased
from an un-authorized dealer.
This warranty terminates if this
product is sold or otherwise
transferred to another party.
Certications:
This device bears the CE symbol as
specied by the provisions of Directive R
&TTE (99/5/EC). Headwave GmbH hereby
declares that this device is in compliance

11
English
with the necessary requirements and other
relevant guidelines and regulations of the
1999/5/EC directive. For further information
and the Declaration of Conformity, please
contact us at [email protected].
Furthermore, this device complies with
Part 15 of the FCC rules. Operation is
subject to the following two conditions:
This device may not cause
harmful interference.
This device must accept any interference
received, including interference that
may cause undesired operation.
After the implementation of European
Directive 2002/96/EU and 2066/96/
EU on Waste Electrical and Electronic
Equipment (WEEE) in the national legal
system, the following now applies:
Electric and electronic devices as well
as batteries must not be disposed of as
regular household waste. Consumers
are obliged by law to return electrical and
electronic devices, as well as batteries, at
the end of their service lives to the public
collecting points set up for this purpose
or point of sale. Details to this are dened
within the national law of the respective
country. This symbol on the product
or instruction manual indicates that a
product is subject to these regulations.
By recycling and/or reusing the materials
or other forms of utilizing old devices,
you are making an important contribution
to protecting the environment.
The Bluetooth® word mark and logos
are registered trademarks owned by
Bluetooth SIG, Inc. and any use of such
marks by Headwave GmbH is under
license. Other trademarks and trade names
are those of their respective owners.
If this product was purchased in Australia,
you have certain rights guaranteed under
Australian Consumer Law (2012).
Please refer to www.consumerlaw.gov.au
for more details.

12
Deutsch
Packungsinhalt:
1 Headwave TĀG (Befestigungs-Tape ist bereits vormontiert)
1 Ersatz-Befestigungs-Tape
1 USB-Ladekabel
1 Bedienungsanleitung
Vor der Befestigung
Verbinde das USB Ladekabel mit Headwave TĀG und einem geeigneten
USB-Anschluss (jeder Computer-USB-Anschluss sollte geeignet sein).
Lasse es so lange angeschlossen, bis die LEDs durchgängig GRÜN
leuchten (dies zeigt an, dass die Akkus vollständig gelagen sind).

13
Deutsch
Befestigung Headwave TĀG
Wähle für die Befestigung einen Bereich mittig hinten
am Helm - sowohl horizontal als auch vertikal.
Säubere diesen Bereich gründlich. Er muss fettfrei, staubfrei und trocken sein.
Entferne die Schutzabdeckung von dem Befestigungs-Tape auf der
Rückseite von Headwave TĀG. Positioniere TĀG horizontal hinten
an Deinen Helm. Drücke es gleichmäßig kräftig überall an.
Abhängig von Deinem Helm-Radius kann es sein, dass die Enden
noch etwas abstehen. In diesen Fall drücke die Enden kräftig
an den Helm bis sie festkleben. TĀG wurde so designed, dass
es sich exibel an verschiedene Radien anpassen kann.

14
Deutsch
Benutzung von Headwave TĀG
1. Drücke den Taster einmal kurz, um TĀG anzuschalten.
Die LEDs leuchten dabei GRÜN.
2. Wenn Du TĀG noch nicht gekoppelt hattest, blinken die LEDs BLAU
um anzuzeigen, dass sich TĀG im Verbindungsmodus bendet.
Wenn Du TĀG schon einmal gekoppelt hattest, leuchten die LEDs
GRÜN und Du kannst die nächsten beiden Schritte überspringen.
3. Öne in deinen Handy die Bluetooth® Einstellungen. Das
Gerät sollte dort unter “Headwave TAG” angezeigt werden.
Klicke darauf, um die Verbindung herzustellen. Für den Fall,
dass ein Passwort benötigt wird, gebe 0000 ein.
4. Sobald die Verbindung besteht, wechseln die LEDs auf GRÜN.
5. Headwave TĀG kann Musik über Bluetooth® entweder von Deinem
Handy streamen oder von jedem anderen Bluetooth®-fähigen
Device, das A2DP unterstützt. Sobald Du TĀG mit Deinem Gerät
verbunden hast, kannst Du das Interface deines Musikplayers nutzen

15
Deutsch
für Play, Pause, Stop, Skip und um die Lautstärke anzupassen.
6. Um TĀG auszuschalten, drücke den Taster für 2 Sekunden.
Die LEDs sind dann ausgeschaltet.
7. Um ein neues Device mit TĀG zu verbinden, schalte Bluetooth®
an den bereits verbundenen Device aus oder entkoppel
TĀG in den Bluetooth® Einstellungen. Wenn TĀG keine
Verbindung mehr herstellen kann, geht es automatisch in
den Verbindungsmodus. Die LEDs blinken dann BLAU.
Drücke Taster einmal kurz Produkt is an GRÜN Ansteigende Melodie
Press Button long (2 sec.) Produkt ist aus Aus Abfallende Melodie
Bluetooth® nicht verbunden Verbindungsmodus BLAU -
Drücke Taster einmal kurz
während Musik spielt
Pause GRÜN -

16
Deutsch
Akku niedrig Akku niedrig ROT +
GRÜN
1x Warntöne
Akku sehr niedrig Akku sehr niedrig ROT +
GRÜN
2x Warntöne
Keine Verbindung
für 10 min.
Produkt aus Aus Abfallende Melodie
Ladekabel angeschlossen Produkt lädt ROT Ein kurzer Ton
Zu heiß Produkt aus Aus Abfallende Melodie

17
Deutsch
Headwave TĀG lösen
Anmerkung: Wir empfehlen nicht TĀG von deinem Helm zu lösen, es sei denn
Du hast einen neuen Helm, an den du es anbringen willst.
Die Verwendung von Werkzeugen um TĀG zu lösen,
kann zu Schäden an Deinem Helm führen.
Um TĀG zu lösen, gehe mit den Fingerspitzen hinter TĀG und ziehe
behutsam. Verstärke die Kraft Stück für Stück. TĀG sollte sich langsam
lösen. Es sollten keine zusätzlichen Werkzeuge nötig sein.
Wenn TĀG komplett vom Helm gelöst ist, entferne
vorsichtig die Tape-Reste vom Helm.
Wenn Du TĀG an einen anderen Helm anbringen willst, kannst Du
das beiliegende Ersatz-Befestigungs-Tape nutzen. Ziehe dafür die
Schutzfolie ab und platziere es auf der Rückseite von TĀG. Folge
anschließend der Anleitung „Befestigung Headwave TĀG“.

18
Deutsch
Allgemeine
Geschäftsbedingungen und
Garantiebestimmungen:
Das Headwave-Team wertschätzt Deine
Unterstützung - aber auch Deine Sicherheit.
Wenn das Produkt zu irgendeinem
Zeitpunkt Deine Fähigkeiten einschränken
sollte, nutze es bitte nicht weiter.
Wenn Du zu irgendeinem Zeitpunkt
unzufrieden mit dem Kauf von TĀG
sein solltest, bitte kontaktiere uns
und wir werden unser Bestes geben,
um die Situation zu verbessern.
Dieses Produkt kann beim Fahren eines
Motorrads oder eines motorisierten
Fahrzeugs verwendet werden. Bitte
sein aufmerksam und acht auf Deine
Umgebung zu jeder Zeit. Fahre
immer verantwortungsvoll, vermeide
Ablenkungen und berücksichtige
die lokalen Verkehrsvorschriften.
Sicherheitsrichtlinien:
Bevor Du dieses Produkt benutzt, befolge
bitte folgende Schritte:
Bevor Du das Produkt am Helm anbringst,
stelle die Lautstärke des Produkts auf die
niedrigste Stufe. Dann klebe das Produkt
an den Helm und steigere die Lautstärke
allmählich, bis Du eine angenehme aber
dennoch sichere Lautstärke erreicht hast.
Wenn Du das Produkt verwendest, halte
die Lautstärke auf dem niedrigsten
noch funktionierenden Level. Wenn
die Lautstärke höher sein soll, passe
diese langsam und vorsichtig an.
Falls Du dich unwohl fühlst oder ein
klingeln im Ohr haben solltest, beende
die Benutzung des Produktes sofort.
Die häuge Benutzung des Produktes
mit hohen Lautstärken kann zu einer
dauerhaften Schädigung des Gehörs
führen, selbst wenn Du zunächst keine
Beschwerden bemerken solltest.
Sicherheitsinformationen:
Das Produkt beinhaltet kleinere Teile,
die für Kinder gefährlich sein können.
Table of contents
Languages:


