Health Care International PHYSIOMILL User manual
Owner’s Manual V.2
HealthCare International, Inc.
PO Box 1509, Langley, WA 98260
P: (360) 321-7090 or (800) 398-9121

1
Table of Contents
Safety Precautions ............................................................................................... 2
Warranty Information............................................................................................ 3
Assembly Instructions .......................................................................................... 4
PhysioMill Display Console .................................................................................. 8
Button Functions ................................................................................................ 9
General Maintenance ......................................................................................... 9
Exploded Diagram.............................................................................................. 10
Parts List ............................................................................................................ 11

2
Safety Precautions
This exercise equipment was designed and built for optimum safety. However,
certain precautions apply whenever you operate a piece of exercise equipment.
Be sure to read the entire manual before assembly and operation of this
machine.
Also, please note the following safety precautions:
1. Read all instructions carefully before using the machine.
2. Consult your physician or other health care professional before beginning this
or any type of exercise program.
3. Always wear proper exercise apparel when using the machine.
4. If at any time you feel faint, light-headed or dizzy while operating the machine,
stop exercise immediately. You should also stop exercising if you are
experiencing pain or pressure.
5. Keep children and pets away from the machine while in use.
6. Only one person can use the machine at a time.
7. Make sure your machine is correctly assembled before you use it. Be sure all
screws, nuts, and bolts are tightened prior to use and retighten periodically.
8. Do not operate this or any exercise equipment if it is damaged.
9. Keep hands and feet away from any moving parts. Do not insert any objects
into any openings.
10.Keep clothes, jewelry and loose items away from moving parts.
NOTE: MAXIMUM WEIGHT CAPACITY FOR THE
PHYSIOMILL IS 500 LBS. (227 KGS)
WARNING:
BEFORE BEGINNING ANY EXERCISE PROGRAM CONSULT YOUR
PHYSICIAN. THIS IS ESPECIALLY IMPORTANT FOR INDIVIDUALS OVER THE
AGE OF 35 OR PEOPLE WITH PRE-EXISTING HEALTH PROBLEMS. READ
ALL INSTRUCTIONS BEFORE USING THIS FITNESS EQUIPMENT. WE
ASSUME NO RESPONSIBILITY FOR PERSONAL INJURY OR PROPERTY
DAMAGE SUSTAINED BY OR THROUGH THE USE OF THIS PRODUCT.

3
Dear Valued Customer,
Thank you for your recent purchase of the PhysioMill from HCI Fitness. We
believe that you have purchased one of the highest quality and affordable
rehabilitation treadmills on the market today. Prior to using your new PhysioMill
please review the owner’s manual and product tips to maximize your experience.
Wishing you the best of luck in reaching your health and fitness goals!
HealthCare International is a leading supplier and distributor of innovative products for Health,
Wellness, Fitness & Active Aging. Visit our website – www.HCIFitness.com for
information on all of our products.
Warranty Information
(Your Serial Number is found on a white sticker at the rear base of the unit, the
front of the user manual, and on the box)
Serial #:_________________ Purchase Date:_______________
5 Year Parts Warranty, One Year Labor, Lifetime Main Frame
NOTE
Before you start to assemble this unit, please note that some of the parts and
screws needed for assembly are already in place on the unit.
TOOL SET:
Tool
QTY
(115) 5mm Allen Wrench Tool
1
(116) Extended 6mm Allen Wrench Tool
1
(117) 13*15 Screwdriver/Wrench
Combo Tool
1
4
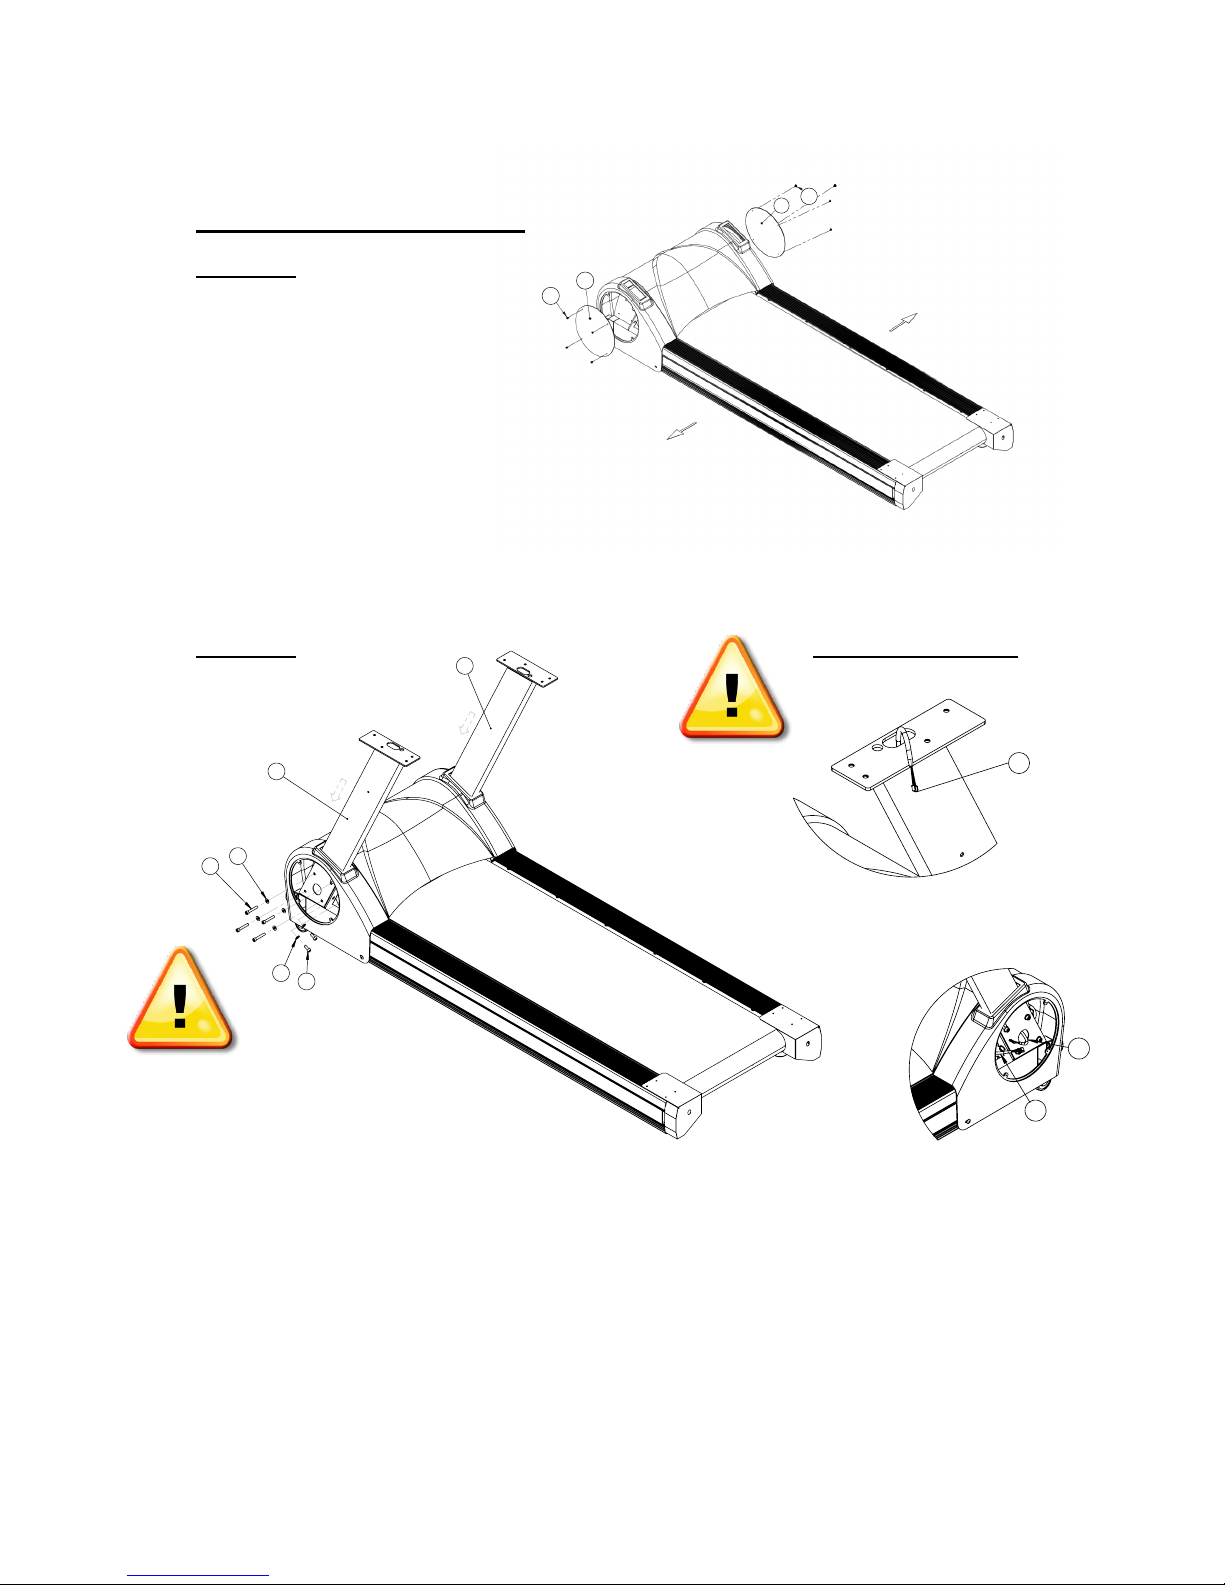
Assembly Instructions
Take off the side motor covers as shown in drawing.
STEP 2:
STEP 1:
Wire Pinch Point:
Inset the Upright Posts (13) (14) to the main base, tighten with the
Hexagon Head Bolts (42)(43) and Flat Washer (28).
13
14
42
28
28
43
67
65
67
44
44
21
21
Table of contents
Other Health Care International Treadmill manuals

Popular Treadmill manuals by other brands


Smooth Fitness
Smooth Fitness EVO 3i user manual

NordicTrack
NordicTrack NETL81810.0 user manual

Schwinn
Schwinn 830/Journey 8.0 Assembly manual / owner's manual

Keys Fitness
Keys Fitness HealthTrainer HT-740T owner's manual

Spirit
Spirit XT8 Service manual

NordicTrack
NordicTrack T 14.0 Treadmill Manuel de l'utilisateur