manuals.online logo
Brands
  1. Home
  2. •
  3. Brands
  4. •
  5. Health Care Logistics
  6. •
  7. Indoor Furnishing
  8. •
  9. Health Care Logistics 5091 User manual

Health Care Logistics 5091 User manual

ASSEMBLY INSTRUCTIONS FOR THE #5091 & 5092
18”W EASY WALL CABINET WITH LOCKING DOOR
Call Free: 1 800 848 1633 or 1 888 HCL INTL®(425 4685) Fax Free: 1 800 447 2923
Web Site: www.HealthCareLogistics.com • E-mail: [email protected]
1
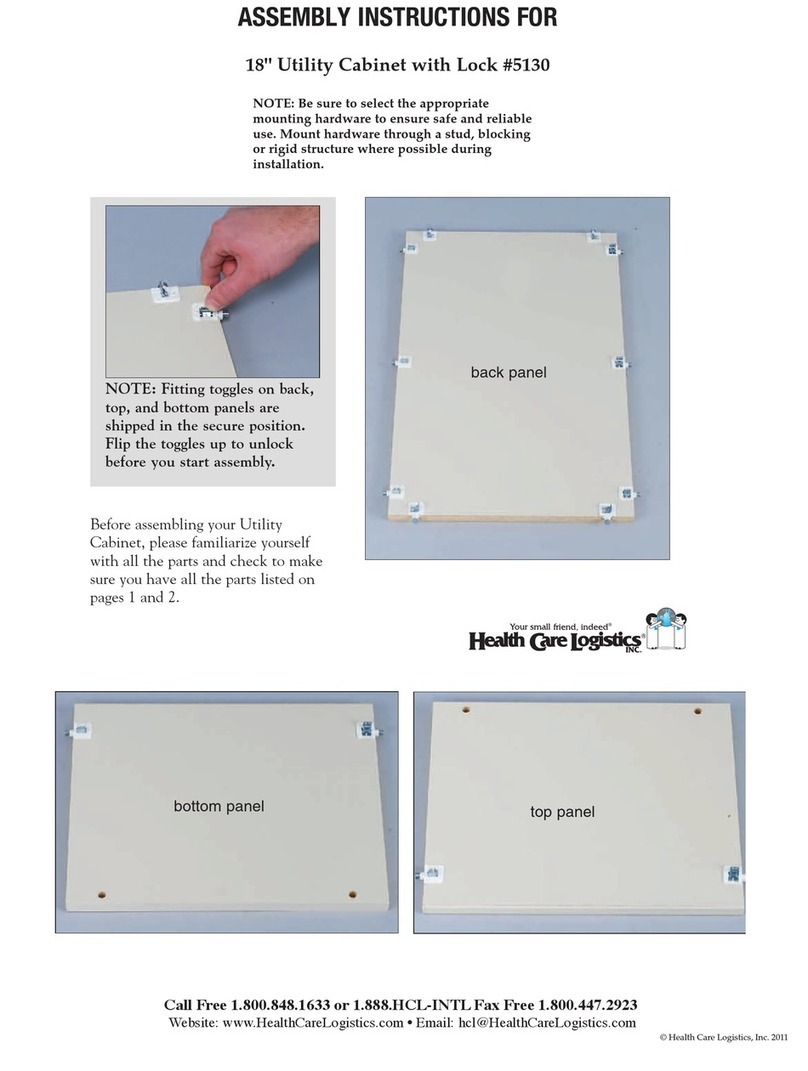
NOTE: Fitting toggles on back,
top, and bottom panels are
shipped in the secure position.
Flip the toggles up to unlock
before you start assembly.
back panel
top panel
Before assembling your Easy Wall
Cabinet, please familiarize yourself
with all the parts and check to make
sure you have all the parts listed on
pages 1 and 2.
bottom panel
© Health Care Logistics, Inc. 2005 • Printed in the U.S.A.
Rev. 111705
NOTE: Be sure to select the appropriate mounting
hardware to ensure safe and reliable use. Mount
hardware through a stud, blocking or rigid structure
where possible during installation.
Call Free: 1 800 848 1633 or 1 888 HCL INTL®(425 4685) Fax Free: 1 800 447 2923
Web Site: www.HealthCareLogistics.com • E-mail: hcl@HealthCareLogistics.com
2
one shelf
door
hinges
shelf pins
left side
right side
ASSEMBLY INSTRUCTIONS FOR THE #5091 & 5092 18”W EASY WALL CABINET WITH LOCKING DOOR
Call Free: 1 800 848 1633 or 1 888 HCL INTL®(425 4685) Fax Free: 1 800 447 2923
Web Site: www.HealthCareLogistics.com • E-mail: hcl@HealthCareLogistics.com
3
Lay the back panel flat on the floor. Bring the top panel into position.
Attach the top panel
by aligning the
pre-drilled holes with
the connection
fittings in the back
panel. Push the two
panels together. Once
together, press the
fitting toggles down to
secure.
top panel
back panel
Locate the bottom panel and position at the bottom of the back panel.
Attach the bottom panel by aligning the pre-drilled holes with the
connection fittings in the back panel. Push the two panels together.
Once together, press the fitting toggles down to secure.
top panel
back panel
top panel
bottom panel
1
2
3
Attach the left side by aligning the pre-drilled holes with the connection
fittings in the back, top and bottom panels.
top panel
bottom panel
left side
4
ASSEMBLY INSTRUCTIONS FOR THE #5091 & 5092 18”W EASY WALL CABINET WITH LOCKING DOOR
Push the panels together and press the fitting toggles down to secure.
Call Free: 1 800 848 1633 or 1 888 HCL INTL®(425 4685) Fax Free: 1 800 447 2923
Web Site: www.HealthCareLogistics.com • E-mail: hcl@HealthCareLogistics.com
4
back panel Attach the right side by aligning the
pre-drilled holes with the connection
fittings in the back, top and bottom panels.
Push the panels together and press the
fitting toggles down to secure.
top panel
bottom panel
Stand your unit to the upright position. Decide the positioning of your
shelf. The shelf is adjustable in 11⁄4" (32 mm) increments. Insert the clear
plastic shelf pins in the back holes at your desired height. Once the back
shelf pins are in place insert shelf pins into the front shelf holes at the
same height as the back pins.
5 6
7
After your shelf pins are in place you’re ready to install
your shelf. Position shelf onto the shelf pins.
8
ASSEMBLY INSTRUCTIONS FOR THE #5091 & 5092 18”W EASY WALL CABINET WITH LOCKING DOOR
Call Free: 1 800 848 1633 or 1 888 HCL INTL®(425 4685) Fax Free: 1 800 447 2923
Web Site: www.HealthCareLogistics.com • E-mail: hcl@HealthCareLogistics.com
5
NOTE: Latches are shipped with the screw cover
plate in the secure position. Before installing
latches, the screw cover plate will need released. To
release flip the plate up with your fingernail or small
screwdriver. The plate is hinged and will lift up.
Begin by laying the door flat on the ground with the hinge hole cutouts
(inside of door) facing up. With screw cover plate lifted, insert
pre-assembled hinge screws into the pre-drilled door holes. There are
two latches.
hinge hole cutout
pre-drilled
door holes
screw cover
plate
pre-assembled
hinge screws
9 10
Once hinges are in place and flush against doors, press down on
the screw cover plates to secure hinges to doors.
Your doors should look like the photo above when hinges
are attached.
11 12
ASSEMBLY INSTRUCTIONS FOR THE #5091 & 5092 18”W EASY WALL CABINET WITH LOCKING DOOR
Call Free: 1 800 848 1633 or 1 888 HCL INTL®(425 4685) Fax Free: 1 800 447 2923
Web Site: www.HealthCareLogistics.com • E-mail: hcl@HealthCareLogistics.com
6
The door is ready to be attached. Position the door onto the side of the
cabinet unit. The hinges should align with pre-installed hinge plates
mounted inside of the unit.
Note: If you are attaching a door to the 5092 unit with overhang it
may be easier to lay the unit on its back or set the unit on a desk or
counter so that the overhang on the door does not hit the floor.
Attach the hinges to the hinge
plates by guiding the hooked area
of the hinges around the small
posts on the hinge plates and
pressing them to the plates until they latch.
This step can be tricky and may take a few attempts to get the hinges to
latch.
hooked
area
post
13 14
Your locking door is now attached and can be
used to secure contents. The cam lock includes
two keys. Additional or replacement keys can
be purchased through our Resource
department.
ASSEMBLY INSTRUCTIONS FOR THE #5091 & 5092 18”W EASY WALL CABINET WITH LOCKING DOOR
Call Free: 1 800 848 1633 or 1 888 HCL INTL®(425 4685) Fax Free: 1 800 447 2923
Web Site: www.HealthCareLogistics.com • E-mail: hcl@HealthCareLogistics.com
7
High quality, fully concealed hinges are self-closing and can be adjusted in three ways to allow you to align your
cabinet door for a consistent look.
The right adjustment screw provides side adjustment:
Side adjustment ... regulates the gaps between doors,
cabinets and walls for perfect parallel alignment.
The middle adjustment screw provides height
adjustment:
Height adjustment ... lets you align door levels across a
row of doors so they match precisely at top and bottom.
The left adjustment screw provides depth adjustment:
Depth adjustment ... lets you bring any style of door
into line with the vertical surface of the cabinet.
middle adjustment
screw
Attach the back of the
cabinet to the wall.
Attach the top and bottom
panels to the back.
Attach the left and right
side panels.
Attach the door and your
cabinet is ready for use.
If you have a hard time attaching a heavier assembled cabinet to the wall,
try our assemble from the wall method!
ASSEMBLY INSTRUCTIONS FOR THE #5091 & 5092 18”W EASY WALL CABINET WITH LOCKING DOOR

This manual suits for next models

1

Other Health Care Logistics Indoor Furnishing manuals

Health Care Logistics 5130 User manual

Health Care Logistics

Health Care Logistics 5130 User manual

Health Care Logistics 5051 User manual

Health Care Logistics

Health Care Logistics 5051 User manual

Health Care Logistics Kango Vinyl Seat Stool User manual

Health Care Logistics

Health Care Logistics Kango Vinyl Seat Stool User manual

Health Care Logistics 17684 User manual

Health Care Logistics

Health Care Logistics 17684 User manual

Health Care Logistics 1431 User manual
Health Care Logistics

Health Care Logistics 1431 User manual

Health Care Logistics 5095 User manual

Health Care Logistics

Health Care Logistics 5095 User manual

Popular Indoor Furnishing manuals by other brands

Bonaldo Sol Assembly instruction

Bonaldo

Bonaldo Sol Assembly instruction

Medline MOBILE 100 RECLINER owner's manual

Medline

Medline MOBILE 100 RECLINER owner's manual

Maxx-world 04098 instructions

Maxx-world

Maxx-world 04098 instructions

ThunderX3 AD7 user manual

ThunderX3

ThunderX3 AD7 user manual

Furniture of America Bridgen CM3429SC-2PK Assembly instructions

Furniture of America

Furniture of America Bridgen CM3429SC-2PK Assembly instructions

Songmics VASAGLE BBK42 Assembly instructions

Songmics

Songmics VASAGLE BBK42 Assembly instructions

Nemschoff Palisade 867-37 instructions

Nemschoff

Nemschoff Palisade 867-37 instructions

UpDown Desk PRO Series Complete guide

UpDown Desk

UpDown Desk PRO Series Complete guide

FourStarGroup 11221725 manual

FourStarGroup

FourStarGroup 11221725 manual

Furniture of America CM3546RT Assembly instructions

Furniture of America

Furniture of America CM3546RT Assembly instructions

Safavieh Furniture SFV7508A Assembly instructions

Safavieh Furniture

Safavieh Furniture SFV7508A Assembly instructions

Discovery World Furniture 2135 instructions

Discovery World Furniture

Discovery World Furniture 2135 instructions

IKEA FRITZ CHAIR instructions

IKEA

IKEA FRITZ CHAIR instructions

Vivo DESK-V028KA instruction manual

Vivo

Vivo DESK-V028KA instruction manual

Sauder Barrister Lane 414724 manual

Sauder

Sauder Barrister Lane 414724 manual

armen LIVING T21962A-C Product assembly instructions

armen LIVING

armen LIVING T21962A-C Product assembly instructions

Dorel DA8313 manual

Dorel

Dorel DA8313 manual

Mocka Brixton Bookcase Assembly instructions

Mocka

Mocka Brixton Bookcase Assembly instructions

manuals.online logo
manuals.online logoBrands
  • About & Mission
  • Contact us
  • Privacy Policy
  • Terms and Conditions

Copyright 2025 Manuals.Online. All Rights Reserved.