Health in motion 421L Installation and operating instructions

Sunset Swings
By Health in Motion, LLC
Model 421 Assembly and Operation Manual
Lounge Swing
Record Serial Number Here
www.sunsetswings.com by Health In Motion, LLC. 1/30/2013

Caution:
READ! VERY IMPORTANT
FOR ADULTS ONLY
Ensure that the 421L swing is set up on a firm level surface.
Make sure the swing has completely stopped before entering or exiting the
swing. Be careful as the swing may shift while sitting down or getting up from
the swing.
Keep all body parts within the swing seat while in motion.
Make sure bystanders are at least 5 feet away from the swing while it is in
motion. Be careful placing the swing too close to a structure as severe injury
might occur if a person gets caught between the structure and the swing or
damage might occur if the swing hits the structure.
Be cautious swinging while children are present as they may stray into the path
of the swing.
Review the maintenance schedule before each use to ensure the swing is in
good working order.
This swing is for casual relaxation swinging only.
In freezing climates, the canopy should be removed, folded and stored in a dry place before the
first freeze or snow and until the last freeze or snow has passed. Failure to follow these
instructions can cause damage to the canopy or canopy rods and will void their warranty.
The canopy is not designed for high winds. If high winds are expected, please remove the
canopy. Failure to follow this instruction can cause damage to the canopy or the canopy rods
and will void their warranty.
1

Thank you for choosing Sunset Swings. Please read the contents of this manual thoroughly.
The information inside will help you in many different areas. You will need to send in your
customer registration card at the back of this manual to validate your warranty. You can also
validate your warranty by registering your swing online at www.sunsetswings.com.
Table of Contents
Positioning your swing___________________________________________3
Tools required for assembly_______________________________________3
Helpful installation hints________________________________________ 3
Exploded Swing Diagram_______________________________________ 4
Hardware and Tool Diagram ____________________________________ 5
Parts and Hardware List__________________________________________6
Assembly Instructions____________________________________________7-17
Leveling Instructions ____________________________________________18
General Maintenance and Safety Information________________________ 19
Label Reference_______________________________________________20
Limited Warranty______________________________________________21
Warranty Claim Procedure_______________________________________21
Sunset Swings by Health In Motion LLC reserves the right to alter the specifications of this product at any time.
2

Positioning Your Swing
1. The swing is designed to be installed on a level surface.
2. There should be a minimum clearance of five feet in front and back, and two feet on
each side of your swing. It should be placed in an area where children will not stray or
walk into the path of the swing.
Tools required for assembly
1. 17, 18 and 19 mm box or ratchet wrench
2. 4, 5 and 6 mm Allen wrenches (Supplied with hardware)
Helpful installation hints
1. At least 2 people are recommended to assemble this swing. Some parts are large
and heavy. Use care when handling.
2. Identify all of the parts for your swing. Empty the boxes and lay out the parts for
identification using the Parts List.
3. Read all the way through the instructions completely before beginning the assembly.
4. Do not tighten hardware completely until instructed. It helps to have some adjustment
for bolt alignment while you are connecting parts. Follow the tightening sequence as
mentioned in the steps. After you have completed the assembly, recheck that all
hardware is secure and tight.
3
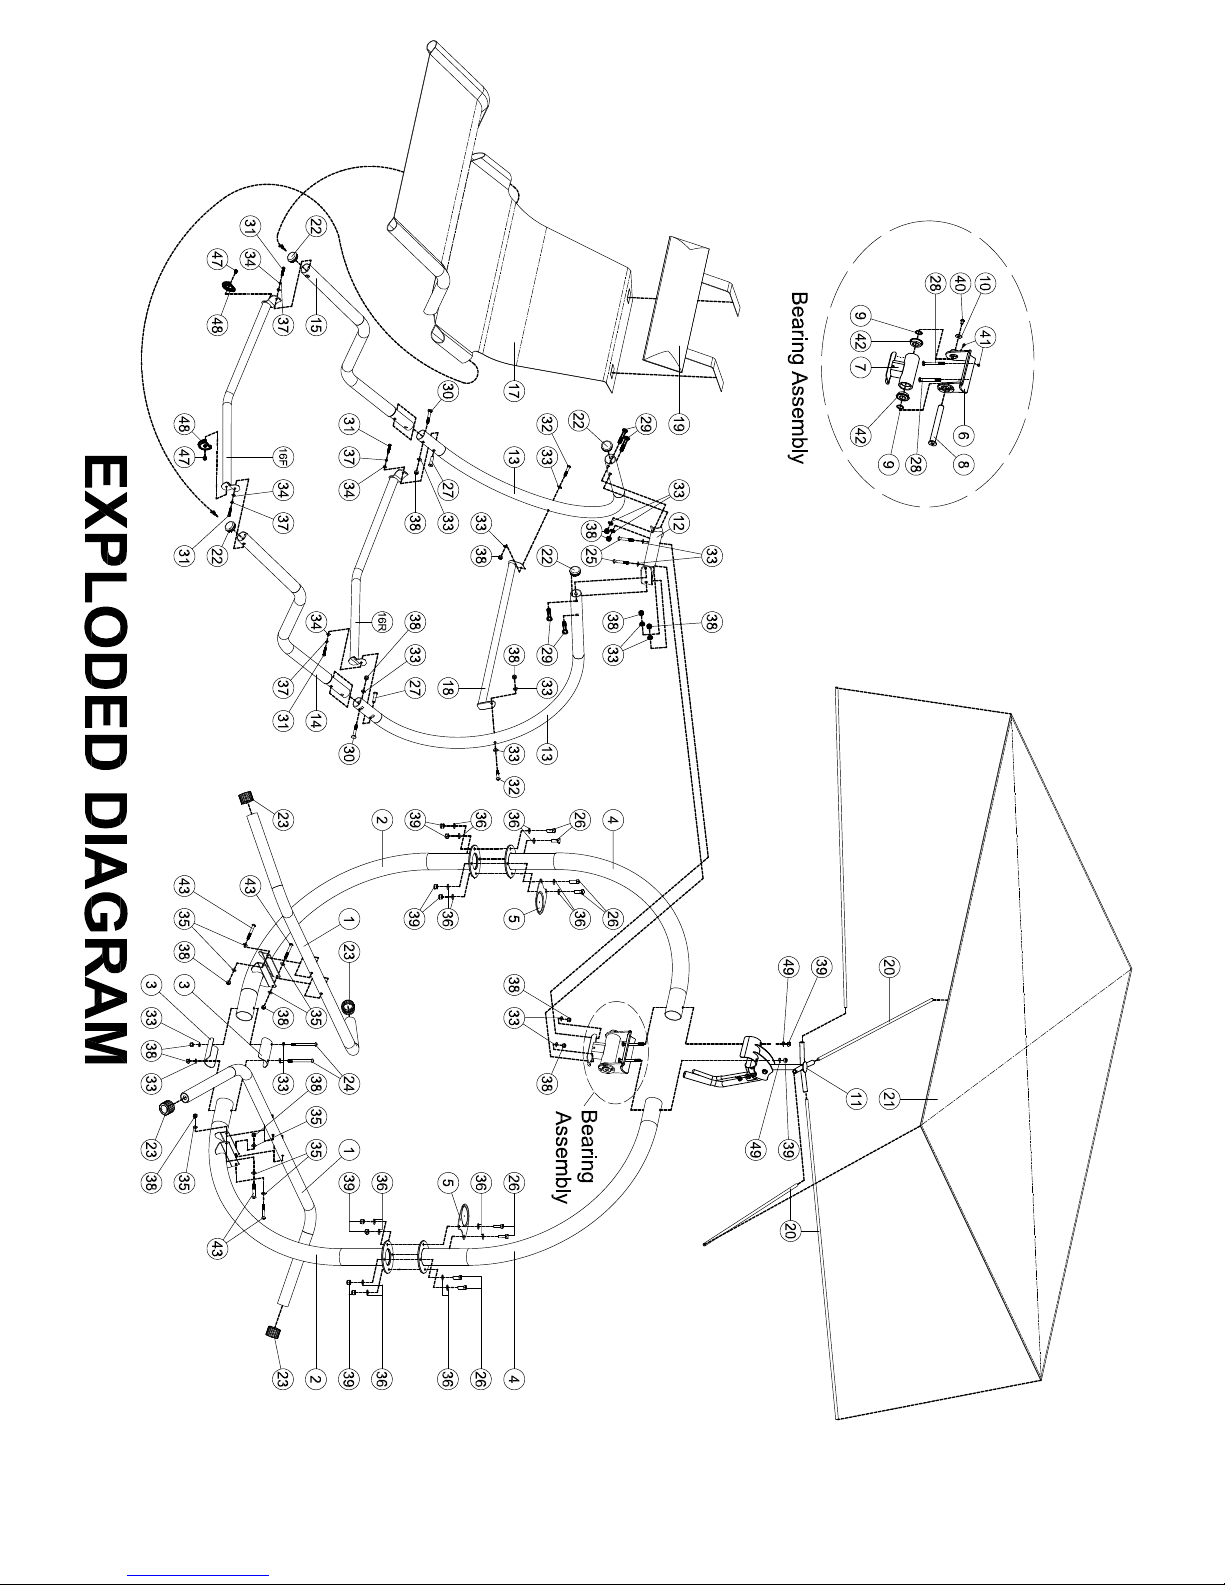


Parts List Hardware List
Part#
Description
Q'ty (pcs)
1
Base Tube
2
2
Lower Upright
2
3Arc Splint 2
4
Upper Upright
2
5
Cup Holder
2
6* Pivot Assembly 1
7* Bearing Support 1
8*
Pivot Shaft Assembly
1
9*
0
1" Spacer
2
10*
0
3/8" Washer 1
11
Canopy Support Assembly
1
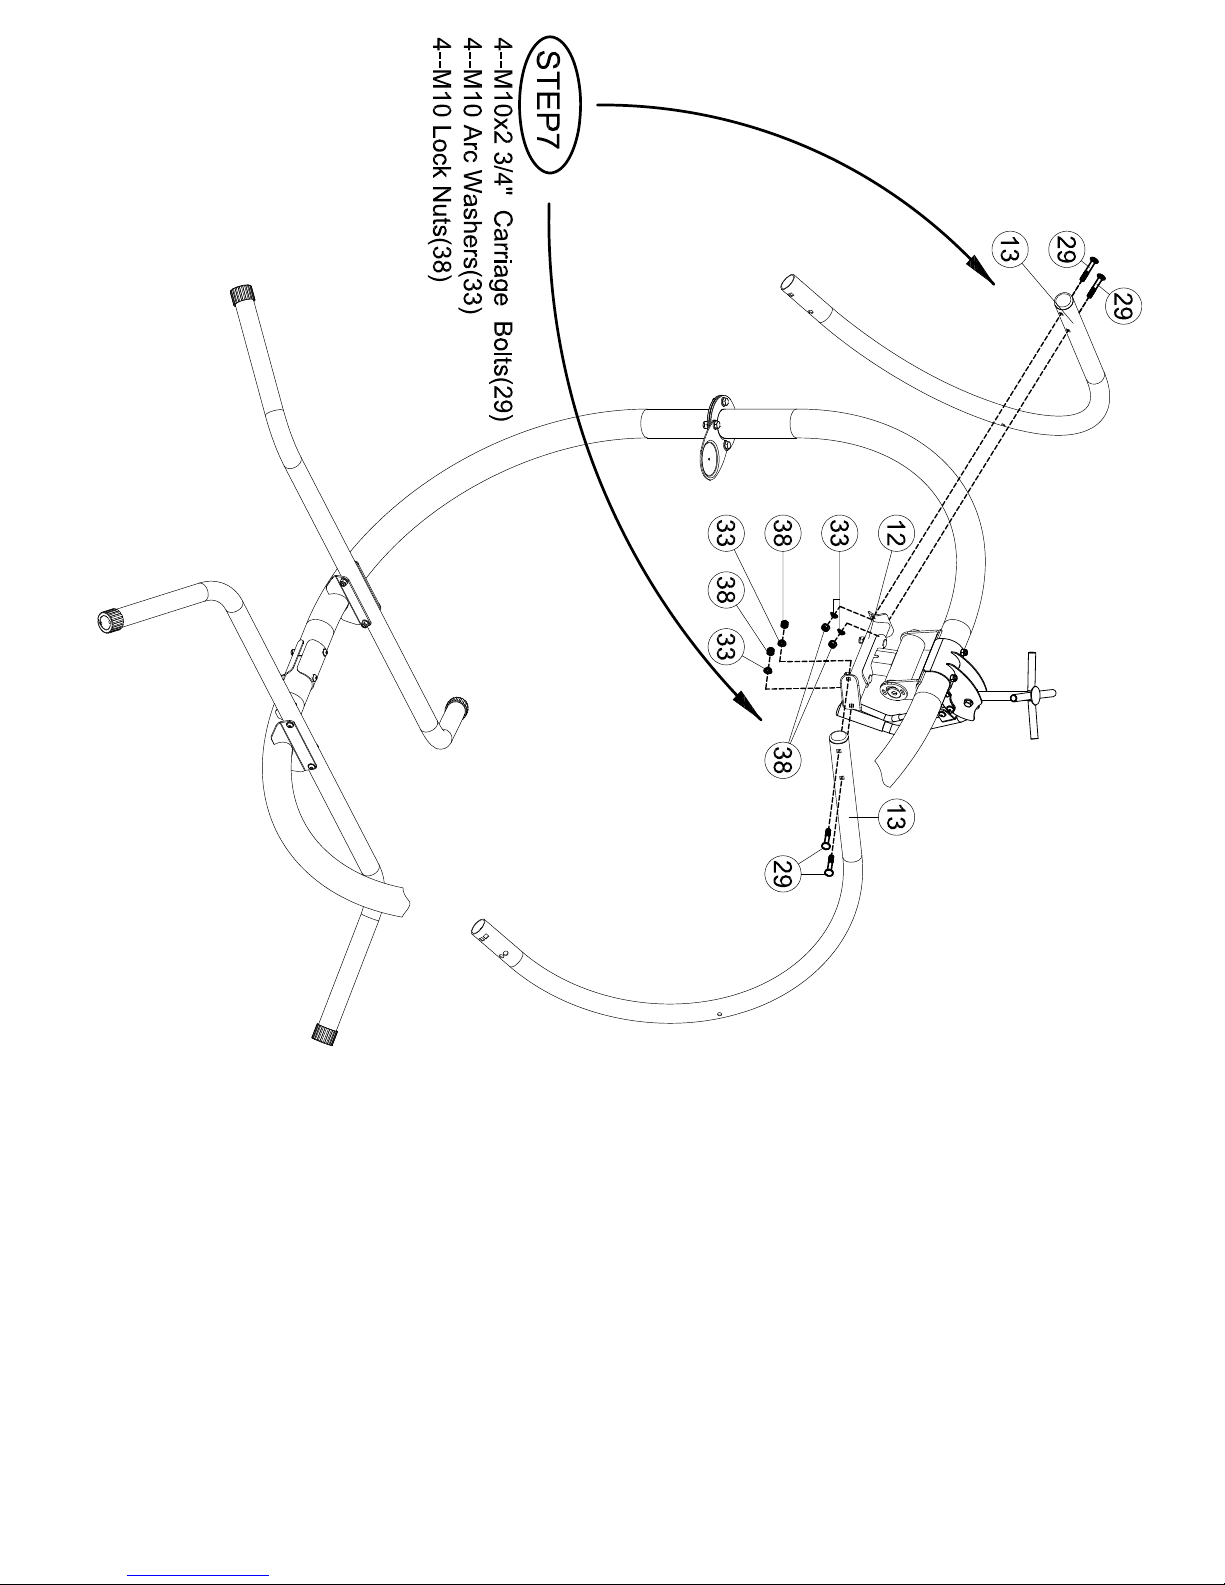
12
Top Bracket Assembly
1
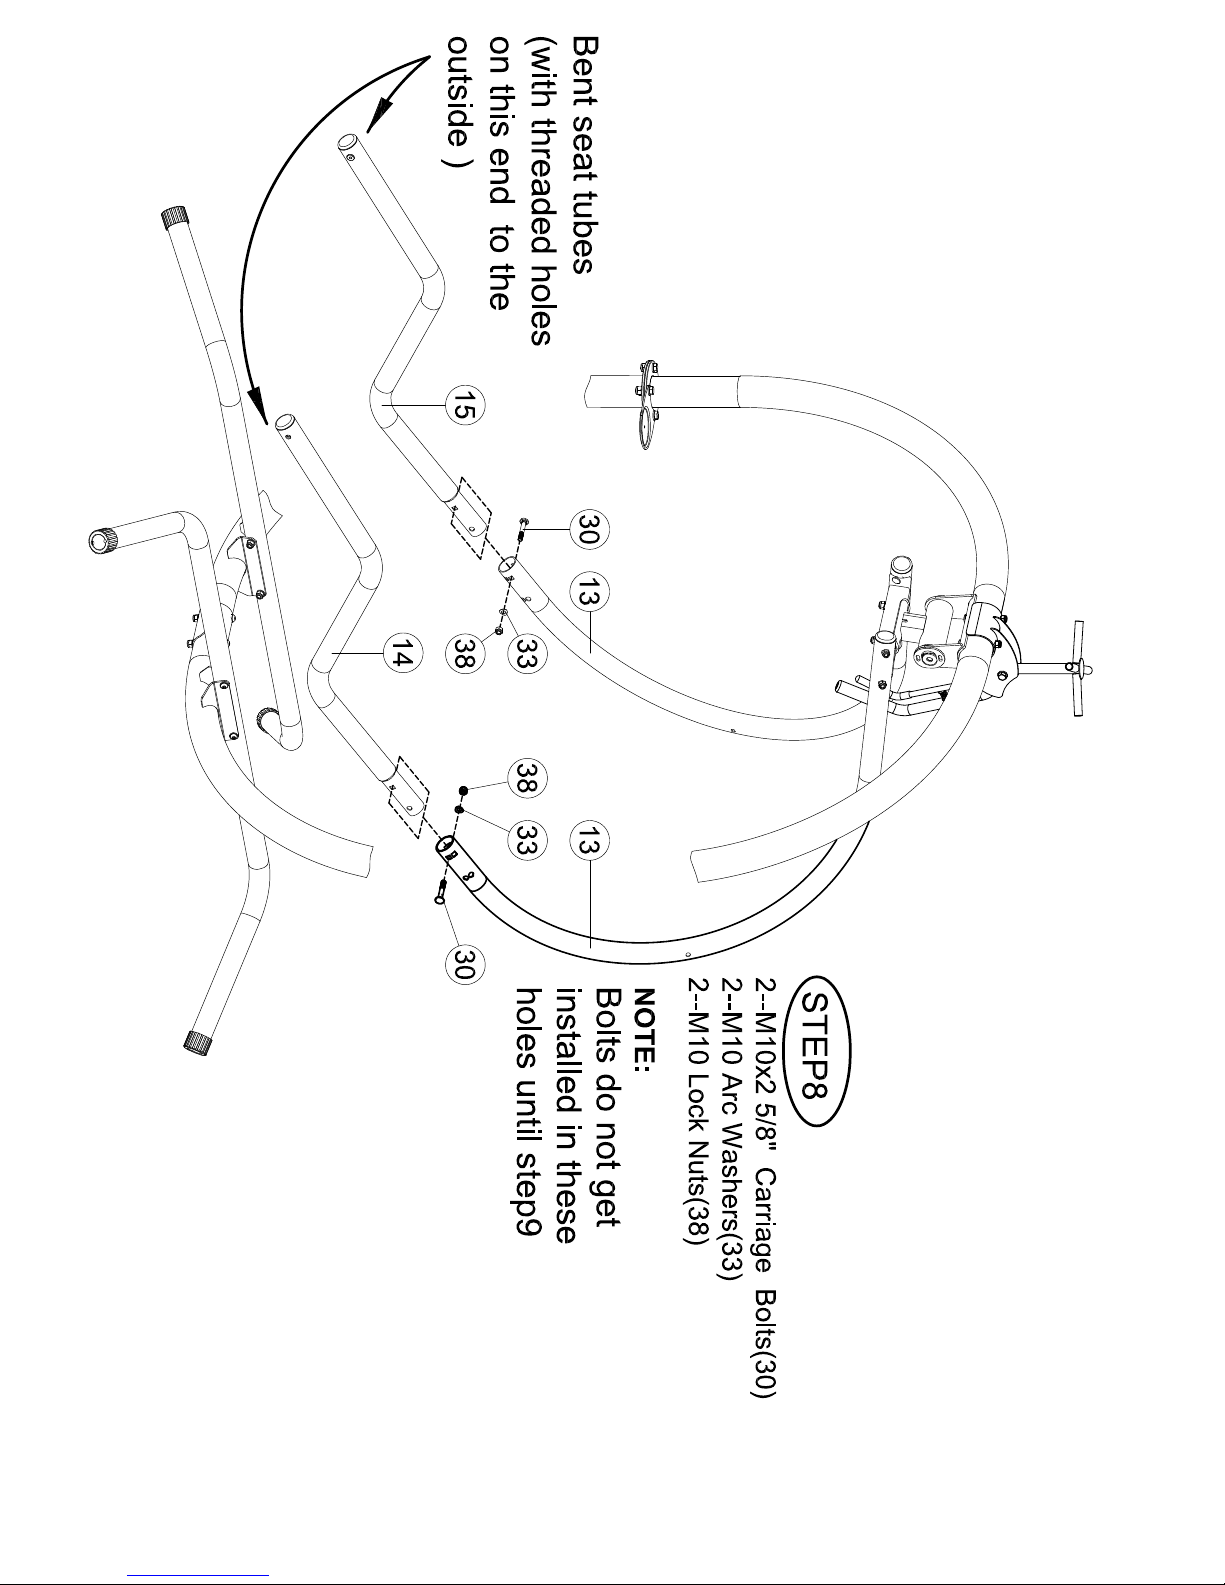
13
Arc Support Tube
2
14 Bent Seat Tube(left) 1
15
Bent Seat Tube(right)
1
16
Separator Assembly
2
17
Seat Fabric
1
18
Head Cross Assembly
1
19
Pillow
1
20
Canopy Rod
4
21 Canopy 1
22
0
2" End Cap 4
23
0
2" Outside End Cap 4
24 M10* 4 1/4" Button Head Bolt 2
* All part of Bearing Assembly
Part#
Description
Q'ty (pcs)
25
M10*3" Button Head Bolt
2
26
M12*1 3/8" Hex Head Bolt
8
27
M8*1 3/4" T
-
nut
2
28*
M10*4 1/8" Carriage Bolt
2
29
M10*2 3/4" Carriage Bolt
4
30 M10*2 5/8" Carriage Bolt 2
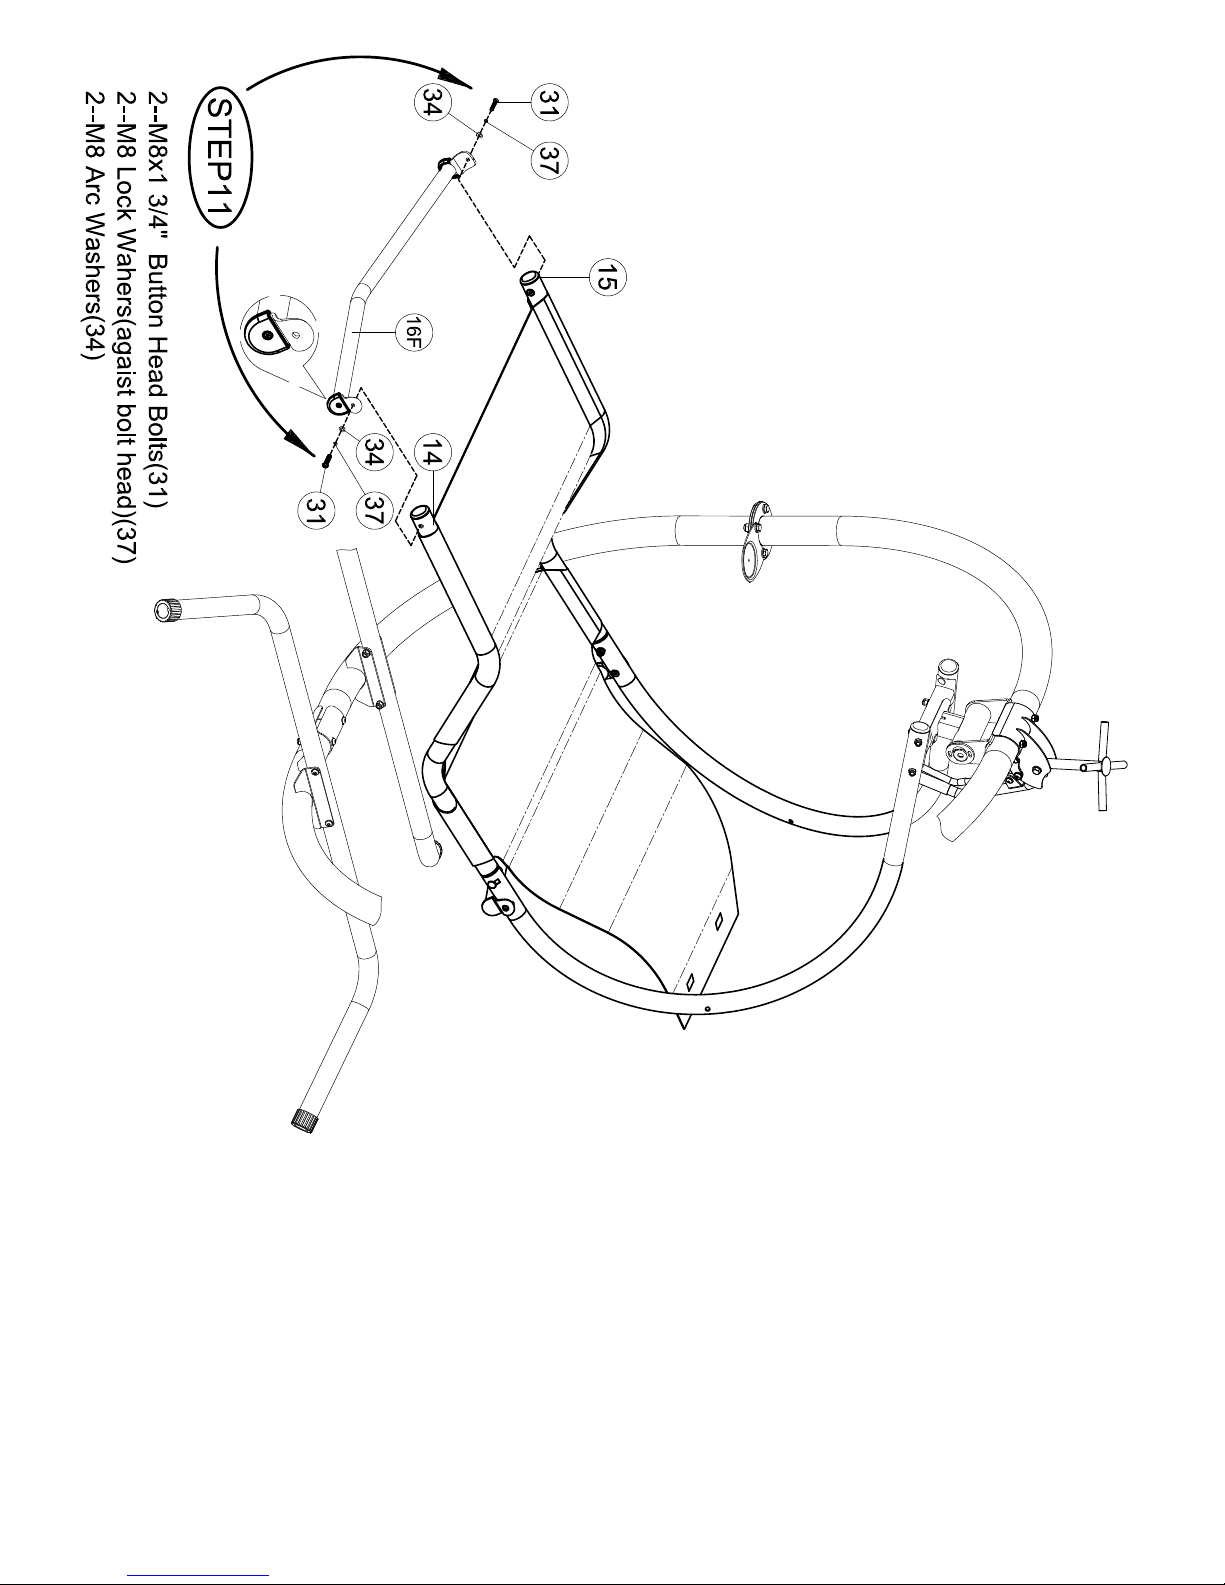
31 M8*1-3/4" Button Head Bolt 4
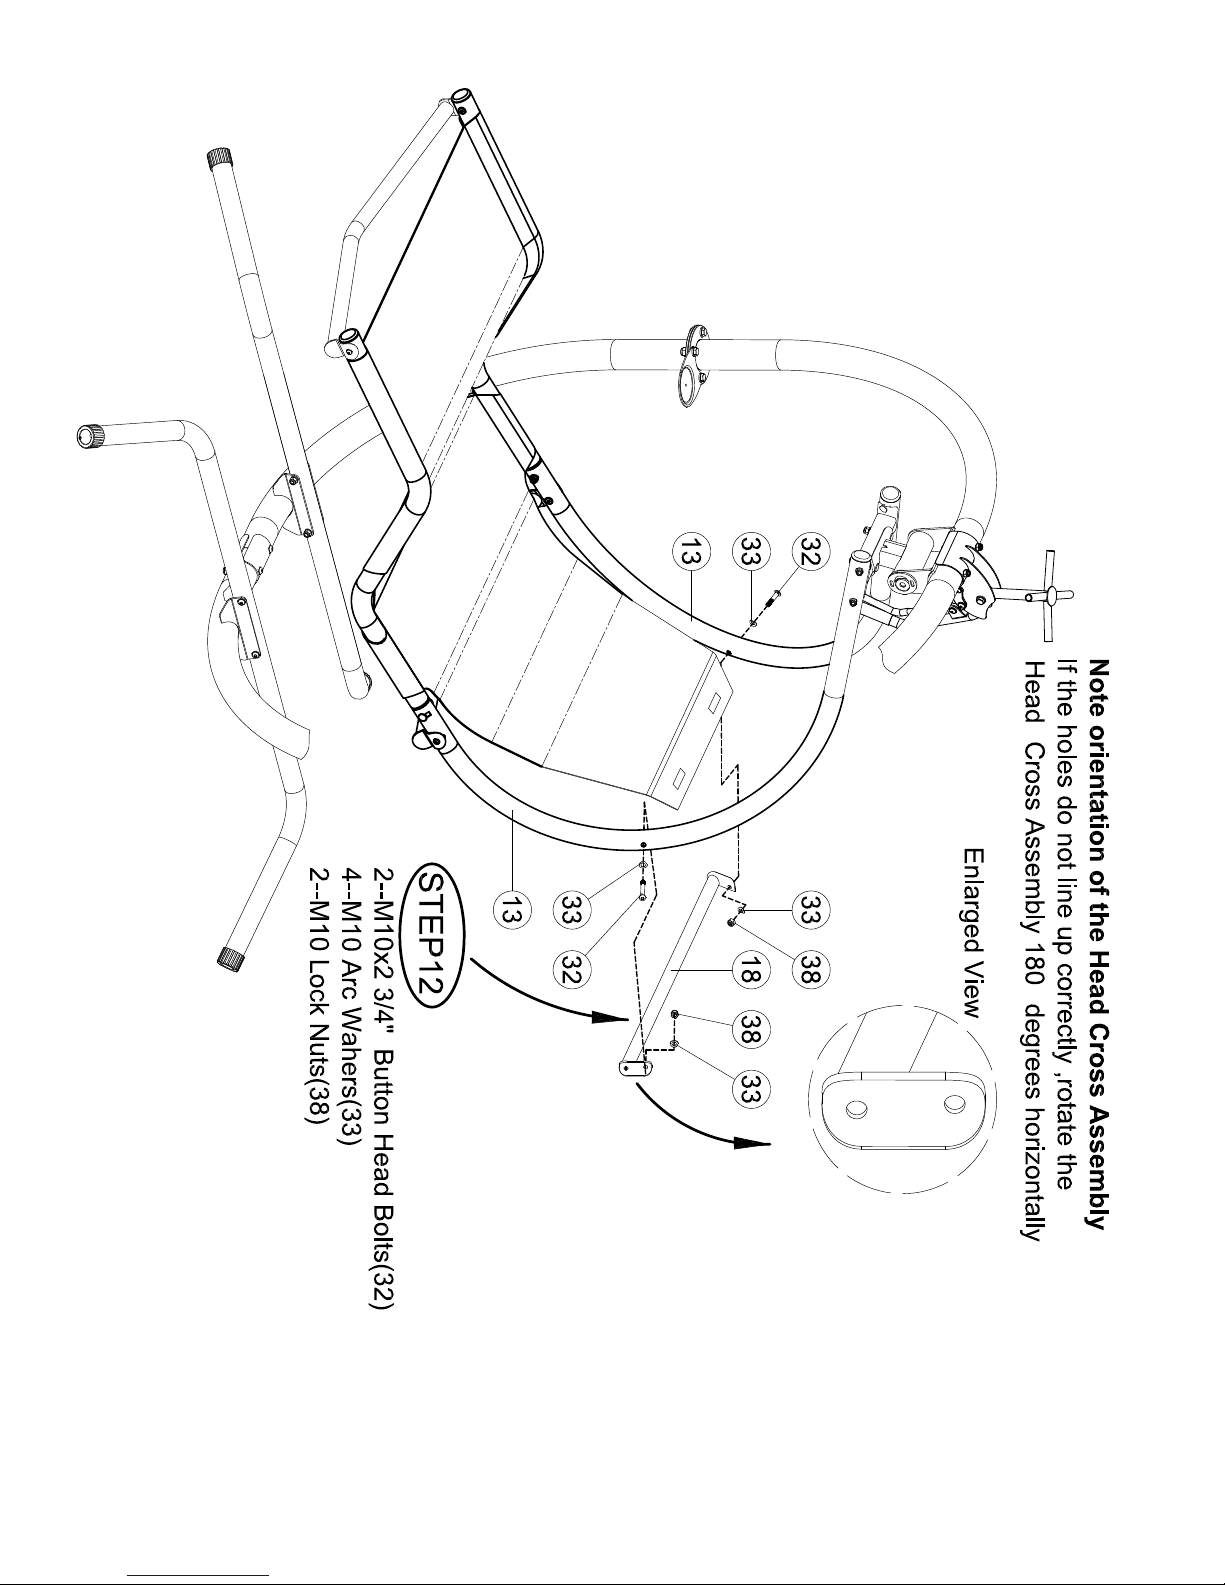
32
M10*2 3/4" Button Head Bolt
2
33
M10 Arc Washer
20
34
M8 Arc Washer
4
35
M10 Flat Washer
8
36
M12 Flat Washer
16
37
M8 Lock Washer
4
38 M10 Lock Nut 16
39
M12 Lock Nut
40*
Button Head Screw
1
41*
Set Screw
2
42*
Bearing
2
43
M10*3 1/8" Button Head Bolt
4
44
6mm Allen Wrench
1
45
5mm Allen Wrench
1
46
4mm Allen Wrench
1
47 M5*3/8" Truss Head Screw 2
48 Bumper 2
6
10
49 M12 Arc Washer 2

Tighten all the hardware in Steps 1 and 2 at this time. Ensure that the drain holes in the
center of the Base Tubes (Item 1) and between the mounting hardware are facing down
towards the ground.
7
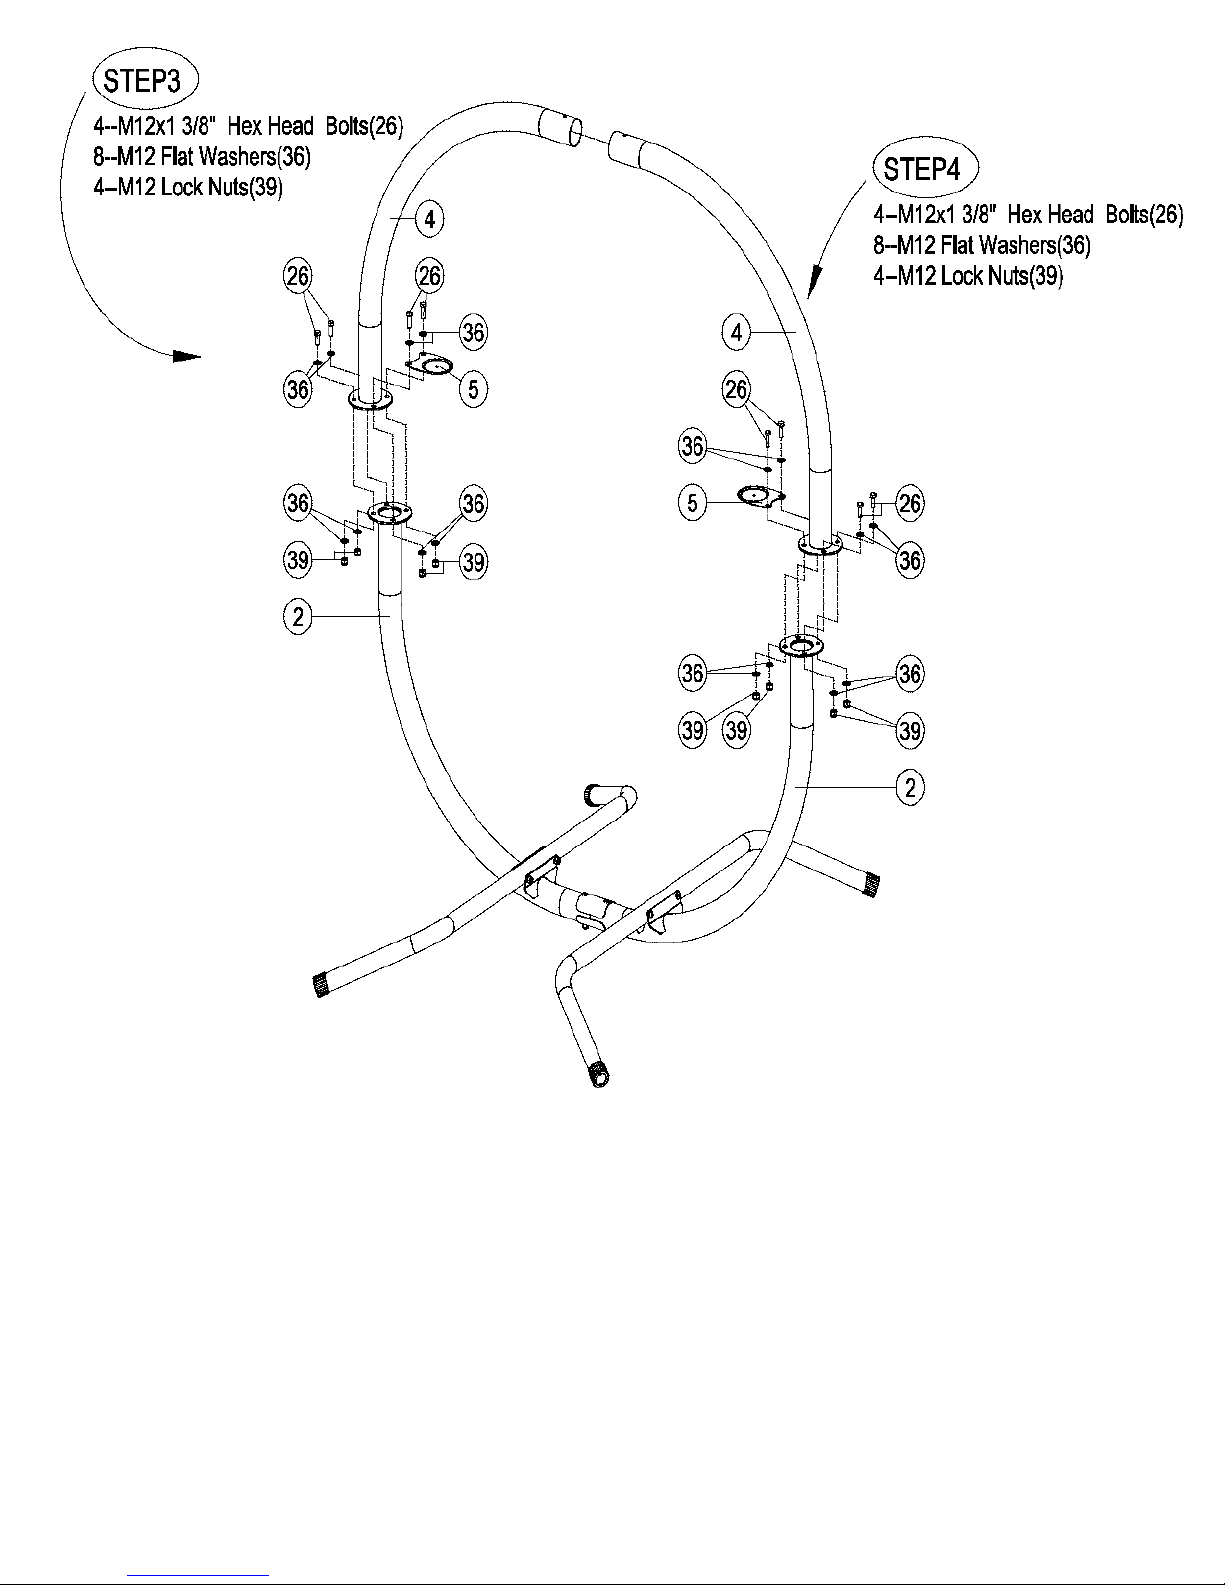
The Cup Holders (Item 5) can be placed as shown or they can be placed so that they face
towards the front of the swing.
Do NOT tighten the hardware in Steps 3 and 4 at this time.
8


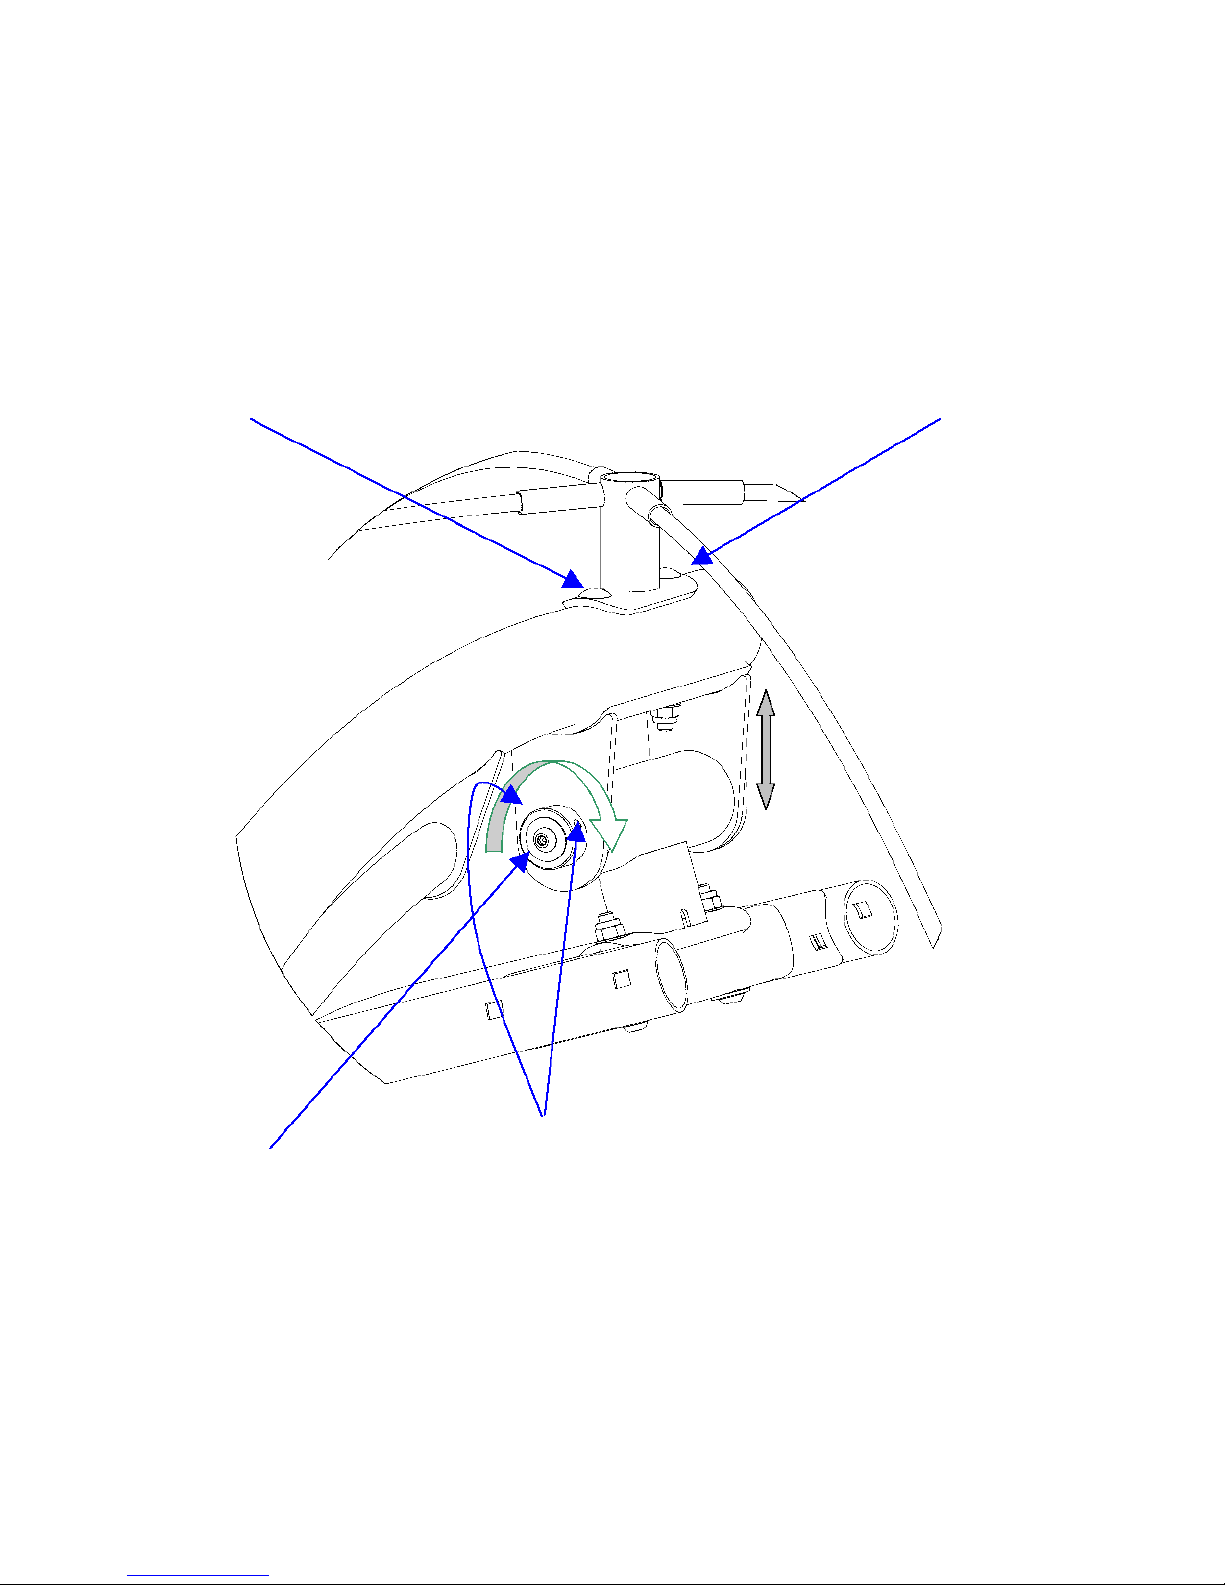
Leveling the Seat (Optional)
Make sure the two set screws are loose and do not come in contact with the inner shaft. Then rotate
the button head adjustment, with the Allen wrench, clockwise to tilt swing up and down until seat is
level and visually pleasing. Then tighten both set screws.
Leveling the Canopy (optional)
Leveling the Canopy can be achieved by placing an extra washer or two on either carriage bolt A or
carriage bolt B, between the Canopy Support Assembly and the Upper Upright.
Carriage Bolt A Carriage Bolt B
Button Head Adjustment
18
Set Screws

421L Swing Weekly Maintenance
Inspect and familiarize yourself with the safety warnings and other information that is
posted on the decals located on the swing or in the owner’s manual.
Inspect all fabric areas for tears and fabric seams for loose or damaged threads. Replace
immediately if needed.
Inspect all the hardware for proper tightness, Retighten if needed.
The canopy is not designed for high winds. If high winds are expected remove the canopy.
Failure to follow these instructions can cause damage to the canopy or canopy rods and
will void the canopy or canopy rod warranty.
In freezing climates the canopy should be removed, folded and stored in a dry place before
the first freeze or snow and until the last freeze or snow has passed. Failure to follow
these instructions can cause damage to the canopy or canopy rods and will void the
canopy or canopy rod warranty.
SAFETY INFORMATION
Velcro MUST have full area engagement behind the head. To ensure
maximum Velcro adhesion, apply pressure while rubbing on both sides of
Velcro engagement region. Check Velcro adhesion each time before using
swing.
Ensure that the 421L swing is set up on a firm level surface. Be careful placing the swing
too close to a structure as severe injury might occur if a person gets caught between the
structure and the swing or damage might occur if the swing hits the structure.
Make sure swing has completely stopped before entering or exiting the swing. Be careful
as swing may shift while entering or exiting. Keep all body parts within the swing seat
while it is in motion.
Make sure bystanders are at least 5 feet away from the swing while it is in motion. Be
cautious swinging while children are present as they may stray into the path of the swing.
Review the maintenance schedule before each use to ensure the swing is in good
working order.
This swing is for casual relaxation swinging only. Residential use only.
19
Table of contents
Other Health in motion Baby Swing manuals


