Health TEMD700 Series User manual

- 1 -
Tablet PC
TEMD700X, TMED800X, TMED900X
X represents 0~9

- 2 -
User
User
User
User Manual
Manual
Manual
Manual
Read
Read
Read
Read me
me
me
me first
first
first
first
�
�
�
�Please
Please
Please
Please read
read
read
read this
this
this
this manual
manual
manual
manual before
before
before
before you
you
you
you operating
operating
operating
operating your
your
your
your tablet,
tablet,
tablet,
tablet, and
and
and
and keep
keep
keep
keep it
it
it
it for
for
for
for future
future
future
future
reference.
reference.
reference.
reference.
�
�
�
�The
The
The
The descriptions
descriptions
descriptions
descriptions in
in
in
in this
this
this
this manual
manual
manual
manual are
are
are
are based
based
based
based on
on
on
on the
the
the
the default
default
default
default settings.
settings.
settings.
settings.
�
�
�
�Images
Images
Images
Images and
and
and
and screenshots
screenshots
screenshots
screenshots used
used
used
used in
in
in
in this
this
this
this manual
manual
manual
manual may
may
may
may differ
differ
differ
differ from
from
from
from the
the
the
the actual
actual
actual
actual
product.
product.
product.
product.
�
�
�
�Available
Available
Available
Available features
features
features
features and
and
and
and additional
additional
additional
additional services
services
services
services may
may
may
may vary
vary
vary
vary by
by
by
by device,
device,
device,
device, software
software
software
software or
or
or
or
service
service
service
service provider.
provider.
provider.
provider.
�
�
�
�
Our
Our
Our
Our company
company
company
company is
is
is
is not
not
not
not liable
liable
liable
liable for
for
for
for performance
performance
performance
performance issues
issues
issues
issues caused
caused
caused
caused by
by
by
by third-party
third-party
third-party
third-party
applications.
applications.
applications.
applications.

- 3 -
CONTENTS
CONTENTS
CONTENTS
CONTENTS
Assembling
Assembling
Assembling
Assembling ...............................................................................................................................
...............................................................................................................................
...............................................................................................................................
............................................................................................................................... -
-
-
- 5
5
5
5 -
-
-
-
Unpack .................................................................................................................................. - 5 -
Charge the battery ................................................................................................................. - 5 -
Install the SIM card .............................................................................................................. - 5 -
Install the memory card ........................................................................................................ - 5 -
Getting
Getting
Getting
Getting started
started
started
started ..........................................................................................................................
..........................................................................................................................
..........................................................................................................................
.......................................................................................................................... -
-
-
- 6
6
6
6 -
-
-
-
Turn you device on and off ................................................................................................... - 6 -
Switch to flight mode ........................................................................................................... - 6 -
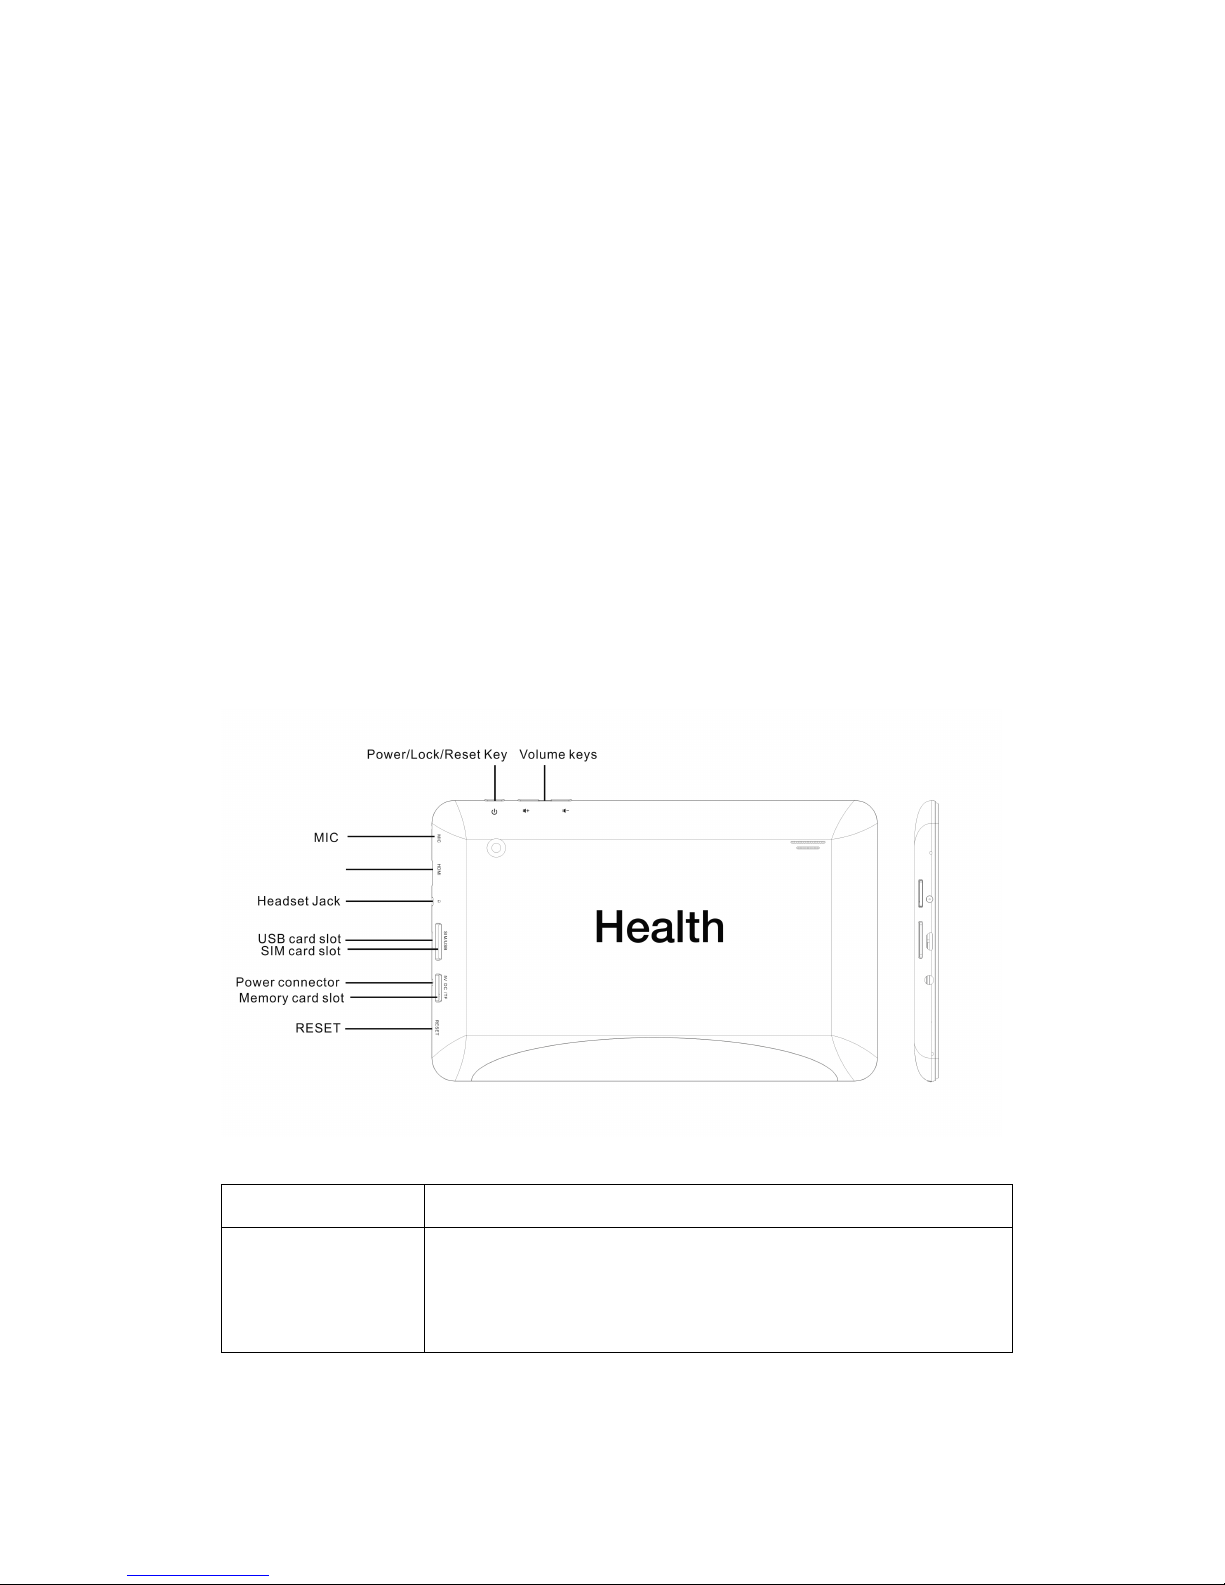
Device layout ........................................................................................................................ - 6 -
Home screen ......................................................................................................................... - 7 -
Add items to the home screen ............................................................................................... - 7 -
Task bar ................................................................................................................................. - 8 -
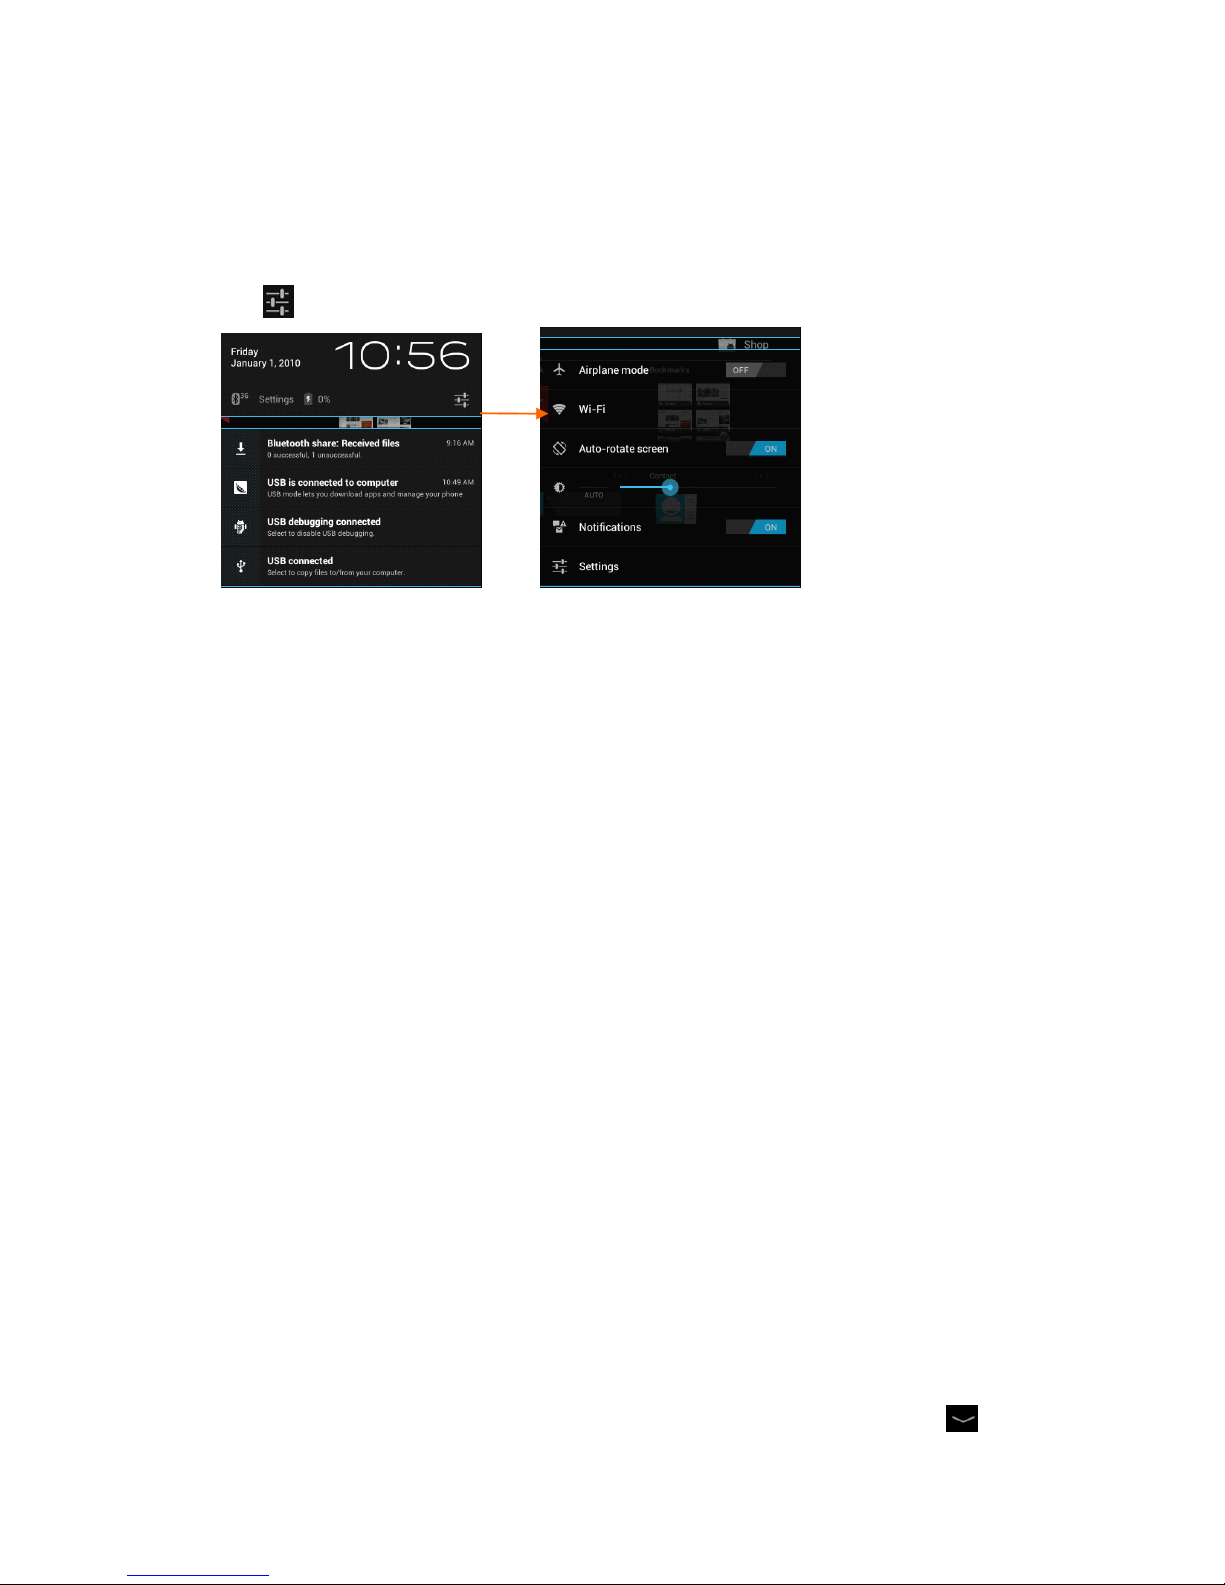
Notification panel ................................................................................................................. - 9 -
Auto rotation ......................................................................................................................... - 9 -
Lock & unlock the screen ..................................................................................................... - 9 -
Enter text .............................................................................................................................. - 9 -
Customize your device ....................................................................................................... - 10 -
Manage applications ........................................................................................................... - 10 -
Security ............................................................................................................................... - 10 -
Reset tablet .......................................................................................................................... - 1 1 -
Communication
Communication
Communication
Communication ......................................................................................................................
......................................................................................................................
......................................................................................................................
...................................................................................................................... -
-
-
- 1
1
1
1 2
2
2
2 -
-
-
-
Phone .................................................................................................................................. - 1 2 -
Contacts .............................................................................................................................. - 1 3 -
Messaging ........................................................................................................................... - 1 4 -
Email ................................................................................................................................... - 1 5 -
Gmail .................................................................................................................................. - 1 6 -
Web
Web
Web
Web ............................................................................................................................................
............................................................................................................................................
............................................................................................................................................
............................................................................................................................................ -
-
-
- 1
1
1
1 7
7
7
7 -
-
-
-
Browser ............................................................................................................................... - 1 7 -
Talk ..................................................................................................................................... - 1 8 -
Entertainment
Entertainment
Entertainment
Entertainment .........................................................................................................................
.........................................................................................................................
.........................................................................................................................
......................................................................................................................... -
-
-
- 18
18
18
18 -
-
-
-
Super-HD Player ................................................................................................................. - 18 -
Music .................................................................................................................................. - 19 -
Camera ................................................................................................................................ - 19 -
Tools
Tools
Tools
Tools ..........................................................................................................................................
..........................................................................................................................................
..........................................................................................................................................
.......................................................................................................................................... -
-
-
- 22
22
22
22 -
-
-
-
Calendar .............................................................................................................................. - 22 -
Alarm .................................................................................................................................. - 22 -
File Manager ....................................................................................................................... - 2 3 -
Sound Recorder .................................................................................................................. - 23 -
Calculator ........................................................................................................................... - 23 -
Connectivity
Connectivity
Connectivity
Connectivity ............................................................................................................................
............................................................................................................................
............................................................................................................................
............................................................................................................................ -
-
-
- 23
23
23
23 -
-
-
-
USB Connection ................................................................................................................. - 23 -
Bluetooth ............................................................................................................................ - 2 4 -

- 4 -
Wi-Fi ................................................................................................................................... - 2 5 -
Safty
Safty
Safty
Safty Precautions
Precautions
Precautions
Precautions ..................................................................................................................
..................................................................................................................
..................................................................................................................
.................................................................................................................. -
-
-
- 25
25
25
25 -
-
-
-
Care
Care
Care
Care &
&
&
& Maintenance
Maintenance
Maintenance
Maintenance ..............................................................................................................
..............................................................................................................
..............................................................................................................
.............................................................................................................. -
-
-
- 26
26
26
26 -
-
-
-

- 5 -
Assembling
Assembling
Assembling
Assembling
Unpack
Unpack
Unpack
Unpack
Check your product box for the following items.
Tablet
User manual
Adapter
You
can purchase additional accessories from your local retailer.
Charge
Charge
Charge
Charge the
the
the
the battery
battery
battery
battery
Before using the device for the first time, you must charge the battery.
1.
You
can charge the device with a travel adapter or by connecting the device to a PC
with a USB cable.
2.Battery full icon is shown when finished if your device is off.
Warning
Warning
Warning
Warning :Use only original batteries and chargers. Unapproved chargers or cables can
cause batteries to explode or damage your device.
Install
Install
Install
Install the
the
the
the SIM
SIM
SIM
SIM card
card
card
card
You
need to insert a SIM card to use the Phone function.
To
install the SIM card, follow the
instructions below.
1. Make sure that the card
’
s gold contacts face into the device.
2. Push the SIM card into the slot until it clicks.
Install
Install
Install
Install the
the
the
the memory
memory
memory
memory card
card
card
card
To
store additional multimedia files, you need insert a memory card.
1. Insert a memory card with the gold contacts facing downwards.
2. Push the memory card into the slot until it clicks.
Notice
Notice
Notice
Notice : Our company uses approved industry standards for memory cards, but some
brands may not be fully compatiable with your device.

- 6 -
Getting
Getting
Getting
Getting started
started
started
started
Turn
Turn
Turn
Turn you
you
you
you device
device
device
device on
on
on
on and
and
and
and off
off
off
off
To
turn on your device, press and hold the power key.
To
turn off your device, press and hold the power key, and then tap OK
OK
OK
OK .
Switch
Switch
Switch
Switch to
to
to
to flight
flight
flight
flight mode
mode
mode
mode
To
use only your device
’
s non-network services, switch to flight mode. Please follow the
instructions below to turn on flight mode:
Tap
Settings
Settings
Settings
Settings �
�
�
�WIRELESS
WIRELESS
WIRELESS
WIRELESS &
&
&
& NETWORKS
NETWORKS
NETWORKS
NETWORKS �
�
�
�More
More
More
More �
�
�
�Airplane
Airplane
Airplane
Airplane mode
mode
mode
mode from application list
or turn on Airplane
Airplane
Airplane
Airplane mode
mode
mode
mode from the notification panel.
Device
Device
Device
Device layout
layout
layout
layout
Volume
Volume
Volume
Volume keys
keys
keys
keys Adjust the device volume.
Power/Lock/Reset
Power/Lock/Reset
Power/Lock/Reset
Power/Lock/Reset Press and hold for 2 seconds to turn on or turn off the device.
Press to lock the device.
Press and hold for 6 seconds to reset the device.

- 7 -
Home
Home
Home
Home screen
screen
screen
screen
The home screen has multiple panels. Scroll left or right to the panels on the home screen,
you can view indicator icons, widgets, shortcuts to applications, and other items.
1
1
1
1Open the search bar
2
2
2
2Access the application list and widget screen.
3
3
3
3Scroll left or right to the other panels
4
4
4
4Task bar
Add
Add
Add
Add items
items
items
items to
to
to
to the
the
the
the home
home
home
home screen
screen
screen
screen
Tap the icon at the upper right to access the application list shown below from home screen.

- 8 -
Scroll left or right to view more items.
To
add items to the home screen, tap and hold an item, then drag the item to a new
location.
To
remove items from the home screen, tap and hold an item, then drag the item to the
Remove
Remove
Remove
Remove area at the top of the home screen.
Task
Task
Task
Task bar
bar
bar
bar
The task bar is shown at the bottom of the screen. It displays commonly used option
buttons, battery level indicator, current time and other indicator icons.
1
1
1
1Return to previous screen.
2
2
2
2Return to home screen.
3
3
3
3View the applications you have accessed recently.
4
4
4
4Adjust the device volume to low.
5
5
5
5Adjust the device volume to high.
6
6
6
6Open a list of options available on the current screen.
7
7
7
7Display notification icons.
Tap
the notifications area to open the notification panel.
Indicator
Indicator
Indicator
Indicator icons
icons
icons
icons
Icon
Icon
Icon
Icon Definition
Definition
Definition
Definition Icon
Icon
Icon
Icon Definition
Definition
Definition
Definition
Open Wi-Fi available Flight mode activated
Wi-Fi connected New email
Signal strength New text or multimedia message
Roaming mode Call in progress
Uploading data Missed call
Downloading data Call on hold
Connected to PC Call diverting activated
Bluetooth activated Alarm activated
Battery power level Music being played
1
1
1
1 2
2
2
2 3
3
3
3 4
4
4
4 5
5
5
5 6
6
6
6 7
7
7
7

- 9 -
Notification
Notification
Notification
Notification panel
panel
panel
panel
Tap
the notifications area to open the notification panel shown below.
You
can access a
list of notifications.
Tap
to activate or deactivate wireless connnection features and other settings.
Airplane
Airplane
Airplane
Airplane mode
mode
mode
mode :Activate or deactivate the flight mode.
Wi-Fi
Wi-Fi
Wi-Fi
Wi-Fi :Activate or deactivate the Wi-Fi connection.
Auto-rotate
Auto-rotate
Auto-rotate
Auto-rotate screen
screen
screen
screen :Activate or deactivate the auto rotation feature.
Brightness
Brightness
Brightness
Brightness :Adjust the basic brightness level of the display to lighter or darker.
Notifications
Notifications
Notifications
Notifications :Activate or deactivate the notification feature.
Settings
Settings
Settings
Settings :Access Settings
Settings
Settings
Settings application.
Auto
Auto
Auto
Auto rotation
rotation
rotation
rotation
If you rotate the device while using some features, the interface will automatically rotate
as well.
To
prevent the interface from rotating, open the notifications panel and select
Auto-rotate
Auto-rotate
Auto-rotate
Auto-rotate screen
screen
screen
screen , then scroll it to Off
Off
Off
Off .
Lock
Lock
Lock
Lock &
&
&
& unlock
unlock
unlock
unlock the
the
the
the screen
screen
screen
screen
To
unlock the screen, tap and hold the lock icon, then drag it to the unlock area where the
unlock icon is.
To
lock the screen manually, press Power
Power
Power
Power key.
Enter
Enter
Enter
Enter text
text
text
text
You
can enter text by selecting characaters on the virtual keyboard.
Tap
the text input field to display the virtual keyboard.
To
hide the keyboard, tap at

- 10 -
the task bar.
To
change the text input method, tap at the task bar.
From a text field, you can use the copy and paste feature for fast inputting.
Customize
Customize
Customize
Customize your
your
your
your device
device
device
device
To
customize your device according to your preferences, tap Settings
Settings
Settings
Settings from application list
or notification panel.
Manage
Manage
Manage
Manage applications
applications
applications
applications
To
manage the applications installed on your device, tap Settings
Settings
Settings
Settings �
�
�
�App.
App.
App.
App.
1.
To
uninstall an application, select DOWNLOADED
DOWNLOADED
DOWNLOADED
DOWNLOADED , then select an item and tap
Uninstall
Uninstall
Uninstall
Uninstall , tap OK
OK
OK
OK to confirm.
2.
To
stop or change the settings of an application, select RUNNING
RUNNING
RUNNING
RUNNING or ALL
ALL
ALL
ALL , then select
an item and tap the option you need.
Security
Security
Security
Security
You
can protect your device and data by setting screen lock or encrypting your tablet.
�
�
�
�Set
Set
Set
Set a
a
a
a screen
screen
screen
screen lock
lock
lock
lock
To
set a screen lock, tap Settings
Settings
Settings
Settings �
�
�
�Security
Security
Security
Security �
�
�
�Screen
Screen
Screen
Screen lock
lock
lock
lock from application list.
None
None
None
None :Deactivate the screen lock.
Slide
Slide
Slide
Slide :Slide to unlock the screen.
PIN
PIN
PIN
PIN :Enter a numeric PIN to unlock. When prompted, enter the PIN to unlock
the screen.
Pattern
Pattern
Pattern
Pattern :Draw a pattern to unlock. Follow the instructions to draw your lock
pattern. When prompted, draw the pattern to unlock the screen.
Password
Password
Password
Password :Enter a passcode to unlock. When prompted, enter the passcode
to unlock the screen.
�
�
�
�
Screen
Screen
Screen
Screen time-out
time-out
time-out
time-out
Select Settings
Settings
Settings
Settings �
�
�
�Display
Display
Display
Display �
�
�
�Sleep
Sleep
Sleep
Sleep from application list, you can set the time before the
screen times out and goes into lock mode. ( you have not entered any characters or made
other selections).

- 11 -
�
�
�
�
Encrypt
Encrypt
Encrypt
Encrypt tablet
tablet
tablet
tablet
You
can encrypt your accounts, settings, downloaded apps and their data, media and
other files. Once you encrypt your tablet, you must enter a numeric PIN or password to
decrypt it each time you switch on your device.
Reset
Reset
Reset
Reset tablet
tablet
tablet
tablet
You
can reset system and desktop settings to their original values by the following steps:
1. Select Settings
Settings
Settings
Settings �
�
�
�Backup
Backup
Backup
Backup &
&
&
& reset
reset
reset
reset from application list.
2.
Tap
Factory
Factory
Factory
Factory data
data
data
data reset.
reset.
reset.
reset.
3. If you want to erase all data on your tablet, such as music, pictures, and other data,
tap Erase
Erase
Erase
Erase SD
SD
SD
SD card
card
card
card checkbox to create a checkmark.
4.
Tap
Reset
Reset
Reset
Reset tablet
tablet
tablet
tablet .
The device resets to the factory default settings automatically.
Warning!
Warning!
Warning!
Warning! : Factory data reset will erase all data from your device and SD card, including
your google account, system and application data and settings, and downloaded
applications.

- 12 -
Communication
Communication
Communication
Communication
Phone
Phone
Phone
Phone
To
use calling functions, tap Phone
Phone
Phone
Phone from application list.
�
�
�
�Make
Make
Make
Make calls
calls
calls
calls
To
make calls, you can use any of the three ways:
Enter numbers by using the virtual numeric keypad on the screen
Make a call from call log .
Make a call from contacts.
�
�
�
�Answer
Answer
Answer
Answer a
a
a
a call
call
call
call
To
answer a call, drag the circled button to the green button.
�
�
�
�
Decline
Decline
Decline
Decline or
or
or
or end
end
end
end a
a
a
a call
call
call
call
To
decline a call, drag the circled button to the red button.
To
end a call in progress, tap the red button.
�
�
�
�
Call
Call
Call
Call settings
settings
settings
settings
To
change call settings, tap the option button at the upper right.
1.
1.
1.
1. Fixed
Fixed
Fixed
Fixed Dialing
Dialing
Dialing
Dialing Numbers
Numbers
Numbers
Numbers
If FDN mode is activated, your device will restrict outgoing calls, except for the
numbers stored in the FDN list.
2.
2.
2.
2. Quick
Quick
Quick
Quick responses
responses
responses
responses
Quick response is a feature to reject the call with the predefined messages.
Tap
one of the pre-written messages to be displayed when you want the call to be
rejected, then tap OK
OK
OK
OK .
3.
3.
3.
3. Voice
Voice
Voice
Voice mail
mail
mail
mail service
service
service
service
With the call divert network service, you can direct incoming calls to your voice
mailbox.
Tap
this item to set your voice mail service provider.
4.
4.
4.
4. Voicmail
Voicmail
Voicmail
Voicmail settings
settings
settings
settings
Set your voice mail number.
5.
5.
5.
5. Call
Call
Call
Call forwarding
forwarding
forwarding
forwarding
Call diverting is a network feature to send incoming calls to another number that you
specify.

- 13 -
6.
6.
6.
6. Call
Call
Call
Call waiting
waiting
waiting
waiting
If call
call
call
call waiting
waiting
waiting
waiting is activated, the network notifies you of a new incoming call while you
have a call in progress or you can make a new call during a call.
Contacts
Contacts
Contacts
Contacts
Tap
People
People
People
People from application list to access contacts.
Groups
Groups
Groups
Groups :List all your contacts by group.
All
All
All
All :List all your contacts saved in the device memory.
Favorites
Favorites
Favorites
Favorites :List the contacts that you have set as favourites or the contacts
that you have sent message to or dialed.
(To
set the contact as your favourites, select at the title bar.)
�
�
�
�
Add
Add
Add
Add new
new
new
new contact
contact
contact
contact
1. Access People
People
People
People .
2.
Tap
.
3. Enter necessary fields.
4.
Tap
DONE
DONE
DONE
DONE .
�
�
�
�Edit
Edit
Edit
Edit a
a
a
a contact
contact
contact
contact
1.
To
edit a contact, scroll to the contact you want to change.
2.
Tap
the option button at the upper right, then select Edit
Edit
Edit
Edit .
3. Change necessary fields.
4.
Tap
DONE
DONE
DONE
DONE .
�
�
�
�Create
Create
Create
Create new
new
new
new group
group
group
group
1.
Tap
the first tab at the upper left.
2.
Tap
at the upper right.
3. Enter a category name.
4.
Tap
DONE
DONE
DONE
DONE .
�
�
�
�
Rename
Rename
Rename
Rename group
group
group
group
1.
To
rename the group, scroll to the group you want to change.
2.
Tap
at the upper right or tap the option button and then select Edit
Edit
Edit
Edit .
3. Enter a new category name.
4.
Tap
DONE
DONE
DONE
DONE .

- 14 -
�
�
�
�
Import/Export
Import/Export
Import/Export
Import/Export contacts
contacts
contacts
contacts
1.
1.
1.
1. Import
Import
Import
Import from
from
from
from the
the
the
the SIM
SIM
SIM
SIM card
card
card
card
To
copy the conatcts from the SIM card, tap the option button at the upper right and
then select Import/Export
Import/Export
Import/Export
Import/Export �
�
�
�Import
Import
Import
Import from
from
from
from the
the
the
the SIM
SIM
SIM
SIM card
card
card
card , select contacts, and then
select Import
Import
Import
Import .
2. Import
Import
Import
Import from
from
from
from SD
SD
SD
SD card
card
card
card
To
import contact files (in vcf format) from a memory card to your device, tap the
option button at the upper right and then select Import/Export
Import/Export
Import/Export
Import/Export �
�
�
�Import
Import
Import
Import from
from
from
from SD
SD
SD
SD card
card
card
card ,
select a memory location and contact files to import and select OK
OK
OK
OK .
3. Export
Export
Export
Export to
to
to
to SD
SD
SD
SD card
card
card
card
To
export contacts from your device to a memory card, tap the option button at the
upper right and then select Import/Export
Import/Export
Import/Export
Import/Export �
�
�
�Export
Export
Export
Export to
to
to
to SD
SD
SD
SD card
card
card
card , select OK
OK
OK
OK to confirm.
4. Share
Share
Share
Share visible
visible
visible
visible contacts
contacts
contacts
contacts
With this feature, you can send the visible contacts via Email or Bluetooth.
�
�
�
�Search
Search
Search
Search for
for
for
for contacts
contacts
contacts
contacts
1.
Tap
at the title bar from contact list screen, enter the desired information, then
your device shows the result.
2.
Tap
the seach icon at the upper left from home screen, enter the contact
’
s name or
number, your device shows the result immediately.
Messaging
Messaging
Messaging
Messaging
Learn to create and send a text or multimedia message, and view or manage messages
that you have sent or received.
�
�
�
�
View
View
View
View messages
messages
messages
messages
1.
Tap
Messaging
Messaging
Messaging
Messaging from application list.
2.
Tap
the message to view the detailed information.
�
�
�
�
Create
Create
Create
Create and
and
and
and send
send
send
send SMS
SMS
SMS
SMS
1.
Tap
NEW
NEW
NEW
NEW MESSAGE
MESSAGE
MESSAGE
MESSAGE .
2. In To
To
To
To field, enter the recipient
’
s mobile phone numbers manually. If you enter
more than one number, separate the numbers with a comma.
3. In Type
Type
Type
Type message
message
message
message , enter the text of the message.

- 15 -
4. Select Send
Send
Send
Send to send the message.
�
�
�
�Create
Create
Create
Create and
and
and
and send
send
send
send MMS
MMS
MMS
MMS
Multimedia message can include pictures, sound and text.
1.
Tap
NEW
NEW
NEW
NEW MESSAGE
MESSAGE
MESSAGE
MESSAGE .
2.
Tap
at the title bar.
3. Select one of the items below.
Pictures: Insert image.
Capture picture :Capture new picture and insert the picture.
Videos: Insert video clip.
Capture video: Capture new video clip and insert the video clip.
Audio: Insert sound clip.
Record audio: Recound sound clip and insert the cound clip.
Slideshow: Add more than one slide.
4. In To
To
To
To field, enter the recipient
’
s mobile phone numbers or email addresses
manually. If you enter more than one number or email, separate them with a
comma.
5. In Type
Type
Type
Type message
message
message
message field, enter the text of the message.
6. Select Send
Send
Send
Send to send the message.
Email
Email
Email
Email
To
receive and send mail, you must have a remote mailbox service. This service may be
offered by a service provider. Your device is compliant with applicable internet standards
for POP3/IMAP/Exchange.
Before you can send or receive mail on your device, you need to set up an email account
and define the email settings correctly. you can define more than 1 mailbox.
�
�
�
�Set
Set
Set
Set up
up
up
up your
your
your
your email
email
email
email
1.
Tap
Email
Email
Email
Email from application list.
2.
You
can use mailbox guide to set up your mailbox, tap Next
Next
Next
Next until it
’
s done.
3. If you need to add another email account, tap the option button at the upper
right �
�
�
�Settings
Settings
Settings
Settings �
�
�
�ADD
ADD
ADD
ADD ACCOUNT
ACCOUNT
ACCOUNT
ACCOUNT , then set up the email account with the
mailbox guide.

- 16 -
When you are finished setting up the email account, the email messages are
downloaded to your device. If you have created more than two accounts, you can
switch between email accounts. Select an account name at the top left of the screen
and select the one you want to retrieve messages from.
�
�
�
�Delete
Delete
Delete
Delete your
your
your
your email
email
email
email account
account
account
account
1. Open the application list and select Email
Email
Email
Email .
2.
Tap
the option button at the upper right, then select Settings
Settings
Settings
Settings and the email account
you want to delete.
3.
Tap
Remove
Remove
Remove
Remove account
account
account
account .
4.
Tap
OK
OK
OK
OK to confirm.
�
�
�
�Create
Create
Create
Create and
and
and
and send
send
send
send email
email
email
email
1. Open Email
Email
Email
Email application.
2.
Tap
.
3. In
To
To
To
To
field, enter the recipient
’
s email addresses manually and separate them with a
comma. Add more recipients by tapping Cc/Bcc
Cc/Bcc
Cc/Bcc
Cc/Bcc .
4.
To
insert attachments, tap the option button at the upper right and select Attach
Attach
Attach
Attach file
file
file
file .
5. Enter the subject and the text.
6.
Tap
SEND
SEND
SEND
SEND to send the email.
Gmail
Gmail
Gmail
Gmail
You can retrieve new email messages from the Google Mail webmail service to your inbox.
Before you can send or receive mail on your device, you need to set up a Gmail account.
�
�
�
�Create
Create
Create
Create a
a
a
a Gmail
Gmail
Gmail
Gmail account
account
account
account
If you don ’ t have a Google Account, tap New
New
New
New , then follow the on-screen instructions to
create a new one.
�
�
�
�Set
Set
Set
Set up
up
up
up a
a
a
a Gmail
Gmail
Gmail
Gmail account
account
account
account
If you want to add an existing account, tap Existing
Existing
Existing
Existing , enter your email address and
password, and then select Next
Next
Next
Next , when you are finished setting up the email account,
the email messages are downloaded to your device.
�
�
�
�
View
View
View
View email
email
email
email messages
messages
messages
messages
1. When you open the email account, the amount of unread email messages is displayed

- 17 -
at the title bar and the unread email messages are displayed in bold.
2.
To
view an email message, tap it.
3.
To
mark an important email message, tap the star icon below the date.
To
cancel the
mark, tap the star icon again.
�
�
�
�Create
Create
Create
Create and
and
and
and send
send
send
send an
an
an
an email
email
email
email
1.
Tap
.
2. In
To
To
To
To
field, enter the recipient
’
s email addresses manually and separate them with a
comma. Add more recipients by tapping Cc/Bcc
Cc/Bcc
Cc/Bcc
Cc/Bcc .
3.
To
insert attachments, tap the option button at the upper right and select Attach
Attach
Attach
Attach file
file
file
file .
4. Enter the subject and the text.
5.
Tap
SE
SE
SE
SE ND
ND
ND
ND to send the email.
Web
Web
Web
Web
Browser
Browser
Browser
Browser
Tap
Browser
Browser
Browser
Browser from application list to access to the web.
�
�
�
�
Browser
Browser
Browser
Browser webpages
webpages
webpages
webpages
1. Select Browser
Browser
Browser
Browser to launch a specified homepage.
2.
To
access a specific webpage, select the URL input field, enter the web address
of the webpage, and select Go
Go
Go
Go .
3.
To
zoom in, place two fingers on the screen and spread them apart.
To
zoom out,
move your fingers closer together.
You
can also double-tap the screen.
�
�
�
�
Add
Add
Add
Add windows
windows
windows
windows
You
can have multiple windows open at one time.
1.
To
add a new window, tap at the title bar.
2.
To
open up a window, tap the title of the window.
3.
To
close the window, tap at the title bar.
�
�
�
�
Set
Set
Set
Set homepage
homepage
homepage
homepage
1.
Tap
the option button at the upper right.
2. Select Settings
Settings
Settings
Settings �
�
�
�Genera
Genera
Genera
Genera �
�
�
�Set
Set
Set
Set homepage
homepage
homepage
homepage .
3. Enter the web address of the desired webpage.

- 18 -
�
�
�
�
Add
Add
Add
Add bookmarks
bookmarks
bookmarks
bookmarks
While navigating a website, tap to add current URL to your bookmark list and easily
access it later.
�
�
�
�
View
View
View
View bookmarks
bookmarks
bookmarks
bookmarks and
and
and
and history
history
history
history
Tap
to open the bookmark list and the recent history.
Tap
a bookmark or any
entry to display the webpage.
�
�
�
�
Customize
Customize
Customize
Customize browser
browser
browser
browser
To
make adjustments in your browser settings, tap the option button at the upper right,
and then select Settings
Settings
Settings
Settings .
Talk
Talk
Talk
Talk
Google
Talk
is a free web-based application for instant text, voice and video chats.
Before using the Google Talk, you must have a Google Account.
1. From the application list, tap Talk
Talk
Talk
Talk .
2. Set up a Google account or sign in, follow the on-screen instructions.
3. Select Add
Add
Add
Add friend
friend
friend
friend , enter a friend
’
s email address and select Send
Send
Send
Send invitation
invitation
invitation
invitation .
4. When your friend accepts the invitation, he or she is added to your friend list.
You
can start talking.
Entertainment
Entertainment
Entertainment
Entertainment
Super-HD
Super-HD
Super-HD
Super-HD Player
Player
Player
Player
To
view or organize your images and video clips, or edit and send your files to other
devices, or set photos as wallpapers, select Super-HD
Super-HD
Super-HD
Super-HD Player
Player
Player
Player from application list.
Note:
Note:
Note:
Note: It takes a few more minutes to enter this application if you store more files.
�
�
�
�
Supported
Supported
Supported
Supported file
file
file
file formats
formats
formats
formats
Type
Type
Type
Type Format
Format
Format
Format
Image
JPEG 、GIF 、BMP 、PNG
Video AVI 、RM 、RMVB 、MOV 、FLV 、3GP 、MP4
Note:
Note:
Note:
Note: Some files may not play properly depending on how they are encoded.
�
�
�
�
View
View
View
View a
a
a
a photo
photo
photo
photo

- 19 -
1. Select a folder.
2. Select a photo to view.
To
view more photos, scroll left or right.
3.
To
zoom in, place two fingers on the screen and spread them apart.
To
zoom out,
move fingers closer together. you can also double-tap the screen.
4.
To
start a slideshow, tap at the titile bar.
5.
To
view the details of a file, tap the option button, then select Details.
Details.
Details.
Details.
6.
To
share a photo with others via Bluetooth, Email, Gmail or Messaging, tap
at the title bar.
7.
To
set a photo as wallpaper, tap the option button at the upper right �select Set
Set
Set
Set
picture
picture
picture
picture as
as
as
as �Wallpaper
Wallpaper
Wallpaper
Wallpaper �drag the slides of the crop box to create the crop area,
then tap Crop
Crop
Crop
Crop .
8.
To
set a photo as a caller ID, tap the option button at the upper right �select Set
Set
Set
Set
picture
picture
picture
picture as
as
as
as �Contact
Contact
Contact
Contact photo
photo
photo
photo �Contacts
Contacts
Contacts
Contacts �Create a new contact or select an
existing contact �drag the slides of the crop box to create the crop area, then tap
Crop
Crop
Crop
Crop .
�
�
�
�
Edit
Edit
Edit
Edit a
a
a
a photo
photo
photo
photo
1.
To
crop the image, tap the option button at the upper right, then select Crop
Crop
Crop
Crop .
To
move the crop box , tap and hold the crop box and drag it to the desired
location.
To
add or substract from the selection border of the crop box, drag the crop
box to the desired size.
When you are finished, tap Save
Save
Save
Save .
2.
To
edit photos and apply various effects, tap the option button at the upper right,
then select Edit
Edit
Edit
Edit .
To
adjust contrast, tap .
To
apply a filter effect, tap .
To
apply a colour effect, tap .
To
crop, straighten, rotate or flip the image, tap .
�
�
�
�Play
Play
Play
Play a
a
a
a video
video
video
video
1. Select a folder.
2. Select a video to play.

- 20 -
3. Control playback with the virtual keys.
4.
To
watch a video saved on your device on
TV,
conncet your device and TV with
HDMI cable.
Music
Music
Music
Music
With Music, you can play music files. The music player supports the following file formats:
MP3, AAC, APE, WMA, OGG,
WAV,
M4A and so on.
Note:
Note:
Note:
Note: Some files may not play properly depending on how they are encoded.
�
�
�
�
Add
Add
Add
Add music
music
music
music files
files
files
files to
to
to
to your
your
your
your device
device
device
device
Start by transferring files to your device or memory card.
�
�
�
�Play
Play
Play
Play music
music
music
music
1. Select a music file.
2. Control playback with the virtual keys.
The current list of songs are randomly shuffled for playback.
Replays the current list when the list ends.
Repeats the current playing song.
�
�
�
�Create
Create
Create
Create a
a
a
a playlist
playlist
playlist
playlist
1.
Tap
and hold a music file.
2. Select Add
Add
Add
Add to
to
to
to playlist
playlist
playlist
playlist .
3. Select New
New
New
New .
4. Enter a name.
5.
Tap
Save
Save
Save
Save .
�
�
�
�Delete
Delete
Delete
Delete a
a
a
a playlist
playlist
playlist
playlist
1.
Tap
Playlists
Playlists
Playlists
Playlists .
2.
Tap
and hold the playlist you want to delete.
3. Select Delete
Delete
Delete
Delete .
Camera
Camera
Camera
Camera
With the camera function, you can capture photos and take videos.
�
�
�
�Capture
Capture
Capture
Capture a
a
a
a photo
photo
photo
photo
1. Open the application list and select Camera
Camera
Camera
Camera .
Other manuals for TEMD700 Series
1
This manual suits for next models
29
Table of contents
Other Health Tablet manuals