Heckmann Audio Repro-1 100B User manual

MODEL 100B
S/N 1 and up
Manual Ref. HA100B
Repro-1 SYNTHESIZER
OPERATION MANUAL
by Heckmann Audio
HECKMANN AUDIO GmbH BERLIN

1 INTRODUCTION 3
....................................................................1-0 HISTORY 3
...........................................................1-1 INSTALLATION 3
...............................................................1-2 RESOURCES 4
............................................1-3 KNOBS AND SWITCHES 5
...................................................1-4 THE CONTROL BAR 5
.....................................................................1-5 PRESETS 6
2 SYNTH 8
.................................................................2-0 OVERVIEW 8
.................................................2-1 VOICE SIGNAL FLOW 8
.........................................................2-2 OSCILLATOR A 10
.........................................................2-3 OSCILLATOR B 11
........................................................2-4 GLIDE & MODE 11
......................................................................2-5 MIXER 12
......................................................................2-6 FILTER 12
....................................................2-7 FILTER ENVELOPE 13
.......................................................2-8 AMP ENVELOPE 14
...........................................................................2-9 LFO 15
................................2-10 MODULATION SIGNAL FLOW 15
......................................2-11 MODULATION CONTROL 17
...........2-12 CLOCK / ARP / SEQUENCER (basic access) 18
3 SEQUENCER 19
......................................................3-0 INTRODUCTION 19
.....................................................3-1 SEQUENCE DATA 19
..............................................3-2 CLOCK / SEQUENCER 20
.........................................................................3-3 EDIT 21
....................................3-4 A FEW SEQUENCER TRICKS 21
4 KEYS / PERFORM 22
.........................................................................4-0 KEYS 22
.................................................................4-1 PERFORM 22
5 EFFECTS 24
......................................................5-0 INTRODUCTION 24
......................................................5-1 JAWS wavefolder 24
.......................................................5-2 LYREBIRD delay 26
......................................5-3 RESQ resonator / equalizer 27
.......................................................5-4 DRENCH reverb 28
.............................................5-5 SONIC CONDITIONER 29
6 TWEAKS 30
...............................................................6-0 OVERVIEW 30
..................................................................6-1 JUMPERS 30
...................................................6-2 MODULE PRESETS 31
7 CONFIGURATION 32
.................................................................7-0 GENERAL 32
.......................................................7-1 ABOUT MIDI CC 32
.............................................................7-2 MIDI LEARN 33
..............................................................7-3 MIDI TABLE 33
.........................................................7-4 PREFERENCES 34
INTRO PRESETS SYNTH SEQUENCER KEYS-PERF EFFECTS TWEAKS CONFIG 2

1INTRODUCTION
1-0 HISTORY
Repro-1 is a faithful simulation (component-level model) of one of the most powerful-
sounding monophonic keyboards ever built. When its 4-year production run started in
the very early 1980s, polyphonic synthesizers were almost within reach of the average
musician. To be commercially viable, any new monophonic instrument had to be
relatively cheap but very capable. Fat drones, cutting leads, funky basses, quirky sci-fi
sound effects – this synthesizer delivered on all counts.
The circuit design made good use of standard Curtis chips (3340 oscillator, 3320 filter
and 3310 envelope), and the little onboard sequencer was more than just a welcome
extra. Despite its molded plastic panel and monophony, it sold surprisingly well and
has recently been recognized as an iconic piece of synthesizer history. Soaring prices
guaranteed.
So here’s our plug-in version Repro-1: All the lovable quirks of the classic synthesizer,
but a much more capable sequencer, presets, several under-the-hood tweaks, more
modulation options. Plus a great collection of cute stomp-box effects… enjoy!
- Urs and the team
1-1 INSTALLATION
Go to the Repro-1 webpage, download the latest installer for Mac or Windows PC and
unzip the compressed file. Open the Repro-1 folder and start the installer application.
The only demo restriction in Repro-1 is a mild crackling sound at irregular intervals
after about two minutes of use. The demo is otherwise fully functional, and the
crackles disappear after you have entered a serial number. For more information,
please refer to the ReadMe file included with the installer.
Repro-1 uses the following directories on your hard disk (by default):
Windows
Presets ...\VstPlugins\u-he\Repro-1.data\Presets\Repro-1\
Preferences ...\VstPlugins\u-he\Repro-1.data\Support\ (*.txt files)
Mac OSX | macOS
Presets MacHD/Library/Audio/Presets/u-he/Repro-1/
(User) ~/Library/Audio/Presets/u-he/Repro-1/
Preferences ~/Library/Application Support/u-he/com.u-he.Repro-1... (*.* files)
Resources MacHD/Library/Application Support/u-he/Repro-1/
To uninstall, delete the plugin files and Repro-1.data (PC) or Repro-1 folders (Mac).
INTRO PRESETS SYNTH SEQUENCER KEYS-PERF EFFECTS TWEAKS CONFIG 3

1-2 RESOURCES
u-he online
For downloads, news articles and support, go to the u-he website
For heated debates about u-he products, go to the u-he forum
For friendship and informal news updates, go to our facebook page
For u-he presets (payware and free), go to u-he preset library
For video tutorials and more, go to our youtube channel
the u-he team
Urs Heckmann (boss code, vision)
Sascha Eversmeier (code, puns)
Jan Storm (framework, more code)
Sebastian Greger (GUI design, 3D stuff)
Rob Clifton-Harvey (interwebz & databases)
William Rodewald (student-life-support code)
Howard Scarr (presets, manuals, necessary grump)
Michael Pettit (videos, marketing, web development)
Viktor Weimer (support, presets, the voice)
Thomas Binek (QA / bug-hunting, presets)
Henna Gramentz (worldly supervision)
Oddvar Manlig (everything else)
…with thanks to Brian Rzycki for maintaining PatchLib
TO NAVIGATE, USE THE HYPERLINKS AT THE BOTTOM OF EACH PAGE
INTRO PRESETS SYNTH SEQUENCER KEYS-PERF EFFECTS TWEAKS CONFIG 4

1-3 KNOBS AND SWITCHES
The knobs respond to click & drag (vertical) as well as to mouse wheel movement (no
clicks required). How switches react depends on a global preference called Switch
Behaviour (see the Configuration chapter).
The name and value of the control being edited appears in the data display, which
you will find in the centre of the control bar…
1-4 THE CONTROL BAR
The panel at the top of Repro-1’s window is for global control and monitoring:
u-he Badge: Clicking on u-he opens a popup menu containing links to this user guide,
to our homepage, to our support forum, and to various social networks.
SYNTH, TWEAKS, SEQUENCER, PRESETS: This row of buttons switches between
Repro-1’s four basic views. For details, see the corresponding chapters.
Data Display: This performs several duties: Normally, it just shows the name of the
current preset. Clicking on the triangles to the left and right steps through all presets,
while clicking in the middle of the display lets you select any preset in the current
folder. While editing, the name and value of the parameter is displayed. The preset
name reappears when you stop editing for a few seconds.
UNDO, REDO: To the right of the data display is a pair of buttons you can use to fix
any ‘mistakes’. Although the number of steps in the undo-buffer is limited, you can
even undo a change of preset – switching presets doesn’t mean losing your work!
MIDI activity: Next is an indicator which flashes whenever MIDI data is received.
SAVE button: Stores the preset in the current folder (see PRESETS below).
MASTER TUNE: Tunes the preset within a range of +/– 12 semitones. For fine tuning,
hold down a SHIFT key on your computer keyboard while adjusting.
OUTPUT: Final volume control, after the amplifier and all effects.
Configuration button: Click on the cogwheel icon to access the configuration pages,
which contain MIDI control options and various global settings.
INTRO PRESETS SYNTH SEQUENCER KEYS-PERF EFFECTS TWEAKS CONFIG 5

1-5 PRESETS
In the control bar, click on the PRESETS button…
Categorized folders appear on the left, presets within those folders appear in the
middle, and any information about the current preset appears on the right. If you
can’t see any folders, Local is probably closed – click on it to open the lists.
Immediately after loading a preset, you can step through the others using your
computer’s cursor keys.
To start programming a new sound from scratch, open the ‘00 User’ folder and load
the -- INIT -- preset. Please remember to give it a different name while saving. If you
happen to overwrite -- INIT -- by mistake, look in the ‘Factory’ folder for another copy.
MIDI Programs
As well as the categorized factory presets, ‘Local’ also contains a special folder called
‘MIDI Programs’, which is initially empty. When the first instance of Repro-1 starts, all
presets in that folder will be loaded into memory. These presets (up to 128) are
selected directly via MIDI Program Change messages. Because they are accessed in
alphabetical order, it’s probably best to put a number at the start of each name e.g.
‘000 rest-of-name’ to ‘127 rest-of-name’. But that’s not all…
‘MIDI Programs’ can contain up to 127 sub-folders, each holding up to 128 presets.
The sub-folders are switched via MIDI Bank Select messages (CC#0). Send Bank Select
first, then Program Change. ‘MIDI Programs’ is bank 0, sub-folders are addressed in
alphabetical order, starting with bank 1.
Important: ‘MIDI Program’ presets cannot be added, removed or renamed on the fly –
any changes to that directory will only take affect after you have restarted the host.
INTRO PRESETS SYNTH SEQUENCER KEYS-PERF EFFECTS TWEAKS CONFIG 6

Save your creations
Of course you will want to save your sounds. The best place is ‘00 User’, which was
created for this purpose. Please make sure that the folder where you want to store
your preset is already selected (if not, please select it first). Then click on the SAVE
button in the Control Bar, give your preset a suitable name and enter any other details
you would like to appear in the INFORMATION area of the browser.
On loading, if Repro-1 sees a preset called simply default in the root folder (‘Local’), it
replaces the regular demo sound. Try this: Go into ‘00 User’, load --INIT--, open the
Local folder and save it under the name ‘default’, then restart Repro-1. To revert to the
regular demo sound, simply delete ‘default.h2p’ and restart Repro-1.
The context menu
Refresh: Whenever the list needs refreshing (always necessary after folders or presets
have been added or moved using Explorer / Finder), right-click in the folder list and
select the first entry from the context menu. Note: Clicking on any folder name will
also refresh the list.
Create new folder: Creates a new folder within the currently selected one.
Reveal in Finder / Open in Explorer: Repro-1’s browser is mainly for loading presets, it
is otherwise fairly limited. This function opens a system window for the current folder
so you can use regular OS file functions instead. Always Refresh after changing the
contents of preset folders!
On open expand to: The submenu contains options which govern how deeply the
browser will open subdirectories whenever the GUI is opened (or the Refresh function
is used). The branch containing the current preset will always be visible.
Favourite or Junk? Right-clicking on a preset opens a context menu in which you can
set the status to ‘Favourite’ or ‘Junk’. Junked files disappear immediately, but can be
made visible again by selecting ‘show Junk’ from the same context menu.
Multiple selection, drag & drop
Files can be moved between folders via drag & drop. Use the SHIFT etc. keys on your
computer keyboard to highlight the files you want to manipulate, click and drag them
from the files area and drop them onto the target folder. To deselect, either click on
any unselected preset or choose deselect from the file context menu. The context menu
also contains a select all function.
INTRO PRESETS SYNTH SEQUENCER KEYS-PERF EFFECTS TWEAKS CONFIG 7

2 SYNTH
2-0 OVERVIEW
This section explains the various modules available on Repro-1’s SYNTH panel. If you
don’t see this panel, click on the SYNTH button at the top left of Repro-1’s window.
The PRESETS browser is described in the previous chapter, while the TWEAKS page
and SEQUENCER functions are described in separate chapters later in this guide.
Due to its relatively simple architecture, you can operate Repro-1 without having to
think about its structure. However, if you want to make the most of the available
options, it’s best to understand how signals are routed between those modules…
2-1 VOICE SIGNAL FLOW
On the next page is a flow diagram showing the audio signal paths as well as some
keyboard control paths – you might like to print it out for future reference. A similar
diagram of modulation signal paths appears later in this chapter.
INTRO PRESETS SYNTH SEQUENCER KEYS-PERF EFFECTS TWEAKS CONFIG 8

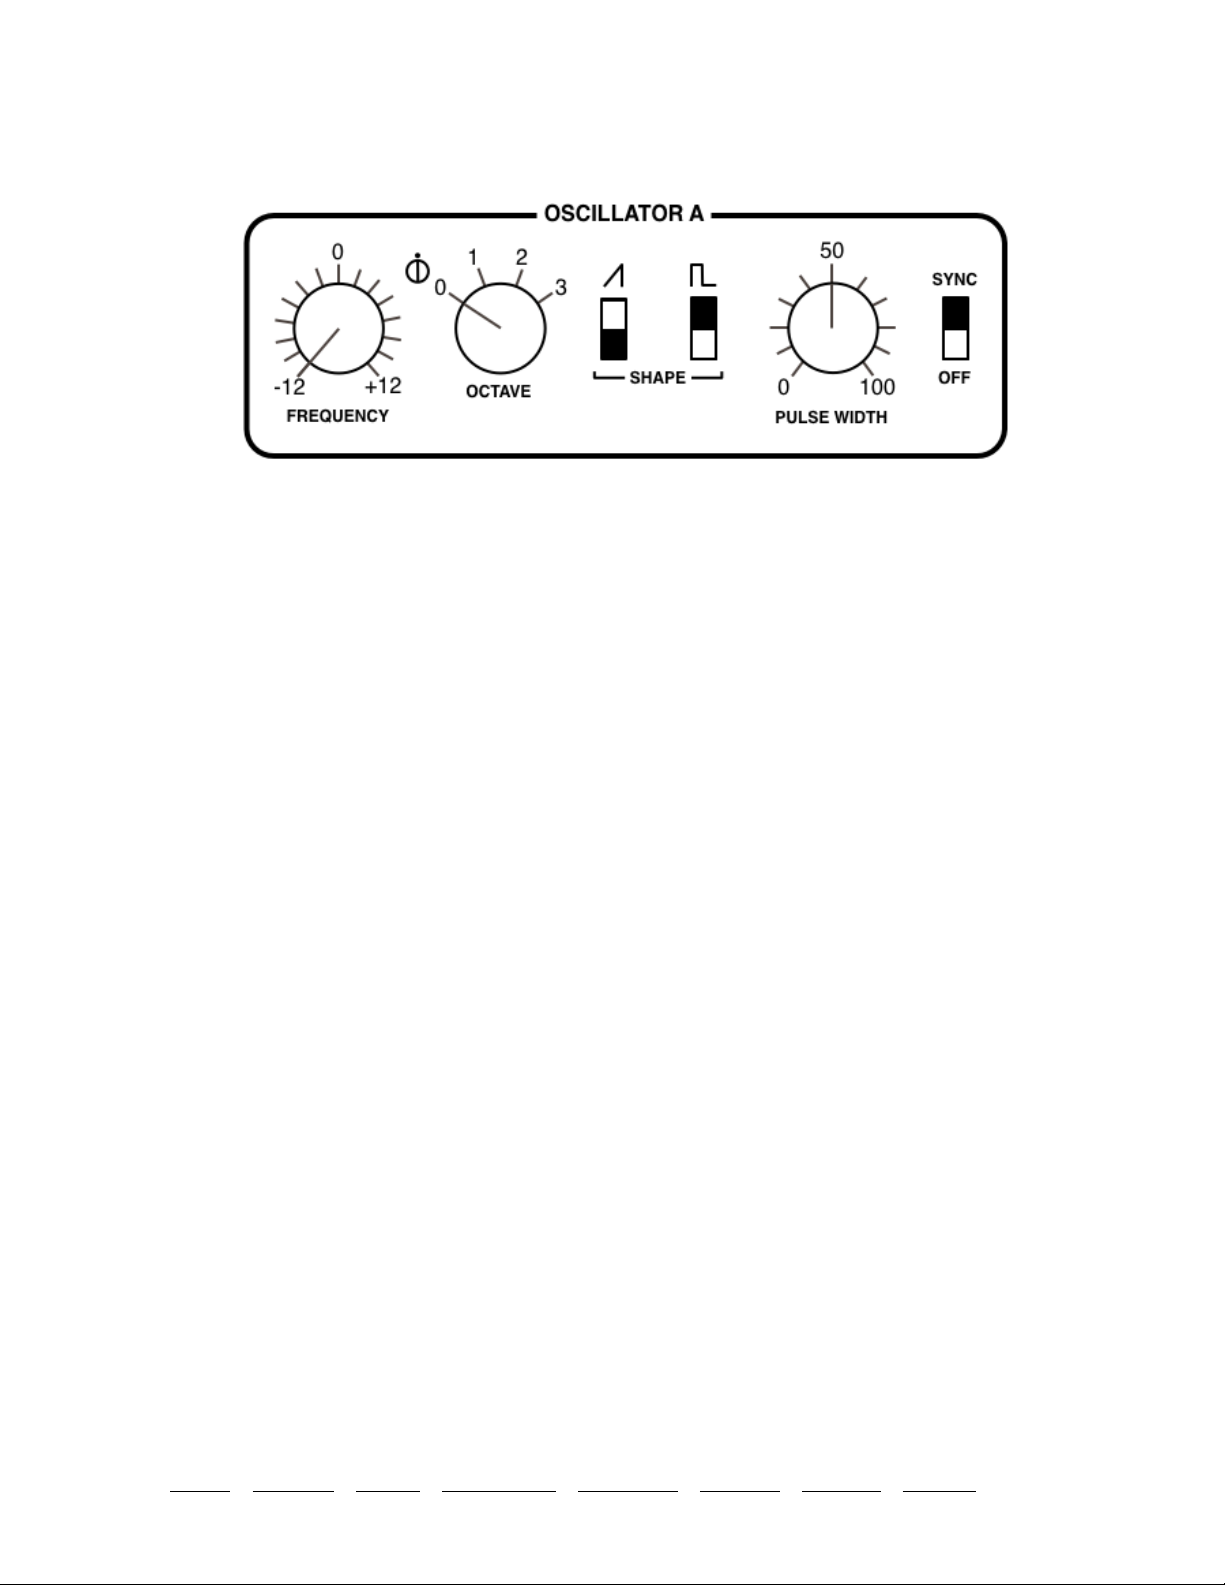
2-2 OSCILLATOR A
FREQUENCY knob: Adjusts pitch within a two-octave range (+/–+/– 12 semitones).
FINE TUNING trimmer between FREQUENCY and OCTAVE: Adjusts pitch within a 40
cent range (+/– 20 cents). Its main purpose is to adjust the rate of beating between
the two oscillators when they are tuned almost in unison.
OCTAVE rotary switch: Transposes oscillator pitch over a four-octave range.
SAWTOOTH SHAPE switch: The UP position activates the standard brassy waveform
containing all harmonics (odd as well as even).
PULSE SHAPE switch: The ‘up’ position enables a waveform with a harmonic content
that depends on the PULSE WIDTH setting but sounds generally more hollow than the
sawtooth. If neither SHAPE is switched on, OSCILLATOR A is silent. If both SHAPEs
are active, the waveforms are mixed together at slightly lower volumes.
PULSE WIDTH knob: Adjusts the harmonic content of the pulse wave by setting its
“duty cycle”. The range is from 0% to 100%. Double-click on the knob for a 50% pulse
(a clean square wave which only contains odd-integer harmonics).
Notes: At extreme values, the signal gets so thin that it becomes inaudible (DC, direct
current). The PULSE WIDTH knob has no effect on the sawtooth.
SYNC switch: Hard synchronization forces the waveform of OSC A to reset whenever
OSC B hits zero. The frequency of OSC A generally needs to be higher than OSC B for
this to work properly. Experiment: Intermediate FREQUENCY values can produce
unusual timbres at the next lower harmonic of OSC B.
INTRO PRESETS SYNTH SEQUENCER KEYS-PERF EFFECTS TWEAKS CONFIG 10

2-3 OSCILLATOR B
OSC B is basically the same as OSC A – without SYNC but with the following extras:
TRIANGLE SHAPE switch: This waveform is bipolar, so it doesn’t add any DC to the
modulation when used as an LFO. As an audio signal, the triangle has very little bite,
but can be used to boost the fundamental frequency. The triangle is also good for
driving the wavefolder effect (see EFFECTS chapter).
NORMAL | LO FREQ switch: Extends the range of oscillator B down to sub-audio
frequencies suitable for use as an LFO. The FREQUENCY range is multiplied by 4.
OFF | KYBD switch: Switching this to OFF disables keyboard follow, resulting in a
constant pitch independent of the played note.
2-4 GLIDE & MODE
Also known as ‘portamento’, glide is the slurring of pitch between consecutive notes.
RATE knob: How long it takes to move from one note to the next. At zero, pitch
changes are instantaneous, while they are very slow at values above 50.
AUTO switch: In the NORM position, all notes will glide. In the AUTO position, this
only happens when a new key is hit while the previous one is still being held (legato).
RETRIG switch: In the NORM position, legato playing does not retrigger envelopes. In
the RETRIG position, the envelopes are retriggered with each new note.
INTRO PRESETS SYNTH SEQUENCER KEYS-PERF EFFECTS TWEAKS CONFIG 11

REPEAT switch: Retriggers the envelopes at the Clock rate. Like in the hardware and
in DRONE mode, notes repeat without you holding down a key…
DRONE switch: Keeps the AMP ENVELOPE sustaining indefinitely.
2-5 MIXER
OSC A and OSC B knobs: The output levels of each oscillator.
FEEDB | NOISE knob and switch: With the switch in the NOISE position, the knob
sets the output level of the noise generator (an unpitched audio source useful for wind
and percussion effects etc.). With the switch n the FEEDB (feedback) position, the
knob governs the amount of signal fed from behind the amplifier back into the MIXER.
2-6 FILTER
CUTOFF knob: Sets the cutoff frequency for the 24 db/octave (4-pole) lowpass filter,
which works a bit like a tone control. The “Cutoff” point is the frequency below which
all components of a signal are allowed to pass, while most of the higher frequency
components are suppressed.
RESONANCE knob: Determines the amount of feedback within the filter circuit. The
higher the resonance, the more the cutoff point will be accentuated. Somewhere
above 60 the filter starts to self-oscillate – it becomes a sine-wave oscillator with pitch
determined by the cutoff. Note that adding any Resonance at all lowers the volume, so
you might have to compensate for that by turning up the main OUTPUT.
INTRO PRESETS SYNTH SEQUENCER KEYS-PERF EFFECTS TWEAKS CONFIG 12

ENVELOPE AMOUNT knob: Adjusts the amount of cutoff modulation from the filter
envelope (see below).
KEYBOARD AMOUNT knob: The amount of cutoff modulation from the keyboard –
the higher the note, the higher the cutoff. Set to precisely 75.00, cutoff follows notes
almost perfectly.
2-7 FILTER ENVELOPE
The filter envelope generator applies a contour to the cutoff frequency:
The envelopes are started whenever a note is played, and as long as the key is held
down, the envelope proceeds through the ATTACK and DECAY stages. It then remains
at the SUSTAIN level until the key is released, after which it drops to zero at a rate set
by the RELEASE knob.
Note: The RELEASE stage is initiated as soon as all keys are released. If this happens
during the ATTACK or DECAY, there is no SUSTAIN stage. Here’s an example:
AT TA CK knob: Varies the time for the envelope to rise from zero to maximum, within
a range of 2 milliseconds to more than 6 seconds.
DECAY knob: Varies the time for the envelope to fall from maximum to the SUSTAIN
level, also within a range of 2 milliseconds to more than 6 seconds.
INTRO PRESETS SYNTH SEQUENCER KEYS-PERF EFFECTS TWEAKS CONFIG 13

SUSTAIN knob: The hold level, from zero to maximum.
RELEASE knob: The time it takes for the envelope to fall from the current level
(usually SUSTAIN) down to zero after the key is released. The range is 2 milliseconds
to more than 6 seconds.
2-8 AMP ENVELOPE
The AMP ENVELOPE controls shape the envelope applied to volume, pre-effects.
Volume Curve trimmer: In the original hardware, the VOLUME knob actually controls
the amount of amp envelope modulating the final VCA. It also affects the curvature of
the envelope – not by design, but as a side-effect of how it works.
As Repro-1’s equivalent (the OUTPUT knob) comes after all the effects, we decided it
would be best to implement envelope curvature as an independent control.
Here is what the attack and decay stages look like when Volume Curve is set to 10 and
100. Note the punchy s-curve and shorter decay at minimum Volume Curve:
trimmer set to minimum trimmer set to maximum
The range starts at 10 instead of 0 because at zero there would be silence.
INTRO PRESETS SYNTH SEQUENCER KEYS-PERF EFFECTS TWEAKS CONFIG 14

2-9 LFO
Two of the modulation sources – the filter envelope generator and oscillator B – are
described above. The third source is the Low Frequency Oscillator (LFO). Its
appearance depends on the HOST | FREE switch – here are the two possible views:
HOST mode FREE mode
HOST | FREE switch: Set to HOST, the LFO is synchronized to your host application.
FREE means that LFO rate is freely adjustable, independent of the speed of your track.
FREQUENCY knob: In FREE mode this adjusts the LFO rate within a range of about
0.1Hz to 30Hz. In HOST mode, the knob transforms into a rotary switch that selects a
synchronized rate. Fine control via SHIFT is disabled. To set a specific intermediate
value, watch the data display while turning the knob.
The trip options are triplets (3 in the space of 2) and the dot options are dotted (2 in
the space of 3 i.e. 50% longer than normal):
SHAPE switches: The same options as in OSC B except that the LFO’s pulse width is
fixed at 50%. Remember that you can add the shapes here e.g. SAW + SQUARE.
2-10 MODULATION SIGNAL FLOW
Repro-1 offers three modulation sources which can be mixed and routed through two
different paths to five modulation targets. See the flow diagram on the next page…
INTRO PRESETS SYNTH SEQUENCER KEYS-PERF EFFECTS TWEAKS CONFIG 15


2-11 MODULATION CONTROL
This important panel is the one most likely to confuse. After a few hours practice,
however, it should become second nature… especially if you repeat this mantra:
3 sources via 2 paths to 5 destinations
MOD FIL ENV, MOD OSC B and MOD LFO knobs: The amount of modulation mixed
into the WHEEL or DIRECT paths. The depth of modulation routed into the WHEEL
path is controlled by the modulation wheel (MIDI CC#01).
WHEEL | DIRECT switches: These route each of the 3 sources into one of two busses:
the WHEEL or DIRECT paths.
OSC A FREQ, OSC A PW, OSC B FREQ, OSC B PW, and FILTER switches: The vertical
row of switches select either the WHEEL or DIRECT modulation path (or neither) for
each destination.
Note: In the original hardware the signal at each PW input gets inverted – when the
modulating signal goes up, the pulse width goes down. We decided to keep this quirk,
so if you want to compensate for deep modulation by adjusting PULSE WIDTH you
need to do this in the “wrong direction”!
INTRO PRESETS SYNTH SEQUENCER KEYS-PERF EFFECTS TWEAKS CONFIG 17
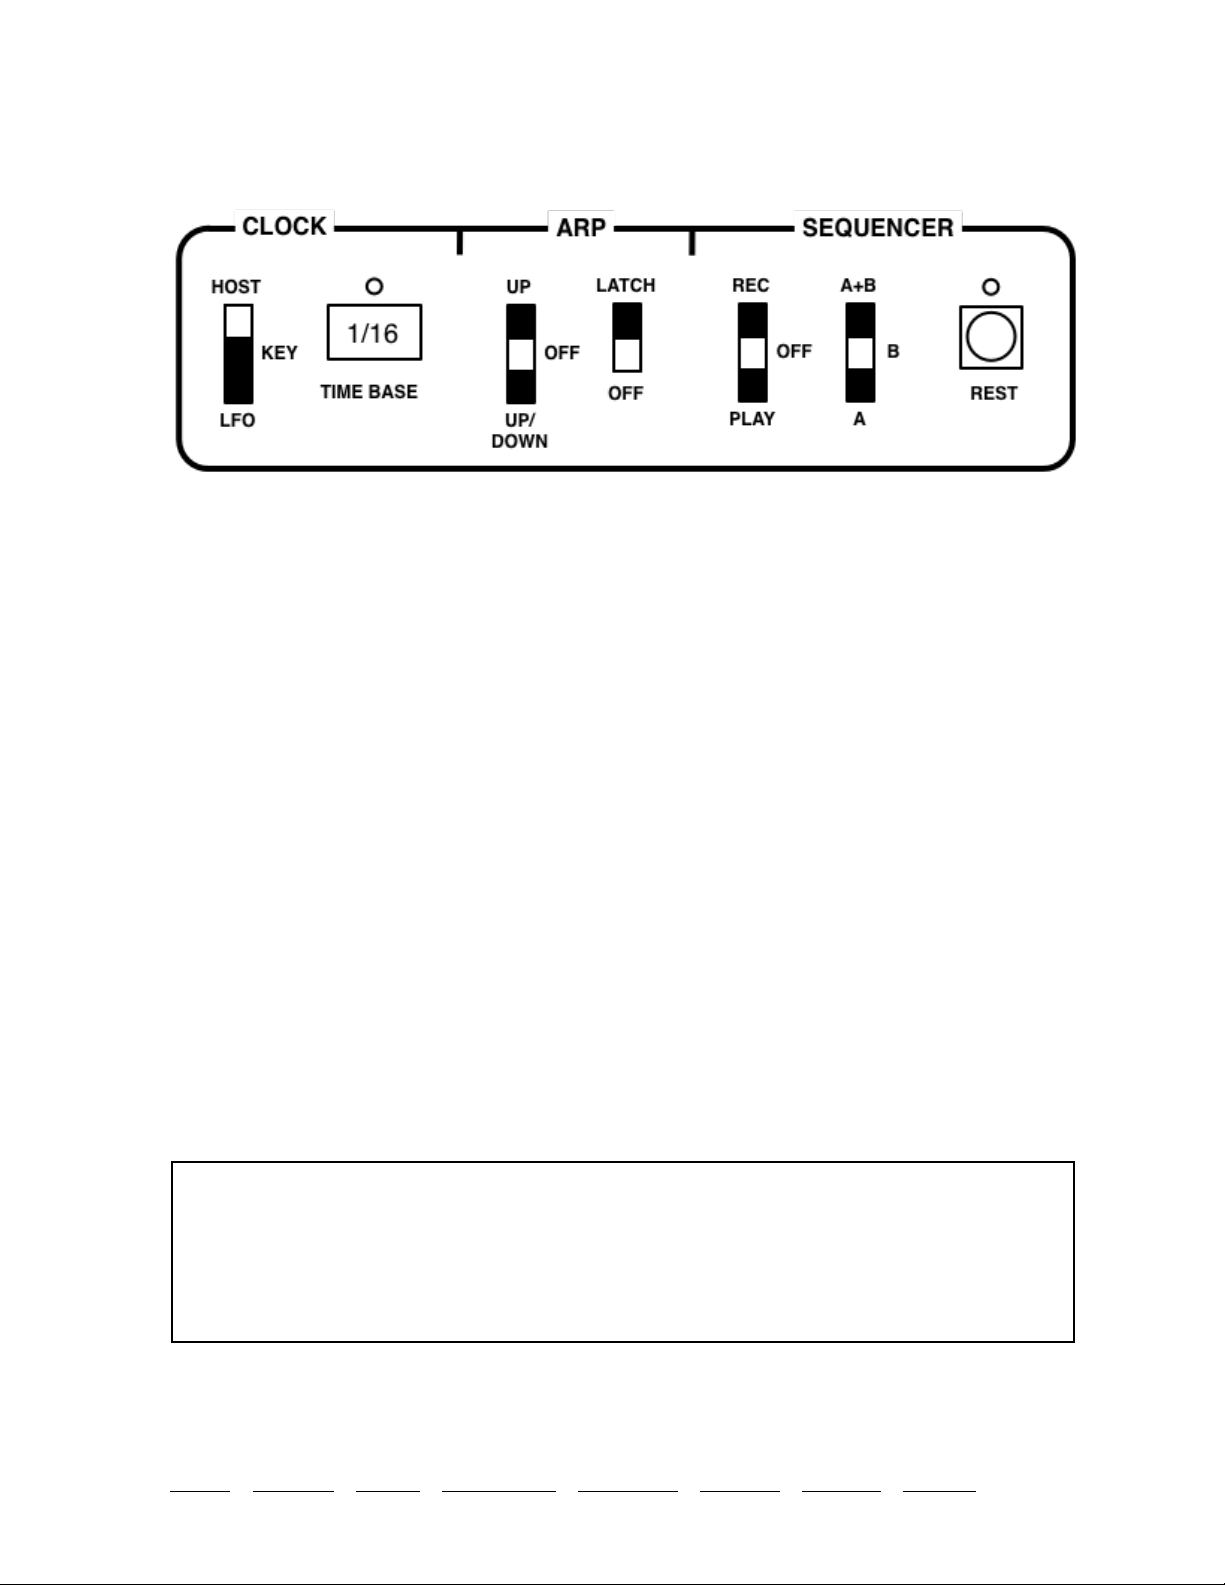
2-12 CLOCK / ARP / SEQUENCER (basic access)
An arpeggiator plays back all held notes, one after the other.
HOST | KEY | LFO switch: Selects which signal will be used to ‘clock’ the arpeggiator
and sequencer. In the HOST position they are both synchronized to the host tempo,
while in the LFO position they are synchronized to the LFO. In the KEY position,
playing a note increments the sequencer and the arpeggiator is deactivated.
TIME BASE control: Sets the clock speed as a factor relative to the host tempo (and is
therefore only relevant in HOST mode). The values are expressed as 4/4 bar divisions:
1/4 (slowest), 1/8, 1/16, 1/32, and 1/64 (fastest).
UP | OFF | UP/DOWN switch: Activates the arpeggiator, either upwards only or
upwards followed by downwards.
LATCH switch: The LATCH function in the original hardware (mis)used the sequencer
memory, but Repro-1 has a dedicated LATCH switch. Try this:
While playing an arpeggio, slide the LATCH switch up. Take your hands off the keys
and add some more notes. It will soon become obvious that these notes are temporary,
they disappear as soon as you release the keys, while the latched notes continue.
Note: The SEQUENCER section of this panel contains just enough elements to let you
record and play back sequences without switching pages. For the full story, please read
the next chapter…
Design decisions: In the original hardware, the arpeggiator and sequencer rate
is permanently tied to the LFO, with the option of using an external trigger signal
to advance the arp/sequencer instead. As we shouldn't expect users to feed an
external trigger into Repro-1 just for the sake of authenticity, we decided to add a
host-synced CLOCK and use MIDI NoteOn messages for the ‘step through’ option.
INTRO PRESETS SYNTH SEQUENCER KEYS-PERF EFFECTS TWEAKS CONFIG 18

3 SEQUENCER
3-0 INTRODUCTION
The sequencer in the original hardware may have been a minor stroke of genius, but
these days we can expect something a bit more comfortable: Repro-1’s sequencer lets
you step-record two patterns of up to 32 notes each (they are saved with the preset):
How to record: In the SEQUENCER sub-panel, select a pattern (A, B, or A+B) and
slide REC/PLAY up to the REC position. Play some notes, inserting pauses by clicking
on the REST button. The pattern can be as short as you like, even just a single note…
simply switch from RECORD to PLAY. How a sequence plays back is governed by the
Clock settings (see section 3.2). Playing any note other than the specified ROOT
transposes the pattern up or down.
3-1 SEQUENCE DATA
A sequence consists of two patterns (called A and B), each with up to 32 steps. Here is
the sequencer panel with all associated controls, including Glide and LFO:
STEPS selectors: These specify the length of each sequence – the number of steps to
play before returning to step 1. Alternatively, click on one of the numbers (1 to 32).
TYPE cells: Either click on a cell or use the mouse wheel to cycle between regular note
(bright dot), tied note (arc), or pause (dark dot). Perhaps unusual: a tied note extends
its gate to the next note, not from the previous one.
NOTE cells: Semitone offsets from -36 (3 octaves down) to +36 (3 octaves up).
VEL cells: MIDI velocity data from 1 to 127.
ROOT selectors: These define NOTE ‘0’, so the note set here will play the sequence at
the same pitch as it was recorded. A lower ROOT actually transposes the sequence
upwards – which is counterintuitive but should become clear after a while.
The GLIDE and LFO panels mirror those on the SYNTH page (see above).
INTRO PRESETS SYNTH SEQUENCER KEYS-PERF EFFECTS TWEAKS CONFIG 19

3-2 CLOCK / SEQUENCER
This panel is similar to the one on the SYNTH page, but with reset/sync options added
and the arpeggiator removed:
HOST | KEY | LFO switch: Selects the signal that will be used to drive the sequencer
(as well as the arpeggiator). In the HOST position they synchronize to the song tempo
specified by your host application, while in the LFO position they synchronize to the
LFO. In the KEY position, the sequence is played back one note per key-press, and the
arpeggiator is deactivated.
TIME BASE control: Only relevant in HOST mode, this sets the clock speed as a factor
relative to host tempo. The values are expressed as 4/4 bar divisions: 1/4 (slowest),
1/8, 1/16, 1/32, and 1/64 (fastest).
RESET MODE: Determines which step will play when you hit a key (non-legato i.e.
after releasing all keys). In Continue mode the sequence resumes playback at the next
step, while in Restart mode it jumps back to step 1.
SYNC MODE: Determines how the sequencer reacts to new (non-legato) notes when a
song is running. Strict Clock waits until the next beat, while Gate plays it immediately.
REC | OFF | PLAY switch: Primes the sequencer for recording. Actual recording starts
as soon as you play a note.
A | B | A+B switch: Selects the pattern(s) to be recorded or played back.
REST button: During recording, adds a pause at the current step.
HOLD switch: Causes the sequence to continue playing even if all keys are released
(simulates pressing a hold / sustain pedal).
INTRO PRESETS SYNTH SEQUENCER KEYS-PERF EFFECTS TWEAKS CONFIG 20
Other manuals for Repro-1 100B
1
Table of contents
Other Heckmann Audio Synthesizer manuals


