Heden Carat Manual

THE ULTIMATE IN LENS CONTROL SYSTEMS
®
CARAT
OPERATORS GUIDE
THE ULTIMATE IN LENS CONTROL SYSTEMS
®
MAY 2017
Table of contents
Important informaon ....................................................................................................... 2
Included in Carat case ........................................................................................................ 2
Carat transmier overview................................................................................................. 3
Carat receiver overview...................................................................................................... 4
Motor type conguraon................................................................................................... 5
Connecng ......................................................................................................................... 5
Pairing................................................................................................................................. 5
Auto calibraon.................................................................................................................. 5
Manual calibraon ............................................................................................................. 5
Fujinon/Canon FIZ .............................................................................................................. 5
Installing graphical user interface (GUI) ............................................................................. 6
GUI parameters .................................................................................................................. 7
Calibrang potenometer/adjust resistance in knb........................................................... 8

THE ULTIMATE IN LENS CONTROL SYSTEMS
®
CARAT
OPERATORS GUIDE
THE ULTIMATE IN LENS CONTROL SYSTEMS
®
MAY 2017
Heden Carat system is fully compliant with european CE, United States FCC and bluetooth standards.
Included in carat case
CARAT Transmier unit ....................................1x
CARAT Receiver unit .........................................1x
HEDÉN motor ...................................................1x
Rod mount........................................................1x
Reducon insert (15mm as standard) ..............1x
0.8 gear (complete gear set is oponal)...........1x
Motor cable......................................................1x
Receiever power cable .....................................1x
HEDÉN neck strap.............................................1x
Scale ring ..........................................................2x
• Avoid using Carat system near water or in rainy condions. It is not water proofed. Water intru-
sion may lead to permanent damage.
• The CARAT transmier control knob is sensive to impacts. Impacts may cause damage to the
internal potenometer.
• Carat receiver thread on the backplate is sensive to over torque (max 5 Nm). Internal electric
and/or mechanical damage may occur.
• Carat kits are congured for the motor included, should you want to use your carat with
another Heden motor make sure it is the same motortype, encoder and resistor ID. If not use
Heden GUI to change motor type.
• All electronics is sensive to over voltage and ESD, only connect and disconnect the motor
when the receiver is not powered up.
• Make sure all cables are original Heden cables and inspect for damage before use. Using faulty
cables may cause serious damage to internal electronics.
• We recommend using rechargeable 9V Lithium baeries for longest run me.
2
THE ULTIMATE IN LENS CONTROL SYSTEMS
®
CARAT
OPERATORS GUIDE
THE ULTIMATE IN LENS CONTROL SYSTEMS
®
MAY 2017
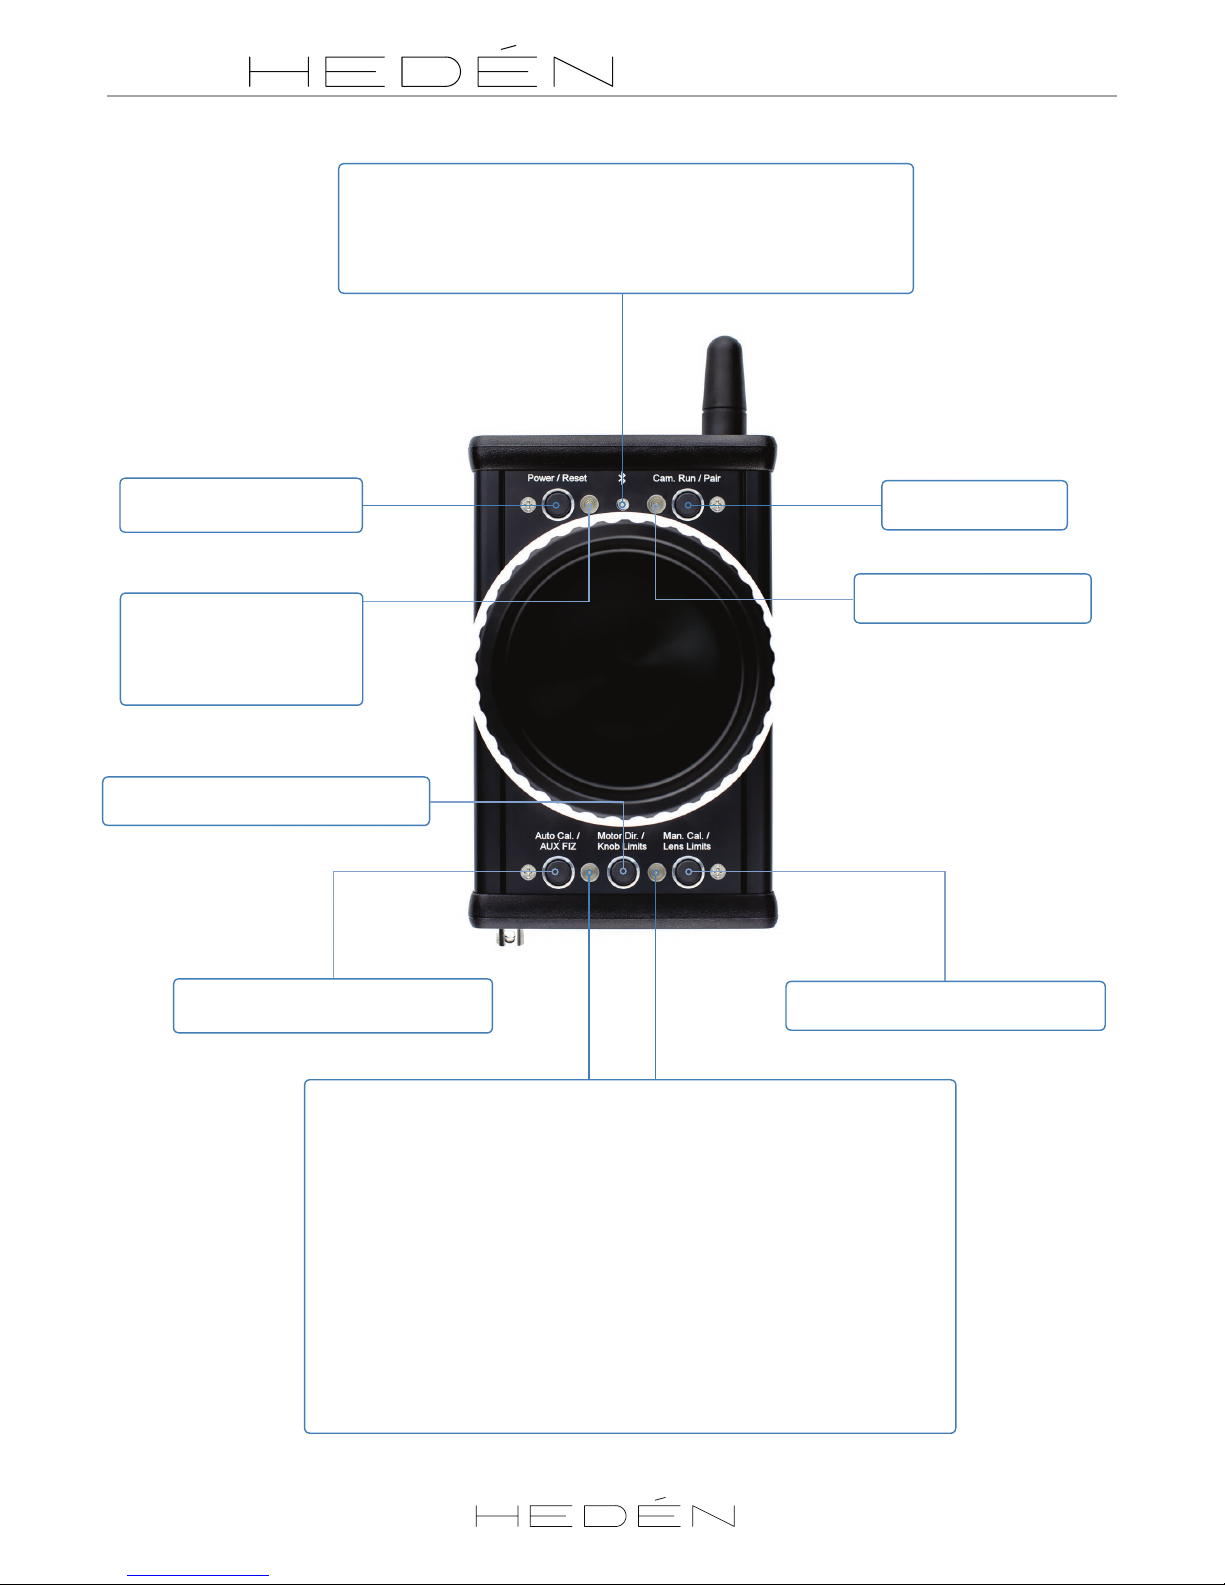
Green - Power on
Green blinking - Sleep mode
Yellow - Baery below 50%
Red - Baery low
Red blinking - Baery empty
Blue:
Slow blinking - Not paired with receiver
Fast blinking - Searching for reciever
Steady light - Paired
Blinking 3 mes, pause, blinking 3 mes - Interferance/bad bluteooth connecon
No light - Hardware connecon to bluteooth not acve/failed
Short press - power on/o
Long press - reset
Short press - Camera run
Long press - Pair
Short press - Acvate knob limits. See page 5.
Long press - Motor direcon
Green light - Motor running
Red blinking - Camera run acve
Short press - Acvate lens limits. See page 5.
Long press - Manual calibraon. See page 5.
Short press - Toggle between Hedén motor/
AUX FIZ. See page 5.
Both LEDs
Orange slow ash – Motor calibraon pending
Red slow ash – Calibraon error
Le LED
Orange fast ash – Motor is calibrang
Green light – Motor calibrated
Green fast ash – Waing for knob limit input
Green slow ash – Knob limit acve
Blue ash – Waing for knob to be turned to center to “pick up” AUX FIZ motor
Blue – AUX/FIZ acve
Right LED
Green fast ash – Waing for lens limit input
Green slow ash – Lens limit acve
Orange – Waing for wheel to be turned to center to begin manual calibraon. See page 5.
Orange ash – Waing for 1st and 2nd posion of manual calibraon
3

THE ULTIMATE IN LENS CONTROL SYSTEMS
®
CARAT
OPERATORS GUIDE
THE ULTIMATE IN LENS CONTROL SYSTEMS
®
MAY 2017
Blue LED
Slow blinking - Not paired
Fast blinking - Searching for transmier
Steady light - Paired
Camera run/stop connecon
See our website for cables
Motor connecon Canon/Fujinon connecon
See our website for cables
4
Power connecon PTAP (14.4V 2.5A)
Long press to start
pairing process
1/4” thread
MAX 5Nm. Damage to internal electronics
may accur if over torqued.

THE ULTIMATE IN LENS CONTROL SYSTEMS
®
CARAT
OPERATORS GUIDE
THE ULTIMATE IN LENS CONTROL SYSTEMS
®
MAY 2017
Motor type conguraon
When a Carat is delivered the transmier unit is congured for the specic motor type included. If you connect the Carat
to another motor type than the one that was originally shipped with the system, the motor type needs to be changed in
the GUI (See page 7). The parameters are changed in the transmier unit. The receiver is interchangeable with no need to
change parameters in GUI. If you are you uncertain about what encoder your Hedén motor are congured with, just send an
email to “[email protected]” with the serial number and we will help you out.
Connecng
Slide the rod mount on to the motor housing. Put reducon insert into the mount. Aach the gear to the motor (gear can
be mounted from either side of the motor. Make sure the gear pin is inserted in the slot in the hub. Mount the motor to lens
and make sure gear is rmly connect to lens. Connect motor cable between the motor and receiver (DM connector). Connect
the power cable to receiver (14.4V 2.5A PTAP). We recommend connecng and disconnecng the motor cable only when
the receiver is not powered up. Slide scale ring on to knob. Note that there is a slot in scale ring and a pin on the knob that
should line up.
Pairing
When delivered as a complete kit the transmier and receiver is already paired.
Long press (2 seconds) the “Pair“ buons on the sender and receiver simultaneously or in short sequence will start the
pairing sequence. Blue LEDs will start ashing rapidly. Aer successful pairing the LEDs will show a steady blue light and if a
motor is connected the lower LEDs will start ashing orange.
Auto calibraon
The 2 lower LEDs will ash orange if the system is ready for calibraon. Use auto calibraon if your lens has xed end stops.
Long press “Auto cal.” buon to start the calibraon sequence. The torque used by the motor to calibrate can be tuned in
GUI if the lens is unusually s or sensive. If you have a lens with no xed ends/oang focus ring use manual calibraon.
Manual calibraon
When the lower LEDs are ashing orange, long press “Man cal.” buon. Lower right LED will show a steady orange light
waing for you to turn the knob into the center posion to do a “pick up” of the motor. The lower right LED will start blinking
orange when you nd the control knobs center, now the knob works as a speed controller rather than the normal posion
control. This means that turning the knob will move the motor incrementally faster depending on how far from center it
is turned. The motor will not stop running unl knob is returned to center again. Run the motor and stop it at its rst limit
and press “Man cal.“ buon. Run it in the other direcon to the next limit and press “Man cal.“ again. Manual calibraon is
nished.
Knob Limit
Knob limit lets you set 2 limits in the knob range and move the motor only between these points. Turning the control knob
beyond the assigned points will acvate the transmiers vibrator unless this is turned o in the GUI (see page 7). To enter
this mode move to desired start posion then short press center lower buon (“Knob limits”). Move to desired second posi-
on and press buon again. To exit mode press buon a third me.
Lens limit
Lens limits allows you to use a selected/limited range of the lens and use the whole range of the knob. This makes ne
increment adjustments easier. To enter this mode move to desired start posion then short press right lower buon (“Lens
limits”). Move control knob to second posion and press buon again. To exit mode press buon a third me.
Controlling Fujinon Cabrio or Canon lenses with internal motors (Addional cables needed - see our website)
Switching between controlling Canon or Fujinon is done in the GUI. As default the Carat is congured to work with Fujinon
lenses, indicated by blue LED on receiver. When congured for Canon the LED on the receiver will switch to magenta color.
Connect your lens’s remote/AUX port to the Carat receiver AUX port using a Hedén Fujinon or Canon adapter cable. Power
up the Carat receiver and sender unit. The lower le LED on the Carat transmier should now start ashing blue. This means
you need to turn the control knob unl it matches the posion of internal motor in lens. The vibrator will indicate that the
correct posion is found and you will be able to control the lens. If your lens has mulple motors for focus/zoom/iris you can
cycle trough the motors by short pressing lower le buon on sender unit. In the GUI it is possible to pre-determine which
lens motors you want to be able to control with the Carat transmier. It is also possible to have a Hedén motor connected
simultaneously with an external lens. Toggle between the modes using lower le buon short press.
5
THE ULTIMATE IN LENS CONTROL SYSTEMS
®
CARAT
OPERATORS GUIDE
THE ULTIMATE IN LENS CONTROL SYSTEMS
®
MAY 2017
6
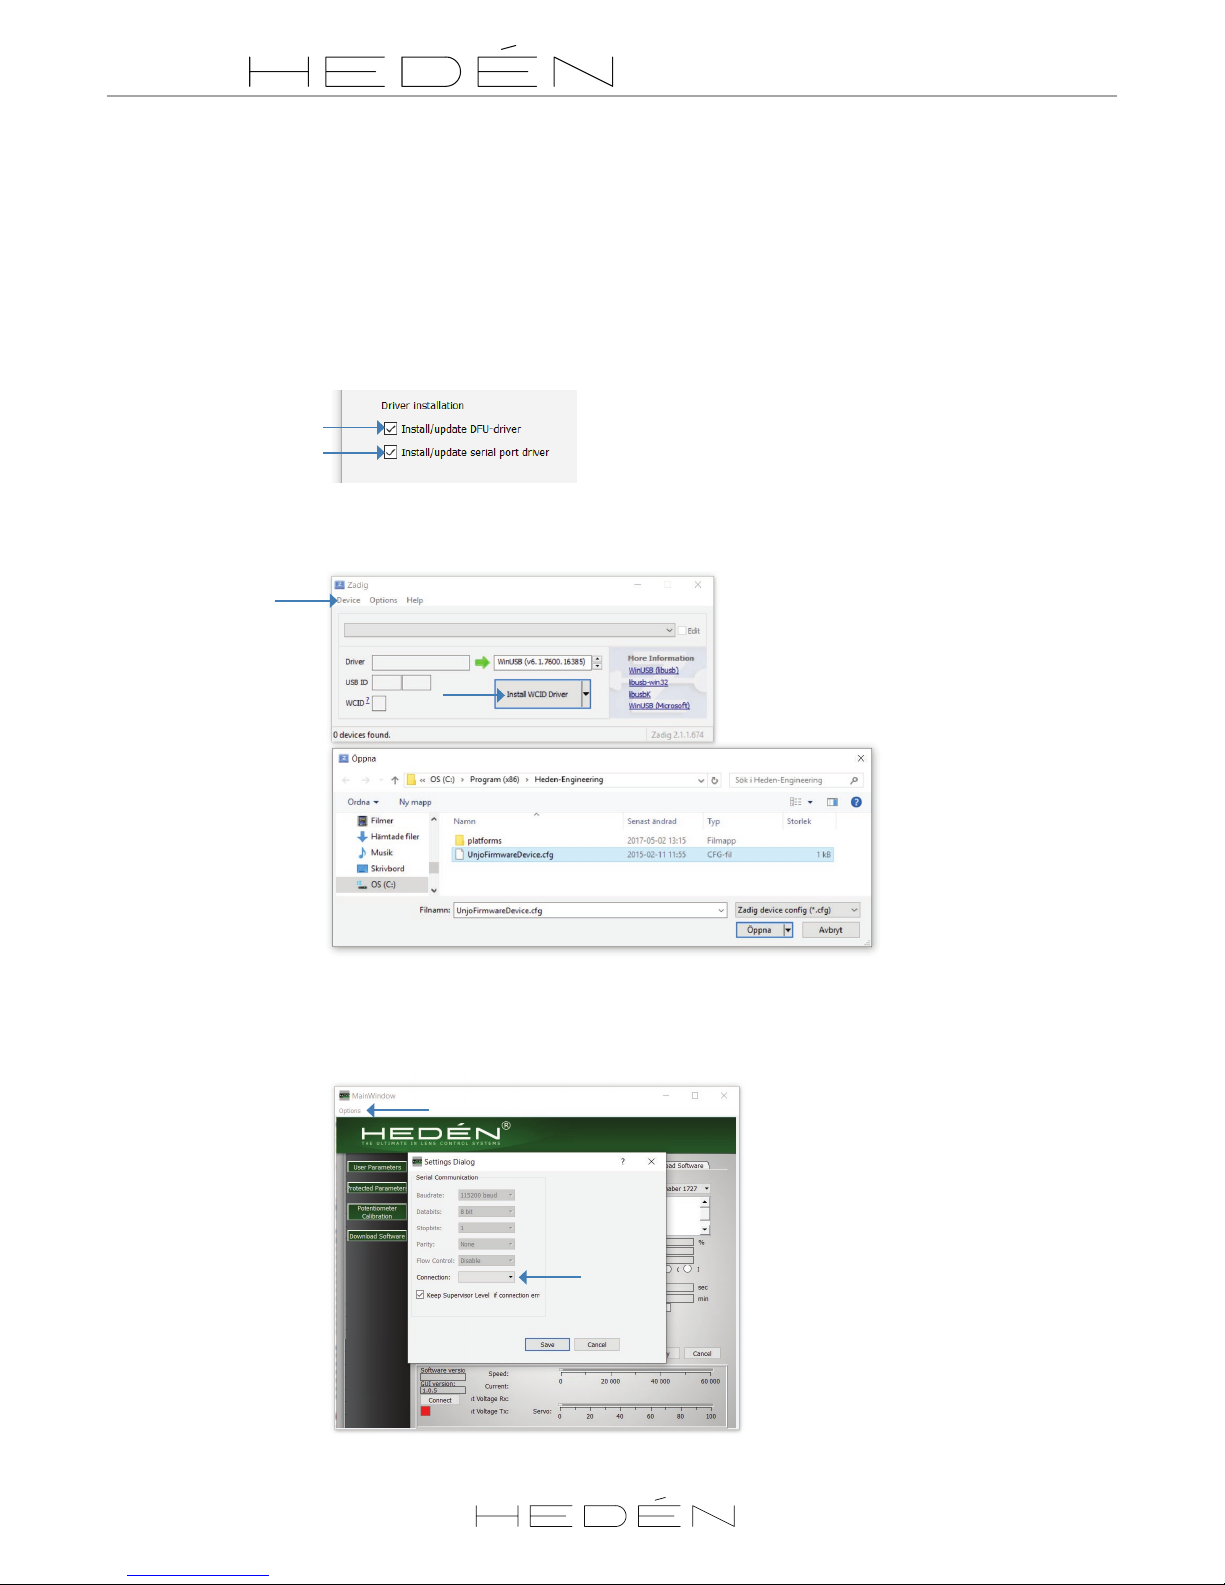
GUI installaon
Soware is only availible as windows applicaon(.exe).
Download le “Héden GUI” (40Mb) from our website www.heden.se/support/downloads
Installing:
Windows 10 users will proably be warned that the soware is from unknown source. Ignore this and proceed.
We recommend installing GUI in the default locaon.
In the rst window of installon it is important that the following boxes are cked:
If you get asked to update Zadig driver online press NO. In Zadig installer go to device/load preset device and pick the le
“UnjoFirmwareDevice”. “Press Install WCID Driver”. Close Zadig insataller.
Connue with the installon of “Virtual COM port“. Just press next unll installaon is nished.
Connect your Carat with Mini USB cable. Open up Héden GUI. Open “opons” menu. Open list “connecons“ and pick a
comport.
THE ULTIMATE IN LENS CONTROL SYSTEMS
®
CARAT
OPERATORS GUIDE
THE ULTIMATE IN LENS CONTROL SYSTEMS
®
MAY 2017
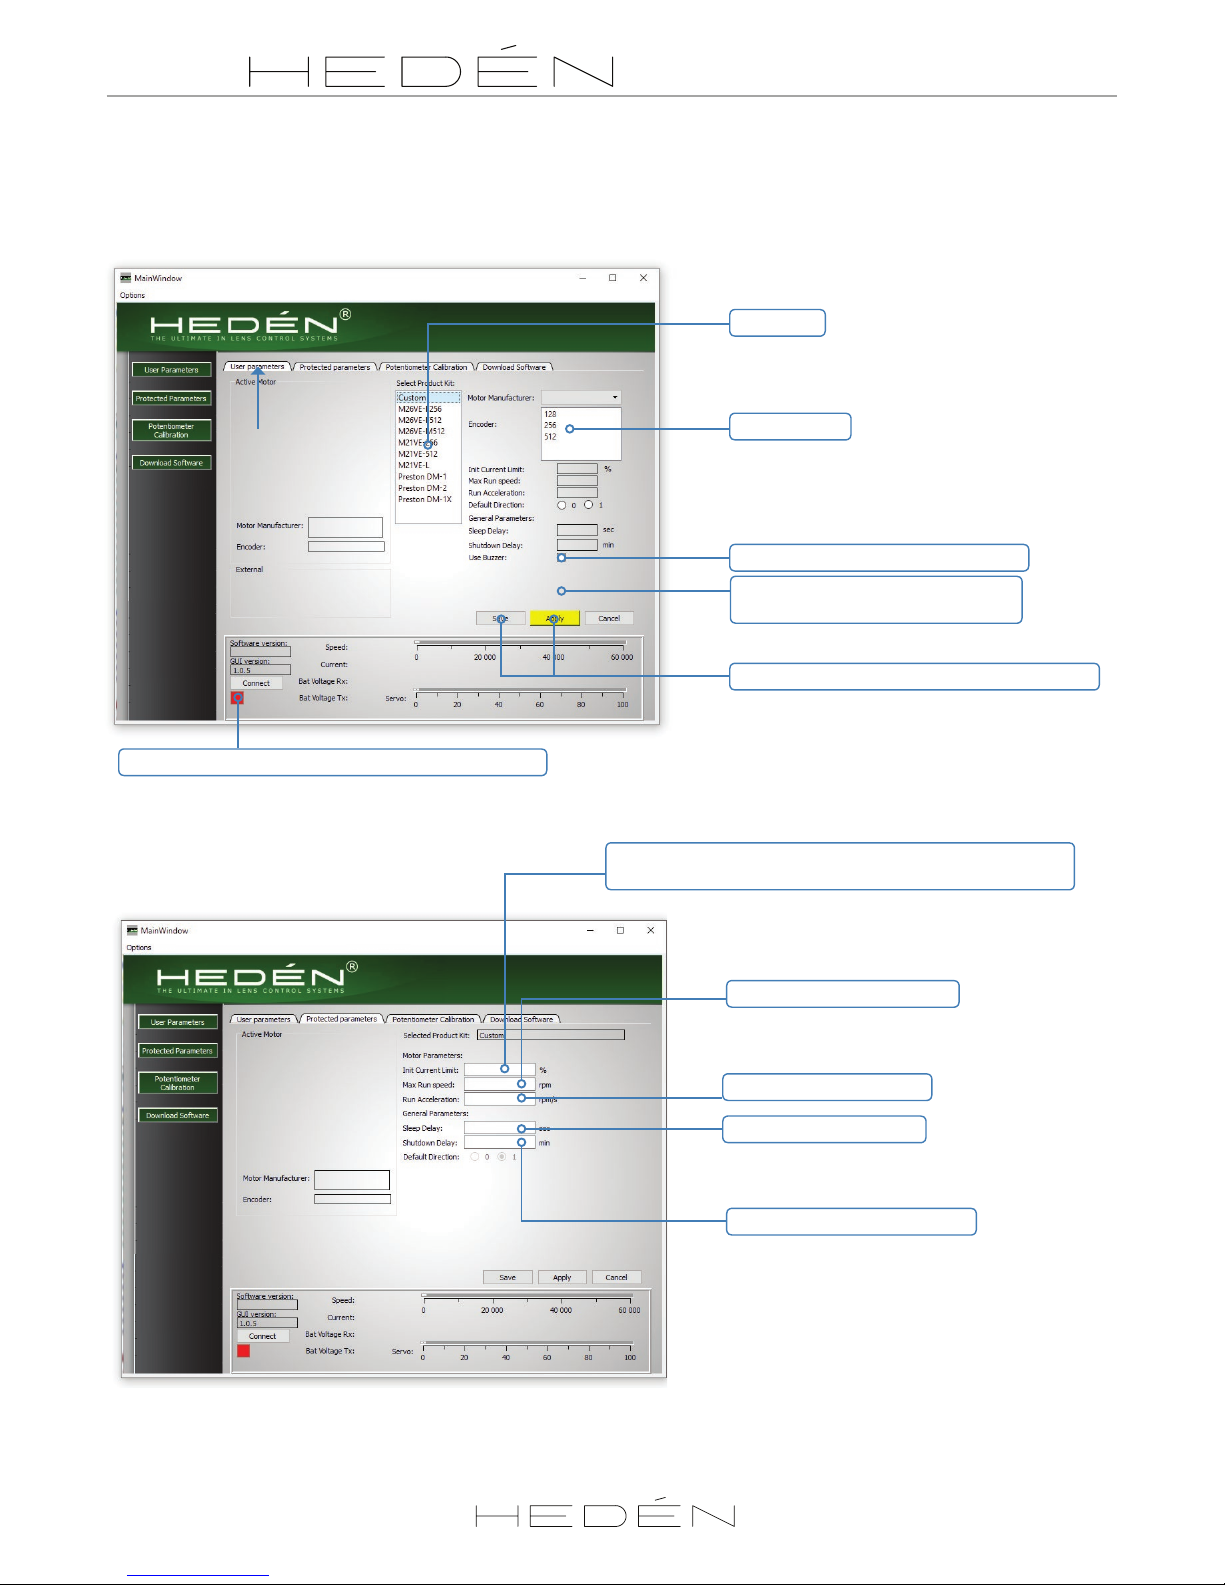
Motor Type
Encoder seng
User parameters
Toggle buzzer on/o for knob limit mode
Switch between Canon/Fujinon FIZ
(only shown when Carat is connected)
Aer any changes to sengs press apply then save
Connecon status (blinking green when Carat is connected)
GUI overview
Connect the Carat transmier to usb and power it up before starng GUI.
Protected parameters (Password is”protected”)
Calibraon torque/current limit.
If using s lenses this value can be increased from default value
Max motor rpm, do not change
Acceleraon, do not change
Carat sender sleep meout
Carat transmier shutdown mer
7

THE ULTIMATE IN LENS CONTROL SYSTEMS
®
CARAT
OPERATORS GUIDE
THE ULTIMATE IN LENS CONTROL SYSTEMS
®
MAY 2017
Adjustment of resistance in knob/end point calibraon
1. Remove scale ring.
2. Connect Carat transmier with mini USB cable.
3. Start GUI
4. Go to “potenometer calibraon”. To access enter
password “protected“. If carat is succesfully con-
nected, turning the contoll knob of the carat will
move the virtual knob in GUI.
5. Turn knob clockwise to its mechanical end stop.
6. Locate and loosen hex screw on the side of the
knob. See g. A. (1.5mm hex tool)
7. Use a small at screwdriver in the center hole on
top of knob. See g. B.
8. Klick start buon.
9. Gently turn the screw driver unl a value between
60-120 is reached. Value will be shown above
virtual knob. Make sure knob is sll in clockwise
posion.
10. Resistance of knob is determined by applying
force to the knob before ghtening hex screw.
More force means more resistance. See g .C.
11. Tighten hex screw and try resistance in knob. If
not sased loosen hex screw again and reapply
force.
12. Sll in counterclockwise posion, press “sample“
13. Move wheel all the way to counterclockwise posi-
on and press “sample again“
14. Knob calibraon procedure is now completed.
A B C
8

THE ULTIMATE IN LENS CONTROL SYSTEMS
®
CARAT
OPERATORS GUIDE
THE ULTIMATE IN LENS CONTROL SYSTEMS
®
MAY 2017
For sales inquires contact Sales at:
For quesons regarding service, support and general technical queries:
Address:
Vita Gavelns Väg 6
SE-426 71 VÄSTRA FRÖLUNDA
SWEDEN
Phone: +46 (0)31-272110
Table of contents


