FUJINON YV10x5R4A-SA User manual

ಕȅ
ུτϋΒͺͼςΑȂVideo ൲ȃຈȂDC ιρঀ
ဥȃ
This content explains important notices for all the users to use this product safely. Read the content carefully
before using, and follow the instructions.
The following signs of ƞWARNING and ƞCAUTION show:
ƞWARNING Indicates the possibility of causing death or serious injury when misused.
ƞCAUTION Indicates the possibility of causing injury or substantial damage when misused.
ƞWARNING
ɜDo not moisten inside of the appliances. It may cause fire or electric shock. If the incident occurs, shut off
the power supplied to the lens immediately.
ɜDo not look at any sorts of strong illuminant such as the sun through the lens. Eyes could be harmed.
ƞCAUTION
ɜBefore supplying the power to the lens, make sure all the parts are connected correctly.
ɜIn order to install or release the lens cable, be sure to hold the joint part. Do not pull it off nor twist it, or it
may get damaged. It may cause fire or electric shock.
ɜDo not leave or store the lens under direct sunshine. The lens may condense light on a near-by object, and
cause a fire.
ɜIf any sorts of incidents such as unusual smoke, noise, smell or obstacles are found, shut off the power
supplied to the lens and pull out the lens cable immediately. Please notify our shop or service
department as soon as possible.
ɜDo not remodel the instrument without permission: it may impair the functions of product or cause
electric shock. Please contact our sales agent or Fujinon service department if remodeling is necessary.
NOTICES
ɜLens and its accessories are extremely precise instrument, then be sure not to apply the strong impacts to
them.
ɜThere may be a case that the glasses of the lens mist when the lens is carried from a cool place to a place of
high temperature and high humidity. To avoid a mist on the glasses, before moving the lens, let the lens
adjust to the ambient temperature of the place where the lens will be used.
ɜFor safe storage of the lens, avoid hot or humid place, and avoid places containing corrosive gas or salt.
ɜPut the cap on the lens while the camera is not used for a long time.
¥ ୋհୃঀဥȂါಕփমࣜ୰ྶȃຈঀဥ
ஜඋȂܱඤယୃঀဥȃ
ડಎƞ࠙࣬ƞಕփষນȃ
ƞ࠙࣬ ࢋ৾եȂ૽ঘཌخෝேඤယাȃ
ƞಕփ ࢋ৾եȂ૽ٺȂഎఅٺอேඤယা
ȃ
ƞ࠙࣬
ɜඤ໐କවȃغۜഩࡔ֦ȃ
ྔ֚କවȂτϋΒރݯഩ࡙୨ȃࠨঀဥ
ȃ
ɜఊုࣞܵഽ࡙τϋΒࡉȃ࿒વٺȃ
ƞಕփ
ɜτϋΒރݯഩ࡙Ȃڎܥܕୃ୪ږࢃවȃ
ɜΉȜήσȂຈΥ·Η໐ȃȂΉȜήσ֨ಫȂ
ȃΉȜήσȂغۜഩࡔ֦ȃ
ɜೄৣ൚ાτϋΒ༗ۯȃτϋΒ߃Ȃغ
ȃ
ɜอȆ։ુإȆ։Ȇ։ව։ુȂτϋΒރݯഩ࡙୨
τϋΒιρ৾ٸȂ௸൚২యၑഝ൚২ȜΫΑௗ࢛Ⴒ၁ȃ
ɜ൚২ྫ౯ٜȆ٨௮࣐ȃୋܥෝఅȂۜഩ
ȃٜȆ٨௮ຈါȂຈ൚২యၑഝ൚২ȜΫΑௗ࢛ȃ
๊֚എಕփ
ɜτϋΒັ௺ୈྟܥ٫ȃࠨޑࠢဓȃ
ɜτϋΒێݢȂܨأܨࣺࣞȂτϋΒචȃ
ષܱ۪ޏτϋΒࣺȂஜτϋΒঀဥ۪ޏأഽഐࣣච
చ࣒ȃ
ɜτϋΒ༗ۯȂࣞأȂఉȂແ΄Αાȃ
ɜιρಿܢۼঀဥȂτϋΒτϋΒ΅λΛί৾ັȃ
Note: The iris control for this lens can not be activated with video signal.
Please use a camera that can sent DC signal.
հঀ / FOR YOUR SAFETY USE
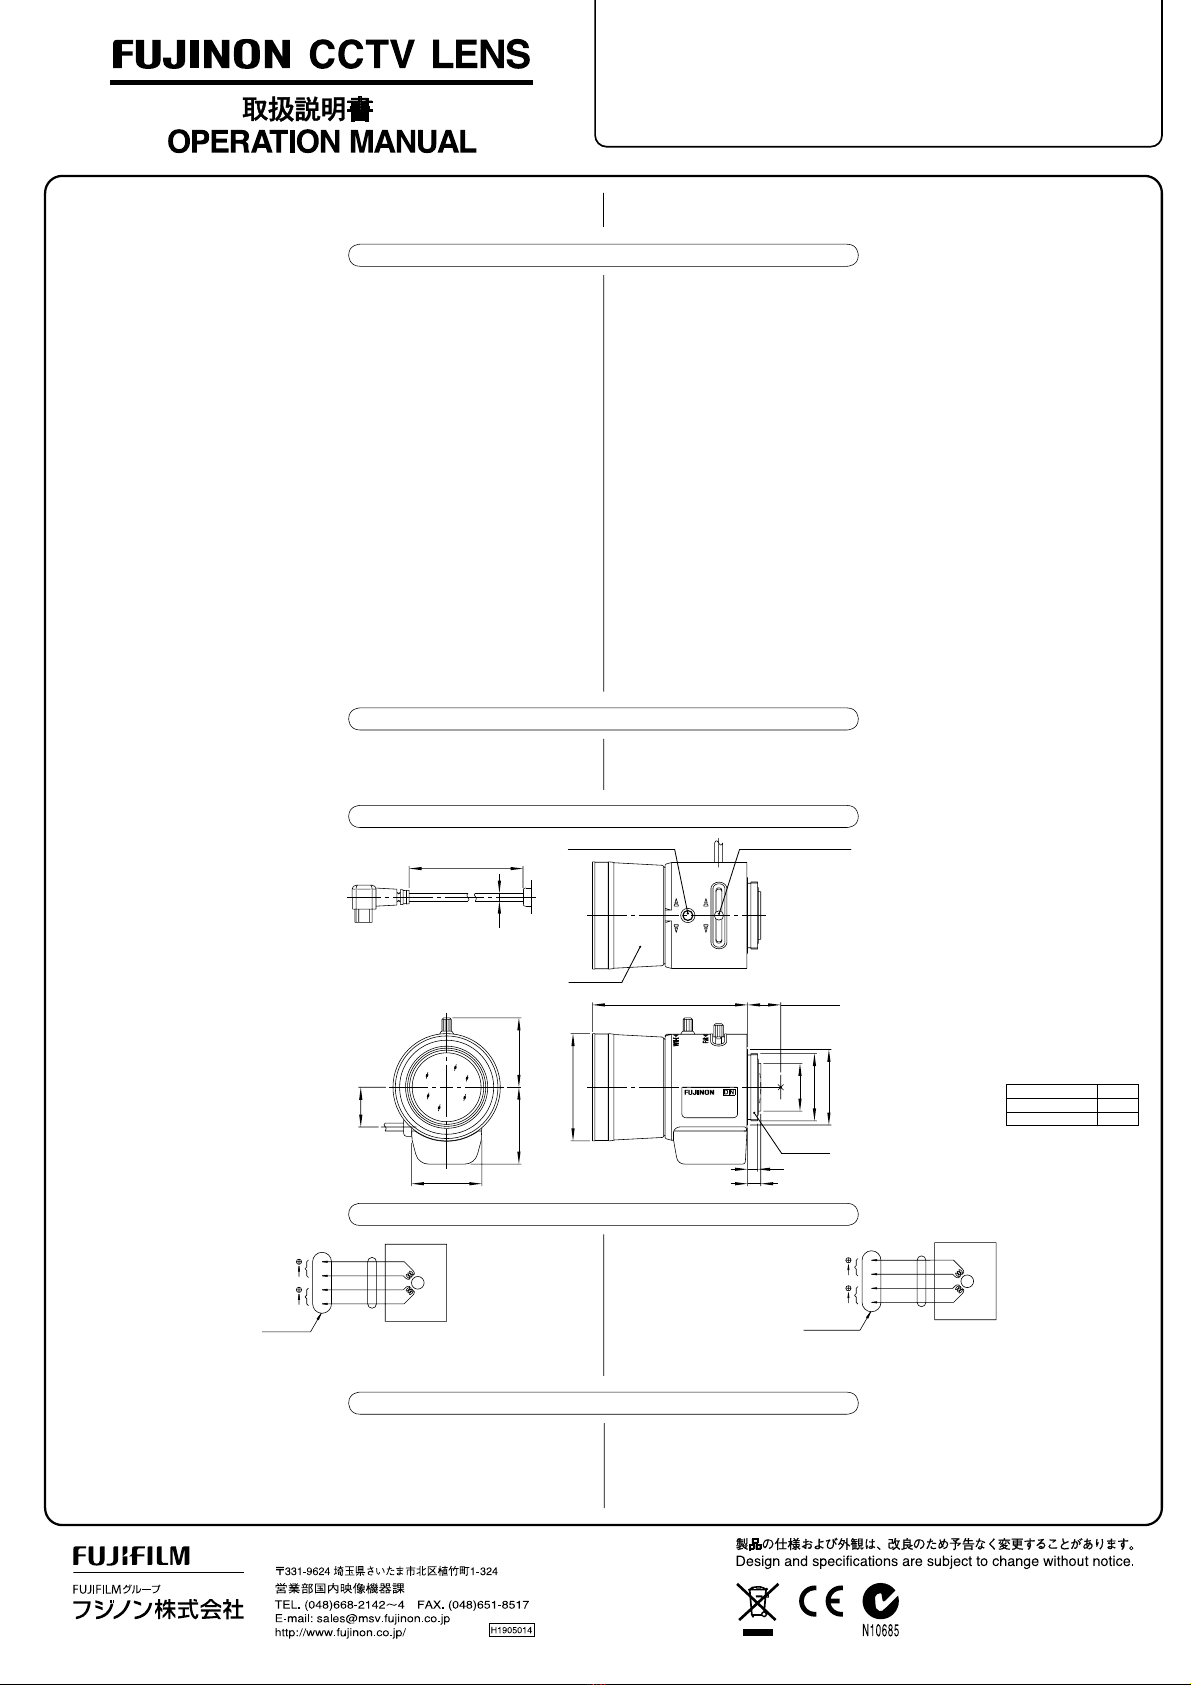
ӳࠫȁȁȁȁ / WIRING DIAGRAM
Ӳٸȁȁ۷ȁȁ / OUTLINE DRAWING
Note: This lens is designed for CS mount camera. Note that C mount camera is unavailable.
Press the threaded portion of the lens mount against the threaded portion of the camera mount, slowly rotate
the lens clockwise, and screw in the lens mount to be installed on the camera.
Note: The lens mount is equipped with a slip mechanism. To change the rotational position of the lens,
strongly rotate the lens clockwise further. If the lens reaches the stopper and cannot be thereby
rotated, rotate it counterclockwise slowly until it reaches the required position.
ಕȅ
ུτϋΒζ;ϋΠ CS ζ;ϋΠȃCζ;ϋΠιρȂུτϋΒঀဥȃ
τϋΒζ;ϋΠ໐ιρζ;ϋΠ໐؋൚ȂτϋΒশ༷ࠗ࢜ٝȂ
ࣺιρ৾ັȃ
ಕȅ
τϋΒζ;ϋΠȂΑςΛίܥࢹັȃτϋΒٝഢ༷࢜উସ་Ȃ
τϋΒࢵޑশ༷ࠗ࢜ٝȃȂݥউସஜΑΠΛΩ൚Ȃ
τϋΒٝȂশ༷ࠗ࢜ٝȂݥউସȃ
Ӵιρ৾ັ / MOUNTING THE LENS
㱢㪊
㪈㪌
㪈㪄㪊㪉㪬㪥㪝
㱢㪈㪏
㱢㪉㪏㪅㪌
㪌㪏㪅㪍
㱢㪋㪇㪅㪌
㪉㪍㪅㪍
㪉㪐 㪉㪍㪅㪉
㪝㪅㪽㩷㪈㪉㪅㪌㩿㪠㪥㩷㪘㪠㪩㪀
㪊㪅㪏
㪌
㪚㪪㩷䊙䉡䊮䊃
㪚㪪㪄㪤㪦㪬㪥㪫
䉵䋭䊛䊥䊮䉫
㪱㪦㪦㪤㩷㩷㪩㪠㪥㪞
䊐䉤䋭䉦䉴✦ઃ䈧䉁䉂
㪝㪦㪚㪬㪪㩷㩷㪫㪠㪞㪟㪫㪜㪥㪠㪥㪞㩷㩷㪢㪥㪦㪙
䉵䋭䊛✦ઃ䈧䉁䉂
㪱㪦㪦㪤㩷㩷㪫㪠㪞㪟㪫㪜㪥㪠㪥㪞㩷㩷㪢㪥㪦㪙
㪮㪠㪛㪜 㪫㪜㪣㪜
㪠㪩㪠㪪㩷㩷㪚㪦㪥㪫㪩㪦㪣㩷㩷㪚㪘㪙㪣㪜
㩿㪚㪦㪥㪥㪜㪚㪫㪦㪩㩷㪑㩷㪋㪄㪧㪠㪥㩷㩷㪧㪣㪬㪞㪀
䉝䉟䊥䉴䉮䊮䊃䊨䋭䊦䉬䋭䊑䊦
㪥㪜㪘㪩
㪝㪘㪩
䋪㪣㪂㪊㪇
㪇
㪝㪅㪽 䋺 䊐䊤䊮䉳䊋䉾䉪 㪆 㪝㫃㪸㫅㪾㪼㩷㪽㫆㪺㪸㫃㩷㫃㪼㫅㪾㫋㪿
㪠㪥㩷㪘㪠㪩 䋺 ⓨ᳇឵▚㐳
䋨න 㪆 㫌㫅㫀㫋䋺 㫄㫄㪀
ဳ㵘ฬ㪆㪤㪦㪛㪜㪣
䋪
㪰㪭㪈㪇㬍㪌㪩㪋㪘㪄㪪㪘㪉
㪰㪭㪈㪇㬍㪌㪩㪋㪘㪄㪪㪘㪉㪣
㪣
㪈㪇㪇
㪉㪊㪇
㪦㪧㪜㪥
㪦㪧㪜㪥
㪛㪘㪤㪧㪅㩷㪚㪦㪠㪣
㪤
㪣㪜㪥㪪
㪊
㪋
㪉
㪈
㪛㪩㪠㪭㪜㩷㪚㪦㪠㪣
㪚㪦㪥㪥㪜㪚㪫㪦㪩
㪋㪄㪧㪠㪥㩷㪧㪣㪬㪞
䉥䊷䊒䊮
䉥䊷䊒䊮
䉻䊮䊏䊮䉫䉮䉟䊦
㪤
䊧䊮䉵
㪊
㪋
㪉
㪈
䊄䊤䉟䊑䉮䉟䊦
䉮䊈䉪䉺
㪋䊏䊮䊒䊤䉫
YV10x5R4A-SA2
YV10x5R4A-SA2L
1:1.6/5-50mm 1/3” CS-Mount
This lens is designed to minimize the difference between the focus position with a visible radiation and that
with a near-infrared radiation, by our original optical correction system. Therefore, it can be used for a
day/night camera, which can be used as a color camera in the daytime and a high-sensitivity monochrome
camera at night, as well as an ordinary camera.
ུτϋΒȂඅڠ΄ρΑဥȂخণ֖ঀဥশ߃ٸ֖ঀဥশάϋΠΒτࡠ
ဲ୭ࠗȃ
Ȃ๊֚ CCTV ιρဥτϋΒȂಓۼρȜιρȂۼࣞۜഽκΦ
·υιρဥঀဥȶΟͼͼΠιρȷဥτϋΒഐȃ
ӱٽȁȁ୰ / GENERAL DESCRIPTION
202B10908331
LC134A-SA2 1703
ঀဥஜȂ৾ե୰ྶඋȃȂ
৾උȂఱ୨༗ۯȃ
Before using this product, please read this operation manual carefully,
and keep the manual handy for future use.

A special coating has been applied on the lens surface in order to prevent light reflection. Dirty lens surface
due to “dust,” “oil” or “finger print” causes harmful flare which result in degenerating lens property. Dirt
may cause mold or scorches on the lens.
Whenever the lens is found to be dirty, clean the lens as instructed below.
Note: Be careful not to damage the lens surface in cleaning.
(1) To remove dust on the lens
Brush “trash” or “dust” off with an oil-free soft brush or a blower-brush (for photography use).
(2) To remove oil on the lens
Wipe water drops or oil off the lens with a clean soft cloth and dry the lens surface. Then prepare oil-free
and washed-out cotton cloth or lens cleaning paper with alcohol for disinfection or lens cleaning liquid.
Wipe the rest of the dirty off gently with the cloth or paper by moving spirally from the lens center
towards its rim. Repeat wiping with another wet cloth or paper until the lens becomes completely clean.
1. Lens ¦¦¦¦¦¦¦¦¦¦¦¦¦¦¦¦¦¦¦¦¦¦¦¦¦¦¦¦¦¦¦¦¦¦¦¦¦¦¦¦¦¦¦¦¦¦¦¦¦¦¦¦¦¦¦¦¦¦¦¦¦¦¦¦¦¦¦¦¦¦¦¦¦¦¦¦¦¦¦¦¦¦¦¦¦ 1
2. Front lens cap ¦¦¦¦¦¦¦¦¦¦¦¦¦¦¦¦¦¦¦¦¦¦¦¦¦¦¦¦¦¦¦¦¦¦¦¦¦¦¦¦¦¦¦¦¦¦¦¦¦¦¦¦¦¦¦¦¦¦¦¦¦¦¦¦¦¦¦¦¦¦¦¦¦¦¦¦¦ 1
3. Rear lens cap¦¦¦¦¦¦¦¦¦¦¦¦¦¦¦¦¦¦¦¦¦¦¦¦¦¦¦¦¦¦¦¦¦¦¦¦¦¦¦¦¦¦¦¦¦¦¦¦¦¦¦¦¦¦¦¦¦¦¦¦¦¦¦¦¦¦¦¦¦¦¦¦¦¦¦¦¦¦ 1
4. Operation manual¦¦¦¦¦¦¦¦¦¦¦¦¦¦¦¦¦¦¦¦¦¦¦¦¦¦¦¦¦¦¦¦¦¦¦¦¦¦¦¦¦¦¦¦¦¦¦¦¦¦¦¦¦¦¦¦¦¦¦¦¦¦¦¦¦¦¦¦¦¦¦¦¦¦ 1
㪹㪀㩷㩷㪪㪫㪦㪩㪘㪞㪜
㪸㪀㩷㩷㪦㪧㪜㪩㪘㪫㪠㪥㪞 㪄㪈㪇㩷㷄㩷㩷㪫㪦㩷㩷㪂㪌㪇㩷㷄
㪄㪉㪇㩷㷄㩷㩷㪫㪦㩷㩷㪂㪍㪇㩷㷄
㪊㪌㩷䋦㩷㩷㪫㪦㩷㩷㪐㪇㩷䋦㩷㩿㪥㪦㩷㪛㪜㪮㩷㪚㪦㪥㪛㪜㪥㪪㪘㪫㪠㪦㪥㩷㪘㪣㪣㪦㪮㪜㪛㪀
㩷㩷㪉㪅㩷㩷㪩㪜㪣㪘㪫㪠㪭㪜㩷㩷㪟㪬㪤㪠㪛㪠㪫㪰
㩷㩷㪈㪅㩷㩷㪫㪜㪤㪧㪜㪩㪘㪫㪬㪩㪜
䋪㪮㪟㪜㪥㩷㩷㪧㪦㪮㪜㪩㩷㩷㪠㪪㩷㩷㪫㪬㪩㪥㪜㪛㩷㩷㪦㪝㪝㪃㩷㩷㪠㪩㪠㪪㩷㩷㪮㪠㪣㪣㩷㩷㪘㪬㪫㪦㪤㪘㪫㪠㪚㪘㪣㪣㪰㩷㩷㪙㪜㩷㩷㪚㪣㪦㪪㪜㪛㪅
㪸㪀㩷㩷㪚㪦㪥㪫㪩㪦㪣 㪘㪬㪫㪦㩷㩷㩿㪥㪦㪫㩷㩷㪠㪥㪚㪦㪩㪧㪦㪩㪘㪫㪠㪥㪞㩷㩷㪘㪤㪧㪣㪠㪝㪠㪜㪩㪀
㪛㪩㪠㪭㪜㩷㩷㪚㪦㪠㪣㩷 㩷㪈㪐㪇㩷㱅㩷㫧㩷㪈㪇㩷䋦
㪛㪘㪤㪧㪠㪥㪞㩷㩷㪚㪦㪠㪣㩷 㩷㪌㪇㪇㩷㱅㩷㫧㩷㪈㪇㩷䋦
㪉㪊㩷㫄㪘㩷㩷㩿㪤㪘㪯㪅㪀㩷㩷㩷㪘㪫㩷㩷㪋㪭㩷㩷㪛㪚
㪹㪀㩷㩷㪚㪦㪠㪣㩷㩷㪩㪜㪪㪠㪪㪫㪘㪥㪚㪜
㪺㪀㩷㩷㪦㪧㪜㪩㪘㪫㪠㪥㪞㩷㩷㪚㪬㪩㪩㪜㪥㪫
㪠㪩㪠㪪㩷㩷㪚㪟㪘㪩㪘㪚㪫㪜㪩㪠㪪㪫㪠㪚㪪
㪈㪊㪅㩷㩷㪤㪘㪪㪪 㪘㪧㪧㪩㪦㪯㪅㩷㩷㪏㪌㩷㪾
㿽㿽㿽㿽㿽
㪚㪪㪄㪤㪦㪬㪥㪫
㪤㪘㪥㪬㪘㪣㩷㩷㩿㪦㪧㪅㩷㪘㪥㪞㪣㪜㩷㩷㪍㪊
䉙㪀
㪘㪬㪫㪦㩷㩷㩿㪪㪜㪜㩷㩷㪜㪣㪜㪚㪫㪩㪠㪚㪘㪣㩷㩷㪪㪧㪜㪚㪅㪀
㪮㪠㪛㪜
㵘
㪉㪉㪏㩷㫄㫄
㩷
㪫㪜㪣㪜
㵘
㪋㪈㩷㫄㫄
㪮㪠㪛㪜
㵘
㪊㪇㪋㩷㫄㫄
㩷
㪫㪜㪣㪜
㵘
㪌㪋㩷㫄㫄
㪮㪠㪛㪜
㵘
㪌㪈
䉙
㪈㪎
㶅㩷
㪫㪜㪣㪜
㵘
㪌
䉙
㪊㪇
㶅
㺙㩷㪄㩷㪇㪅㪊㩷㫄㩷㩷㩿㪝㪩㪦㪤㩷㪝㪩㪦㪥㪫㩷㪦㪝㩷㪣㪜㪥㪪㪀
㪈㪉㪅㪌㩷㫄㫄㩷㩷㩿㪠㪥㩷㩷㪘㪠㪩㪀
㱢㪍㩷㫄㫄
䋨
㪋㪅㪏㩷㫄㫄㩷
㬍
㩷㪊㪅㪍㩷㫄㫄
䋩
㪝㪈㪅㪍㩷㪄㩷㪫㪊㪍㪇㩷㩷㩿㪜㪨㪬㪠㪭㪘㪣㪜㪥㪫㩷㩷㪫㪦㩷㩷㪝㪊㪍㪇㪀
㪈㩷㪑㩷㪈㪅㪍
㪌㩷㫄㫄㩷㪄㩷㪌㪇㩷㫄㫄
㪝㪦㪩㩷㩷㪈㪆㪊㩹㩷㩷㪝㪦㪩㪤㪘㪫㩷㩷㪛㪘㪰㪆㪥㪠㪞㪟㪫㩷㩷㪚㪘㪤㪜㪩㪘
㪈㪉㪅㩷㩷㪝㪠㪣㪫㪜㪩㩷㩷㪪㪚㪩㪜㪮㩷㩷㪪㪠㪱㪜
㪈㪈㪅㩷㩷㪤㪦㪬㪥㪫
㪹㪀㩷㩷㪱㪦㪦㪤㩷㩿䋪㪈㪀
㪤㪘㪥㪬㪘㪣㩷㩷㩿㪦㪧㪅㩷㪘㪥㪞㪣㪜㩷㩷㪌㪇
䉙㪀
㪺㪀㩷㩷㪝㪦㪚㪬㪪
㪸㪀㩷㩷㪠㪩㪠㪪
㪹㪀㩷㩷㪭㪜㪩㪫㪠㪚㪘㪣
㪸㪀㩷㩷㪟㪦㪩㪠㪱㪦㪥㪫㪘㪣
㪮㪠㪛㪜
㵘
㪍㪈
䉙
㪌㪍
㶅㩷
㪫㪜㪣㪜
㵘
㪍
䉙
㪌㪉
㶅
㪮㪠㪛㪜
㵘
㪊㪐
䉙
㪊㪍
㶅㩷
㪫㪜㪣㪜
㵘
㪋
䉙
㪇㪎
㶅
㪺㪀㩷㩷㪛㪠㪘㪞㪦㪥㪘㪣
㪹㪀㩷㩷㪭㪜㪩㪫㪠㪚㪘㪣
㪸㪀㩷㩷㪟㪦㪩㪠㪱㪦㪥㪫㪘㪣
㪈㪇㪅㩷㩷㪚㪦㪥㪫㪩㪦㪣
㩷㩷㪐㪅㩷 㪝㪠㪜㪣㪛㩷㪦㪝㩷㪭㪠㪜㪮
㩷 㪘㪫㩷㪤㪅㪦㪅㪛
㩷㩷㪏㪅㩷㩷㪝㪠㪜㪣㪛㩷㩷㪘㪥㪞㪣㪜
㩷㩷㪎㪅㩷㩷㪝㪦㪚㪬㪪㩷㩷㪩㪘㪥㪞㪜
㩷㩷㪍㪅㩷㩷㪝㪣㪘㪥㪞㪜㩷㩷㪝㪦㪚㪘㪣㩷㩷㪣㪜㪥㪞㪫㪟
㩷㩷㪌㪅㩷㩷㪠㪤㪘㪞㪜㩷㩷㪪㪠㪱㪜
㩷㩷㪋㪅㩷㩷㪠㪩㪠㪪㩷㩷㪩㪘㪥㪞㪜
㩷㩷㪊㪅㩷㩷㪤㪘㪯㪠㪤㪬㪤㩷㩷㪩㪜㪣㪘㪫㪠㪭㪜㩷㩷㪘㪧㪜㪩㪫㪬㪩㪜
㩷㩷㪉㪅㩷㩷㪝㪦㪚㪘㪣㩷㩷㪣㪜㪥㪞㪫㪟
㩷㩷㪈㪅㩷㩷㪘㪧㪧㪣㪠㪚㪘㪫㪠㪦㪥
㩿䋪㪈㪀䋺㩷㪘㩷㪪㪫㪘㪫㪜㩷㪦㪝㩷㪦㪬㪫㩷㪦㪝㩷㪝㪦㪚㪬㪪㩷㪦㪚㪚㪬㪩㪪㩷㪛㪬㪩㪠㪥㪞㩷㪱㪦㪦㪤㩷㪦㪧㪜㪩㪘㪫㪠㪦㪥㩷㪛㪬㪜㩷㪫㪦㩷㪫㪟㪜㩷㪪㪧㪜㪚㪠㪝㪠㪚㪘㪫㪠㪦㪥㪃㩷㪭㪘㪩㪠㪄㪝㪦㪚㪘㪣㩷㪣㪜㪥㪞㪫㪟㩷㪣㪜㪥㪪㪅
1) Loosen the focus tightening knob.
2) Move the focus tightening knob to adjust the focus. Move the knob to “FAR” side to set the focus to
infinity; move the knob to “NEAR” side to set the focus to near.
3) Tighten the focus tightening knob.
Note: The lens is a vari-focal length lens. After a zoom operation, you will need to focus.
1) Loosen the zoom tightening knob.
2) Rotate the zoom ring to select the appropriate field angle. Rotate the ring to “WIDE” side to set the
zoom to wide; rotate the ring to “TELE” side to set the zoom to telephoto.
3) Adjust the focus referring to “FOCUS OPERATION.”
4) Tighten the zoom tightening knob.
τϋΒນ࿂ৣཡগȜΞͻϋΈঔȃນ࿂ȶȷȶȷȶঐȷ൝
ȂခٺέτͺอȂτϋΒෝ೩ئȃȂȶμΉȷ
ȶΫȷอࡔ֦ȂࡉȂষအව࣐ȃ
ಕȅ
ව൚ȂτϋΒນ࿂΅Βັಕփȃ
(1) ൝ັ
ܨΧΉήυͺȜήρΏȪৢ૯ဥȫ൝ࠚȶȷȶȷ၂
ȃ
(2) ൝ັ
ȶକȷȶȷ൝ୄࠩືࠚ৾ۋȃষܨ
࿐࿀ືτϋΒ·ςȜΣϋΈβȜΩȜકඉဥͺσȜστϋΒ·ςȜઁၾ
ࣺȂτϋΒಎ໐༏໐࢜־ےેࠚષȃ
Ȃ༆ືβȜΩȜ৾ఢȂତٝ߫༐ȃ
1. τϋΒུఘ ¦¦¦¦¦¦¦¦¦¦¦¦¦¦¦¦¦¦¦¦¦¦¦¦¦¦¦¦¦¦¦¦¦¦¦¦¦¦¦¦¦¦¦¦¦¦¦¦¦¦¦¦¦¦¦¦¦¦¦¦¦¦¦¦¦¦¦¦¦¦¦¦¦¦¦¦¦¦¦ 1
2. ஜ΅λΛί ¦¦¦¦¦¦¦¦¦¦¦¦¦¦¦¦¦¦¦¦¦¦¦¦¦¦¦¦¦¦¦¦¦¦¦¦¦¦¦¦¦¦¦¦¦¦¦¦¦¦¦¦¦¦¦¦¦¦¦¦¦¦¦¦¦¦¦¦¦¦¦¦¦¦¦¦¦¦¦ 1
3. ࢃ΅λΛί ¦¦¦¦¦¦¦¦¦¦¦¦¦¦¦¦¦¦¦¦¦¦¦¦¦¦¦¦¦¦¦¦¦¦¦¦¦¦¦¦¦¦¦¦¦¦¦¦¦¦¦¦¦¦¦¦¦¦¦¦¦¦¦¦¦¦¦¦¦¦¦¦¦¦¦¦¦¦¦ 1
4. ৾ե୰ྶ ¦¦¦¦¦¦¦¦¦¦¦¦¦¦¦¦¦¦¦¦¦¦¦¦¦¦¦¦¦¦¦¦¦¦¦¦¦¦¦¦¦¦¦¦¦¦¦¦¦¦¦¦¦¦¦¦¦¦¦¦¦¦¦¦¦¦¦¦¦¦¦¦¦¦¦¦¦¦¦ 1
㪹
㪀ሽᐲ
㪸
㪀↪ᐲ 㪄
㪈㪇㩷㷄㩷䌾㩷
㪂
㪌㪇㩷㷄
㪄
㪉㪇㩷㷄㩷䌾㩷
㪂
㪍㪇㩷㷄
㪊㪌㩷䋦㩷䌾㩷㪐㪇㩷䋦
䋨䈢䈣䈚⚿㔺䈚䈭䈇䈖䈫䋩
㩷㩷㪉㪅㩷㩷
Ḩᐲ▸࿐
㩷㩷㪈㪅㩷㩷
ᐲ▸࿐
㪸㪀㩷㩷
ᠲᣇᑼ ⥄േ䋨䉝䊮䊒ή䋩
㪹㪀㩷㩷
䉮䉟䊦ᛶ᛫ 䊄䊤䉟䊑䉮䉟䊦㩷
㪈㪐㪇㩷㱅㩷㫧㩷㪈㪇㩷䋦
䉻䊮䊏䊮䉫䉮䉟䊦㩷
㪌㪇㪇㩷㱅㩷㫧㩷㪈㪇㩷䋦
㪺㪀㩷㩷
ᶖ⾌㔚ᵹ
㪉㪊㩷㫄㪘
䋨ᦨᄢ䋩
㩷㩷㪛㪚㩷㪋㪭㩷
ᤨ
䉝䉟䊥䉴․ᕈ
䋪㔚Ḯ䉕ಾ䉎䈫䇮䉝䉟䊥䉴䈲⥄േ⊛䈮䉪䊨䊷䉵䈮䈭䉍䉁䈜䇯
㩿䋪㪈㪀䋺㩷
䊋䊥䊐䉤䊷䉦䊦䊧䊮䉵䈱䈢䉄䇮䉵䊷䊛䉕ᠲ䈜䉎䈫䊏䊮䊃䈮䉵䊧䈏↢䈛䉁䈜䇯
㪈㪊㪅㩷㩷
⾰㵘㵘㊂⚂
㩷㪏㪌㩷㪾
㿽㿽㿽㿽㿽
㪚㪪
䊙䉡䊮䊃
ᚻേ䋨ᠲⷺ
㩷㩷㪌㪇
䉙䋩
⥄േ䋨㔚᳇᭽䉕䈗ෳᾖ䈒䈣䈘䈇䋩
ᐢⷺ
㵘
㪉㪉㪏㩷㫄㫄
㩷ᦸ㆙
㵘
㪋㪈㩷㫄㫄
ᐢⷺ
㵘
㪊㪇㪋㩷㫄㫄
㩷ᦸ㆙
㵘
㪌㪋㩷㫄㫄
ᐢⷺ
㵘
㪌㪈
䉙
㪈㪎
㶅㩷 ᦸ㆙
㵘
㪌
䉙
㪊㪇
㶅
ᐢⷺ
㵘
㪊㪐
䉙
㪊㪍
㶅㩷 ᦸ㆙
㵘
㪋
䉙
㪇㪎
㶅
ᐢⷺ
㵘
㪍㪈
䉙
㪌㪍
㶅㩷 ᦸ㆙
㵘
㪍
䉙
㪌㪉
㶅
㺙㩷㪄㩷㪇㪅㪊㩷㫄
䋨䊧䊮䉵೨₹㗂ὐ䉋䉍䋩
㪈㪉㪅㪌㩷㫄㫄
䋨ⓨ᳇឵▚㐳䋩
㱢㪍㩷㫄㫄
䋨
㪋㪅㪏㩷㫄㫄㩷
㬍
㩷㪊㪅㪍㩷㫄㫄
䋩
㪝㪈㪅㪍㩷㪄㩷㪫㪊㪍㪇
䋨
㪝㪊㪍㪇
䈮⋧ᒰ䋩
㪈㩷㪑㩷㪈㪅㪍
㪌㩷㫄㫄㩷㪄㩷㪌㪇㩷㫄㫄
㪈㪆㪊㩹㩷㩷
䊐䉤䊷䊙䉾䊃㩷䊂䉟䊅䉟䊃䉦䊜䊤↪
㪈㪉㪅㩷㩷
䊐䉞䊦䉺ขઃ↪䈰䈛ᓘ
㪈㪈㪅㩷㩷
䊙䉡䊮䊃
㪺㪀㩷㩷
䊐䉤䊷䉦䉴
㪸㪀㩷㩷
䉝䉟䊥䉴
ᚻേ䋨ᠲⷺ
㩷㩷㪍㪊
䉙䋩
㪹㪀㩷㩷
䉵䊷䊛㩷
㩿䋪㪈㪀
㪹㪀㩷㩷
ု㵘⋥
㪸㪀㩷㩷
᳓㵘ᐔ
㪸㪀㩷㩷
᳓㵘ᐔ
㪺㪀㩷㩷
ኻ㵘ⷺ
㪹㪀㩷㩷
ု㵘⋥
㪈㪇㪅㩷㩷
ᠲ㵘㵘
㩷㩷㪐㪅㩷
ᦨㄭធᤨ䈱
㩷 ᓇ▸࿐
㩷㩷㪏㪅㩷㩷
↹㵘㵘ⷺ
㩷㩷㪎㪅㩷㩷
䊐䉤䊷䉦䉴▸࿐
㩷㩷㪍㪅㩷㩷
䊐䊤䊮䉳䊋䉾䉪
㩷㩷㪌㪅㩷㩷
↹㕙ኸᴺ
㩷㩷㪋㪅㩷㩷
⛉䉍▸࿐
㩷㩷㪊㪅㩷㩷
ᦨᄢญᓘᲧ
㩷㩷㪉㪅㩷㩷
ὶὐ〒㔌
㩷㩷㪈㪅㩷㩷
↪㵘㵘ㅜ
1) έȜΑັ۱ȃ
2) έȜΑັௌάϋΠࣣȃȸFARȹ௰ௌྫࡠ௰Ȃ
ȸNEARȹ௰ௌঢ߃௰άϋΠࣣȃ
3) έȜΑັັȃ
ಕ.ུτϋΒΨςέȜστϋΒȂΒȜθௌࢃέȜΑௌάϋΠࣣ
ຈါȃ
1) ΒȜθັ۱ȃ
2) ΒȜθςϋΈٝഐ൚ْڙ఼ȃςϋΈȸWIDEȹ௰ٝࢩڙȂȸTELEȹ௰
ٝབȃ
3)
ȶέȜΑௌȷࣜચȂάϋΠࣣȃ
4) ΒȜθັັȃ
ӵέȜΑௌ / FOCUS OPERATION
ӶΒȜθௌ / ZOOM OPERATION
Ӹڠܥ٫အ / OPTICAL & MECHANICAL SPECIFICATIONS
ӹഩȁܨȁȁအ / ELECTRICAL SPECIFICATIONS
Ӻ۪ȁޏȁૄȁ / ENVIRONMENTAL CONDITIONS
ӻτϋΒව / MAINTENANCE OF THE LENS
Ӽȁȁࢹȁ଼ / PRODUCT COMPONENTS
When you cannot get the lens in focus in spite of repeated focusing operations, follow the following
procedures to adjust the flange focal length on the camera.
1) Set the lens iris open.
2) Set the zoom at the telephoto end and the focus at the infinity end.
3) Adjust the flange focal length on the camera, and then focus on an object which is more than 8 m away
from the lens.
4) Confirm the focus at telephoto end, around the middle, and at wide end throughout the zoom. (If you
cannot get the focus in spite of the above procedures, try again.)
τϋΒέȜΑௌάϋΠࣣȂոئιρέρϋΐΨΛ·
ାȃ
1) τϋΒࣆȜίϋȃ
2) ΒȜθΞτȂέȜΑྫࡠȃ
3) ιρέρϋΐΨΛ·ାȂৢఘȪ˔ոષȫάϋΠࣣȃ
4) ΒȜθΞτȂಎۼັ߃ȂχͼΡάϋΠࣣږȃ
ȪάϋΠࣣȂഽା࣐ȃȫ
ӷέρϋΐΨΛ·ା / FLANGE FOCAL ADJUSTING
This manual suits for next models
4
Table of contents
Other FUJINON Lens manuals
Popular Lens manuals by other brands

Samsung
Samsung D-XENON 100mm Macr user manual

FujiFilm
FujiFilm XF18mmF2 R owner's manual

Sigma
Sigma 24-35mm F2 DG HSM Art instructions

VOIGTLANDER
VOIGTLANDER ULTRA WIDE-HELIAR 12mm F5.6 Aspherical III instruction manual

Optika Italy
Optika Italy ACCESSORIES Series instruction manual

Sony
Sony SAL-135F28 - 135mm f/2.8 STF Telephoto Lens Service manual

Leica
Leica SUMMARON-M 1:5,6/28mm instructions

COLBOR
COLBOR CPL-80 user manual

malimexPro
malimexPro 800/8,0 T2 instruction manual

Navitar
Navitar 1-51190 Dimensional drawing

FujiFilm
FujiFilm FUJINON GF45-100mmF4 R LM OIS WR owner's manual

Schneider Kreuznach
Schneider Kreuznach PC-TS SUPER-ANGULON 2.8/50 HM user manual