Hedue Q3 User manual

1
[en]
Rotating lasers hedue Q3 and Q3G
Do not look into the laser beam!
Instruction manual
3R
2

Repair or calibration
2
RMA Service
rma.hedue.com
Should a repair ever be necessary, we would like to help you quickly. With little
effort, you can register your rotating laser for repair on our website. As soon as
your package arrives at our service department, our technicians can immediately
start with the repair. This way, we don't waste any time and you get your rotating
laser back as quickly as possible.
Free parcel card for many countries.
For shipping from many European countries, we even cover the shipping costs. You
can find a list of these countries at rma.hedue.de.
24 months warranty.
During the first 24 months, your device is protected by our comprehensive warranty.
The battery is covered by a 12-month warranty.
The QR code on your device for valuable information.
Using a smartphone, you can scan the QR code on your rotating laser. You will
then not only receive the calibration certificate of your rotating laser, but also
much more valuable information about accessories, spare parts, warranty
conditions as well as the costs for a repair outside the warranty or for a
calibration.
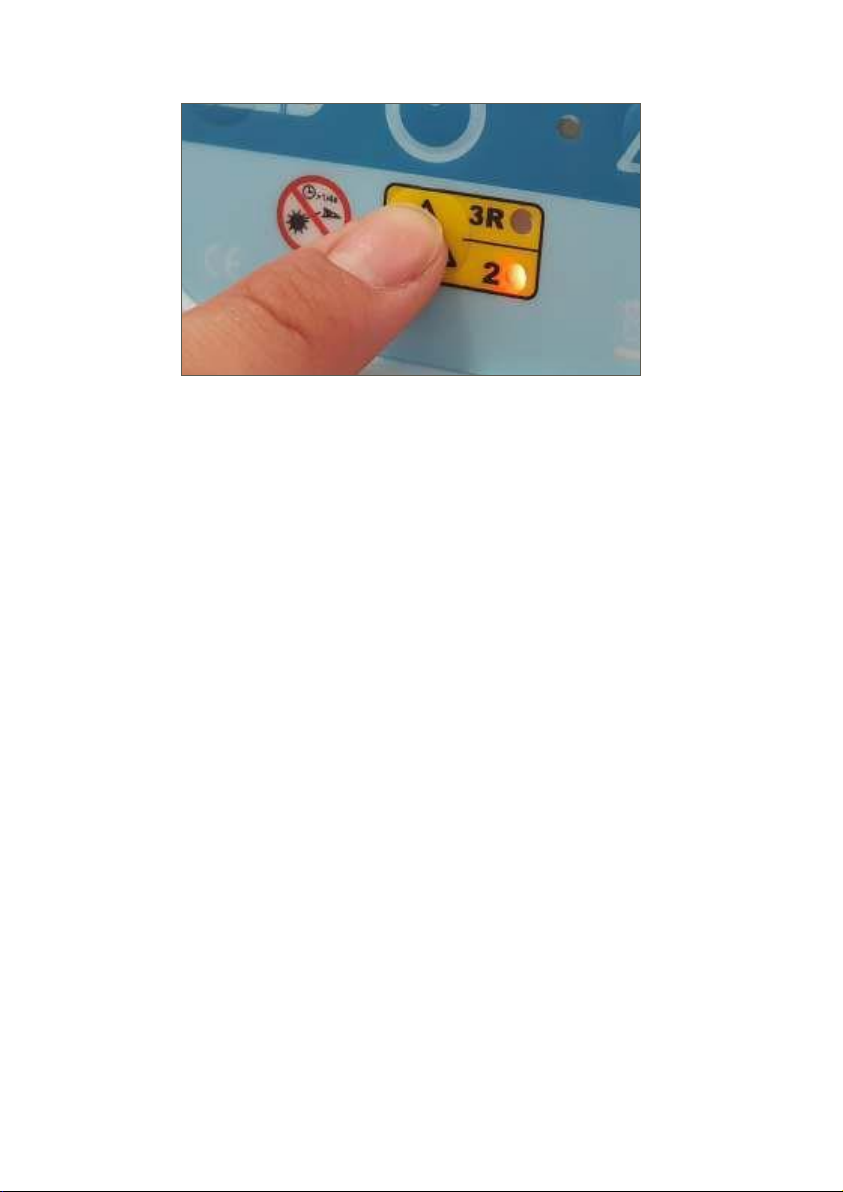
The laser classes
3
The hedue Q3 and Q3G rotating lasers can be operated in both laser class II and
laser class 3R. Laser class 3R allows a higher light output, i.e. a stronger
emission of laser radiation. Therefore, the laser beam is more visible in laser
class 3R than in laser class II.
However, the strongest source of light is the sun.
No artificial light can compete with the sun. This is true for all light sources and
especially for the laser beam. In sunlight, the laser beam can become almost
invisible. We recommend laser class II here. Even if you cannot see the laser
beam, you have a range of 250 m with the laser receiver.
Laser class 3R indoors.
The advantage of laser class 3R, the better visibility, comes into play especially in
closed rooms. By switching from rotation to line, you often have a highly visible
laser line and can work without a laser receiver.
Selection of the laser class.
The laser class can be switched on the device, see figure above. A light emitting
diode indicates whether the rotating laser is operated in laser class II or 3R.
Do not look into the laser beam!
The rotating laser can only be operated with a rotating laser beam (10°, 25°, 50°
or 360°). There is no danger to the eye when doing so. However, if you use the
device vertically, please do not operate the rotating laser at head height.

The
weather
4
The rotating laser is protected against dust and water according to IP54. This is a
normal protection class for devices that are used outdoors. The device is
protected against dust and splash water from all sides. This means that it is also
adequately protected against rain.
In high humidity or weather changes, the windows of the laser head may fog up.
In this case, allow the device to dry before placing it in the case.
Only place the rotating laser dry in the case.
Please do not place the rotating laser wet or damp in the case. The device cannot
dry then and water can penetrate the device.
Heat and cold.
The rotating laser tolerates heat up to approx. 50°C and cold down to approx. -
20°C. If the temperature changes, the device must be given time to acclimatize.

Battery pack and charger
5
You can use the rotating laser and charge the battery pack at the same time. If
the battery pack is empty, the device cannot be used even if the charger is
connected. In this case, charge the battery pack at least partially before using the
rotating laser. It takes approx. 7 hours to fully charge the battery pack.
Use only chargers with these specifications: Input: AC
100VAC-240VAC 50/60Hz
Output: C 5.6V 700mA
Charge indicator on the charger.
If the LED on the charger is permanently red, the battery pack is being charged.
When the LED is green, the battery pack is fully charged.
Socket for connection of the
charger
Removal of the battery pack.
The battery pack can be easily removed. To do so, turn the screw on the tripod
thread to the left.
The ready-made battery pack (item number R120-1) can be ordered as a
spare part. The battery pack consists of 4 rechargeable batteries type C NiMH
1.2 V with 3,500 mAh.
Loosen this screw
to remove the
battery pack.
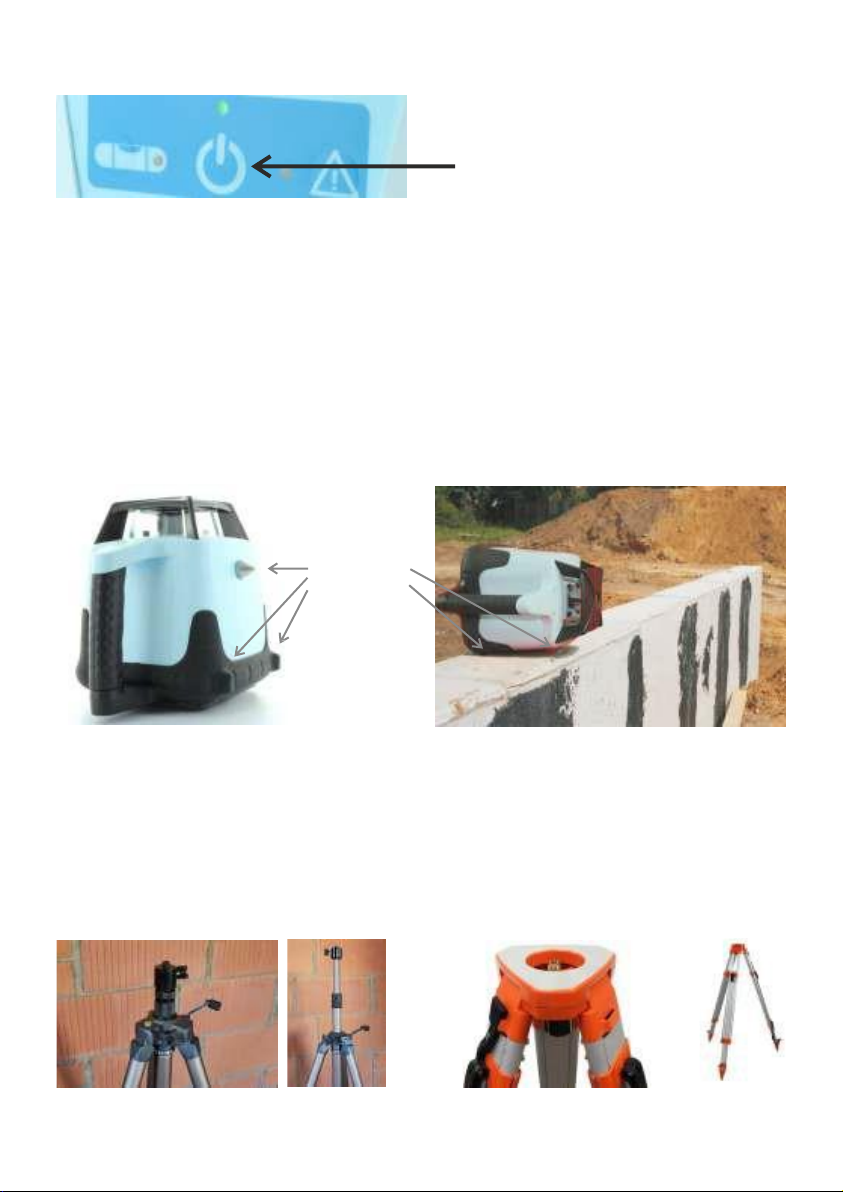
Switch on and level
6
Switching on and off
with this key
The rotating laser can be used both horizontally and vertically. After switching on,
the laser head is motorized to the correct horizontal or vertical position. The
motors can compensate for an inclined position of up to 5°. This process takes a
few seconds. After that, the laser head rotates at a speed of 600 revolutions per
minute.
Vertical leveling.
For vertical leveling, the rotating laser is placed on the integrated feet. These are
located on the rear side.
Feet
vertical
Horizontal leveling.
For horizontal leveling, the rotating laser can be screwed onto a tripod with 5/8"
thread or placed on the ground or an object.
Crank tripods are often used for interior work, as they allow precise height
adjustment of the laser line. In contrast, a simple leveling tripod is often sufficient for
determining height differences outdoors.
Crank stand with height adjustment
with crank (hedue 1085)
Leveling stand with flat head
(hedue 1050)
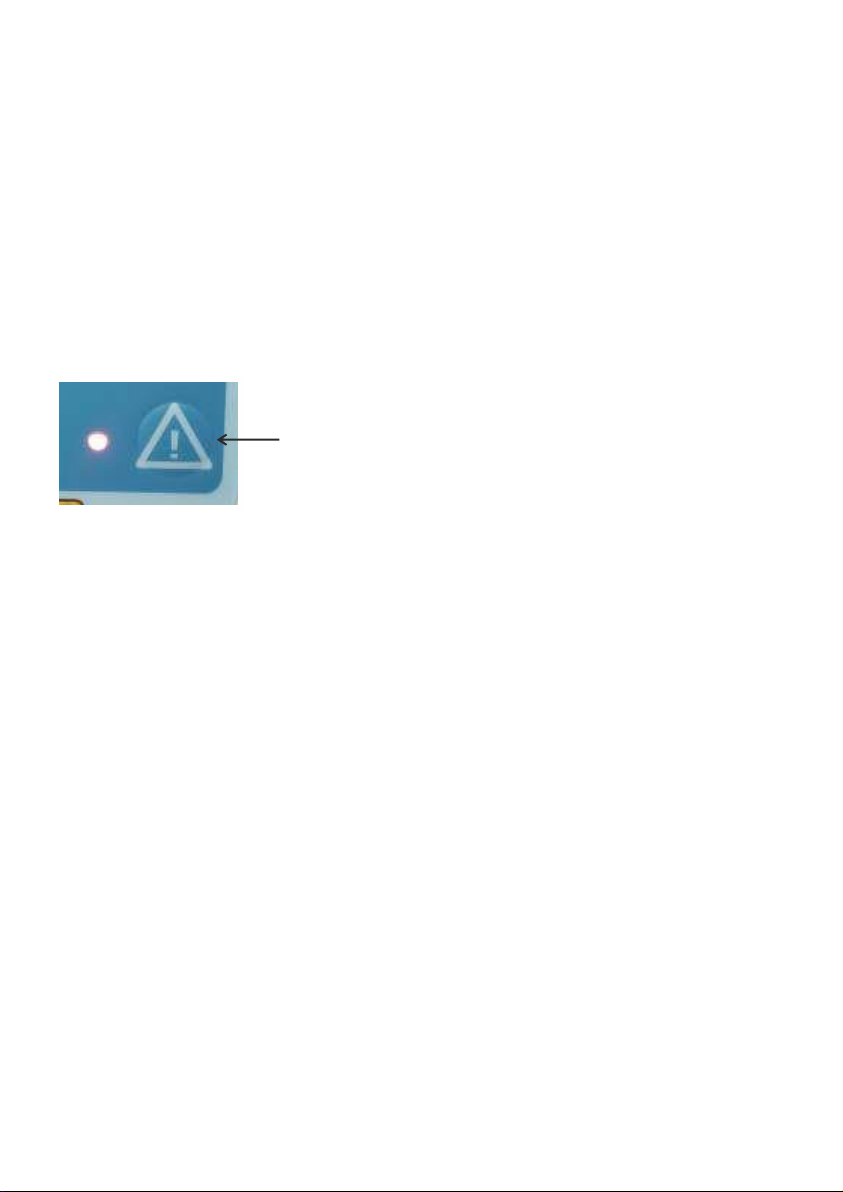
Leveling monitoring
7
Normal operation: Short interruption in case of vibration.
The rotating laser realigns itself after a shock and continues to rotate.
Prevent automatic leveling with "Anti-Shake" (Tilt)
On large or unclear construction sites, automatic leveling can lead to problems,
e.g. if someone bumps into the tripod and thus changes its height. Activate the
"Anti-Shake" (Tilt) function on such construction sites. The rotating laser then
stops in the event of vibrations.
This key activates "Anti-Shake".

The remote control
8
Less is sometimes more.
More sophisticated functions can only be controlled via the remote
control on the Q3 and Q3G rotating lasers. Dispensing with the
remote control can be useful if a person's training time is to be
reduced to a minimum. It can also increase work safety.
One remote control for a whole product family.
This remote control is also used for other rotating lasers. The two keys with the
dashed outline therefore have no function for the Q3 and Q3G rotating lasers.

Line instead of
rotation
Button on the remote control
9
This key ends the 360° rotation and switches to the line mode with 10° opening
angle. The length of the line is determined by the opening angle and the
distance of the rotating laser to the projection surface. With one further
keystroke each, the opening angle is increased to 25° and 50°.
Pressing the key again returns the unit to 360° rotation mode.
Better visibility of the line.
In line mode, the laser line is usually much more visible than in rotation mode. In
addition, visibility can be further improved by switching to laser class 3R, as
described on page 3.
The use of a laser receiver is not possible in line mode.
Move the line to the left or to the right.
Use the arrow keys on the remote control to move the laser line to the left or right
in the direction of your working area.
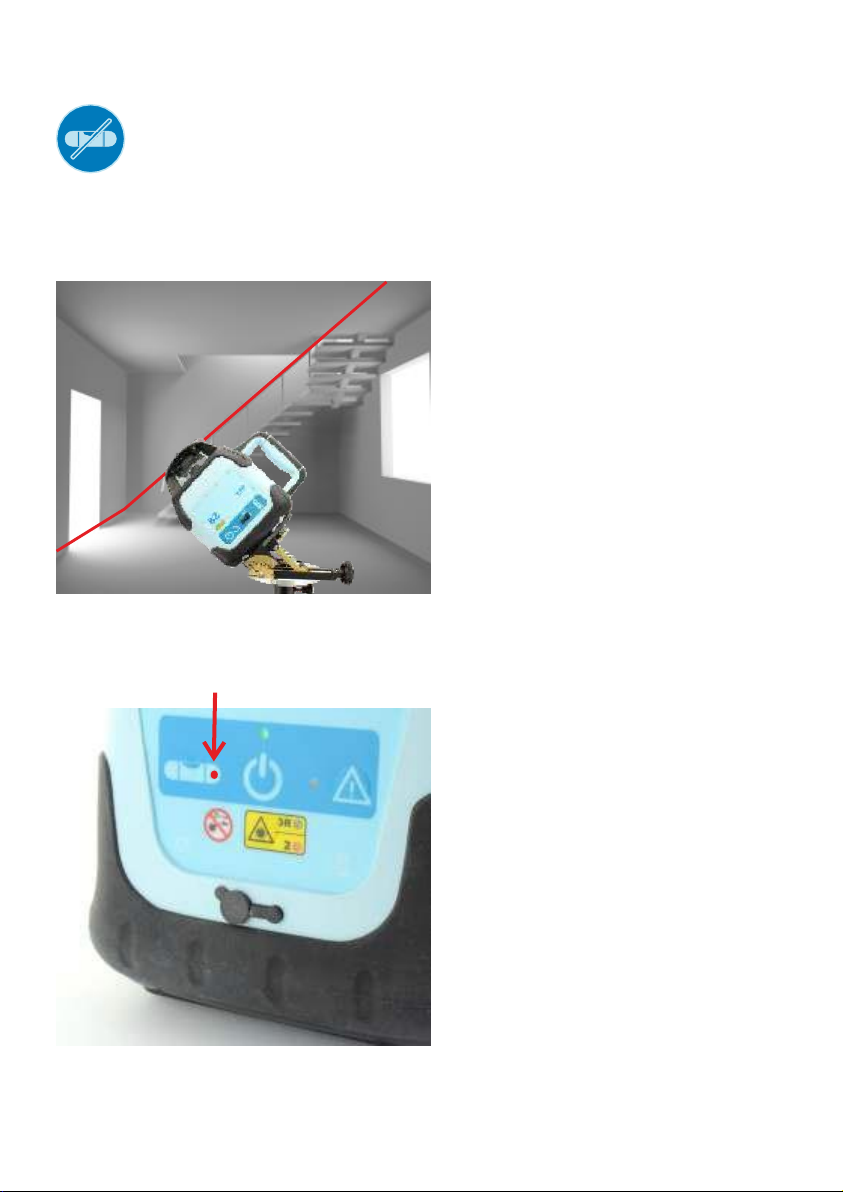
Switching off the self-leveling
function
Button on the remote control
10
The self-leveling function can be switched off. The device then rotates in any
position. Slopes can be displayed in this way.
The picture shows the angle
adapter hedue WA2 with item
number 1322.
This red LED lights up when self-leveling is switched off:

Inclination of the X and / or Y axis
11
X-axis
Y-axis
Paved surfaces shall normally be constructed with a slope of 2.5% for drainage.
This can be done by a transverse slope or by a combination of transverse and
longitudinal slopes. To display the slope, the rotating laser can be tilted in the X or
Y axis or in both axes.
The direction of the axes is indicated on the top of the rotating laser. A pair of
keys is assigned to each axis. The key pairs are also labeled X and Y.
1. Set up the unit, switch it on and wait for self-leveling.
After self-leveling is complete, the laser beam is aligned horizontally in both the X
and Y axes.

12
X-axis
2. Switch off self-leveling
Press this button on the remote control to turn off self-
leveling.
3. Tilt X axis
You will need a sufficiently long measuring rod, e.g. the hedue S503 leveling rod,
and the laser receiver with clamp holder, which you attach to the measuring rod.
Mark a point in the direction of the X axis that is at least 1 m away from the rotating
laser. Measure the distance of this point to the rotation laser. The greater the
distance, the more accurate the subsequent inclination.
Assume that the desired inclination is 2 % and you have measured 4.1 m. You
must now correct the inclination of the rotating laser by 2% of 4.1 m, i.e. by 8.2
cm upwards or downwards.
Hold the measuring rod vertically and move the laser receiver so that it receives
the laser beam correctly. Then move the laser receiver up or down by the
previously determined value, i.e. 8.2 cm in the example.
Use the remote control to raise or lower the laser beam until
it is correctly received by the laser receiver again. The laser
beam now has the desired inclination along the X-axis, while
the Y-axis is still aligned horizontally.

13
4. Tilt Y-axis
You can tilt the Y axis in the same way. However, use these remote control
keys to tilt the Y axis.
The pause button
Button on the remote control
The laser beam is switched off with this remote control key. However, the level
monitoring remains active.

Rotate vertical axis
14
90°
The vertical axis can only be rotated if self-leveling is
switched off. Therefore, first deactivate the self-leveling with
this key. After turning the axis, self-leveling can be switched
on again.
These remote control keys can be used to rotate the vertical axis.
You can align the vertical axis at an angle of 90° to a wall. To do this, measure the
distance of the plumb beam to the wall directly on the rotating laser. Then go a few
steps further. Now control the plumb beam by remote control to the previously
measured dimension.

Check accuracy
15
x1
x2
10m
Set up the rotation laser on a tripod at a distance of 10 m from a wall. The
keypad of the rotation laser faces the wall. Switch on the device. Wait until self-
leveling is completed.
Select the line mode with the remote control. Move the laser line to the wall. Mark
the vertical center of the laser line on the wall as x1.
Rotate the rotating laser on the tripod by 180°. Important: The tripod remains
stationary! Only rotate the laser on the tripod. Wait until self-leveling is
completed.
Use the remote control to point the laser line at the wall again. Mark the vertical
center of the laser line as x2.
If the height difference between x1 and x2 is not more than 2 mm, the device is
within the tolerance of 1 mm per 10 m.
The permissible tolerance is calculated from twice the distance from the wall
multiplied by the specified accuracy of 0.1 mm per 1 m.

Technical data
16
Working range with laser receiver
500 m
Self leveling range horizontal
5°
Self leveling range vertical
5°
Inclination angle
10%
Leveling accuracy
1 mm / 10 m
Rotation speeds rpm
600
Laser class
II,3R
Laser diode
635 nm
Opening angle of the line function
10°, 25°, 50°
IP protection class
Ip54
Remote control range
20 m, 360°
Battery
NiMH
Operating time in hours
20
Tripod thread
5/8"
Operating temperature
-20°C - +50°C
Warranty / months
24
Power plug
Type C
Other manuals for Q3
1
This manual suits for next models
1
Table of contents
Other Hedue Measuring Instrument manuals


Popular Measuring Instrument manuals by other brands


Fieldbus Specialists
Fieldbus Specialists PROline promag 53 operating instructions

hager
hager SM101E user manual

World Precision Instruments
World Precision Instruments EVOM2 instruction manual

MyMeters
MyMeters MM-SDM630-2C user manual

PCE Instruments
PCE Instruments PCE-CT 100 user manual

WIKA
WIKA mensor CPG2400 operating instructions