HEED OBELISK Si User manual

Users Manual
Thank you for choosing our product!
In designing the Heed Obelisk Si, our objective was to produce an integrated amplifier that
conveys all the emotional content and immediacy of your recordings faithfully, allowing
the atmosphere, tension, and excitement of the original performance to shine through in
an organic, true-to-life fashion. We sincerely hope that you will agree, and that your Obelisk
will provide you with many years of impeccable, trouble-free operation.
Happy listening!
Your Heed Obelisk Si integrated amplifier is designed to offer the finest performance
available by avoiding compromise, wherever possible. This detailed guide contains advice
specifically related to using this amplifier and its optional auxiliary X-2 power supply,as
well as more general warnings about the use of domestic audio components.
integrated amplifier
OBELISK Si
Please read them carefully.
u

precautions
Instructions
— All safety and operating instructions should be read and adhered to exactly as written here or as
depicted on the unit. Please retain for future reference.
Water and Moisture
— The unit should not be used near water — that is, near a bathtub, washbowl, kitchen sink,
laundry tub,
in a wet basement, or swimming pool, etc.
Ventilation
—
The unit should be situated so that its location or position does not interfere with its ventilation. For example,
the unit should not be placed on a bed, sofa, rug, or similar surface, that may block the ventilation openings; or placed in
a built-in installation, such as bookcase or cabinet that may impede the flow of air through the ventilation openings.
Heat
—The unit should be situated away from heat sources such as radiators, stoves, etc..
Power Sources
—The unit should be connected to a power supply only of the type described in the operating instructions
or as marked on the unit.
Power-Cord Protection
—
Power-supply cords should be routed so that they are not likely to be walked on or pinched
by items placed upon or against them, paying particular attention to cords at plugs, convenience receptacles, and the point
where they exit from the unit.
Lightning
—
For added protection during a lightning storm, or when left unattended and unused for long periods of time,
unplug the unit from the wall outlet. This will prevent damage to the product due to lightning and power-line surges.
Object and Liquid Entry
—
Care should be taken so that objects do not fall into and liquids are not spilled into the inside
of the unit. For this reason,no objects filled with liquid, such as vases or drinking glasses should be placed on the equipment.
Damage Requiring Service
— The unit should be serviced by qualified service personnel when:
— The power-supply cord or the plug has been damaged;
—
Objects have fallen, or liquid has been spilled into the unit; or the unit has been exposed to rain respectively;
— The unit does not appear to operate normally or exhibits a change in performance;
— The unit has been dropped, or the cabinet damaged.
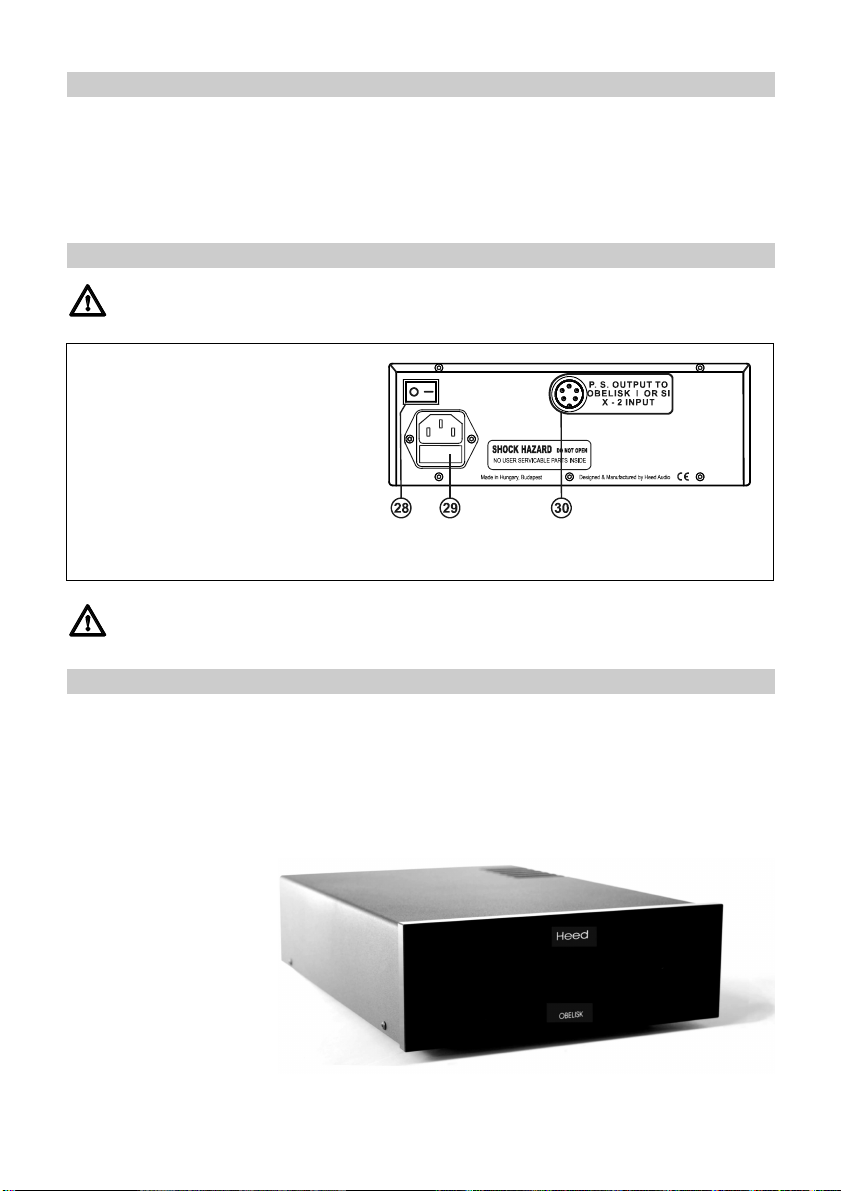
The Obelisk Si integrated amplifier, just like the optional X-2 power supply unit do not have
any user serviceable parts. It is essential that repairs and updates are only carried out by
our authorised trade partners
—
distributors and dealers
—
, or at the factory by Heed Audio itself.
Many components are custom made, tested or matched and appropriate replacements are often
unobtainable from other sources.
Therefore, users should not attempt to service the units beyond those means described in the
operating instructions, or under any circumstances allow anyone to modify them. Unauthorised
repairs or modifications will invalidate the guarantee of the units.
Grounding or Polarization
—Precautions should be taken so that the grounding or polarization is not defeated.
Radio interference
—
All Heed components are designed to provide reasonable protection against harmful interference
in a domestic installation. However, there is no guarantee that interference will not occur in a particular installation. If your
Obelisk does cause harmful interference to radio or television reception, which can be determined by turning off and on,
you are encouraged to try to correct the interference by one or more of the following measures:
— Reorient or relocate the receiving antenna;
— the separation between amplifier and receiver (radio tuner, television set, etc.);
— Connect the equipment into a power outlet on a circuit different from that to which the receiver is connected;
— your Heed dealer or an experienced radio/TV technician for help.
Maintenance / Cleaning
—
It is recommended to dust the equipment from time to time with a soft dry cloth.
Do not use cleaning solvents or abrasives for cleaning!
Always switch off and unplug the unit from the power supply when cleaning!
I
I

1 Volume Knob 3
Position and on/off indicator LEDs
2 Input Selector Switch 4 Infrared sensor
7
Auxiliary Power Supply connector
17
No. 4. Line level input right channel
8
Speaker right channel connector "+"
18
No. 3. Line level input left channel
5
Power on/off switch
15
No. 5. Line level input right channel
6
Mains connector and fuse socket assy
16
No. 4. Line level input left channel
9
Speaker right channel connector "
–"
19
No. 3. Line level input right channel
10
Speaker left channel connector "+"
20
No. 2. Line level input left channel
11
Speaker left channel connector "
–
"
21
No. 2. Line level input right channel
12
Pre-out left channel connector
22
No. 1. Line level input left channel
13
Pre-out right channel connector
23
No. 1. Line level input right channel
14
No. 5. Line level input left channel
24
Earthing (
for tonarm cables only
)
front panel
rear panel

Installation
We believe that a Heed Audio component should be, optimally, installed by an approved Heed dealer. Nevertheless, the
procedure is straight-forward enough that you may install your new Obelisk Si yourself by following the instructions contained
herein. Should any problems be experienced which are not covered here, contact your local dealer. If you are unable to
do so, or problems persist, however, do not hesitate to contact our distributor / reseller in your country (see our website >
>> www.heedaudio.com >> "worldwide distributors" for details), or us directly at Heed Audio …we're here for you!
When opening the cardboard and unpacking the unit, you will find following items
being supplied with:
— (1) Heed Obelisk Si integrated amplifier
—
(1) OBELISK remote control handset
— (1) 'shorting' power supply plug
— (1) IEC-norm mains power cord
— (1) Users Manual
Before placing the amplifier onto its chosen place, insert the 'shorting' power supply plug
into the PSU socket (7) —see rear panel. Alternatively, you can use the Obelisk X-2 optional
auxiliary power supply via this socket (see below 'Upgrade Options'). If this socket is vacant, the
amplifier is completely muted because the power amp section is disconnected from the onboard
power supply, and thus giving way to connecting the Obelisk X-2.
In common with all high-quality audiophile equipment, the Obelisk Si performs optimally when positioned on its own individual
mounting surface, ideally a light rigid structure. There are many purpose-built examples readily available from all better dealers.
Always allow adequate ventilation with sufficient airflow around the unit, do not mount on soft surfaces, for example, carpets
or soft fabrics.
Before performing any connections or disconnections ensure that the power on/off switch (5)
of the unit is in "off" position
.
Always check that the voltage and frequency of the mains supply corresponds to the specifi-
cations as labled on the unit!
1. the power cord's IEC type plug into the power inlet connector (6) of the Obelisk.
2. Connect the power cord's mains plug to your power outlet.
The Obelisk has 5 pairs of high quality RCA (cinch) input connections.
Number 1 input (22, 23) is a line level connection in a standard configuration. This input, however, can be alternatively
equipped with the optional Heed Audio Vinyl-1 MM phono module for connecting a turntable, or with the optional Heed
Audio Dactyl-1 DAC module for connecting a CD-transport (or a CD-Player via its digital output respectively), computer
music server, or any other source with a digital co-axial output.
When the latter is correctly mounted in the Obelisk chassis,
Number 1 input transforms
into a true co-axial input. (Either the Left or Right RCA jack may be used to accept a suitable
digital source, but only one (1) of them may be used as such, with the other remaining unconnected.)
Number 2 to 5 inputs (14-21) are standard line level inputs. See specifications section for sensitivity data of the inputs.
unpacking
placement
connection to mains supply
input connections
I
I
I
'shorting' power supply plug

The Obelisk is equipped with high quality loudspeaker connectors suitable for 4mm banana plugs, max. 4mm diameter
bare wire or spades.
Wenn connecting the loudspeaker cables ensure that the speakers are connected correctly
i.e. "+" (red) to "+" and "
–
" (black) to "
–
".
Your Obelisk Si has a pre-out (RCA) connection (12,13). Here you can connect an additional Heed Audio Obelisk PAS stereo
power amplifier for bi-amplification, or, alternately, make use of this facility to connect your Obelisk Si to an analog recording
device (tape or CD recorder), or headphone amplifier, ideally our Heed Audio CanAmp. If you want to use your amplifier this
way, you need to change the position of the jumper on the PCB behind the connection. Follow these steps:
Operation
Once the Obelisk is connected to mains supply, as well as to source component(s) and loud-
speakers, remove the protective film from the front panel. You can detach it by peeling off and
grabbing the film at any of the corners. Please note: this step only serves as visual completion of
the amplifier, it has no electrical or mechanical influence on the functioning of the unit.
When all steps of installation are correctly completed, your Obelisk is ready for action!
Turn the Volume Knob (1) counter-clockwise to the minimum setting.
Switch on your desired source components.
Switch on your Obelisk with power on/off switch (5) on the rear panel and allow some time (5-10 minutes minimum)
for warming up.
If your unit was transported or stored in cold environment allow it to warm up to room
temperature before switching on!
Select the component that you'd like to listen to with the Input Selector Switch (2).
Begin playing the source component.
Adjust the volume level with the Volume Knob (1) or with the Remote Volume Control Unit to your preferred setting.
Sit back and enjoy!
Note:
Although you can use your Obelisk within seconds of switching it on, as with all audio equipment the best sound
quality will be reached after a period of warm-up time, preferably a couple of hours. We recommend keeping the unit
switched on continually for optimum performance. However, your Obelisk should be switched off if left unattended for
extended periods, or in the event of thunderstorm. As mentioned previously, it is also necessary to switch the unit off when
connecting or disconnecting any input or output cables.
loudspeaker connections
pre-out connection (pre-amplifier output)
I
I
I
1.
Remove the housing cover of the Obelisk Si.
2. Change the positions of the jumper (25)
3. Reassemble the housing cover.
4.
Connect your recorder or headphone
amp (see "installation" section on page 4).
J
q
q
q
q
q
q

Upgrade Options
Upon installation of the Heed Audio Vinyl-1 MM phono module, your Obelisk will be able to amplify a signal directly from
the cartridge (moving-magnet) of your turntable.
Alternatively, upon installation of the Heed Audio Dactil-1 DAC module, your Obelisk will be able to take the digital signal of a
CD-Transport or a CD-Player (or any other source with a digital co-axial output) and convert it into a line-level analogue signal.
We strongly recommend that the installation of either of these modules be carried out by
your authorised Heed Audio dealer, so the description outlined below is for reference
purposes only!
MM phono and D-to-A converter (DAC) modules
1. Remove the housing cover of the Obelisk Si.
2. Change the positions of the jumpers (26,27) to "phono".
(This applies likewise for installing the DAC module, since there
is no jumper position marked "DAC".)
3. Connect the module to the main PCB of the amplifier by sliding it
on the pin connectors (27).
4. Reassemble the housing cover —see "installation”, page 4.
5. Re-connect all cables —see "installation”, page 4.
6. Connect your turntable to Input 1 (22,23). [OR] Connect your
digital source (CD-Transport, computer server, etc.) via co-axial
interconnect to either the Left or Right RCA jack of Input 1 (22,23),
leaving the other jack unconnected.
Before installation of the module your equipment must be switched off, and disconnected
from the power supply. All input/output cabling should be disconnected.
Caution:
Allow a minimum of 30 minutes after disconnecting unit from
power supply for internal capacitors to discharge fully before removing
cover and attempting any work inside.
I
phono module Heed Audio Vinyl-1 MM DAC module Heed Audio Dactil-1

The Obelisk X-2 is an optional auxiliary power supply which not only increases the output power of the Obelisk Si integrated
amplifier but also dramatically improves its sonic performance.
In this enhanced 2-box configuration, the Obelisk X-2 will support the power amplifier stage of your Obelisk Si integrated
amplifier while the built-in power supply will continue to support the Si's pre-amplifier stage alone. This means that after
connecting the X-2, the power cable of the Obelisk should remain connected as well..
Before performing any connections or disconnections ensure that the power on/off
switch (5) of the unit is in "off" position.
4. Switch Obelisk Si power on/off switch to "on".
Allow time for warm-up. Enjoy!
Never attempt to connect any other type of power supply to this connection as it may
cause failure of your equipment!
Your Obelisk Si integrated amplifier can be further upgraded with an additional Obelisk PAS stereo power amplifier.
This is an ideal solution for bi-amplification
of your loudspeakers. Not all speakers are bi-amplificable though. Consult your
local dealer, our distributor or us directly at Heed Audio to confirm compatibility.
Simply connect a pair of interconnecting RCA (cinch) cables to the pre-out connectors (12,13) of the Obelisk Si and to the
input connectors of the Obelisk PAS.
For detailed description, refer to the
separate instruction manual that is
supplied with Obelisk PAS.
OBELISK X-2 power supply
connecting the Obelisk X-2 to the Obelisk Si
OBELISK PAS stereo power amplifier
1. Connect the supplied special connector of the
auxiliary power supply to its socket (30).
2.
Connect the power cord's IEC type plug into the
power inlet connector of the Obelisk X-2. (29).
Connect the X-2 mains plug to your power outlet.
3. Switch X-2 power on/off switch to "on" (28).
Confirm blue LED power indicator is lit.
I
I

SPÉCIFICATIONS
Input 1. sensitivity/impedance: 250 mV / 10 kOhm
Input 1. with MM phono module: 5 mV / 47 kOhm
Input 2-5. sensitivity/impedance: 250 mV / 10 kOhm
Power output: 40/65 W (8/4 Ohm, 1kHz, <0.1% THD)
Power output (with Obelisk X-2): 50/80 W (8/4 Ohm, 1kHz, <0.1% THD)
Signal-to-noise ratio (A-weighted): 98 dB
Channel separation: >90 dB
Distortion (THD, 1 kHz, 100mW): <0,08%
Bandwidth: 7Hz-60kHz (1W, 8 Ohm, -1.5 dB)
Damping: >150 (8 Ohm)
Pre-out: 0 dBm (775 mV)/ <50 Ohm
Power consumption: <160 W
Power consumption (standby): 5 W
Weight (Obelisk Si): 7 kg
(Obelisk X-2): 5 kg
If within three years of the purchase date your Heed OBELISK Si proves to be defective for any reason
other than accident, misuse, neglect, unauthorised modification or fair wear and tear, Heed Audio Ltd.
will, at its discretion, replace the faulty parts without charge for labour.This factory warranty is valid only
for units sold into countries with no appointed Heed distributor. Service enquiries in countries with
appointed distributor should be addressed first to the supplying dealer and/or Heed distributor.
Warranties granted in these countries are entirely at the discretion of distributor.
FACTORYCONTACT
DISTRIBUTOR CONTACT
WARRANTY
HEED Audio Kft. (Ltd)
Tel/Fax: +36 1 2947401
H-1181 Budapest
Hungary Web: www.heedaudio.com
Heed OBELISK Si - Users Manual 1.1 (2009)
This manual suits for next models
2
Table of contents
Other HEED Amplifier manuals
Popular Amplifier manuals by other brands

McIntosh
McIntosh MI1250 owner's manual

Two-Rock
Two-Rock Studio Signature owner's manual

JSD TestPhone
JSD TestPhone AM5xs Operation manual

Clearaudio
Clearaudio Smart phono V2 user manual

Blaupunkt
Blaupunkt MPA 4 Fitting instructions / operating instructions

Episode
Episode EA-AMP-HYB-2D-1000 product manual