HEED DACTILUS User manual

Heed DACTILUS
Digital To Analog converter
Thank you for choosing our product!
In designing the Heed DACTILUS, our aim was to create a DAC
which makes any digital component – CD- and DVD-players,
computer servers (Squeezebox, AirPort), DAB tuners, etc. –
more enjoyable to listen to: less analytical and less processed,
conveying music in a fluid, natural, and rhythmically engaging
fashion. The DACTILUS embodies our belief that while digital
sources needn't sound digital, they can sound musical!
We sincerely hope that you will agree, and that your DACTILUS
will provide you with many years of impeccable, trouble-free
operation.
Happy listening!
The Heed Team
users manual
TECHNICAL SPECIFICATIONS
Frequency response: 3 Hz – 21 kHz (+/-0.5 dB)
THD (at 0 dB, 1 kHz): 0.09 %
Signal-to-noise ratio (A-weighted): 96 dB
Dynamic range: 96 dB
Channel separation: 90 dB
Output level at 0 dB: 1,25 Vrms
Resolution/Sampling: 24-bit/96kHz
Supported sample rates:
32, 44.1, 48, 64, 88.2, 96 kHz
Format: 1-bit, Delta/Sigma Conversion
Digital inputs:
SPDIF (75 ΩCoax) / Toslink
Power consumption: <15 W
Dimensions: 9x6x22 cm (W/H/D)
Weight: 1.2 kg
u
WARRANTY
If within three years of the purchase date your Heed DACTILUS proves
to be defective for any reason other than accident, misuse, neglect,
unauthorised modification or fair wear and tear, Heed Audio Ltd. will,
at its discretion, replace the faulty parts without charge for labour.
This factory warranty is valid only for units sold into countries with no
appointed Heed distributor. Service enquiries in countries with
appointed distributor should be addressed first to the supplying
dealer and or Heed distributor/importer. Warranties granted in
these
countries are entirely at the discretion of distributor.
FACTORYCONTACT
Heed Dactilus Users Manual 1.1 (2009)
DISTRIBUTOR CONTACT
u
HEED Audio Kft. (Ltd.)
Tel/Fax: +36 1 2947401
H-1181 Budapest
Hungary Web: www.heedaudio.com
The functions and operation of the DACTILUS are extremely simple and
straightforward. The following notes are provided to explain all aspects of
its installation and use, primarily as DAC (digital to analog converter) but
also in general
as a domestic audio component.
Please read them carefully
.
dactilus_guide1.1.qxd 2009.07.23. 11:56 Page 1
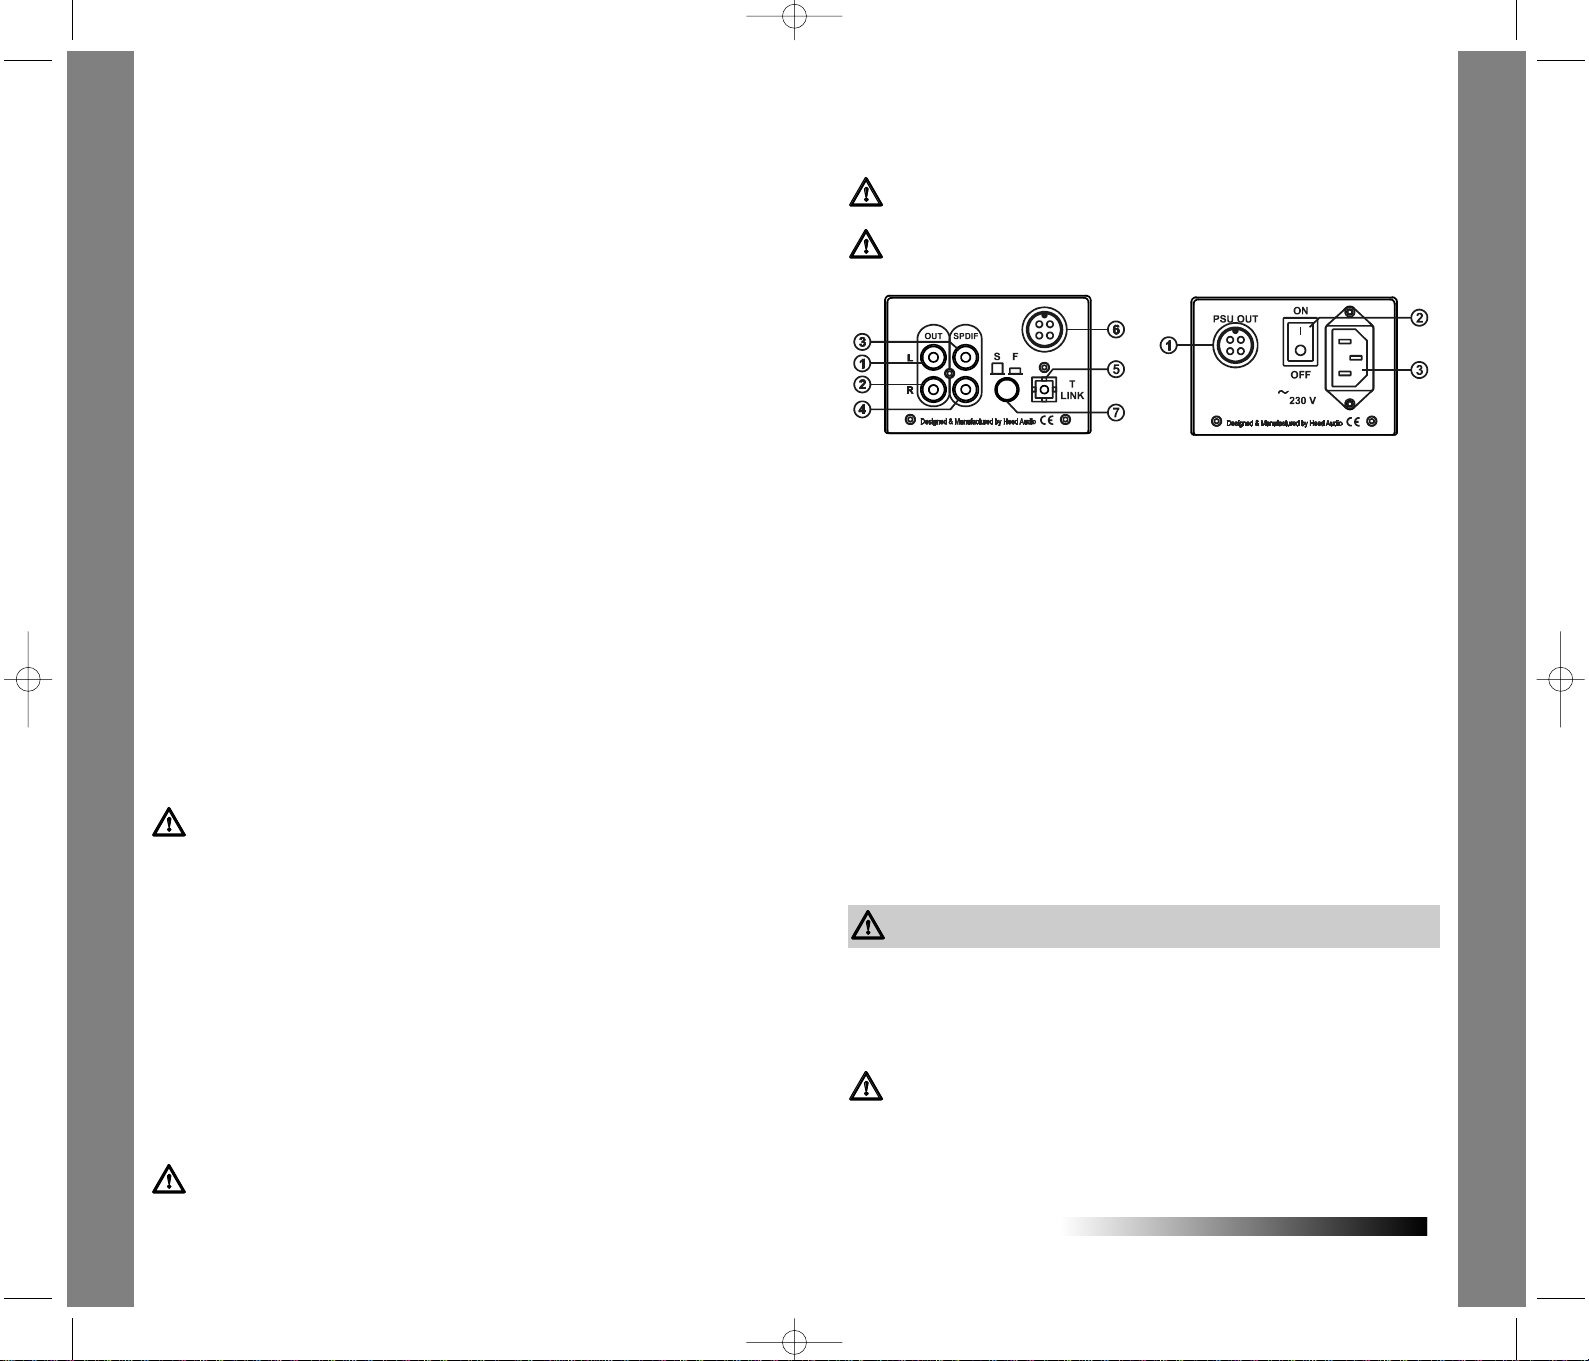
installation
All connections must be made before the wall wart mains adaptor (or Q-PSU) is
plugged in, and before amplifier and source component connected are switched on.
If you use a Q-PSU instead of the wall wart device ensure that the power on/off
switch (2) of the unit is in "off" position. Check that the voltage and frequency of the
mains supply corresponds to the specifications as labled on the unit!
CONNECTION TO MAINS SUPPLY
q
Connect the 4-pin plug of the wall wart adaptor — or the Q-PSU’s supply cable which of course
has to
be connected with its opposite 4-pin plug to the power outlet of the
Q-PSU
marked by PSU OUT (1)
— into the power inlet connector (6) of the DACTILUS.
qConnect the wall wart adaptor’s ‘flying’ power cable, or if using Q-PSU its IEC power cable with its mains
plug into your power outlet, and its IEC plug end into the IEC socket (3) of the Q-PSU respectively.
CONNECTION TODIGITAL SOURCE COMPONENT
You find 2 pairs of high quality phono sockets (RCA jacks) on the rear panel of the DACTILUS.
The sockets (3, 4) marked by SPDIF are coaxial inputs to take the “raw”, unprocessed digital signal of your source
component (CD- or DVD-player, music server or DAB tuner). Either the Left or Right RCA jack may be used to
accept a suitable digital source, but only one of them may be used as such, with the other remaining unconnected.
Alternatively, a TOSLINK (optical fiber) connection can be used via the "digital optical" socket (5) marked by T LINK.
You select between these options via the push-button switch (7) adjacent to the socket.
CONNECTION TOAMPLIFIER
The sockets (1, 2) marked by OUT are to give the signals of the stereo channels (L and R) converted from digital
to analog by the DACTILUS to your amplifier. When connecting the DACTILUS ensure that the pair of interconnect
cables you use are wired up correctly i.e. "+" (red) to "+" and "–" (black) to "–" to the input sockets of your amplifier.
operation
When all connections are correctly completed, your DACTILUS is ready for action! You can proceed playing your
source component as you usually do.
If your unit was transported or stored in cold environment allow it to warm up to
room temperature before switching on!
It is necessary for the DACTILUS to be 'burned in' for at least 72 hours before its full sound quality potential can
be realised. As the DACTILUS draws very little power, unless it is out of use for a long period, it is recommended
to leave it switched on permanently.
Should any problems be experienced with installing or operating the unit, contact your local dealer.
If you are unable to do so, or problems persist, however, do not hesitate to contact our distributor in your
country, or us directly at Heed Audio
precautions
Instructions — All safety and operating instructions should be read and adhered to exactly as written here
or as depicted on the unit. Please retain for future reference.
Water and Moisture — The unit should not be used near water - that is, near a bathtub, washbowl, kitchen
sink, laundry tub, in a wet basement, or swimming pool, etc.
Heat — The unit should be situated away from heat sources such as radiators, stoves, or other appliances
that produce heat.
Power Sources — The unit should be connected to a power supply only of the type described in the
operating instructions or as marked on the unit.
Power-Cord Protection — Power-supply cords should be routed so that they are not likely to be walked
on or pinched by items placed upon or against them, paying particular attention to cords at plugs, convenience
receptacles, and the point where they exit from the unit.
Lightning — For added protection during a lightning storm, or when left unattended and unused for long
periods of time, unplug the unit from the wall outlet. This will prevent damage to the product due to lightning and
power-line surges.
Object and Liquid Entry — Care should be taken so that objects do not fall into and liquids are not spilled
into the inside of the unit. For this reason,no objects filled with liquid, such as vases or drinking glasses should
be placed on the equipment
Damage Requiring Service — The unit should be serviced by qualified service personnel when:
— The power-supply cord or the plug has been damaged;
— Objects have fallen, or liquid has been spilled into the unit; or the unit has been exposed to rain respectively;
— The unit does not appear to operate normally or exhibits a change in performance;
— The unit has been dropped, or the cabinet damaged.
This amplifier does not have any user serviceable parts. It is essential that repairs and updates are only carried
out by our authorised trade partners – distributors and dealers – , or at the factory by Heed Audio itself. Many
components are custom made, tested or matched and appropriate replacements are often unobtainable from
other sources.
Therefore, users should not attempt to service the unit beyond those means described
in the operating instructions, or under any circumstances allow anyone to modify it.
Unauthorised repairs or modifications will invalidate the guarantee of the unit.
Grounding or Polarization — Precautions should be taken so that the grounding or polarization is not
defeated.
Radio interference — All Heed components are designed to provide reasonable protection against harmful
interference in a domestic installation. However, there is no guarantee that interference will not occur in a
particular installation. If your CanAmp does cause harmful interference to radio or television reception, which can
be determined by turning off and on, you are encouraged to try to correct the interference by one or more of the
following measures:
— Reorient or relocate the receiving antenna;
— Increase the separation between amplifier and receiver (radio tuner, television set, etc.);
— Connect the equipment into a power outlet on a circuit different from that to which the receiver is connected;
— Consult your Heed dealer or an experienced radio/TV technician for help.
Maintenance / Cleaning — It is recommended to dust the equipment from time to time with a soft dry cloth.
Do not use cleaning solvents or abrasives for cleaning!
Always switch off and unplug the unit from the power supply when cleaning!
Once the unit is connected to mains supply, as well as to source and amplifier, remove the protective
film from the front panel. You can detach it by peeling off and grabbing the film at any of the corners.
I
I
I
I
I
I
…we're here for you! see contactsu
DACTILUS rear side Q-PSU rear side
dactilus_guide1.1.qxd 2009.07.23. 11:56 Page 2
Other HEED Media Converter manuals


Popular Media Converter manuals by other brands

Hall Research Technologies
Hall Research Technologies SC-VD-2 manual

CD Automation
CD Automation TU-RS485-ETH IO DL manual

Sisyph
Sisyph SMB10 user guide

Renkforce
Renkforce 1172089 operating instructions

Rose electronics
Rose electronics VSP-1X2V Installation and operation manual

Casti
Casti CAX-01 user manual


