HeimVision Greets 1 User manual
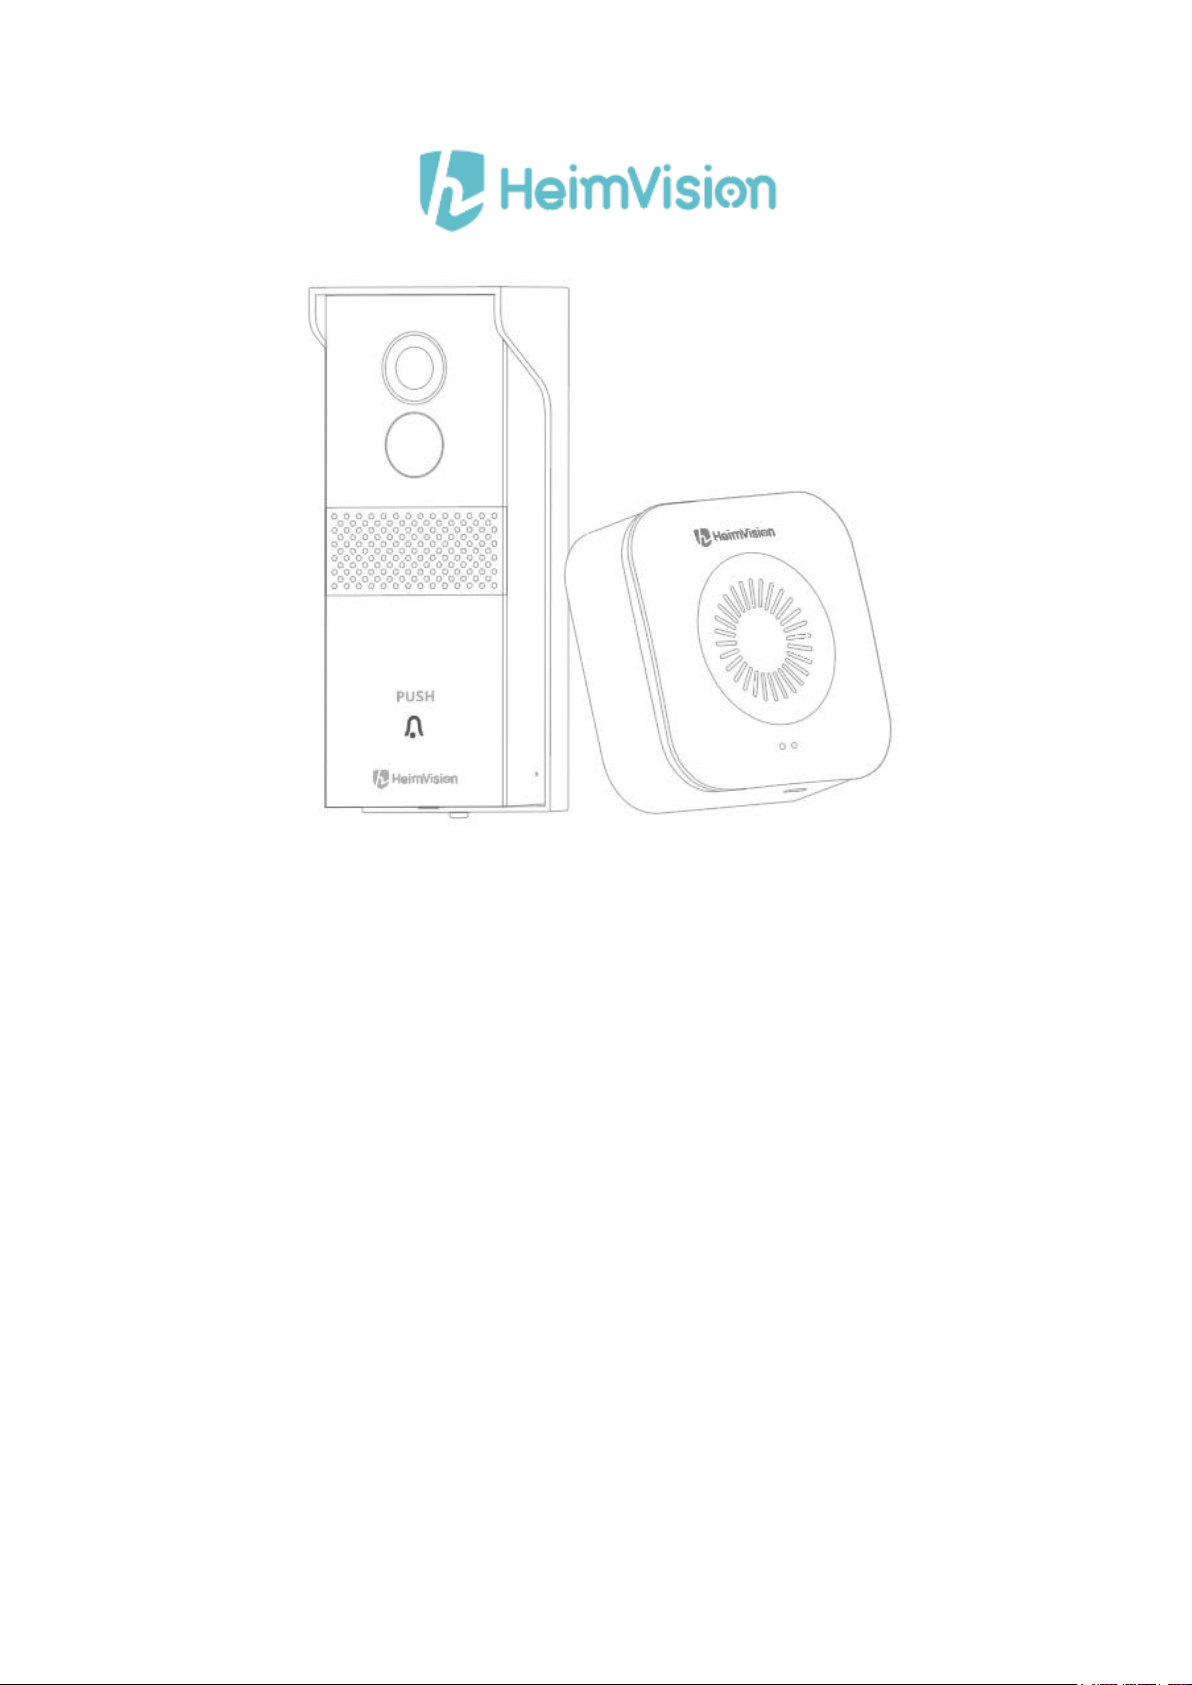
Smart Video Doorbell
Greets 1
User Manual • Uživatelský manuál •
Užívateľský manuál • Használati utasítás •
Benutzerhandbuch

2
Dear customer,
Thank you for purchasing our product. Please read the following instructions carefully
before first use and keep this user manual for future reference. Pay particular attention
to the safety instructions. If you have any questions or comments about the device,
please contact the customer line.
✉www.alza.co.uk/kontakt
✆+44 (0)203 514 4411
Importer Alza.cz a.s., Jankovcova 1522/53, Holešovice, 170 00 Praha 7, www.alza.cz
3
Safety Cautions
1. For security, please use the original accessories provided.
2. Do not replace the batteries without the official guidance.
3. Please obey the local security regulations and policies when installing the products.
4. We assume no liability or responsibility for any fires or electrical shock caused by
improper installation.
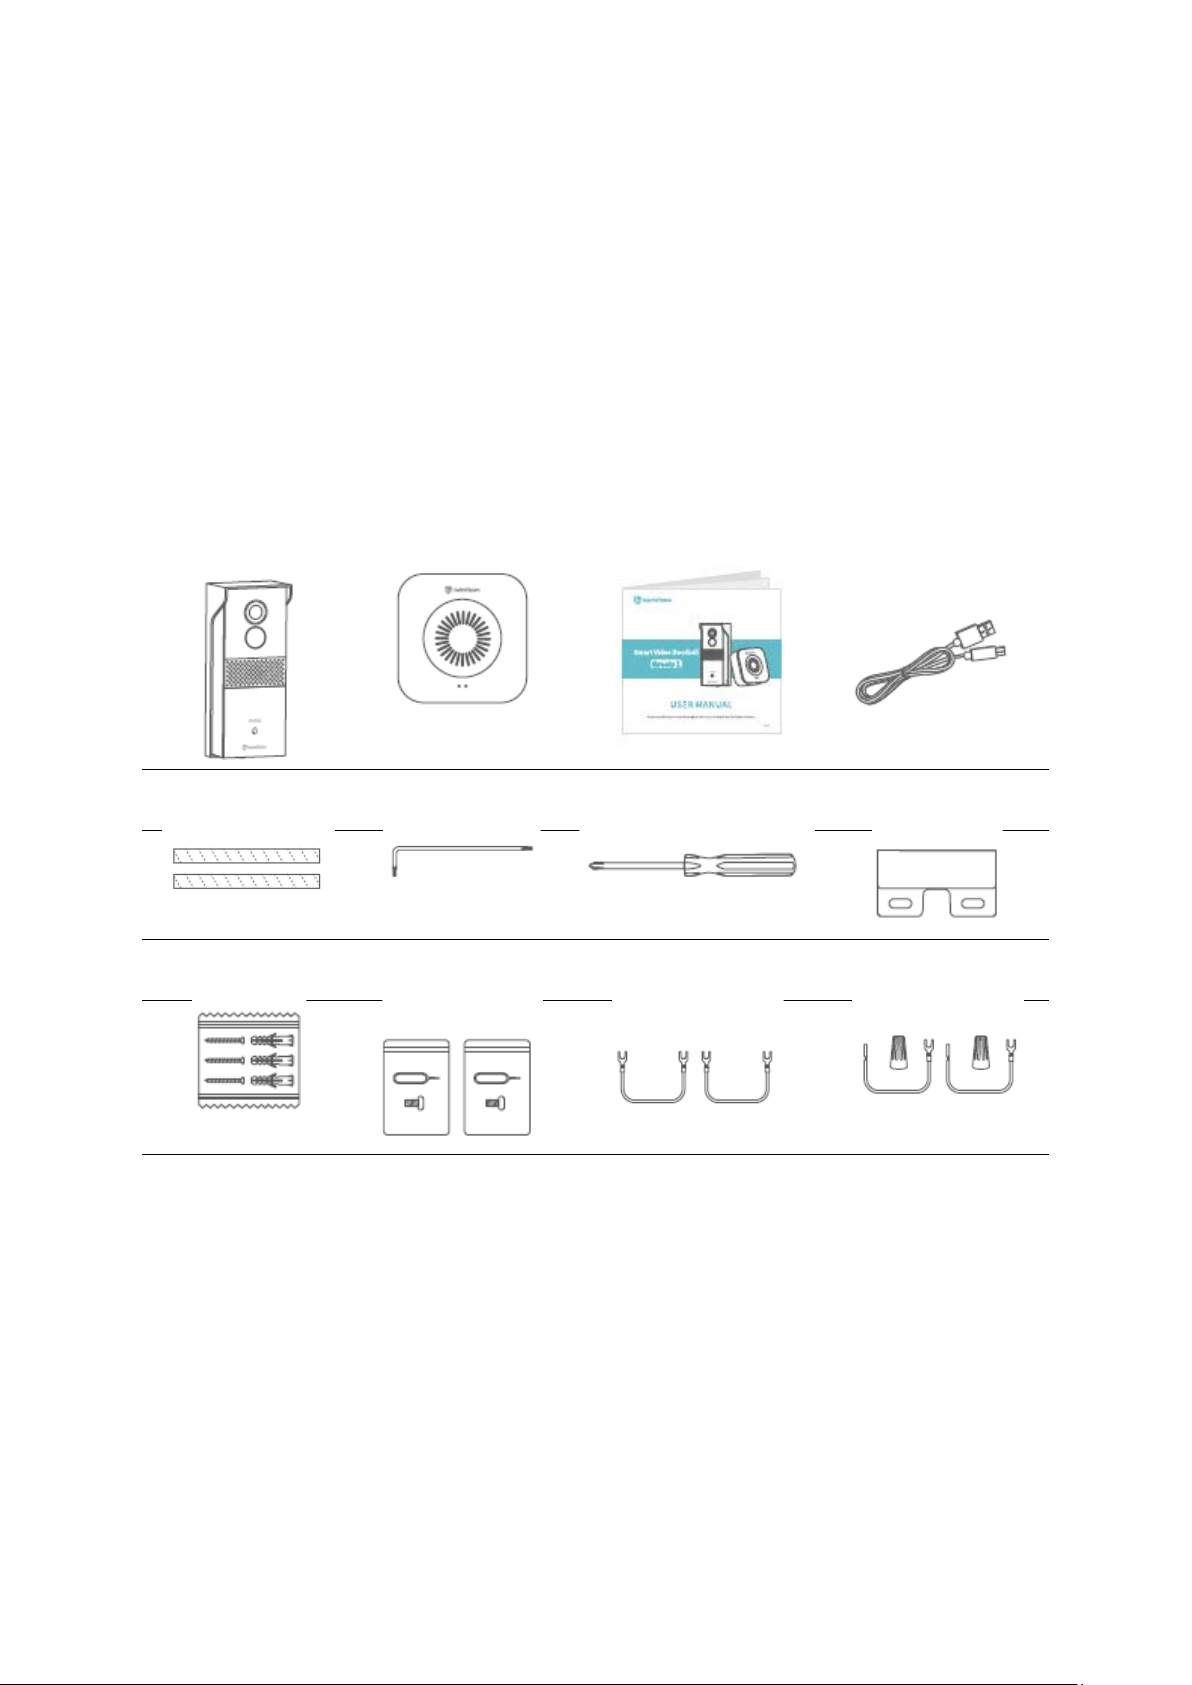
Packing List
Doorbell with
Bracket
Chime
User Manual
USB Cable
3M Adhesive
Tapes
Torx Hex Key
Phillips Screwdriver
Nameplate Holder
Expansion Pipes and
M3x20 Screws
Reset Pins and
M3x5 Screws
Copper Wires with
2 U-shaped Terminals
Copper Wires with a
U-Shaped Terminal
and Wire nuts

4
Product Overview
Doorbell
1. Camera Lens
5. Wi-Fi Status Indicator
9. Charging
Indicator
12. Rubber
Plug
2.
Passive Infrared (PIR)
Sensor
6.
Microphone
10. Micro USB
Port
13. Screw
Hole for
M3x5 Screw
3. Speaker
7. AC Electrical Contacts
11 Reset Hole
4. Doorbell Button
8. Battery Compartment
Bracket
14. Screw Terminals
15. Screw Holes for M3x20 Screws
16. Screw Hole for M3x5 Screw

5
Chime
1. Speaker
3. Working Indicator
5. Reset
7. Ringtone
2. Pairing Indicator
4. Battery
Compartment
6. Volume ±
8. Micro USB port
Getting Started
1. Remove the protective film from the camera lens, then take the doorbell out
from the bracket.

6
2. Unscrew the Battery Compartment Door with the Phillips Screwdriver, take out
the batteries, then peel off the Insulation Film.
3. Insert a memory card (not included) to record videos. Or you can alternatively
subscribe to a cloud plan via the App
Notes:
•The doorbell accepts a memory card with capacity up to 128GB. If it’s needed,
please contact us or get it from an authorized HeimVision store.
•The doorbell is not designed for 7/24 all day recording. It will be woken up to
record videos according to your setting after you install a memory card or
subscribe to the cloud plan.
Insulation Film
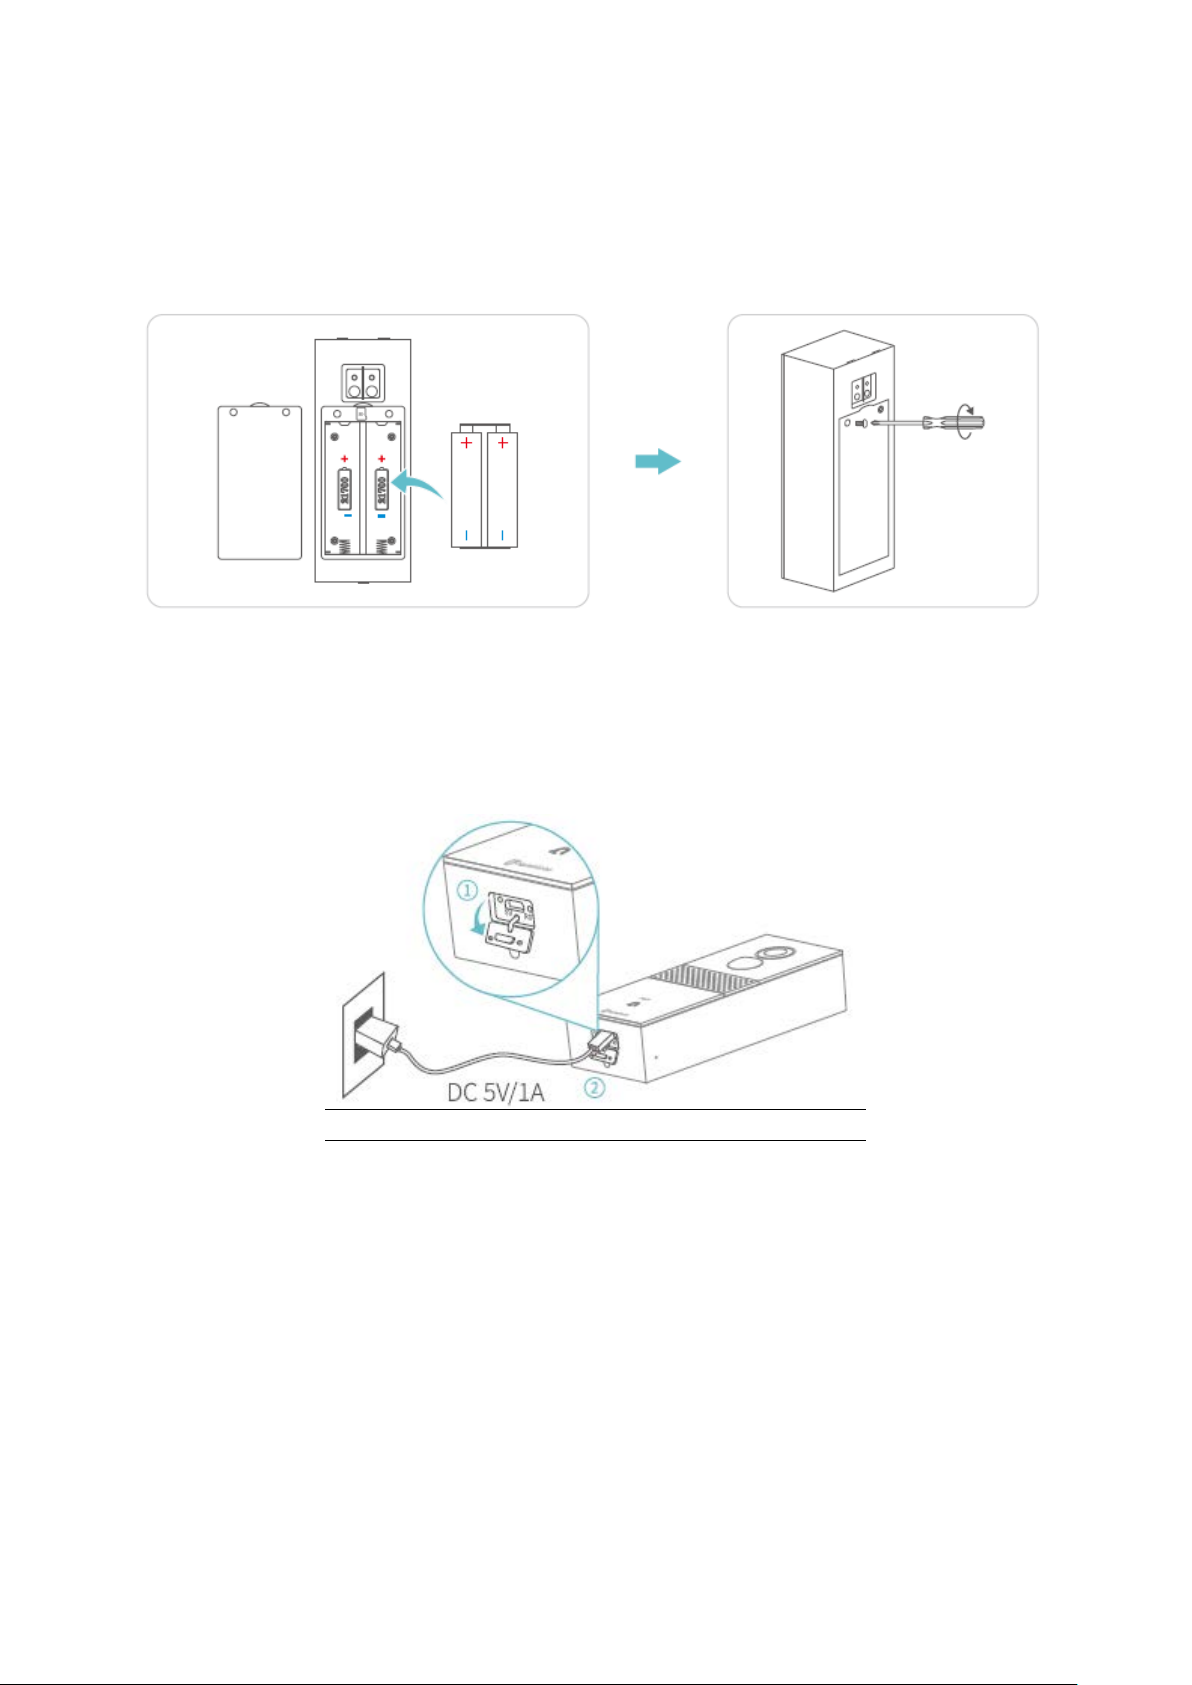
7
4. Install the batteries into the compartment and fix the door with the screw. Make
sure the positive and negative poles of batteries are correctly aligned; otherwise,
the batteries would be damaged.
5. Remove the Rubber Plug with care, then charge the doorbell with the USB Cable
provided.
Charging: Red Charging Indicator
Fully Charged: Blue Charging Indicator
Notes:
•It takes about 10-12 hours to reach a full charge.
•You can launch HeimLife App, then go to Settings>Basic Function>Power
Management>Remaining Battery to check the percentage of the remaining
battery.
6. After a full charge, please insert the Reset Pin into the Reset Hole and gently
press it for 3s - 5s until you hear a beep from the doorbell to perform a reset.

8
Connect Your Doorbell to a Mobile Device
App Downloading and Installation
Option 1:
Search for HeimLife in the App Store/Google Pay, then download and install it to your
mobile device.
Option 2:
Scan the QR codes bellow to download and install the App.
Note:
•Google Pay is a trademark of Google Inc., and App Store is a trademark of Apple
Inc.
Account Registration and Login
Launch HeimLife App, register and account with a valid email address at the first use of
HeimLife App, then log in.

9
Notes:
•Please select the correcet country code when signing up and logging in.
•For a successful connection, please allow HeimLife App to use your WLAN and
Celluar Data when Running it.
•Please turn on the location service on your mobile device and allow HeimLife App
to access your lacation.
Connect the Doorbell to the HeimLife App
Important:
1. The doorbell can only support a 2,4 GHz Wi-Fi.
2. Avoid using special symbols / or ‘ in your Wi-Fi name and password.
3. Make sure that the doorbell and your mobile device are close to the router when
connectiong.
4. Make sure the power of your doorbell is enough when performing a reset.
5. The explanations of Wi-Fi Status Indicator:
Solid red
Device Abnormal
Solid Blue
Wi-Fi Connected
Flash Red Slowly
Ready for Wi-Fi
Connection
Flash Blue Quickly
Upgrading
Flash Red Quickly
Connecting to Wi-Fi
Flash Blue Slowly
Watching Live Video
10
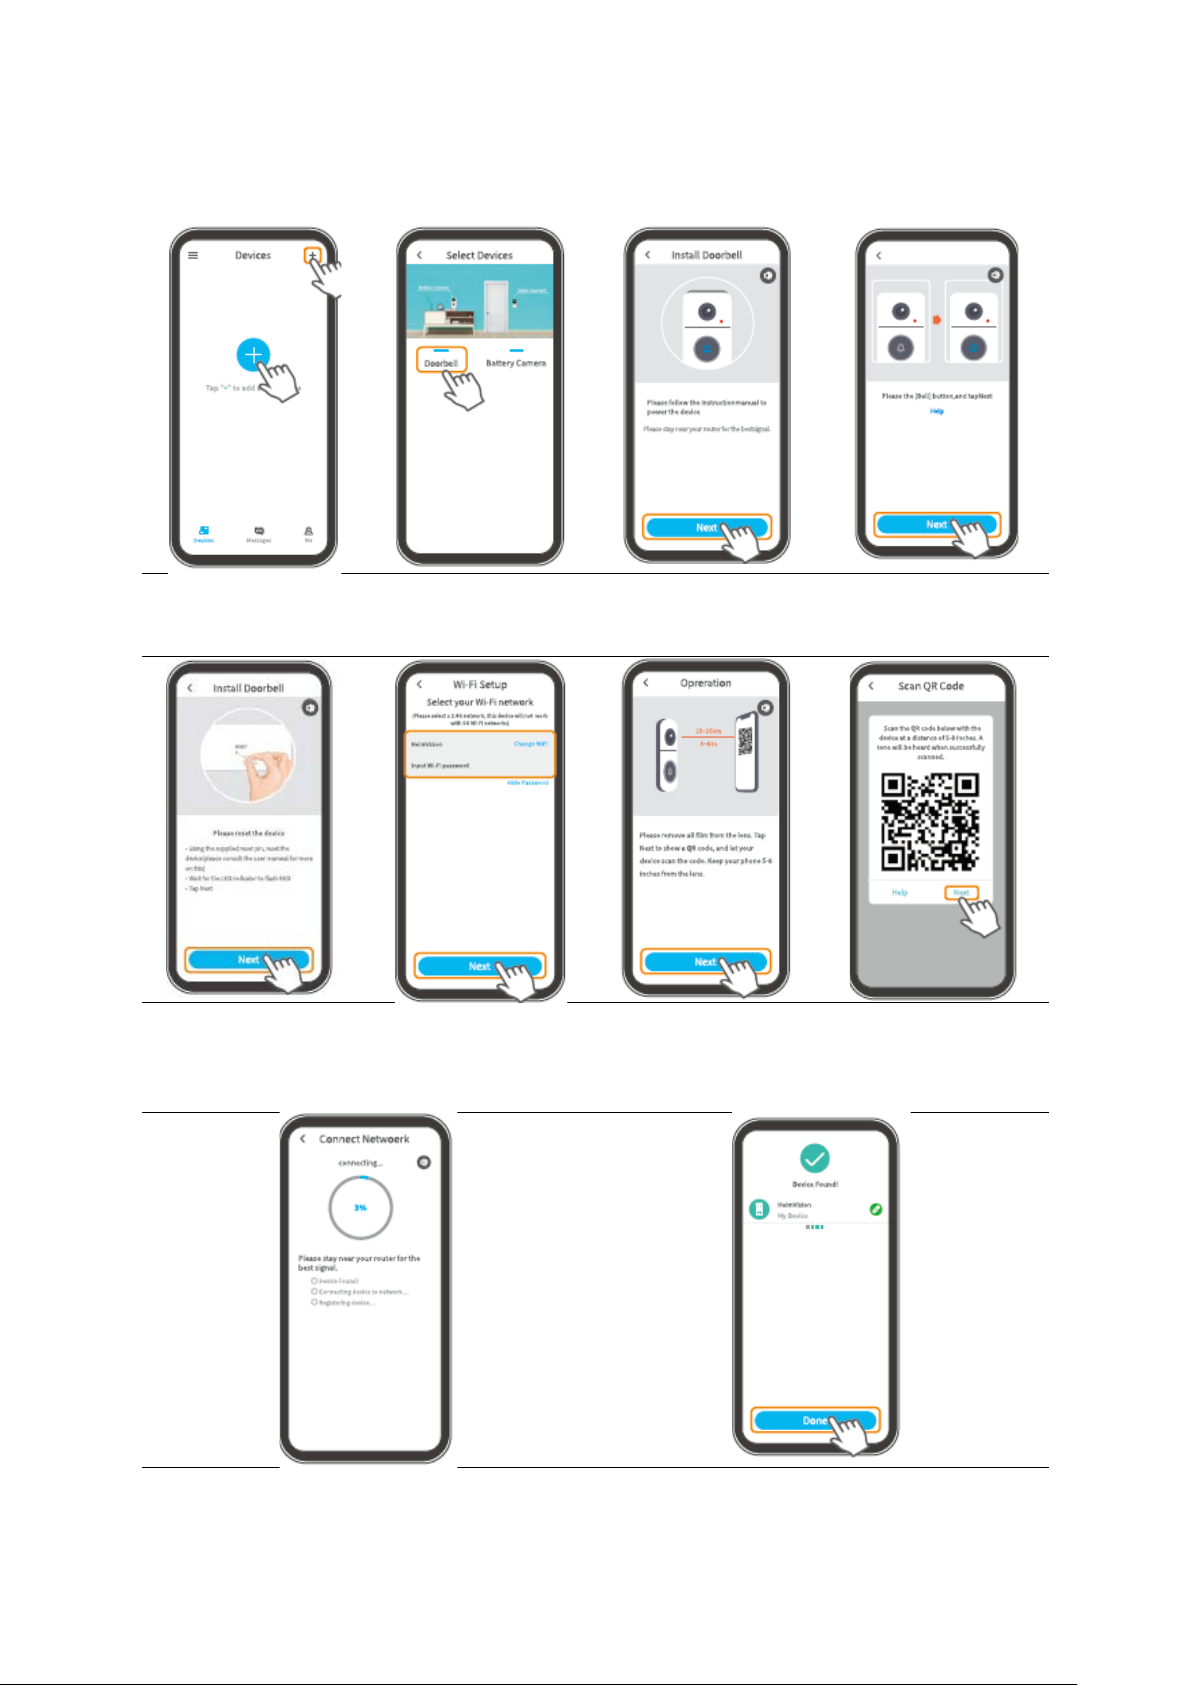
Connecting the Doorbell by Scanning the QR Code
Tap + in the centre or
on the upper right
corner
Select doorbell
Tap Next to continue
Press the Doorbell
Button once, then tap
Next
Reset the doorbell
then tap Next
Select your router’s
Wi-Fi and enter the
correct password,
then tap Next
Tap next to show QR
code
Align the camera lens
with the QR code,
then tap Next after
hearing a beep
Wait for Wi-Fi Connection
Tap Done to complete the connection

11
Connecting the Doorbell by AP Hotspot
Tap Other methods if
QR Code scanning
fails
Tap Manual
Configure to start
Press the Doorbell
button once then tap
next
Reset the doorbell,
then tap Next
Select your router’s
Wi-Fi and enter the
correct password,
then tap Next
Tap Connect to enter
Wi-Fi settings of your
mobile device
Select the Wi-Fi
“STRN_XXXXXXX” (no
password required)
Tap Connect to
Continue
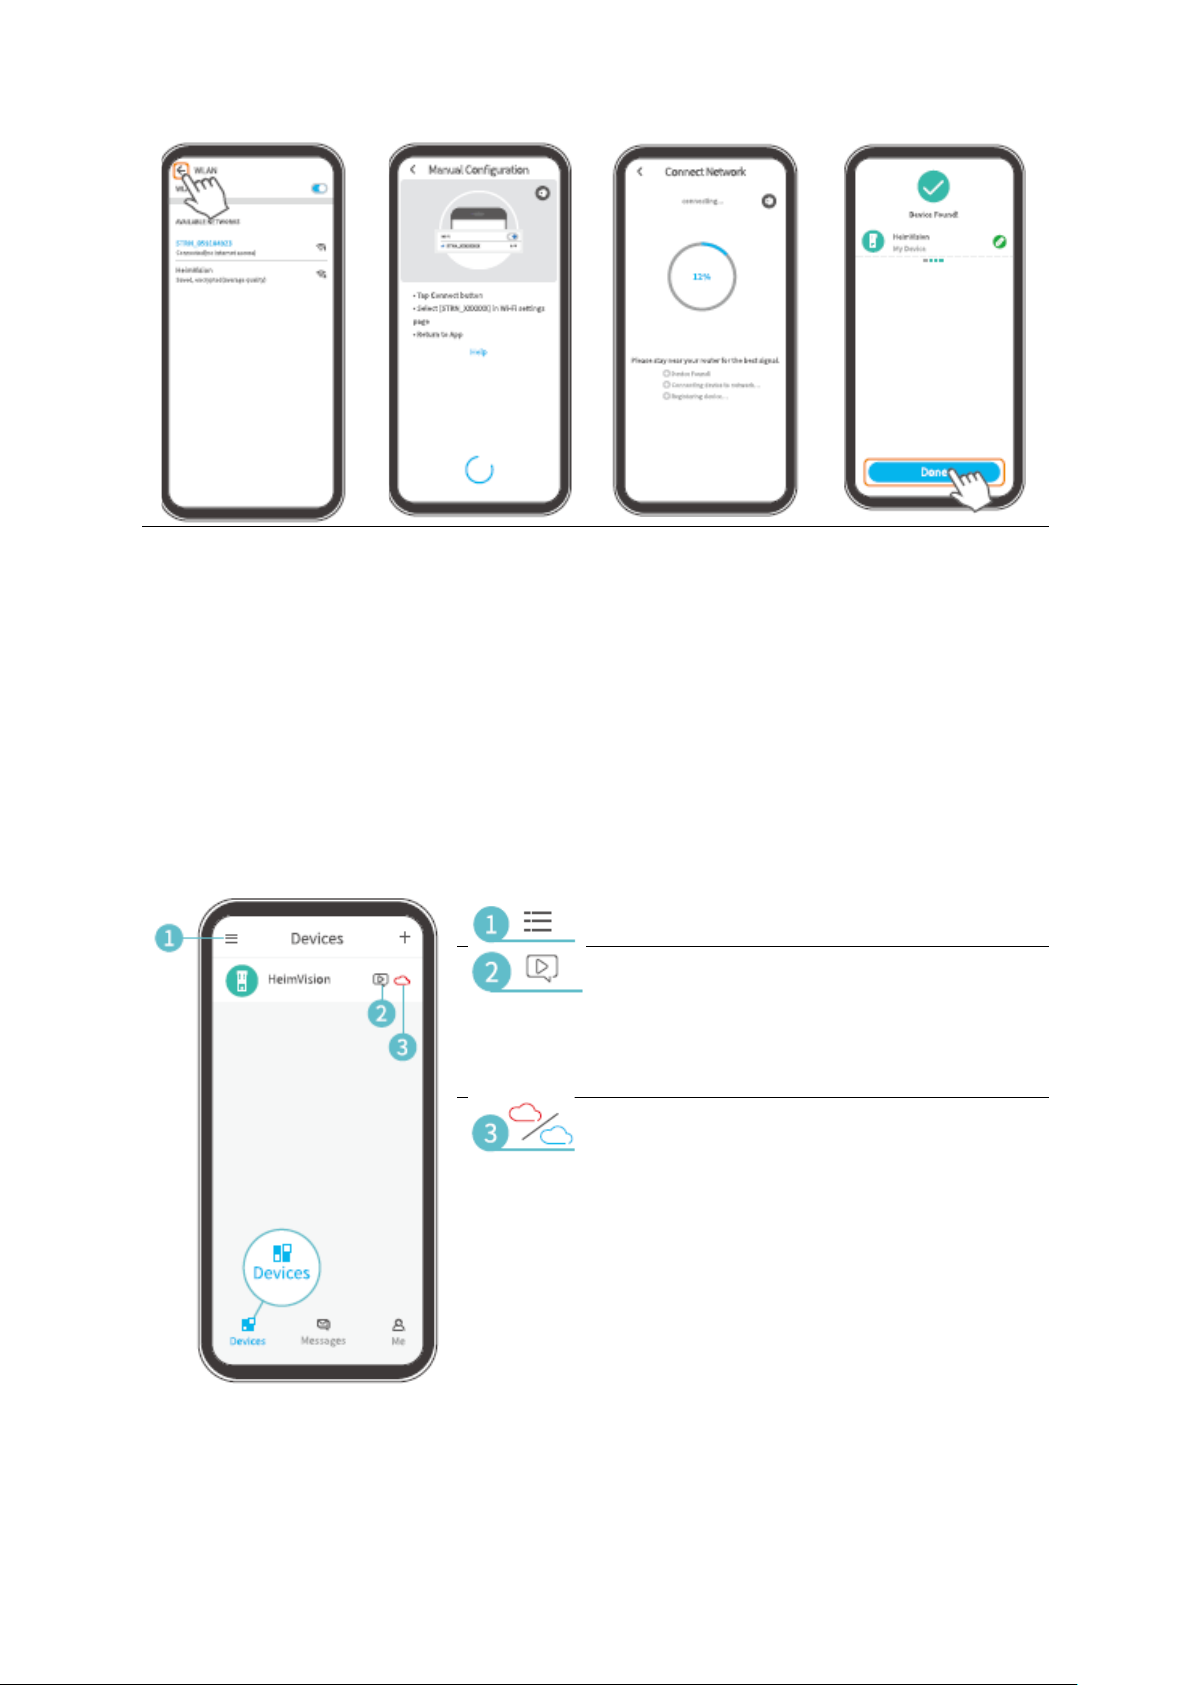
12
Tap
to return to
the app after
connecting
Read for connecting
Connecting to Wi-Fi
Tap Done to
complete the
connection
Function Overview
Home Page
Hide/show the preview image(s)
Quick access to the snapshots captured
and videos recorded when there was a
visitor pressing the Doorbell Button,
motion or human detected; tap the play
button to watch the selected video.
If it’s red, tap it to subscribe to or renew
the cloud plan; if it’s blue, tap to directly
go to the interface of Cloud.

13
Check all the messages about device
sharing.
The same as .
System operation logs.
Share your doorbell with another
account and check the requests of
device sharing.
Check the photos and videos saved to
your Me> pictures & Videos.
Frequently asked questions
Contact HeimVision support team
directly.
Check mor information, about the App.
Check account information, reset
password, find the QR code of your
account, log out the App, and more.

14
Clear Cache
Clear the cache of the App
App Version
Check the version of the App
About us
Check more contact options
Keep apps in
the background
Switch it on to always log in to the
App (for android device)
15
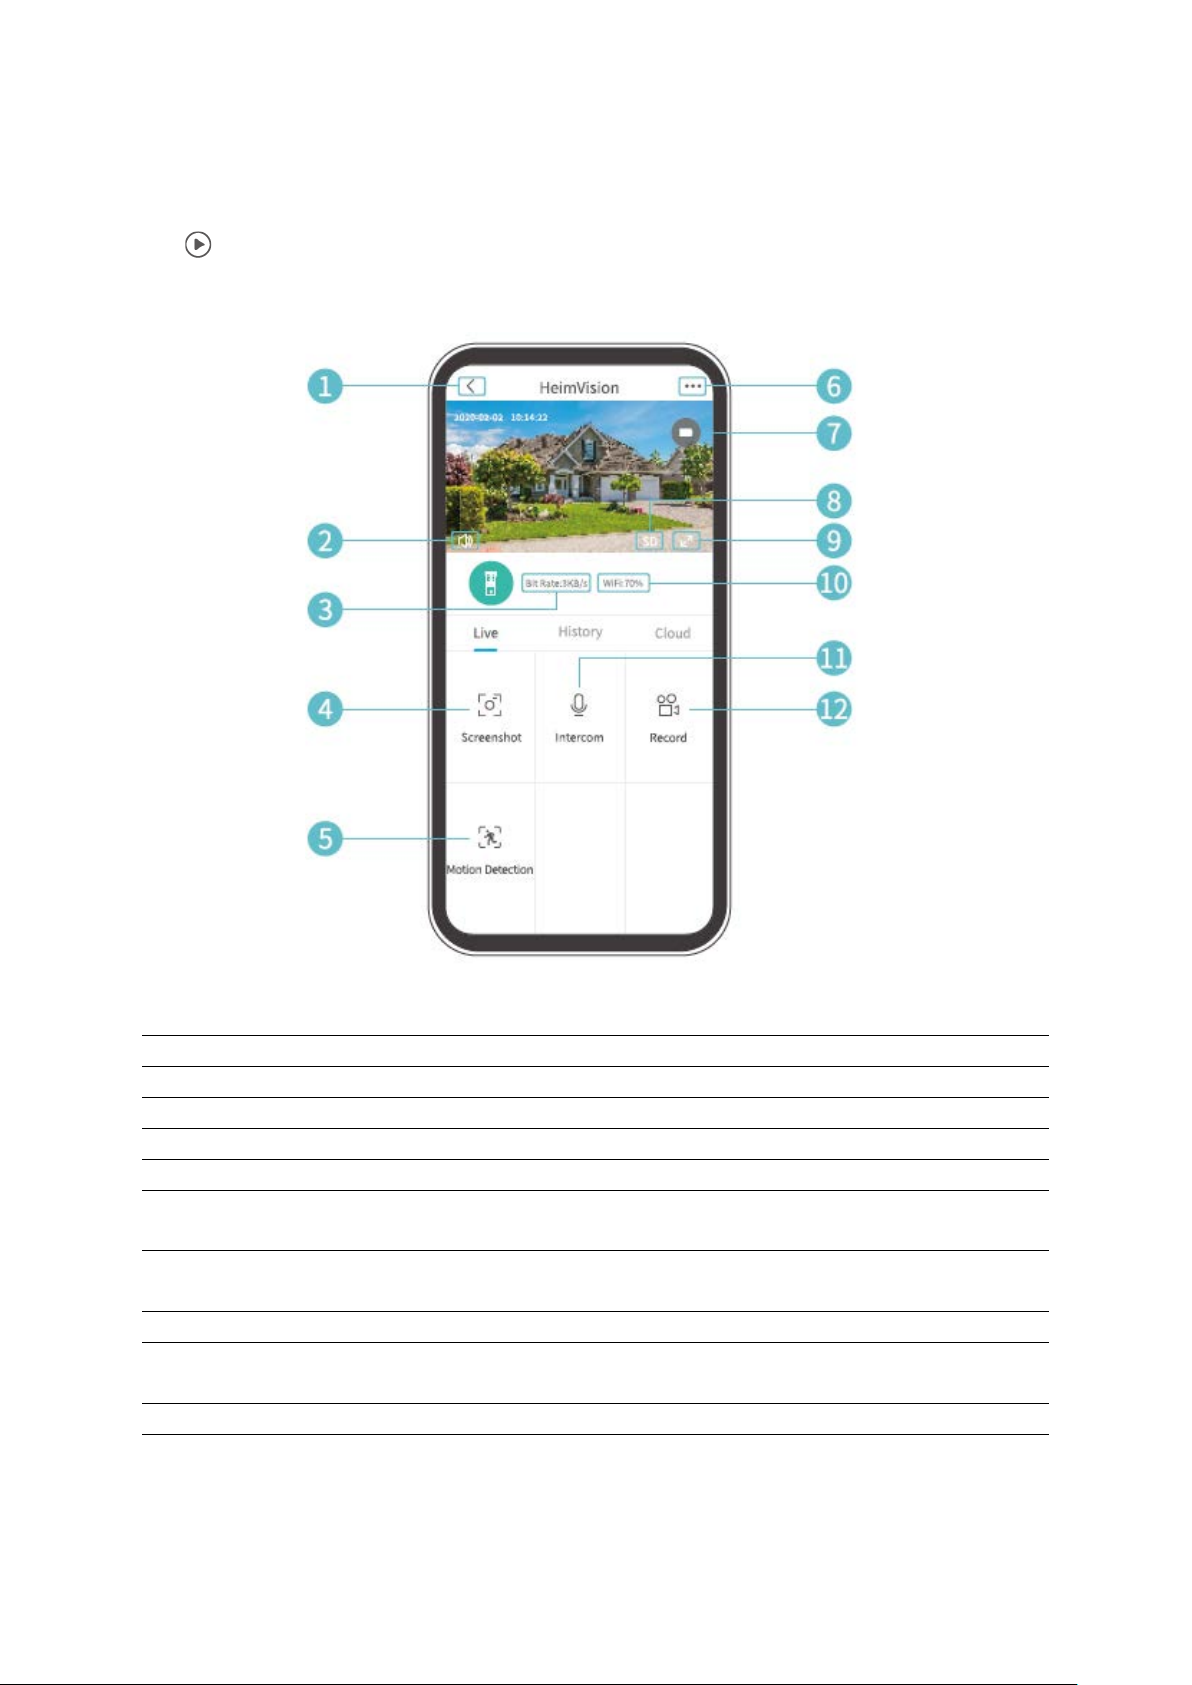
Live Video
Tap on the Home Page to watch the live video from the camera lens of your doorbell.
1.
Back to Home page
2.
Turn on/off the live audio from the doorbell
3.
Real-time bit rate of the live video
4.
Tap to capture a photo and save to Me>Pictures and Videos
5.
Motion detection on/off
6.
Detailed doorbell settings
7.
Battery status of the doorbell. If the battery icon shows red, please charge the
doorbell timely.
8.
Image quality. You can toggle between SD and HD, in which SD is recommended
for smoother streaming.
9.
Fullscreen
10.
Wi-Fi Signal. If the percentage is less than 70%, please check your network
connection of the doorbell
11.
Tap and hold to talk with people near the doorbell
12.
Tap to start recording the current live video; tap it again to end and save it to
Me>Pictures and Videos
16
Video Recording
Important:
1. If no memory card installed or no cloud plan was subscribed to, the doorbell will
not record any video and you can only watch the live video.
2. If you’ve installed a memory card or subscribed to a cloud play, the doorbell will
record video according to your setting.
Record videos when visitors ring the door
If a visitor presses the Doorbell Button, HeimLife App will send a notification to your
mobile device and the doorbell will record a video accordingly.
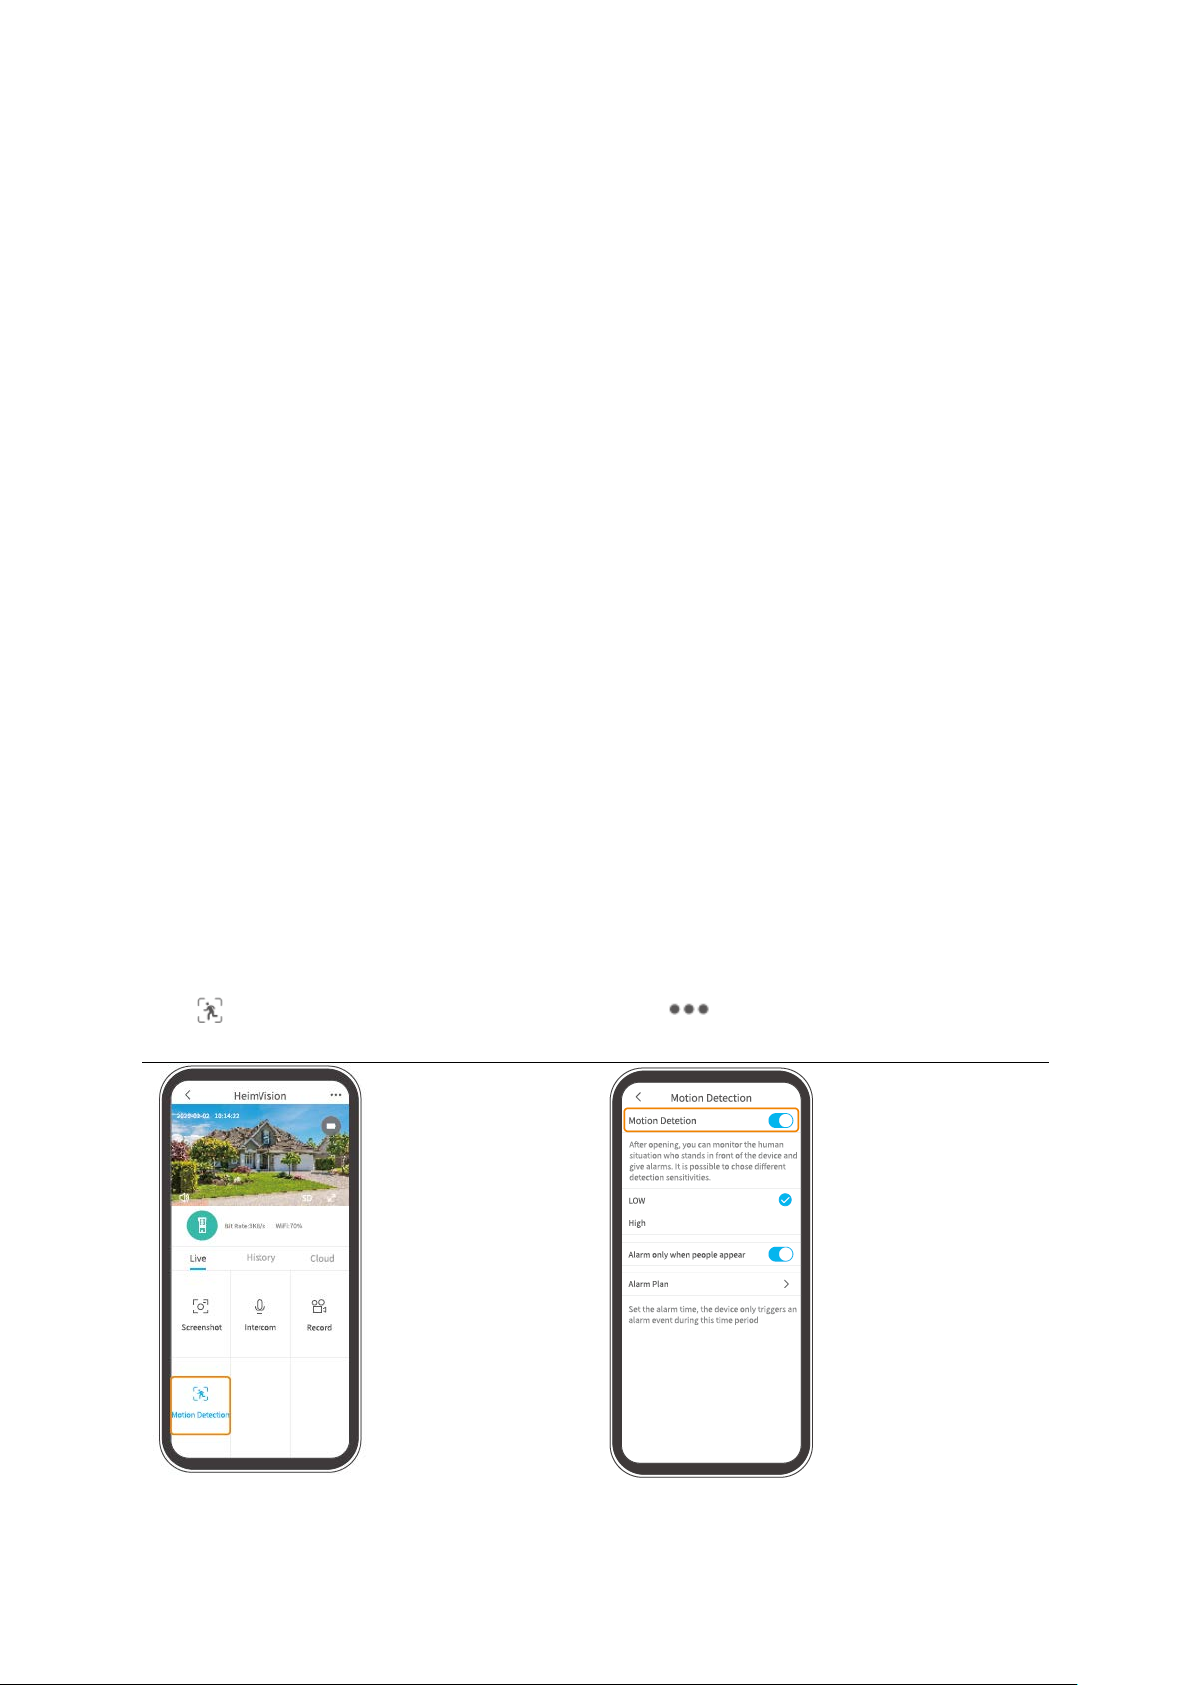
Record videos when any motion is detected
The motion function is disabled by default. If recording a video when the doorbell
detects a moving object is required, please enable this function by following the
instructions below.
Option 1:
Tap Motion Detection on the interface
of Live video to enable it.
Option 2:
Go to >Settings>Detection Alarm>
Motion detection to switch it on.

17
•Setting the sensitivity level of Motion Detection to low can decrease unnecessary
notifications of being disturbed and reduce false alarm.
•Tap Alarm Plan to set multiple schedules when motion detection will be enabled
to avoid being disturbed frequently.
Record videos only when any human detected
This function helps to filter the false alarms caused by the heat source or light which can
affect the PIR sensor. Switching on the option of Alarm only when people appear, the
doorbell will only record videos and push notifications when it detects people.
Video Playback
Tap History to play the videos recorded in the memory card if you’ve installed one;
otherwise, there are no historical videos here.
1.
Timeline.Slide leftwards or rightwards to check the videos. Blue bars stand for the
videos recorded when there was a visitor pressing the Doorbell Button, motion or
human detected; while orange bars indicate the moments when the event occurred to
wake up the doorbell to start recording.
2.
Tap the date with blue background to play the video recorded on that day.
3.
Screenshot: slide to the blue bar, then tap to capture a photo and save it to Me>Pictures
and Videos.
4.
Record: slide to the blue bar, then tap to start recording a video; tap again to end and
save it to Me>Pictures and Videos.

18
5.
Alarm:
check the moments when there was a visitor pressing the Doorbell Button,
motion or human detected.
6.
Timeline zoom in/out
Notes:
•Tap Cloud to play the videos recorded on the encrypted cloud if you’ve
subscribed to a cloud plan. Please go to > Cloud storage service to subscribe
to, check, renew and change a cloud plan, or enter the activation code.
•If you have installed a memory card and subscribed to the cloud plan, the videos
will be recorded in the memory card and cloud at the same time.
Settings
Tap to access the detailed settings for the doorbell.
Device Name:
Tap to edit the name of your doorbell.
Receive Notifications:
Turin it on and allow HeimLife App to push notifications to your mobile device.
Device share:
Tap to start sharing your doorbell with your family members.
Device Information:
Check the information about the doorbell, including network, signal strength, virtual ID

19
(serial number of your doorbell. It may be needed when the technical support is
required), etc
Basic Functions:
•Night Vision:
Turn on/off the night vision of the camera, or set it to automatic which mean the
doorbell will enable the night vision when it detects low-level ambient light. The
image will be black and white then.
•Speaker Volume:
Adjust the volume of doorbell’s speaker.
•Host leaves a Message:
Record voice messages
•Power Management:
Check the remaining power of your doorbell.
Detection Alarm:
Enable/disable Motion Detection, adjust the detection sensitivity and set schedules to
enable the motion detection.
SD Card:
Set the video length of each recording (only available for memory card), check the
remaining capacity of the memory card or format it.
Cloud storage service:
Tap to subscribe to, check, renew, and change the cloud plan, or enter the activation
code.
Device Version:
Check the version of the firmware.
Delete Device:
Tap to delete the doorbell permanently.
Leave a Voice Massage
This function helps you to quickly respond to visitors when it’s inconvenient to answer
the door. You can add 3 pre-recorded voice messages at most and the time length of
each message can last up to 10s.

20
Step 1: Record a voice message
Go to Settings>Basic Function> Host leaves Message, then press and hold the icon to
record a voice message.
Step 2: Leave a voice message
When the visitor pressed the Doorbell Button, your mobile device will receive a call. Tap
the icon select a voice message, then the visitor will hear it through the doorbell.
Table of contents
Languages:
Popular Accessories manuals by other brands


IFM
IFM UIT501 operating instructions

ORION TELESCOPES & BINOCULARS
ORION TELESCOPES & BINOCULARS EQ-2 Equatorial Mount 9019 instruction manual

Carefree
Carefree MARQUEE installation manual

Wavetronix
Wavetronix Click 400 Instructions for use

Datalogic
Datalogic SG-LP SERIES manual

Intenso
Intenso POWERBANK A5200 user manual


