HEITECH HT1500 User manual

User Manual
Art.-Nr.: 09001544 Ver.20190506
1
Automatic Lead Acid / Lithium Car Battery Charger HT1500
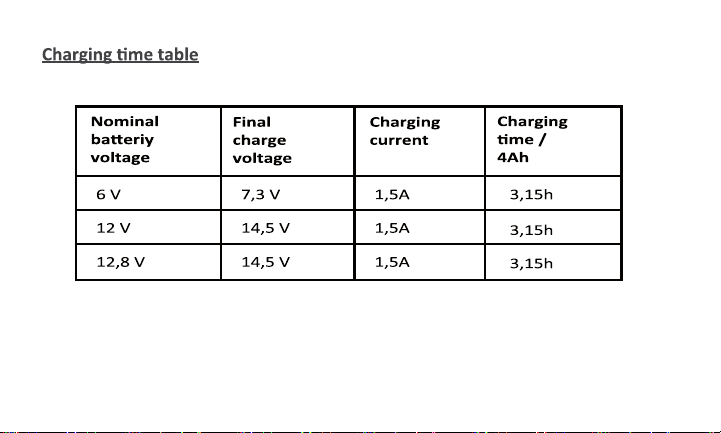
6 V / 12 V / 12,8 V (Lithium) Charging current 1,5 A
• Automatic charging with IU-curve
• Automatic trickle charge
• Short circuit, wrong polarity, high battery voltage, over temperature
and safety time protection
• Precharge mode (to regenerate deep-discharged batteries)
• Cold temperature mode
Batterie Types:
• 6-12V Lead-acid battery (Wet, Gel, MF und AGM) 4Ah - 50Ah
• 12,8V Lithium (4-cells LiFePO4) 3Ah-25Ah
Charging current: 1,5A
Input: 220-240V / 50Hz - 350mA
Protection class: IP65 (Dust- and waterproof)

Input: 220-240V AC 50 Hz / 0.35A
Output: 12V DC 1.5A / 6V DC 1.5A / 12.8DC 1.5A
Charges:
1- 6/12V Lead Acid Flooded, Gel, Maintenance-Free,
AGM Batteries 4Ah - 50Ah
2-12.8V Lithium Iron Phosphate (LiFePO4) 3Ah-25Ah
Thank you for purchasing our product. Read the instruction
manual thoroughly before use and keep the manual for
later reference.
Important safety Instructions
1- Save these Instructions
DANGER - To reduce the risk of fire or electric shock,
carefully follow these instructions.
2. This charger is intended for use with with 6/12V Lead
Acid Flooded, Gel, Maintenance-Free, AGM Batteries 4Ah-50Ah and
LiFePO4 2Ah – 15Ah lithium rechargeable batteries only. Attempting to
charge other types of batteries may cause personal injury and damage to
the charger. 2

3. Do not expose charger to rain, snow or moisture.
4. Operate charger only in well-ventilated areas. Batteries generate explosive
gases during normal operation.
5. Wear eye protection when operating charger.
6. Never use an extension cord or any attachment not recommended by
manufacturer, otherwise this may result in a risk of fire, electric shock or
personal injury.
7. Do not leave charger unattended while in use.
8. To reduce risk of damage to electric plug and cord, pull by the plug rather
than cord when disconnecting charger.
9. Do not attempt to charge damaged or frozen batteries.
10. Do not operate the charger if the cord or plug has been damaged or if the
charger has been subjected to shock or damage. Take it to a qualified
technician for repair.
11. Do not disassemble the charger. Incorrect reassembly may result in a risk
of electric shock or fire.
12. Unplug the charger from power source before attempting any maintenance
3

or cleaning. Use lint-free cloth to clean the surface, do not immerse into
water.
13. This equipment can be used by children of 8 years and older and by people with
limited physical, sensory or mental capacities or those with no experience and
knowledge if they are supervised or have received instruction in how to use the
equipment safely and understand the dangers which result from such use. Children
are not allowed to play with the equipment. Unless supervised, children are not
allowed to clean the equipment and carry out user-level maintenance work.
14. WARNING: RISK OF EXPLOSIVE GASES WORKING IN VICINITY OF
A LEAD-ACID BATTERY IS DANGEROUS. BATTERIES GENERATE
EXPLOSIVE GASES DURING NORMAL BATTERY OPERATION. FOR THIS
REASON, IT IS OF UTMOST IMPORTANCE THAT YOU FOLLOW THE
INSTRUCTIONS EACH TIME YOU USE THE CHARGER.
To reduce risk of battery explosion, follow these instructions and those published by
the battery manufacturer and the manufacturer of any equipment you intend to use
in the vicinity of the battery. Review cautionary marking on these products and on
engine.
15. The battery charger is not intended for use in electric vehicles
4

SAFETY & PRECAUTIONS
1. Someone should be within range of your voice or close enough to come to
your aid if you have an accident.
2. Have plenty of fresh water and soap nearby in case battery acid contacts
skin, clothing or eyes.
3. Wear complete eye protection and clothing protection. Avoid touching eyes
while working near battery.
4. If battery acid contacts skin or clothing, wash immediately with soap and
water. If acid enters eye, immediately flood eye with running cold water for
at least 10 minutes and get medical attention immediately.
5. NEVER smoke or allow a spark or flame in vicinity of battery or engine.
6. Remove all jewelry and other metallic items from your hands and body when
working with batteries. Metal may spark or create a short circuit resulting in
electrical shock, fire or explosion which may result in injury, death or
property damage.
7. Always use nonconductive or insulated tools when working with any battery.
8. Use charger for charging LEAD-ACID or LITHIUM IRON PHOSPHATE 5

batteries only. Do not attempt to charge any other type of battery. Charging
other battery types may cause injury to persons and damage to property.
9. NEVER USE THE RECOVER MODE FOR A LITHIUM IRON
PHOSPHATE BATTERY.
Location:
Locate the charger as far away from the battery as possible. Do not place the
charger directly above the battery as gases from battery will corrode and
damage charger. Do not allow battery acid to come in contact with charger. Do
not operate the charger in a closed-in area or an area with restricted
ventilation. Do not set battery on top of charger.
6
WARNING:
Battery terminals, terminals and related accessories contain lead.
Lead compounds are carcinogenic and damage the reproductive system.
PLEASE WASH YOUR HANDS AFTER HANDLING BATTERIES

CHARGING MODES
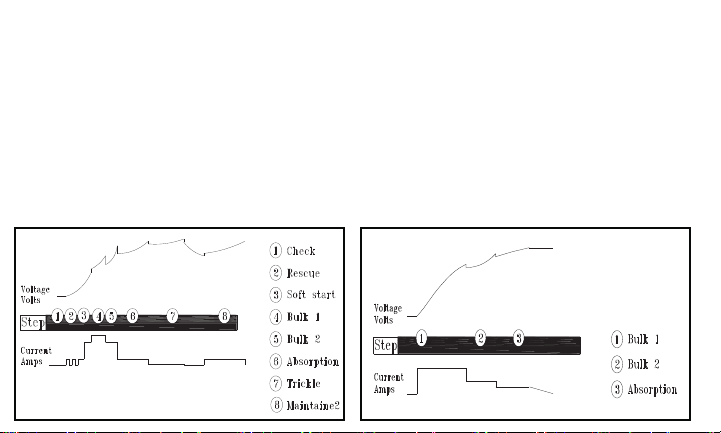
The HT1500 has three (3) modes. The Lithium charge mode requires the mode
button to be pressed and held for three (3) seconds to enter the enhanced
mode.
This “Enhanced” mode requires your full attention before selecting.
Do not operate the charger until you confirm the appropriate charge mode for
your battery. Here is a brief description.
For charging 12-volt Flooded, Gel, Maintenance-Free batteries.
Press & Hold Mode
Description
1
2
4
Voltage
12V
6V
Output
Battery
size
14,5V
1,5A
7,5V
1,5A
4-50Ah Batteries
Mode
Normal
Lithium
#
7
For charging 12-volt batteries in cold temperatures below 50 F(10C) or AGM batteries. When selected, the LED will illuminate.
Cold/AGM
Normal
For charging 6-volt Flooded, Gel, Maintenance-Free batteries. When selected, the LED will illuminate
Cold/AGM
For charging 6-volt batteries in cold temperatures below 50 F(10C) or AGM batteries. When selected, the LED will illuminate
3
5
7,3V
1,5A
12V
3-25Ah Batteries
14,5V
1,5A
For charging 12.8-volt lithium iron phosphate batteries. When selected,
the LED will illuminate.

CONNECTING TO BATTERY
1. Set any charger switches to “off” position and remove AC cord from electric
outlet before connecting or disconnecting DC output clamps or eyelets.
Never allow clamps or eyelets to touch each other.
The battery terminal not connected to the chassis has to be connected first.
The other connection is to be made to the chassis, remote from the battery
and fuel line. The battery charger is then to be connected to the supply
mains; After charging, disconnect the battery charger from the supply mains.
Then remove the chassis connection and then the battery connection.
2. Identify the correct polarity of the battery terminals. The positive battery
terminal is typically marked with (POS, P, +). The negative terminal is
typically marked with (NEG, N, -).
3. Position cords and cables to reduce risk of damage by hood, door or moving
parts (including fan blades, belts, and pulleys) or other parts that could
cause injury to persons.
4. Do not connect to carburetor, fuel lines, or sheet-metal body parts.
8

charger to the NEGATIVE (NEG, N, -) post of battery.
7. For Positive grounded vehicle, connect NEGATIVE (BLACK) clamp or eyelet
connector from battery charger to NEGATIVE (NEG, N, –) post of battery.
Connect POSITIVE (RED) clamp or eyelet connector from battery charger to
the POSITIVE (POS, P, +) post of battery.
8. When disconnecting charger, turn switches to off, disconnect AC cord,
remove connectors in reverse sequence from connecting procedure.
9
5. Determine which post of battery is grounded (connected) to the chassis.
If negative post is grounded to the chassis (as in most vehicles) see (6).
If positive post is grounded to the chassis, see (7).
6. For Negative-grounded vehicle, connect POSITIVE (RED) clamp or eyelet
connector from battery charger to POSITIVE (POS, P, +) post of battery.
Connect NEGATIVE (BLACK) clamp or eyelet connector from battery
PREPARING TO CHARGE
1. If necessary to remove battery from vehicle to charge, always remove
grounded terminal from battery first. Make sure all accessories in the vehicle
are off, so as not to cause an arc. 10
2. Be sure area around battery is well ventilated while battery is being charged.
3. Clean battery terminals. Be careful to keep corrosion from coming in contact
with eyes.
4. Study all battery manufacturer’s specific precautions while charging and
recommended rates of charge.
5. Determine voltage of battery by referring to car owner’s manual and make
sure that the output voltage selector switch is set at correct voltage. If charger
has adjustable charge rate, charge battery initially at lowest rate.
11
Charging steps (charging Voltage & charging current):

PRESS & HOLD
3SECONDS
STANDBY LED
MODE
The battery charger must be connected to the battery according to the
instructions above.
STARTING THE CHARGING PROCESS:
1. Once you have established that the battery clamps or eyelets have been
correctly connected, you can start the charging process. To do so, insert the
charger plug into the AC socket.
2. The charger will start in Standby mode, indicated by the STANDBY LED.
3. Press the mode button to select the
appropriate charge mode (press and hold for
three seconds to enter an enhanced charge
mode) for the voltage and chemistry of
your battery. The selected charge mode
LED will illuminate.
12

STATE OF CHARGE INDICATORS
LED EXPLANATION
25% Red LED The LED will flash when the battery is less than
25% charged. When the battery is 25%
charged, the LED will be solid.
50% Orange LED
The LED will flash when the battery is less
than 50% charged. When the battery is 50%
charged, the LED will be solid.
75% Yellow LED
The LED will flash when the battery is less than
75% charged. When the battery is 75%
charged, the LED will be solid.
100% Green LED
The LED will flash when the battery is less
than 100% charged. When the battery is 100%
charged, the LED will be solid.
The state-of-charge (SOC) LED display has four (4) SOC indicators.
13

ERROR REASON/SOLUTION
Solid Red LED
Standard Charging
Mode
The battery is not accepting a charge.
Change charge mode to Recovery Mode.
Recovery Mode The battery cannot be recovered.
Flashing Yellow LED
Battery capacity may be too high for the selected mode. Verify the
battery capacity and charge mode. If battery capacity is in range,
change charge mode to Recovery Mode.
Solid Yellow LED Battery voltage is too high or too low for the selected mode.
Verify the battery voltage and charge mode.
Flashing Red LED Reverse polarity. Reverse the battery connections.
TROUBLESHOOTING
Error conditions are indicated in the LED display.
14

Declaration of Conformity:
We hereby declare that it complies with Directive 2014/30 / EU, 2014/35 / EU
and 2011/65 / EU (RoHS II). The full text of the EU Declaration of Conformity
is available at the following internet address:
http://www.heitech-promotion.de/zertifikate
Limited 3 Year Warranty:
Warranty Disclaimer Heitech Promotion GmbH assumes no liability and
provides no warranty for damage resulting from improper installation.
This product is warranted to be free of defects in material and workmanship for
3 years from date of purchase, dated receipt required. Defective product will
be replaced or substituted with a product of equal value. This is your sole
remedy in lieu of all other remedies, including consequential damages.
15

After the end of its service life, please take the unit for proper disposal.
Do not throw in the household waste; take the unit to a collecting
point for electrical and electronic equipment.
Packaging materials are raw materials and can be recycled.
Your responsible administration will be glad to provide details
of the addresses and opening hours of collection points.
HEITECH Promotion GmbH
Krefelder Strasse 562
D-41066 Mönchengladbach
Tel +49(0)2161-47763-0
Fax +49(0)2161-561 746
www.heitech-promotion.de 16
Table of contents
Other HEITECH Batteries Charger manuals


