Heli-scale EC-145 XL 600 size User manual

HELI - SCALE Copyright ® 2010 - Reproductions interdites
www.heli-scale.fr
Instruction manual
EC-145 XL
600 size
Dear customers,
Thank you for purchasing our fuselage
HELI –SCALE
www.heli-scale.fr

HELI - SCALE Copyright ® 2010 - Reproductions interdites
www.heli-scale.fr
IMPORTANT
Thank you to please read and follow the installation
instructions step by step.
- Before the bonding of certain parts, they must be completely dry.
- The Helicopter models are not toys: misuse of this product
may cause damage and injury is very important that the death
- The manufacturer and retailer assume no responsibility for the use
of this product.
- This product is intended for use by a responsible
adult, provided on a plot of the official model.
- Check the setting on your machine before first flight.
- You are fully responsible for the assembly
and adjustment. Microsoft makes no after sales service or any
warranty after purchase and installation.
- Fly only in safe and suitable for the practice of modeling.
- Do not fly close to homes or places frequented by passers-
by and or children.
- The models can be the cause of accidents, breakdowns of various
kinds including lack of maintenance, pilot error, radio interference,
etc ...
- The driver is fully responsible for his machine, so for any
defect it may cause by using a model. Be responsible!
- Remember
to strengthen couples wooden support frame with carbon
cloth, at the joint between them and the fuselage.
- It is recommended to improve the existing system of fixation
with a locking system manual of the car (screws or other solution to
your liking.)
- The installation requires several hours
- Be sure to check the CG before the first flight

HELI - SCALE Copyright ® 2010 - Reproductions interdites
www.heli-scale.fr
Landing gear mounting
Star building the landing gear. You can paint it at this
moment if you need.
Build the aluminium parts and drill 2 holes at 45mn from the
back to secure it
Measure about 25,5cm between the 2 main landing gear
Important: 2 the legs gear are not the same. Please put the
higher one on the front for a better Scale finish
Makes 2 holes of 3mn into the fuselage, where the landing
gear will comes. Please put 10cm between the 2 holes.
Put the landing gear in place under fuselage and make
marks into the 2 holes on the landing gear. Then inbuilt the
landing gear and make hole on it. After this, with the
supplied screw, nuts and washers fix the landing gear and
secure it.

HELI - SCALE Copyright ® 2010 - Reproductions interdites
www.heli-scale.fr
Tail boom mounting of the fuselage.
You can glue and screw the tail boom. Drill 4 holes of
3mn. The holes must be into the wood part already
installed into the main fuselage part.
Then marks these 4 holes on the tail boom with a pen
and drill it and set in place the 3mn screw into the tail
boom and secure it with washers and nuts into the
main fuselage part.
Into Tail boom install washers and nuts, set them in
place with some glue
Then screw the 4 screws and the tail boom mounting is
okay
Trick: You can paint inside of the fuselage in black
colour painting in order to obscure all mechanics!

HELI - SCALE Copyright ® 2010 - Reproductions interdites
www.heli-scale.fr
Stickers Settings
Stick all the big stickers on the fuselage
Then unstuck the white cover slowly. Do the
same for the Heli ID on vertical fin.
Glue the windows.
Cut around windows, following the line. Lease
5mn more to glue/screw the window later.
Pull the plastic cover from the windows
You can screw /or glue using the provide glue
into the kit. Think about frosting the parts to
glue before.

HELI - SCALE Copyright ® 2010 - Reproductions interdites
www.heli-scale.fr
Sandpaper grained S is enough to do this
Be careful a lot of cyanoacrylate glue leaves some
white marks on the windows. Try it before on a
small part!
Elbow gear box mounting
EC-145 got a specific elbow gear box. We are using belt (supplied) because it is better for vibrations
and belt can run for long times
Use the CNC elbow gear box supplied into the
kit. It is a shorter one than the ALIGN RC
original.
Take the elbow gear box, the small wood parts,
pinion and gears supplied + small screw and a
small CNC tail boom supplied also + belt
First cut the small CNC tail boom at 90mn (9cm)
Depending your mechanics, this size can be
deferent. It is easier to get a long one than a
short one!
Use a lime take over the small part of
aluminium into the tube. Otherwise it can
damage the belt

HELI - SCALE Copyright ® 2010 - Reproductions interdites
www.heli-scale.fr
Then built the AC like on the picture. On
various mechanics the original AC box can you.
Otherwise use the one sin CNC supply into the
kit.
Cut the fuselage tail boom with a tool like a
“dremel”, the AC must fit perfectly.
Cut also the side for the AC. Go slowly for this,
Try it , cut again, try , cut, try…. It can takes time
to adjust it perfectly. Be patient!
Now first step of elbow gear box is finished.

HELI - SCALE Copyright ® 2010 - Reproductions interdites
www.heli-scale.fr
Mounting the mechanics
Please prepare you mechanics: take off landing
gear, tail boom support…
We suggest that you have test the mechanics a
lot of time in trainer mode before making the
integration into the fuse.
Trick: To an easy integration, please take off all
the rotor head.
Built the supplied belt instead of your original
one.
Cut the fuselage small part like on the picture
Then integrate the mechanics on the main
wood part into the fuselage.
You probably have to cut a little the tail
boom of your mechanics.
Trick: Put some adhesive rubant around the
tail boom to cut it straight
Set in place the upper cover, the main shaft
must be centre into the hole on the upper
cover and the tail boom of your mechanics
must touch the wood part of the elbow gear
box into the fuselage. For information if using
a Align RC T-rex 600, you must cut about
70mn (7cm)

HELI - SCALE Copyright ® 2010 - Reproductions interdites
www.heli-scale.fr
Use the CNC square on the back of your
mechanics. it will elevate the back of the
mechanics. The mechanics must be tilt to the
front. For a n ALIGN RC T-rex 600 the back must
be elevate about 5mn (1/2 cm)
Drill 4 holes of 3mn and use the supplied screws
to fix the CNC square to you mechanics.
Adjust height in order that the tail boom arrived
into extension of the fuselage tail boom
Another possibility is using the quick stop
system like on this picture. It allow mechanics
to encase into main wood former
Up to customer to choose the best solution for
him.

HELI - SCALE Copyright ® 2010 - Reproductions interdites
www.heli-scale.fr
Use the wood skid to elevate mechanics on the back, the secure the system with 3mn screw into
frame of mechanics and into main wood former.
Mounting the elbow gear box belt
Prepare the pinion of the elbow gear box :
Take care about 3 washers on each side of the
pinion and the bearing.
Info: the other with pinion is already installed
into the former wood of the elbow gear box. This
one is for tender the belt
Tender the belt into the tail boom of your
mechanics. Take care that the pipe for the
linkage must be outside. We suggest that the
pipe must be scotched to your mechanics tail
boom
Use lubricant like « 3W40 » into the pipe of the
linkage. Take care that the curve must be smooth
without any hard point on the linkage.
Then make ¼ turn of your belt like in trainer
mode instruction manual and install the small
wood part with screw to secure the pinion like on
this picture.

HELI - SCALE Copyright ® 2010 - Reproductions interdites
www.heli-scale.fr
Pull the belt until the top of the AC and set in place
the AC box. Tender the belt with pulling the AC box
behind then secure it with screw. Do not tender the
belt too much.
The belt mustn’t scratch on the tail boom when go
in and go out of it. If the belt is touching the tail
boom, please adjust angulations of the mechanics.
When everything fit well, glue the CNC tube of the
elbow gear box to the wood part. Use epoxy glue to
do it.
Install the cover on the elbow gear box to the fuselage and secure it with screw supplied.
Trick: use EPP between tail boom of the mechanics and tail boom fuselage, in order to stop and limit
vibration.
Glue the horizontal stabilizers from bottom using
epoxy glue and do the same for the vertical fins.
Please note that the original EC-145 have not a
Straight tail boom in the main axis of the main
fuselage part: the tail boom must drift a little to
the right. Also the vertical fins are not straight
and got an angle! There is no impact during fast
translation.
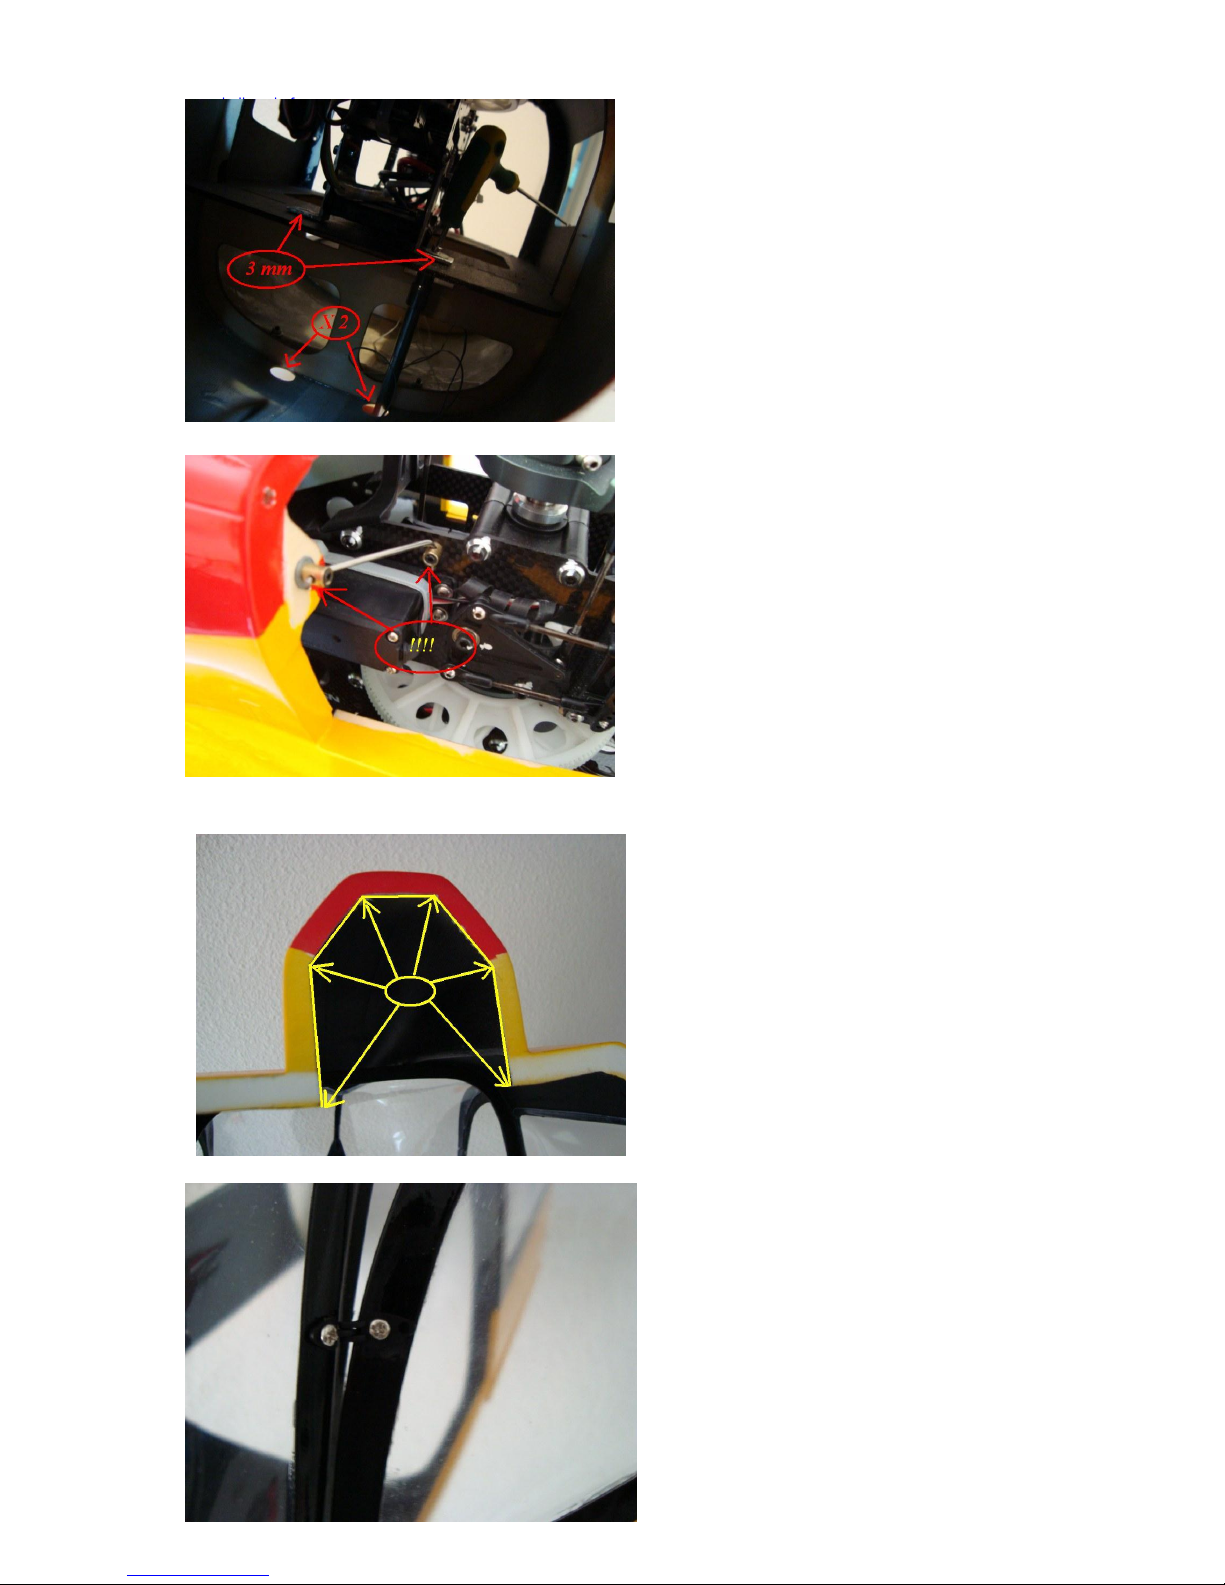
Please adjust the hole of the swash plate in
order that all the servos and linkage do not
touch the fuselage. The hole is willingly small to
be adjusted! Use a tool like “dremel” to do this.
The upper cover got some strong magnets but
we suggest you to secure it with 2 screws from
inside (left/right side)
HELI - SCALE Copyright ® 2010 - Reproductions interdites
www.heli-scale.fr
Fixed the mechanics with screws of 3mn. 2
holes under the fuselage can be donned in
order to access easily to the screws.
Trick: You can use some washers (not supplied)
with the screws
Installed anti vibration arms in order to rigidify
the mechanics and the fuselage like indicated
on the picture. On on left side, one on right
side!
Depending of your mechanics, you should
have to open by cutting the fuselage on the
front fuselage part (inside). Use a tool like
“dremel” to do this.
Install the hinges with the supplied screws for
the front doors. Glue small strong magnets:
Small one on the door and big one on the
fuselage.
IMPORTANT: the front fuselage part got
some magnets, but we invite you to secure
it more with screws and or scotch tape!

HELI - SCALE Copyright ® 2010 - Reproductions interdites
www.heli-scale.fr
Enjoy you flight and think about CG before first flight!
HELI-SCALE Team
You can find a lot of accessories for EC-145 like scale cockpit / pilots, lightening
system, 4 blades rotor head, scale blades and much more available on:
www.heli-scale.fr
Other Heli-scale Toy manuals


