Heli-scale Blue Thunder 700 User manual

HELI - SCALE
Copyright ® 2011 - Reproductions interdites
www.heli-scale.fr
Manuel d’assemblage
Instruction manual
Blue Thunder / PART 1
Cher client,
Merci d’avoir choisi un fuselage/accessoire HELI - SCALE.
Toute l’équipe vous souhaite une bonne construction et de bons vols.
Dear customer
Thank you for choosing a scale fuselage/accessories HELI-SCALE
All our team wishes you a lot of fun and good flights.
HELI – SCALE
www.heli-scale.fr

HELI - SCALE
Copyright ® 2011 - Reproductions interdites
www.heli-scale.fr
IMPORTANT
Merci de bien vouloir lire et respecter cette notice de montage
étape par étape.
- Avant le collage de certaines pièces, celles-ci doivent être
totalement sèche.
- Les Hélicoptères modèles réduits ne sont pas des jouets : un
mauvais usage de ce produit peut causer des dommages
matériels et corporels très important dont la mort
- Le fabriquant et le revendeur déclinent toutes responsabilités
sur l’utilisation de ce produit.
- Ce produit est destiné à être utilisé par un adulte responsable,
assuré sur un terrain de modélisme officiel.
- Vérifier le réglage votre machine avant le premier vol.
- Vous êtes entièrement responsable du montage et du réglage.
Nous n’assurons aucun service après vente ou quelconque
garantie après son achat et son montage.
- Volez uniquement dans des endroits sûrs et adaptés à la
pratique du modélisme.
- Ne pas voler proche des habitations ou des lieux fréquentés
par des passants et ou des enfants.
- Les modèles réduits peuvent être la cause d’accidents, de
pannes de différentes natures dont le manque de
maintenance, une erreur de pilotage, des interférences radios,
etc…
- Le pilote est entièrement responsable de sa machine, donc de
tous les dommages qu’il pourrait causer en utilisant un
modèle réduit. Soyez responsable !
- Pensez à renforcer les couples en bois qui supportent le
châssis avec du tissu carbone, au niveau de la jointure entre
ceux-ci et le fuselage.
- Il est conseillé d’améliorer le système existant de fixation avec
un système de verrouillage manuel de la cabine (visses ou
autre solution à votre guise.)
- Le montage nécessite plusieurs heures
- N’oubliez pas de vérifier le centrage avant le premier vol.

HELI - SCALE
Copyright ® 2011 - Reproductions interdites
www.heli-scale.fr
IMPORTANT
Thank you to please read and follow the installation
instructions step by step.
- Before the bonding of certain parts, they must be completely dry.
- The Helicopter models are not toys: misuse of this product
may cause damage and injury is very important that the death
- The manufacturer and retailer assume no responsibility for the use
of this product.
- This product is intended for use by a responsible
adult, provided on a plot of the official model.
- Check the setting on your machine before first flight.
- You are fully responsible for the assembly
and adjustment. Microsoft makes no after sales service or any
warranty after purchase and installation.
- Fly only in safe and suitable for the practice of modeling.
- Do not fly close to homes or places frequented by passers-
by and or children.
- The models can be the cause of accidents, breakdowns of various
kinds including lack of maintenance, pilot error, radio interference,
etc ...
- The driver is fully responsible for his machine, so for any
defect it may cause by using a model. Be responsible!
- Remember
to strengthen couples wooden support frame with carbon
cloth, at the joint between them and the fuselage.
- It is recommended to improve the existing system of fixation
with a locking system manual of the car (screws or other solution to
your liking.)
- The installation requires several hours
- Be sure to check the CG before the first flight

HELI - SCALE
Copyright ® 2011 - Reproductions interdites
www.heli-scale.fr
Merci d’avoir choisi notre fuselage classe 700 « Blue Thunder ».
Merci de lire attentivement ce manuel qui est composé de 2 parties
(Fuselage et Accessoires)
Equipement recommandé pour votre mécanique :
Servos DS610 ou équivalents
Lipo 4S 2500 MAH pour l’alimentation du fenestron
Lipo 6S 10 S pour le moteur principal
Pales de 660 700 mn
Récepteur 7 canaux minimum
Thank you for choosing our 700 Blue Thunder. Please read
through the instruction manual carefully before proceeding
with the assembly of the model.Please note that due to the
extensive details associated with this product the
instruction manual is divided into two parts, one for the
mechanic and one for the assembly of the accessories.
Equipment Recommendations
Rudder servo DS610 or equivalent.
4s 2500 Mah battery for tail motor.
Trex 600 or clone mechanic.
Main motor battery 6 s-10 s
Main blade 660-700 mm
Minimum 7 channel receiver.
Contenu du kit / Content List
Fuselage principal et fenestron pré-installé (moteur /tube) dans le tube de queue. Couples et
fenestron posés et collés
Main fuselage and tail. Wood formers pre glued and tail motor drive system with fenestron pre
installed. Dummy engine
Moteur factice, stabilisateurs verticaux et horizontaux, capots pour le tube de queue
Dummy engine components, dummy intake, components, horizontal tail and vertical fin and tail section
access opening covers.

HELI - SCALE
Copyright ® 2011 - Reproductions interdites
www.heli-scale.fr
C
Canon, phares, tourelle IR, arceaux du train, radars latéraux
Gun turret components, 20mm Vulcan cannon, microphone turret, Spotlights, IR sensor turret, side
sensors, components and landing gear struts.
Patron pour pose du train (à monter et à coller) et Anneaux de sécurisation du train
Landing gear gluing jig and landing gear struts wood bearer rings.
ESC pour le fenestron, manuel d’instruction de l’ESC, prises pour l’ESC à souder, vis pour
l’assemblage du tube de queue, tringlerie spéciale pour le rotor principal
Tail rotor Esc with instructions, one set of bullet connectors, fuselage stays components, tail fixing
screws and blind nuts, and extended rotor head pushrod.

HELI - SCALE
Copyright ® 2011 - Reproductions interdites
www.heli-scale.fr
Autocollant, patins du train, axe principal rallongé et câble en Y.
Decals, landing skids with metal skid end nipples, wire mesh, optional fuselage stays Long main shaft
for trex 600 and Y harness
Jeux de pare brise découpé au laser
One set of laser cut window panels
Vis pour : fenêtres, trappes d’accès moteur / fenestron, fixation train
Screws for securing window panels, access panels and landing skid securing screws.

HELI - SCALE
Copyright ® 2011 - Reproductions interdites
www.heli-scale.fr
Prés-assemblage / Pre Assembly
Avant de monter le tube de queue, merci de bien vouloir souder les connecteurs entre l’ESC et le
moteur du tube de queue. Note : La prise pour alimenter l’ESC n’est pas fournie mais doit être soudée
à ce moment là.
Before assembly please solder all the motor and ESC and battery bullet connectors to the tail motor
and tail motor ESC. Motor to ESC connectors are supplied. ESC battery connectors are not supplied.
Assemble du tube de queue (Fenestron compris) / Tail Fenestron
Assembly
L’ensemble tube de queue Fenestron est assemblé et posé en usine. Localiser les 3 trous à percer
comme indiqué sur la photo ci-dessous et percer les avec une mèche de 3mn.
The tail fenestron unit comes preassembled from the factory, so only minor assembly is required.
Locate the 3 claw nuts supplied and drill 3 holes in the tail for the 3 3mm nuts. Following photo is a
guideline for locating the 3 holes. After drilling the 3 holes install the claw nut on the inside face of the
tail.

HELI - SCALE
Copyright ® 2011 - Reproductions interdites
www.heli-scale.fr
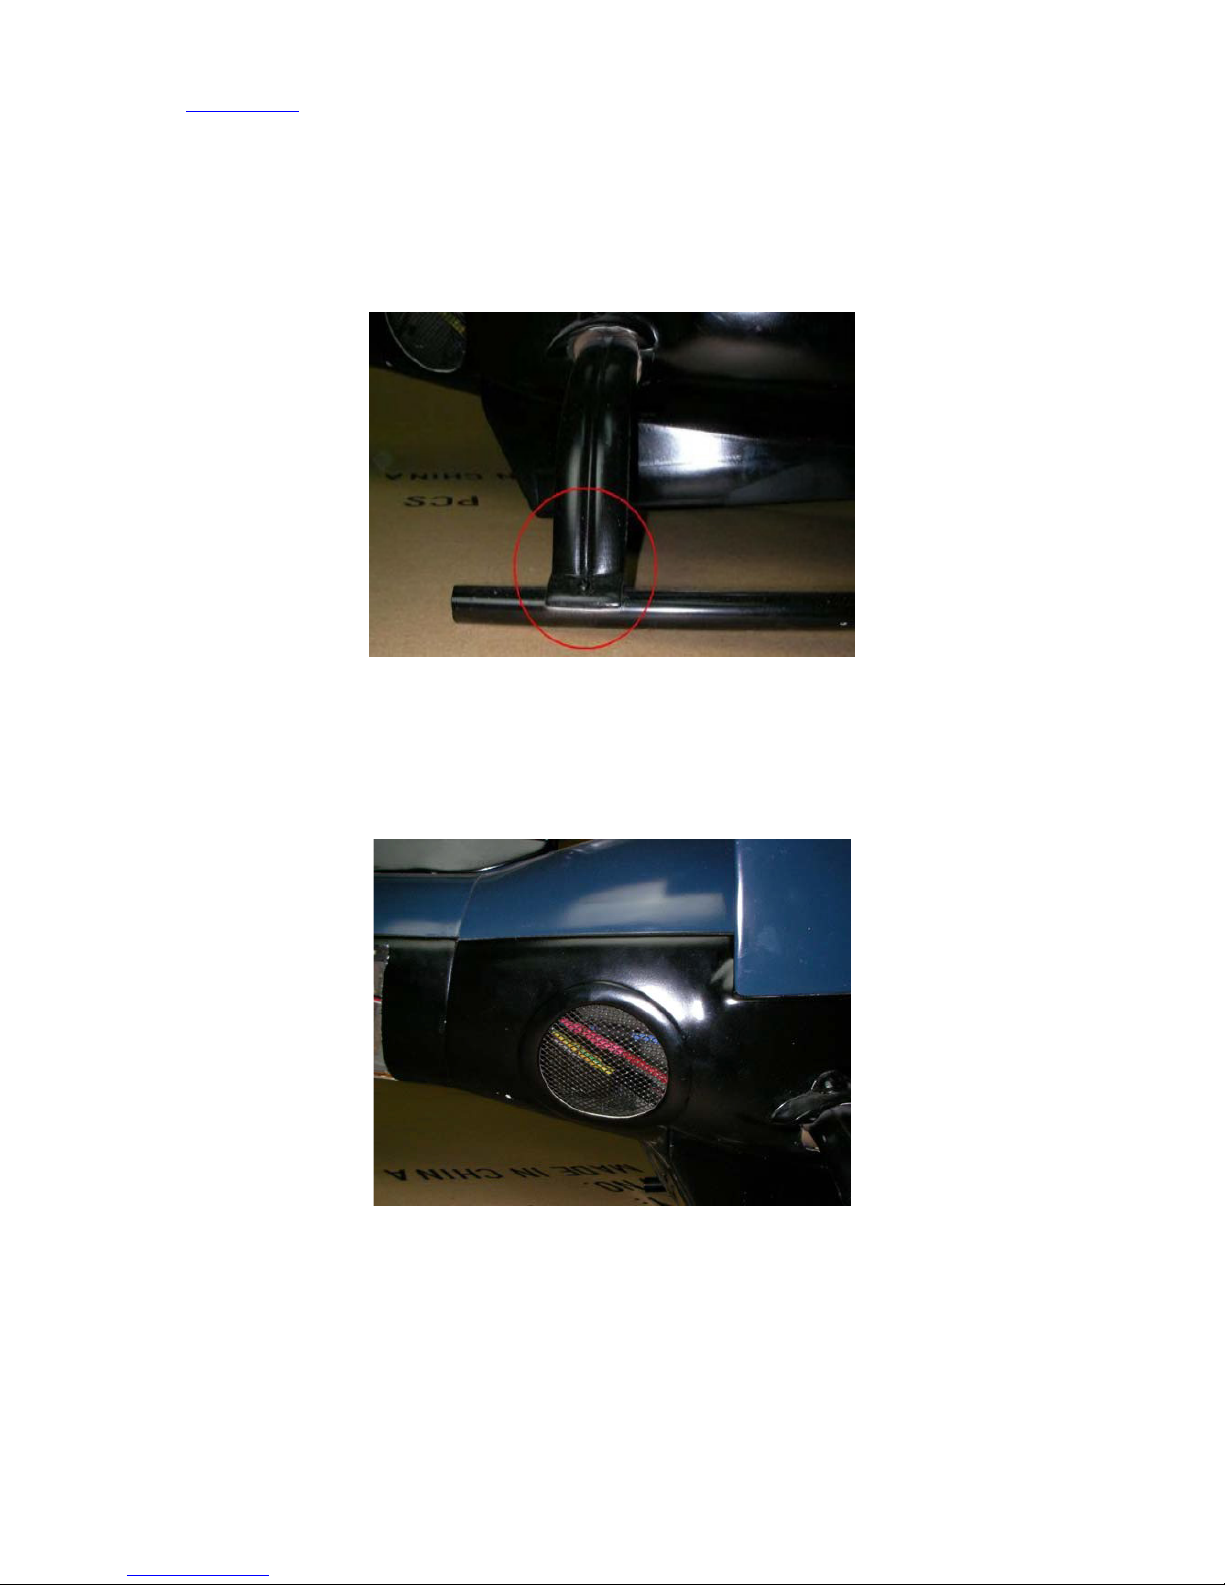
Positionner le tube de queue sur le fuselage principal, repérer et percer 3 autres trous dans le
fuselage principal. Puis installer les vis/ écrous. Nous recommandons d’installer des rondelles des 2
côtés (non fournies).
Offer the tail section up to the main fuselage section and transfer the location of the 3 holes over to the
main fuselage section. Drill the 3 holes for the 3 mm screws on the main fuselage.
Now glue the tail to the main fuse and use the 3 screws for further reinforcement. Photo shows the
installed screws.
Assemblage du train / Landing Skid Assembly
Repérer les 4 arceaux du train. Attention ils ne sont pas tous de la même longueur. Les longs sont
pour l’arrière!!
Locate the 4 landing skid cross members. Also locate and assemble the landing gear
gluing jig supplied with the model.
The cross members are the same for both left and right side. The longer cross member
is for the rear and the shorter one for the front.

HELI - SCALE
Copyright ® 2011 - Reproductions interdites
www.heli-scale.fr
Assembler et coller le patron pour le montage du train comme indiqué sur les photos ci dessous, puis
placer ce patron sous le fuselage afin de donner la bonne hauteur aux arceaux.
Assemble the landing skid gluing jig into the box in the following photo and place it under the main
fuselage.
Ajuster la position du patron comme indiqué sur la photo ci dessous : celui ci doit être à la hauteur de
la partie rectangulaire sous le fuselage.
After placing the gluing jig under the main fuselage, align the front of the jig with the front of the
fuselage rectangular protrusion on the fuselage bottom. See photo.

HELI - SCALE
Copyright ® 2011 - Reproductions interdites
www.heli-scale.fr
Repérer les 3 anneaux de renfort pour chaque arceau du train
Locate the skid cross member reinforcement rings as in photo. You need 3 rings per cross member.
Insérer chaque arceau dans le fuselage (utiliser les trous existants, un ajustement de ces trous peut
être nécessaire). La longueur des arceaux est définie par la hauteur du patron comme indiqué sur la
photo ci-dessous.
Insert the cross member into the already pre opened cross member holes in the fuselage sides. Slip
the reinforcement rings onto the cross members on the inside as shown in the following photo

HELI - SCALE
Copyright ® 2011 - Reproductions interdites
www.heli-scale.fr
Insérer les anneaux sur chaque arceau et ajuster le tout.
Arrangement of the reinforcement rings. Same for all four sides
Quand tout est en place et correctement ajusté (hauteur) coller l’ensemble à l’époxy lente comme
indiqué sur la photo ci-dessous. Répéter l’opération sur les 4 arceaux.
Once the desired landing skid height and location is set, use ample epoxy to glue the reinforcement
rings at the location shown on the following photos. Same for all four sides.
HELI - SCALE
Copyright ® 2011 - Reproductions interdites
www.heli-scale.fr
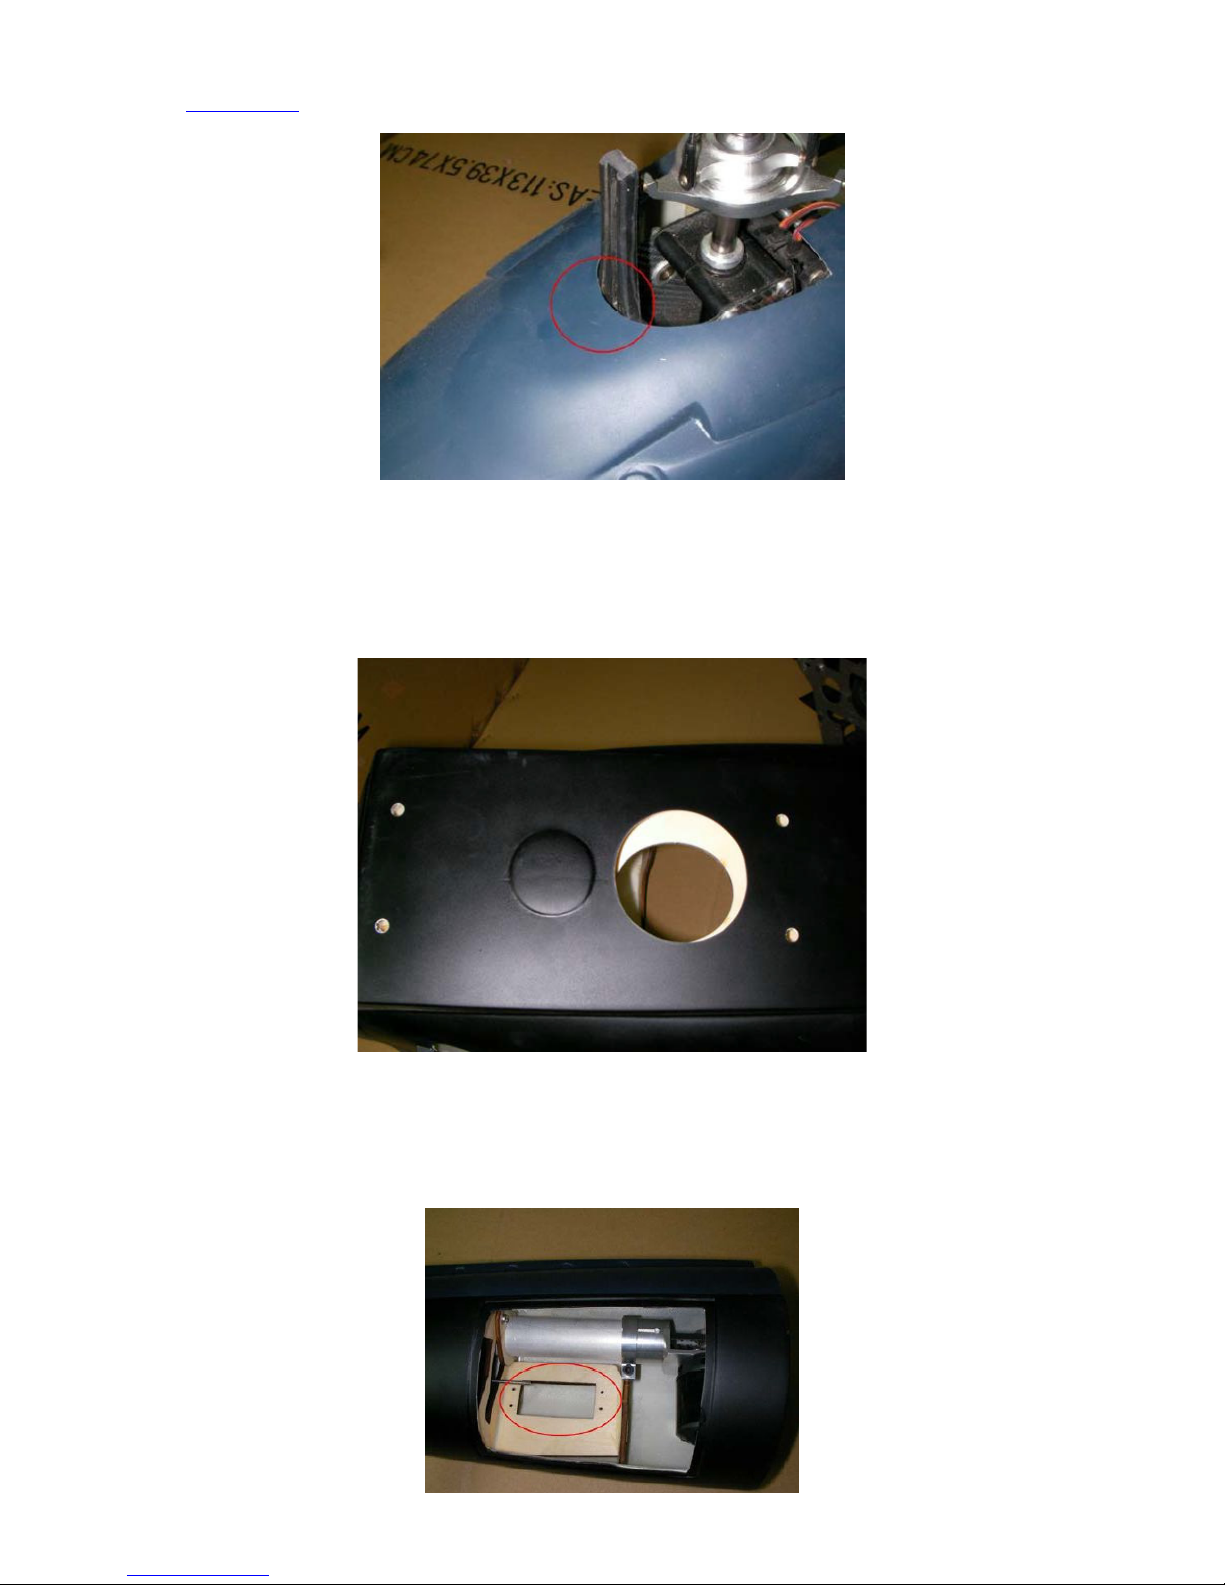
Lorsque tout est bien sec (24h), percer un trou sur le dessus de chaque arceau, comme indiqué sur la
photo ci-dessous. Sécuriser avec la vis adéquate et utiliser de l’époxy pour verrouiller le tout.
After gluing the skid cross members and its reinforcement rings, drill a hole on each cross member
through to the metal landing skid at location in photo. Use epoxy and sheet screw to secure the
landing skid to the cross members.
Coller le grillage à l’intérieur du fuselage comme indiqué sur la photo ci-dessous des 2 côtés inférieurs
arrière.
Now locate the supplied wire meah and glue it on the inside of the two openings on the side and st the
rear of the main fuselage.

HELI - SCALE
Copyright ® 2011 - Reproductions interdites
www.heli-scale.fr
Installation de la mécanique / Installing Mechanics
Sur votre mécanique, enlever le tube de queue ainsi que les vis inutiles.
On your mechanic, remove the tail boom from the tail boom holder and set aside the unused screws.
Démonter la tête de rotor de l’axe principal. Puis insérer le châssis dans le fuselage sur le couple
principal. Pour une mécanique ALIGN électrique, les trous du châssis (des vis du train) doivent
correspondre à ceux du couple principal. Ajuster le tout.
Disconnect the swashplate side ball links and slide the mechanics into the main fuselage. Align the
mechanic mounting holes with the predrilled holes on the factory installed base board.
Il est tout a fait possible d’avoir à retailler l’ouverture supérieure pour le guide du plateau cyclique en
fonction de votre mécanique. Utiliser un outil type « Dremel » pour effectuer cette opération.
You might need to trim the area on the top of the main fuselage for your mechanic's mounting holes to
line up with the base board holes.
HELI - SCALE
Copyright ® 2011 - Reproductions interdites
www.heli-scale.fr
Fixer la mécanique à l’aide des vis fournies avec le train d’origine de votre mécanique. Utiliser les
trous qui se trouvent sur le dessous du fuselage.
Secure the mechanic using the bolts supplied with your mechanic. Screw the bolts in from the bottom
through the pre drilled holes on the bottom of the main fuselage.
Installer le servo d’anti couple sur le support dans le tube de queue. La tringlerie est déjà installée en
usine. Il sera simplement nécessaire d’ajuster la tringlerie en fonction de votre servo.
Install the rudder servo into the preinstalled rudder servo plate inside the tail. The rudder pushrod is
preinstalled as well. You need only fine tune the length for your specific servo only.

HELI - SCALE
Copyright ® 2011 - Reproductions interdites
www.heli-scale.fr
Servo installé.
Servo installed
IMPORTANT / IMPORTANT
A ce stade du montage, nous recommandons fortement d’effectuer un vol de test, afin d’optimiser le
tout à votre manière de voler et afin de vous familiariser avec le fenestron.
At this point of the assembly, HELI-SCALE highly recommend that you test fly the basic
airframe first to get the setting adjusted to your style of flying and to get used to the
handling characteristic of this new independent tail drive system (ITDS)
Mise en service du système AED Fenestron pour le premier vol test /
Setting up of the ITDS for first test flight.
Sécuriser l’ESC avec un collier type « Riselan » sur votre mécanique. Un câble en « Y » est fourni
dans le kit afin de relier l’ESC principal et l’ESC pour le Fenestron. Connecter ensuite ce câble ne
« Y » sur la voie des gaz sur votre récepteur (voie 3 en principe : reportez vous à la notice de votre
radio). Le système fonctionnera correctement en «IDLEUP» activé, veiller à régler votre radio
correctement lors de cette phase de vol. C’est l’ESC du moteur principal qui va contrôler en temps que
«Maître», l’ESC du moteur du fenestron qui lui se retrouve «Esclave ». Pour le premier vol test nous
recommandons un IDLEUP à 80%. Ajuster en fonction de votre style de vol ce pourcentage.
Hook up the ESCs and Motors as you normally would. Locate and secure the ESCs to
your desired locations. A "Y" lead/harness is supplied in the kit for you to link the main
and tail ESCs. Connect them up and plug the Y lead into the throttle channel of your
receiver. To utilize the tail motor drive successfully, you will need to set idle up for the
throttle, the main throttle will slave the tail motor ESC and will both operate at the
same idle setting. For the first test flight we recommend a idle up throttle setting of
80%. After the first flight, you can then fine tune the idle up setting to suit your flying
style.
Afin d’alimenter un correctement le système moteur /ESC pour le fenestron, il est recommandé
d’utiliser un Lipo 4S 2500mah indépendant.
For the tail motor drive system we recommend the use of a separate 4s Lipo of 2500mah capacity
.

HELI - SCALE
Copyright ® 2011 - Reproductions interdites
www.heli-scale.fr
Procédure de mise en marche / Battery Pluggin In Procedure
Voila la procédure de mise ne marche pour le système de fenestron.
Before your first flight here is the recommended procedure for plugging in the batteries.
1. Allumer la radio et vérifier que le manche des gaz est bien en position basse et que l’inter pour
l’IDLUP soit bien en position normale ou désactivé.
1. Turn on your transmitter making sure that the throttle stick is at low and the idle switch is at normal
or off.
2. Allumer le récepteur.
2. Power up the receiver.
3. Brancher l’accu pour alimenter l’ESC et le moteur du fenestron
3. Plug in the battery to the ESC of the REAR motor.
4. Brancher l’accu principal pour alimenter le moteur et l’ESC principal (celui du rotor)
4. Plug in the main battery to the main drive ESC.
5. Passer en IDLEUP et voler !
5. Switch to idle up and GO FLY!
Note importante: Lors de la phase de démarrage, le Fenestron va se mettre en marche avant le Rotor
principal, ce qui est normal. Il suffit simplement de s’accommoder à cette nouvelle procédure.
You will notice that on startup, the tail rotor will spin up first before the main rotor blades, this is
desirable. You just need to get use to it.
Après avoir testé correctement et affiné vos réglages pour le vol, vous pouvez maintenant passer à la
2ieme partie du manuel de construction (Blue_thunder_part2_700.pdf)
After thoroughly testing and enjoying our new system, you can now proceed to the second part of this
manual to dress up your BLUE THUNDER !
HELI-SCALE propose toute une gamme d’accessoires pour
personnaliser votre modèle, à découvrir sur : www.heli-scale.fr
HELI-SCALE propose a lot of various accessories for your scale
fuselage, you can discover them on : www heli-scale fr
Bon vol, Enjoy,
L’équipe d’HELI-SCALE / HELI-SCALE team
www.heli-scale.fr
Table of contents
Other Heli-scale Toy manuals


