Heli-scale Bell HUEY 412 User manual

HELI - SCALE Copyright ® 2012 - Reproductions interdites
www.heli-scale.fr
Manuel d’assemblage
Instruction manual
Bell HUEY 412
Part 2
Cher client,
Merci d’avoir choisi un fuselage/accessoire HELI - SCALE.
Toute l’équipe vous souhaite une bonne construction et de bons vols.
Dear customer
Thank you for choosing a scale fuselage/accessories HELI-SCALE
All our team wishes you a lot of fun and good flights.
HELI –SCALE
www.heli-scale.fr

HELI - SCALE Copyright ® 2012 - Reproductions interdites
www.heli-scale.fr
IMPORTANT
Merci de bien vouloir lire et respecter cette notice de montage
étape par étape.
- Avant le collage de certaines pièces, celles-ci doivent être
totalement sèche.
- Les Hélicoptères modèles réduits ne sont pas des jouets : un
mauvais usage de ce produit peut causer des dommages
matériels et corporels très important dont la mort
- Le fabriquant et le revendeur déclinent toutes responsabilités
sur l’utilisation de ce produit.
- Ce produit est destiné à être utilisé par un adulte responsable,
assuré sur un terrain de modélisme officiel.
- Vérifier le réglage votre machine avant le premier vol.
- Vous êtes entièrement responsable du montage et du réglage.
Nous n’assurons aucun service après-vente ou quelconque
garantie après son achat et son montage.
- Volez uniquement dans des endroits sûrs et adaptés à la
pratique du modélisme.
- Ne pas voler proche des habitations ou des lieux fréquentés
par des passants et ou des enfants.
- Les modèles réduits peuvent être la cause d’accidents, de
pannes de différentes natures dont le manque de
maintenance, une erreur de pilotage, des interférences radios,
etc…
- Le pilote est entièrement responsable de sa machine, donc de
tous les dommages qu’il pourrait causer en utilisant un
modèle réduit. Soyez responsable !
- Pensez à renforcer les couples en bois qui supportent le
châssis avec du tissu carbone, au niveau de la jointure entre
ceux-ci et le fuselage.
- Il est conseillé d’améliorer le système existant de fixation avec
un système de verrouillage manuel de la cabine (visses ou
autre solution à votre guise.)
- Le montage nécessite plusieurs heures
- N’oubliez pas de vérifier le centrage avant le premier vol.

HELI - SCALE Copyright ® 2012 - Reproductions interdites
www.heli-scale.fr
IMPORTANT
Thank you to please read and follow the installation
instructions step by step.
- Before the bonding of certain parts, they must be completely dry.
- The Helicopter models are not toys: misuse of this product
may cause damage and injury is very important that the death
- The manufacturer and retailer assume no responsibility for the use
of this product.
- This product is intended for use by a responsible
adult, provided on a plot of the official model.
- Check the setting on your machine before first flight.
- You are fully responsible for the assembly
and adjustment. Microsoft makes no after sales service or any
warranty after purchase and installation.
- Fly only in safe and suitable for the practice of modeling.
- Do not fly close to homes or places frequented by passers-
by and or children.
- The models can be the cause of accidents, breakdowns of various
kinds including lack of maintenance, pilot error, radio interference,
etc ...
- The driver is fully responsible for his machine, so for any
defect it may cause by using a model. Be responsible!
- Remember
to strengthen couples wooden support frame with carbon
cloth, at the joint between them and the fuselage.
- It is recommended to improve the existing system of fixation
with a locking system manual of the car (screws or other solution to
your liking.)
- The installation requires several hours
- Be sure to check the CG before the first flight

HELI - SCALE Copyright ® 2012 - Reproductions interdites
www.heli-scale.fr
Notre kit est compatible avec diffèrent type de mécanique, ci-dessous les abréviations :
- (REX) = Trex600EP ou 100% similaire
- (RAP) = Raptor.50 V1 ou V2 ou Stinger.50 our 100% similaire
- (HS) = Hirobo Sceadu ou 100% similaire
-(ALL) = toutes les mécaniques sont concernées REX+RAP+HS
Par défaut les instructions sont communes à toutes les mécaniques. Réaliser les opérations
seulement pour votre mécanique repérée par les abréviations ci-dessus.
Vous aurez aussi besoin des éléments suivants afin de construire le kit :
Colle époxy, ruban adhésif, cyano, outils divers du modéliste…
There are different Fuselage Kit contents; depending on your model helicopter‘s existing mechanic.
Therefore we use this abbreviations:
- (REX) = Trex600EP or 100% similar
- (RAP) = Raptor.50 or Stinger.50 or 100% similar V1 or V2
- (HS) = Hirobo Sceadu or 100% similar
-(ALL) = concerned for all type = REX+RAP+HS
You need the usual Tools and Adhesives, like 5-minute epoxy glue and thick / thin Superglue (CA).
Montage support Servo AC (REX)
Afin de monter correctement le support en bois du servo d’AC, découper le support plastique inférieur
d’origine de votre châssis comme indiqué sur la photo ci-dessous. Poncer ajuster si besoin afin
d’insérer le support en bois.
Tail servo mounting (REX)
For a good fit of the wooden tail servo holder, the lower TRex plastic connector has to be cutted /
rasped a little bit at it‘s back end. See Pictures.
HELI - SCALE Copyright ® 2012 - Reproductions interdites
www.heli-scale.fr
Percer des trous de 1,5mm pour la fixation comme indiqué sur la photo ci-dessous
As usual with tail tubes too, pre-drill 1.5mm and use 4 self-tap screws to fix the new REX plates
against any movements. See picture.
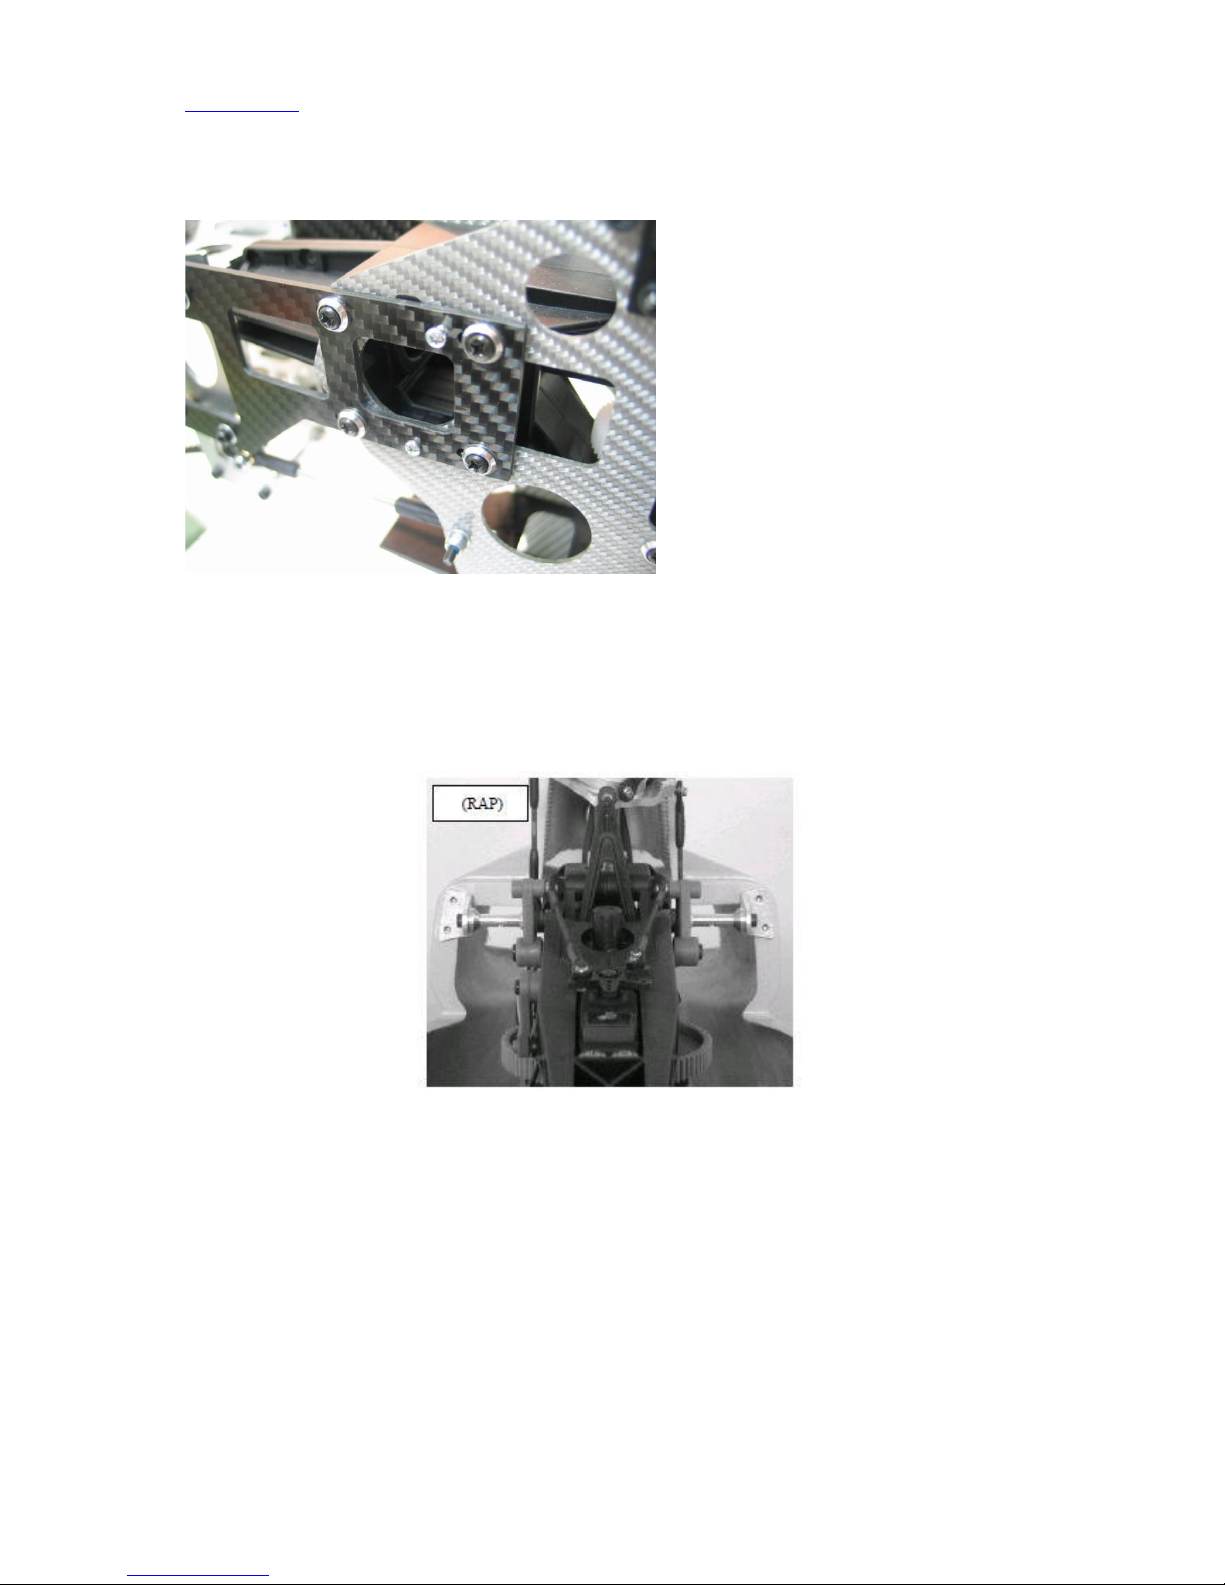
(ALL) Installer la mécanique dans le fuselage.
(HS) : Percer des trous de 3mm dans le châssis si besoin
(ALL) Install the new Post at the mechanic.
(HS) Drill new 3mm holes into the chassis if necessa-ry.
(ALL): découper le fuselage afin de permettre le passage du support de cockpit
(ALL) Make a suitable cutout for the front wood Cockpit holders.
HELI - SCALE Copyright ® 2012 - Reproductions interdites
www.heli-scale.fr
Integration Mécanique / Place your Mechanic
(RAP): Le couple pour le raptor doit être construit avec un manuel spécial (nous consulter).
(RAP): The RAP base have to be built according the separate PDF that is available. Screw on the
Mechanic like you used to do with the standard braces.
(HS): Visser votre mécanique via les trous du train en mode trainer. Utiliser les 4 écrous /bois depuis
le dessous.
(HS): Screw on the Mechanic like you do with the standard HS braces. Use the 4 special wood-nuts
from the bottom.
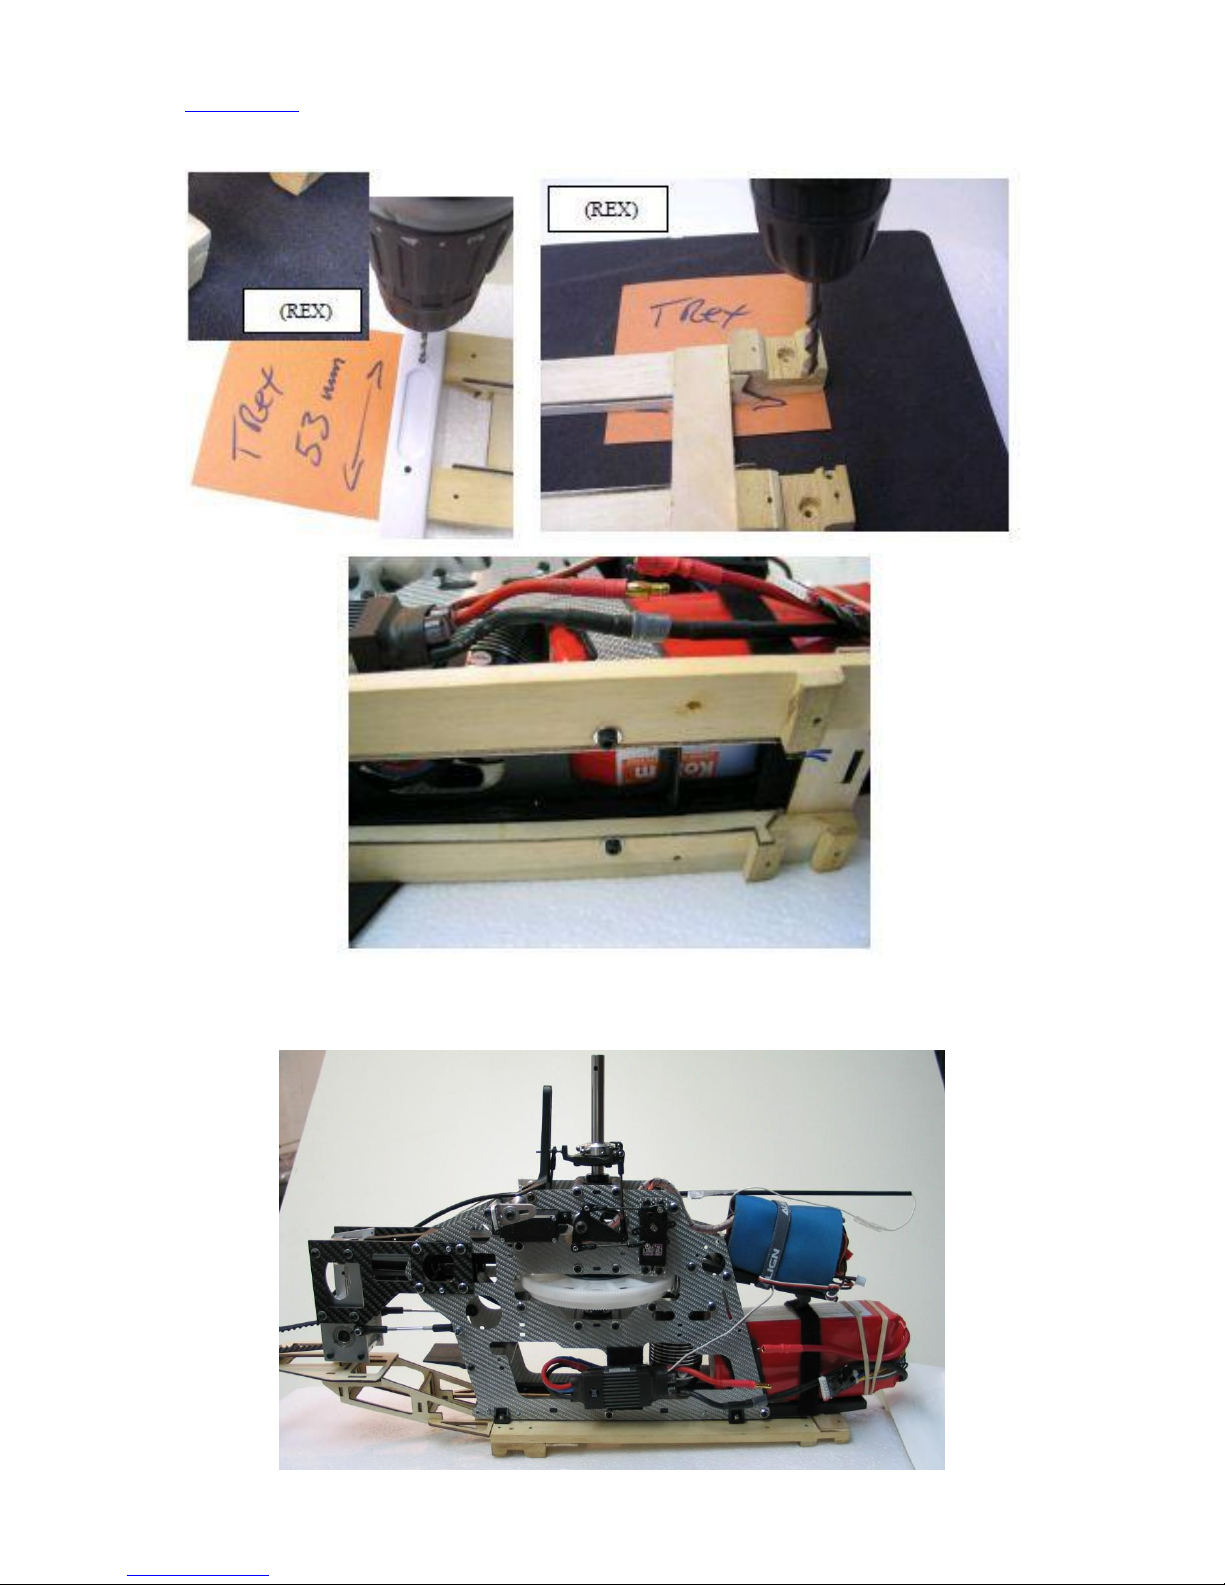
(REX): Positionner votre châssis sur le couple, bien centré la mécanique sur le couple. Marquer
ensuite les 4 trous pour la fixation. Percer des trous de 3mn (X4). Utiliser les arceaux de votre trainer
pour repérer les trous à faire. Effectuer 2 trous pour les vis M3 qui fixera la mécanique sur le couple.
(REX): Place your prepared REX mechanic (see Part2) exactly centered on the wodden base, next to
the end of the base then mark all 4 holed of the brace holders (see photo above). Drill the 4 marked
3mm holes; you can use the T-rex brace as a drilling guide. Make two blind holes hole as shown
just for the M3 hex screws heads. Screw on the mechanic now.
HELI - SCALE Copyright ® 2012 - Reproductions interdites
www.heli-scale.fr
(ALL): Vue d’ensemble d’un montage sur base de T-rex. Cela doit ressembler à la photo ci-dessous
(ALL): Now your pre-finished RAP/REX/HS mechanic should look like our Sample with the Trex below.
We will mount it precisely into the fuselage; this is the procedure:
HELI - SCALE Copyright ® 2012 - Reproductions interdites
www.heli-scale.fr
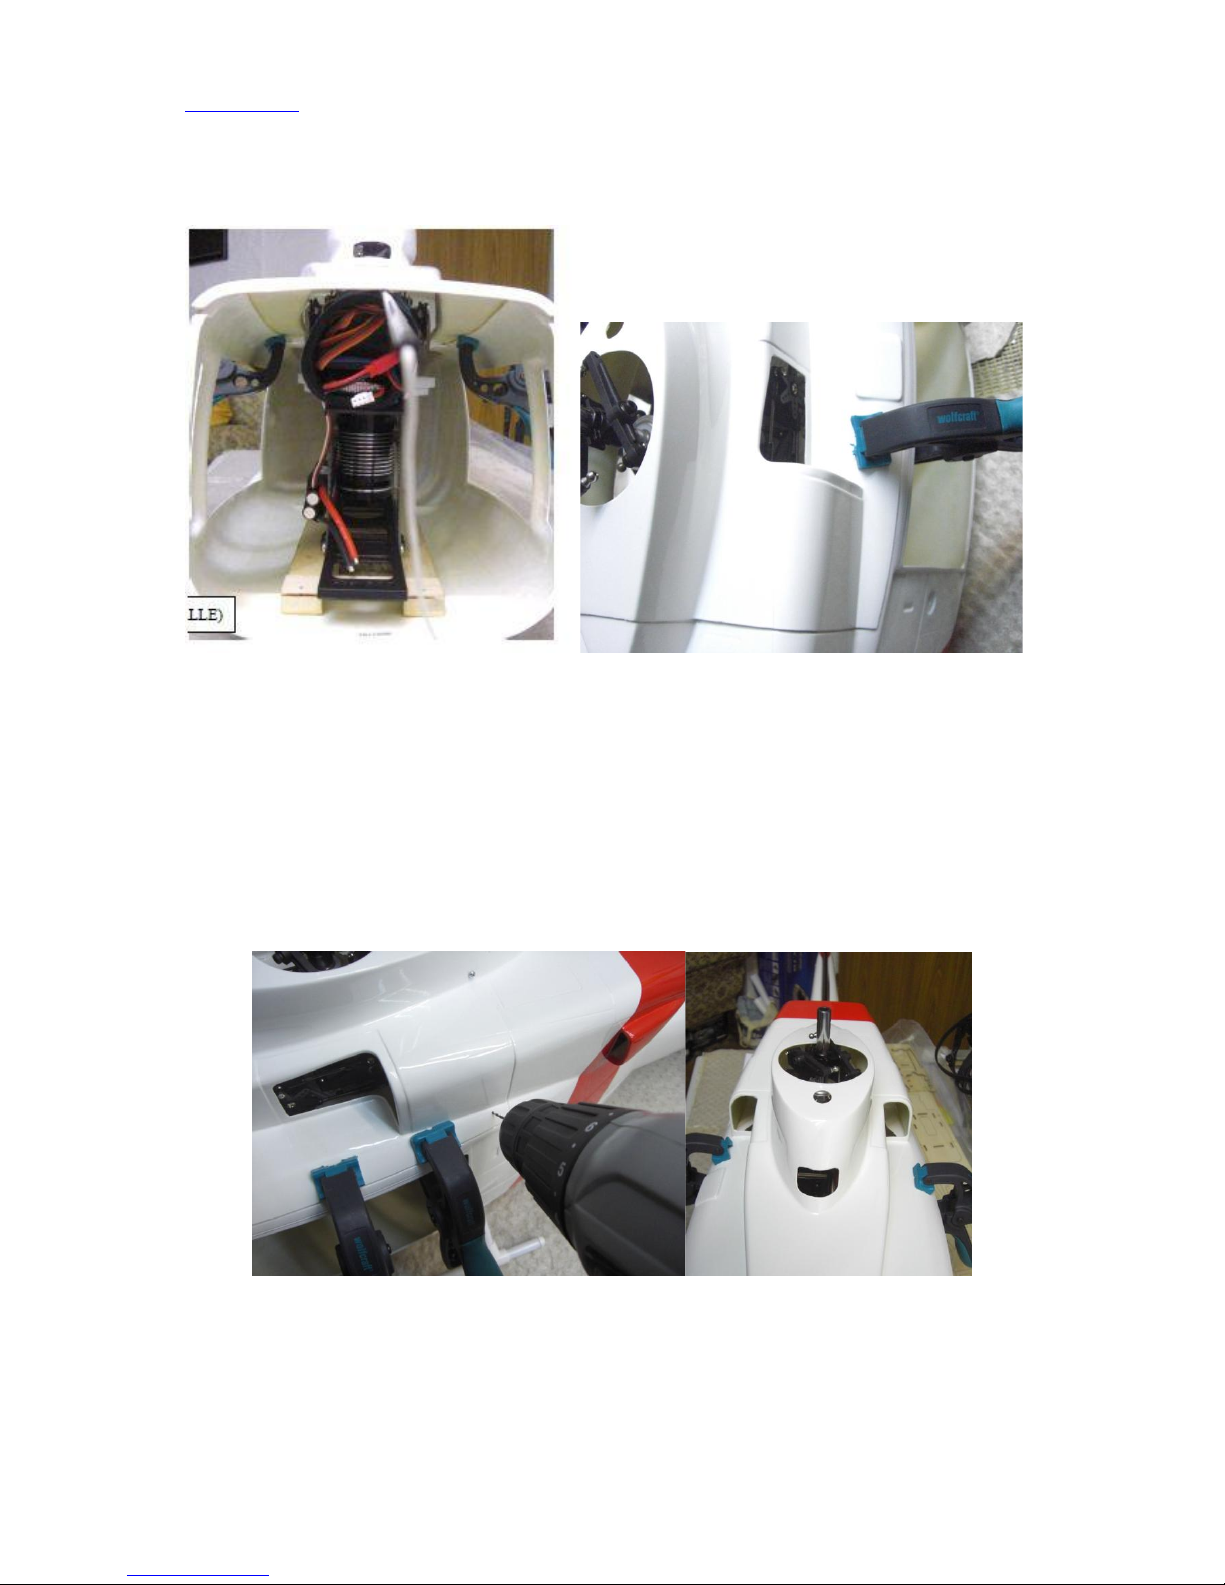
Glisser la mécanique dans le fuselage. Faire tenir le capot supérieur avec des pinces
Slide in and center it always with the use and aid of the Dome Roof / the Doghouse! See Pics..
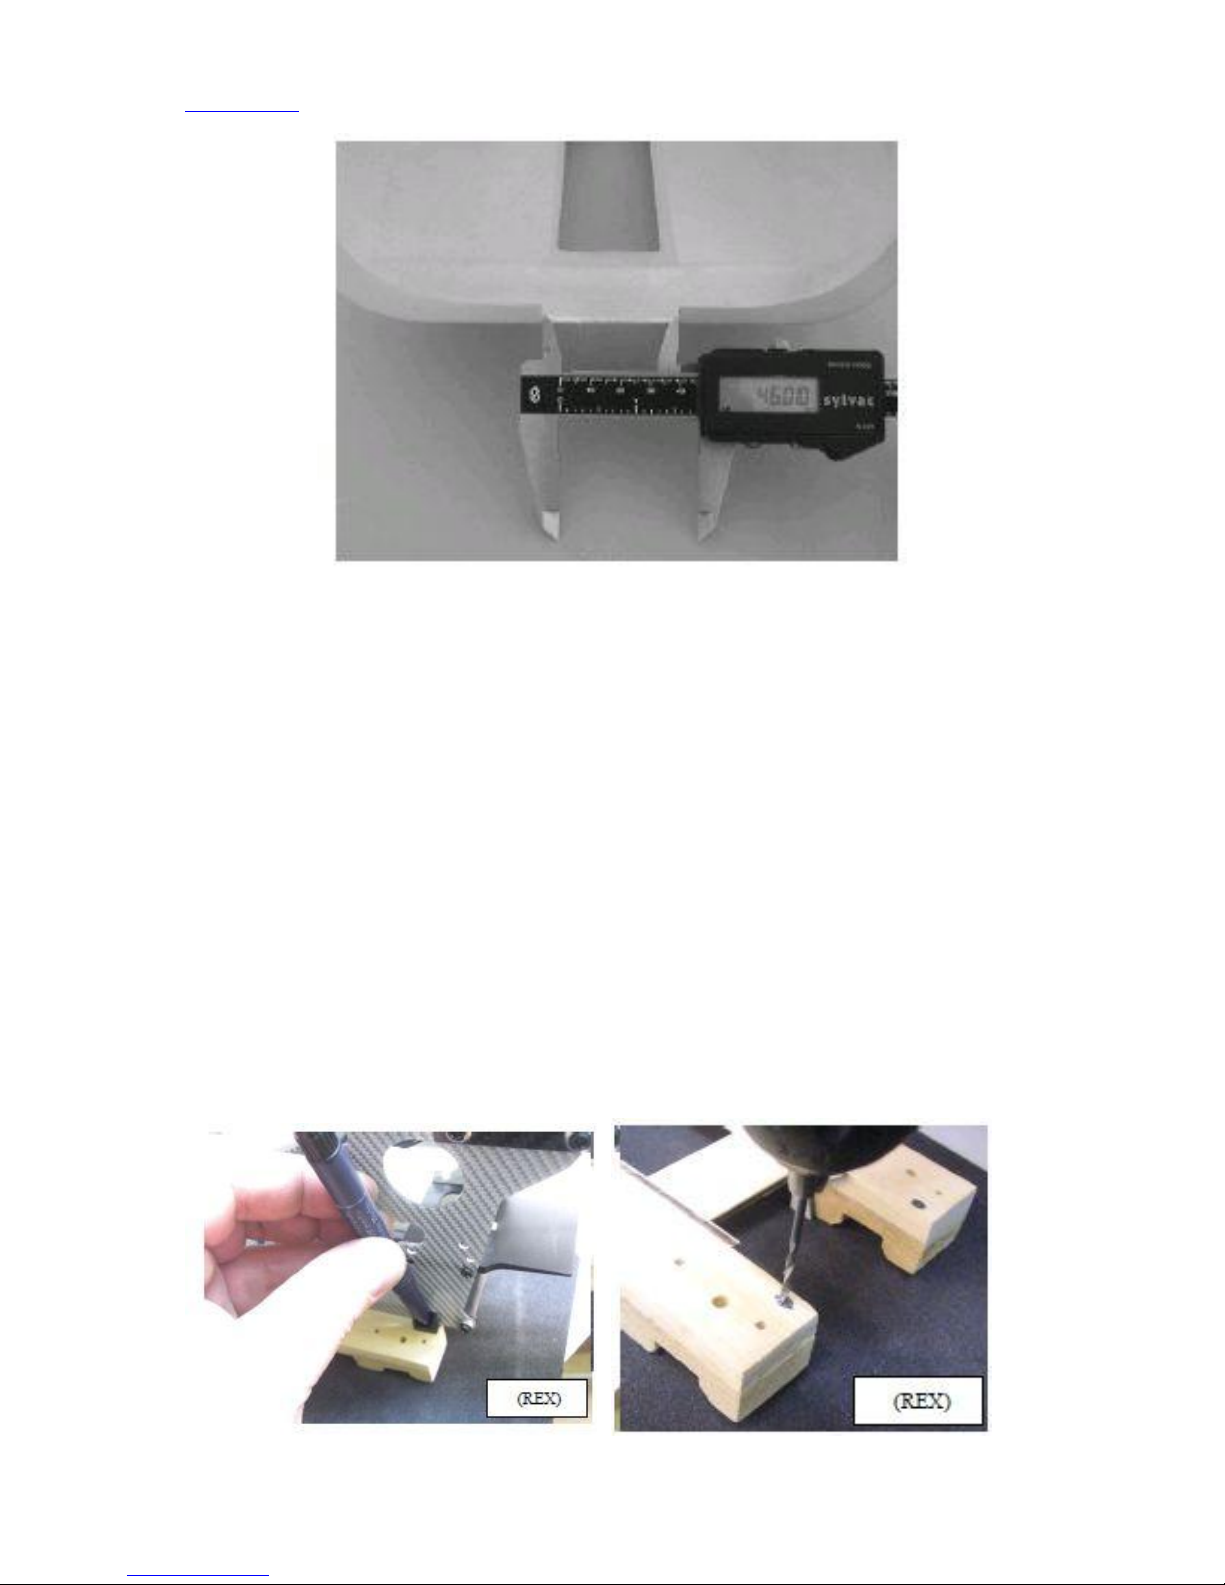
Le centrage de la mécanique couple sera plus précis si vous sécuriser le capot supérieur avec des vis
(X4). Ensuite déplacer doucement l’ensemble Mécanique/ couple afin de se retrouver avec le l’axe
principale au centre du trou du capot supérieur. Ajuster si besoin le centrage. Enlever ensuite le capot
supérieur pour la suite. Mesurer ensuite la même distance entre les bords de votre châssis et le flan du
fuselage.
Precise centering is much easier if you screw on the Dome hood now with a 4 screws at each edge.
Then, carefully center the wooden base with the help of a ruler. Take measures at 4 points as shown in
the sample pictures below. Then remove the Dome but don‘t change the bases position again.

HELI - SCALE Copyright ® 2012 - Reproductions interdites
www.heli-scale.fr
(ALL): utiliser une mèche de 2,5 mm avec un peu de peinture pour marquer /repérer les trous à faire
dans le fuselage à l’avant et a l’arrière.
(ALL ): Use a 2.5mm drill and a little bit of paint to mark the found base position on the belly of the
fuse as shown in the pictures.

HELI - SCALE Copyright ® 2012 - Reproductions interdites
www.heli-scale.fr
Enlever ensuite la mécanique et le couple du fuselage, puis percer les trous marqués à la peinture à
l’aide d’une mèche de 2,6 à 3mm. Ensuite utiliser les 4 vis, 8 rondelles et écrous pour monter et
assemble ensemble le train, le couple et la mécanique.
Remove the mechanic and pre-drill exactly at the markings, then finish the holes from outside by
drilling 2.6mm –3.0mm. Stand in the mechanic again. In future use the provided 4 clamps, 8 washers
and 8 self-tapping screws to bolt the skids, the fuselage and the mechanic all together.
(ALL Nitro): Découper une ouverture afin d’accéder au pot d’échappement. Utiliser les vis fournie
dans le kit pour nitro pour l’assemblage.
(ALL Nitro): Drill a fitting opening for the diverter of your Muffler into the belly of the fuse.
Use the provided screws and washers to bolt together the skids and the mechanic.
(ALL): Installer les renforts entre la mécanique et le fuselage. Un sur chaque flan. Ajuster la distance
si besoin. Percer et visser. La symétrie doit être parfaite. Il est possible d’avoir à ajouter des cales en
bois pour renforcer le tout (épaisseur).

HELI - SCALE Copyright ® 2012 - Reproductions interdites
www.heli-scale.fr
(ALL): Screw the body retainer at the pre-installed new Canopy posts. Adjust the retainer to just
contact the fuselage, then re-center the dome and use a pen to mark at the retainer mounting holes as
shown below.
Drill the holes at the marks and screw on the Retai-ners. Maybe glue in some wood stiffeners before.
Note: These fitting must be there, be strong bolted (Locktite) and they play a big role in taking the
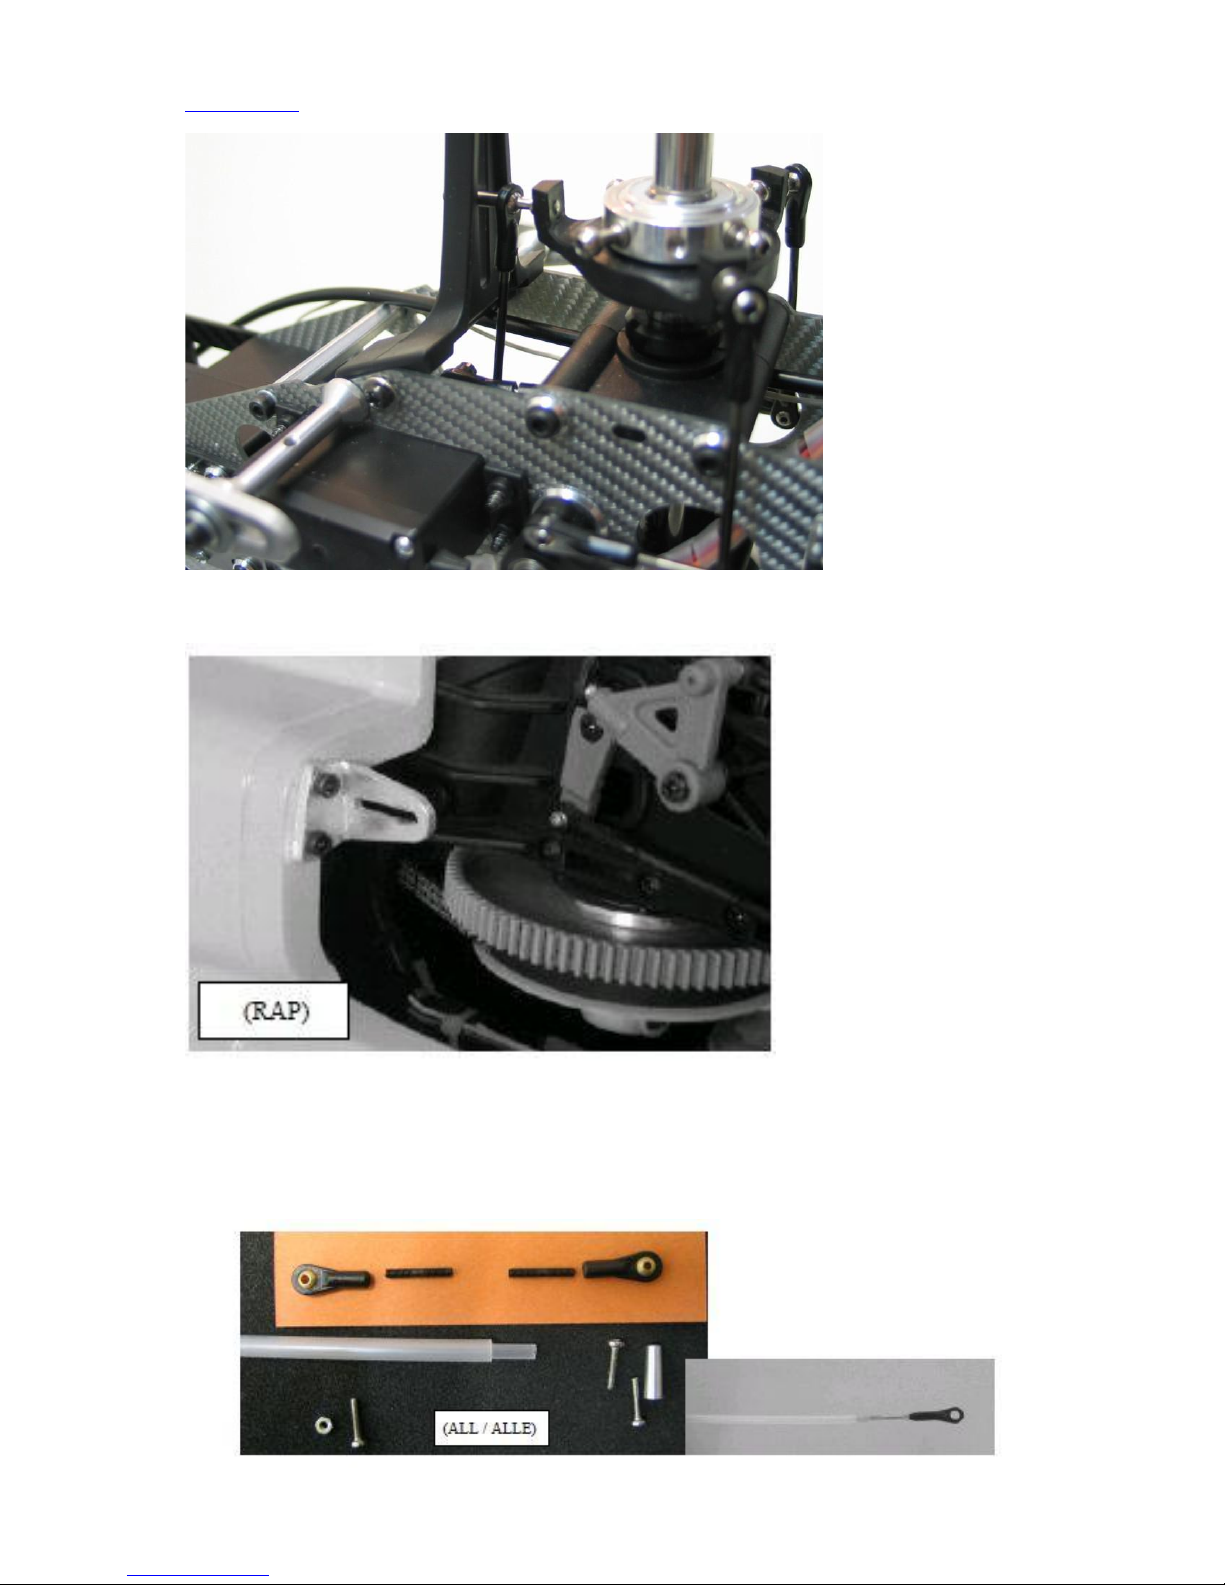
tension of the main belt into the mechanics. See the samples right below.
Pour / FOR (REX):
HELI - SCALE Copyright ® 2012 - Reproductions interdites
www.heli-scale.fr
Pour /FOR (RAP):
(ALL): Utiliser la tringlerie du kit pour le servo d’AC sur la photo ci-dessous. Insérer la tringlerie dans
les tubes et monter votre servo d4AC sur son support avec les chapes.
(ALL): Locate the Tail Pitch pushrod and its special fittings. Thread the short rod into the tube and the
ball end on the other end as shown. Mount the Tail servo in the Servo holder and the Ball on the
steering lever. See the samples right below.

HELI - SCALE Copyright ® 2012 - Reproductions interdites
www.heli-scale.fr
(ALL): Coller le tube sur le couple ne bois en le laissant dépasser de 35mm sauf si vous posséder un
RAPTOR V2 (ne pas coller le tube).
(ALL ) : Stick the Pitch pushrod outer tube into the both ribs leaving a min. 35mm end stick out.
(REX / HS): Enlever la mécanique du fuselage et positionner le couple en bois dans la queue, puis
colle le a l’époxy.

HELI - SCALE Copyright ® 2012 - Reproductions interdites
www.heli-scale.fr
(REX / HS): Remove the mechanic and epoxy the rib in place where the rib just tie fit in the tail. Let
the tube 35mm stick out. Let it dry.
Attention: le sens du couple n’est pas le même pour les REX/HS et les RAP !!
Remember, the RAP tube runs on the RIGHT side, the REX and HS on the LEFT side.
(REX /HS): (RAP) :
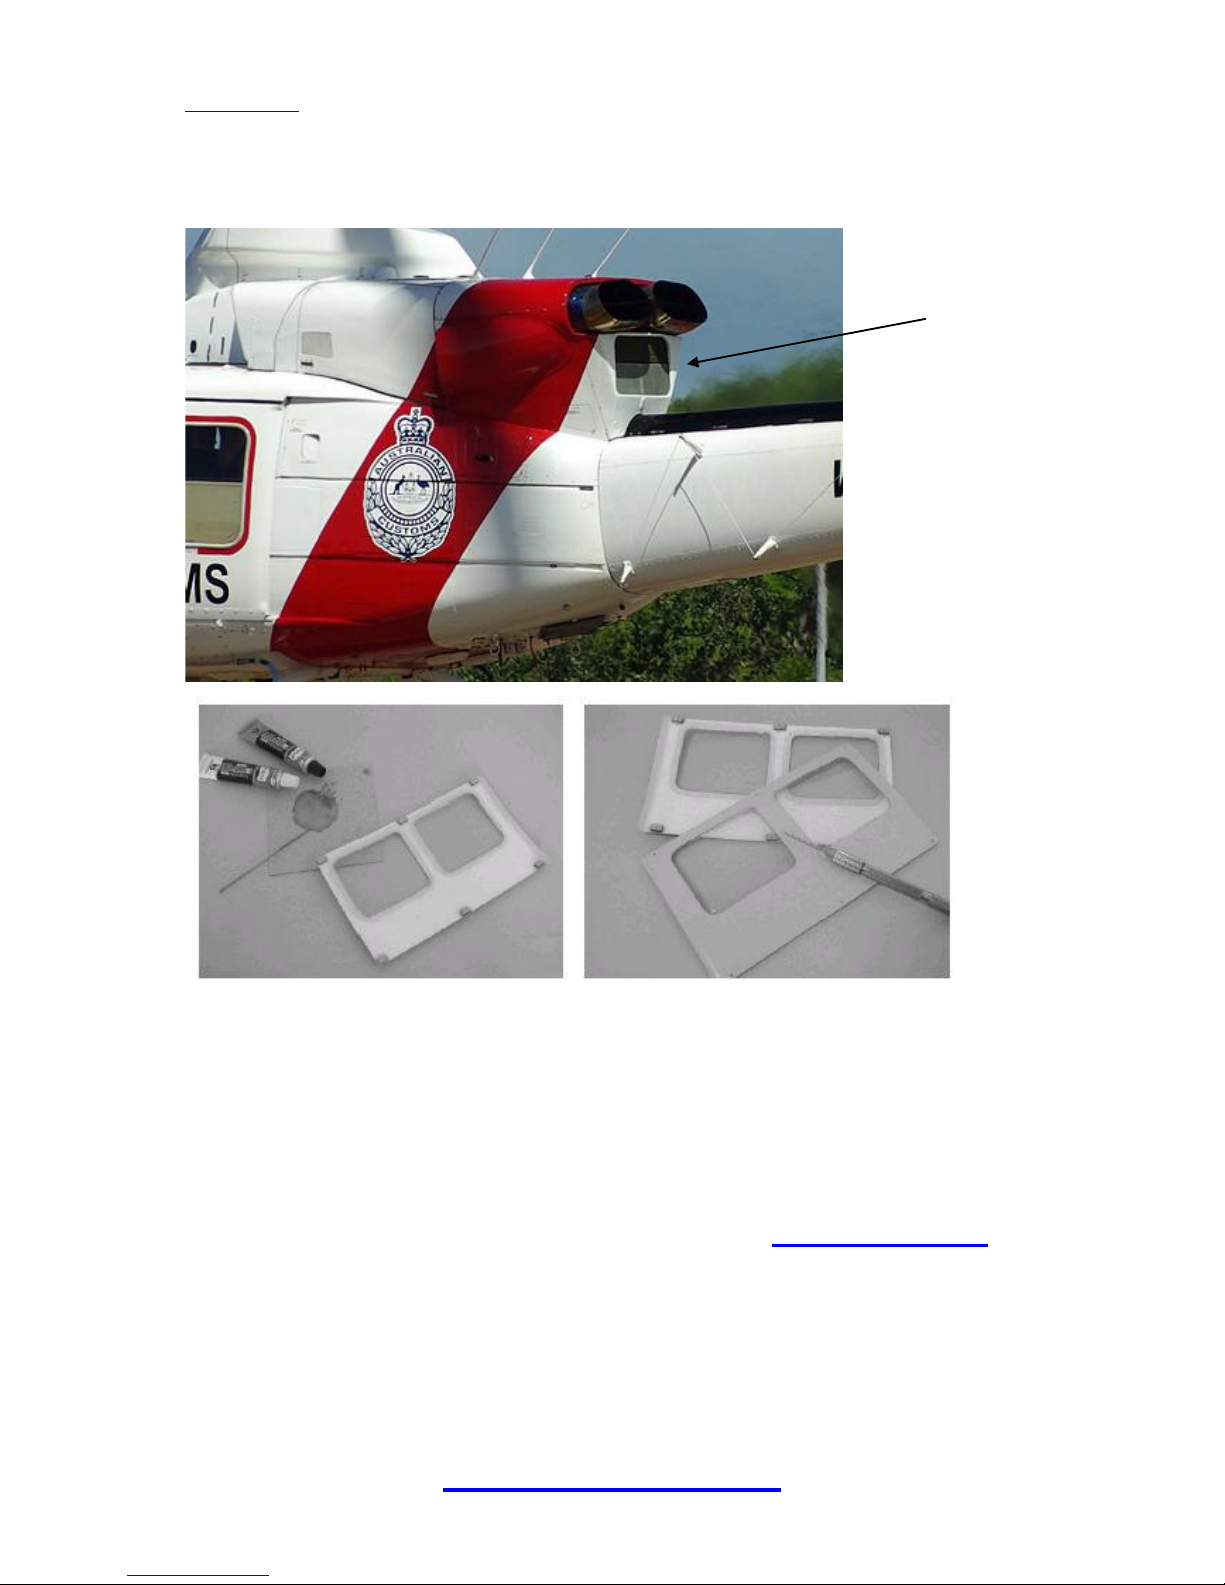
(ALL): poncer le contour intérieur et coller à l’époxy les tuyères, bien respecter le sens
(ALL): Sand the glue area (as usual) and glue in the exhaust that way, it has some space around itself
against the Fuselage
(ALL): Coller ou visser la grille d’aération sous les tuyères. Coller ensuite les aimants (non fournis) si
vous souhaitez faire une porte latérale ouvrante.
HELI - SCALE Copyright ® 2012 - Reproductions interdites
www.heli-scale.fr
(ALL): Now is a good time to glue or screw the ‚Back Cooler‘ plastic part at the upper main fuses end.
Same with the doublers on the doors and inside the fuselage. (Skip this if You make slide doors, see
the „412 Tip‘s Manual“). If you want to install a center hook or any scale lighting at the model, fix the
electrics and twisted electric lines better now. Mount the cockpit parts, too.
Merci de continuer le montage avec le fichier PDF suivant :
« Bell412_FR_EN_PART3.pdf »
Please continue building using PDFfile :
« Bell412_FR_EN_PART3.pdf »
HELI-SCALE propose toute une gamme d’accessoires pour
personnaliser votre modèle, à découvrir sur : www.heli-scale.fr
HELI-SCALE propose a lot of various accessories for your scale
fuselage, you can discover them on: www.heli-scale.fr
Bon vol, Enjoy,
L’équipe d’HELI-SCALE / HELI-SCALE team
www.heli-scale.fr
Table of contents
Other Heli-scale Toy manuals


