Helicute H817 User manual
USER MANUAL

INDEX
1.0 GENERAL INFORMATION
2.0 PRODUCT CONTENTS
3.0 SAFETY PRECAUTIONS
1.0 General Information
2.0 Product Contents
3.0 Safety Precautions
4.0 Safety Regulations
5.0 Remote Controller
5.1 Inserting the batteries
5.2 Remote Controller commands
5.3 Binding the remote controller with the VR-Racer
5.4 Flying controls
5.5 Speed selector
5.6 Trim/Regulating
5.6.1 Manual trim
5.6.2 Automatic trim/reset
5.7 App controller mode
6.0 VR-Racer
Helicute accepts no responsibility for any harm or damage caused to the product itself or thereby.
The customer bears sole and exclusive responsibility for the appropriate use and handling thereof
including, without limitation, its assembly, charging process, use and even selection of the area use.
Please read the instructions for use and operation, it contains important information and advice.
Attention!
Declaration of Conformity
- (R&TTE) Radio-electric equipment and telecommunications terminals 1995/5/CE.
- (RoHS) Restrictions on the use of certain hazardous substances in electrical and electronic devices
2011/65/EU.
1. Read the user manual carefully before using the VR-Racer..
2. Do not fly your VR-Racer near other people.
3. Keep all body parts away from the rotor rotors at all times when they are moving.
4. Never attempt to repair the electronic circuits as you could cause irreparable damage – they
contain very delicate parts.
6.1 Battery charging
6.1.1 Precautions you should take with batteries
6.2 Flight time
6.3 Electronic protection system
6.4 Maintaining your VR-Racer
6.5 Acrobatic flight: Flip & Roll (360º)
6.6 Headless mode function
6.7 Return home function
6.8 Replacing damaged rotor blades
6.9 How to use the camera
6.9.1 How to switch camera ON/OFF
6.9.2 Camera SD/HD
6.9.3 Camera Wifi SD/HD
6.10 List of your VR-Racer components
1x - VR-Racer
1x - 2.4 GHz Transmitter
2x - Li-Po Battery
1x - Charger (CE) 1x - VR Headset
Helicute hereby state that all models in the VR-Racer range comply with all relevant EC regulations
(in particular those stated below) and all of their products.
In some countries it is essential to have a special insurance policy to cover aeromodelling. You will
find more information about this at your local club or by contacting an insurance company.
1x - Replacement Rotors Kit
1x - User Manual 1x - Canopy
4x - Propeller Guards 1x - Obstacle Kit
4x - AAA Remote Battery

4.0 SAFETY REGULATIONS
5.0 REMOTE CONTROLLER
1- Keep all small parts out of the reach of children to prevent accidents.
2- The VR-Racer is a powerful machine.You must move the left joystick slowly (the accelerator
joystick) to ensure that it does not climb rapidly and cause a collision.
3- When you have finished flying, please remove the Li-Po battery from the VR-Racer. Before you
do, switch off the transmitter.
4- Do not expose the battery to high temperatures or sources of heat (fire, direct sunlight, etc).
5- Bear in mind that the VR-Racer must be flown at least 2-3 metres from the operator or from any
other person that happens to be in the vicinity, to ensure that it cannot hit anybody in the head, face
or body.
6- If children fly the aircraft they must be under the supervision of an adult at all times, who shall
ensure that it is under control and within the field of vision, so that it can be handled easily.
7- Look for an open space that complies with relevant regulations, with no trees, buildings and/or
other obstacles.
8- Never fly the aircraft near airports, railway lines or roads.
9- Keep at a safe distance from potentially dangerous areas and from specially-protected areas.
10- Please respect relevant regulations regarding the recycling of electrical/electronic materials and
components when disposing of devices of this kind (transmitters, chargers, models, etc.). Please take
them to a recycling centre to dispose of them.
12- Remove the transmitter batteries if you are not going to use it for several days.
13- Do not touch the motor during or immediately after flight as it could result in burns.
14- If you replace your VR-Racer rotors ensure that you fit them correctly.
15- Do not throw any part of this product in the bin. All of its component parts must be taken to the
nearest recycling centre for disposal.
16- Not recommended for persons under the age of 12 years. If used by children, they must be under
the supervision of an adult at all times.
Specifications:
Signal type: 2.4 GHz.
Batteries required for the transmitter: 4 x 1.5V “AAA” size batteries (included).
Range: 40-70 metres.
Movement channels: 4
11- If the VR-Racer suffers an impact that results in any alteration of it’s flight characteristics, please
stop usingit immediately.

5.1 INSERTING THE BATTERIES
5.2 REMOTE CONTROLLER COMMANDS
5.3 BINDING THE REMOTE CONTROLLER WITH THE VR-RACER
To insert the batteries in the transmitter, remove the battery compartment cover and insert 4 “AAA”
size 1.5v batteries (included) / paying special attention to the their position to ensure that the
transmitter operates correctly. You may need to use a screwdriver to open the rear cover.
Recommendations:
Batteries must be fitted under the supervision of an adult.
Do not mix new batteries with used ones.
1. Connect your VR-Racer battery, having first checked that it is correctly charged. If your model
has an on/off switch, make sure it is in the ON position.
2. Place your VR-Racer on a flat surface.
3. Pull and hold the transmitter left control joystick downwards.
4. Turn on the transmitter.
5. Very slowly, move the left control joystick to its upper limit and then move it down slowly.
If you have followed these steps correctly, at the moment when the left control joystick returns to its
starting position in the lower section, you will see how the LED light stop flashing that tells you that
the transmitter and VR-Racer are now synched.
1. Speed selector
2. Smartphone holder
3. Camera button
4. Power Led
5. Left control stick / Speed Selector
6. Manual Trim A
7. Manual Trim B
8. Camera LED
9. Right control stick / Flip&Roll button
10. Manual Trim C
11. Manual Trim D
Do not mix batteries of different kinds.

5.4 FLYING CONTROLS
-The left stick controls the ascent/descent and the rotation in both directions.
-The right stick controls the forward/backward and lateral displacement in both directions.
5.5 SPEED SELECTOR
The VR-Racer has 3 programmable speeds:
When you hear a "beep" will be on slow speed mode.
When you hear two "beeps" will be on intermediate speed mode.
When you hear three "beeps" will be on fast speed mode.
5.6 TRIM / REGULATING
To ensure that your VR-Racer can fly straight and level, you need to trim the aircraft. This can be
done either manually or automatically.
5.6.1 MANUAL TRIM
in-flight
remain stable.
(1) - Trim: with these buttons will correct the spin on itself, should the VR-Racer turn unintentionally,
press the Trim A in the opposite direction to the rotation of the VR-Racer until it stops.
(2) Trim C: these buttons will correct involuntary forward/backward movement of our VR-Racer , again
by pressing button C Trim in the opposite direction until it stops.
Press the speed selector (1) to switch between the different programs of speed.
The manual trim calibrates the movement channels of the VR-Racer that both takeoff and
(3) Trim D: This will correct unintentional lateral displacement of VR-Racer by pressing in the
opposite direction.
Note: it is advised to make the final trim adjustment when the craft is airborne.
The VR-Racer is equipped with an auto-trim system whereby it’s initial settings can be restored,
allowing the aircraft to fly in an accurate and level manner.
When must we use this function?
- If the aircraft has taken an impact and as a result it’s Gyroscope / Electronic stabilizer is unstable.
- If you have transported the aircraft from one place to another.
- If your VR-Racer does not maintain it’s fixed position when hovering.
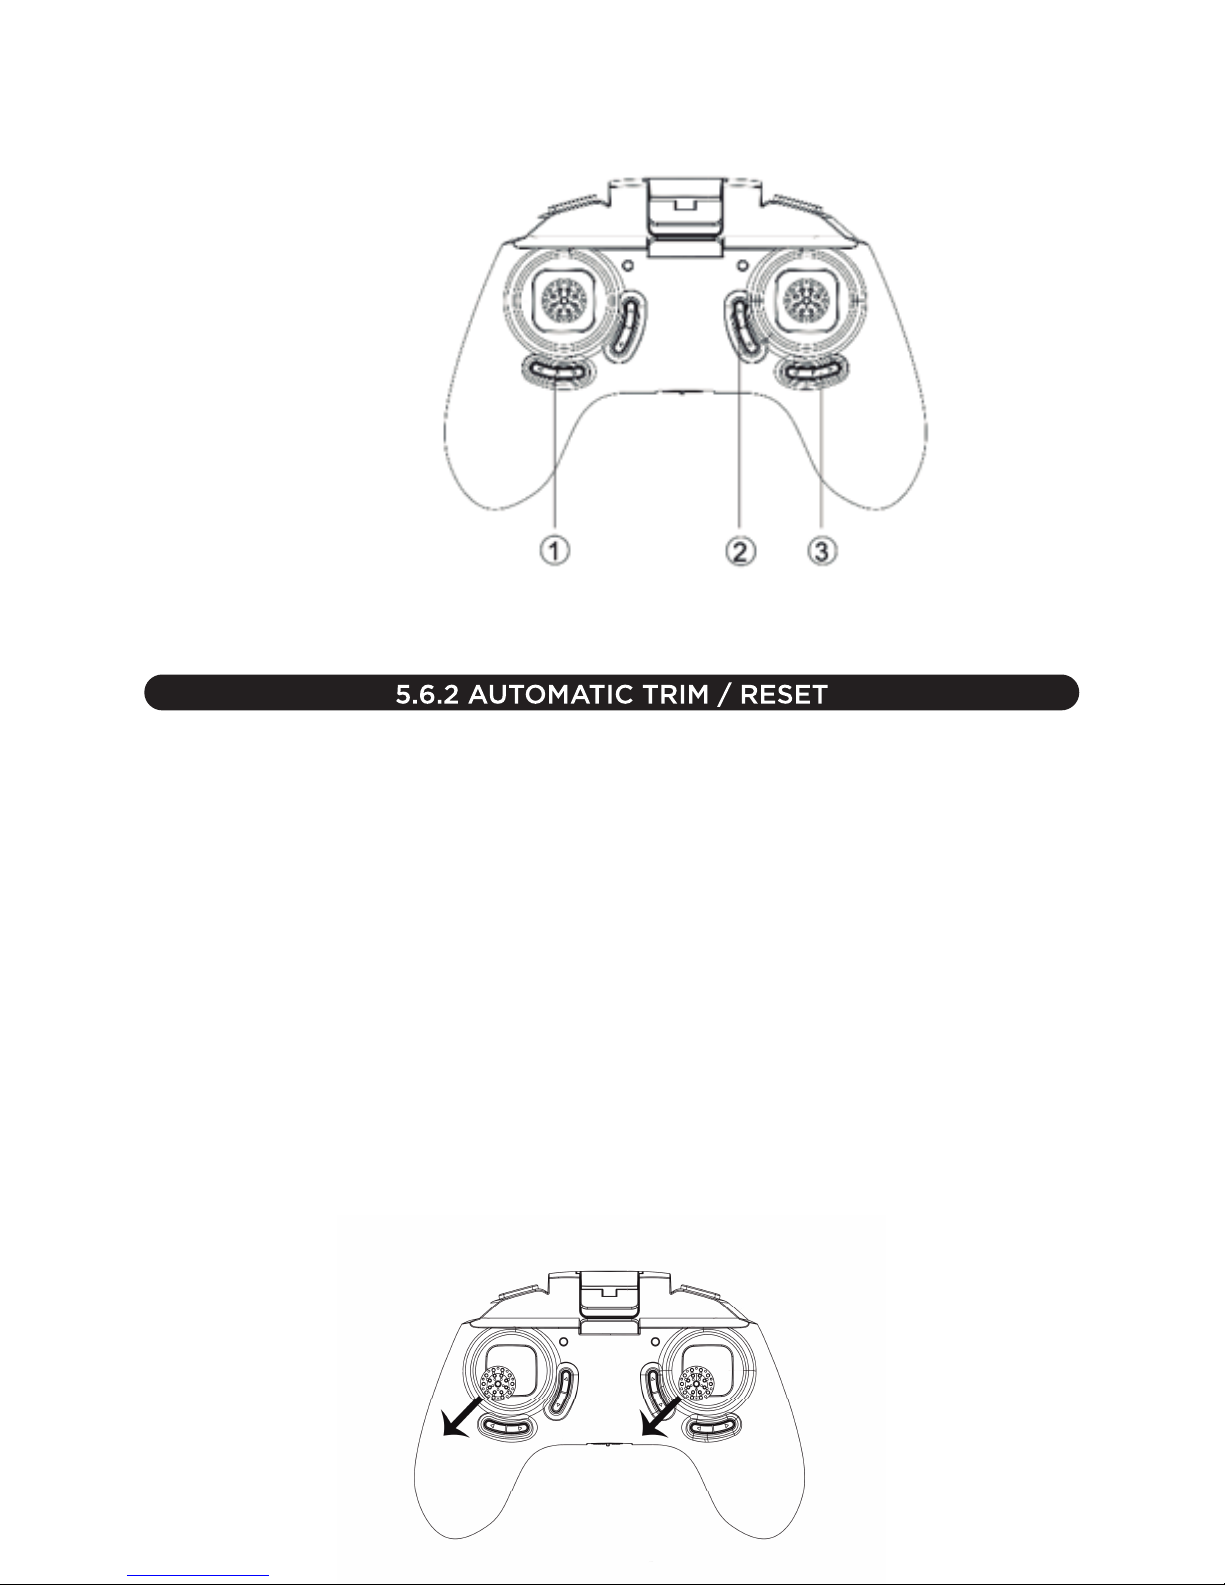
Automatic trim: To return the transmitter to it’s original default setting press and hold down the
“automatic trim” button, located in the upper left section of the transmitter while turning the on / off
switch to the ON position as indiacted below. This function can be carried out regardless of whether
the VR-Racer and transmitter have previously been synched / linked.
When both joysticks are moved to the reset position the lights on the VR-Racer will start to
flash rapidly, which means that the reset process is being carried out, once 10 seconds has
elasped, return both joysticks to their initial position, at that time the lights on the VR-Racer
will stop flashing, which means that the reset has completed successfully.

6.0 VR-RACER
In this section of the user manual, we will explain all of the aspects relating to your VR-Racer such as
battery charging, flight time, precautions for correct use of batteries, safety protection systems, how
to change a rotor blade on your VR-Racer and more important information for its correct use and
handling.
6.1 BATTERY CHARGING
Charging with USB:
- Remove the battery from the compartment on the underside of the VR-Racer.
- Connect the USB charger terminal to the power supply you want to use.
- Once conneted at both ends, a red light indicates that the VR-Racer is charging, when this light
goes out the charging process is complete.
- The charge time will depend on how much the USB terminal is used, the output power level of the
power supply to which the USB terminal is connected (in Amps) will also have an influence on the
time it takes to charge.
5.7 APP Controller mode
Now you can control your VR-Racer from your Smartphone thanks to the new Helicute App.
You will need to download the corresponding version depending on the version you have purchased,
there are two versions available:
To activate APP mode, you must follow the following steps:
1. Connect your VR-Racer battery and place it on a horizontal surface.
2. Switch on the drone.
3. Be sure the camera is turned on.
4. Access the menu of your Smartphone Wifi networks.
5. Select the Wifi network that is generated by your VR-Racer and make sure it is connected properly.
6. Once the connection has been made, access your App.
If the connection is made successfully, once you press the PLAY button, you should receive live
image of your VR-Racer.
In case of no signal, disconnect your VR-Racer, restart your WiFi connection and repeat the process
again.
-To verify that the load was successful check that both ends are well connected and USB light is off.

6.1.1 PRECAUTIONS YOU SHOULD TAKE WITH YOUR BATTERIES
VR-Racer is equipped with a rechargeable Li-Po battery.
- Do not use or leave the battery near a fire or source of heat.
- Do not hit, throw or drop the battery on any hard surface.
- Do not immerse the battery in water; keep it in a dry, cool place at all times.
- When charged, the battery must be checked regularly.
- Do not overcharge the battery.
- Do not damage or pierce the battery with any sharp object.
- Do not join the battery or lead to any metal object of any kind.
- Never charge the battery for more than one hour.
- Never throw batteries into a fire or incandescent flame.
- The battery must be charged under the supervision of an adult.
- If you are going to store a battery for a long period do so with an intermediate level of charge,
neither completely charged nor uncharged.
- When the battery is in storage, check the charge level with a certain frequency in order to ensure
that it does not become completely uncharged and become consequently broken.
- Use only the transformer included in the contents of this product.
- Never leave the battery unsupervised while it is charging.
- If, due to any fault, the charger does not stop charging, the battery could catch fire. Therefore,
monitor the charging process.
- Rapid charges cannot be used. The batteries’ charge voltage must be respected.
- Batteries must be stored when they are between semi- and fully- charged. If stored when empty
they will be spoiled. For this reason, new batteries are always semi-charged.
- Always dispose of batteries in a responsible manner.
6.2 FLIGHT TIME
Your VR-Racer flight time may vary depending on a range of factors:
- The battery charge level.
- The speed at which you fly your aircraft.
- If your VR-Racer comes with the option of switching from the internal to external body, as the
former is generally heavier than the latter.
- The wind speed to which the aircraft is subjected.
- Whether it is fitted with a camera or not.
As a general rule, with the original configuration of the aircraft and with the battery fully charged, we
can expect a continuous hovering flight time of 6-9 minutes, which may increase or decrease
depending on the factors mentioned above.
- Do not connect the battery to power outlet with a different voltage.

6.3 ELECTRONIC PROTECTION SYSTEM
- Low-voltage protection: the VR-Racer is equipped with a system whereby, when the VR-Racer
battery level is low, the control system will cut the power supply to the rotors. In this case, the
battery will have to be recharged to resume flying.
6.5 ACROBATIC FLIGHT: FLIP & ROLL (360º)
Once you have experience at the controls of flight of the VR-Racer you can continue to make
progress and begin making amazing Flips & Rolls.
To perform a Flip & Roll in any of the speeds you can press the right control stick and then move it in
any of the four directions to perform a Flip&Roll in this direction.
Once selected only you must quickly shift the right control stick to any direction to perform a
Flip&Roll.
Note: it is not recommended to perform Flip&Roll close to objects or persons.
6.6 HEADLESS MODE FUNCTION
The VR-Racer comes equipped with a flight aid based on the Compass, which can be enabled or disabled
The forward direction will be fixed when we switch on the headless mode function.
For example, if our VR-Racer
How to activate the headless mode?
6.4 MAINTAINING YOUR VR-RACER
1. Clean the VR-Racer with a clean, soft cloth.
2. Do not immerse the VR-Racer in water, or the electrical parts will be damaged.
3. Check the component parts of the VR-Racer regularly, such as rotor blades, the chassis, motors,
etc. If any of them is damaged or worn, please do not use it again until it has been repaired.
4. Carry out an automatic trim and reset fairly often.
5. Depending on the VR-Racer model you have purchases, if it has gears, we recommend that you
lubricate them with a silicon-based lubricant fairly regularly, as in this way you will extend the useful
life of the gears.
6. Check the VR-Racer battery charge regularly. If you are not going to use it for a while, ensure that
it is charged and never store if after having discharged it.
Preferably this function must be activated before take-off so that the forward direction is set correctly.
depending on the need. The function of this component is to set forward direction of your VR-Racer to a
static / fixed direction.
Which is the forward direction?
is pointing north when we activate the headless mode, this direction will be the forward direction at any time
provided we do not deactivate the headless mode while we fly.
You must hold the button for 3 seconds after “Speed Selector”, then you will hear one “beep”, now the
headless mode is activated.
To disable it, the process is exactly the same, keep pressed the same button during the same interval
of time until you hear the beep stop intermittently.
To reset the forward direction and set a new one you only have to reboot your VR-Racer disconnecting
the battery and reconnecting it.
The return home function is used as an aid of flight that is to return your VR-Racer in the direction that it
was set initially.
How to activate the return home function?
Press down the Trim Button and the VR-Racer will begin to move in the direction that was set at
the time of takeoff.
To disable the return home function, perform any movement with the right control stick.
Note: is not recommended to use this flight mode until you have enough experience to control your
VR-Racer in regular mode.
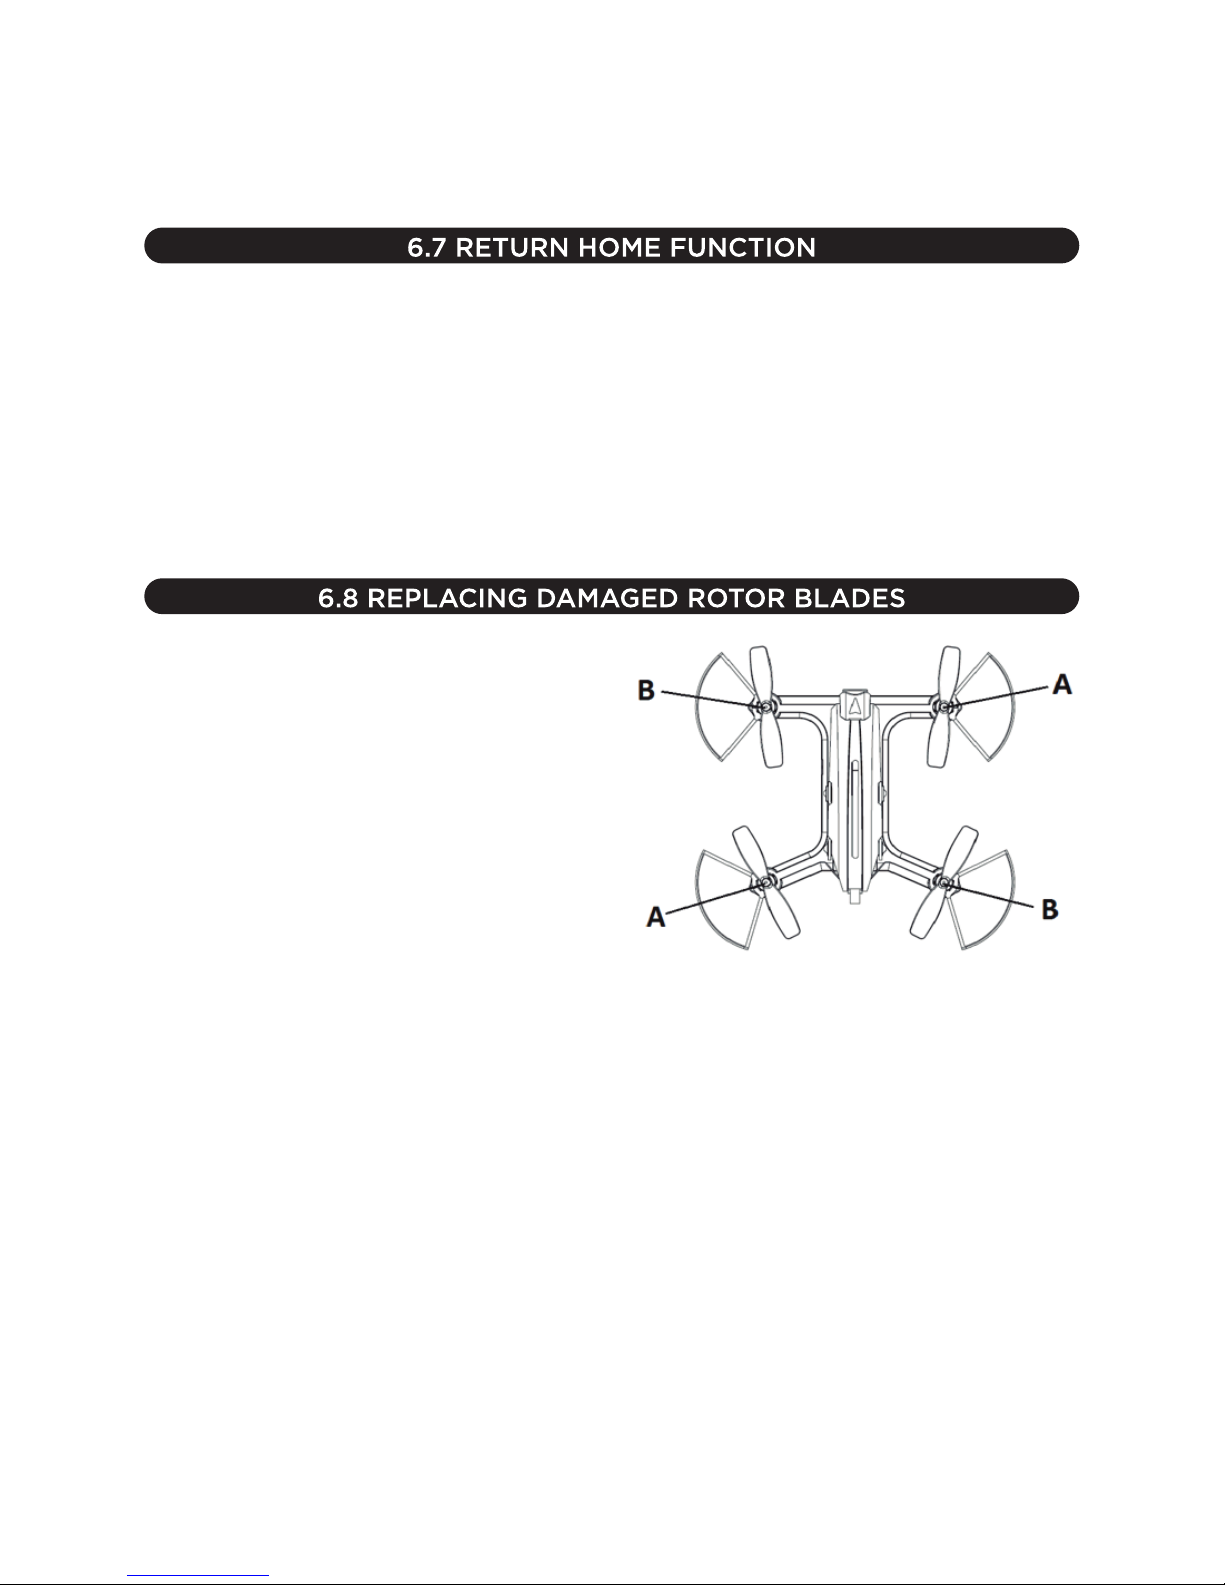
To replace rotor blades on your VR-Racer you
must follow the following instructions:
- Your VR-Racer has 4 rotors, 2 of which turn
clockwise (A) and the other two anti-clockwise
(B).
- These two types of rotors use blades of opposite
types since each of the two pairs of blades is
designed to work in a different direction of turn.
- The kit provided in it’s original packaging contains
4 replacement blades, two type (A) and two
Type (B).
- If one of the blades are damaged following an impact, you must replace it by removing the damaged
blade and replacing it with a new blade of the same type, otherwise your VR-Racer will not be able to
fly properly.
- If you need spare blades for your VR-Racer, please contact your nearest dealer.

6.9 HOW TO USE THE CAMERA
Depending on the model of VR-Racer purchased this will come equipped with camera or not.
If you have purchased one of the versions with built-in camera, here you will learn how to use it.
6.9.1 HOW TO SWITCH THE CAMERA ON/OFF
The VR-Racer has a specific switch that you can use to turn
With this function you can disable the camera when you
don't want to take pictures or record videos in order to
increase the flight time of your VR-Racer.
The following image shows where the switch is located.
By moving forward you will cut the power of the
camera and to switch on you must move it back.
You will know if the camera is switched on if the LED
camera is blinking, if not, you must change the position of
the switch.
6.9.2 CAMERA SD/HD
To take a picture momentarily press the (3) camera button, a momentary LED lighting system flashing indicates
you that photo was successful.
To start recording a video, press and hold the camera button (3) for 3 seconds, LED lighting system
will start to blink continuously during the recording of the video.
To finish the recording hold the camera control button (3), the lighting system will stop flashing.
the camera on and off, regardless of the model you have
purchased.

To make photos and videos with your WiFi SD/HD camera from the Helicute application you
must follow these instructions:
- Download the Helicute APP
- Once the application is downloaded turn on your VR-Racer
- Synchronize with your transmitter you want to handle it with, otherwise skip to the next step.
- Access the menu of your Smartphone menu of WiFi network and connect to the WiFi network
generated by the VR-Racer.
- Once connected, open the Helicute APP and press the PLAY button, if the connection is
successful should be able to view the real-time image of the VR-Racer.
- You will find two logos in the interface of the application, one for taking pictures and one for
recording videos.
- The photos and videos will be stored on the mobile device. If you have Micro SD card compartment
and have a Micro SD card installed in it, they will be stored on the Micro SD card.
(1) Body (6) Kit Propellers
(2) Canopy (7) PCB Main Board
(3) Propeller Guards (8) Motors
(4) Battery (9) LED Lights
(5) Remote Controller (10) Camera
If an abnormality or imbalance in flying performance of the VR-Racer is detected, we have a tutorial
video in which we can help to identify the most common problems.
6.10 LIST OF YOUR VR-RACER COMPONENTS
This manual suits for next models
1
Table of contents


