Helwett Packard HPE LCD 8500 1U User manual

HPE LCD 8500 1U Console User Guide
Part Number: 30-8EDD75DE-004
Published: March 2022
Edition: 4
Abstract
This guide provides operational guidance for the HPE LCD 8500 1U Console.

©Copyright 2019, 2022 Hewlett Packard Enterprise Development LP
Notices
The information contained herein is subject to change without notice. The only warranties for Hewlett Packard Enterprise
products and services are set forth in the express warranty statements accompanying such products and services.
Nothing herein should be construed as constituting an additional warranty. Hewlett Packard Enterprise shall not be liable
for technical or editorial errors or omissions contained herein.
Confidential computer software. Valid license from Hewlett Packard Enterprise required for possession, use, or copying.
Consistent with FAR 12.211 and 12.212, Commercial Computer Software, Computer Software Documentation, and
Technical Data for Commercial Items are licensed to the U.S. Government under vendor's standard commercial license.
Links to third-party websites take you outside the Hewlett Packard Enterprise website. Hewlett Packard Enterprise has no
control over and is not responsible for information outside the Hewlett Packard Enterprise website.
Acknowledgments
Bluetooth®is a trademark owned by its proprietor and used by Hewlett Packard Enterprise Company under license.
ENERGY STAR®logo is a registered U.S. mark.
All third-party marks are property of their respective owners.

Contents
Introduction........................................................................................................................5
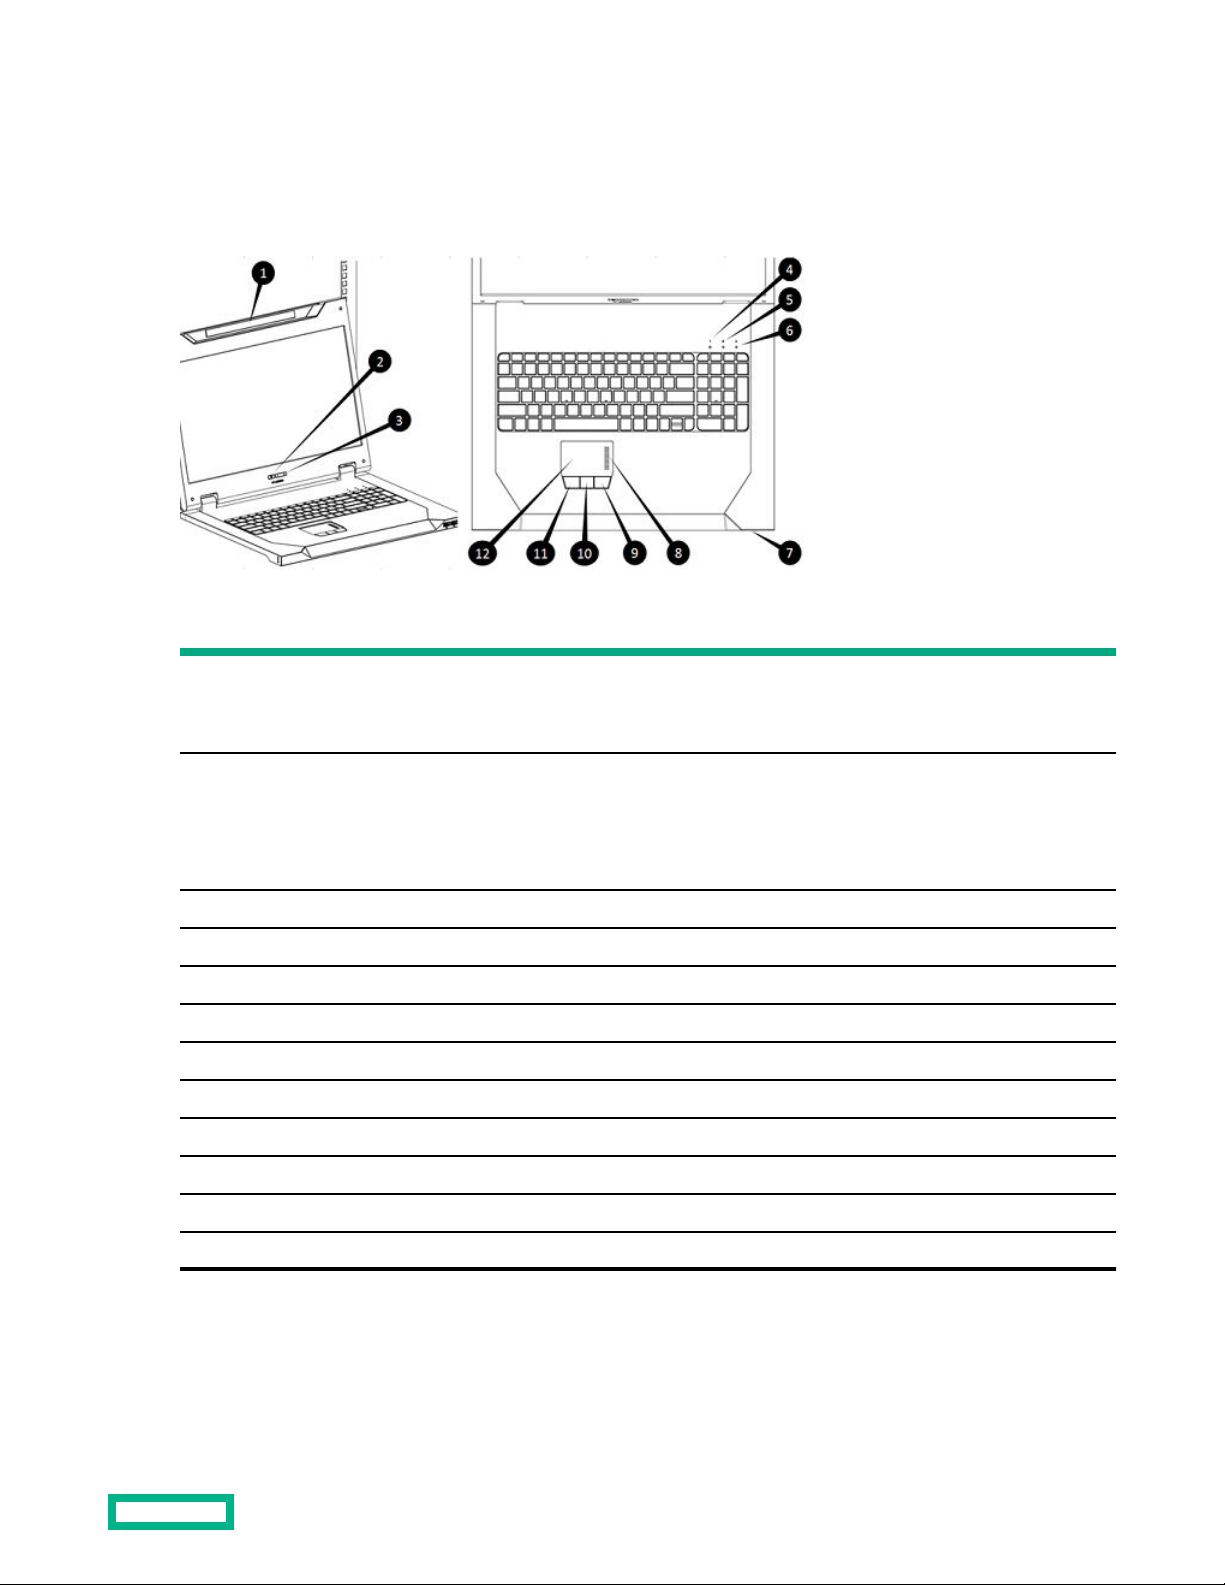
Main Components............................................................................................................................................................................................................5
Rear components............................................................................................................................................................................................................. 6
ENERGY STAR compliant........................................................................................................................................................................................... 6
Installation..........................................................................................................................7
Kit contents......................................................................................................................................................................................................................... 7
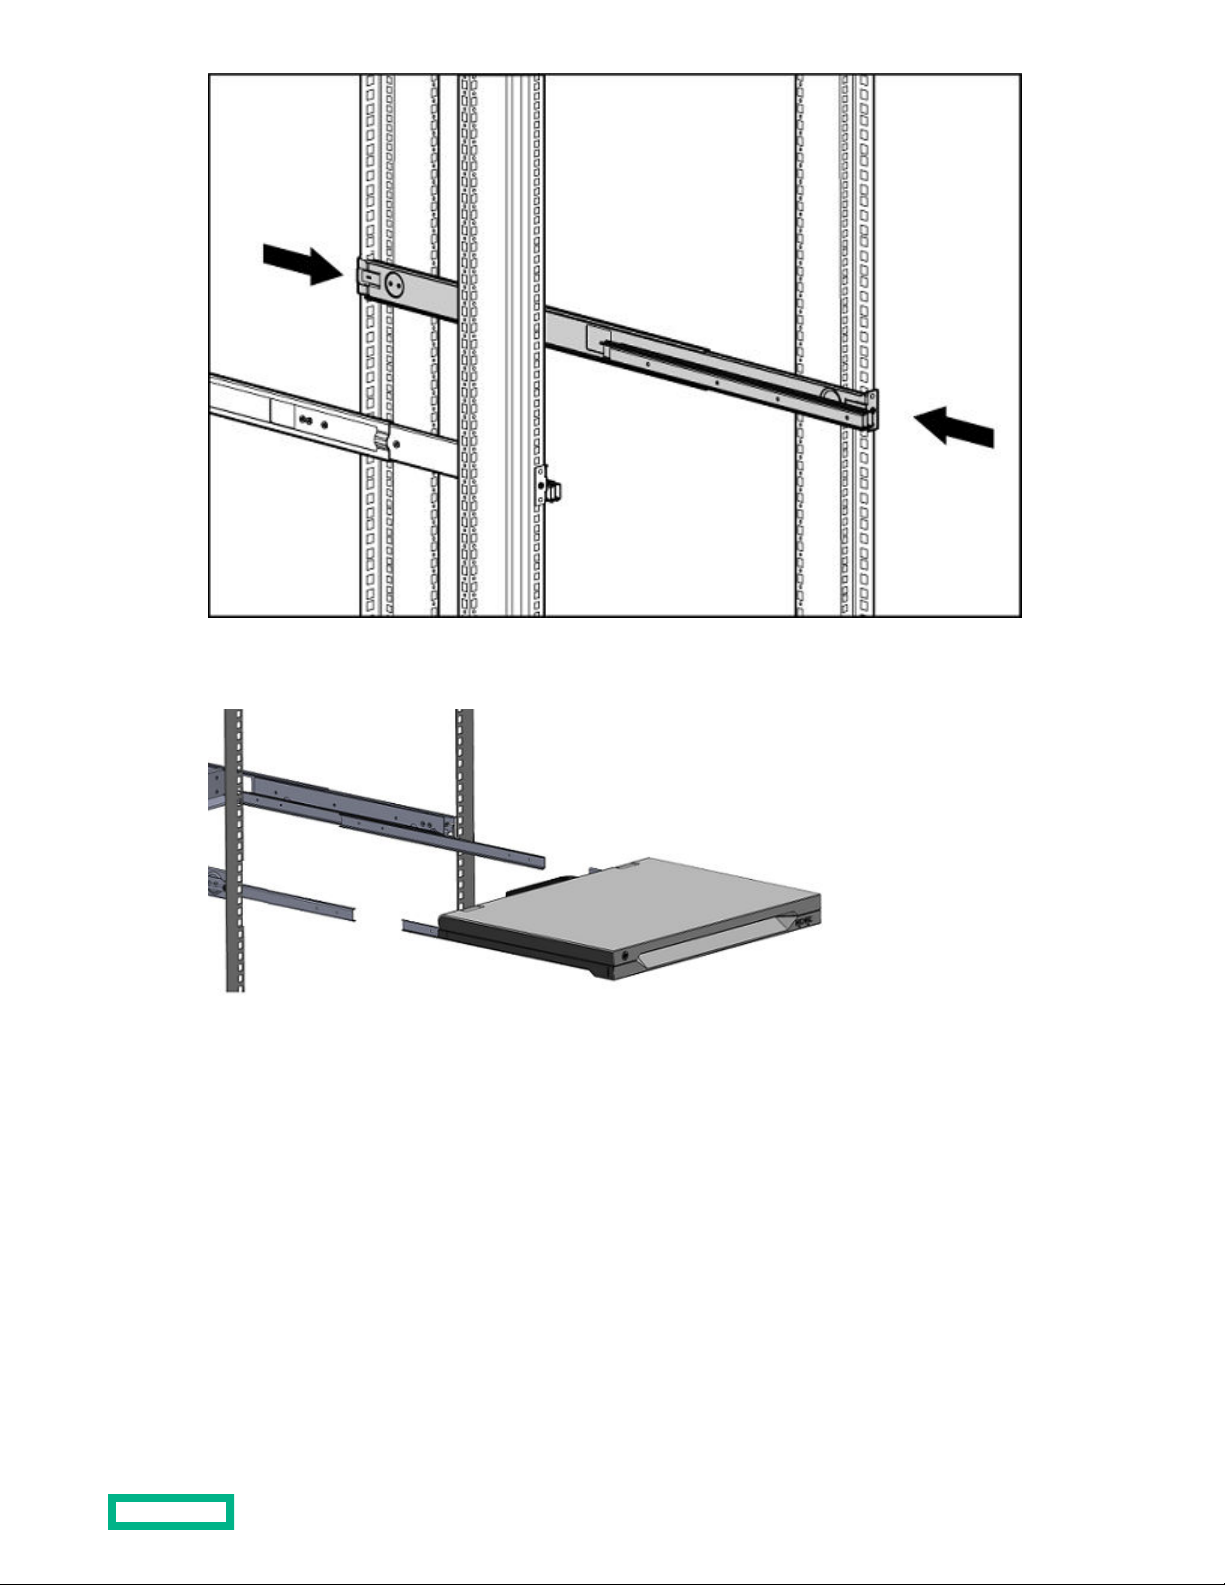
Installing the HPE LCD 8500 1U Console.........................................................................................................................................................7
Connecting and routing cables.............................................................................................................................................................................11
Accessing the HPE LCD 8500 1U Console................................................................................................................................................... 12
Removing the HPE 1U Console Rails................................................................................................................................................................13
Operational overview.....................................................................................................14
On-screen display.........................................................................................................................................................................................................14
Launching OSD menu.................................................................................................................................................................................................14
Navigating OSD............................................................................................................................................................................................................. 14
OSD menu......................................................................................................................................................................................................................... 15
Auto Configuration.....................................................................................................................................................................................15
Brightness/Contrast.................................................................................................................................................................................. 15
Image control.................................................................................................................................................................................................15
Advanced......................................................................................................................................................................................................... 16
Factory settings........................................................................................................................................................................................... 16
Language......................................................................................................................................................................................................... 16
Information......................................................................................................................................................................................................17
Maintenance..................................................................................................................... 18
Maintenance guidelines............................................................................................................................................................................................ 18
Cleaning the monitor.................................................................................................................................................................................18
Shipping instructions..................................................................................................... 19
Electrostatic discharge...................................................................................................20
Preventing electrostatic discharge.....................................................................................................................................................................20
Grounding methods to prevent electrostatic discharge........................................................................................................................20
Websites............................................................................................................................21
Support and other resources........................................................................................ 22
Accessing Hewlett Packard Enterprise Support.........................................................................................................................................22
Accessing updates....................................................................................................................................................................................................... 22
Remote support.............................................................................................................................................................................................................23
3

Customer self repair....................................................................................................................................................................................................23
Warranty information................................................................................................................................................................................................. 23
Regulatory information............................................................................................................................................................................................. 23
Documentation feedback......................................................................................................................................................................................... 24
4

Introduction
Main Components
Callout
Number
Component Function
1 Blue LED • Turns on when the display is closed
• Helps identify the HPE LCD85001U Console in a rack
2 OSD activation button • Launches OSD menus
• Selects menu options
• Exits menus and OSD
3 OSD scroll up and down button Used to scroll in the OSD menu and adjust functions
4 Number lock LED Lights when Number lock is on
5 Cap lock LED Lights when Cap lock is on
6 Scroll lock LED Lights when Scroll lock is on
7 USB connections Pass-through to the rear USB ports
8 Scroll bar Used to scroll on the monitor
9 Right pick button Used to select the option on the right
10 Middle pick button Used to select the option in the middle
11 Left pick button Used to select the option on the left
12 Touchpad Used to move the mouse on the monitor
Introduction 5

Rear components
Callout number Description
1 USB pass-through
2 USB pass-through
3 Display Port
4 VGA input port
5 Power connection port
6 USB keyboard and mouse port
7 Serial firmware port
ENERGY STAR compliant
The HPE LCD8500 1U Console is ENERGY STAR qualified.
For more information about the ENERGY STAR qualifications, see the HPE website (https://www.hpe.com/us/en/about/
environment/eco-labels.html).
Introduction 6

Installation
Kit contents
Item Quantity
HPE Liquid Crystal Display (LCD) 8500 1U Console 1
M6 screws 2
6-32 screws 5
HPE 1UConsole Rails LH/RH 2
Cable management arm, power adapter with brace rail 1
CTO Brackets 2
USB cable 1
Video cable 1
Power cord 1
USB cable label 1
This kit might contain extra hardware.
This product is supplied with a C5 to C14 power cord. The C14 is a standard connection for PDUs and UPSs. If another
power source is used, a region specific cord must be purchased separately.
HPE constantly strives to improve and develop products that are environmentally friendly. In communicating with our
customers, we have discovered that 90% use the C5 to C14 jumper cord and discard the C5 to country specific power
cords. In an eort to reduce landfill, HPE made a Green decision to remove excess waste from our accessory kit. This
resulted in removing the multiple power cords included in the product.
Installing the HPE LCD 8500 1U Console
Procedure
1. Align the 1U console rails with the holes marked on the rack, and then snap them into place.
a. Snap rear end of the HPE 1U console rails into the retma rails.
b. Extend the front half of the HPE 1U console rails to meet the appropriate rack depth, and then snap into place.
NOTE: If the HPE 1U console rails do not snap into place, make sure that they align with the holes marked on the
rack. The holes marked on the rack must be in the same location for the front and rear of the rack.
Installation 7

2. Extend the inner slides until they lock into place.
3. Align the unit with the extended inner slides, and then insert the unit into the rack.
4. From the rear of the rack, slide the brace rail assembly in between the HPE 1U console rails.
Installation 8

5. Align the screw holes on the brace rail with the screw holes on the HPE 1U console rails.
6. Using two 6-32 screws, secure the brace rail to the HPE 1U console rails.
7. Remove the two screws from the rear of the unit.
Installation 9

8. Attach the cable management arm to the rear of the unit with same two screws.
9. Connect and route the cables through the cable management arm and unit opening.
Installation 10

The installation is complete.
Connecting and routing cables
When connecting and routing the cables through the cable management arm and cable tray to the HPE LCD8500 1U
Console, use the following cable-routing method to ensure that the cables fit into the tray.
NOTE: Use the USB keyboard/mouse cable when connecting the unit to a device.
Display Port Cable Option Kit (P/N G7T29A) can be used as replacement for VGA Cable.
Procedure
1. Connect and route the USB pass-through cable (callout 1).
2. Connect and route the USB pass-through cable (callout 2).
3. Connect and route the VGA cable (callout 4).
4. Connect and route the Power cable (callout 5).
5. Connect and route the USB keyboard/mouse cable (callout 6).
The following figure illustrates where the cables connect and how to route the cables in the tray.
Installation 11

Item Description
1 USB pass-through cable
2 USB pass-through cable
3 Display port
4 VGA cable
5 Power cable
6 USB keyboard/mouse cable
Accessing the HPE LCD 8500 1U Console
Procedure
1. Gently extend the HPE LCD 8500 1U Console until the slides lock.
2. Lift the display.
Installation 12

Removing the HPE 1U Console Rails
Procedure
1. Locate the spring release.
2. Place your hand on the outside of the HPE 1U Console Rails so that you can move the spring release.
3. Gently move the spring release toward the inside of the rack (callout 1) while moving the HPE 1U Console Rails
(callout 2).
NOTE: If you cannot gain access to the spring release from the outside of the HPE 1U Console Rails, a tool might be
required to unlock the spring release from the inside of the HPE 1U Console Rails.
Front
Rear
4. Repeat the steps 1 to 3 for the other HPE 1U Console Rail.
Installation 13

Operational overview
On-screen display
The On Screen Display (OSD) buttons are used to operate the HPE LCD8500 1U Console OSD menus.
Callout
number
Component Function
1 OSD activation button • Launches OSD menus
• Selects menu options
• Exits menus and OSD
2 OSD scroll up and down button Used to scroll in the OSD menu and adjust the function
Launching OSD menu
NOTE: To activate Auto Configuration, push the Menu Button twice.
Procedure
1. Press the OSD activation button on the front panel. The main menu displays on the screen.
2. To select a menu item, press the OSD scroll up and down button.
3. Press the OSD activation button again to select your choice. A second level expands menu items.
Navigating OSD
To navigate through the OSD menus and functions:
Operational overview 14

Procedure
1. Use the Up (+) or Down (-) button to scroll through the OSD menu or an OSD sub-menu.
The Up (+) and Down (-) button are also used to adjust or change a function setting.
2. Use the OSD activation button to select a sub-menu or a function.
Example
To exit the OSD menu:
1. To scroll to the Exit function, press the Down (-) button .
2. To select the Exit function and exit the OSD menu, press the OSD activation button.
OSD menu
The OSD menu provides access to display settings and functions, enabling the user to customize the HPE LCD8500 1U
Console display settings.
Auto Configuration
The Auto Configuration option performs following four functions automatically:
•Auto Level—Automatically adjusts the black and white levels of the screen.
•Auto Position—Automatically adjusts the position of the screen.
•Auto Phase—Automatically adjusts the phase.
•Auto Clock—Automatically adjusts the output clock per line to match the input.
Brightness/Contrast
The Brightness/Contrast option contains the following menu options:
•Brightness —Enables the adjustment of the back light brightness using a slider bar.
•Contrast —Enables the adjustment of the screen contrast using a slider bar. Contrast adjustments are more
discernible when the background is white.
•Exit sub-menu —Enables exiting the menu.
Image control
The Image control option contains the following sub-menu:
•Display Resolution Mode
◦Fill—Stretches image to fulfill viewing area
◦Aspect —Proportional relationship between width and height
◦Current Mode—Settings determined by current OS
◦Recommended Mode—Supports maximum resolution
•Horizontal position—Enables the adjustment of the screen's horizontal position using a slider bar.
Operational overview 15

The center of the bar is obtained from the factory-preset value for Horizontal Position. At value=MIN, the selection of
+ positioning response might vary between XGA and SXGA panels. This is caused by physical limitations at MIN OSD
placement.
•Vertical position—Enables the adjustment of the screen's vertical position using a slider bar.
The center of the bar is obtained from the factory-preset value for Vertical Position.
•Clock—Enables the adjustment of the Horizontal Clocks using a slider bar.
•Phase—Enables the adjustment of the analog signals phase using a slider bar.
•Exit sub-menu—Enables exiting the menu.
Advanced
The Advanced option provides access to the following options:
• OSD settings menu
• Exit sub-menu
OSD settings
The OSD settings option provides access to the following options:
•Lock OSD settings—Locks or unlocks the OSD settings.
•Timeout—Displays a slider bar at the right side of the OSD display to enable the adjustment of OSD timeout. The
timeout ranges from 5 to 60 seconds with 1-second intervals. The default setting is 10 seconds.
•V position—Enables the location of the OSD window to move up or down on the screen.
•H position—Enables the location of the OSD window to move left or right on the screen.
•Exit sub-menu—Provides option to exit current menu.
Factory settings
The Factory settings option enables the user to set the HPE LCD8500 back to its original factory settings. The following
options are available in the Factory settings menu list:
• Yes
• No
• Exit sub-menu
Language
The Language option allows the user to change the language in which the menu options are displayed. The following
languages are available:
• English
• French
• German
• Italian
• Japanese
Operational overview 16

• Simple Chinese
• Spanish
Information
The Information option provides the following unit information:
• Rack Tag Version
• Rack SN
• Rack Part Number
• Rack Product Name
• Rack U Height
• Console Description
◦U Position
◦U Location
◦Console U Height
◦Console U Oset
◦Console Part Number
◦Console Serial Number
◦Console UUID
• SW Version
• Exit sub-menu
Operational overview 17

Maintenance
Maintenance guidelines
To protect your unit from overheating and other types of damage:
• Use only a power source and connection appropriate for this unit, as indicated on the marking labeland back plate.
• If an extension cord or power strip is used, be sure that the cord or strip is rated for the product. Also, be sure that the
total ampere ratings of all products plugged into the extension cord or power strip donot exceed 80% of the extension
cord or power strip ampere ratings limit.
• Do not overload an electrical outlet, power strip, or convenience receptacle. The overall system load must not exceed
80% of the branch circuit rating. If power strips are used, do not allow the load to exceed 80% of the power strip input
rating.
• Install the unit near an outlet that you can reach easily. Disconnect the unit by grasping the plug firmlyand pulling it
from the outlet. Do not disconnect the plug by pulling the cord.
• Disconnect the unit from the wall before cleaning. Do not use liquid or aerosol cleaners.
• Slots and openings in the monitor are provided for ventilation. These openings must not be blocked or covered. Do not
push objects of any kind into these slots or openings.
• Do not drop the unit or place it on an unstable surface.
• Do not allow anything to rest on the power cord. Do not step on the cord.
• Keep the unit in a well-ventilated area, away from excessive light, heat, and moisture. Keep the monitor away from
high-capacity transformers, electric motors, and other strong magnetic fields.
• Do not attempt to service this product yourself. Adjust only those controls that are covered by the operating
instructions. If the unit is not operating properly or has been dropped or damaged, contact your HPE authorized
dealer, reseller, or service provider.
Cleaning the monitor
Procedure
1. Turn o and unplug the unit.
2. Dust the panel by wiping the screen with a soft, clean cloth.
If the screen requires additional cleaning, use any anti-static LCD screen cleaner.
CAUTION: Do not use benzene, thinner, ammonia, or any volatile substance to clean the monitor screen or
cabinet. These chemicals might damage the monitor. Never use water to clean an LCD screen.
Maintenance 18

Shipping instructions
Keep the original packing box in a storage area in case you must move or ship your HPE LCD8500 1U Console.
Moving a rack with the HPE LCD8500 1U Console installed
When moving the HPE LCD8500 1U Console installed in a rack, HPE recommends that you install the CTO Brackets,
included in your kit, on each side of the unit and rack.
To install CTO Brackets:
Procedure
1. Place the CTO Brackets into the slot.
2. Insert 6-32 screw into the top hole on the CTO Bracket, repeat step with second 6-32 screw securing the unit to the
rack. Place the orange tag before inserting the lower screw.
3. Repeat steps 1 and 2 to install the other CTO Bracket.
4. Do not remove the orange tag until the rack is at its final destination.
Shipping instructions 19

Electrostatic discharge
Preventing electrostatic discharge
To prevent damaging the system, be aware of the precautions you must follow when setting up the system or handling
parts. A discharge of static electricity from a finger or other conductor may damage system boards or other static-
sensitive devices. This type of damage may reduce the life expectancy of the device.
To prevent electrostatic damage:
• Avoid hand contact by transporting and storing products in static-safe containers.
• Keep electrostatic-sensitive parts in their containers until they arrive at static-free workstations.
• Place parts on a grounded surface before removing them from their containers.
• Avoid touching pins, leads, or circuitry.
• Always be properly grounded when touching a static-sensitive component or assembly.
Grounding methods to prevent electrostatic discharge
Several methods are used for grounding. Use one or more of the following methods when handling or installing
electrostatic-sensitive parts:
• Use a wrist strap connected by a ground cord to a grounded workstation or computer chassis. Wrist straps are flexible
straps with a minimum of 1 megohm ±10 percent resistance in the ground cords. To provide proper ground, wear the
strap snug against the skin.
• Use heel straps, toe straps, or boot straps at standing workstations. Wear the straps on both feet when standing on
conductive floors or dissipating floor mats.
• Use conductive field service tools.
• Use a portable field service kit with a folding static-dissipating work mat.
If you do not have any of the suggested equipment for proper grounding, have an authorized reseller install the part.
For more information on static electricity or assistance with product installation, contact an authorized reseller.
Electrostatic discharge 20
Table of contents
Popular Music Mixer manuals by other brands

VADDIO
VADDIO EasyUSB Mixer/Amp Release Notes & Update Instructions

Alesis
Alesis MultiMix 12 USB Service manual

Newhank
Newhank ROOMMATE User guide and reference manual

Peavey
Peavey SRM Series owner's manual

SYNQ AUDIO RESEARCH
SYNQ AUDIO RESEARCH SMX-1 user manual

SEIKAKU
SEIKAKU 8/10 channel mixing console user manual