Hena MID-7526 User manual

USER MANUAL
MID-7526CM
MID-7526 ROCKCHIPS3026 双核 4.2系统 前置摄像头 无HDMI 无蓝牙
标准说明书,70g书纸,135x102mm,钉装
4.2系统

Table of Contents
Table of Contents......................................P1
Features..................................................P2
Unit at a Glance .......................................P3
Getting Started....................................P4-P5
About Applications...............................P5-P6
Preinstalled Applications...........................P6
Connect to a Wi-Fi network.................... P7
Optional Connections...............................P8
Specifications......................................... P9
....
.
1

Features
2
Browse the Web.
Visit your favorite websites
Check your e-mail
Keep in touch with friends and family
Watch YouTube™ videos
Browse the world’s most popular video-
sharing community
Read your favorite books
Download thousands of books with the
included E-book reader *
Discover thousands of apps for Android™
Games, applications, and more with
marketplace(need for customer installed)
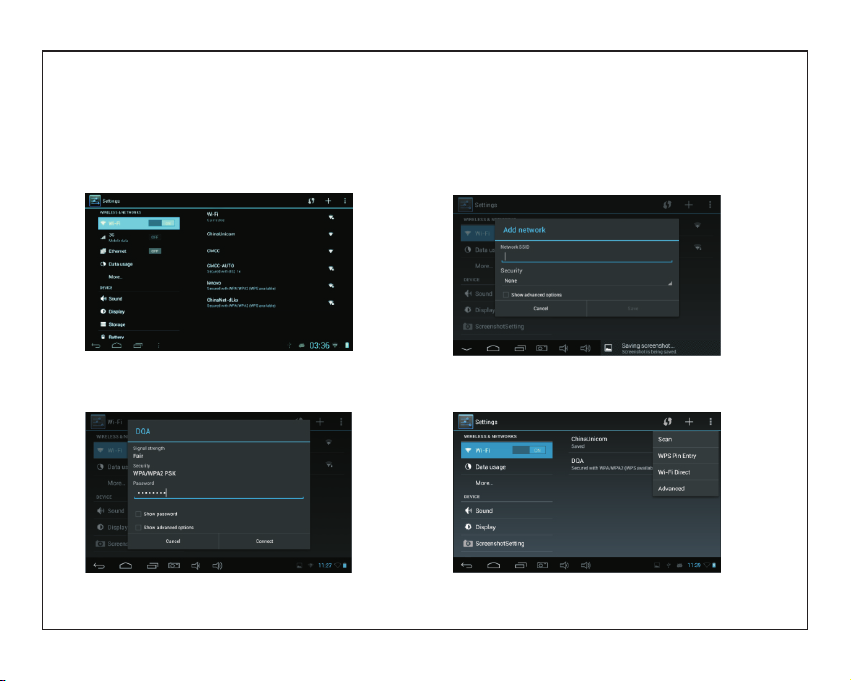
Connect to the Internet wirelessly
High-speed Wi-Fi 802.11 b/g/n networking
Enjoy your media library anywhere
Portable powerhouse plays popular music,
video,and photo formats
microSD memory card reader
Increase your storage capacity (up to 32 GB
supported)
Built-in camera
Convenient front-facing camera with 0.3MP
Automatic orientation detection
Read any way you want; the display adjusts
automatically!
Reading books in the EPub format requires
the included E-book reader application.

Unit at a Glance
3
5.
6. TF CARD
Load external microSD memory cards here.
4. Adapter In
Charge and power the tablet with adapter.
VOL+/VOL-
Press VOL+ to increase the volume level.
Press VOL- to decrease the volume level.
1.
2.
3.
POWER
Press to turn the unit on, or to turn the screen on
or off.
Press and hold to access the Power Off menu.
Headphone
Audio output connection for headphones.
Micro USB OTG
Connect to a USB device.
1
2
3
4
5
6

Getting Started
Turning the Tablet on or off Turning the Screen On or off
When the screen is bright, short press power key
can turn off the screen, then short press power
key can turn on screen.
1. Turn on the tablet:
Long Press the Power key 5S to start device.
2. Turn off the tablet:
Long Press the Power key 5S to power off
interface. Touch ok key to power off. To conserve battery power, the screen
can be set to turn off automatically when
the tablet is not in use (between
1 minute and 30 minutes).
This Screen timeout option can be found
in the Display menu.
4

Getting Started
5
Unlocking the Screen
About Applications
To open an application, touch the application
icon on the home screen or in the Launcher
where you can tap the icon right up on the
home screen to get in..
Launcher screen:
The screen shown above is for illustrative
purposes only. Reserves the right to modify
and improve the final list of applications
available on the tablet.
When the screen turns off, you will have to
unlock the screen
when you turn it back on.
To unlock the screen, drag the lock icon across
the screen towards the lock icon.
.

About Applications
6
Preinstalled Applications
Some applications have been installed on your
tablet for your convenience.
These applications include:
Browse the web.
Perform simple mathematical operations.
Take pictures or videos with the
frontfacing camera.
Check your e-mail.
Play music.
Access the Settings menu to adjust the
tablet’s options.
Preinstalled Applications
Installing Applications
You can also download an install additional
applications from the device’s applications
marketplace, the web browser, or other
sources.
The tablet must be set to allow installation of
applications from non-Market sources. The
Unknown sources option can be set in the
Application settings menu.

7
Connect to a Wi-Fi network
1.Turn on WIFI:
Turn on the wi-fi button in the setting menu.
The tablet can search and display list of the
available Wi-Fi networks.
2.Connect to WIFI network:
choose the wifi network to join, then input the
password can be connected.
3. add network:
Press the add button in the wifi interface can add
the network. Input SSID, choose the security,
then input password.
4.Other function:
scan、wps pin entry、wi-fi direct and advanced
function in the menu of the wifi interface.

8
Optional Connections
Connecting to a Computer 3.Mount the storage.
Touch button Turn on USB storage to mount the
tablet’s built-in storage. When it is mounted, you
can copy files to or from your tablet.
Connect the tablet to a computer to transfer files.
1.Connect your tablet to the computer.
With the included USB cable: Plug the small end
of the cable into the USB 2.0 high speed
connector of the tablet. Plug the large end of the
cable into an available USB 2.0 high speed port
on the computer.
2.When your tablet is connected,slide up the
USB icon right down on the screen and then
touch icon USB connected.

9
Specifications
Music was tested with a 128 kbps MP3 file; video
was tested with a 1920x1080 MPEG-4/AVC file;
browsing was tested with the screen brightness
set to default. Actual playback results may vary.
Processor
RAM
Storage
Display
Wi-Fi Networking
Audio Output
PC Interface
Additional Features
Operating System
Power
Playback Time
(hours)
Rockchip3026 (Dual core 1GHz Cortex A9)
4~16GB(option) flash built-in; micro
SD card slot (max.32GB supported)
7.0”TFT LCD(800x480), Capcitive touchscreen
IEEE 802.11 b/g/n
3.5mm headphone
USB 2.0 high speed
Up to 8 hours music,
3 hours video,
3 hours web browsing
Built-in microphone
Front facing camera(0.3MP)
1W speaker
Android™ 4.2.2
Rechargeable Li-poly battery power
Adapter(DC 5V, 1.5A)
512MB DDR3

FCC Notice
This device complies with Part 15 of the FCC Rules. Operation is
subject to the following two conditions:
(1) This device may not cause harmful interference, and (2) this device must accept any
interference received, including interference that may cause undesired operation.
NOTE 1: This equipment has been tested and found to comply with the limits for a Class B digital
device, pursuant to part 15 of the FCC Rules. These limits are designed to provide reasonable
protection against harmful interference in a residential installation. This equipment generates, uses
and can radiate radio frequency energy and, if not installed and used in accordance with the
instructions, may cause harmful interference to radio communications. However, there is no
guarantee that interference will not occur in a particular installation. If this equipment does cause
harmful interference to radio or television reception, which can be determined by turning the
equipment off and on, the user is encouraged to try to correct the interference by one or more of
the following measures:
- Reorient or relocate the receiving antenna.
- Increase the separation between the equipment and receiver.
-Connect the equipment into an outlet on a circuit different from that to which the receiver is
connected.
-Consult the dealer or an experienced radio/TV technician for help.
NOTE 2: Any changes or modifications to this unit not expressly approved by the party
responsible for compliance could void the user's authority to operate the equipment.
Table of contents
Other Hena Tablet manuals