Hena MID-71Q6L User manual

HENA DIGITAL TECHNOLOGY (SHEN ZHEN) CO. LTD.
-
1
-
MID-71Q6L Service Manual
Prepared: 王家俊 、熊华兵
Verified: 熊华兵
Approved: 蒋江林
Version: V1.1
Date: 2015/8/8

HENA DIGITAL TECHNOLOGY (SHEN ZHEN) CO. LTD.
-
2
-
Product Spec. Introduction ···································································································································· -3-
Exploded View ·························································································································································· -4-
Disassembly ······························································································································································· -5-
Assembly···································································································································································· -6-
System block diagram ············································································································································· -8-
Troubleshooting ······················································································································································ -11-
Upgrading Guide···················································································································································· -14-
PhoenixUSBPro Installation ································································································································ -15-
Operation Steps ······················································································································································ -18-
Precautions ······························································································································································ -26-
Appendix:Device Upgrade FailureAnalysis ···································································································· -27-

HENA DIGITAL TECHNOLOGY (SHEN ZHEN) CO. LTD.
-
3
-
Product Spec. Introduction
CPU: AllwinnerA33 (ARM Cortex-A7 up to 1.3GHz)
RAM: 512MB / DDR3
Internal: 8GB Flash
Removable: Micro SDHC card slot (Max 32GB)
OS: Android 4.4.2
Panel: 7" (16:9,800x480)
Touch screen: G+P
Camera: 0.3MP (Front)
Video: 1080P
Wifi:802.11b/g/n
Battery: 3.7V, 2000mAh
Adapter: 5V, 1.5A
Accessory: USB Cable, User manual, Power adapter
Size: 107*189*9.5mm
HENA DIGITAL TECHNOLOGY (SHEN ZHEN) CO. LTD.
-
4
-
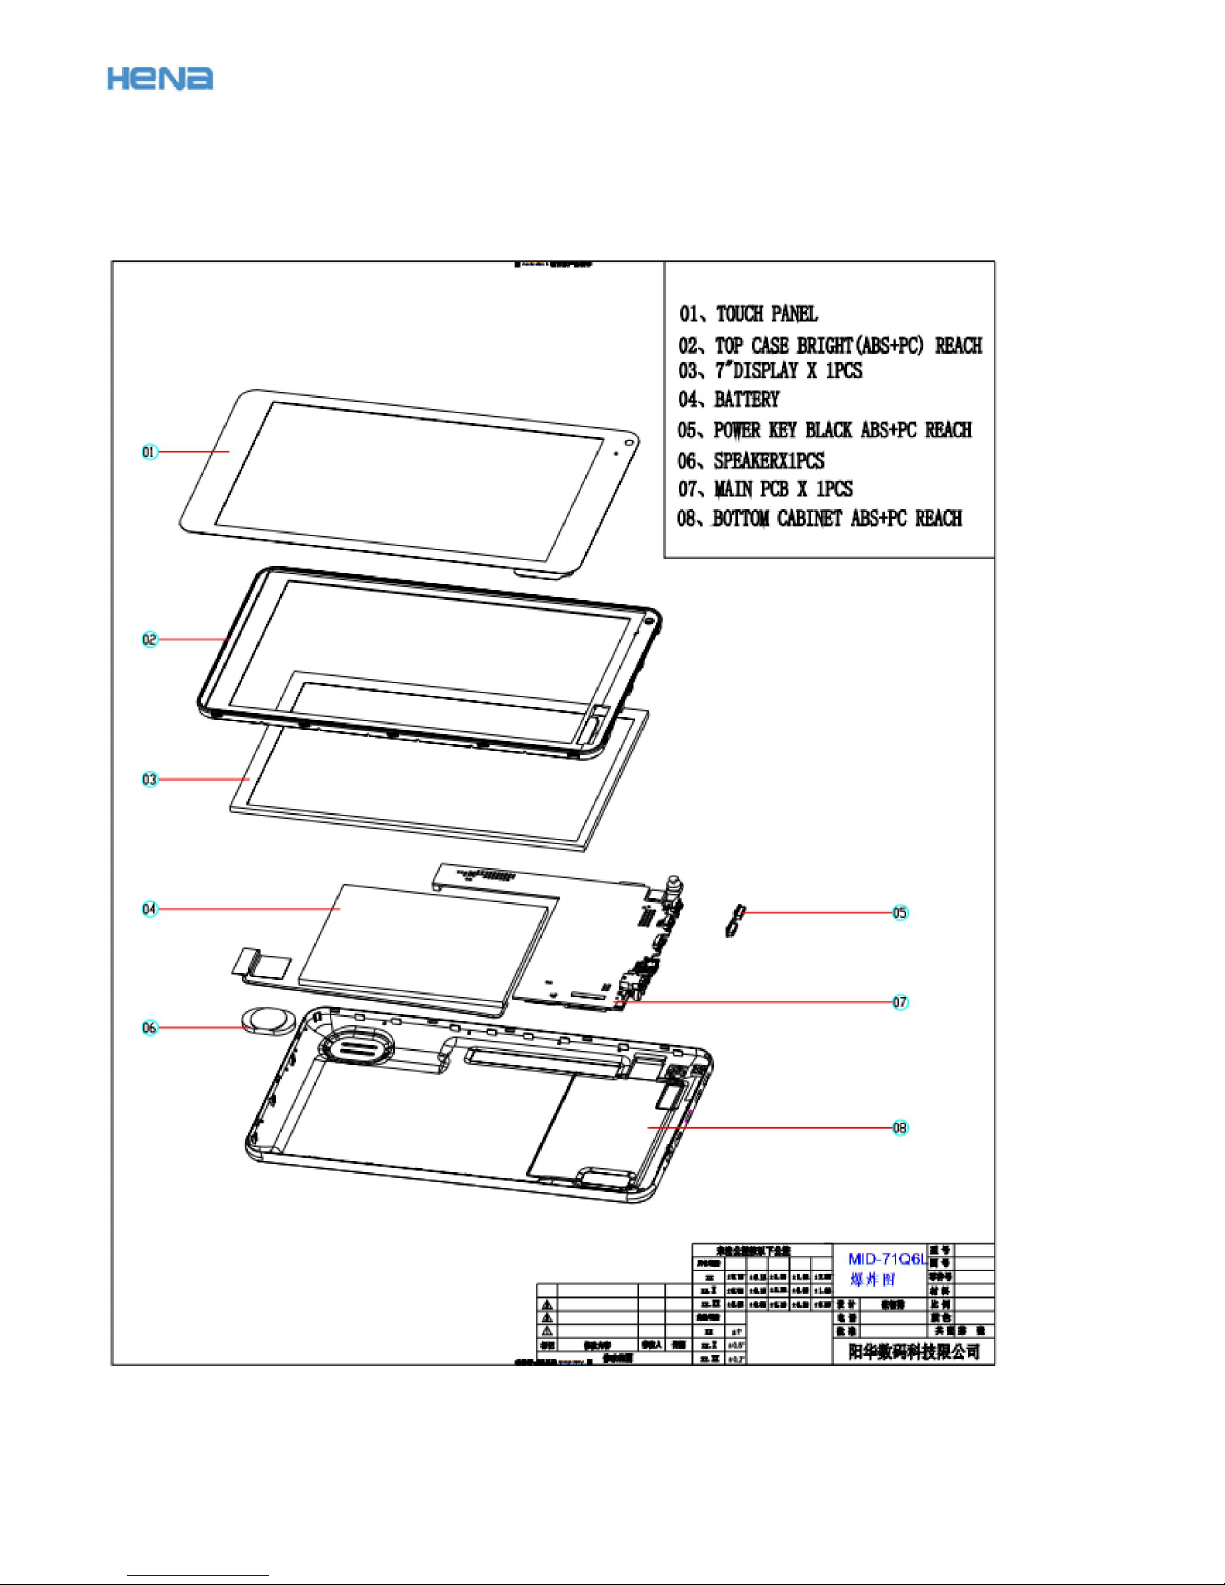
Exploded View

HENA DIGITAL TECHNOLOGY (SHEN ZHEN) CO. LTD.
-
5
-
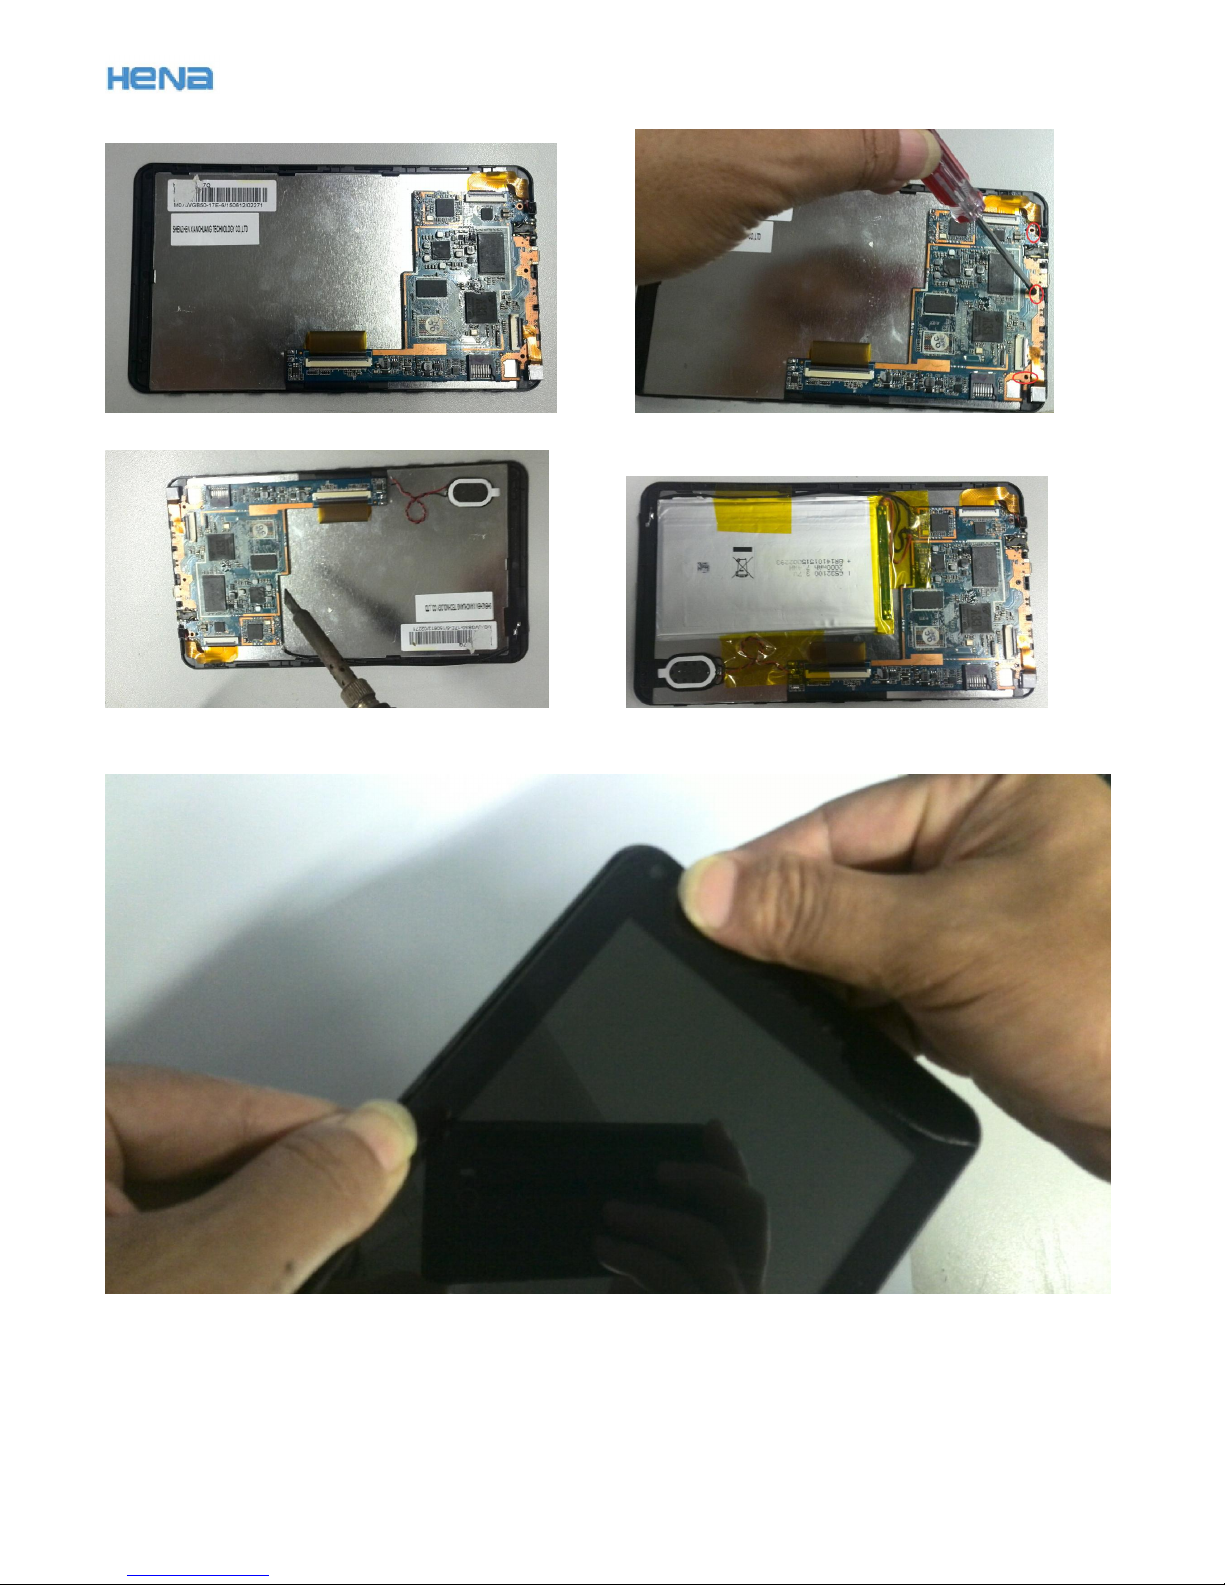
Disassembly

HENA DIGITAL TECHNOLOGY (SHEN ZHEN) CO. LTD.
-
6
-
Assembly
HENA DIGITAL TECHNOLOGY (SHEN ZHEN) CO. LTD.
-
7
-
HENA DIGITAL TECHNOLOGY (SHEN ZHEN) CO. LTD.
-
8
-
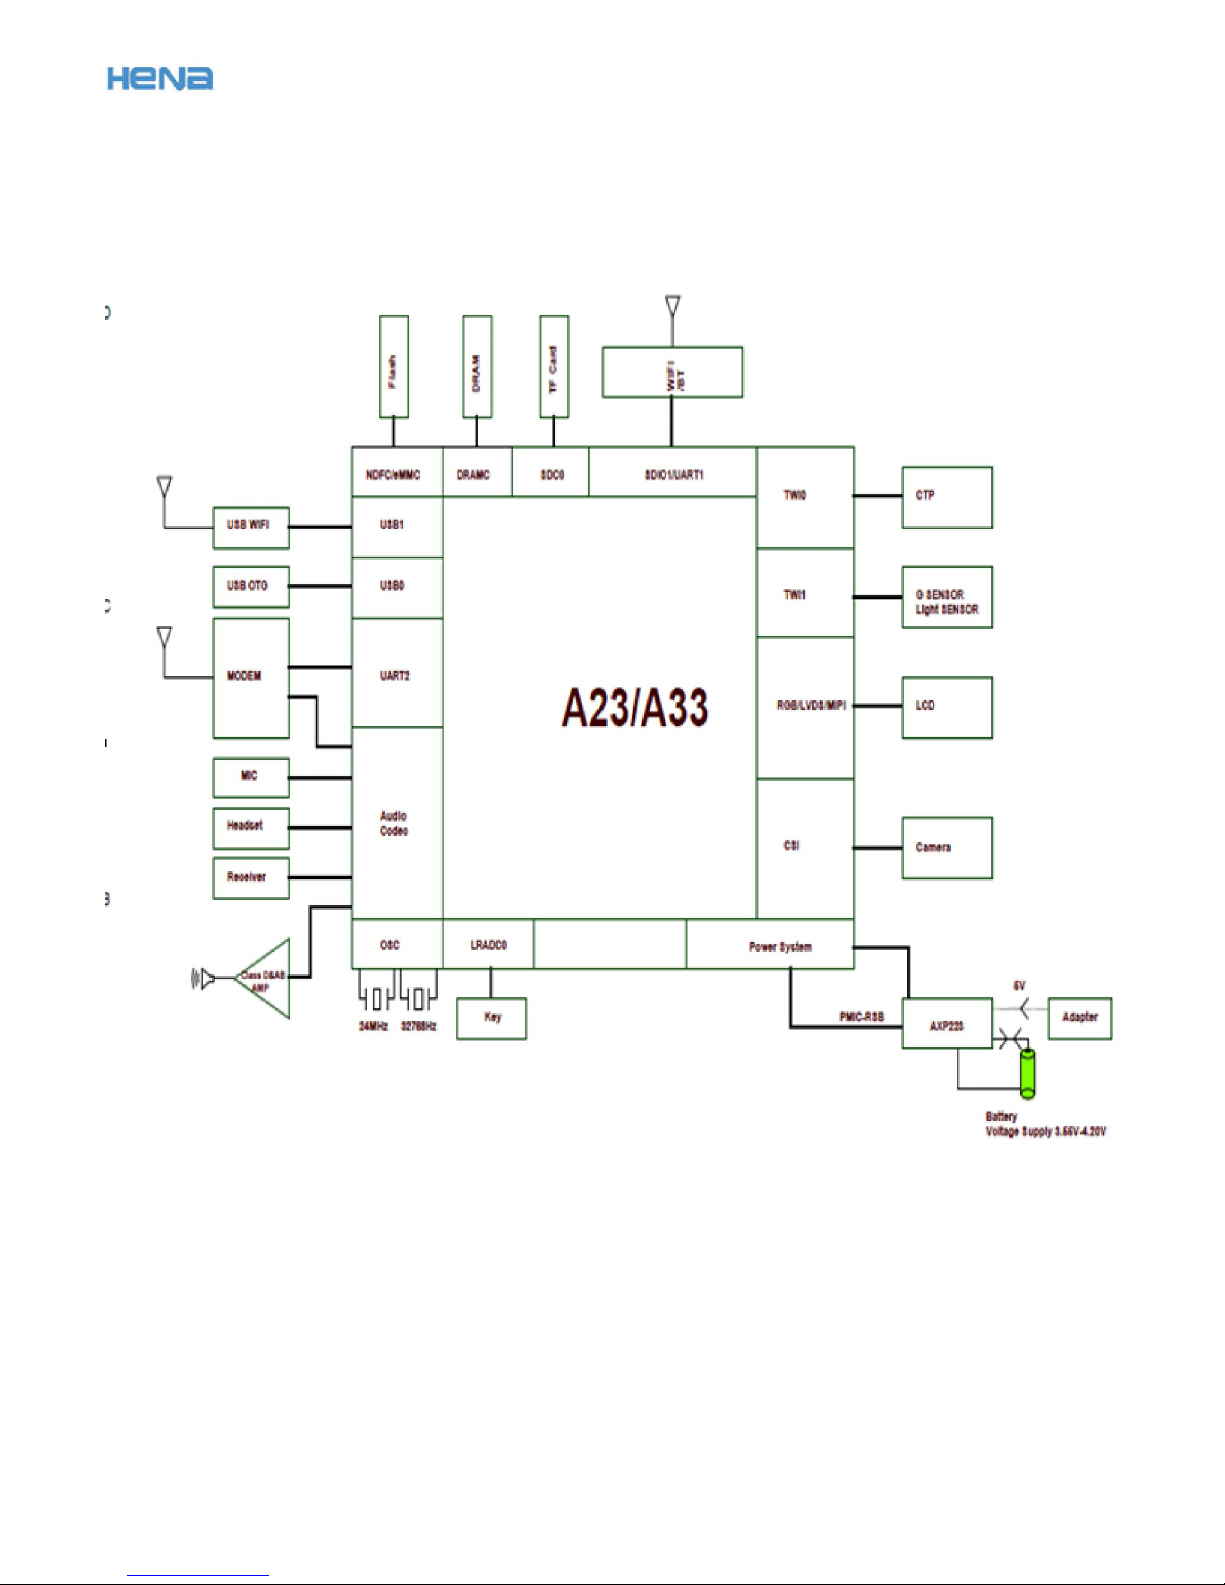
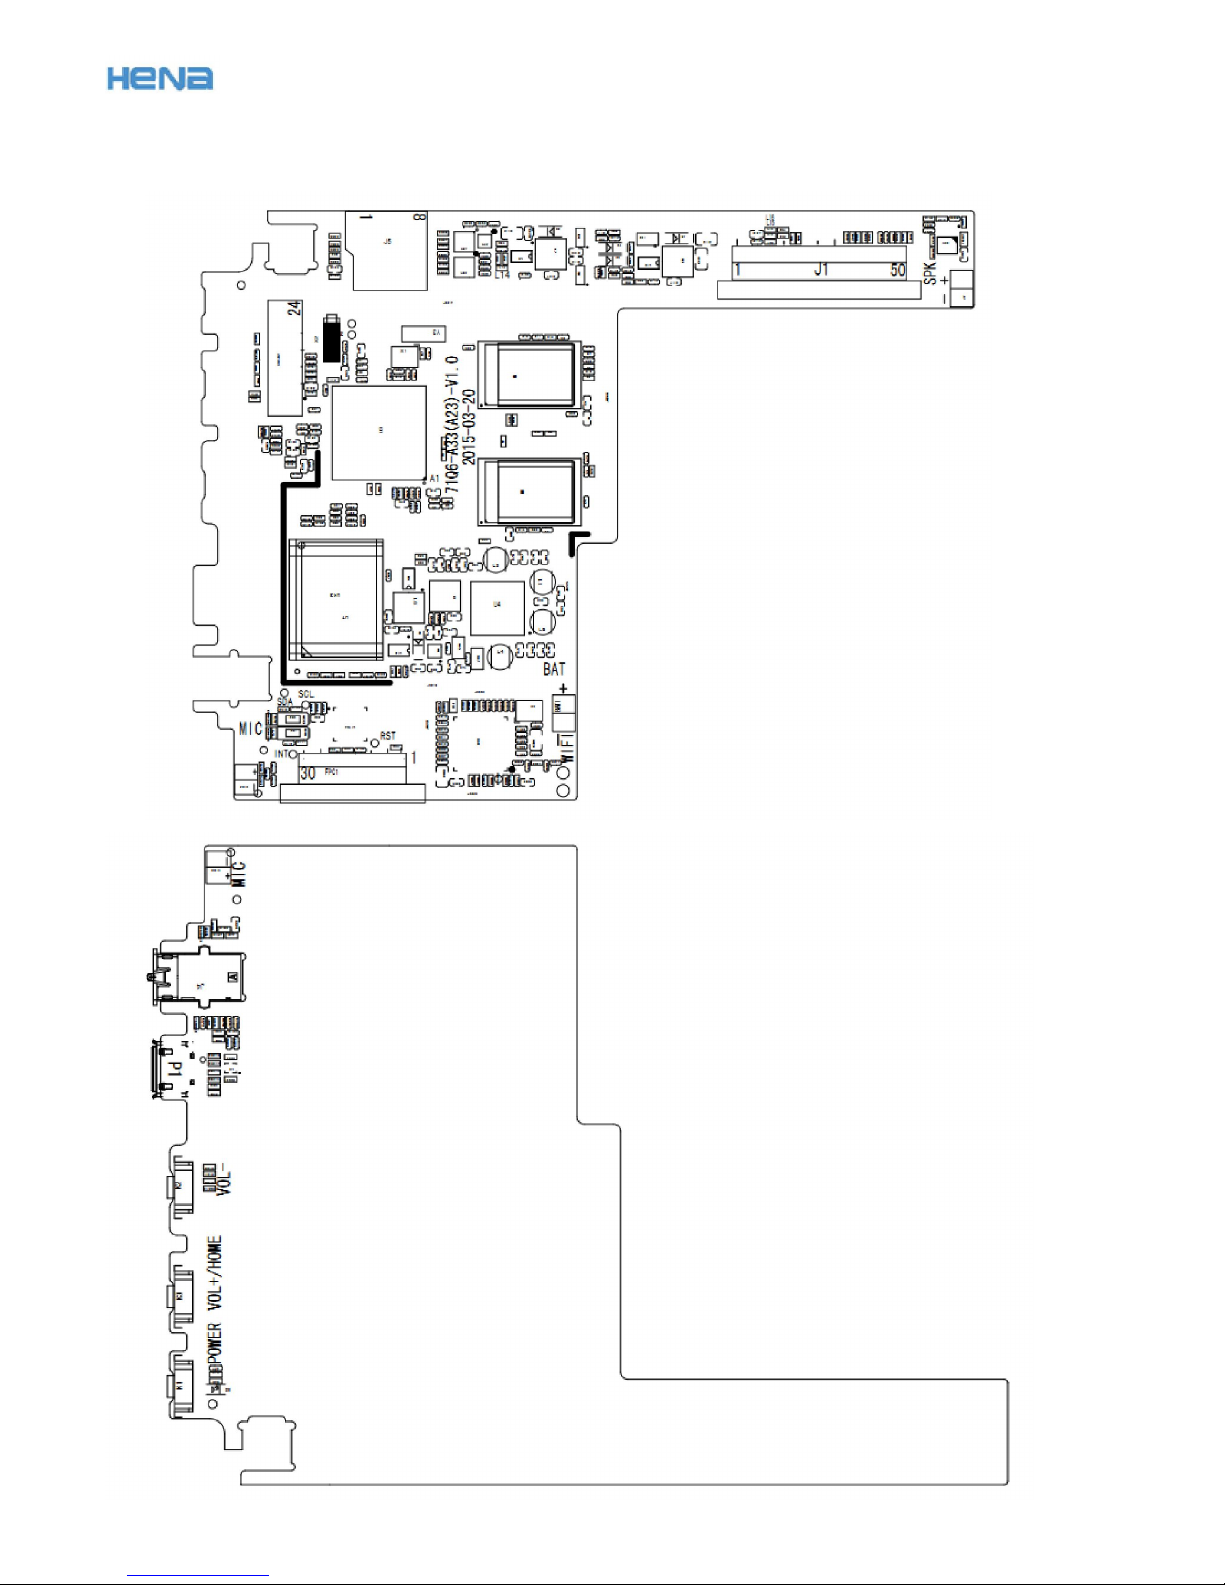
System block diagram
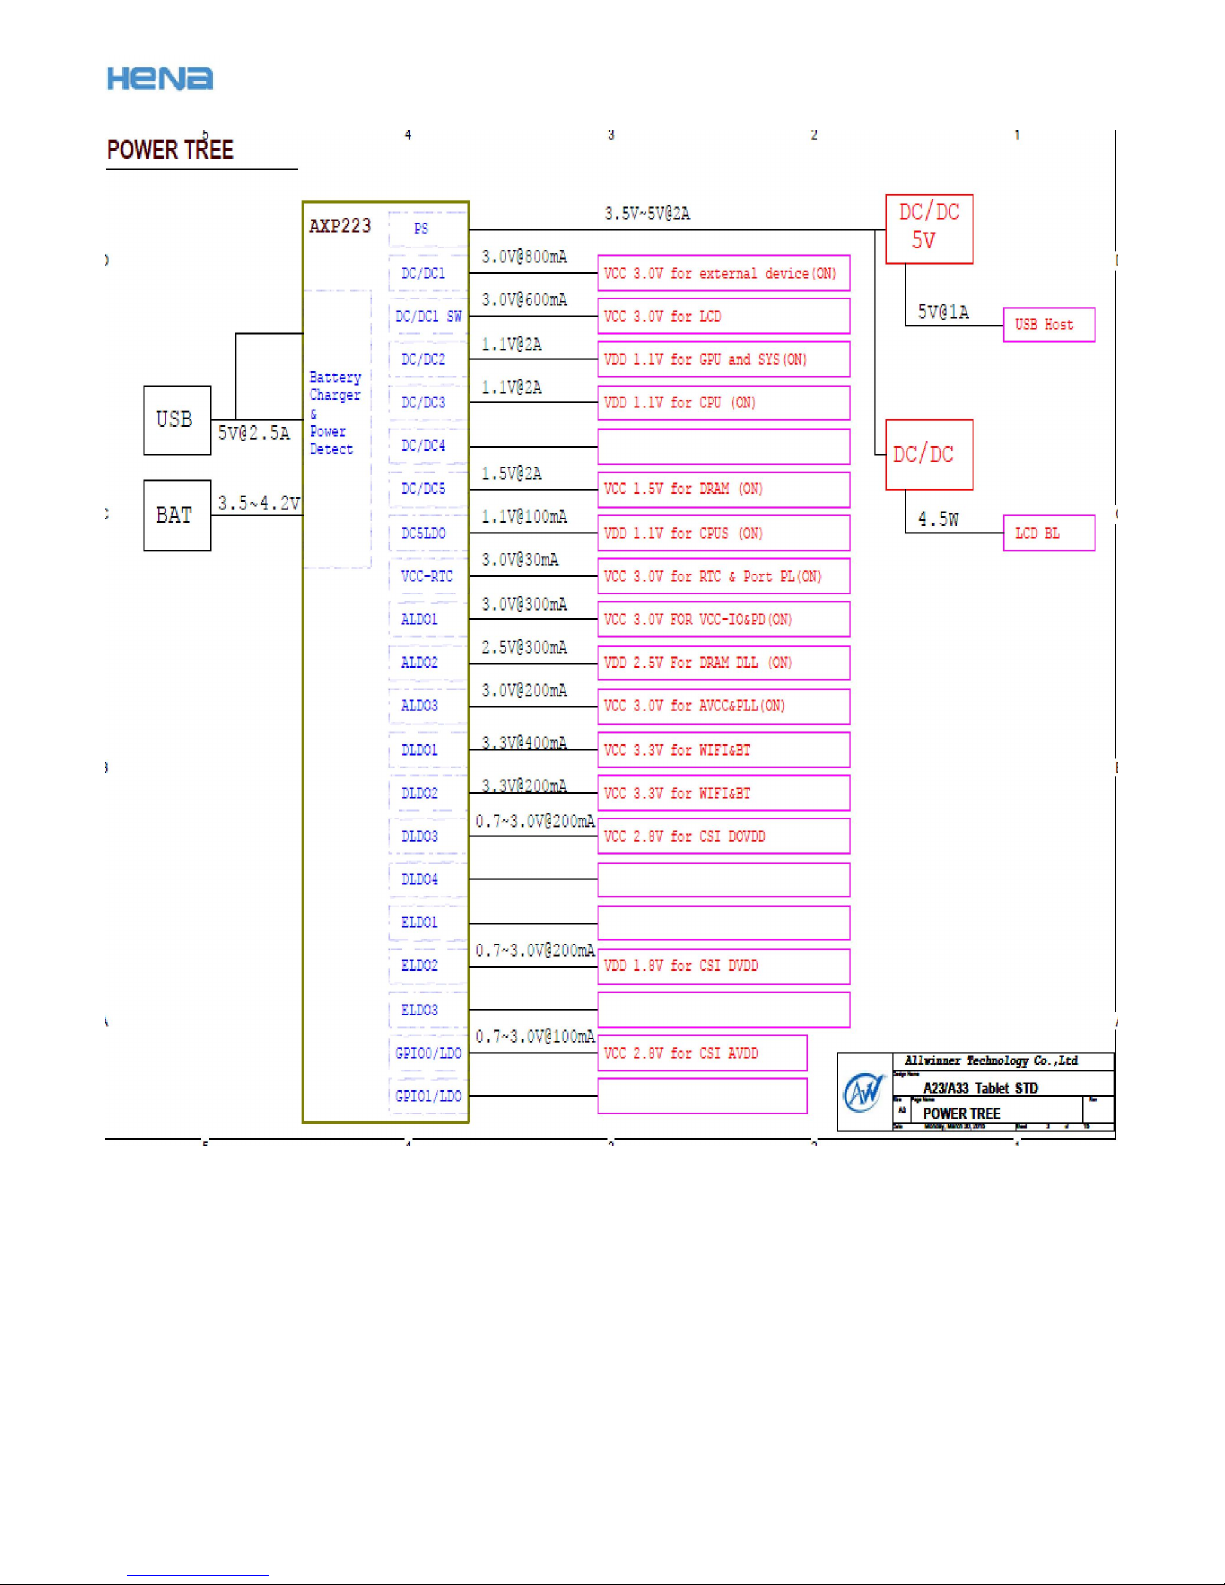
1.1. Block diagram:
HENA DIGITAL TECHNOLOGY (SHEN ZHEN) CO. LTD.
-
9
-
HENA DIGITAL TECHNOLOGY (SHEN ZHEN) CO. LTD.
-
10
-
1.2. Layout diagram:
2.

HENA DIGITAL TECHNOLOGY (SHEN ZHEN) CO. LTD.
-
11
-
Troubleshooting
1) NO POWER ON: ⑴Check the VDD,VDD_LOG,VDD_ARM voltage;
⑵ Upgraded the software;
⑶ checked the A33 & DDR3 solder.
Measured VDD voltage: 1.1V
Measured VDD_LOG voltage: 1.1V
Measured VDD_ARM voltage: 1.5V

HENA DIGITAL TECHNOLOGY (SHEN ZHEN) CO. LTD.
-
12
-
2) LCD no Display:
Measured VCC_LCD_voltage: the same
as battery voltage;
VCC_LCD: 3.3v
Checked the L8, D7 & U10 is damaged

HENA DIGITAL TECHNOLOGY (SHEN ZHEN) CO. LTD.
-
13
-
3) No touch: checked the U1705, whether colder solder; then checked TP, whether damaged.
4) WIFI not work:
Changed the WIFI antenna; or changed the WIFI MODEL.
5) No charger:
Checked U4, whether damaged.
Checked the VGL Voltage: -8V;
VGH Voltage: 18V;
AVDD Voltage: 10.3V

HENA DIGITAL TECHNOLOGY (SHEN ZHEN) CO. LTD.
-
14
-
Upgrading Guide
PhoenixUSBPro
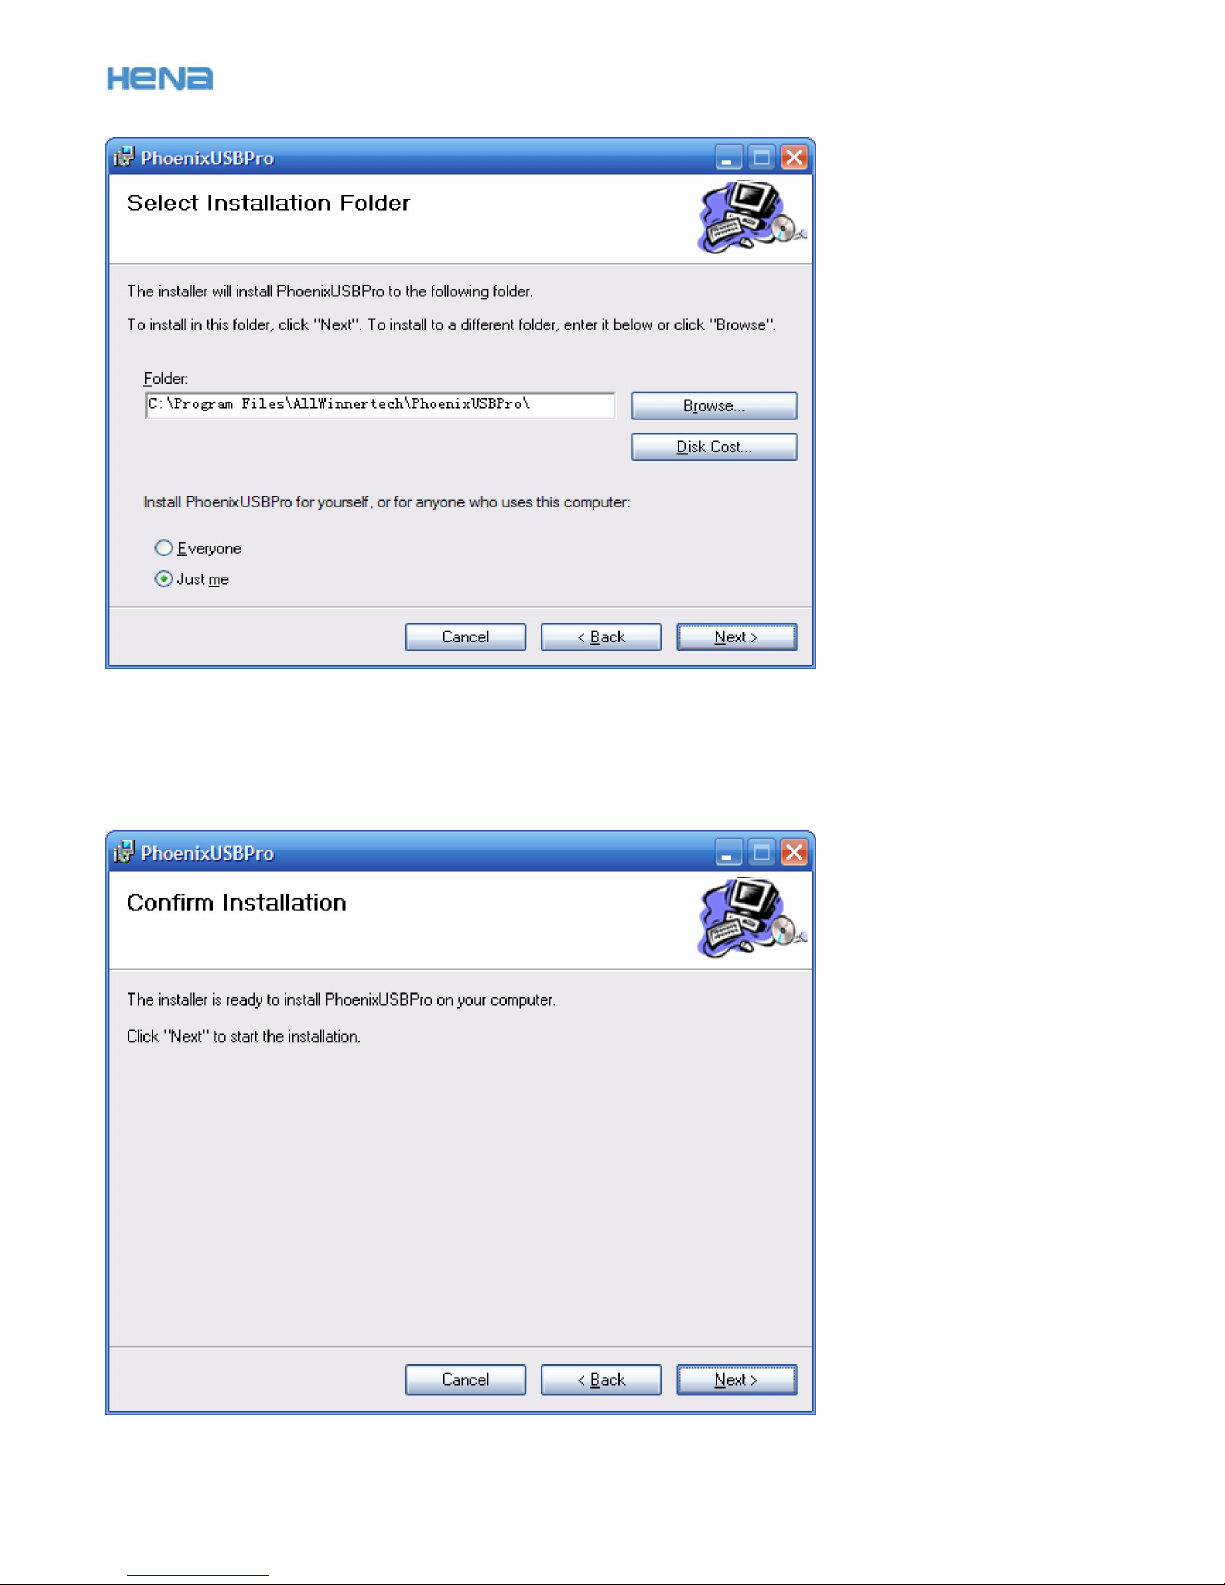
1.PhoenixUSBPro Installation
First of all, double click on PhoenixPacket.msi icon ,and follow
the prompts to finish the installation:
HENA DIGITAL TECHNOLOGY (SHEN ZHEN) CO. LTD.
-
15
-

HENA DIGITAL TECHNOLOGY (SHEN ZHEN) CO. LTD.
-
16
-
Note: if following prompt pops up during the installation, select Continuing.
After the installation, go to Start menu, and you can see PhoenixPro there.

HENA DIGITAL TECHNOLOGY (SHEN ZHEN) CO. LTD.
-
17
-
You can also find it on the desktop.
图1.4
2.Operation Steps
Disconnect all the devices before running the PhoenixUSBPro.
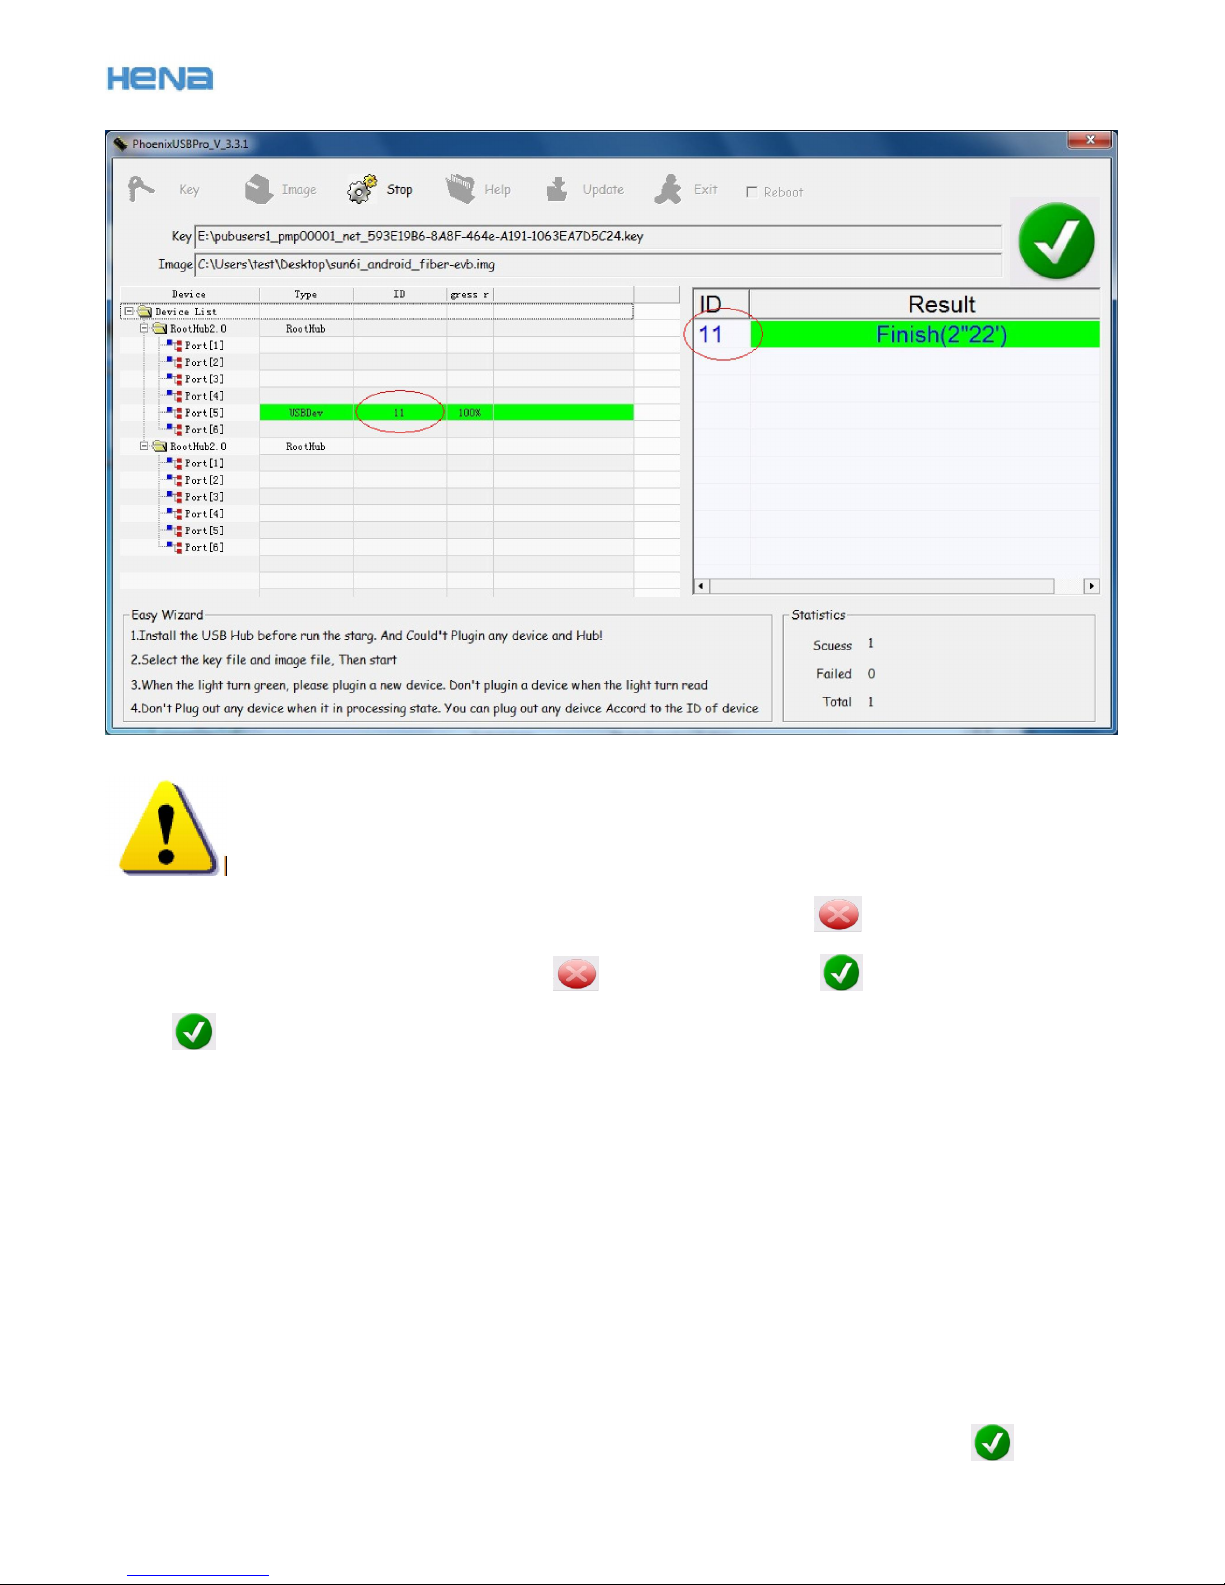
1) Run PhoenixUSBPro, and you will see following interface:
2) Select target certification and firmware files: click on Certification to select the
target file suffixed .key.

HENA DIGITAL TECHNOLOGY (SHEN ZHEN) CO. LTD.
-
18
-
Copyright©2013 Allwinner Technology All Rights Reserved 7
Click on Firmware to select the target firmware file suffixed .img.
3) Load firmware to devices: click on Start , and you will find the upper right
sign becomes . Remember not to connect any device during the state.
4) Firmware loading via PC USB
Make sure that the USB port to be used works well. When the green sign appears, connect
the device to PC via USB. You may be prompted to install USB driver if devices are connected
to the PC for the first time, as shown below, follow the prompts to install the driver:

HENA DIGITAL TECHNOLOGY (SHEN ZHEN) CO. LTD.
-
19
-
After the device is connected, you will see it in the device list. Remember the ID allocated
to each USB device,
and make sure that the right device is disconnected after the upgrade.
HENA DIGITAL TECHNOLOGY (SHEN ZHEN) CO. LTD.
-
20
-
Note
a. Devices are not allowed to be connected to PC during the state;
b. After devices are connected to PC, will turn into in about 5 seconds;
c. If doesn’t appear after devices are connected to PC, there may be something wrong
with devices.
Reference can be made to the Appendix: Device Upgrade Failure Analysis.
5) Firmware loading via USB Hub
Close PhoenixUSBPro first, and then connect USB Hub to REAR USB port, NOT the front, of
the PC, and to the adaptor as well if it has one.
Start PhoenixUSBPro, click on Start, and connect the device to USB Hub when appears.
You may be
Table of contents
Other Hena Tablet manuals


