Hendi 208878 User manual

You should read this user manual carefully before
using the appliance
Bevor Sie das Gerät in Betrieb nehmen, sollten
Sie diese Gebrauchsanweisung aufmerksam lesen
Przed uruchomieniem urządzenia należy koniecznie
dokładnie przeczytać niniejszą instrukcję obsługi
Lisez attentivement ce mode d’emploi avant d’utiliser
l’appareil .
Prima di utilizzare l’apparecchio in funzione leggere
attentamente le istruzioni per l’uso.
User manual
Gebrauchsanweisung
Instrukcja obsługi
Mode d’emploi
Istruzioni per l’utente
Item: 208878
208885
COFFEE GRINDERS
MŁYNKI DO MIELENIA KAWY

2
Keep this manual with the appliance.
Diese Gebrauchsanweisung bitte beim Gerät aufbewahren.
Bewaar deze handleiding bij het apparaat.
Zachowaj instrukcję urządzenia.
Gardez ces instructions avec cet appareil.
Conservate le istruzioni insieme all’apparecchio.
Păstraţi manualul de utilizare alături de aparat.
Хранить руководство вместе с устройством.
For indoor use only.
Nur zur Verwendung im Innenbereich.
Alleen voor gebruik binnenshuis.
Do użytku wewnątrz pomieszczeń.
Pour l’usage à l’intérieur seulement.
Destinato solo all’uso domestico.
Numai pentru uz casnic.
Использовать только в помещениях.

3
EN
Dear Customer,
Thank you for purchasing this Hendi appliance. Please read this manual carefully before connecting the
appliance in order to prevent damage due to incorrect use. Read the safety regulations in particular very
carefully.
Technical data
Model Version Dimensions Power/Voltage Weight Cable
(mm) (W/V) (kg)
208878 automatic 160x290x(H)510 420 W/230 V, 1N, 50 Hz 10.5 3x0,75 mm2, H05 RN
208885 electronic 160x280x(H)510 420 W/230 V, 1N, 50 Hz 10.0 3x0,75 mm2, H05 RN
Unpacking, installation and connection
On opening the packaging, check carefully to make
sure the appliance is intact and that there are no
sing of damage. If in any doubt contact immediately
your dealer that will help you in a professional way.
The packaging materials should be collected and
disposed in conformity with the safety rules in force.
Keep out of the reach of children and irresponsible
persons because are potential sources of danger.
If you decide not to use the appliance anymore re-
member to unplug it so that it cannot be used, and
then cut the cable in the point where it comes out
of the appliance. Contact specialized firms for in-
formation on the disposal of the components of the
appliance.
The installation must be carried out only by pro-
fessionally qualified persons who are authorised to
perform such tasks and must be comply with the
regulations in force in the place in which the appli-
ance is installed . Incorrect installation may result in
injury of persons or animals, or damage to property,
for which the manufacturer cannot be held respon-
sible.
Before using the appliance read carefully the notices
and the instructions:
• The appliance must be placed on a stable, flat sur-
face.
• Not installed outside.
• Make sure that the appliance is not resting on the
power supply cable.
• Make sure the voltage and frequency values of the
supply mains correspond to the ratings indicated
on the label featuring the appliance’s technical
data.
• Make sure the ratings of the system are suitable
for the power absorbed by the appliance and/or
maximum voltage.
• It’s compulsory to earth the appliance. Check that
the grounding system is in compliance with the
actual safety laws.
• The external equipotential terminal must be con-
nected to a equipotential node .
• Three fase version: connect the motor correctly so
the blade, if viewed from the grinder, rotate clock-
wise.
General warnings
Read thoroughly and stick closely to the instructions
and warnings.
Always remove the plug from the socket before carrying
out any maintenance or clearing of the appliance.
SINGLE PHASE models are supplied complete with
cable and plug for connection to the socket.
Any tempering with the machine or connections not
complying with the above indications invalidate the
manufacturer’s guaranty.

4
EN
Particular warnings
Never tamper with the machines anyway. For all in-
terventions or tampering on the machines, always
apply to the authorized centre service. Never pull
the power cable to remove the plug from the socket.
Only use the appliance for the purposes it is meant
for. Position the appliance a minimum of 5 cm from
walls so as to allow good aeration. Keep the appli-
ance away from sinks and water. Never leave unat-
tended the machine switched on. Keep the appli-
ance away from children and incompetent persons.
Children should be supervised to ensure that they
do not play with the appliance.
Use only original accessories and parts. To avoid the
danger of fire, never cover the appliances. Unplug
the appliance from the mains when it is not in use.
Let the appliance to cool down before moving it. In
the interest of safety, the appliances must always be
considered as live. The motor is equipped of a ther-
mal sensor that switch off the feeding when high
temperatures are reached. If this happen unplug the
machines from the mains and let it cool down, then
contact technical staff. Do not repair by yourself.
If the coffee grinder is to remain inactive for a long
period, clean it carefully, dry the top container and
leave it open.
Instructions
Appliances to ground coffee beans.
ATTENTION Moving parts.
Operation interval of the machine
Respect the following cycle of use of the machine:
If the supply cord is damaged, it must be replaced
by the manufacturer, its service agent or similarly
qualified persons in order to avoid a hazard.
30 s ON / 6 min. OFF
Operation
Before inserting the plug in the socket or the main
switch upstream from the machine, ensure that the
switch on the machine is on position “0” (figure 1).
Insert the shutter that closes the container and
check that it slides in its seat (figure 2).
figure 1
figure 2

5
EN
Fit the container in its seat, pressing at the side with
your fingers until it is firmly in place. Then fix it to the
ring nut of milling regulation with the appropriate
screw supplied with the apparatus, match the hole
on the beans container with the one on the ring nut.
If your coffee grinder ha san automatic switch, check
that the lever is in the position indicated. The coffee
grinder is now ready for work (figure 3).
Pour the coffee beans into the top container. Open
the shutter. Insert the plug in the socket or turn on
the main switch upstream from the machine, then
turn the machine switch to position “I”. For security
issues, the customer not have to remove any type of
screw on the coffee grinder. This operation is only
concurred by qualified technicians and after de-
tached the apparatus from the feeding net.
Check the grain size of the ground coffee; each grind-
er
is set for medium-fine grain. If you’re not satisfied
with this result you must proceed as follows:
Coffee grinder doser 208878:
1. Press the ring nut pawl downwards (figure 4).
2. Turn the ring nut to the LEFT for finer grain or to
the RIGHT for coarser grain (figure 5).
To avoid the removal of the metal ring with the con-
sequent possibility to have free access to the milling
group, place the screw in one of the two holes allow-
ing the widest regulation.
Adjusting the quantity delivered:
(figure 5)
To adjust the quantity, turn the adjusting nut. Turn
to the LEFT to increase the quantity, to the RIGHT
to decrease it.
The dosing device can deliver from 4 gr to 9 gr (figure 6).
To set the amount you want, take 10 doses (ten pulls
of the lever) from the doser and weight the coffee
that comes out, in this way you can calculate the
weight of each dose.
figure 3
figure 4
figure 5
figure 6

6
EN
208885 “on demand” version
Warning: to stop the provision of coffee press any of the 5 keys of display.
Operation
Before inserting the plug in the socket or turning on
the main switch upstream from the machine, ensure
that the switch on the machine in on position “0”.
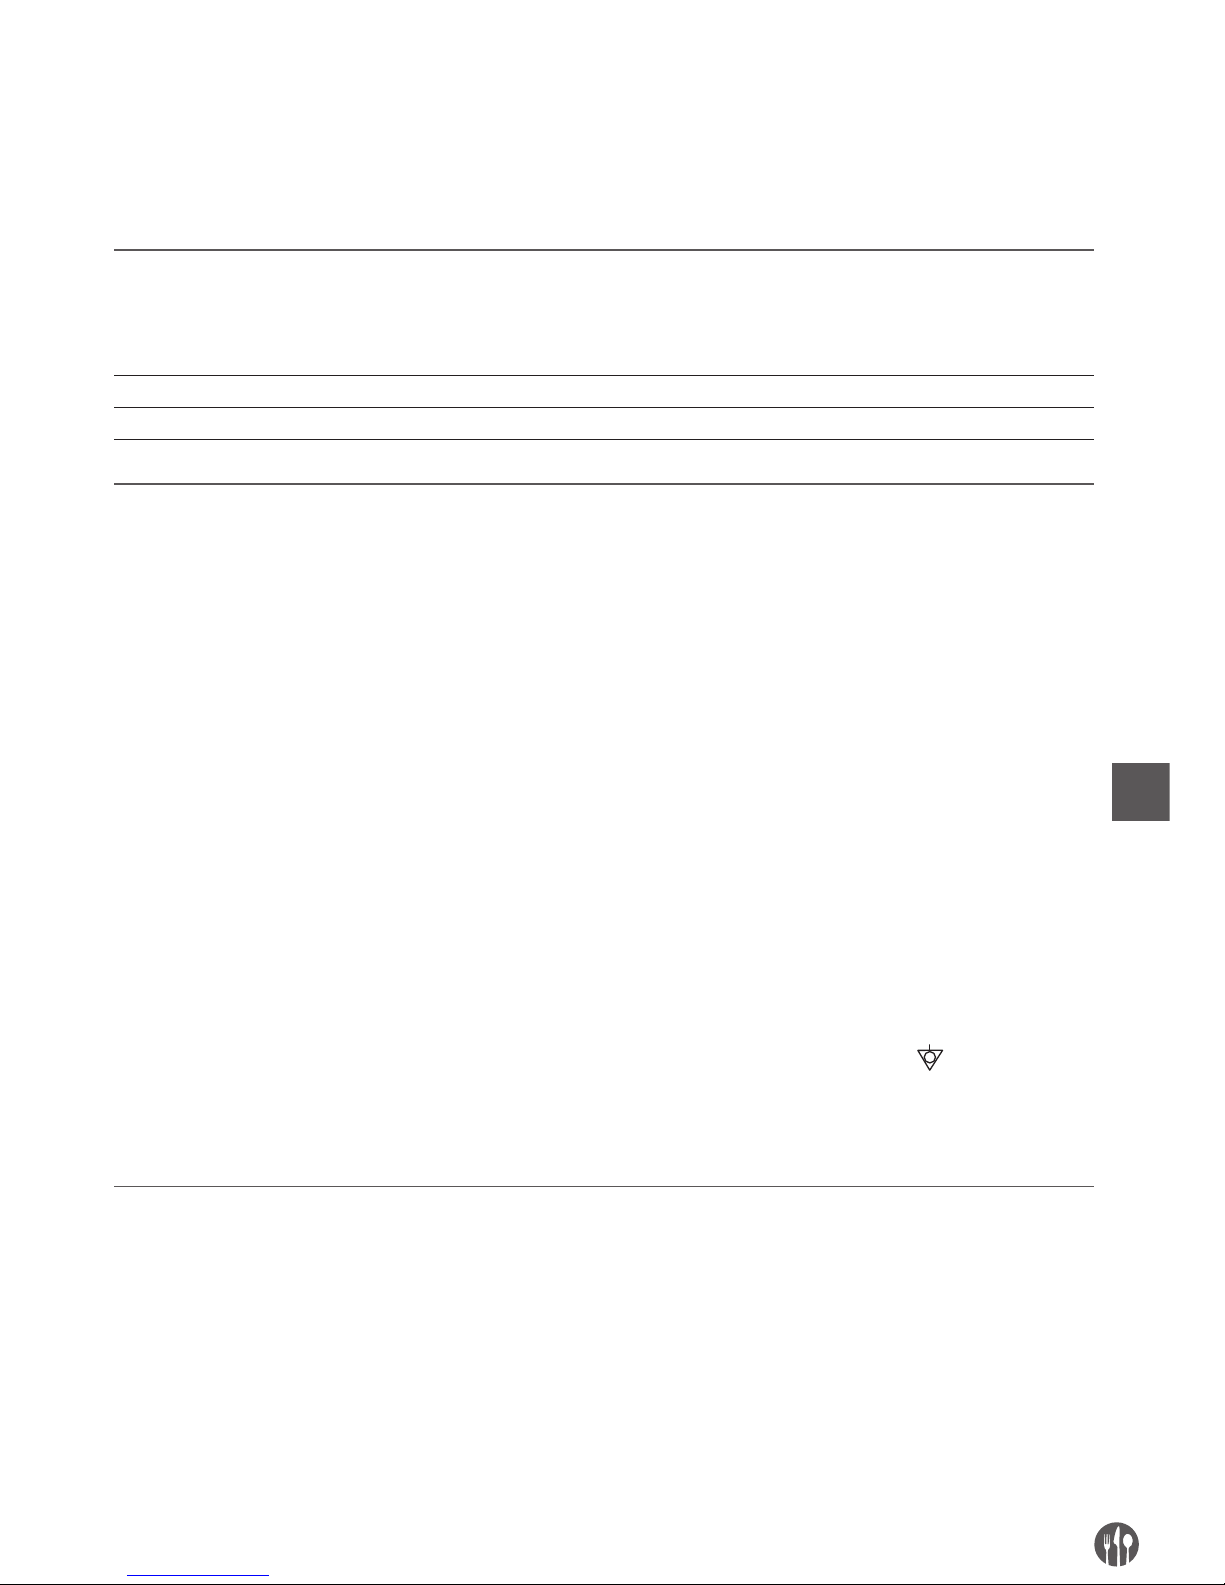
Insert the shutter that closes the top container and
check that it slides in its seat.
Fit the container in its seat, pressing at the side with
your fingers until it is firmly in place, then fix it to the
ring nut of milling regulation with the appropriate
screw supplied with the apparatus, match the hole
on the beans container with the one on the ring nut.
The coffee grinder is now ready for work. Pour the
coffee beans into the top container. Open the shutter
and insert the plug in the socket, then turn the ma-
chine switch to position “I”. Now the display will be
ignited visualizing the written “READY”; the grinder
is ready to erogate the required doses (from one to
three) or to be programmed. Put the door filter in
the appropriate staple and then is possible to pro-
ceed with the distribution of the milled coffee in this
way:
• single dose: push the button with a cup
• double dose: push the button with two cups
• triple dose: pressing key with 3 cups
• manual dose: pressing key “MAN”, the grinder
starts to work. To stop erogation press again key
“MAN” (the grinder automatically stops after 4
minutes).
Programme
FOR ONE COFFEE CUP - Press for 3 seconds key
“MENU” to get access to programme menu. Press
the key “+” or “-” to slide the menu options, select
“time dose 1” pressing key “OK”; using key “+” or “-”
it’s possible to increase or decrease the erogation
time, which is displayed in seconds (3 numbers) and
cents of seconds (2 numbers) to set and refine the
released dose. After setting parameter of time press
again key “OK” to confirm and exit. To exit from pro-
gramme menu press “ESC”.
FOR TWO COFFEE CUPS – the same as for one cup,
just positioning on parameter written “time dose 2”.
FOR THREE COFFEE CUPS - the same as for one cup,
just positioning on parameter written “time dose 3”.
The maximum time you can set is 640 seconds and
99 hundredths of a second for all three options.
STAND-BY TIME – It is the time after which the
display enters in power saving mode. Press for 3
seconds key “MENU” to get access to programme
menu. Press the key “+” or “-” to slide the menu op-
tions, select “ STAND BY time”. Select it pressing key
“OK”, then using “+” or “-” it’s possible to increase
or decrease the time, which is displayed in seconds.
After setting parameter of time press again key “OK”
to confirm and exit. To exit from programme menu
press “ESC”.
WEAR GRINDERS - Provides information on the to-
tal doses that can be erogated before the replace-
ment of the grinders. This item is editable. Upon
reaching the maximum doses that can be erogated
with the set of grinders in use, the display will show
the written “WEAR GRINDERS”. Press for 3 seconds
key “MENU” to get access to programme menu.
Press the key “+” or “-” to slide the menu options,
select “WEAR GRINDERS” pressing key “OK”. Using
key “+” or “-” it’s possible to increase or decrease
the dosis. Press key “OK” to confirm and exit. To exit
from programme menu press “ESC”.
SET WRITTEN “READY” – Keep pressed for 3 sec-
onds key “MENU” to get access to programme
menu. Press the key “+” or “-” to slide the menu op-
tions, select “BAR message”. Select it pressing key
“OK”, then using key “MAN” move the cursor till the
point you want the written begins. Use key “+” and
“-” to slide the alphanumeric list; to stop at choosen
character and move to next, use key “MAN”. Repeat
the procedure till the choosen code for stand by
mode is complete. To confirm and exit press “OK”.
To exit from programme
menu press “ESC”.
BRIGHTNESS – To set the display brightness.
Press for 3 seconds key “MENU” to get access to
programme menu. Press the key “+” or “-” to slide

7
EN
the menu options, select “brightness” pressing key
“OK”, then using “+” or “-” it’s possible to increase
or decrease the brightness from 0 to 100%. To con-
firm and exit press “OK”. To exit from programme
menu press “ESC”.
SET TIME AND DATE - Keep pressed for 3 seconds
key “MENU” to get access to programme menu.
Press the key “+” or “-” to slide the menu options,
select “time/date” pressing key “OK”. Firstly it ap-
pears flashing writing of time, which is ready to be
modified. Pressing “+” o “-” it’s possible to increase
or decrease the displayed values. To confirm hour,
minutes, seconds and date press repeatedly key
“OK”. To confirm and exit press “OK”. To exit from
programme menu press “ESC”.
TOTAL COUNT OF EROGATED DOSES – Provides in-
formation on the total doses erogated by the grind-
er and the remanent doses until the next grinding
blades change. To display it, press for 3 seconds key
“MENU” to get access to programme menu. Press
the key “+” or “-” to slide the menu options, select
“total count” pressing key “OK”. When you change
the grinding blades press key “RESET” to carry back
the number as the value of “WEAR GRINDERS”.
After doing it, the written “WEAR GRINDERS” will
disappear from the display. To exit from programme
menu press “ESC”.
PARTIAL COUNT OF EROGATED DOSES – Provides
information on the quantity of erogated doses from
the last
reset (usually to count the erogated doses during
the day/ week). To reset press for 3 seconds key
“MENU” to get access to programme menu. Press
the key “+” or “-” to slide the menu options, select
“partial count” pressing key “OK”. Keep pressed key
“RESET” untill the value returns to zero. To confirm
and exit press “OK”. To exit from programme menu
press “ESC”.
MONTHLY COUNT OF EROGATED DOSES – Provides
information on the quantity of erogated doses from
the last reset (usually to count the erogated doses
during the month) and on the quantity of erogated
doses in the previous 30 days. To reset press for 3
seconds key “MENU” to get access to programme
menu. Press the key “+” or “-” to slide the menu
options, select “monthly count” pressing key “OK”.
Keep pressed key “RESET” untill the value returns
to zero. To confirm and exit press “OK”. To exit from
programme menu press “ESC”.
CHANGE LANGUAGE / CAMBIO LINGUA – Keep
pressed for 3 seconds key “MENU” to get access to
programme menu, press key “+” or “-” to slide the
menu options, select “CHANGE LANGUAGE”: select
pressing key “OK”, then using “+” or “-” it’s possible
set the choosen language among the available ones.
After choosing the language, press again key “OK”
to confirm and exit. To exit from programme menu
press “ESC”.
Security system to avoid the access to the moving parts
There are many protection systems (already de-
scribed) to avoid the access to the rotary parts as
the safe screw on the beans container and the metal
ring, the fixed cone of protection inside of the beans
container and the protection in metal placed in front
of the milled coffee exit. All these devices are con-
ceived in order to protect who use the apparatus.
For this reason, we underline that you don’t have
absolutely remove or modify them and, for any prob-
lem of malfunctioning, you have to contact technical
staff which will know how to help you.

8
EN
This product complies with EU Directive 2002/96/EC.
The crossed bin symbol on the appliance indicates
that the product, at the end of its life span, must be
disposed of separately from domestic waste, either
by taking it to a separate waste disposal site for
electric and electronic appliances or by returning
it to your dealer when you buy another similar ap-
pliance. The user is responsible for taking the ap-
pliance to a special waste disposal site at the end
of its life span; failure to do so will incur penalties
under the waste disposal regulations in force. If the
disused appliance is collected correctly as separate
waste, it can be recycled, treated and disposed of
ecologically; this avoids a negative impact on both
the environment and the health and contributes to-
wards the recycling of the product’s materials. For
further information regarding the waste disposal
services available, contact your local waste disposal
agency or the shop where you bought the appliance.
The manufactures and importers do not take the re-
sponsibility for recycling, treatment and ecological
disposal, either directly or through a public system.

9
DE
Sehr geehrte Kundin, sehr geehrter Kunde,
wir danken Ihnen für den Kauf des Gerätes Hendi. Machen Sie sich bitte mit dieser Anleitung noch vor der
Inbetriebnahme des Gerätes vertraut, um Schäden durch die unsachgemäße Bedienung zu vermeiden. Den
Sicherheitsregeln ist besondere Aufmerksamkeit zu widmen.
Technische daten
Model Version Dimensions Power/Voltage Weight Cable
(mm) (W/V) (kg)
208878 automatic 160x290x(H)510 420 W/230 V, 1N, 50 Hz 10.5 3x0,75 mm2, H05 RN
208885 electronic 160x280x(H)510 420 W/230 V, 1N, 50 Hz 10.0 3x0,75 mm2, H05 RN
Auspacken, installation und elektroanschluss
Nachdem die Verpackung geöffnet wurde ist sich
zu vergewissern, dass das Gerät unversehrt ist und
keinerlei Beschädigungen aufweist. Im Zweifelsfall
ist sofort Ihr Händler zu informieren, der Ihnen pro-
fessionell behilflich sein wird.
Die Bestandteile der Verpackung sind entsprechend
den geltenden Richtlinien zu entsorgen. Lassen
Sie sie nie in der Reichweite von Kindern oder von
Behinderten, da sie eine mögliche Gefahrenquelle
darstellen können.
Ab dem Moment der Entscheidung, das Gerät nicht
mehr zu verwenden, empfiehlt es sich, es unbrauch-
bar zu machen, indem das Kabel am Austritt aus
dem Gerät abgeschnitten und das Gerät den spe-
zialisierten Entsorgungsbetrieben übergeben wird.
Die Installation hat durch qualifiziertes und auto-
risiertes Fachpersonal entsprechend den im Ge-
brauchsland des Geräts geltenden Vorschriften zu
erfolgen. Eine fehlerhafte Installation kann zu Schä-
den an Personen, Tieren oder Dingen führen, für die
der Hersteller keine Verantwortung übernimmt.
Vor dem Gebrauch des Geräts ist sich strengstens
an die folgenden Anweisungen zu halten:
• Stellen Sie das Gerät auf eine feste und ebene
Fläche.
• Nicht zur Installation im Freien geeignet.
• Achten Sie darauf, dass das Gerät nicht das Ver-
sorgungskabel quetscht.
• Überprüfen Sie, ob die Spannung und die Fre-
quenz des Stromversorgungsnetzes mit der auf
jedem Gerät angebrachten Etikett angegebenen
Spannung und Frequenz übereinstimmen.
• Überprüfen Sie, ob die elektrische Leistung der
Stromversorgungsanlage der Leistung und/oder
dem maximal aufgenommenen Strom des Geräts
entspricht.
• Es ist Pflicht, das Gerät zu erden. Überprüfen Sie
daher, ob die Erdung den aktuellen Sicherheits-
vorschriften entspricht.
• Verbinden Sie die äußere durch das Symbol gekenn-
zeichnete
Klemme mit dem Ausgleichsknoten .
• Drei-Phasen-Version: Schließen Sie den Motor
richtig, so dass die Grate, wenn aus der Mühle ge-
sehen, im Uhrzeigersinn drehen.
General anweisungen
Die Hinweise und Anleitungen müssen sorgfältig
durchgelesen und strikt werden. Vor jeder Wartung
und Reinigung des Gerätes den Stecker immer aus
der Steckdose ziehen.
Die Ein-Phasen Modelle werden dereite mit Kabel
und Stecker fur del Stromanschluss geliefert.
Die Drei-Phasen Modelle weden mit einem Kabel
geliefert; der Netzanschluss ist Aufgabe eines qual-
ifizierten Elektrikers.
Versichen Sie sich nach dem Anschluss des Gerats,
ob die Drehrichtung auch mit der am Great angege-
benen Pfeilrihtung uberstimmt.

10
DE
Spezial anweisungen
Die Geraten auf Keinen Fall nicht aufdrechen.
Für jede Veränderung oder Eingreifen auf der gera-
ten nur am autorisiert Dienstzentrum sich wenden.
Beim Herausziehen des Steckers nie am Anschluß-
kabel ziehen.
Verwenden Sie das Gerät nur für die Funktionen für
die es vorgesehen ist jede andere Verwendung ist
falsch und daher gefährlich.
Halten Sie beim Aufstellen der Geräte einen Min-
destabstand von 5 cm. Von den Wanden ein, um
eine optimale Belüftung zu gewährleisten außer-
dem müssen die Geräte fern von Spülbecken oder
spritzendem Wasser aufgestellt werden. Das einge-
schaltete Gerät nicht unbeaufsichtigt lassen oder in
der Nahe von Kindern und unfähigen Personen auf-
bewahren. Kinder müssen von einem Erwachsenen
beaufsichtigt werden, um sicherzustellen, dass sie
nich mit dem apparat spielen.
Das Gerät nicht einschalten, wenn es defekt ist.
Verwenden Sie nur Originalzubehör und Ersatzteile.
Die Geräte niemals abdecken,um Brandgefahr zu
vermeiden. Ziehen Sie den Netzstecker, wenn des
Gerät nicht in Betried ist.
Lassen Sie die Geräte abkühlen, devor sie Sie um-
stellen. Sicherheitshalber solten die Geräte immer
als unter Spannung stehend betrachtet werden.
Der Motor ist mit einem Temperaturfühler ausge-
stattet, der beim Erreichen erhöhter Temperaturen
die Stromversorgung trennt. Sollte es dazu kom-
men, lassen Sie den Motor abkühlen, indem Sie das
Gerät vom Stromnetz nehmen und sich gleich an
das technische Fachpersonal wenden. Versuchen
Sie niemals irgendwelche Reparaturen vorzuneh-
men.
Sollte das Gerat aus irgendeinem Grunde ful lan-
gere Zeit hinweg nicht benutzt werden, so reiningen
Sie es wie oben beschrieben, trocknen Sie den Kaf-
feebohnenbehalter ad und lasses Sie ihn offen.
Anleitungen
Geräten zum Aufschäumen von Milch-Shakes oder Sahne.
ACHTUNG: Bewegliche Maschinenorgane.
Betriesintervall des geräts
Halten Sie den folgenden Betriebszyklus des Geräts
ein 30s ON / 6 min. OFF
Wenn das Netzkabel beschädigt ist, muss es vom
Hersteller, seinem Vertreter oder einer qualifizier-
ten Person eine Gefahr zu vermeiden ersetzt wer-
den.
Betrieb und handhabung
Bevor Sie das Gerat an das Stromnetz anschliessen
dzw den Hauptschalter oberhalb des Gerats ein-
schalten,vergewissern Sie sich,dass der Schalter
der Kaffeemuhle auf “0”steht (Fig. 1).
Setzen Sie den Schleber zum Verschluss des Kegel
einachten Sie darauf, dass er in der richtigen Po-
sition liegt. Halten Sie den Kegel mit beiden Han-
den auf den Selten fest und befestingen Sie ihn so
auf dem Great. Befestigen Sie diese nun an der
Mutter für die Regulierung des Mahlgrads mithilfe
Fig. 1
Fig. 2

11
DE
der mit dem Gerät gelieferten Schraube, indem Sie
das Loch des Bohnenbehälters mit dem der Mutter
übereinstimmen lassen (Fig. 2).
Sollte ihr Great mit einem automatischen Schalter
ausgestattet sein, so achten Sie bitte darauf, dass
er sich in der Bild angegebenen Stellung befindet.
Die Kaffemuhle ist nun bestriebsfertig (Fig. 3).
Fullen sie nun den Kegel mit Kaffeeb-oh-nen, offnen
Sie den Schieber; stechen Sie nun den Stecher in
die Steckdose oder schalten Sie den Hauptschalter
ein, indem Sie ihn in die Position “l”bringen. Aus
Gründen der Sicherheit ist es dem Bediener nicht
gestattet, die Schrauben an der Kaffeemühle zu ent-
fernen. Dieser Eingriff ist ausschließlich dem Fach-
personal vorbehalten, und nachdem das Gerät von
der Stromversorgung getrennt wurde.
Wir raten, die Kornung des gerlebenen Kaffees zu
kontrollieren; jede Kaf-feemhule ist auf eine mit-
telfeine Kornung eingestellt. Solten Sie eine feinere
oder grobere Kornung wuschen, gehen Sie bitte fol-
gendermassen vor:
Kaffeemulhe 208878:
1.
Drucken Sie die Ringsperrklinke nach unten. (Fig. 4).
2. Drehen Sie die Mutter im Uhrzeigersinn, um eine
gröbere Körnung zu erhalten und entgegen dem
Uhrzeigersinn, um einen feinere Körnung zu er-
halten (Fig. 5).
Um das Entfernen der Mutter und die anschließen-
de Möglichkeit des freien Zugriffs auf die Mahlein-
heit zu verhindern, positionieren Sie die gesicherte
Schraube in einem der beiden Löcher, die eine grö-
ßere Einstellung ermöglichen.
Regulierung der Ausgebenem menge des Kaffee-
mehls:
(Fig. 5)
Um die gewunschte Menge einzustellen, muss die
Einstellmutter nach RECHTS gedreht werden, um
die Menge zu erhohen, nach LINKS, um sie zu ver-
mindem (Fig. 6).
Der Dosiere nimmt zwischen 4 und 9 gr. Kaffee auf.
Um die gewuschte Menge zu ermitteln, entnehmen
Sie dem Dosierer 10 Portionen (10 Anschlage) und
wagen Sie die so erhaltene Keffeemenge ab;suf
diese Art ermitten Sie das Gewicht einer einzigen
Portion.
Fig. 3
Fig. 4
Fig. 5
Fig. 6

12
DE
208885 elektronische ausführung:
Warnung: um die einschließlich der von der kaffeepause drücken sie eine der 5 schlüssel display.
Betrieb und Programmierung
Betrieb: Bevor der Stecker mit dem Stromnetz
verbunden wird prüfen Sie, ob der Schalter auf “0“
gestellt ist. Führen Sie die Verschlusslasche des
Bohnenbehälters ein und kontrollieren Sie das Ein-
rasten in ihrer Aufnahme.
Positionieren Sie den Bohnenbehälter mit seitli-
chem Druck mit den Fingern in seiner Aufnahme,
bis dass er fest sitzt. Befestigen Sie diesen nun an
der Mutter für die Regulierung des Mahlgrads mit-
hilfe der mit dem Gerät gelieferten Schraube, indem
Sie das Loch des Bohnenbehälters mit dem der
Mutter übereinstimmen lassen.
Nun ist die Dosiermühle, nachdem die Kaffeeboh-
nen in den entsprechenden Bohnenbehälter einge-
füllt wurden, für den Betrieb bereit.
Öffnen Sie die Lasche und stecken Sie den Stecker
ein, anschließend stellen Sie den Schalter auf “I”.
Nun schaltet sich das Display ein Anzeige “BEREIT”:
Die M80EL ist bereit, auf Knopfdruck die gewünsch-
ten Kaffeedosierungen (von 1 bis drei oder manuell)
auszugeben (siehe Punkt 2).
Nachdem die Filterhalterung in der entsprechen-
den Gabel positioniert wurde ist es möglich, mit der
Ausgabe des gemahlenen Kaffees folgendermaßen
fortzufahren:
• Einzeldosis: durch Drücken der Taste mit der Dar-
stellung einer Tasse
• Doppeldosis: durch Drücken der Taste mit der
Darstellung zweier Tassen
• Kaffeemenge “DOSIS 3”: Taste mit drei Tassen
drücken.
• Manuelle Dosis: “MAN” drücken um den Mahlvor-
gang zu starten. Wiederholt “MAN” drücken, um
den Vorgang zu beenden. Die Mühle beendet den
Mahlvorgang automatisch nach 4 minuten wenn
der Mahlvorgang nicht manuell beendet wurde.
Programmenü
“DOSIS 1“ definieren – “MENU” drücken und 3 s hal-
ten, um ins Programmmenü zu gelangen. “+” oder
“-” zum Vorwärts- oder Rückwärtsblättern durch
das Menü, bis zur Anzeige “DOSIS 1”. “OK” drücken,
um in die Einstellungen zu gelangen. Mit (-) oder (+)
erhöhen oder reduzieren Sie die Vermahlungszeit
zum Einstellen der Kaffeemenge. Der Wert wird in
Sekunden und Hundertstelsekunden dargestellt.
Nach dem Erreichen des gewünschten Wertes, mit
“OK“ bestätigen um den Wert zu speichern und wie-
der ins Programmmenü zu gelangen.
“DOSIS 2” definieren – analog Dosis 1, jedoch im
Programmmenü bis zur Anzeige “DOSIS 2“ blättern.
“DOSIS 3” definieren – analog Dosis 1, jedoch im
Programmmenü bis zur Anzeige “DOSIS 3“ blättern.
Der maximal einstellbare Zeitwert beträgt 640 Se-
kunden und 99 Hundertstelsekunden für alle drei
Bezugsmengen.
“STANDBY ZEIT” – legt die Dauer fest, nach der
die Anzeige in den Energiesparmodus wechselt.
“MENU” drücken und 3 s halten, um ins Programm-
menü zu gelangen. Mit (+) oder (-) vorwärts- oder
rückwärts blättern, bis zur Anzeige “Standby- ZEIT”.
Mit “OK” bestätigen und über (-) oder (+) den Zeit-
wert erhöhen oder Reduzieren und erneut mit “OK”
bestätigen. Mit “ESC” verlassen Sie das Programm-
menü.
Mahlscheibenverschleiß – informiert über die Ge-
samtbezüge bis zur empfohlenen Erneuerung der
Mahlscheiben. Dieser Wert ist frei einstellbar. Bei
Erreichen des eingestellten Maximalwertes für die
Lebensdauer des Scheibensatzes, erscheint im Dis-
play die Meldung “WEAR GRINDERS“.
Drücken Sie die Taste MENU für 3 Sekunden, um
ins Programmmenü zu gelangen. Drücken Sie “+”
oder “-” um zum Menüpunkt “WEAR GRINDERS”
zu gelangen. Mit “+” oder “-” können Sie den Ma-
ximalwert verändern. Zum Bestätigen des Wertes
drücken Sie “OK”, mit “ESC”verlassen Sie den Pro-
grammiermodus.
“EIGENE LABEL” – erlaubt es Ihnen die Anzeige
“BEREIT” durch eine eigene Nachricht auszutau-
schen: “MENU” drücken und 3 s halten, um ins
Programmmenü zu gelangen. “+” oder “-” zum Vor-
wärts- oder Rückwärtsblättern durch das Menü, bis
zur Anzeige “Eigene Label”. Mit “OK“ bestätigen und

13
DE
“MAN” drücken, um den Cursor an die richtige Stelle
zu
setzen. Benutzen Sie (-) und (+) zum Blättern durch
das Alphabet, bis zum gewünschten Buchstaben.
Drücken Sie erneut “MAN” und wiederholen Sie den
Vorgang, bis Ihre eigene Begrüßung für den Stand-
By-Modus vollständig ist. Schließen Sie den letzten
Vorgang mit “OK” ab.
“HELLIGKEIT” – Zur Einstellung der Helligkeit der
Anzeige drücken Sie bitte für 3 Sekunden die Taste
“MENU” um ins Programmmenü zu gelangen. Mit
“+” oder “-” blättern Sie bis zum Menupunkt “Hel-
ligkeit” und bestätigen mit “OK”. Mit “+” oder “-” er-
höhen oder reduzieren Sie den Helligkeitswert von 0
bis 100%. Zum Bestätigen der Einstellung drücken
Sie “OK”, mit “ESC” verlassen Sie das Programmmenü.
“ZEIT/DATUM” – einstellen - “MENU” drücken und
3 s halten, um ins Programmmenü zu gelangen.
“+“ oder “-” zum Vorwärts- oder Rückwärtsblättern
durch das Menü, bis zur Anzeige “Zeit/Datum” und
bestätigen Sie mit “OK”. Mit (-) oder (+) stellen Sie
nun die blinkende Zeitangabe ein, die Sie mit “OK”
bestätigen, um die Einstellung zu übernehmen und
um ins Programmmenü zurück zu gelangen. Zum
Bestätigen der Stunden, Minuten, Sekunden und
des Datums wiederholt die “OK” Taste drücken.
Zum Bestätigen der Einstellung drücken Sie “OK”,
mit “ESC” verlassen Sie das Programmmenü.
“GESAMTANZAHL” –informiert Sie über die Sum-
me aller geleisteten Bezüge des Mahlwerkes und
die noch verbleibenden Bezüge, bis zum nächsten
empfohlenen Mahlscheibenwechsel. Drücken Sie
die Taste MENU für 3 Sekunden um ins Programm-
menü zu gelangen, und den Wert anzuzeigen. Drü-
cken Sie “+” oder “-” bis Sie den Menüpunkt “TOTAL
COUNT“ erreicht haben, und dann die “OK” Taste.
Nachdem Sie die Mahlscheiben erneuert haben,
drücken Sie bitte einige Sekunden die “RESET” Tas-
te, um das Zählwerk auf den eingestellten Maximal-
wert für Mahlscheibenverschleiß zurück zu setzen.
Danach wird die Meldung “WEAR GRINDERS” aus
der Anzeige erlöschen. Mit “ESC” verlassen Sie den
Programmiermodus.
“TEILWEISE COUNT” – zeigt die Summe aller ge-
mahlenen Portionen, seit dem letzten Reset an.
Hilfreich für eine Tages- oder Wochenauswertung .
Zum Anzeigen und Rückstellen drücken Sie bitte für
3 Sekunden die Taste “MENU” um ins Programm-
menü zu gelangen. Mit “+” oder “-” blättern Sie bis
zum Menupunkt “TEILWEISE COUNT” und bestäti-
gen mit “OK”. Halten Sie die RESET-Taste solange
gedrückt, bis der Zähler wieder auf “0“ ist. Mit “ESC”
verlassen Sie das Programmmenü wieder.
“MONATLICHE ANZAHL” – ist ein zusätzliches Zähl-
werk und zeigt die Summe aller gemahlenen Porti-
onen, und über die Menge der geleisteten Bezüge
der vergangenen 30 Tage, seit dem letzten Reset an,
hilfreich für eine Monatsstatistik. Zum Anzeigen und
Rückstellen drücken Sie bitte für 3 Sekunden die
Taste “MENU” um ins Programmmenü zu gelangen.
Mit “+” oder “-” blättern Sie bis zum Menüpunkt
“MONATLICHE ANZAHL” und bestätigen mit “OK”.
Halten Sie die RESET-Taste solange gedrückt, bis
der Zähler wieder auf “0” ist. Mit “ESC” verlassen
Sie das Programmmenü wieder.
“SPRACHE ÄNDERN” / “CHANGE LANGUAGE“ /
“Cambio Lingua ” – “MENU” drücken und 3 s hal-
ten, um ins Programmmenü zu gelangen. (+) oder
(-) zum Vorwärtsoder Rückwärtsblättern durch das
Menü, bis zur Anzeige “Sprache ändern” / “CHANGE
LANGUAGE” / “Cambio Lingua”. Mit “OK” bestäti-
gen und mit (+) oder (-) zur gewünschten verfügba-
ren Sprache zu gelangen. Ausgewählte Sprache mit
“OK” bestätigen, um die Einstellung zu übernehmen
und um ins Programmmenü zurück zu gelangen.
Stromverbrauch im stand-by: 1,1 W.

14
DE
Sichenrheitssystem zum Schutz vor Rotierenden Teilen
Es gibt mehrere Schutzsystem (bereits oben be-
schrieben), um den Zugriff auf die rotierenden Teile,
wie die Sicherungsschrauben des Bohnenbehälters
und der Mutter, die Schutzkappe innerhalb des Boh-
nenbehälters und den Metallschutz vor dem Austritt
des gemahlenen Kaffees zu verhindern. All diese
Vorrichtungen wurden entwickelt, um die Gesund-
heit des Benutzers des Geräts zu schützen. Aus
diesem Grund bestehen wir darauf, dass sie unter
keinen Umständen entfern oder verändert werden
dürfen und, dass Sie sich bei jedweder Funktions-
störung an das technische Fachpersonal wenden,
das Ihnen bestmöglich helfen wird.
Dieses produkt entsprincht der EU-Richtlinie 2002/96/EC.
Das symbol der durchgestrichenen abfalltonne,
welches auf dem great abgebildet ist, weist darauf hin,
dass dieses product am ende seines lebenskreislaufs
von den haushaltsabfällen getrennt zu behandlen ist,
sowie einer stelle für die getrennte sammlung für
elektrische und elektronische altgeräte zuzuführen
oder dem verkäufer zum zeitpunkt des kaufs eines
neuen gleichwertigen gerätes zurückzugeben ist.
Der verbraucher ist verantwortlich für die ablief-
erung des altgerätes am ende seiner lebensdaueran
die zuständigen sammeleinrichtungen; bei verstoß
kommen die sanktionen zur anwendung, die von den
geltenden richtlinien für die abfallbeseitigung vorg-
esehen sind. Die geeignete und getrennte sammlung
für die anschließende ablieferung des altgerätes zum
recycling, zur behandlung und umweltgerechten ent-
sorgung trägt dazu bei, dass mögliche negative aus-
wirkungen auf die umwelt und die gesundheit ver-
mieden warden und begünstigt die wiederverwertung
der werkstoffe, aus denen das product besteht. Für
nähere auskünfte über die vorhandenen sammelsys-
teme wende man sich an den örtlichen betrieb für die
abfallentsorgung oder an das geschäft, in dem das
great gekauft worden ist. Die hersteller und impor-
teure übernehmen die verantwortung für das recy-
cling, die behandlung und die umweltgerechte ent-
sorgung, sowohl direct als auch durch beteiligung an
einem gemeinschaftssystem.

15
PL
Szanowny Kliencie,
Dziękujemy za zakup urządzenia firmy Hendi. Prosimy o uważne zapoznanie się z niniejszą instrukcją przed
podłączeniem urządzenia, aby uniknąć uszkodzeń spowodowanych niewłaściwą obsługą. Należy zwrócić
szczególną uwagę na zasady bezpieczeństwa.
Dane techniczne
Model Wersja Wymiary Moc/Napięcie Waga Kabel
(mm) (W/V) (kg) zasilający
208878 automatyczny 160x290x(H)510 420 W/230 V, 1N, 50 Hz 10,5 3x0,75 mm2, H05 RN
208885 elektroniczny 160x280x(H)510 420 W/230 V, 1N, 50 Hz 10,0 3x0,75 mm2, H05 RN
Rozpakowanie, instalacja i podłączenie
Po otwarciu opakowania sprawdzić, czy urządzenie
nie jest uszkodzone. W razie wątpliwości niezwłocz-
nie skontaktować się ze sprzedawcą, który zapewni
profesjonalną pomoc.
Materiały opakowaniowe należy zebrać i zutylizować
zgodnie z obowiązującymi przepisami. Urządzenie
stanowi potencjalne zagrożenie dla dzieci i osób
nieodpowiedzialnych, nie dopuszczać tych osób do
urządzenia.
W przypadku wycofania urządzenia z eksploatacji
należy je odłączyć od źródła zasilania, aby unie-
możliwić eksploatację, a następnie odciąć przewód.
Skontaktować się z wyspecjalizowaną firmą w celu
uzyskania informacji na temat utylizacji elementów
urządzenia.
Instalację musi przeprowadzić wykwalifikowana
osoba z uprawnieniami, zgodnie z przepisami obo-
wiązującymi w miejscu instalacji. Nieprawidłowa in-
stalacja może doprowadzić do obrażeń osób i zwie-
rząt albo uszkodzeń mienia, za które producent nie
ponosi odpowiedzialności.
Przed przystąpieniem do eksploatacji urządzenia
należy uważnie przeczytać ostrzeżenia i instrukcje:
• Urządzenie należy używać i umieścić na płaskiej
i stabilnej powierzchni.
• Nie instalować na zewnątrz.
• Upewnić się, że urządzenie nie stoi na kablu za-
silającym.
• Sprawdzić, czy wartości napięcia i częstotliwości
odpowiadają parametrom wskazanym na tabliczce
znamionowej.
• Upewnić się, że parametry odpowiadają mocy po-
bieranej przez urządzenie albo wartościom mak-
symalnym.
• Konieczne jest uziemienie urządzenia. Sprawdzić,
czy instalacja uziemienia spełnia wymogi określo-
ne w przepisach bezpieczeństwa.
• Zewnętrzny zacisk ekwipotencjalny należy podłą-
czyć do gniazdka ekwipotencjalnego .
Ostrzeżania ogólne
• Uważnie przeczytać instrukcje i ostrzeżenia oraz
ściśle ich przestrzegać.
• Przed konserwacją albo czyszczeniem urządzenia
zawsze odłączać wtyczkę od gniazdka.
• Młynki wyposażono w kabel i wtyczkę służącą do
podłączenia do gniazdka.
• Ingerencja w urządzenie albo podłączenie niezgod-
ne
z powyższymi instrukcjami powodują unieważ-
nienie gwarancji.

16
PL
Ostrzeżenia szczególne
Nigdy nie ingerować w urządzenie. W celu dokonania
ingerencji w urządzenie skontaktować się z autory-
zowanym centrum serwisowym. Nigdy nie ciągnąć
za kabel, aby odłączyć go od gniazdka. Używać urzą-
dzenia wyłącznie zgodnie z przeznaczeniem. Umie-
ścić urządzenie przynajmniej 5 cm od ścian, aby
zapewnić odpowiedni przepływ powietrza. Umieścić
urządzenie z dala od źródeł wody. Nigdy nie pozosta-
wiać włączonego urządzenia bez nadzoru. Umieścić
urządzenie z dala od dzieci i osób nieupoważnio-
nych. Urządzenie nie jest przeznaczone do zabawy
dla dzieci. Należy używać wyłącznie oryginalnych
akcesoriów lub części. Aby uniknąć pożaru, nigdy
nie zasłaniać urządzenia. Odłączać urządzenie, jeśli
nie jest używane. Przed myciem należy odczekać, aż
urządzenie ostygnie. Ze względów bezpieczeństwa
zawsze należy zakładać, że urządzenie jest pod na-
pięciem. Silnik wyposażony jest w czujnik termiczny,
który powoduje odłączenie zasilania w przypadku
osiągnięcia wysokiej temperatury. W takim przypad-
ku należy odłączyć urządzenie od sieci, odczekać aż
ostygnie, następnie skontaktować się z serwisem
technicznym. Nie próbować samodzielnie napra-
wiać urządzenia. Jeśli młynek nie będzie używany
przez dłuższy okres, należy dokładnie go oczyścić,
osuszyć pojemnik i pozostawić otwarty. W przypadku
uszkodzenia przewodu zasilania, należy zwrócić się
do producenta, serwisu lub wykwalifikowanej osoby
w celu jego wymiany, aby uniknąć zagrożenia.
Instrukcja
Urządzenia przeznaczone do mielenia kawy ziarnistej.
UWAGA: Ruchome części.
Czas pracy urządzenia
• Używać urządzenia w następujących cyklach: 30 s
WŁ. / 6 min WYŁ.
• 30 sekund pracy młynka
• 6 minut przerwy przed kolejnym cyklem mielenia.
• Nie przestrzeganie tej zasady może spowodować
palenie się ziaren kawy podczas mielenia na sku-
tek rozgrzania żaren i przyczyni się do złego sma-
ku naparu kawy.
Obsługa
Przed podłączeniem wtyczki do gniazdka albo prze-
łącznika głównego przed urządzeniem, upewnić
się, że przełącznik urządzenia jest w położeniu „0”.
(zdjęcie 1).
Wsunąć zasuwkę zamykającą pojemnik i sprawdzić,
czy się przesuwa (zdjęcie 2).
zdjęcie 1
zdjęcie 2

17
PL
Zamocować pojemnik, naciskając palcami z boku.
Następnie zamocować pojemnik do nakrętki wień-
cowej regulatora grubości mielenia za pomocą
odpowiedniej śruby dostarczonej z urządzeniem,
dopasować otwór pojemnika na kawę do otworu na
nakrętce (zdjęcie 3).
Jeśli młynek wyposażony jest w automatyczny prze-
łącznik, sprawdzić czy dźwignia znajduje się we
wskazanym położeniu. Teraz urządzenie jest gotowe
do pracy.
Wsypać kawę ziarnistą do pojemnika górnego. Otwo-
rzyć zasuwkę. Podłączyć wtyczkę do gniazdka albo
włączyć przełącznik przed urządzeniem, następnie
przełączyć włącznik do położenia „1”.
Ze względów bezpieczeństwa użytkownikowi nie
wolno zdejmować żadnych śrub z urządzenia. Takie
czynności może wykonywać wyłącznie wykwalifiko-
wany technik, po odłączeniu urządzenia od sieci.
Sprawdzić grubość zmielonej kawy, każdy młynek
ustawiany jest na średnią grubość. Jeśli rezultat
mielenia nie jest zadowalający, wykonać następują-
ce czynności:
Młynek z dozownikiem 208878:
1. Nacisnąć zasuwkę
(zdjęcie 4).
2. Obrócić nakrętkę wieńcową w LEWO, aby mielić
drobniej albo w PRAWO, aby mielenie było grubsze
(zdjęcie 5).
Aby uniknąć zdjęcia pierścienia metalowego w celu
uzyskania dostępu do grupy żaren, umieścić śrubę
w jednym z dwóch otworów pozwalających na najszer-
szą regulację.
Regulacja ilości mielonej kawy:
(zdjęcie 5).
Aby dostosować ilość, obrócić nakrętkę regulującą.
Obrócić w LEWO, aby zwiększyć ilość, albo w PRAWO,
aby ją zmniejszyć (zdjęcie 6). Dozownik można ustawić
w zakresie od 4 g do 9 g. Aby ustawić żądaną ilość,
zmielić 10 porcji (10 pociągnięć dźwigni) i zważyć uzy-
skaną kawę, co pozwoli zmierzyć wagę każdej porcji.
zdjęcie 3
zdjęcie 4
zdjęcie 5
zdjęcie 6

18
PL
208885 wersja elektroniczna
Ostrzeżenie: aby zatrzymać dozowanie kawy, nacisnąć dowolny przycisk na wyświetlaczu.
Obsługa
Przed podłączeniem wtyczki do gniazdka albo prze-
łącznika głównego przed urządzeniem, upewnić się,
że przełącznik urządzenia jest w położeniu „0”. Wsu-
nąć zasuwkę zamykającą pojemnik i sprawdzić, czy
się przesuwa. Zamocować pojemnik w gnieździe,
naciskając palcami z boku, następnie zamocować
pojemnik do nakrętki wieńcowej regulatora grubości
mielenia za pomocą odpowiedniej śruby dostar-
czonej z urządzeniem, dopasować otwór pojemnika
na kawę do otworu na nakrętce.
Teraz urządzenie jest gotowe do pracy. Wsypać kawę
ziarnistą do pojemnika górnego. Otworzyć zasuwkę
i podłączyć wtyczkę do gniazdka, następnie przełą-
czyć włącznik urządzenia do położenia „1”. Na wy-
świetlaczu pojawi się komunikat o gotowości „RE-
ADY”, młynek jest gotowy do zmielenia wymaganej
porcji (od jednej do trzech) albo do zaprogramowa-
nia. Po oparciu kolby (uchwytu filtra na kawę) na
widelcu można przejść do dozowania mielonej kawy:
• pojedyncza porcja: nacisnąć przycisk z jedną fi-
liżanką
• podwójna porcja: nacisnąć przycisk z dwiema fi-
liżankami
• potrójna porcja: nacisnąć przycisk z trzema fili-
żankami
• porcja dozowana ręcznie: nacisnąć przycisk
„MAN”, młynek rozpocznie pracę. Aby zatrzymać
mielenie, nacisnąć przycisk „MAN” ponownie
(młynek automatycznie zatrzymuje się po 4 mi-
nutach).
Programowanie
JEDNA FILIŻANKA KAWY - Nacisnąć przycisk
„MENU” i przytrzymać przez 3 sekundy, aby uzyskać
dostęp do menu programów. Nacisnąć przycisk „+”
albo „-”, aby przewijać opcje menu; wybrać opcję
„time dose 1 (czas 1 porcji)”, nacisnąć przycisk „OK”;
za pomocą przycisków „+” albo „-” zmniejszyć albo
zwiększyć czas mielenia wyświetlany w sekundach
(3 liczby) i setnych sekundy (2 liczby), aby ustawić
i dostosować porcję. Po ustawieniu parametru czasu
nacisnąć ponownie przycisk „OK”, aby zatwierdzić
i wyjść. Aby wyjść z menu programowania, nacisnąć
„ESC”.
DWIE FILIŻANKI KAWY - czynności takie same,
jak w przypadku pojedynczej filiżanki, wybrać opcję
„time dose 2 (czas 2 porcji)”.
TRZY FILIŻANKI KAWY - czynności takie same,
jak w przypadku pojedynczej filiżanki, wybrać opcję
„time dose 3 (czas 3 porcji)”. Maksymalny czas,
jaki można ustawić, to 640 sekund i 99 setnych dla
wszystkich trzech opcji.
CZAS GOTOWOŚCI - to czas, po upływie którego
wyświetlacz przełączany jest w tryb oszczędzania
energii. Nacisnąć przycisk „MENU” i przytrzymać
przez 3 sekundy, aby uzyskać dostęp do menu pro-
gramów. Nacisnąć przycisk „+” albo „-”, aby przewi-
nąć opcje menu, wybrać opcję „STAND BY time (czas
gotowości)”. Zatwierdzić wybór naciskając przycisk
„OK”, następnie za pomocą przycisków „+” albo „-”
zwiększyć albo zmniejszyć czas, który wyświetlany
jest w sekundach. Po ustawieniu parametru czasu
nacisnąć ponownie przycisk „OK”, aby zatwierdzić
i wyjść. Aby wyjść z menu programowania, nacisnąć
„ESC”.
ZUŻYCIE ŻAREN - Opcja ta informuje o całkowitej
liczbie porcji, które zostaną zmielone przed wy-
mianą żaren. Pozycję tę można edytować. Po osią-
gnięciu maksymalnej liczby porcji zmielonych za
pomocą używanych żaren, na wyświetlaczu pojawi
się komunikat „WEAR GRINDERS (ZUŻYCIE ŻA-
REN)”. Nacisnąć przycisk „MENU” i przytrzymać
przez 3 sekundy, aby uzyskać dostęp do menu pro-
gramów. Nacisnąć przycisk „+” albo „-”, aby prze-
wijać opcje menu, wybrać „WEAR GRINDERS (ZU-
ŻYCIE ŻAREN)” i zatwierdzić przyciskiem „OK”. Za
pomocą przycisków „+” albo „-” można zwiększyć
albo zmniejszyć porcję. Nacisnąć przycisk „OK”, aby
zatwierdzić wybór i wyjść. Aby wyjść z menu progra-
mowania, nacisnąć „ESC”.
USTAWIANIE TRYBU GOTOWOŚCI „READY” - Na-
cisnąć przycisk „MENU” i przytrzymać przez 3 se-
kundy, aby uzyskać dostęp do menu programów.

19
PL
Nacisnąć przycisk „+” albo „-”, aby przewinąć opcje
menu, wybrać opcję „BAR”. Zatwierdzić wybór naci-
skając przycisk „OK”, następnie przyciskiem „MAN”
przesunąć kursor do miejsca rozpoczęcia wpisywa-
nia. Za pomocą przycisków „+” i „-” przesuwać opcje
listy alfanumerycznej. Aby zatrzymać się na wybra-
nym znaku i przejść do kolejnego, nacisnąć przycisk
„MAN”. Powtarzać czynność do momentu zakończe-
nia wpisywania odpowiedniej nazwy. Aby zatwierdzić
i wyjść, nacisnąć „OK”. Aby wyjść z menu programo-
wania, nacisnąć „ESC”.
BRIGHTNESS (JASNOŚĆ) - Ustawianie jasności
wyświetlacza. Nacisnąć przycisk „MENU” i przy-
trzymać przez 3 sekundy, aby uzyskać dostęp do
menu programów. Nacisnąć przycisk „+” albo „-”,
wybrać opcję „brightness (jasność)”, nacisnąć „OK”,
następnie przyciskami „+” albo „-” zwiększyć albo
zmniejszyć jasność wyświetlaczaw zakresie od 0 do
100%. Aby zatwierdzić i wyjść, nacisnąć „OK”. Aby
wyjść z menu programowania, nacisnąć „ESC”.
USTAWIANIE GODZINY I DATY - Nacisnąć przycisk
„MENU” i przytrzymać przez 3 sekundy, aby uzyskać
dostęp do menu programów. Nacisnąć przycisk „+”
albo „-”, aby przewijać opcje menu, wybrać „time/
date (godzina/data)” i zatwierdzić przyciskiem „OK”.
Na wyświetlaczu miga godzina, którą można zmie-
nić. Aby zwiększyć albo zmniejszyć wyświetlaną
wartość, nacisnąć przycisk „+” albo „-”. Aby zatwier-
dzić godzinę, minuty, sekundy i datę, naciskać przy-
cisk „OK”.
Aby zatwierdzić i wyjść, nacisnąć „OK”. Aby wyjść
z menu programowania, nacisnąć „ESC”.
CAŁKOWITA LICZBA PRZYGOTOWANYCH PORCJI
Informuje o całkowitej liczbie zmielonych przez
młynek porcji i o liczbie porcji pozostałych do
czasu wymiany żaren. Nacisnąć przycisk „MENU”
i przytrzymać przez 3 sekundy, aby uzyskać dostęp
do menu programów i wyświetlić te dane. Nacisnąć
przycisk „+” albo „-”, aby przewijać opcje menu,
wybrać „total count (całkowita liczba)” i zatwierdzić
przyciskiem „OK”. W przypadku wymiany żaren
nacisnąć przycisk „RESET”, aby wyzerować liczbę
i wartość „ZUŻYCIA ŻAREN”. Na wyświetlaczu po-
jawi się komunikat „WEAR GRINDERS (ZUŻYCIE
ŻAREN)”. Aby wyjść z menu programowania, na-
cisnąć „ESC”.
CZĘŚCIOWA LICZBA PRZYGOTOWANYCH PORCJI
Informuje o liczbie porcji przygotowanych od os-
tatniego wyzerowania (zazwyczaj służy do zliczania
porcji wykonanych w ciągu dnia/tygodnia). Nacisnąć
przycisk „MENU” i przytrzymać przez 3 sekundy, aby
uzyskać dostęp do menu programów i zresetować
te dane. Nacisnąć przycisk „+” albo „-”, aby prze-
wijać opcje menu, wybrać „partial count (częściowa
liczba)” i zatwierdzić przyciskiem „OK”. Nacisnąć i
przytrzymać przycisk „RESET” do momentu wyze-
rowania wartości. Aby zatwierdzić i wyjść, nacisnąć
„OK”. Aby wyjść z menu programowania, nacisnąć
„ESC”.
MIESIĘCZNA LICZBA PRZYGOTOWANYCH PORCJI
Informuje o liczbie przygotowanych porcji od ostat-
niego wyzerowania (zazwyczaj zlicza porcje wyko-
nane w ciągu miesiąca) o i liczbie porcji wykonanych
w ciągu ostatnich 30 dni. Nacisnąć przycisk „MENU”
i przytrzymać przez 3 sekundy, aby uzyskać dostęp
do menu programów i zresetować te dane. Nacisnąć
przycisk „+” albo „-”, aby przewijać opcje menu,
wybrać „monthly count (miesięczna liczba)” i zat-
wierdzić przyciskiem „OK”. Nacisnąć i przytrzymać
przycisk „RESET” do momentu wyzerowania wartoś-
ci. Aby zatwierdzić i wyjść, nacisnąć „OK”. Aby wyjść
z menu programowania, nacisnąć „ESC”.
ZMIANA JĘZYKA
Nacisnąć i przytrzymać przez 3 sekundy przycisk
„MENU”, aby przejść do menu programów. Nacis-
kając przyciski „+” albo „-” przewijać opcje menu,
wybrać opcję „CHANGE LANGUAGE (ZMIEŃ JĘZYK)”:
zatwierdzić wybór naciskając przycisk „OK”. Następ-
nie
za pomocą przycisków „+” albo „-” wybrać
język.
Po wybraniu języka nacisnąć ponownie przycisk
„OK”, aby zatwierdzić i wyjść. Aby wyjść z menu pro-
gramowania, nacisnąć „ESC”.

20
PL
Zabezpieczenie chroniące przed dostępem do ruchomych części
Istnieje wiele systemów zabezpieczeń (opisanych
wcześniej), które uniemożliwiają dostęp do
obrotowych części, np. śruba zabezpieczająca na
pojemniku na kawę ziarnistą i metalowy pierścień,
stałe zabezpieczenie wewnątrz pojemnika na kawę
ziarnistą i metalowa osłona u wylotu zmielonej kawy.
Wszystkie te zabezpieczenia mają na celu ochronę
użytkowników. Dlatego nie wolno ich usuwać ani
modyfikować, w przypadku awarii należy skontak-
tować się z serwisem.
Produkt spełnia wymogi dyrektywy UE nr 2002/96/WE.
Symbol przekreślonego kubła oznacza, że po za-
kończeniu eksploatacji produktu nie wolno utylizo-
wać razem z odpadami komunalnymi, tylko należy
odstawić do punktu odbioru odpadów elektrycznych
i elektronicznych albo zwrócić do sprzedawcy w przy-
padku
zakupu nowego urządzenia. Użytkownik po-
nosi odpowiedzialność za odstawienie wycofanego
z użytkowania urządzenia do punktu utylizacji. Nie-
przestrzeganie tej zasady może być karane zgodnie
z obowiązującymi przepisami dotyczącymi utylizacji
odpadów. Jeśli urządzenie wycofane z użytkowa-
nia jest poprawnie odebrane jako osobny odpad,
może zostać przetworzone i zutylizowane w sposób
przyjazny dla środowiska, co zmniejsza negatywny
wpływ na środowisko i zdrowie. Aby uzyskać więcej
informacji dotyczących dostępnych usług w zakresie
odbioru odpadów, należy skontaktować się z lokalną
firmą odbierającą odpady albo sklepem, w którym
zakupiono urządzenie. Producenci i importerzy nie
ponoszą odpowiedzialności za ponowne przetwarza-
nie, obróbkę i utylizację odpadów, ani bezpośrednio
ani za pośrednictwem systemu publicznego.
This manual suits for next models
1
Table of contents
Languages: