Henry Schein Maxima PowerClean 210 User manual

PowerClean 210
Ultrasonic Cleaner
Limpiador ultrasónico
Nettoyeur à ultrasons
570 -2241
Read before use. Keep in a safe place for future reference.
Lea antes de usarlo. Guárdelo en un lugar seguro para referencia futura.
Lisez le mode d’emploi avant l’utilisation. Conservez-le dans un endroit sûr
pour vous y reporter ultérieurement.
CAUTION: Federal (US) law restricts this device to sale by or on the order of a
licensed professional.
ADVERTENCIA: La ley federal de los Estados Unidos restringe el uso de este
dispositivo a profesionales con licencia.
AVERTISSEMENT: La loi fédérale américaine restreint l’usage de ce dispositif à
des professionnels diplômés.
INSTRUCTIONS FOR USE
INSTRUCCIONES DE USO
DIRECTIVES D’UTILISATION
Maxima PowerClean 210 - 2
HEALTH AND SAFETY
• Danger of electrical shock! Never touch the power plug with wet hands, especially when
inserting or removing the plug.
• Danger of electrical shock! If the unit falls into water, unplug it immediately; do not reach
into the water. Send to Henry Schein® Handpiece & Small Equipment Solutions for evalua-
tion and repair.
• Never allow power cord to be pulled, twisted or severely bent. Never operate unit if cord,
power plug, or housing is damaged or loose.
• Never block the vents on the device. Keep the vents free from lint, hair and other materials.
• Keep unit away from excessive heat sources.
• To avoid risk of electrical shock, equipment damage or fire during an electrical storm, turn
machine off and do not touch machine or cord.
GENERAL OPERATIONS/PRECAUTIONS
• Do not turn on the unit without water in the tank. Dry running over 30 seconds will
damage the unit or severely reduce the life of the unit.
• Do not place instruments directly on the base of the tank. Placing instruments directly
on the base of the tank will result in damage to the unit. Place instruments into the basket
for proper use.
• Do not run the unit without the lid on. The lid helps reduce aerosols and reduce noise.
• Avoid cleaning burs and files in the main tank directly otherwise they may get into the
drainage valve and cause damage. Use a beaker or cleaning chamber. See accessories.
• Do not fill the tank above the Max line to avoid overspill.
• Do not use solution containing abrasive substances or strong corrosive chemical solution
not recommended by the manufacturer or the supplier.
• Do not run the unit for an extended time or continuously. If the unit has been running for 30
minutes, it is recommended to stop the unit for about 10 minutes.
• Place the device on a dry and flat surface for operation.
• If any abnormalities are found, stop using immediately and contact Henry Schein® Hand-
piece & Small Equipment Solutions.
• This device should only be operated by a professional.
• Never operate the device unattended.
• Disconnect the power cord from the unit before cleaning the device.
• Never disassemble the unit. All servicing of this unit is to be conducted by a qualified
service personnel.

Maxima PowerClean 210 - 3
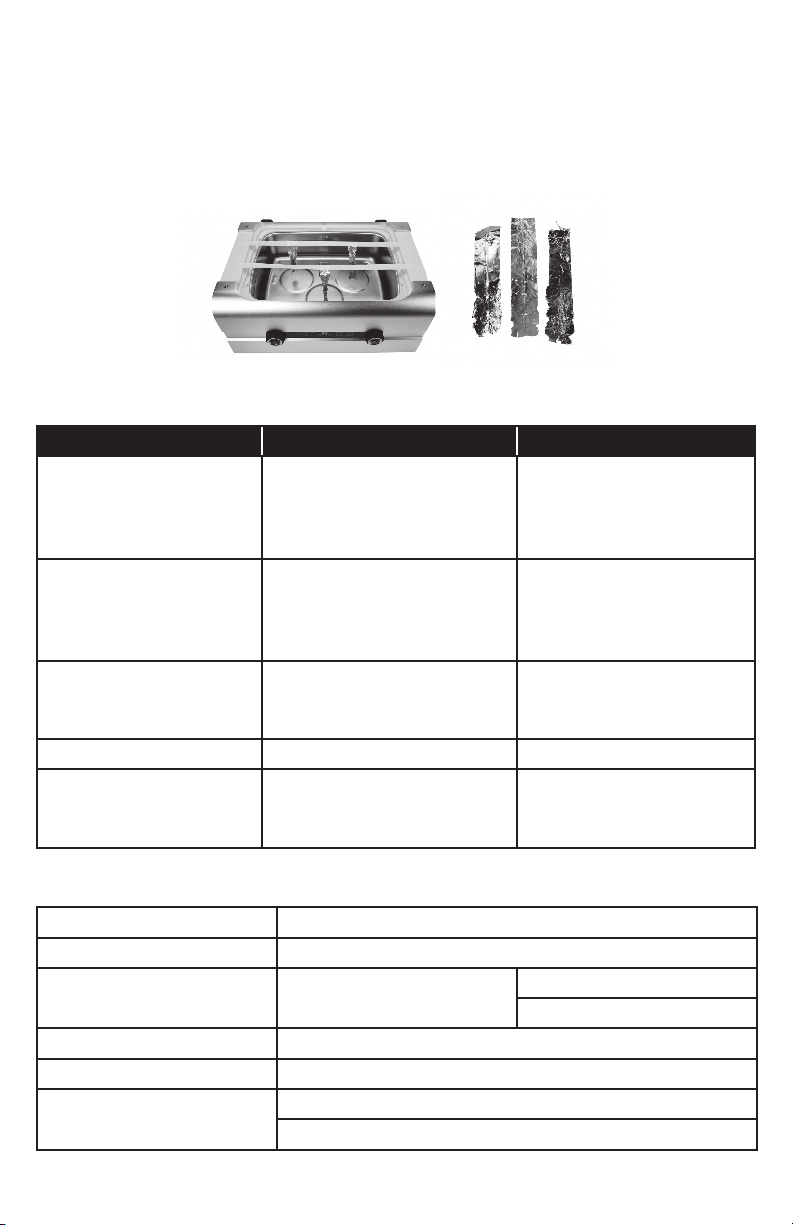
PRODUCT STRUCTURE AND ACCESSORIES
91110 12
1
5
3
7
2
6
4
8
1. Lid
2. Stainless Steel Cleaning Tank
3. Aluminum Front Panel
4. Degas Dial
5. Set Time/ Start & Stop
6. Drainage Valve Handle
7. Aluminum Handle
8. Plastic Side Panel
9. Drainage Sprout
10. Lid Holder
11. Power Socket
12. Power Switch
Standard Accessories
Power Cord Drain Hose (39” long) Stainless Steel Basket
Optional Accessories
Large Stainless Steel Remov-
able Cleaning Chamber
(8.5” x 8.4” x 3.2”)
570-2243
Stainless Steel Beaker
570-2242
Small Stainless Steel Remov-
able Cleaning Chamber
(9.0” x 5.0” x 3.0”)
570-2244

Maxima PowerClean 210 - 4
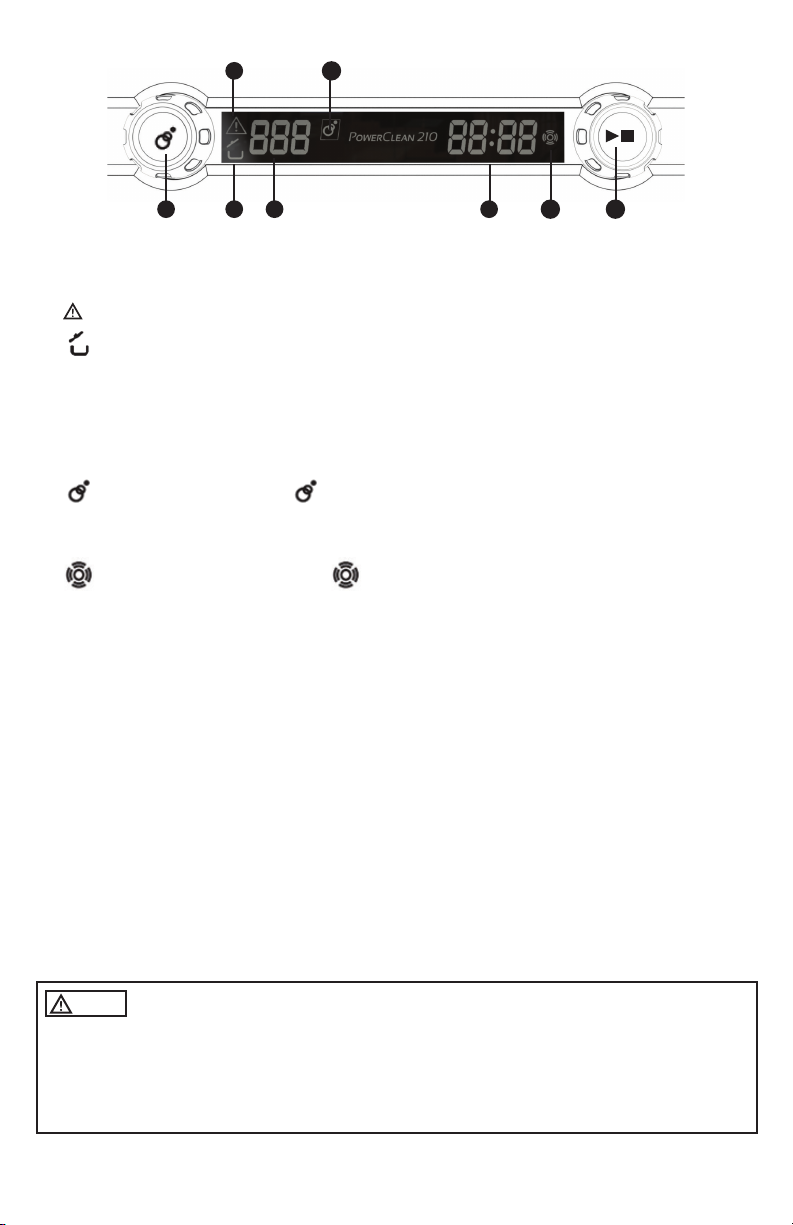
CONTROL PANEL
1 63 7
25
4 8
1. Degas dial. Turn it clockwise or counterclockwise to select the degas timer setting, either
60, 120 or 180 seconds. This setting determines the automatic and manual degas time. Push
in the dial to start degassing.
2. Warning. Stop operations and see troubleshooting guide (pg 7).
3. Open lid warning. The lid should be closed during operation to prevent the spread of
aerosols. The warning symbol helps to standardize operations. The open-lid warning symbol
is illuminated if the unit is not in cycle. Additional warning beeps are sounded if the unit is in
cycle.
4. 60, 120 or 180 Degas timer display. It displays the degas timer setting and how much
degas time remains in seconds (s).
5. Degas status.flashes, indicating degas is underway.
6. 05:00. Ultrasonic time display. It displays the timer setting and how much time remains in in
the ultrasonic cleaner operation.
7. Ultrasonic cleaning status. illuminated, normal cleaning is under way.
8. Set time dial/start and stop. Rotating either clockwise or counterclockwise can set the
timer to 6 settings: 5:00 – 7:30 – 10:00 – 12:30 – 15:00 – 20:00 mins. Once the timer is set,
push in the dial to start.
SETUP
1. Place your ultrasonic cleaner in a desired location on a dry flat surface next to a sink.
2. Connect the hose. Connect one end of the drain hose to the drain valve and place the other
end in the sink. The drain valve is located behind the unit on the right side.
3. Plug In the unit. Attach the power cord into the back of the unit. Ensure that it is properly
attached and that the cord is undamaged.
4. Turn unit on. The power switch to turn the unit on is located in the back of the unit on the left
side just above the power socket.
OPERATION
• Do not turn on the unit without water in the tank. Dry running will damage the unit.
• Do not place instruments directly on the base of the tank. Place instruments into the
basket for proper use.
• Avoid cleaning burs directly in the main tank. Use beakers or cleaning chamber.

Maxima PowerClean 210 - 5
Operation Steps
Used when cleaning with loose instruments or cassettes. For burs, files, or corrosive solutions
see the accessories section below.
1. Remove basket and ensure drainage valve handle is in the closed position.
2. Follow the ultrasonic cleaner solution dosage instructions per cleaning solution label. Fill the
unit with ultrasonic cleaner solution (general purpose, enzymatic, etc.) between the MIN and
MAX lines.
3. Place instruments to be cleaned directly into the basket or into cassettes and place the cas-
settes into the basket. Then place the basket directly into the main tank already containing
ultrasonic cleaner solution.
4. Place the lid on the unit to reduce aerosols and noise.
5. Using the right knob, set the unit to the proper cleaning time (see below) and press the knob
in to run the unit.
6. After cleaning, rinse the basket and instruments thoroughly under running water.
Determining Proper Cleaning Time
This unit cleans much faster and more thoroughly than most other ultrasonic cleaners on the
market. You should expect it to clean in 1/2 to 1/3 of the time it takes for other common ultra-
sonic cleaners. Typical cleaning time is:
• 5 minutes for one layer of loose instruments or cassette
• 10 minutes for two layers of loose instruments or cassettes
Before starting with routine cleaning, test runs should be conducted to establish proper
cleaning time. With a standard batch of instruments, run cleaning at 5 minutes then check the
condition of the instruments. Add more time until satisfactory result is achieved. Repeat the test
a couple of more times to establish a reliable, proper and standard time.
Do not run it with excessive time as it is unnecessary, and it counts towards the unit’s service life.
Degassing
Degassing the solution is a necessary step to eliminate large air bubbles that interfere with the
cleaning process. This unit runs degassing automatically during the first run when the unit is first
turned on. Degassing can be initiated manually with the left knob. Automatic and manual degas
time can be set by rotating the left knob.
Cleaning With Accessories
Beakers
1. Place small items such as burs and files in the beakers. Add ultrasonic cleaner solution into
the beakers to submerge the items inside. Place the clear lids over the beakers if needed.
2. Place the beakers inside the basket and place them inside the tank. If the liquid level in the
tank is close to MAX already, discharge some liquid. The bottom of the beakers should be in
contact with water or solution in the tank.
Cleaning Chamber
The removable cleaning chamber is used when corrosive or dangerous solution is used or to
reduce the amount of cleaning solution needed for small loads.

Maxima PowerClean 210 - 6
1. Add tap water in the main tank to the MIN line.
2. Add instruments inside the removable cleaning chamber. Add proper solution to submerge
the items.
3. Place the removable cleaning chamber across the top of the tank. The bottom of the chamber
should be in contact with water for about 1/2” or 10 mm in depth. Ultrasound will penetrate
the removable chamber to clean the items inside.
MACHINE CLEANING AND MAINTENANCE
• Do not run the unit for extended time or continuously. The unit is designed with overheat
protection. If the unit has been running for 30 minutes, it is recommended to stop the unit for
about 10 minutes to prolong the life of the unit.
• Do not keep water in the cleaning tank for a long time. After cleaning is completed, open the
drainage valve to drain the dirty water. Clean and wipe the tank dry.
• If condensation water forms on the lid, shake it off or wipe it before placing the lid on the lid
holder to avoid water dripping down from the lid.
• Do not spread disinfectant over the housing or the tank. Use clean water to wipe the housing.
Use a paper towel to dry up the tank and the housing. Use a disinfectant wipe that doesn’t
damage aluminum and ABS plastic to wipe the tank and the housing if needed.
• Do not use corrosive solutions such as liquid bleaches in the stainless steel tank.
• Do not use corrosive solutions such as paint thinner or acetone as it will corrode plastic
housing. Do not use flammable solutions.
• Do not use osmosis water or highly purified water as they may corrode metals aggressively.
Avoid spilling water over the control panel or inside the housing.
• Keep the unit in a dry, cool and ventilated area.
• Do not expose the unit under direct sunshine for a long time.
• Keep the original packing material in case of sending it for repair service. If it is no longer
available, use enough cushioning equivalent to minimum 2” of Styrofoam all around the unit
inside the shipping carton to avoid damages to fragile transducers. Warranty does not cover
damages during return shipping from customers.
Foil Test
Ultrasonic cleaners should be tested periodically or as needed for cleaning performance and to
verify that the transducers are working properly. The test results should be documented.
Procedure:
Remove the lid, basket, containers, and anything else in the tank.
1. Clean the tank thoroughly.
2. Fill the tank with water to halfway between the MIN and the MAX lines.
3. Take 2 pieces of autoclave tape and run them from left to right over the top rim of the tank.
One tape goes over the centers of 2 round cycles on the bottom of the tank. One tape goes
over the third cycle on the bottom of the tank. The transducers that generate ultrasound are
mounted underneath each circle.
4. Obtain a piece of standard household aluminum foil and cut 3 pieces 2cm (3/4”) wide and 13
cm (5”) long. Fold each piece to L shape along the length. Do not use heavy duty foil.
5. Stick one foil above the center of each circle, sticking the end to the underside of the tape.
Keep the foils vertically into the water with the bottom edge approximately 2-3 cm (1”) above
the bottom of the tank.
Maxima PowerClean 210 - 7
6. Turn on the ultrasound under the normal cleaning mode and run for 1 minute. Stop it once
the time has been reached.
7. Remove the foils and inspect. The foils should be perforated or knocked off along the 3 edges.
8. If any one of the foils has no obvious perforations, the transducer near that foil may not be
working properly. Call Henry Schein® Handpiece & Small Equipment Solutions if this happens.
9. Flush out the loose foil particles from the tank and clean it thoroughly.
TROUBLE SHOOTING
Problem Cause Solution
Warning symbol is on;
the unit has been running
extensively.
At least one of the transducers
is under overheat protection.
Stop the unit for 15 minutes
or more until the warning
symbol dims before resuming
operations.
Warning symbol is on;
Warning symbol doesn’t
turn off after unit is left
idling for 15 minutes.
At least one transducer is not
working.
Contact Henry Schein Hand-
pieces & Small Equipment
(pg 8).
Unit isn’t draining properly. Debris is caught in hose. Detach the drainage hose and
flush out any debris in hose
and inside the unit.
Unit is beeping. Unit is running but the lid is off. Place the lid back the unit.
Unit is not turning on. The power cord may be loose or
detached.
Check the power cord and
ensure power is coming from
the outlet it is plugged into.
SPECIFICATIONS
Description Ultrasonic Cleaner
Model Maxima PowerClean 210
Tank Capacity 8.0L /
2.1 gallon (US)
Max. 7.0 L / 1.8 gallon (US)
Min. 3.6 L / 0.95 gallon (US)
Tank Size 33.1x23.8x11.6 cm / 13.0"x9.4"x4.6"
Longest Item Fits inside Tank 37.0 cm / 14.4”
Power Supply 240W AC 100~120V 60Hz
240W AC 220~240V 50Hz

Maxima PowerClean 210 - 8
Timer settings 5min > 7.5min > 10min > 12.5min > 15min > 20min
Degas timer settings 60, 120, 180 seconds
Ultrasonic Frequency 48KHz ± 3KHz
Tank Material Stainless Steel SUS304
Housing Material Aluminum + ABS
Net Weight 14.3 kg / 31.5lb
Gross Weight 17.1 kg / 37.7lb
Unit Size 46.6x35x22.9 cm / 18.3"x13.8"x9.0"
SERVICE
For items that require service, including warranty service, please send to Henry Schein® Hand-
piece & Small Equipment Solutions.
Henry Schein Handpiece & Small Equipment Solutions
620 S. Placentia Ave.
Placentia, CA 92870 USA
Phone # 800-235-6337 Prompt 1
WARRANTY
This product is designed for use in a dental office and this warranty is not applicable to other
uses. This product is warranted against manufacturing defects in materials and workmanship for
3 years from date of purchase.
Henry Schein® will repair or replace product at its sole discretion. This warranty shall be limited
to replacement or repair of the product or its parts and shall not extend to any other claims,
including but not limited to loss of profit, cost of removal or replacement, incidental or conse-
quential damages or other similar claims arising from use of this product. Damage to product
resulting from acts of God, faulty installation, misuse, tampering, accident, abuse, negligence,
alterations, unauthorized repairs or problems unrelated to materials and workmanship are not
covered by this warranty.

Maxima PowerClean 210 - 9
PowerClean 210
Ultrasonic Cleaner
Limpiador ultrasónico
Nettoyeur à ultrasons
570 -2241
Read before use. Keep in a safe place for future reference.
Lea antes de usarlo. Guárdelo en un lugar seguro para referencia futura.
Lisez le mode d’emploi avant l’utilisation. Conservez-le dans un endroit sûr pour vous
y reporter ultérieurement.
CAUTION: Federal (US) law restricts this device to sale by or on the order of a
licensed professional.
ADVERTENCIA: La ley federal de los Estados Unidos restringe el uso de este
dispositivo a profesionales con licencia.
AVERTISSEMENT: La loi fédérale américaine restreint l’usage de ce dispositif à
des professionnels diplômés.
INSTRUCTIONS FOR USE
INSTRUCCIONES DE USO
DIRECTIVES D’UTILISATION

Maxima PowerClean 210 - 10
SALUD Y SEGURIDAD
• ¡Peligro de choque eléctrico! Nunca toque el enchufe de alimentación con manos mojadas,
especialmente al conectarlo o desconectarlo.
• ¡Peligro de choque eléctrico! Si la unidad cae dentro del agua, desconéctela inmediatamente, no
la alcance dentro del agua. Envíela a Soluciones de piezas de mano y equipo pequeño de Henry
Schein®para su evaluación y reparación.
• El cable de alimentación nunca se debe jalar, torcer ni doblar demasiado. Nunca opere la unidad si el
cable, el enchufe de alimentación o la cubierta están dañados o flojos.
• Nunca obstruya la rejilla de ventilación del aparato. Mantenga las rejillas de ventilación libres de
pelusa, cabello y otros materiales.
• Mantenga la unidad alejada de las fuentes de calor excesivo.
• Para evitar el peligro de un choque eléctrico, el daño o incendio del equipo durante las tormentas
eléctricas, apague la máquina y no toque la máquina ni el cable.
OPERACIÓN/PRECAUCIONES GENERALES
• No encienda la unidad sin agua en el tanque. La unidad se daña o su vida útil se reduce
seriamente si se pone a funcionar en seco durante 30 segundos.
• No coloque instrumentos directamente en la base del tanque. Colocar instrumentos
directamente en la base del tanque hará que la unidad se dañe. Coloque los instrumentos en la
canasta para usarlos correctamente.
• No use la unidad sin la tapa puesta. Esta ayuda a reducir rocío y ruido.
• Evite limpiar las fresas y las limas directamente en el tanque principal, ya que podrían caer en la
válvula de drenaje y causar daños. Use un vaso de precipitados o una cámara de limpieza. Consulte
los accesorios.
• No llene el tanque por encima de la línea de máximo (MAX) para evitar el desbordamiento.
• No use ninguna solución que contenga sustancias abrasivas o una solución química fuertemente
corrosiva que no esté recomendada por el fabricante o el proveedor.
• No haga funcionar la unidad durante un tiempo prolongado o de forma continua. Si la unidad ha
estado funcionando durante 30 minutos, se recomienda detenerla durante unos 10 minutos.
• Coloque el aparato en una superficie seca y plana cuando lo vaya a usar.
• Si se encuentra alguna anomalía, deje de usarlo inmediatamente y póngase en contacto con
Soluciones de piezas de mano y equipo pequeño de Henry Schein®.
• Este dispositivo solo debe ser operado por un profesional.
• Nunca opere el dispositivo desatendida.
• Desconecte el cable de alimentación de la unidad antes de limpiar el dispositivo.
• Nunca desmonte la unidad. Todo el servicio de esta unidad debe ser realizado por personal de
servicio calificado.

Maxima PowerClean 210 - 11
ESTRUCTURA Y ACCESORIOS DEL PRODUCTO
91110 12
1
5
3
7
2
6
4
8
1. Tapa
2. Tanque de limpieza de acero
inoxidable
3. Panel delantero de aluminio
4. Perilla de desgasificación
5. Ajuste de tiempo/puesta en
funcionamiento y parada
6. Mango de la válvula de drenaje
7. Mango de aluminio
8. Panel lateral de plástico
9. Boquilla de drenaje
10. Soporte de la tapa
11. Toma de alimentación
12. Interruptor de encendido
Accesorios estándar
Cable de alimentación Manguera de drenaje
(39 pulg. de largo)
Canasta de acero inoxidable
Accesorios opcionales
Cámara grande de limpieza,
amovible, de acero inoxidable
(8,5 x 8,4 x 3,2 pulg.)
570-2243
Vaso de precipitados
de acero inoxidable
570-2242
Cámara pequeña de limpieza,
amovible, de acero inoxidable
(9,0 x 5,0 x 3,0 pulg.)
570-2244
Maxima PowerClean 210 - 12
TABLERO DE CONTROL
1 63 7
25
4 8
1. Perilla de desgasificación. Gírela hacia la derecha o hacia la izquierda para seleccionar el ajuste del
temporizador de desgasificación, ya sea 60, 120 o 180 segundos. Este ajuste determina el tiempo de
desgasificación automático y manual. Presione la perilla para dar inicio a la desgasificación.
2. Advertencia. Detenga el funcionamiento y consulte la guía de solución de problemas (pág. 7).
3. Advertencia de tapa abierta. La tapa debe cerrarse durante el funcionamiento para evitar
la dispersión de rocío. El símbolo de advertencia ayuda a estandarizar las operaciones. El símbolo
de advertencia de tapa abierta se ilumina, si la unidad está fuera de ciclo. Tonos de advertencia
adicionales suenan si la unidad está en ciclo.
4. Pantalla del temporizador de desgasificación de 60, 120 o 180 segundos. Muestra el ajuste del
temporizador de desgasificación y cuánto tiempo de desgasificación queda en segundos (s).
5. Estado de desgasificación. parpadea, indicando que la desgasificación ha comenzado.
6. 05:00. Pantalla de tiempo ultrasónico. Muestra el ajuste del temporizador y cuánto tiempo falta para
que termine el proceso de limpieza ultrasónica.
7. Estado de limpieza ultrasónica. está iluminado, se está llevando a cabo la limpieza
normal.
8. Perilla de ajuste de tiempo/puesta en funcionamiento y parada. Al girarla hacia la derecha o hacia
la izquierda se puede colocar el temporizador en 6 ajustes: 5:00 – 7:30 – 10:00 – 12:30 – 15:00 –
20:00 min. Una vez que el temporizador se ha ajustado, presione la perilla para dar inicio.
INSTALACIÓN
1. Coloque el limpiador ultrasónico en el lugar deseado, sobre una superficie seca y plana, cerca de
un lavabo.
2. Conecte la manguera. Conecte un extremo de la manguera a la válvula de drenaje y coloque el otro
extremo en el lavabo. La válvula de drenaje se encuentra detrás de la unidad, en el lado derecho.
3. Conecte la unidad. Conecte el cable de alimentación en la parte posterior de la unidad. Asegúrese de
que esté conectado correctamente y que el cable no esté dañado.
4. Encienda la unidad. El interruptor de encendido de la unidad se encuentra en la parte posterior de la
misma, en el lado izquierdo, justo arriba de la toma de alimentación.
FUNCIONAMIENTO
• No encienda la unidad sin agua en el tanque. La unidad se daña si se pone a funcionar en seco.
• No coloque instrumentos directamente en la base del tanque. Coloque los instrumentos en la
canasta para usarlos correctamente.
• Evite limpiar las fresas directamente en el tanque principal. Use vasos de precipitados o una cámara
de limpieza.
Pasos del funcionamiento

Maxima PowerClean 210 - 13
Se usan durante la limpieza con instrumentos o contenedores sueltos. Consulte la siguiente sección de
accesorios para las fresas, las limas o las soluciones corrosivas.
1. Retire la canasta y asegúrese de que el mango de la válvula de drenaje esté en la posición cerrada.
2. Siga las instrucciones de dosificación de la solución de limpieza ultrasónica, de acuerdo a la etiqueta
de la solución de limpieza. Llene la unidad con solución de limpieza ultrasónica (de uso general,
enzimática, etc.) entre las líneas de mínimo y máximo (MIN y MAX).
3. Coloque los instrumentos a limpiar directamente en la canasta o en los contenedores y colóquelos
dentro de la canasta. Coloque a continuación la canasta directamente en el tanque principal, el cual ya
contiene la solución de limpieza ultrasónica.
4. Coloque la tapa en la unidad para reducir rocío y ruido.
5. Usando la perilla de la derecha, ajuste el tiempo de limpieza apropiado en la unidad (consulte a
continuación) y presione la perilla para poner la unidad en funcionamiento.
6. Después de la limpieza, enjuague muy bien la canasta y los instrumentos con agua corriente.
Determinar el tiempo de limpieza apropiado
Esta unidad limpia más rápidamente y más a fondo que la mayoría de los limpiadores ultrasónicos en el
mercado. Debe anticipar que limpie en la mitad o un tercio del tiempo de lo que toma a otros limpiadores
ultrasónicos comunes. El tiempo de limpieza normal es de:
• 5 minutos para una capa de instrumentos o contenedores sueltos
• 10 minutos para dos capas de instrumentos o contenedores sueltos
Antes de empezar la rutina de limpieza, hay que llevar a cabo limpiezas de prueba para establecer el
tiempo de limpieza apropiado. Con una tanda normal de instrumentos, haga una limpieza de 5 minutos y
luego compruebe el estado de los instrumentos. Añada más tiempo hasta lograr resultados satisfactorios.
Repita la prueba un par de veces más para establecer un tiempo fiable, apropiado y estándar.
No la haga con tiempo excesivo, ya que no es necesario, y repercute en la vida útil de la unidad.
Desgasificación
La desgasificación de la solución es un paso necesario para eliminar burbujas grandes de aire que
interfieren con el proceso de limpieza. Esta unidad ejecuta la desgasificación automáticamente durante
el primer uso, cuando se enciende por primera vez. La desgasificación se puede iniciar manualmente con
la perilla izquierda. El tiempo de desgasificación automático o manual se puede ajustar girando la perilla
izquierda.
Limpieza con accesorios
Vasos de precipitados
1. Coloque cosas pequeñas, tales como fresas y limaduras, en los vasos de precipitados. Agregue
solución de limpieza ultrasónica a los vasos de precipitados hasta sumergir los artículos en el interior.
Coloque tapas transparentes sobre los vasos de precipitados, si es necesario.
2. Coloque los vasos de precipitados dentro de la canasta y colóquelos dentro del tanque. Si el nivel de
líquido en el tanque ya está cerca del máximo (MAX), saque un poco del líquido. La base de los vasos
de precipitados debe estar en contacto con el agua o la solución en el tanque.
Cámara de limpieza
La cámara de limpieza amovible se utiliza cuando se usa una solución corrosiva o peligrosa o cuando se
reduce la cantidad de solución de limpieza que se necesita para tandas pequeñas.
1. Agregue agua al tanque principal hasta la línea de mínimo (MIN).
2. Agregue instrumentos dentro de la cámara de limpieza amovible. Agregue la solución apropiada hasta
sumergir los artículos.

Maxima PowerClean 210 - 14
3. Coloque la cámara de limpieza amovible a lo largo de la parte superior del tanque. La base de
la cámara debe estar en contacto con el agua, aproximadamente hasta 10 mm o 1/2 pulg. de
profundidad. El ultrasonido penetra la cámara amovible para limpiar los artículos en el interior.
LIMPIEZA Y MANTENIMIENTO DE LA MÁQUINA
• No haga funcionar la unidad por tiempo prolongado o continuamente. La unidad está diseñada con
protección contra el recalentamiento. Si ha estado funcionando por 30 minutos, se recomienda
detenerla aproximadamente 10 minutos para prolongar su vida útil.
• No mantenga agua en el tanque de limpieza por mucho tiempo. Después de terminar la limpieza, abra
la válvula de drenaje para que salga el agua sucia. Limpie y seque el tanque.
• Si se forma condensación de agua en la tapa, sacúdala o límpiela antes de colocarla en su soporte
para evitar goteos de agua desde la tapa.
• No use desinfectante en la cubierta o el tanque. Use agua limpia para limpiar la cubierta. Use una
toalla de papel para secar el tanque y la cubierta. Use un paño desinfectante, que no dañe el aluminio
y el plástico ABS, para limpiar el tanque y la cubierta, si es necesario.
• No use soluciones corrosivas, tales como blanqueadores, en el tanque de acero inoxidable.
• No use soluciones corrosivas, tales como diluyente de pintura o acetona, ya que corroen la cubierta de
plástico. No use soluciones inflamables.
• No use agua de ósmosis o agua altamente purificada, ya que pueden corroer sustancialmente los
metales. Evite derramar agua sobre el tablero de control o dentro de la cubierta.
• Mantenga la unidad en un lugar seco, fresco y ventilado.
• No exponga la unidad a la luz directa del sol por mucho tiempo.
• Mantenga el material de empaque original, en caso de tener que enviarla al servicio de reparación.
Si ya no está disponible, use suficiente material protector equivalente a dos espumas de poliestireno,
como mínimo, completamente alrededor de la unidad dentro de la caja de cartón para el envío para
evitar daños a los transductores frágiles. La garantía no cubre daños durante el envío de devolución de
los clientes.
Prueba con papel de aluminio
Los limpiadores ultrasónicos deben ponerse a prueba periódicamente, o según sea necesario, para
comprobar su desempeño en la limpieza o para verificar que los transductores están funcionando
correctamente. Los resultados de la prueba se deben documentar.
Procedimiento:
Retire la tapa, la canasta, los contenedores y cualquier otra cosa del tanque.
1. Limpie minuciosamente el tanque.
2. Llene el tanque con agua hasta el punto medio entre las líneas de mínimo (MIN) y máximo (MAX).
3. Tome dos pedazos de cinta de autoclave y péguelas de izquierda a derecha sobre el borde superior
del tanque. Una cinta va sobre los centros de dos ciclos redondos en la base del tanque. Otra cinta va
sobre el tercer ciclo en la base del tanque. Los transductores que generan ultrasonido están montados
debajo de cada círculo.
4. Obtenga un pedazo de papel de aluminio estándar, como el que se usa en casa, y corte tres pedazos
de 2 cm (3/4 pulg.) de ancho y 13 cm (5 pulg.) de largo. Doble cada pedazo en forma de L sobre la
longitud. No use papel de aluminio de alta resistencia.
5. Pegue cada papel de aluminio por encima del centro de cada círculo, pegando el extremo a la parte
inferior de la cinta. Mantenga los papeles de aluminio verticales dentro del agua con el extremo inferior
de 2 a 3 cm (1 pulg.) por encima del fondo del tanque.
6. Encienda el ultrasonido en modo de limpieza normal y déjelo funcionar por un minuto. Deténgalo
después de que haya pasado este tiempo.
7. Retire los papeles de aluminio y revíselos. Los papeles de aluminio deben estar perforados o quebrados a
lo largo de los tres bordes.
8. Si cualquiera de los papeles de aluminio no tiene perforaciones evidentes, el transductor cerca de ese

Maxima PowerClean 210 - 15
papel de aluminio podría no estar funcionando correctamente. Llame a Soluciones de piezas de mano y
equipo pequeño de Henry Schein®si esto sucede.
9. Saque del tanque las partículas de papel de aluminio sueltas y límpielo minuciosamente.
SOLUCIÓN DE PROBLEMAS
Problema Causa Solución
El símbolo de advertencia está
encendido; la unidad ha estado
funcionando ampliamente.
Por lo menos uno de los
transductores está protegido
contra el recalentamiento.
Pare la unidad por 15 minutos
o más, hasta que el símbolo
de advertencia se atenúe,
antes de volver a ponerla en
funcionamiento.
El símbolo de advertencia está
encendido; este símbolo no
se apaga después de dejar
la unidad inactiva por
15 minutos.
Por lo menos uno de los
transductores no está
funcionando.
Contacte a Piezas de mano
y equipo pequeño de Henry
Schein®(pág. 16).
La unidad no está drenando
correctamente.
Hay residuos atrapados en la
manguera.
Desconecte la manguera de
drenaje y desaloje los residuos
en la manguera y dentro de la
unidad.
La unidad está emitiendo
sonidos.
La unidad está funcionando,
pero no tiene la tapa.
Vuelva a colocar la tapa en la
unidad.
La unidad no se apaga. El cable de alimentación puede
estar flojo o desconectado.
Compruebe el cable de
alimentación y asegúrese de
que la corriente está pasando
desde el tomacorriente al cual
está conectado.
ESPECIFICACIONES
Descripción Limpiador ultrasónico
Modelo Maxima PowerClean 210
Capacidad del tanque 8,0 L/2,1 galones (EE. UU.) Máximo 7,0 L/1,8 galones (EE. UU.)
Mínimo 3,6 L/0,95 galones (EE. UU.)
Tamaño del tanque 33,1 x 23,8 x 11,6 cm/13,0 x 9,4 x 4,6 pulg.
Artículo de mayor longitud que
cabe dentro del tanque 37,0 cm/14,4 pulg.
Fuente de alimentación 240 W CA 100~120 V 60 Hz
240 W AC 220~240 V 50 Hz

Maxima PowerClean 210 - 16
Ajustes del temporizador 5 min > 7,5 min > 10 min > 12,5 min > 15 min > 20 min
Ajustes del temporizador
de desgasificación 60, 120, 180 segundos
Frecuencia ultrasónica 48 kHz ± 3 kHz
Material del tanque Acero inoxidable SUS304
Material de la cubierta Aluminio + ABS
Peso neto 14,3 kg/31,5 lb
Peso bruto 17,1 kg/37,7 lb
Tamaño de la unidad 46,6 x 35 x 22,9 cm/18,3 x 13,8 x 9,0 pulg.
SERVICIO
Para las piezas que requieran servicio, incluyendo el servicio por la garantía, envíelas a Soluciones de
piezas de mano y equipo pequeño de Henry Schein®.
Henry Schein Handpiece & Small Equipment Solutions
620 S. Placentia Ave.
Placentia, CA 92870 EE. UU.
Número de teléfono 1-800-235-6337, opción 1
GARANTÍA
Este producto está diseñado para ser utilizado en consultorios odontológicos y la presente garantía no es
aplicable para otros usos. Este producto está garantizado contra defectos de fabricación en materiales y
mano de obra durante 3 años, a partir de la fecha de compra.
Henry Schein®reparará o reemplazará el producto a su entera discreción. Esta garantía se limita al
reemplazo o reparación del producto o de sus piezas y no se extiende a ningún otro tipo de reclamo,
incluido, pero no limitado a, la pérdida de ganancias, el costo de remoción o reemplazo, los daños
incidentales o consecuentes, u otros reclamos similares que puedan surgir de la utilización de este
producto. Los daños al producto provocados por causas de fuerza mayor, instalación defectuosa, mal
uso, alteración, accidente, abuso, negligencia, alteraciones, reparaciones no autorizadas o problemas no
relacionados con los materiales y la mano de obra no están cubiertos por esta garantía.
Maxima PowerClean 210 - 17
PowerClean 210
Ultrasonic Cleaner
Limpiador ultrasónico
Nettoyeur à ultrasons
570 -2241
Read before use. Keep in a safe place for future reference.
Lea antes de usarlo. Guárdelo en un lugar seguro para referencia futura.
Lisez le mode d’emploi avant l’utilisation. Conservez-le dans un endroit sûr
pour vous y reporter ultérieurement.
CAUTION: Federal (US) law restricts this device to sale by or on the order of a
licensed professional.
ADVERTENCIA: La ley federal de los Estados Unidos restringe el uso de este
dispositivo a profesionales con licencia.
AVERTISSEMENT: La loi fédérale américaine restreint l’usage de ce dispositif à
des professionnels diplômés.
INSTRUCTIONS FOR USE
INSTRUCCIONES DE USO
DIRECTIVES D’UTILISATION

Maxima PowerClean 210 - 18
SANTÉ ET SÉCURITÉ
• Risque de décharge électrique! Ne touchez jamais la fiche d’alimentation électrique avec les mains
mouillées, particulièrement lors de l’insertion ou du retrait de la fiche.
• Risque de décharge électrique! Si l’unité tombe dans l’eau, débranchez-la immédiatement; ne
plongez pas les mains dans l’eau. Envoyez-la à Henry Schein®Handpiece & Small Equipment
Solutions (solutions pour pièce à main et petit équipement) pour qu’elle soit évaluée et réparée.
• Évitez toujours de tirer, tordre ou plier fortement le cordon d’alimentation. N’utilisez jamais l’unité si
le cordon, la fiche d’alimentation électrique ou le boîtier est endommagé ou mal fixé.
• Ne bloquez jamais les fentes d’aération du dispositif. Veillez à ce que les fentes d’aération soient
exemptes de peluches, de cheveux et d’autres matériaux.
• Maintenez l’unité éloignée des sources de chaleur excessive.
• Afin d’éviter le risque de décharge électrique, d’endommagement de l’équipement ou d’incendie lors
d’un orage électrique, éteignez l’appareil et ne touchez ni l’appareil ni le cordon.
FONCTIONNEMENT GÉNÉRAL/PRÉCAUTIONS
• Ne mettez pas l’unité en marche sans qu’il n’y ait d’eau dans la cuve. Un fonctionnement à sec
de plus de 30 secondes endommagera l’unité ou réduira sévèrement sa durée de vie.
• Ne placez pas les instruments directement au fond de la cuve. Placer les instruments directe-
ment sur le fond de la cuve endommagera l’unité. Au lieu de cela, placez les instruments dans le
panier.
• Ne faites pas fonctionner l’unité sans le couvercle. Le couvercle permet de réduire les aérosols et de
diminuer le bruit.
• Évitez de nettoyer les fraises et les limes directement dans la cuve principale, sinon elles risquent
de pénétrer dans le purgeur et de l’endommager. Utilisez un bécher ou un bac de nettoyage. Voir
Nettoyage à l’aide d’accessoires.
• Ne remplissez pas la cuve au-dessus du repère MAX afin d’éviter les débordements.
• N’utilisez pas de solution contenant des substances abrasives ou une solution chimique fortement
corrosive non recommandée par le fabricant ou le fournisseur.
• Ne faites pas fonctionner l’appareil pendant une période prolongée ou en continu. Si l’unité a
fonctionné pendant 30 minutes, il est recommandé d’arrêter l’unité pendant environ 10 minutes.
• Placez le dispositif dans un endroit sec et sur une surface plane pour le faire fonctionner.
• Si vous observez des anomalies, cessez immédiatement l’utilisation et communiquez avec Henry
Schein®Handpiece & Small Equipment Solutions.
• Cet appareil ne doit être utilisé que par un professionnel.
• Ne faites jamais fonctionner l’appareil sans surveillance.
• Débranchez le cordon d’alimentation de l’appareil avant de nettoyer l’appareil.
• Ne démontez jamais l’appareil. L’entretien de cet appareil doit être effectué par un personnel d’en-
tretien qualifié.

Maxima PowerClean 210 - 19
NOMENCLATURE ET ACCESSOIRES
91110 12
1
5
3
7
2
6
4
8
1. Couvercle
2. Cuve de nettoyage en acier
inoxydable
3. Panneau avant en aluminium
4. Bouton de dégazage
5. Réglage de la durée/
démarrage et arrêt
6. Poignée du purgeur
7. Poignée en aluminium
8. Panneau latéral en plastique
9. Bec de purge
10. Support de couvercle
11. Prise de courant
12. Interrupteur d’alimentation
Accessoires de base
Cordon d’alimentation Tuyau de purge (39 po de long) Panier en acier inoxydable
Accessoires en option
Grand bac de nettoyage amovible
en acier inoxydable
(8,5 x 8,4 x 3,2 po)
570-2243
Bécher en acier inoxydable
570-2242
Petit bac de nettoyage amovible en
acier inoxydable
(9,0 x 5,0 x 3,0 po)
570-2244

Maxima PowerClean 210 - 20
PANNEAU DE CONTRÔLE
1 63 7
25
4 8
1. Bouton de dégazage. Tournez le bouton dans le sens horaire ou antihoraire pour sélectionner le
réglage de la minuterie, soit 60, 120 ou 180 secondes. Ce réglage détermine les durées automatique et
manuelle du dégazage. Appuyez sur le bouton pour démarrer le dégazage.
2. Avertissement. Arrêtez l’utilisation et consultez le guide de dépannage (page 23).
3. Avertissement de couvercle ouvert. Le couvercle doit être fermé pendant le fonctionnement
afin d’éviter la propagation des aérosols. Le symbole d’avertissement contribue à la normalisation des
opérations. Le symbole d’avertissement de couvercle ouvert s’allume si l’unité n’est pas en cours de
cycle. En outre, un signal sonore d’avertissement retentit si l’unité est en cours de cycle.
4. Affichage de la minuterie du dégazage (60, 120 ou 180). Il affiche le réglage de la minuterie du
dégazage et le temps de dégazage qu’il reste en secondes (s).
5. État du dégazage. clignote, indiquant que le dégazage est en cours.
6. 05:00. Affichage de la durée de la phase ultrasonore. Il affiche le réglage de la minuterie et le temps
qu’il reste au nettoyeur à ultrasons.
7. État du nettoyage par ultrasons. illuminé, nettoyage normal est en cours.
8. Bouton de réglage de la durée/démarrage et arrêt. Six réglages possibles de la minuterie en
tournant le bouton dans le sens horaire ou antihoraire : 5:00 – 7:30 – 10:00 – 12:30 – 15:00 – 20:00
minutes. Une fois le réglage choisi, appuyez sur le bouton pour démarrer.
INSTALLATION
1. Placez le nettoyeur à ultrasons à l’endroit souhaité, sur une surface sèche et plane et près d’un évier.
2. Connectez le tuyau. Raccordez une extrémité du tuyau de purge au purgeur et placez l’autre extrémité
dans l’évier. Le purgeur est situé à l’arrière de l’unité sur le côté droit.
3. Branchez l’unité. Branchez le cordon d’alimentation dans la prise à l’arrière de l’unité. Assurez-vous
qu’il est correctement branché et qu’il n’est pas endommagé.
4. Mettez l’unité en marche. L’interrupteur d’alimentation pour mettre l’unité sous tension est situé à
l’arrière de l’appareil sur le côté gauche, juste au-dessus de la prise d’alimentation.
FONCTIONNEMENT
• Ne mettez pas l’unité en marche sans qu’il n’y ait d’eau dans la cuve. Faire fonctionner l’unité à
sec l’endommagera.
• Ne placez pas les instruments directement au fond de la cuve. Au lieu de cela, placez les
instruments dans le panier.
• Évitez de nettoyer les fraises directement dans la cuve principale. Utilisez des béchers ou un bac de
nettoyage.
Étapes de fonctionnement
This manual suits for next models
1
Table of contents
Languages:


