Heritage 023760 Assembly instructions

INSTRUCTIONS FOR USE AND CARE P.2
INSTRUCTIONS POUR L’USAGE ET L’ENTRETIEN
P.17
SOUS VIDE PRECISION COOKER
CUISEUR DE PRÉCISION SOUS VIDE


2
OPERATING AND SAFETY INSTRUCTIONS
Item no. Voltage (V) Wattage (W) Frequency (Hz)
023760 120 900 60
IMPORTANT SAFEGUARDS
READ THE INSTRUCTIONS BEFORE USE
WARNING: To reduce the risk of fire, electrical shock, serious personal
injury and/or property damage:
A. To protect against electric shock, DO NOT immerse the power
cord in water or other liquid.
B. Keep the appliance out of the reach of children and pets.
This appliance is not intended for use by children. Close adult
supervision is necessary when any appliance is used near children.
C. Unplug the sous vide precision cooker when not in use. Allow the
unit to cool down completely before disassembling the adjustable
holding clamp or relocating.
D. Do not operate the product if it has a damaged power cord or
plug, or after the appliance malfunctions or has been damaged
in any manner. Do not attempt to examine or repair this product
yourself. For further assistance, please contact customer service to
the following e-mail address: starfrit.com/en/contact-us
E. Do not use attachments not recommended or sold by the product
manufacturer. The use of accessory attachments not recommended
by the appliance manufacturer may cause injuries.
F. The stainless steel element cover, the heating element, the cooking
container, the heated water and the vacuumed or sealed bag
become hot during use. Do not touch hot surfaces.
G. Use protective mitts to avoid burns or serious personal injury.
H. The heating element surface is subject to residual heat after use.
Do not touch the metal surface.
I. Do not operate the appliance without food or liquid in the cooking
container.
J. Always seal food in an airtight plastic bag before submerging it into
the water of the cooking container.
K. Consuming raw or undercooked meats, poultry, seafood, shellfish
or eggs may increase the risk of food borne illness; refer to the
minimum cooking times provided within this guide.
L. Always ensure the cooking container is placed on a firm and
stable surface. The sous vide precision cooker should be securely
clamped to the cooking container before use. The appliance must

3
always be kept perpendicular to the water level in order to allow
for an adequate circulation of the water in the container.
M. Do not immerse the sous vide precision cooker beyond the max marking
line. The plastic part of appliance must not be immersed in water.
N. Always be cautious when lifting the sous vide precision cooker after
cooking. The unit is hot and can result in serious burns.
O. The heating element, temperature sensors and water circulator
enclosed inside the stainless steel element cover are fragile and
must be handled with care to prevent any damage or deformation
to these internal parts.
P. This product is intended for indoor, non-commercial use. Do not
use outdoors or for any other purpose.
Q. Do not allow the power cord to hang (e.g., over the edge of a table
or counter) or touch hot surfaces.
R. Do not place the appliance on or near a hot gas, electric burner, in
a heated oven or microwave oven.
S. To disconnect, press the button, then remove plug from wall
outlet. Connect the power plug to an easily accessible outlet so
the appliance can be unplugged immediately in the event of an
emergency.
T. Do not use appliance for anything other than its intended use.
U. Do not leave the appliance unattended while it is in use. Always
unplug the product from the electrical outlet when not in use.
SAVE THESE INSTRUCTIONS
FOR FUTURE REFERENCE
GROUNDED PLUG: As a safety feature, this appliance is equipped with a grounded
plug, which will only fit into a three-prong outlet. Do not attempt to defeat this feature
or modify the plug in any way. Improper connection of the grounding conductor may
result in the risk of electric shock. Consult a qualified electrician if you are in doubt as
to whether the outlet is properly grounded.
SPECIAL INSTRUCTIONS: A short power-supply cord is provided to reduce risk of
becoming entangled in or tripping over a longer cord.
AN EXTENSION CORD MAY BE USED IF CARE IS EXERCISED IN THEIR USE:
• Minimize the risk of overheating by using the shortest UL or ETL cord possible.
• The marked electrical rating must be at least as great as that of the product.
• This appliance is equipped with a grounded plug, therefore the extension cord must
be a grounding-type 3-wire cord.
• Arrange the longer cord so that it will not drape over a countertop or tabletop where
it can be tripped over, snagged, or pulled on unintentionally (especially by children).
• DO NOT alter the plug. DO NOT attempt to defeat the safety purpose of the
grounded plug.

4
INTRODUCTION SOUS VIDE COOKING
Sous vide has been a popular cooking method in restaurants for quite some time.
Sous vide is a French term which means “under vacuum” and describes food placed in
vacuum sealed pouches and cooked in a water bath.
Food slowly cooks at precise low temperatures over a long period of time to achieve
succulent tasting meals. Sealing foods inside pouches allows it to cook in its own juices
in addition to any marinades or seasonings you wish to add. Vitamins, minerals and
juices are retained within the food and natural flavors are intensified.
The Heritage sous vide precision cooker creates and maintains an even and accurately
controlled cooking water bath for perfect cooking results. This appliance will be a great
addition to your kitchen essentials and will allow you to prepare delicious meals ahead
of time to enjoy with your friends and family.
IDEAL FOODS FOR SOUS VIDE COOKING
Meats are ideal to cook using the sous vide method as the results are more tender,
succulent and more flavour filled. However, precision cooking is equally satisfying for
seafood, vegetables and eggs!
Red meats Lamb, beef and pork
Poultry Chicken, duck
Fish and Seafood Fish, lobster tail, shrimp, scallop
Vegetables
Root
Tender
Potato, carrot, parsnip, beet, turnip
Pea, asparagus, corn, broccoli,
cauliflower, eggplant, onion, squash
Fruits
Firm
Tender
Apple, pear
Mango, plum, apricot, nectarine, papaya,
strawberry
Eggs
PARTS IDENTIFICATION
1. Digital control panel
2. Handle with power cord & 3 prong plug
3. Stainless steel element cover
4. Water flow channels
5. Minimum water level
6. Maximum water level
7. Heating element
8. Adjustable holding clamp
9. Tightening screw
5
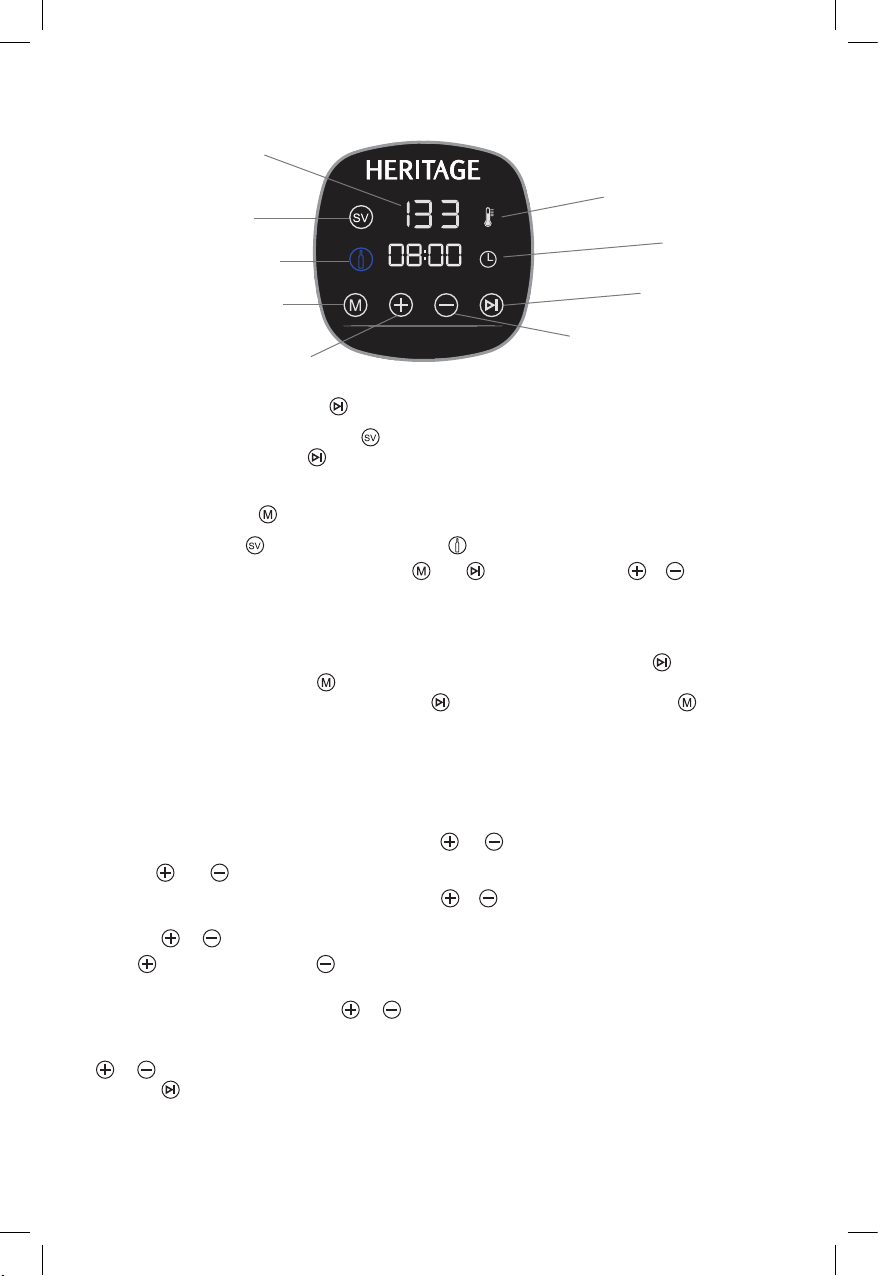
CONTROL PANEL & FEATURES
START/STOP BUTTON
Press the Start/StopButton to enter (SOUS VIDE) program or wine cooling program after
plugging the appliance. The button will start the heating /cooking / cooling process. Press
this button again to stop the cooking process.
MODE BUTTON
Select the sous vide or wine cooling function .
After entering desired function by Pressing and , press both button & and hold for
2 seconds to change from Fahrenheit to Celsius. (Default display is Fahrenheit).
NOTE: The temperature cannotbe changed from Fahrenheit to Celsius while the sous
vide precision cooker is in use.
NOTE: To change from SOUS VIDE function to Cooling function : Press the Start/
Stop button, then press the button and hold for 2 seconds. To change from Cooling
function to SOUS Vide function : Press the Start/Stop button and press button.
NOTE: The sous vide precision cooker can be unplugged from electrical outlet, and
plugged back in, in order to change from one function to the other function (i.e. from
sous vide to wine cooling orfrom wine cooling to sous vide), Repeatabove operation.
After one mode ofoperation was already in use its recommended to leave 30 minutes
before changing between the two modes.
SETTING ADJUSTMENT BUTTONS &
Use the and buttons to adjust to the desired temperature and time settings.
When using the temperature setting,press the & buttons once to increase or to
decrease the temperature in increments of 1°F or 0.1°C while in Celsius mode. Pressand
hold the or buttons to change the values faster.
Press button to increase or button to decrease the time and temperature settings. Press
button 1 time and temperature adjusts with 1°F or 0.1°C while in Celsius mode.
To adjustcooking time, press the or button to increase or decrease time in increments
of 1 minute for cooking time between 10 minutes and 2 hours (00:10-02:00), and in
increments of 10 minutes between 2 hours and 72 hours (02:00- 72:00). Press and hold the
or buttonto changes the values faster. Once desired temperature is reached, press and
hold the buttonto begin cooking.
Refill evaporated water during use, so thatalways water is filled into cooking container
between MIN and MAX marking of the Sous vide precision cooker. Otherwise, the device
could be damaged.
Temperature Display
Temperature indicator
Sous Vide indicator
Time indicator
Wine cooling indicator
Start/Stop Button
Mode selection button
(time/temperature) Setting adjustment Button
(MINUS time/temperature)
Setting adjustment Button
(ADD time/temperature)
6
SOUS VIDE FUNCTION
Default Temperature & Time 140°F / 56°C, 08:00 (8 hours)
Temperature setting range 68°F - 194°F / 20°C - 90°C
Time setting range 10 min up to 72 hours (00:10-72:00)
Temperature Adjustment increments +/ - 1°F / 0.1°C
BEFORE FIRST USE
(READ THE INSTRUCTIONS BEFORE FIRST USE)
NOTE: During first use of the appliance, smoke and/or a slight odour may occur from
the appliance. This is normal and will quickly disappear. It will not recur after appliance
has been used a few more times.
A. Remove all packaging materials.
B. Remove any stickers or labels from the appliance.
C. Remove the protective film on the control panel and ensure no packaging materials
remain on the heating element, the water flow channels or on the stainless steel
element cover.
D. Using a soft damp cloth, wipe the surface of the main body and the stainless
steel element cover. Dry thoroughly- The stainless steel element cover is
dishwasher safe.
Refill evaporated water during use, so that always water is filled into cooking container
between MIN and MAX marking. Otherwise, the device could be damaged.
TIPS AND RECOMMENDATIONS
NOTE: For best results read the following tips:
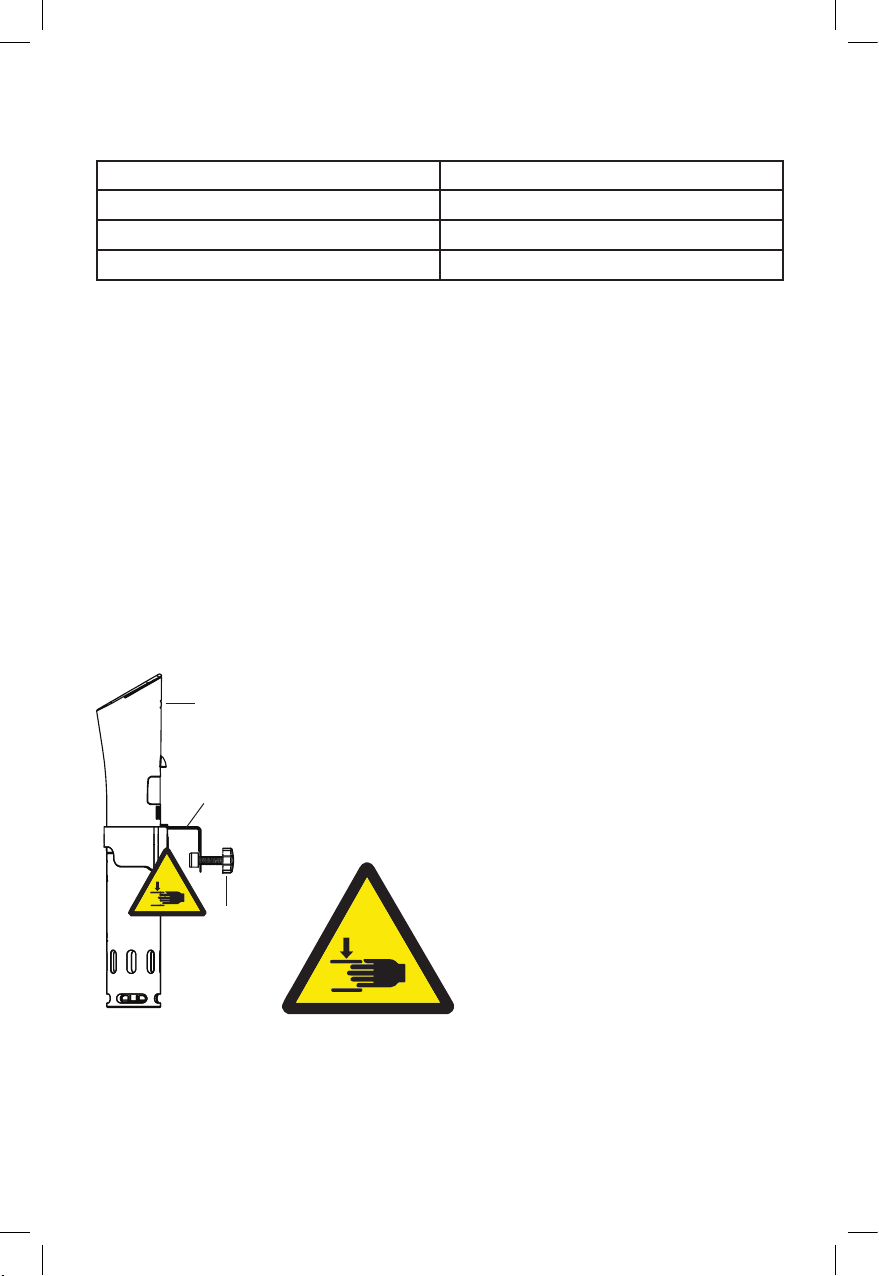
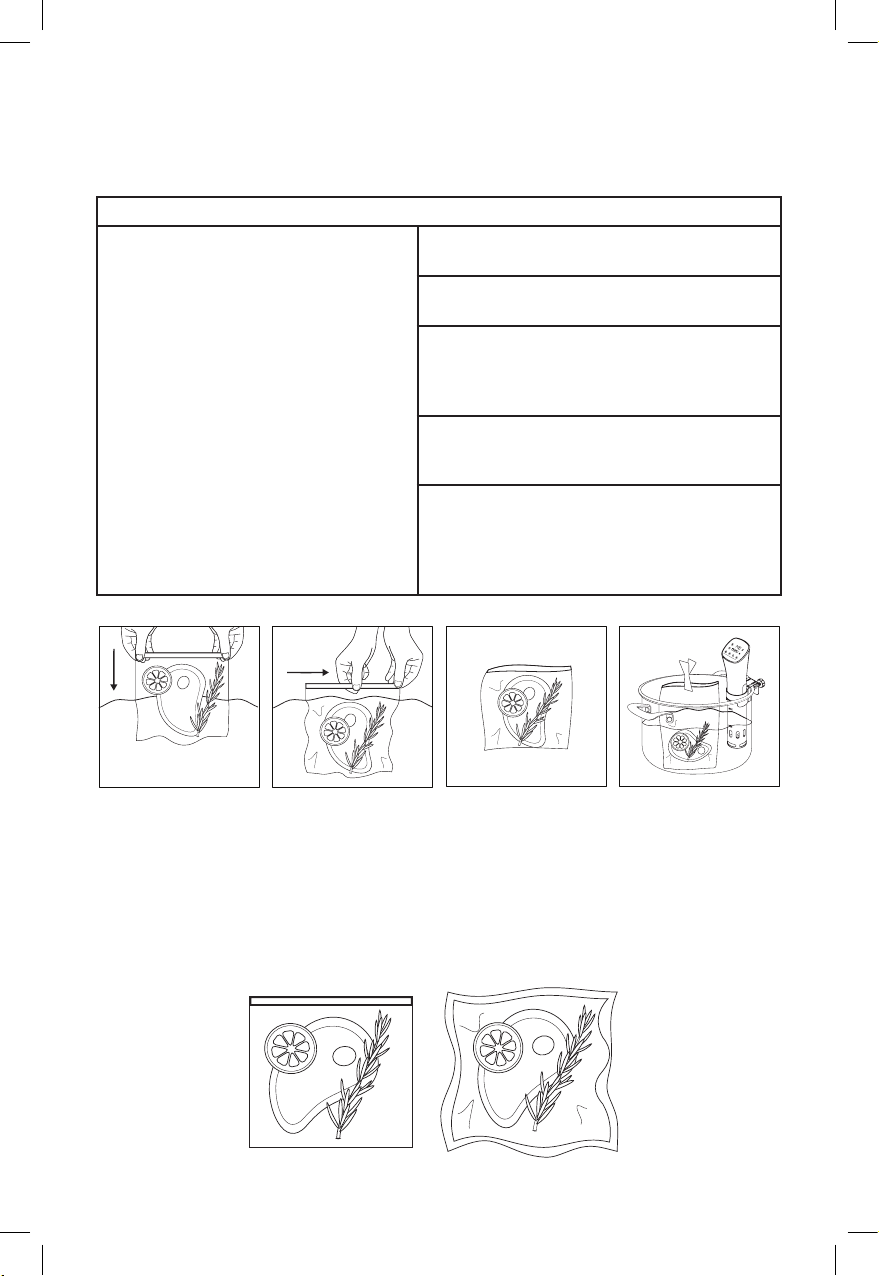
TO ASSEMBLE
Place the bracket (B) at edge of cooking container and fix the
screw (C).
Place the device (A) into the bracket.
Fill water into the cooking container and observe min-/max-
marking at device.
Plug in the power plug into outlet after filling the water in the
cooking container.
A
B
CWarning! Risk of crushing
Figure 1.
SETTING RANGE SPECIFICATIONS
7
SELECT A COOKING CONTAINER
The cooking container must be large enough to hold sealed food and allow water to
circulate between and around the sealed bags.
NOTE: It is recommended to use large metal container with a minimum height of 8,5
inches or 20,3 cm. The capacity of the container should be minimum 6 L and should
not exceed 19 L.
WARNING: Do not use plastic containers made with BPA or PVC materials.
Place the cooking container on a stable, flat and heat resistant surface. Use a potholder
or trivet under the cooking container.
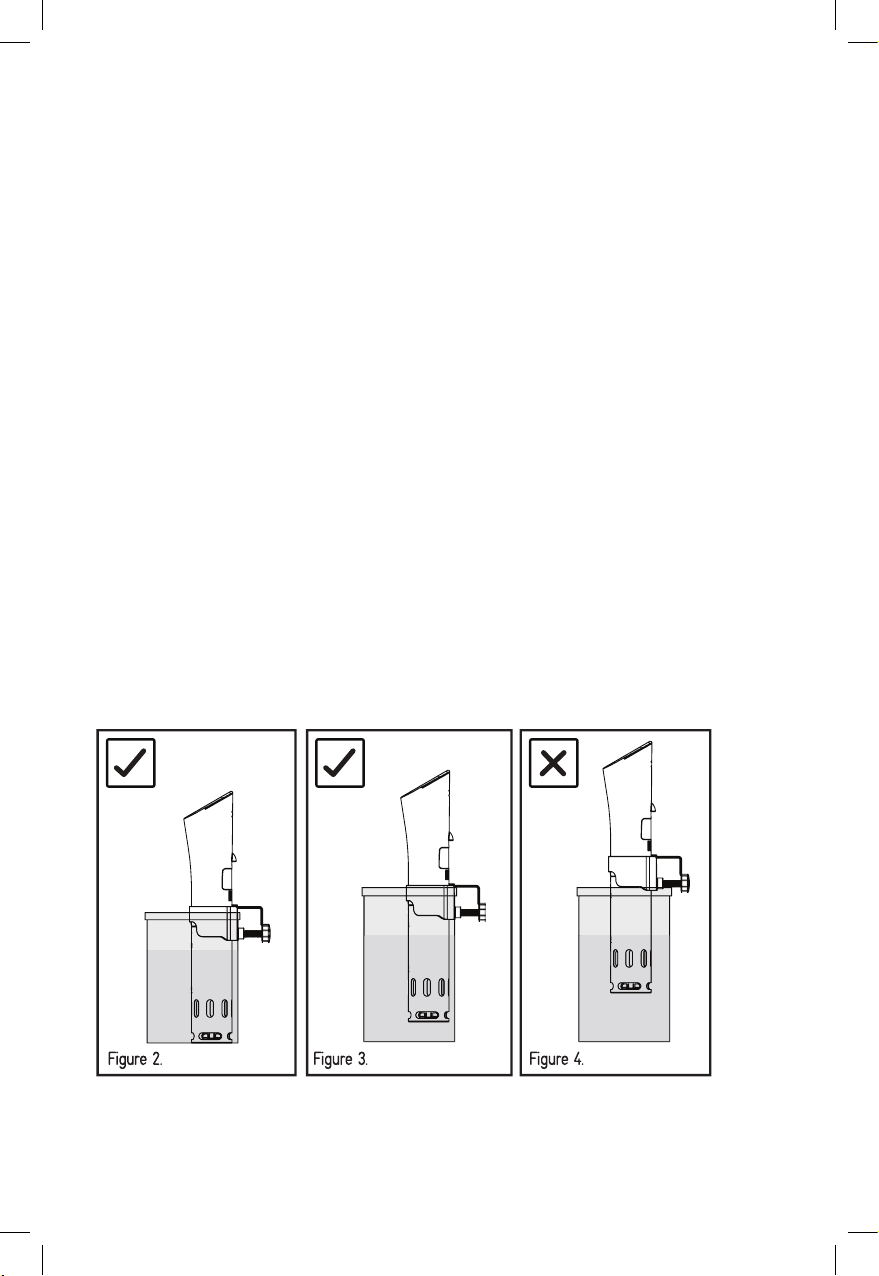
SECURE THE ADJUSTABLE HOLDING CLAMP OF THE SOUS VIDE
PRECISION COOKER
The adjustable holding clamp of the sous vide precision cooker should be installed on
the side of the cooking container. The appliance must always be kept perpendicular
to the water level in the cooking container to allow the water to circulate properly.
The bottom of the lower housing should rest on the bottom of the cooking container
(Figure 2). For larger cooking containers, the stainless steel plate of the clamp must
rest on the rim of the cooking container. Never use the sous vide precision cooker
suspended without the bottom of the lower housing in the cooking container or the
clamp not securely attached on the rim of the cooking container (Figure 4).
TO USE
The cooking container must be large enough to hold sealed food and allow water to
circulate between and around the sealed bags.
NOTE: It is recommended to use large metal container with a minimum height of 8.5
inches or 20.3 cm. The capacity of the container should be minimum 6 L and should
not exceed 19 L.
8
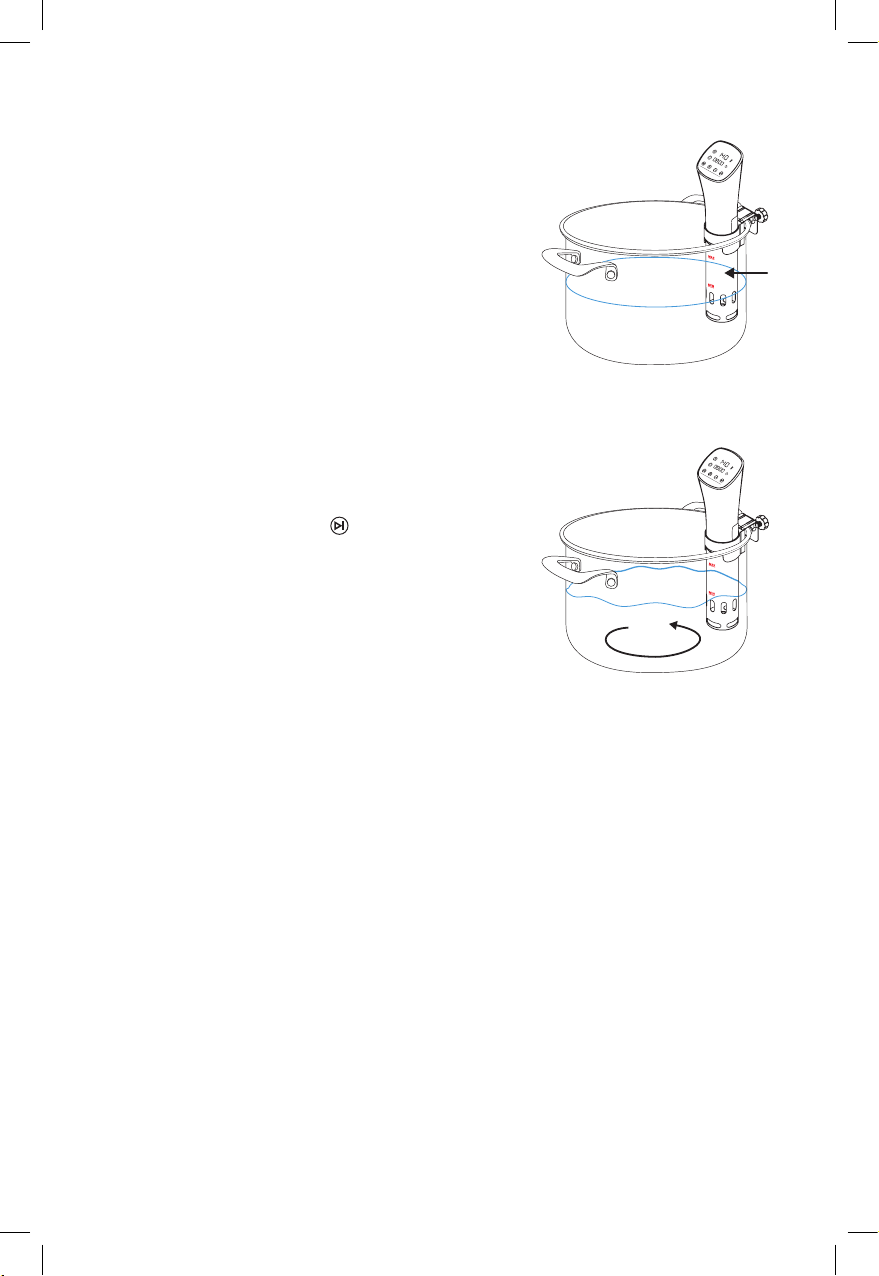
FILL THE COOKING CONTAINER WITH WATER
• The water level should be above the MIN level mark
as indicated on the precision cooker and below the
MAX level mark. Ensure you leave enough room in
the container for food to be added.
• Verify periodically to ensure that the water level
remains above the food and the MIN level mark.
• If additional water is needed, heat it on the
stovetop or in the kettle to approximately the same
temperature (but not hotter) as the water in the
cooking container to avoid cooling the water.
PLUG THE SOUS VIDE PRECISION COOKER
• The appliance must be plugged in a 120V AC
wall outlet. A “beep“ will sound.
• Press the Start /Stop button to enter SV
(SOUS VIDE) program after plugging the appliance.
PLACE THE FOOD TO BE COOKED IN A VACUUM
SEALED BAG ORIN A RESEALABLE FREEZER BAG
• Spices or marinades can be added prior to placing the food in the bag or to sealing.
• Oxygen and moisture in air causes food to degrade and lose flavor, texture and
nutritional value. Therefore, to capture the taste and the nutritional quality, sous vide
cooking requires food to be vacuum sealed or placed in resealable freezer bags.
• If you are using a vacuum sealer, the seal will be created by the vacuum sealer after
the air has been removed. Commercial quality vacuum systems remove air and
moisture before sealing items airtight to create a commercial quality vacuum.
• Bags that are heat-safe, BPA free and PVC free are safe for sous vide cooking. Most
name-brand resealable freezer bags as well as the bags sold for vacuum sealing can
be used.
• Ensure food placed in resealable freezer bags are not overcrowded.
• Ensure that the food bags are clean and have not been contaminated by dirt or other
food contaminants.
• If the food bag floats above water, use a large, heavy metal spoon, plate or any other
heat resistant utensil to weigh the bag down in order to keep food submerged.
• Use proper precautions while preparing food to prevent cross contamination.
Set the target temperature and cooking time.Press
the Start/Stop button.The water will preheat while you
prepare your recipe.Once the water has reached the
target temperature the appliance will “beep” 1 time.
The time indicator will flash on the control panel. The
Start/Stop button must be pressed before counting down.
9
• For cooking periods longer than 8 hours, it is recommended to seal food with a
vacuum sealer.
NOTE: Water must circulate entirely around each portion of food for even cooking.
Do not layer food in the bag.
METHOD
Resealable Freezer bag
*This method is recommended for any
foods that cooks less than 8 hours.
Place food in a resealable freezer bag and
remove as much air as possible.
Close bag leaving a 1-inch (2.5 cm) opening
at the top.
Hold the top of the bag open and slowly
lower in into the cooking container. The
pressure of the water will squeeze the air
out of the bag.
Just before the top of the bag reaches the
water squeeze any remaining air out of the
bag and seal.
Do not submerge the seal of the bag.
It is recommended to clip the top of
the bag to the side of the cooking pot
ensuring the seal will not go underwater
to avoid liquid to leak inside the bag.
VACUUM BAG
NOTES:
• If the bag is vacuumed sealed it can be completely submerged below the water level.
• If the food bag floats above water, use a large, heavy metal spoon, plate or any other
heat resistant utensil to weigh the bag down in order to keep food submerged.

10
SEARING & FINISHING FOOD
• Use oven mitts and remove the bag from water bath. Remove food from the bag, pat
dry before searing.
• Searing will improve the appearance and flavor of the food. Sear meat in a preheated
cast iron pan or BBQ for about 30-60 seconds on both side for a golden crispy
texture.
• If the cooked food is not going
to be consumed immediately,
do not remove food from the
bag. Plunge the sealed bag into
ice water to reduce temperature
quickly and keep refrigerated.
TO USE
The cooking container must be large enough to hold sealed food and allow water to
circulate between and around the sealed bags.
NOTE: It is recommended to use large metal container with a minimum height of
8.5 in or 20.3 cm. The capacity of the container should be minimum 6 L and should not
exceed 19 L.
SOUS VIDE FUNCTION
PREHEATING MODE
1. Connect the power cord into wall outlet. A “beep“ will sound. flashes by default
on the control panel. Press the Start/Stop button to activate the SOUS VIDE
function. The sous vide precision cooker will display the default time of 08: 00 (8
hours) and temperature of 140 °F / 56 °C.
2. Press the button, and the temperature display will flash. Press the or button
to set the desired temperature.
Press the button again, and the time display will flash. Press the or button to
set the desired cooking time.
NOTE: No food should be added into the water bath at this stage. Preheating
time may vary depending on the current and set water temperature.
3. Once the temperature and time parameters have been set, press the button
to start the preheating stage. The preheat stage will bring the sous vide precision
cooker to the desired temperature before starting the cooking process.
NOTE: During the preheating stage, the display will indicate the real
temperature.
COOKING MODE
1. Once the preheating stage has completed, the appliance will beep 1 time indicating
the appliance is ready for the cooking stage. The setting time and Start/Stop button
will flash in the control panel.
The Start/Stop button must be
pressed before counting down. If there is no action after preheating, the setting
temperature will remain during 30 minutes. It will stop heating after 30 minutes.
2. Place the sealed bag into the cooking container.
NOTE: Ensure the food is not floating above the water, it must be full submerged and
must remain throughout the entire cooking stage.
11
TIME AND TEMPERATURE RESET
Press the button and the sous vide precision cooker will stop working. The display
will indicate the setting time and temperature. To set a new time and cooking
temperature, repeat steps above in the PREHEATING MODE and the COOKING
MODE SECTIONS to set a new time and temperature.
NOTE: Do not pause cooking for more than 1 or 2 minutes to avoid cooling
temperature of the water bath.
AUTO SHUT-OFF:
The sous vide precision cooker is equipped with an auto shut-off safety device.
Intelligent water-level sensors will immediately turn the heating elements off if the unit
is removed from the water or if the water falls below the minimum water level.
COMPLETED
Once cooking stage is completed, the appliance will “beep” 3 times. The time
countdown is finished, and the display will indicate “End”. The appliance will not stop
working. It will keep warm 1 hour and the timer will run up to an hour. After an hour,
the appliance will stop working and circulating water timer will turn to off.
WHEN COOKING IS COMPLETED:
1. Turn off and unplug appliance.
2. Remove sealed foods using tongs and place on a plate.
3. After, food is removed let water cool. Remove the precision sous vide cooker by
releasing adjustable holding clamp and follow recommended cleaning instructions
(see cleaning section)
4. Discard cooking water after it is fully cooled.
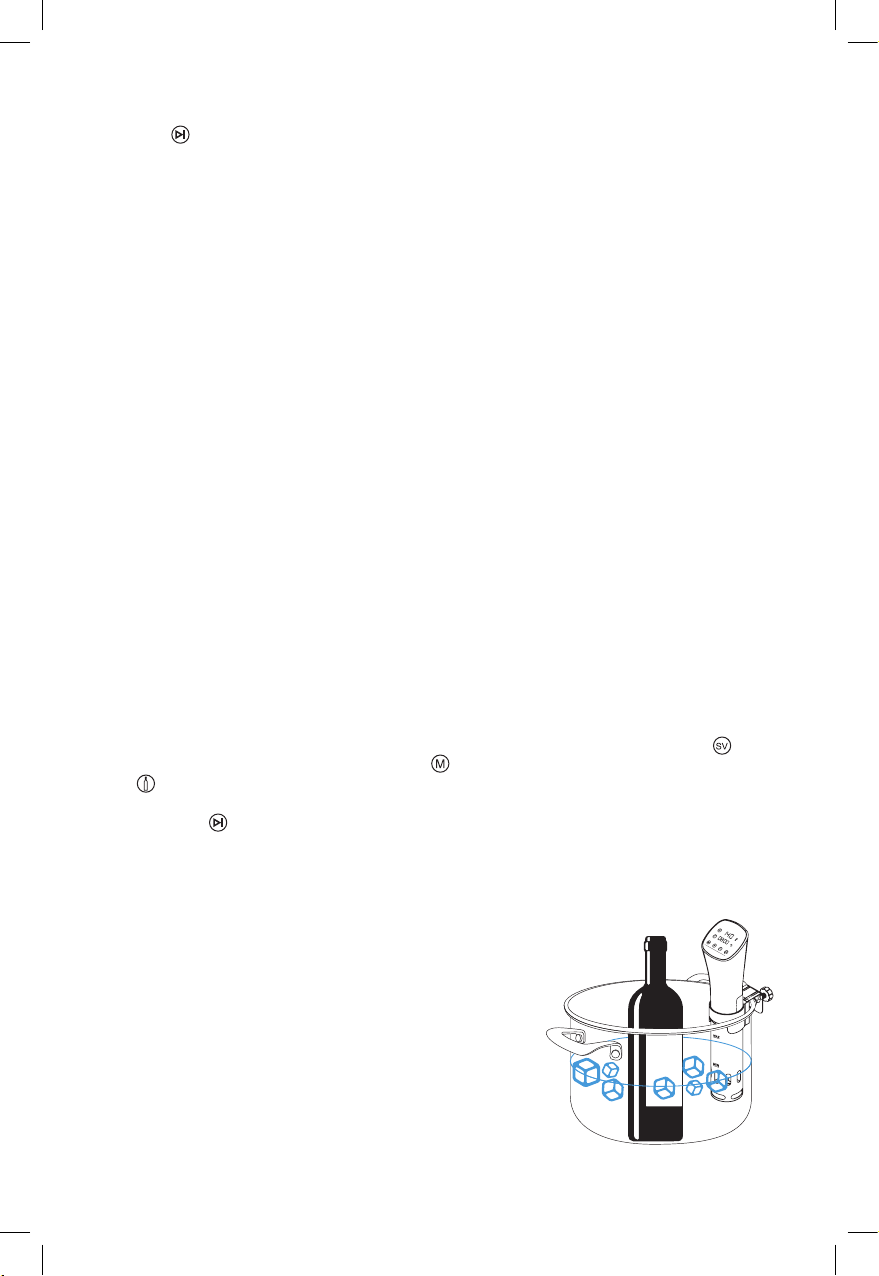
WINE COOLING FUNCTION
COOLING MODE
1. Connect the power plug into wall outlet. A “beep” will sound. By default,
flashes in the control panel. Press the button to select the WINE COOLING
which is ideal to cool wine.
default time is pre-set to 01:00 (1 hour) and real temperature is
indicated.
NOTE: Temperature cannot be adjusted during cooling function. Real temperature
will display.
2. Press the the
To create an ice bath, place the Sous vide precision
cooker into a container of water. Be sure the water
level does not go over the max marking. Slowly
drop ice cubes into the container and the water
temperature will start to drop. Circulating the water in
the container will help to cool more quickly.
12
TIME AND TEMPERATURE RESET
Press the button the sous vide precision cooker will stop working.
above in the cooling mode.
COMPLETED
The cooling function will run for one hour and then automatically stop. Once cooling
process is completed, the appliance will “Beep” 3 times. The time countdown is
finished, and the display will indicate “End”. The appliance will stop cooling process
and circulating water timer will turn to off. The water circulator can be stopped at any
time by pressing the button.
WHEN COOLING IS COMPLETED:
1. Turn off and unplug appliance.
2. Remove bottles of wine.
3. Remove the precision sous vide cooker by releasing clamp and follow recommended
cleaning instructions (see cleaning section)
4. Discard cooking water when cooking is completed.
SOUS VIDE TEMPERATURE AND TIME CHART
The following cooking temperature and time are intended as guidelines for sous
vide cooking.
Additional cooking time may be required to adjust to your individual tastes and ingredients.
Beef & Lamb
Tender Cuts
Tenderloin,
cutlets, sirloin,
ribeye, rump,
T-bone
0.5-2” /
2-5 cm
Rare 122°F / 50°C
1 hour 4 hours
Medium Rare 129°F / 54°C
Medium 133°F / 56°C
Well Done 140°F / 60°C
Tougher Cuts
Blade, chuck,
leg of lamb,
shoulder, shanks,
game meats
1.5-2.5” /
4-6 cm 122°F / 50°C 8 hours 18 hours
Pork
Belly 1-2.5” / 3-6 cm 180°F / 82°C 10 hours 22 hours
Ribs 0.5-1.5” / 2-4 cm 138°F / 59°C 10 hours 22 hours
Chops 0.5-2” / 2-5 cm 133°F / 56°C 2 hours 10 hours
Lamb
Repeat steps
13
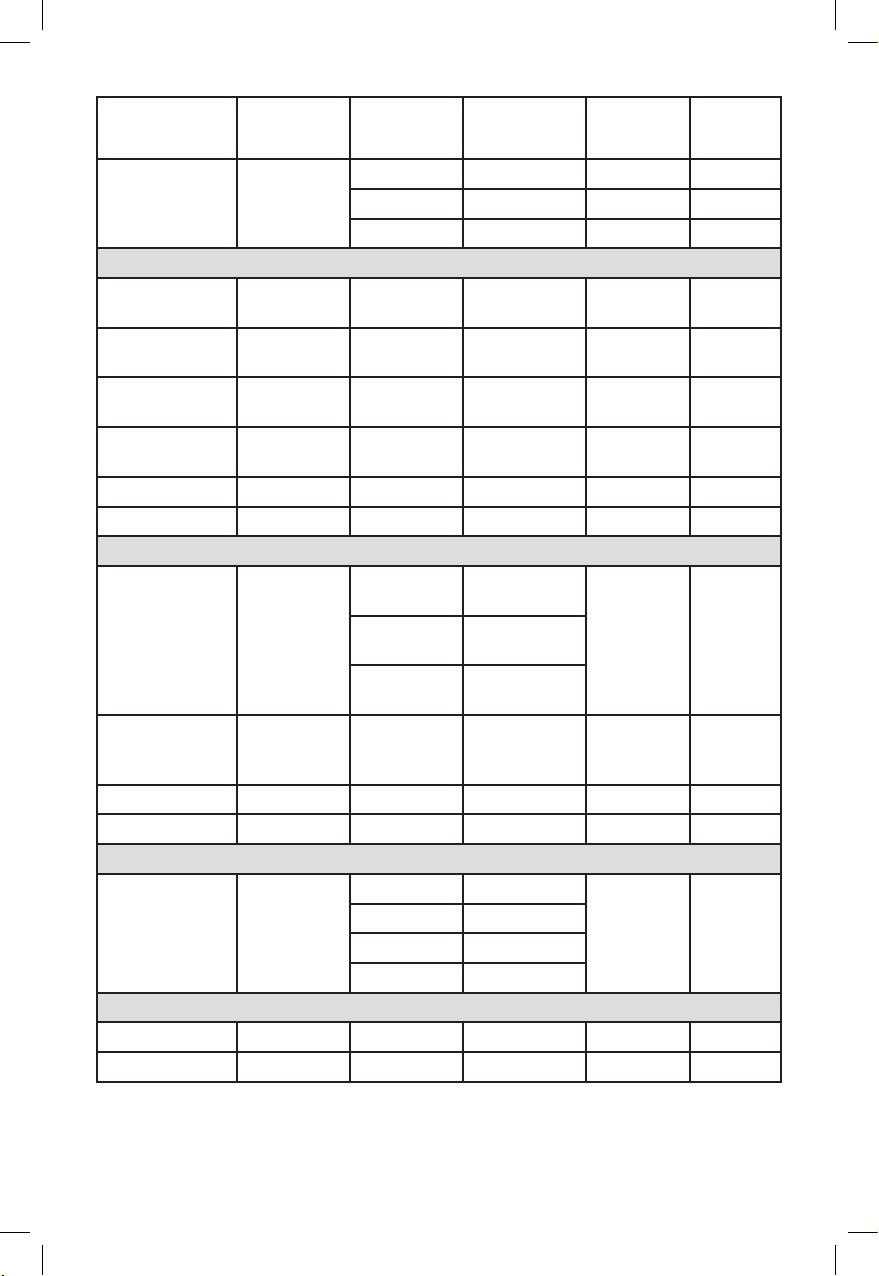
Food Thickness Cooking
Outcome Cooking
Temperature Cooking
Time
(Minimum)
Cooking
Time
(Maximum)
Chops 0.5-2” /
2-5 cm
Rare 126°F / 52°C 1 hour 3 hours
Medium Rare 131°F / 55°C 2 hours 5 hours
Medium 140°F / 60°C 1 hour 4hours
Poultry
Chicken breast
with bone
1-2” / 3-5 cm 180°F / 82°C 2 hours 7 hours
Chicken breast
without bone
1-2” / 3-5 cm 148°F / 64°C 1 hour 5 hours
Chicken thigh
with bone
1-2” / 3-5 cm 180°F / 82°C 2 hours 7 hours
Chicken thigh
without bone
1-2” / 3-5 cm 148°F / 64°C 1 hour 4 hours
Chicken legs 2-3” / 5-7 cm 180°F / 82°C 2 hours 7 hours
Duck breast 1-2” / 3-5 cm 148°F / 64°C 2 hours 4 hours
Fish and Seafood
Fish 0.5-1.5” /
2-3 cm Very lighlty
cooked 113°F / 45°C
45 min
Lightly
cooked 122°F / 50°C
Medium
Rare 131°F / 55°C
Shrimp 0.5-2” / 2-5 cm Juicy and
cooked
through
140°F / 60°C 30 min
Lobster tail 1.6-2.4” / 4-6 cm N/A 140°F / 60°C 1 hour
Scallops 0.8-1.6” / 2-5 cm N/A 140°F / 60°C 30 min
Eggs
Runny 144°F / 62°C
45 min
Just set 150°F / 66°C
Medium 155°F / 68°C
Soft boiled 164°F / 73°C
Fruit & Vegetables
Vegetables 185°F / 85°C 1 hour 3 hours
Fruits 185°F / 85°C 45 min 2 hours
*All thicknesses are measured once the food has been vacuum sealed.

14
IMPORTANT NOTES
• Only use fresh ingredients when cooking sous vide.
• Ensure that all meat, seafood, and poultry have been stored at below 5°C /41°F
before preparation begins. Using a digital food thermometer to check the
temperature is recommended.
• The temperature and time indicated in the chart are measured according to the
thickness once the food has been vacuum sealed.
• Cooking time may vary depending on the thickness of the food. Thinner cuts of meat
will cook more quickly, and thicker cuts will require a longer cooking time.
• Consuming raw or undercooked meat, poultry, seafood, or eggs may increase the risk
of foodborne illness.
• Longer cooking times may result in an altered texture of finished foods.
• These times and temperatures are guidelines. Further cooking may be required to
achieve desired result.
• Always use an accurate instant read thermometer to measure the temperature of the
food after removing it from the sealed bag to ensure that it has reached the proper
safe internal doneness.
• For food safety reasons, do not cook the food at lower temperatures and times that
have been given in the temperature and time guidelines.
• The Sous vide precision cooker can hardly overcook your food. Just keep in mind
that the texture and quality of the food can start to decline if it’s left to cook for a lot
longer than is recommended.
CLEANING AND MAINTENANCE
WARNING: Ensure the appliance is unplugged from the electrical outlet and allow it to
cool down completely before handling or cleaning it.
REGULAR MAINTENANCE
1. Once the sous vide precision cooker has cooled down, clean with a slightly soft
damp cloth. Dry thoroughly.
NOTE: Never immerse the main body, the control panel, the electrical cord or the
plug in water or any other liquid
2. Store the sous vide precision cooker in a dry place.
NOTE: Do not use abrasive cleaners or scouring pads or any other object that
could scratch
DESCALING
After several uses, descaling may be required. The stainless steel element cover may
be coated with mineral deposits from water. Follow below steps to descale your sous
vide precision cooker.
1. Clamp the sous vide precision cooker to a heat proof container. Fill the container
with water to the maximum line (MAX) indicated on the stainless steel element
cover with equal amounts of water and white vinegar.
2. Plug the power cord. Set the target temperature to 43°C / 109 °F and set timer for
1 hour. Press the button to start the appliance and begin the cleaning process.
3. Once completed, unplug the power cord to turn off the appliance and let it cool
down. Dry thoroughly with a soft cloth before storage.
4. Discard the water from the container.

15
OIL MARKS
1. Clamp the sous vide precision cooker to a heat proof container. Fill the container
with water to the maximum line (MAX) indicated on the stainless steel element
cover and add dishwasher soap.
2. Plug the power cord. Set the target temperature to 43°C/ 109 °F and set timer for
1 hour. Press the button to start the appliance and begin the cleaning process.
3. Once completed, unplug the power cord to turn off the appliance and let it cool
down. Dry thoroughly with a soft cloth before storage.
4. Discard the water from the container.
STORAGE
Ensure all pieces are clean and dried thoroughly with a soft cloth before storage. Store
appliance in a dry and clean place. Never wrap the cord tightly around the appliance,
as this could place undue stress on the cord where it enters and cause the cord to wear
prematurely and break.
TROUBLESHOOTING
If you experience any problem with your sous vide cooker, try these helpful tips to
solve the issue.
ISSUE CAUSE SOLUTION
The Sous Vide
precision cooker
has stopped and E1
appears on the screen
of the control panel.
• The water pot has not
been filled.
• The water level has fallen
below the minimum water
level mark.
• The Sous Vide precision
cooker is not positioned
on a flat surface.
• Electronics error.
• Unplug the Sous Vide
precision cooker. Add
water past the minimum
water level mark. Plug
into a 120 AC- 3 prong
electrical wall outlet.
• Reposition unit on a clean
flat surface.
• Please contact customer
service.
The water circulator
suddenly stops and E2
or E3 appears on the
screen of the control
panel.
• There is a potential loose
wire connection of the
water sensor.
• The water sensor shorts
out and is damaged.
• Please contact customer
service.
The sous vide
precision cooker
has stopped and E4
appears on the screen
of the control panel.
• The water level has fallen
below the minimum water
level mark.
• The dry boil protection
has been triggered.
• Electronics error.
• Unplug the Sous vide
precision cooker. Add
water past the minimum
water level mark.
• Plug into a 120 AC 3-
prong electrical wall outlet.
• Please contact customer
service

16
CUSTOMER SERVICE: STARFRIT.COM/EN/CONTACT-US
WARRANTY
1-YEAR LIMITED WARRANTY.
This warranty covers any defects in materials and workmanship for a period of one
(1) year from the date of the original purchase. Please retain your original receipt as
a proof of the purchase date. Any complaints must be registered within the warranty
period. The product will be repaired, replaced (parts or entire appliance) or refunded at
our sole discretion. Shipping charges may apply.
This warranty does not cover normal wear of parts or damage resulting from any
of the following:
Negligent use or misuse of the product including failure to clean the product regularly,
use for commercial purposes, accident, use on improper voltage or current, and use
contrary to the operating instructions, disassembly, repair or altercation by anyone
other than a HERITAGE authorized service agent.
Stains, discoloration and minor scratches on the inside and outside of the utensil
constitute normal use, do not affect performance, and are not covered by this warranty.
Decisions as to the cause of damage are the responsibility of HERITAGE.
All decisions will be final.
For further assistance, please contact customer service to the following e-mail address:
starfrit.com/en/contact-us
ISSUE CAUSE SOLUTION
The water circulator
suddenly stops and E5
or E6 appears on the
screen of the control
panel.
• There is a potential loose
wire connection of the
temperature sensor.
• The temperature
sensor shorts out and is
damaged.
• Please contact customer
service.

17
MODE D’EMPLOI ET CONSIGNES DE SÉCURITÉ
No de l’article Tension (V) Puissance (W) Fréquence (Hz)
023760 120 900 60
DIRECTIVES IMPORTANTES
LIRE LES INSTRUCTIONS AVANT D’UTILISER
L’APPAREIL
ATTENTION : Veuillez respecter les consignes suivantes pour réduire les
risques d’incendie, de décharges électriques, de blessures corporelles
sérieuses et de dommages matériels.
A. Pour assurer une protection contre les décharges électriques, NE
PAS immerger le cordon d’alimentation dans l’eau ou dans tout
autre liquide.
B. Garder l’appareil hors de la portée des enfants ou des animaux
domestiques. Cet appareil ne doit pas être utilisé par des enfants.
La surveillance d’un adulte est nécessaire lorsque l’appareil est en
fonction en présence d’un enfant.
C. Débrancher le cuiseur de précision sous vide lorsqu’il n’est pas en
fonction. Laisser l’appareil refroidir complètement avant de retirer
la pince de maintien réglable ou avant de déplacer l’appareil.
D. Ne pas utiliser l’appareil si le cordon électrique ou la prise
électrique sont endommagés, si l’appareil a subi une quelconque
défaillance ou s’il a été endommagé. Ne pas tenter de réparer
l’appareil. Pour obtenir une aide supplémentaire, communiquez
avec le service à la clientèle à l’adresse suivante :
starfrit.com/fr/contactez-nous
E. Ne pas utiliser d’accessoires qui ne sont pas inclus avec l’appareil
ou qui ne sont pas recommandés par le fabricant. L’utilisation de
tels accessoires peut encourir de blessures.
F. Le couvercle de l’élément en acier inoxydable, l’élément chauffant,
le récipient de cuisson, sacs refermables ou sous vide deviennent
très chauds durant l’utilisation. Ne pas toucher aux surfaces
chaudes.
G. Utiliser des mitaines pour le four pour prévenir les brûlures ou les
blessures.
H. L’élément chauffant produit une chaleur résiduelle après
l’utilisation. Ne pas toucher à la surface de métal.
I. Ne pas faire fonctionner l’appareil sans aliment ou sans liquide
dans le récipient de cuisson.
J. Toujours sceller les aliments dans un sac de plastique étanche
avant de le submerger sous l’eau (dans le récipient de cuisson).

18
K. La consommation de viandes crues ou pas assez cuites, de volaille,
de fruits de mer, de crustacés ou des œufs peut augmenter le
risque de développer des maladies alimentaires. Veuillez vous
référer au tableau des temps minimums de cuisson ci-dessous.
L. Toujours s’assurer que le récipient de cuisson est placé sur une
surface stable et solide. Le cuiseur de précision sous vide doit être
fixé de façon sécuritaire au récipient de cuisson avant l’utilisation.
Le cuiseur doit être placé perpendiculairement au niveau de l’eau
pour permettre une circulation idéale de l’eau dans le récipient.
M. Ne pas submerger le cuiseur de précision sous vide au-delà de la
ligne de démarcation maximale. La partie supérieure du cuiseur est
en plastique et ne doit pas être submergée.
N. Toujours faire attention lors du retrait du cuiseur de précision sous
vide de l’eau. L’appareil est chaud et peut causer des brûlures.
O. L’élément chauffant, les capteurs de température, le circulateur
d’eau situés à l’intérieur du couvercle de l’élément en acier
inoxydable sont fragiles et doivent être manipulés avec soin pour
prévenir les bris et la déformation de ces pièces.
P. Cet appareil a été conçu pour un usage domestique et intérieur
uniquement. Ne pas utiliser à l’extérieur ou à toutes autres fins que
pour lesquelles il a été conçu.
Q. Ne pas laisser pendre le cordon d’alimentation (par exemple d’une
table ou d’un comptoir) ou toucher à des surfaces chaudes.
R. Ne pas installer l’appareil sur ou à proximité d’un brûleur à
gaz ou électrique, ou à l’intérieur d’un four chaud ou d’un four
micro-ondes.
S. Pour débrancher l’appareil, appuyer sur le bouton , ensuite retirer
la fiche de la prise électrique. Toujours brancher l’appareil dans
une prise facilement accessible de sorte que l’appareil pourra être
facilement débranché en cas d’urgence.
T. Ne pas utiliser l’appareil à d’autres fins que celles pour lesquelles il
a été conçu.
U. Ne pas laisser l’appareil sans supervision lorsqu’il est en fonction.
Toujours débrancher l’appareil lorsqu’il n’est pas en fonction.
VEUILLEZ CONSERVER CES
INSTRUCTIONS POUR RÉFÉRENCE
FUTURE
Fiche de mise à la terre : Par mesure de sécurité, cet appareil est doté d’une prise à
trois broches reliée à la terre qui ne peut qu’être branchée dans une prise triphasée.
Ne jamais modifier la conformation de la fiche. Une mauvaise connexion au conducteur
de mise à la terre peut entrainer des risques de décharges électriques. Communiquer
avec un électricien qualifié si vous n’êtes pas certain que la prise est correctement mise
à la terre.

19
RECOMMANDATIONS PARTICULIÈRES : Un cordon d’alimentation court est
fourni afin de réduire les risques de vous emmêler ou de trébucher sur un cordon
d’alimentation plus long.
UNE RALLONGE ÉLECTRIQUE PEUT ÊTRE UTILISÉE SI SON UTILISATION EST
FAITE AVEC PRÉCAUTIONS :
- Pour réduire le risque de surchauffe, utiliser les rallonges homologuées UL ou ETL les
plus courtes possible.
- La puissance électrique indiquée sur la rallonge doit être au moins aussi élevée que la
puissance de l’appareil.
- Ne jamais utiliser qu’une seule rallonge pour alimenter plusieurs appareils.
- Ne jamais laisser pendre une rallonge du bord d’un comptoir ou d’une table afin
de prévenir les trébuchements, les accrochages ou d’éviter qu’un enfant tire sur la
rallonge par accident.
- NE PAS modifier la fiche. NE PAS tenter de contourner le mécanisme de sécurité de
la fiche.
INTRODUCTION À LA CUISSON SOUS VIDE
La cuisson sous vide est une méthode de cuisson qui est populaire dans les restaurants
depuis quelques années.
Le terme «sous vide» fait référence à des aliments scellés dans des sacs hermétiques
et ensuite cuits dans l’eau.
Des aliments qui sont cuits à basse température sur une longue période de temps
donneront des repas succulents. Lorsque les aliments sont scellés hermétiquement,
ils cuiront alors dans leurs propres jus en plus des marinades ou des assaisonnements
que vous pouvez ajouter. Les vitamines, les minéraux et les jus sont conservés pendant
toute la cuisson et les saveurs naturelles sont intensifiées.
Le cuiseur de précision sous vide Heritage crée et maintien un environnement de
cuisson à température constante et contrôlée qui donnera les meilleurs résultats de
cuisson. Cet appareil deviendra rapidement un outil essentiel dans votre cuisine et
vous permettra de préparer des repas délicieux pour la famille et les amis.
LES ALIMENTS PARFAITS POUR LA CUISSON SOUS VIDE
La cuisson sous vide est parfaite pour la cuisson des viandes. Résultats : des viandes
plus tendres, succulentes et pleines de saveurs. Vous pouvez également utiliser la
cuisson sous vide pour apprêter des fruits de mer, des légumes et les œufs.
Viandes rouges Agneau, bœuf, porc
Volailles Poulet, canard
Poissons et fruits de mer Poissons, queues de homard, crevettes, pétoncles
Légumes
Légumes racines
Légumes tendres
Pommes de terre, carottes, navet, betteraves, panais
Pois, asperges, maïs, brocoli, chou-fleur, aubergine,
oignons, courges
Fruits
Fruits fermes
Fruits tendres
Pommes, poires
Mangues, prunes, abricots, nectarines, papayes,
fraises
Œufs
Table of contents
Languages:
Other Heritage Kitchen Appliance manuals


