HeroSpeed PoE NVR Kits User manual

PoE NVR Kits
Quick Start Guide
Please read the Quick Operation Guide carefully before using the product and keep it.
Related tools and documents of products, please download from
www.herospeed.net.

Statement
Thanks for purchasing our products. If you have any questions or need, please contact us directly.
This manual is used for PoE NVR and PoE cameras in the kit.
The contents of this manual will be updated according to our products improvements.
And updated contents will be added in new versions of this manual without prior notice.
If description in this guide does not conform to the product, please be subject to the product.
Safety Precautions
1. Please modify default password promptly after the equipment is installed, to avoid being stolen.
2. Please do not place and install the equipment in direct sunlight or near heating equipment.
3. Please do not install the equipment in wet, dusty or soot-burning places.
4. Please keep the equipment horizontally installed or installed in a stable place,
avoid the equipment falling down.
5. Please do not drop and splash liquid on the equipment and ensure no objects filled with liquid on the
equipment and prevent liquid from leaking.
6. Please install the equipment in a well-ventilated place and do not block the vents of the equipment.
7. Please use the equipment within rated input/output range only.
8. Please do not disassemble the equipment without notifying supplier.
9. Please transport, use and reserve the equipment in permissible range of humidity and temperature.
Disclaimer
Please pay special attention to the following exclusions or restrictions:
1. If the product is terminated for any of the following reasons, our company shall not be liable for any
personal injury or property damage to you or third parties:
A. The installation or use of equipment is not strictly in accordance with the requirements;
B. State or public interest;
C. Majeure;
D.Your own or third-party reasons, including but not limited to the use of third-party products, software,
components and so on.
2. Our company does not guarantee the equipment for special purposes or use in any express or
implied way. This equipment shall not be used for medical/safety equipment or other products which
can cause life hazards and personal injury applications or dangerous uses of weapons of mass
destruction, biological and chemical weapons, nuclear explosion and any unsafe use of nuclear energy
or contrary to humanitarian purposes. Any loss or liability arising from such use shall be borne by you.
3. This equipment can perceive specific illegal invasion in correct installation and use, but it can not
avoid accidents or personal injury and property loss caused by this. In daily life, please be vigilant and
strengthen the awareness of safety precautions.
4. We are not liable for any consequential, accidental, special or punitive damages, requests, property
losses, data losses and documents losses. In the maximum extent permitted by law, our liability for
compensation shall not exceed the amount paid by you when purchasing this product.
Products Appearance Description
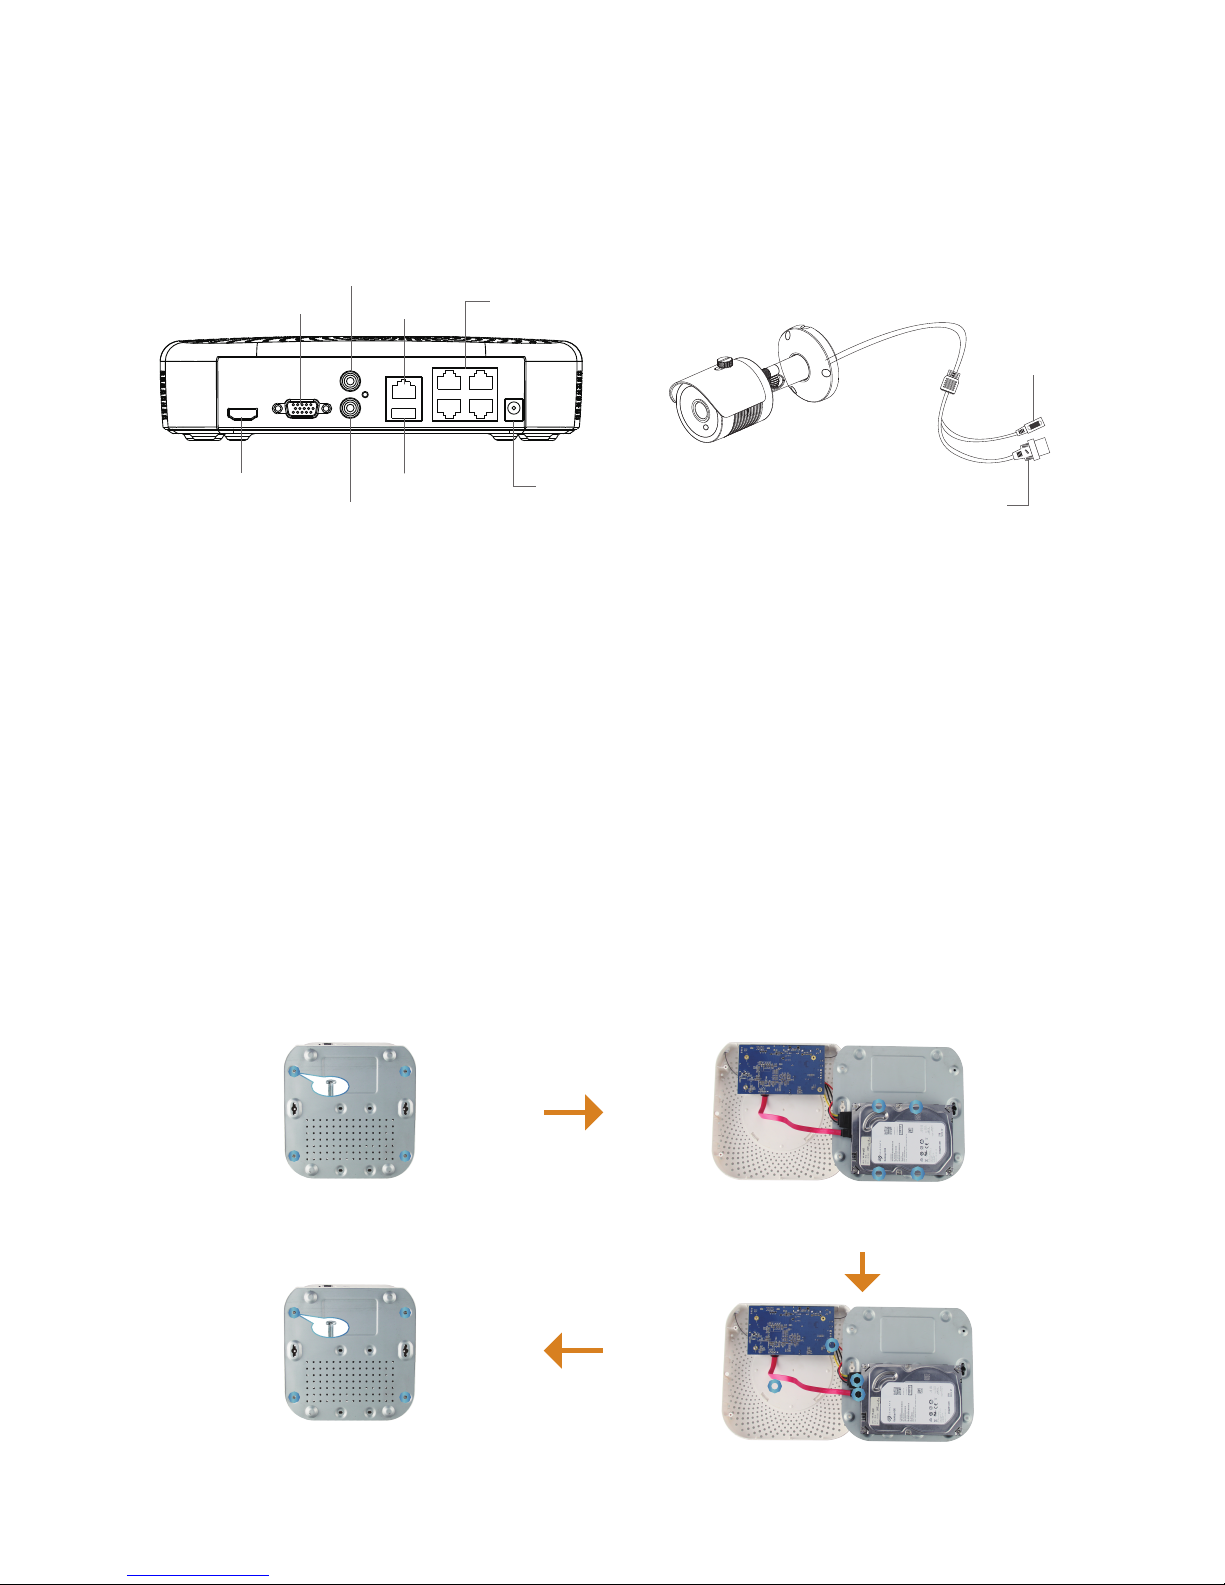
NVR Ports: HD port, VGA video output port, Audio input port, Audio output port, Ethernet port, USB
port, PoE LAN PORT, POWER INPUT PORT.
IP camera Ports: Ethernet Port, Power input port.
PoE NVR Kits Quick Installation Guide
This PoE NVR Kit can be easily installed, no need cable, plug and play and no need any set up.
PoE IP cameras can be powered on by network cable, which can eliminate layout of cable and Socket.
The camera is not limited by power supply.
Step1:Installation Preparation
Install HDD. Make sure all power are cut before installing.
Installation tool: Cross screwdriver.
Notes: Please use professional hard disk recommended by supplier.
Installation Guide:
Notes: Images for instruction use only, the final goods are subjected to the real object.
VGA
HD
AUDIO IN
AUDIO OUT
NET
USB
POWER
0
2
31
HD video output interface
VGA Video output interface
Audio input
Ethernet port With PoE function network interface
Power inputUSB2.0 port
Audio output
Power input
Ethernet port
Notes: Images for instruction use only, the final goods are subjected to the real object.
Loosen the screws on the base plate
and remove the upper cover.
Align the cover against the base and gently close it.
Tighten the top cover to the floor with screws.
Align the screw holes on the hard disk with the screw holes on the
base plate and tighten the hard disk to the bottom with screws.
Plug in the hard drive cable and power cable.

Power on the PoE NVR and connect it to Network. After connecting IP cameras with the POE port of NVR
through network cable, the kit can work normally.
Note: NVR default IP address is http://192.168.1.88.
Step2:Device connection
To confirm the PoE package is working properly:NVR connected to the display, IPC connect to NVR
through the network cable, NVR plug in the power, when the NVR monitor display shows IPC video,
indicating that the device is working properly without any operation. The device has been configured
successfully before shipment.
Attention:Configure output voltage of the power adapter is 48V, please ensure the power supply
voltage is between 100V ~ 240V, otherwise it will seriously damage POE package equipment.
※ Attention Please When Installation:The IPC camera provides the network and power through the
POE network interface that accesses to the NVR
Notes: Images for instruction use only, the final goods are subjected to the real object.
Notes: Images for instruction use only, the final goods are subjected to the real object.
Internet
VGA
HD
AUDIO IN
AUDIO OUT
NET
USB
POWER
0
2
31
A variety of display
monitoring device
VGA
HD
AUDIO IN
AUDIO OUT
NET
USB
POWER
0
2
31
Router
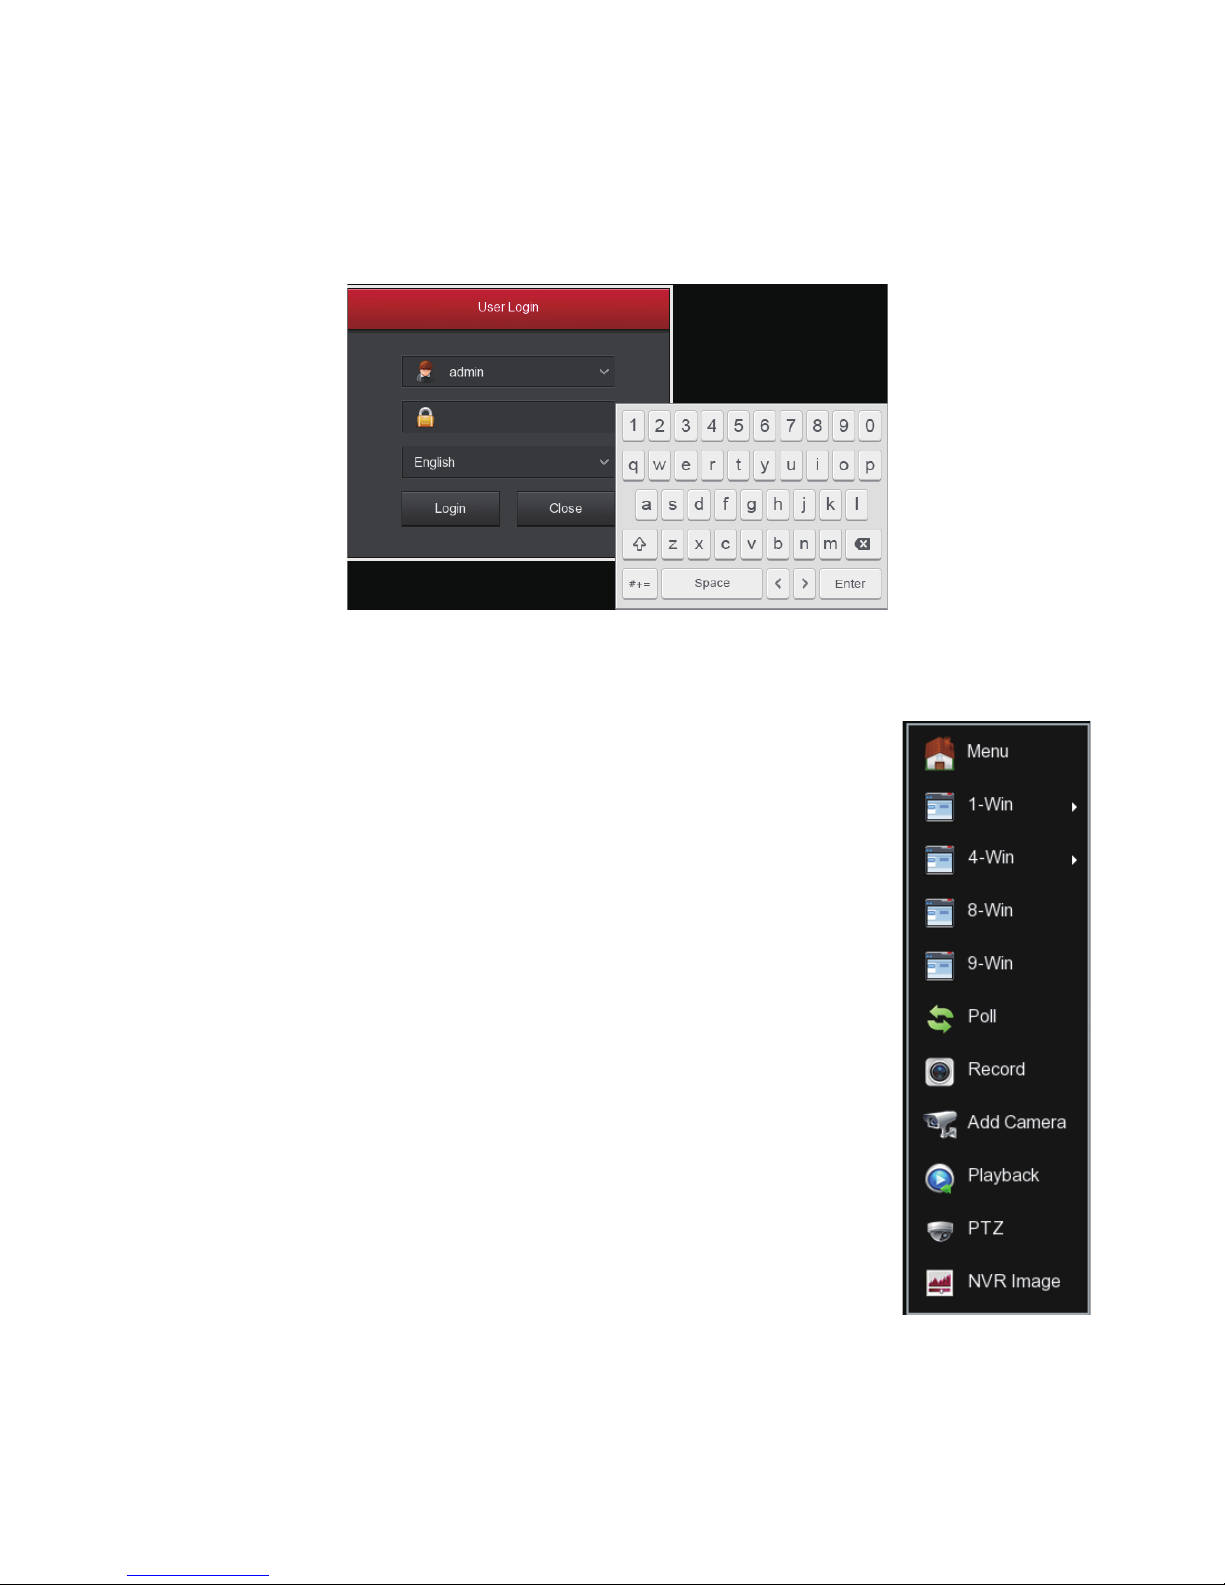
System login
Start up the NVR,right click the desktop and enter the user login interface.
Input the user name and password. System default user name : “ admin” Password : “12345”.
Preview
Enter preview interface after device start up.Preview interface include date and
time of system,and channel name.Login system,double left click to switch
between full screen and multi-screen.
1. Enter the menu mode
Login system,right click to popup shortcut menu.
Left click【menu】,enter the main menu interface.
Left click 【playback】, enter playback operation interface.
Left click 【record】, enter record setting operation interface.
2. Exit the menu mode
Right click to exit the menu mode.
In the menu mode, right click to return to the previous menu (also for other
menus).
Menu basic operating instructions

Shortcut menu introduction
Click the right mouse button pop-up shortcut menu, shortcut menu consists of the following
three parts:
Preview mode: Select the preview mode in the menu bar you like.
Shortcut menu mode: In the menu bar wheel tour, video settings, add equipment, video playback,
PTZ settings and NVR image color, you can directly enter the appropriate menu.
Main menu : Click to enter after the 【Playback】, 【Export】, 【HDD】, 【Record】, 【Camera】
, 【Configuration】, 【Maintenance】, 【Shutdown】.
Record
1. HDD formatting, to ensure that the hard disk has been detected and work normally (you can check
status of HDD from menu “HDD”-”General”).
2. In the shortcut menu, click【Record】, enter the video settings interface, or in the main menu,
click the left mouse button 【Record】 to enter the video settings interface, NVR default all time
ordinary Video.

Playback
3. Set the motion detection video, check the "motion detection", then you can open the dynamic
detection of video, Everyday, you can set up to 6 intermittent scheduled time period. When colleagues
set up ordinary video and motion detection video at the same channel, there is a motion detection
occurs, you can query the motion detection video, then no ordinary.
Enter “Playback” interface by clicking “Playback” from shortcut or main menu, select channels and search
the record files and playback what you want.
or
Live View
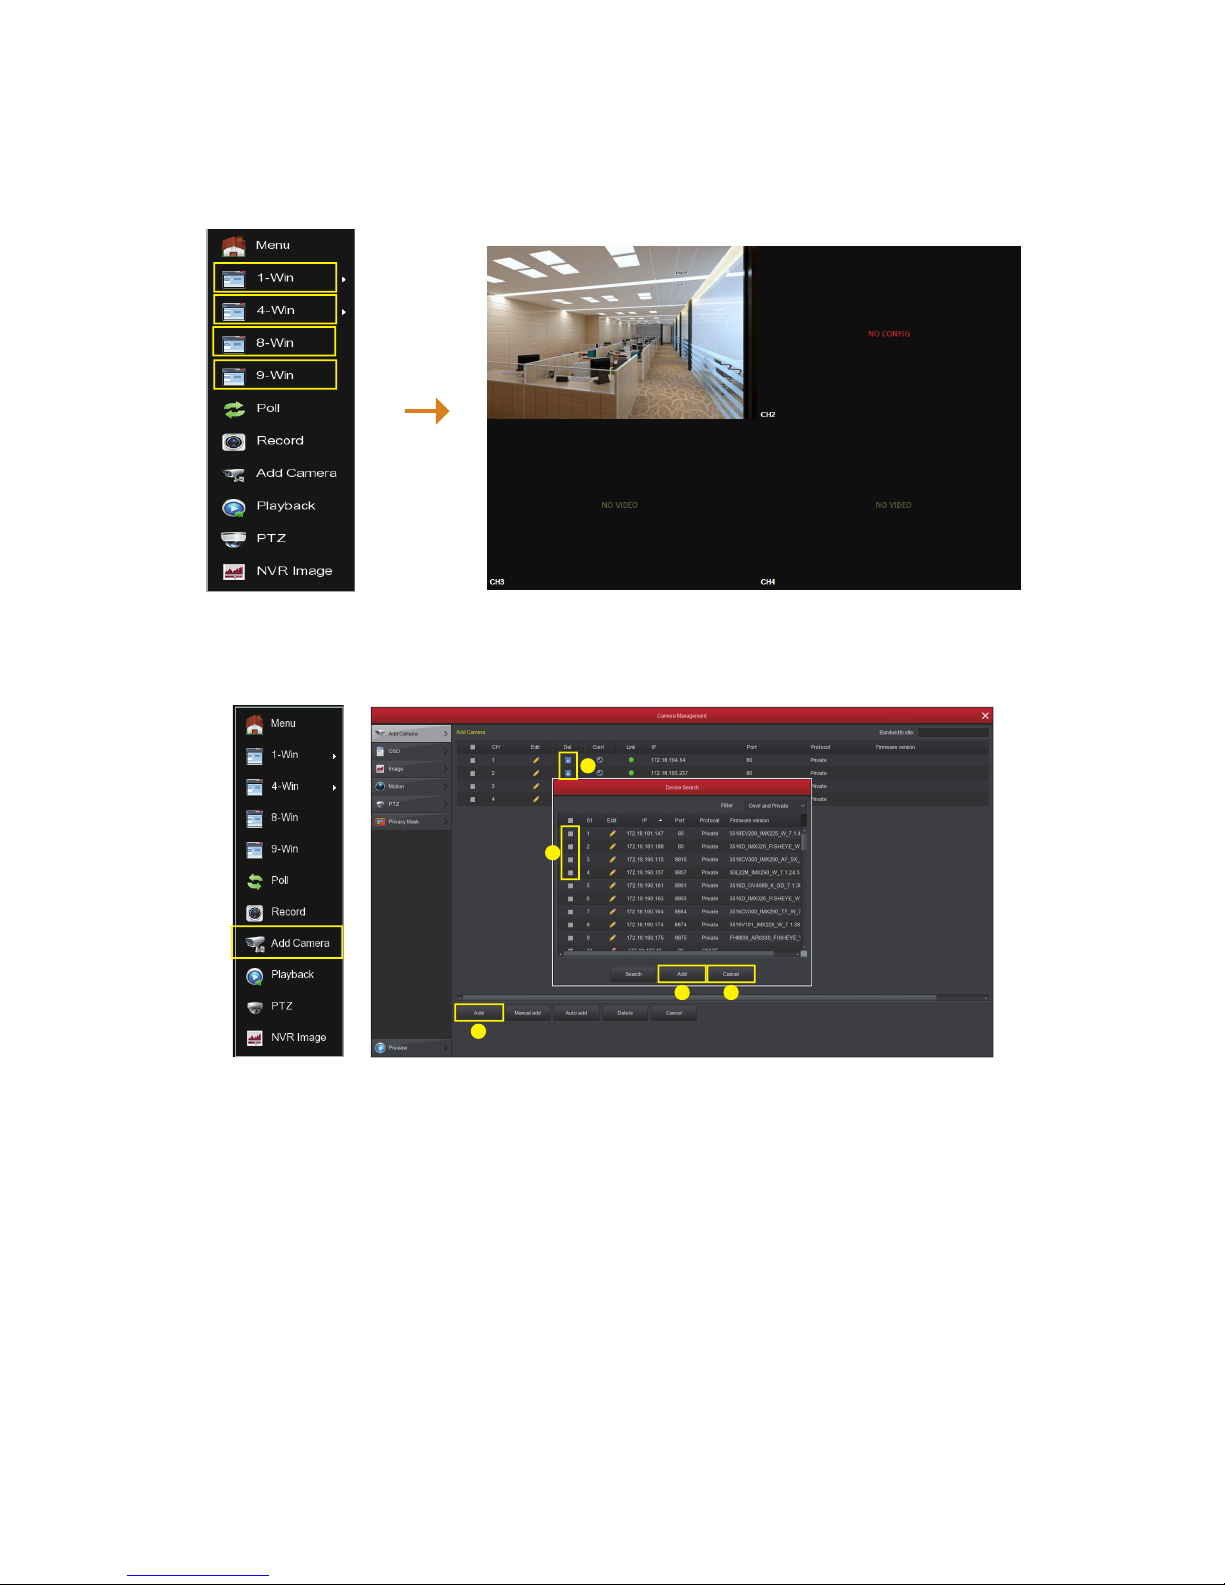
1. Left click【1-Win】/【4-Win】/【8-Win】/【9-Win】in the menu, and enter real time view interface,
can add one or more cameras monitor pictures at the same time.
2. POE kits default match cameras device, connect all the devices to NVR, power on, connect the
monitor device, then can real time preview, if you change the cameras default IP address, need to add
again the devices to the NVR.
As picture above, left click to enter adding device interface with the shortcut menu, or choose “Channel”
in the mainmenu-”Add Camera”
① Connect the NVR to the power supply, and the IPC connects to the POE network interface of the NVR
through the network cable without any additional power supply.
② If you have added the device, first deleted the device has been added; click “adding” in the menu,
enter adding device interface, this interface will search the device automatically and will show the device
that already searched.
③ Click on the menu button "add" to enter the add device interface, the interface automatically search
the device and display the device to search; click “Adding”
④ Check the equipment you want to add;
⑤ Click "add";
⑥ Click "Cancel" to return to the previous interface.
2
4
3
5 6
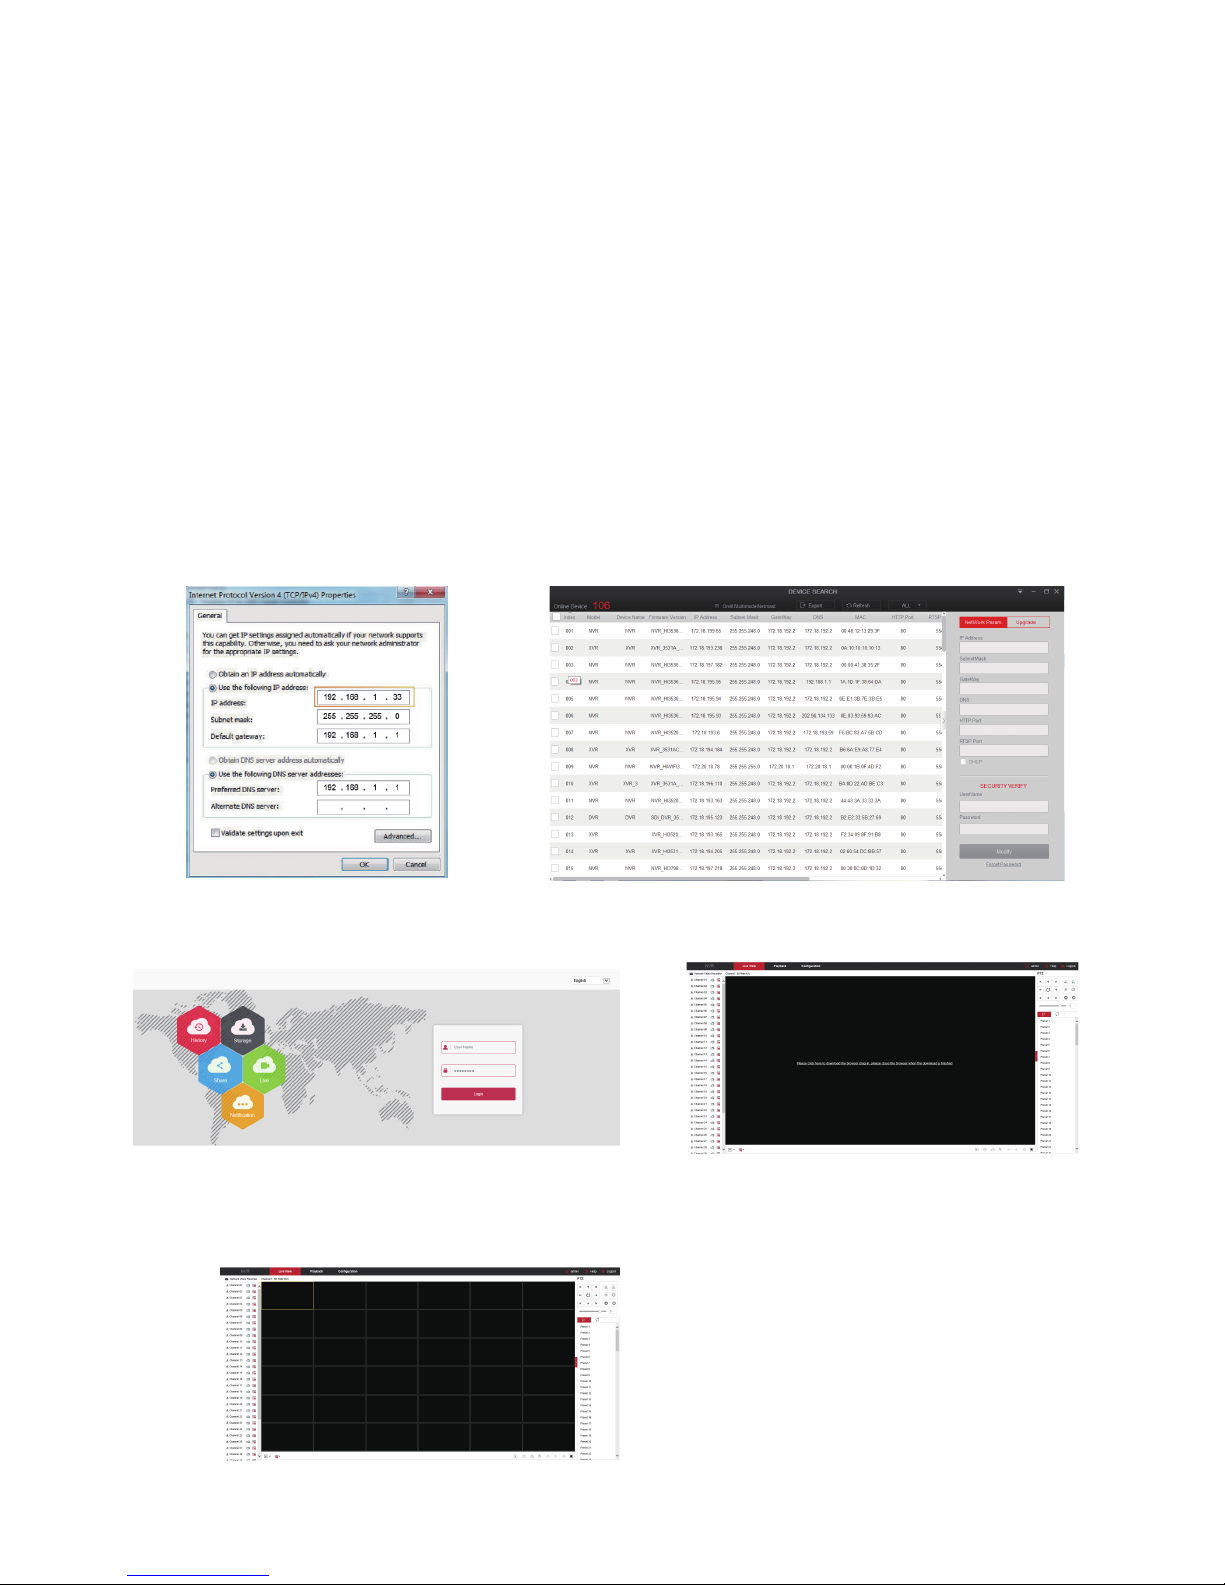
Webpage NVR Login
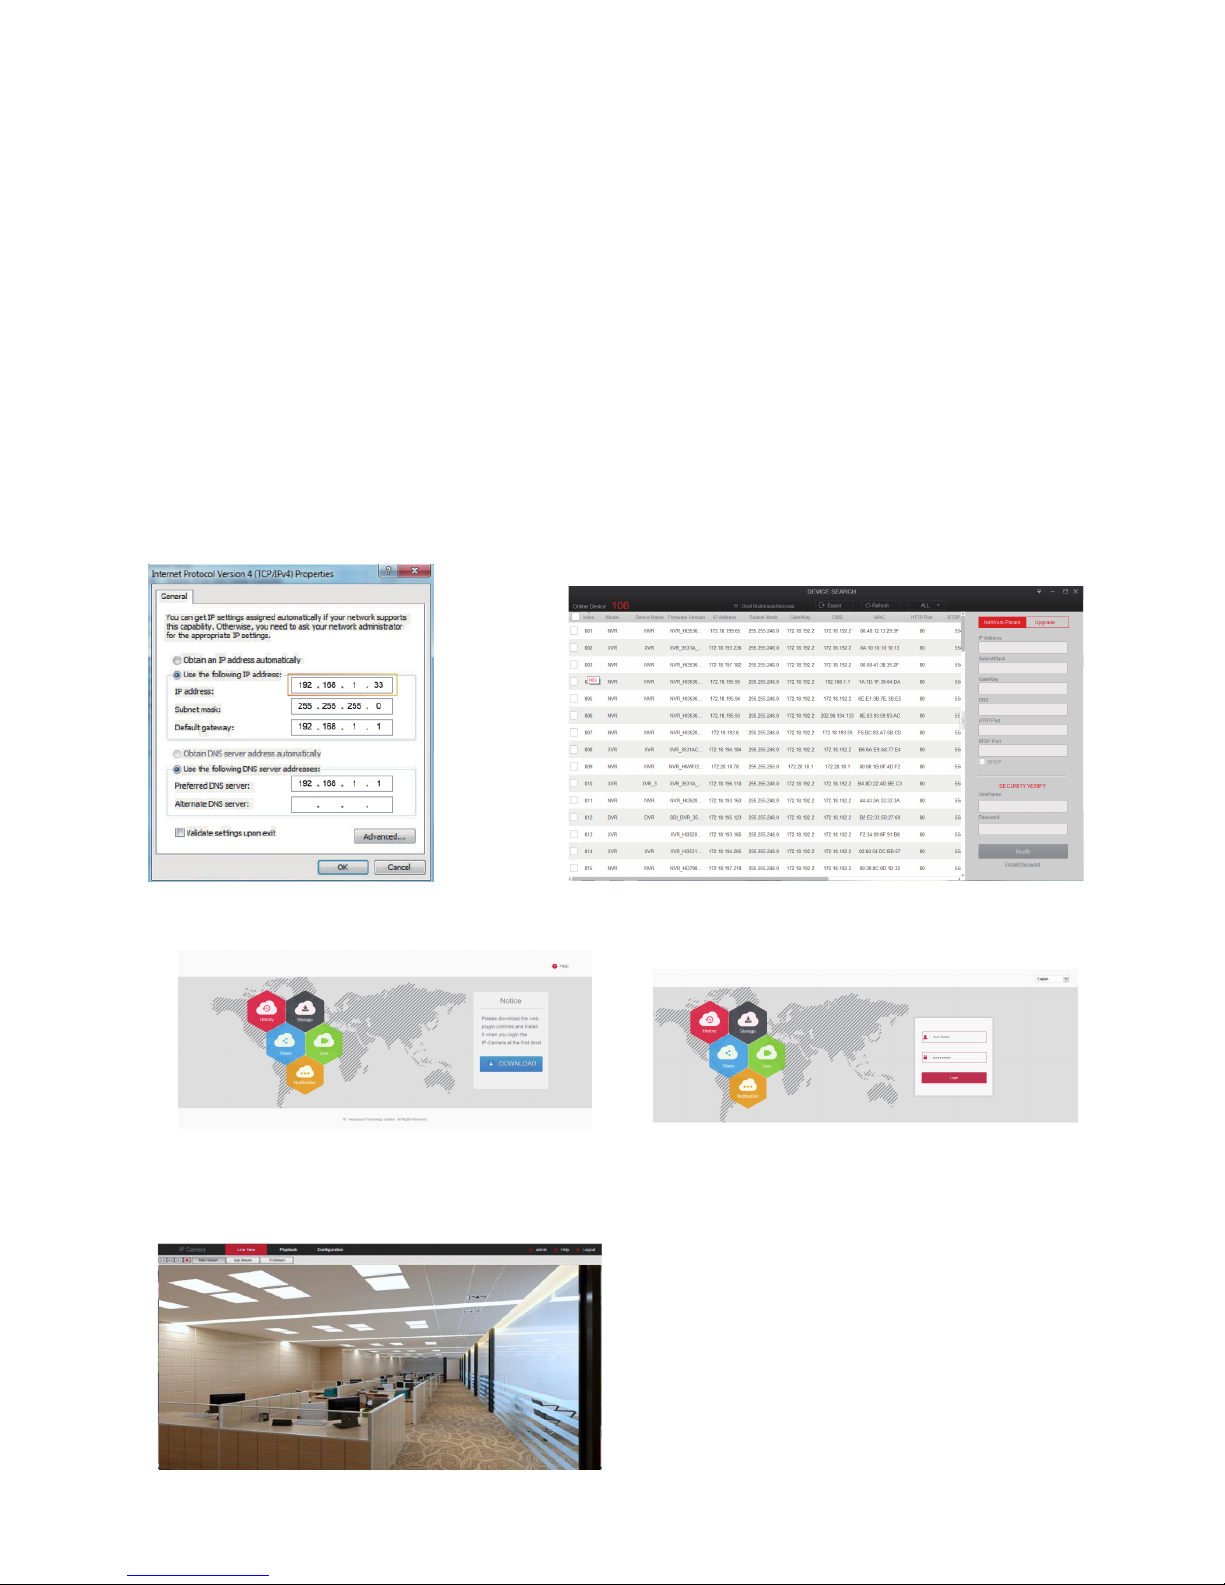
1. Login NVR LAN( Same router in same computer, also named intranet)
① Connect PC with LAN of NVR with internet, confirm NVR and computer with the same network
segment. If computer do not have the network segment, need add one same network segment with
NVR. For example: ‘192.168.1.33’( Note: NVR default IP address is 192.168.1.88).
② Open IE browser, choose Tool- internet item-safe-default level-ActiveX Controls and plug-ins, All
choose start using.
③ Search NVR or open IE Browser input NVR address through the Search Tool: for example
http://192.168.1.88( if NVR port 80 change to be other, need add the new port).
④ Login NVR Default User :admin, password : 12345
⑤ Preview NVR through PC ,Click player button in the bottom interface of ‘LiveVideo’.
① ③
④ ⑤-1
⑤-2
(Search Tool)
(First connect need download and install plugin)
2. Login IPC LAN( Same router in same computer, also named intranet)
① First set the PC's IP address and IPC for the same network segment, such as PC's IP can be set to
"192.168.1.104" (Note: IPC default address of 192.168.1.100 ~ 103).
② Open IE browser, choose Tool- internet item-safe-default level-ActiveX Controls and plug-ins, All
choose start using.
③ Search IPC or open IE Browser input IPC address through the Search Tool: for example
http://192.168.1.100( if NVR port 80 change to be other, need add the new port)
④ Login IPC,Default User :admin, password : admin
⑤ Preview ipc through PC,Click player button in the bottom interface of ‘LiveVideo’.
④-1 ④-2
⑤
(Search Tool)
(First connect need download and install plugin)
① ③

Mobile App Access
Download and install iVMS320 on smart phone by following way:
1. In the Android phone App Store or iPhone App Store enter “iVMS320” search, download and install.
2. Scan the following QR codes to download and install the App.
Android ios
3. Download from the following websites:
Android App: https://play.google.com/store/apps/details?id=com.gzch.lsplat.bitvision
iOS App: https://itunes.apple.com/app/id1443531590
Open iVMS320 App( New user please register an account ), follow up next steps to add the devices.
① ② ③ ④

① ② ③ ④
⑤ ⑥ ⑦ ⑧
① Click 【Device manage】in the sliding menu bar;
② Click【 】;
③ Click 【 Add device】;
④ Click 【SN Add】;
⑤ Scan the QR Code printed on the device sticker or posted on the P2P interface;
⑥ Enter device user name, password and Captcha (printed on the label), click 【Submit】;
⑦ Click 【Please set the device name】, enter the device name, click 【Done】; Click 【Please
choose a group】, choose camera group, click 【Done】, click 【Finish】;
⑧ Device added successfully.
The steps to preview the video are as follows:
① Click on the right part of the sliding menu to enter the main interface;
② Click 【Real time】, click 【 】to enter the “Device manage” interface.
③ Choose the device channel you want to preview, click【Done】.
④ Start to play the real-time video.
Table of contents
Other HeroSpeed Security System manuals


